在https://blog.csdn.net/jimmyleeee/article/details/156482413 中介绍了如何安装和使用Langfuse,本篇文章主要是介绍几种在代码里使用langfuse来跟踪使用Ollama进行query的几种方法。
第一种方法,使用Langfuse的start_as_current_observation方法手动控制需要Tracing的部分,示例代码如下:
python
import os
from langfuse import Langfuse
import ollama

# CORRECTED: Set the environment variables with proper key types
os.environ["LANGFUSE_PUBLIC_KEY"] = "pk-lf-xxxxxxxx"  # Public key starts with 'pk-lf'
os.environ["LANGFUSE_SECRET_KEY"] = "sk-lf-yyyyyyyy"  # Secret key starts with 'sk-lf'
os.environ["LANGFUSE_BASE_URL"] = "http://localhost:3000"

# Initialize Langfuse after setting environment variables
langfuse = Langfuse()

def ask_llm(query, model: str = "llama3.2"):
    response = ollama.chat(
        model=model,
        messages=[{"role": "user", "content": query}]
    )
    return response

# Create a span using a context manager
with langfuse.start_as_current_observation(as_type="span", name="process-request") as span:
    span.update(output="Processing starting")

    # Create a nested generation for an LLM call
    with langfuse.start_as_current_observation(as_type="generation", name="llm-response", model="llama3.2") as generation:
        generation.update(input="Hello, how are you?")
        response = ask_llm("Hello, how are you?")

        # Access the content correctly from the response
        generation.update(output=response['message']['content'])

    span.update(output="Processing completed")

# Flush events
langfuse.flush()
运行代码之后,可以查看LangFuse的UI:

这种方法是最基本的,也是最麻烦的,需要将每一个请求消息和响应消息都手动地更新。不过,却可以详细了解它的工作步骤与过程。
第二种方法,配置系统环境的相关环境变量之后,直接使用OpenAI的接口针对Ollama的API进行Query:
python
from langchain_ollama import ChatOllama

import os
from dotenv import load_dotenv
load_dotenv()


LANGFUSE_PUBLIC_KEY = os.getenv("LANGFUSE_PUBLIC_KEY")
LANGFUSE_SECRET_KEY = os.getenv("LANGFUSE_SECRET_KEY")

LANGFUSE_HOST = os.getenv("LANGFUSE_HOST", "http://localhost:3000")

# Drop-in replacement to get full logging by changing only the import
from langfuse.openai import OpenAI

# Configure the OpenAI client to use http://localhost:11434/v1 as base url
client = OpenAI(
    base_url = 'http://localhost:11434/v1',
    api_key='ollama', # required, but unused
)

response = client.chat.completions.create(
  model="qwen3:8b",
  messages=[
    {"role": "system", "content": "You are a helpful assistant."},
    {"role": "user", "content": "Who was the first person to step on the moon?"},
    {"role": "assistant", "content": "Neil Armstrong was the first person to step on the moon on July 20, 1969, during the Apollo 11 mission."},
    {"role": "user", "content": "What were his first words when he stepped on the moon?"}
  ]
)
print(response.choices[0].message.content)
UI跟踪的消息如下图所示:
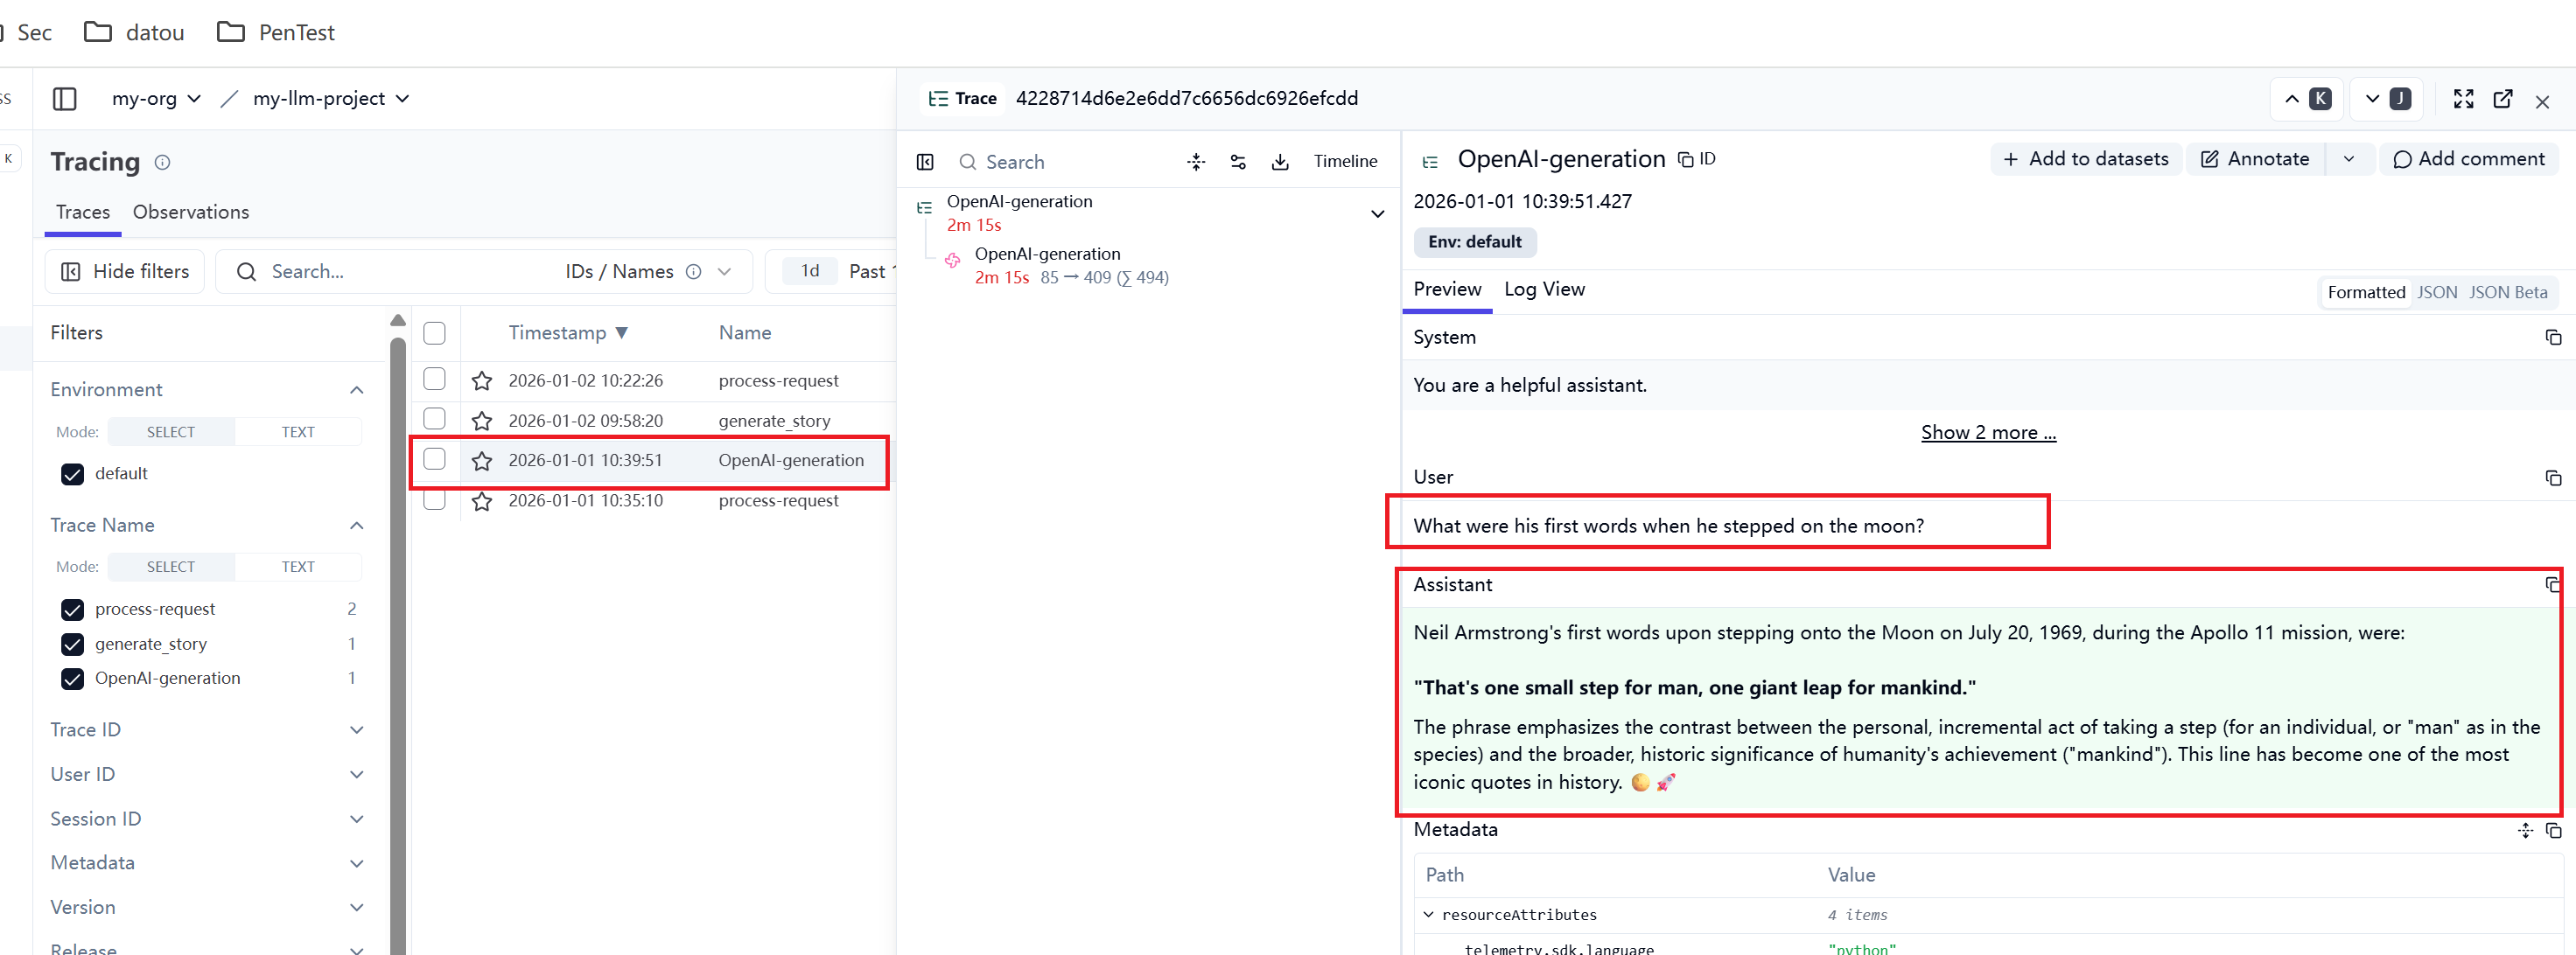
这种方法会控制针对所有的Query都进行追踪。不能有针对性地针对某些Query进行跟踪,如果系统有大量的Query,而想控制只跟踪某些类型的query,就比较难以控制了。
第三种方法,使用observe装饰器,前提也是必须要配置好环境变量LANGFUSE_PUBLIC_KEY、LANGFUSE_SECRET_KEY和LANGFUSE_HOST。
observe 是 Langfuse 提供的一个装饰器(decorator),它可以自动跟踪函数的执行,包括:
-
输入参数
-
返回值
-
执行时间
-
错误信息
-
调用链关系
它能够实现以下功能:
1. 自动跟踪
只需在函数前添加 @observe() 装饰器,即可自动记录函数执行。
2. 简化代码
不需要手动创建 span/trace,装饰器会自动处理。
3. 智能上下文管理
自动管理 OpenTelemetry 上下文,避免上下文错误。
4. 集成到现有代码
可以轻松添加到现有的函数中,无需重写。
python
from langfuse import observe
@observe()  # Decorator to automatically create a trace and nest generations
def generate_story():
    completion = client.chat.completions.create(
        name="story-generator",
        model="qwen3:8b",
        messages=[
            {"role": "system", "content": "You are a creative storyteller."},
            {"role": "user", "content": "Tell me a short story about a token that got lost on its way to the language model. Answer in 100 words or less."}
        ],
        metadata={"genre": "adventure"},
    )
    return completion.choices[0].message.content

story = generate_story()
print(story)
UI跟踪的消息如下图所示:

使用oberve可以有针对性的针对某些功能的消息进行跟踪,而且容易控制。只需要添加装饰器@oberve即可,不想跟踪了,只需要删除装饰器,非常方便。
更多使用方法可以参考:
https://langfuse.com/docs/observability/sdk/instrumentation#custom-instrumentation