上一篇参考:
1. 简介
上一篇实现了将文字转换成ACII艺术字,但是同事有个要求,他是一个Ikun,非常想将打篮球的图变成ASCII艺术字,不知道怎么实现。
我瞅了下,其实都是使用Pillow库的,那么就尝试实现一下吧。
2. 技术细节
给定一张图,提取出人物,然后转换为ASCII
2.1 三种提取方法,总有一种适合你
程序提供了三种人物剪影提取方法:
-
threshold - 阈值分割法:简单粗暴,适合背景简单的照片
-
grabcut - GrabCut算法:比较智能,适合复杂背景
-
deep - 深度学习模型:最准确,但需要安装rembg
class SilhouetteViewer:
def init(self):
self.original_image = None
self.silhouette = None
self.mask = None
self.method_used = ""
人物提取
python
def _extract_with_grabcut(self):
    """使用GrabCut算法提取剪影"""
    self.method_used = "GrabCut算法"

    # 创建掩码,告诉AI"这是背景,这是前景"
    mask = np.zeros(self.original_image.shape[:2], np.uint8)
    bgd_model = np.zeros((1, 65), np.float64)
    fgd_model = np.zeros((1, 65), np.float64)

    # 定义矩形(假设人物在中央,AI:我猜的,对了算我牛逼)
    height, width = self.original_image.shape[:2]
    rect = (width // 4, height // 4, width // 2, height // 2)

    # 应用GrabCut(AI:我尽力了)
    cv2.grabCut(self.original_image, mask, rect, bgd_model, fgd_model, 5, cv2.GC_INIT_WITH_RECT)
2.2 字符画生成
python
def silhouette_to_ascii(silhouette, char='*', width=80, threshold=128):
    """将剪影转换为字符画"""
    if silhouette is None:
        return ["无剪影数据"]  # AI:我也不知道怎么处理

    # 调整大小,毕竟字符画不能太大(手机屏幕不够用)
    height, orig_width = silhouette.shape
    new_height = int(height * width / orig_width * 0.5)

    resized = cv2.resize(silhouette, (width, new_height))

    # 生成字符画(像素值 > 阈值 = 字符,否则 = 空格)
    output_lines = []
    for y in range(new_height):
        line = ""
        for x in range(width):
            if resized[y, x] > threshold:
                line += char
            else:
                line += " "
        output_lines.append(line)

    return output_lines
3. 完整代码显示
python
import cv2
import numpy as np
from PIL import Image
import matplotlib.pyplot as plt
import os
class SilhouetteViewer:
def __init__(self):
self.original_image = None
self.silhouette = None
self.mask = None
self.method_used = ""
def load_and_show_image(self, image_path):
"""加载并显示原始图片"""
# 读取图片
self.original_image = cv2.imread(image_path)
if self.original_image is None:
raise ValueError(f"无法读取图片: {image_path}")
# 转换为RGB
self.original_image = cv2.cvtColor(self.original_image, cv2.COLOR_BGR2RGB)
# 显示原始图片
plt.figure(figsize=(10, 6))
plt.subplot(2, 3, 1)
plt.imshow(self.original_image)
plt.title('原始图片')
plt.axis('off')
return self.original_image
def extract_and_show_silhouette(self, image_path, method='auto'):
"""
提取并显示人物剪影
"""
# 加载图片
self.load_and_show_image(image_path)
# 根据方法提取剪影
if method == 'threshold':
self._extract_with_threshold()
elif method == 'grabcut':
self._extract_with_grabcut()
elif method == 'deep':
self._extract_with_deep(image_path)
else: # auto
# 尝试GrabCut,失败则用阈值
try:
self._extract_with_grabcut()
except:
self._extract_with_threshold()
# 显示处理过程
self._display_processing_steps()
# 显示最终剪影
self._display_final_silhouette()
plt.tight_layout()
plt.show()
return self.silhouette, self.mask
def _extract_with_threshold(self):
"""使用阈值方法提取剪影"""
self.method_used = "阈值分割法"
# 转换为灰度
gray = cv2.cvtColor(self.original_image, cv2.COLOR_RGB2GRAY)
# 使用大津算法自动计算阈值
_, binary = cv2.threshold(gray, 0, 255, cv2.THRESH_BINARY + cv2.THRESH_OTSU)
# 取反(假设人物比背景暗)
if np.mean(binary[binary > 0]) > 127:
binary = 255 - binary
# 形态学操作去除噪声
kernel = np.ones((3, 3), np.uint8)
binary = cv2.morphologyEx(binary, cv2.MORPH_OPEN, kernel)
binary = cv2.morphologyEx(binary, cv2.MORPH_CLOSE, kernel)
self.silhouette = binary
self.mask = binary > 0
# 显示灰度图和二值化结果
plt.subplot(2, 3, 2)
plt.imshow(gray, cmap='gray')
plt.title('灰度图')
plt.axis('off')
plt.subplot(2, 3, 3)
plt.imshow(binary, cmap='gray')
plt.title('二值化结果')
plt.axis('off')
def _extract_with_grabcut(self):
"""使用GrabCut算法提取剪影"""
self.method_used = "GrabCut算法"
# 创建掩码
mask = np.zeros(self.original_image.shape[:2], np.uint8)
bgd_model = np.zeros((1, 65), np.float64)
fgd_model = np.zeros((1, 65), np.float64)
# 定义矩形(假设人物在中央)
height, width = self.original_image.shape[:2]
rect = (width // 4, height // 4, width // 2, height // 2)
# 应用GrabCut
cv2.grabCut(self.original_image, mask, rect, bgd_model, fgd_model, 5, cv2.GC_INIT_WITH_RECT)
# 创建最终掩码
mask2 = np.where((mask == 2) | (mask == 0), 0, 1).astype('uint8') * 255
self.silhouette = mask2
self.mask = mask2 > 0
# 显示GrabCut中间结果
plt.subplot(2, 3, 2)
plt.imshow(mask, cmap='gray')
plt.title('GrabCut初始掩码')
plt.axis('off')
plt.subplot(2, 3, 3)
plt.imshow(mask2, cmap='gray')
plt.title('GrabCut结果')
plt.axis('off')
def _extract_with_deep(self, image_path):
"""使用深度学习模型提取剪影"""
self.method_used = "深度学习模型"
try:
from rembg import remove
# 使用rembg去除背景
input_image = Image.open(image_path)
output_image = remove(input_image)
output_image = output_image.convert('RGBA')
rgba_array = np.array(output_image)
if rgba_array.shape[2] == 4:
alpha_channel = rgba_array[:, :, 3]
mask = alpha_channel > 0
# 创建剪影
silhouette = np.zeros(rgba_array.shape[:2], dtype=np.uint8)
silhouette[mask] = 255
self.silhouette = silhouette
self.mask = mask
else:
raise ValueError("深度学习提取失败")
# 显示去除背景的结果
plt.subplot(2, 3, 2)
plt.imshow(output_image)
plt.title('去除背景')
plt.axis('off')
plt.subplot(2, 3, 3)
plt.imshow(silhouette, cmap='gray')
plt.title('Alpha通道掩码')
plt.axis('off')
except ImportError:
print("未安装rembg,使用阈值方法")
self._extract_with_threshold()
def _display_processing_steps(self):
"""显示处理步骤"""
# 应用掩码的图片
masked_img = self.original_image.copy()
if self.mask is not None:
masked_img[~self.mask] = [255, 255, 255] # 背景设为白色
plt.subplot(2, 3, 4)
plt.imshow(masked_img)
plt.title('提取的人物')
plt.axis('off')
# 纯剪影
plt.subplot(2, 3, 5)
if self.silhouette is not None:
plt.imshow(self.silhouette, cmap='gray')
plt.title('纯剪影')
plt.axis('off')
def _display_final_silhouette(self):
"""显示最终剪影效果"""
# 创建对比图:原始 vs 剪影
plt.subplot(2, 3, 6)
if self.silhouette is not None:
# 将剪影转换为彩色以便对比
silhouette_color = cv2.cvtColor(self.silhouette, cv2.COLOR_GRAY2RGB)
# 并排显示
comparison = np.hstack([self.original_image, silhouette_color])
plt.imshow(comparison)
plt.title('原始 vs 剪影')
plt.axis('off')
# 在图上添加文字说明
plt.figtext(0.5, 0.01, f"使用方法: {self.method_used}",
ha='center', fontsize=12, bbox=dict(boxstyle="round,pad=0.3", facecolor="yellow", alpha=0.5))
def silhouette_to_ascii(silhouette, char='*', width=80, threshold=128):
"""将剪影转换为字符画"""
if silhouette is None:
return ["无剪影数据"]
# 调整大小
height, orig_width = silhouette.shape
new_height = int(height * width / orig_width * 0.5)
resized = cv2.resize(silhouette, (width, new_height))
# 生成字符画
output_lines = []
for y in range(new_height):
line = ""
for x in range(width):
if resized[y, x] > threshold:
line += char
else:
line += " "
output_lines.append(line)
# 裁剪空白
output_lines = trim_whitespace(output_lines)
return output_lines
def trim_whitespace(lines):
"""裁剪空白行和列"""
if not lines:
return lines
# 移除顶部空白行
while lines and all(c == ' ' for c in lines[0]):
lines.pop(0)
# 移除底部空白行
while lines and all(c == ' ' for c in lines[-1]):
lines.pop()
if not lines:
return lines
# 移除左侧空白列
min_left = len(lines[0])
for line in lines:
for i, c in enumerate(line):
if c != ' ':
min_left = min(min_left, i)
break
# 移除右侧空白列
max_right = 0
for line in lines:
for i in range(len(line) - 1, -1, -1):
if line[i] != ' ':
max_right = max(max_right, i)
break
# 裁剪每一行
trimmed_lines = []
for line in lines:
if min_left <= max_right:
trimmed_lines.append(line[min_left:max_right + 1])
else:
trimmed_lines.append(line)
return trimmed_lines
def main():
"""主程序"""
print("=" * 70)
print("人物剪影提取与字符画生成器")
print("=" * 70)
# 创建查看器
viewer = SilhouetteViewer()
# 获取输入
image_path = input("请输入图片路径: ").strip()
# 检查文件是否存在
if not image_path or not os.path.exists(image_path):
print("图片不存在,创建示例图片...")
# 创建一个示例图片
create_sample_image()
image_path = "sample_person.jpg"
print(f"已创建示例图片: {image_path}")
# 选择提取方法
print("\n选择剪影提取方法:")
print("1. 自动选择 (推荐)")
print("2. 阈值分割 (适合简单背景)")
print("3. GrabCut算法 (适合复杂背景)")
print("4. 深度学习 (需要安装rembg,最准确)")
method_choice = input("请选择 (1-4, 默认:1): ").strip() or "1"
methods = {
'1': 'auto',
'2': 'threshold',
'3': 'grabcut',
'4': 'deep'
}
method = methods.get(method_choice, 'auto')
print(f"\n使用 {method} 方法提取剪影...")
print("正在显示处理结果...")
try:
# 提取并显示剪影
silhouette, mask = viewer.extract_and_show_silhouette(image_path, method)
# 询问用户是否满意
print("\n" + "-" * 70)
satisfaction = input("剪影效果是否满意? (y/n): ").lower()
if satisfaction != 'y':
print("重新选择提取方法...")
return main() # 重新开始
# 生成字符画
print("\n生成字符画...")
char = input("请输入要使用的字符 (默认:*): ").strip() or "*"
width = int(input("请输入字符画宽度 (默认:80): ").strip() or 80)
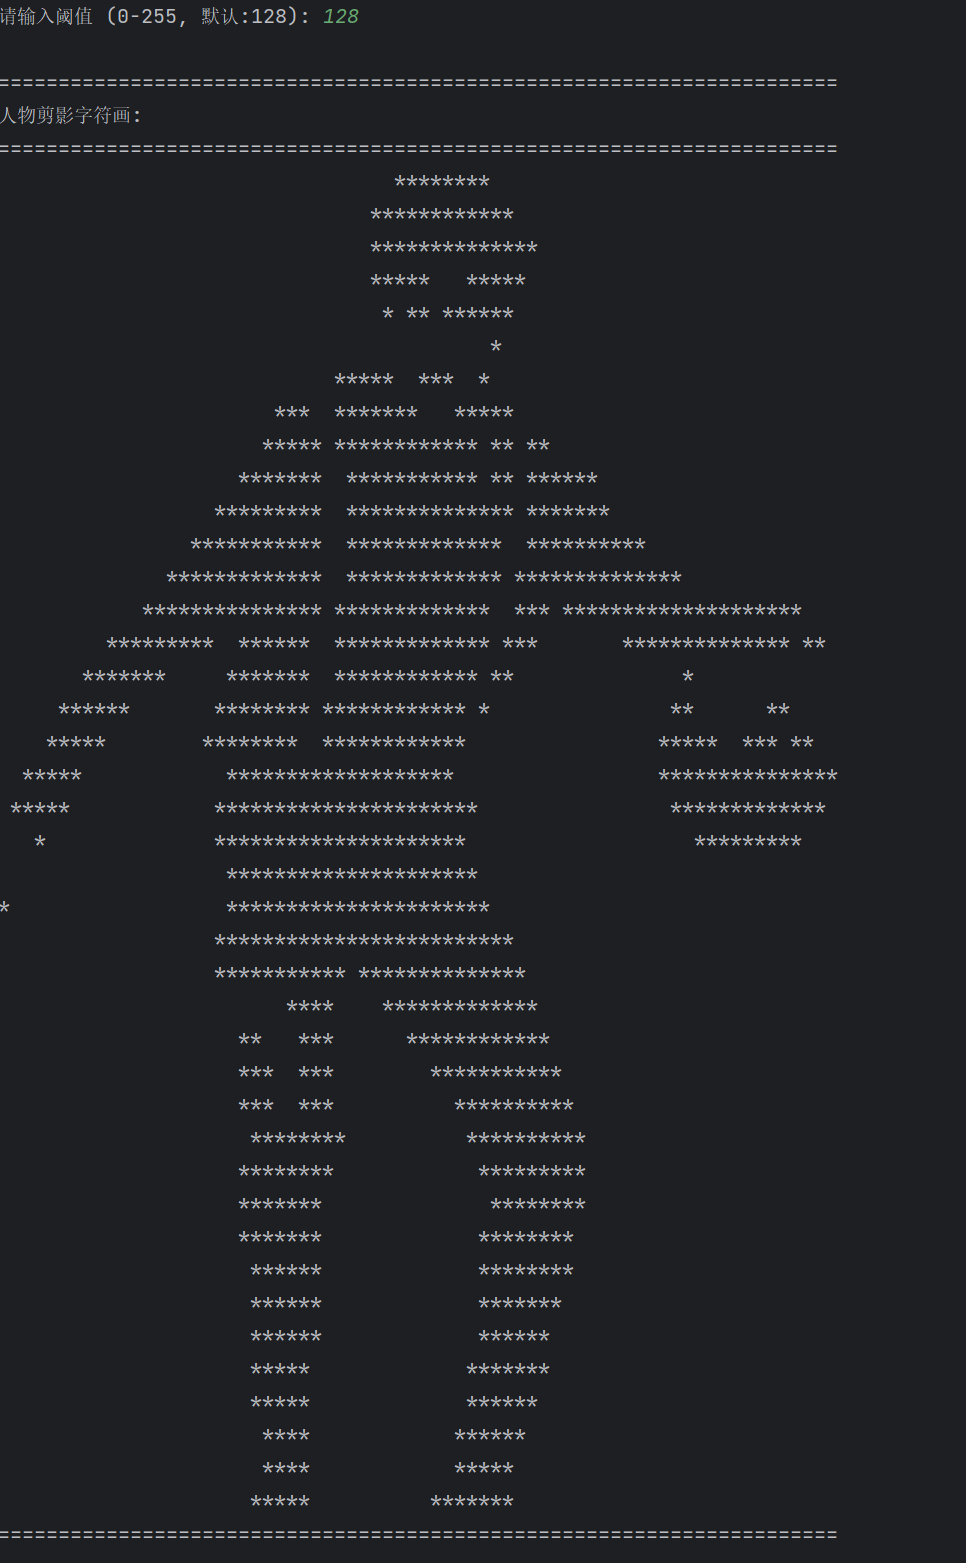
threshold = int(input("请输入阈值 (0-255, 默认:128): ").strip() or 128)
ascii_art = silhouette_to_ascii(silhouette, char, width, threshold)
# 显示字符画
if ascii_art:
output_width = max(len(line) for line in ascii_art)
print("\n" + "=" * output_width)
print("人物剪影字符画:")
print("=" * output_width)
for line in ascii_art:
print(line)
print("=" * output_width)
# 保存选项
save = input("\n是否保存字符画到文件? (y/n): ").lower()
if save == 'y':
filename = input("文件名 (默认: silhouette_art.txt): ").strip() or "silhouette_art.txt"
with open(filename, 'w', encoding='utf-8') as f:
f.write('\n'.join(ascii_art))
print(f"已保存到 {filename}")
# 是否保存剪影图片
save_img = input("\n是否保存剪影图片? (y/n): ").lower()
if save_img == 'y':
img_filename = input("图片文件名 (默认: silhouette.png): ").strip() or "silhouette.png"
cv2.imwrite(img_filename, silhouette)
print(f"剪影图片已保存到 {img_filename}")
else:
print("未能生成有效的字符画")
except Exception as e:
print(f"处理失败: {e}")
import traceback
traceback.print_exc()
def create_sample_image():
"""创建示例图片"""
# 创建一个白色背景的图片
img = np.ones((400, 300, 3), dtype=np.uint8) * 255
# 画一个人物剪影
# 头部
cv2.circle(img, (150, 100), 40, (0, 0, 0), -1)
# 身体
cv2.rectangle(img, (120, 140), (180, 250), (0, 0, 0), -1)
# 左臂
cv2.line(img, (120, 160), (80, 200), (0, 0, 0), 20)
# 右臂
cv2.line(img, (180, 160), (220, 200), (0, 0, 0), 20)
# 左腿
cv2.line(img, (140, 250), (130, 320), (0, 0, 0), 20)
# 右腿
cv2.line(img, (160, 250), (170, 320), (0, 0, 0), 20)
# 保存图片
cv2.imwrite("sample_person.jpg", cv2.cvtColor(img, cv2.COLOR_RGB2BGR))
def interactive_demo():
"""交互式演示"""
print("\n" + "=" * 70)
print("人物剪影提取演示")
print("=" * 70)
while True:
print("\n选项:")
print("1. 处理新图片")
print("2. 查看示例")
print("3. 退出")
choice = input("请选择 (1-3): ").strip()
if choice == '1':
main()
elif choice == '2':
# 显示示例
show_examples()
elif choice == '3':
print("再见!")
break
else:
print("无效选择,请重试")
def show_examples():
"""显示示例"""
print("\n示例效果:")
# 创建示例图片
create_sample_image()
# 处理示例图片
viewer = SilhouetteViewer()
silhouette, mask = viewer.extract_and_show_silhouette("sample_person.jpg", "threshold")
# 生成字符画示例
print("\n生成字符画示例...")
ascii_art = silhouette_to_ascii(silhouette, '*', 60, 128)
if ascii_art:
output_width = max(len(line) for line in ascii_art)
print("\n" + "=" * output_width)
print("示例字符画:")
print("=" * output_width)
for line in ascii_art:
print(line)
print("=" * output_width)
if __name__ == "__main__":
# 检查依赖
try:
import cv2
import numpy as np
from PIL import Image
import matplotlib.pyplot as plt
# 设置matplotlib中文字体(如果有中文的话)
try:
plt.rcParams['font.sans-serif'] = ['SimHei']
plt.rcParams['axes.unicode_minus'] = False
except:
pass
# 启动交互式演示
interactive_demo()
except ImportError as e:
print(f"缺少依赖库: {e}")
print("\n请安装以下库:")
print("pip install opencv-python pillow numpy matplotlib")
print("\n如需深度学习功能,请安装:")
print("pip install rembg onnxruntime")4. 效果展示
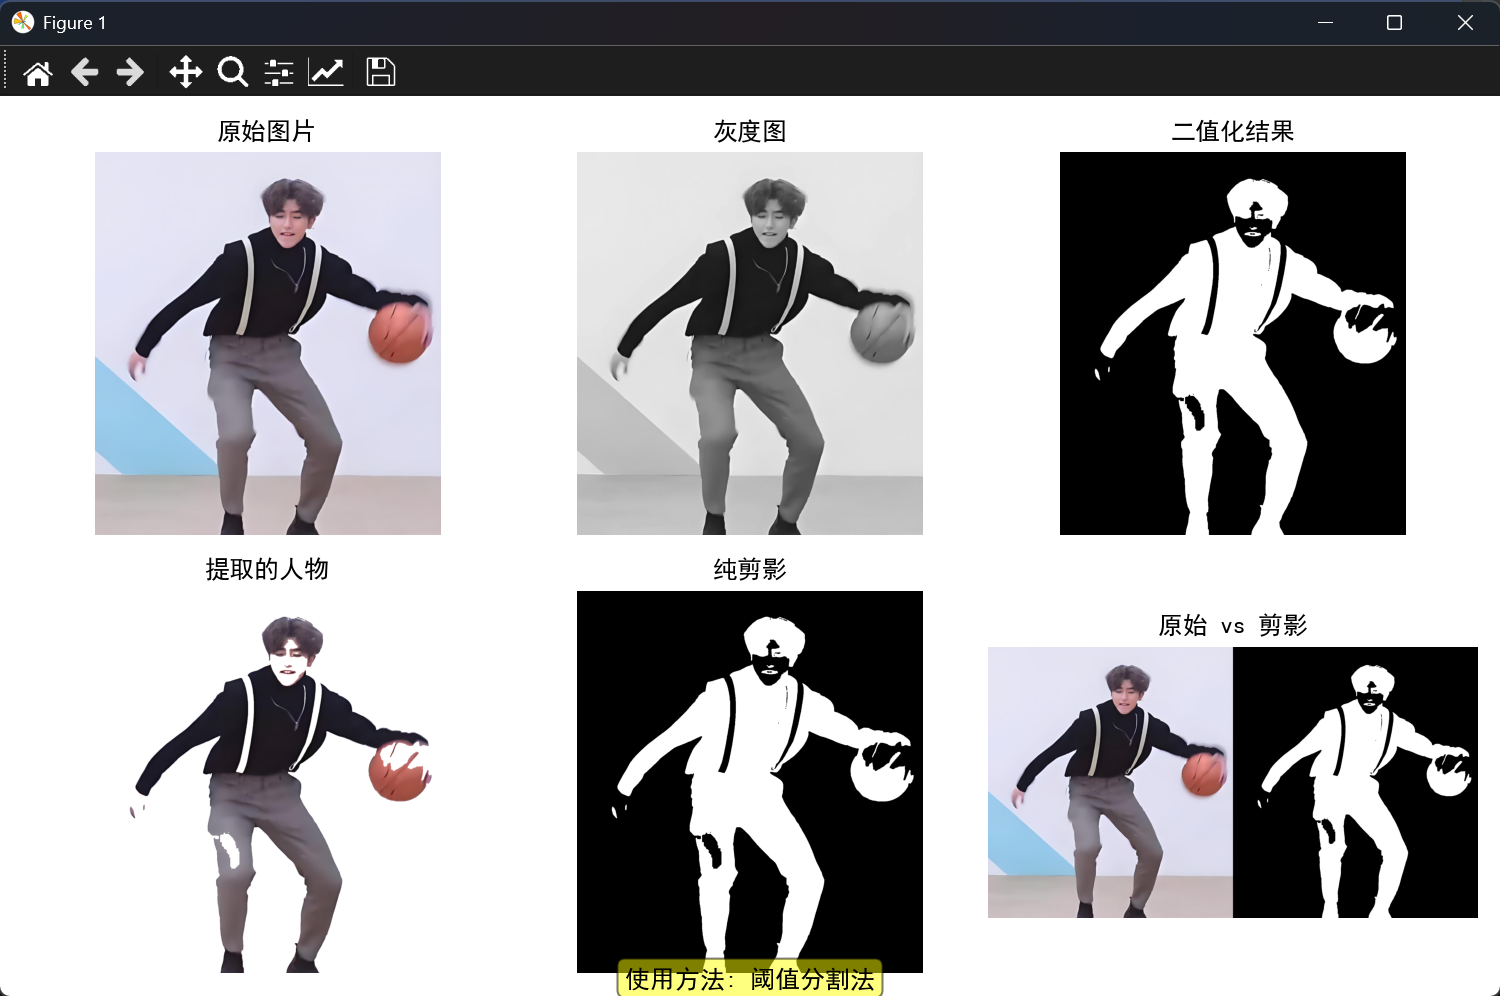
示例图如下:

使用阈值分割得到的剪影图如下:
最终结果: