目录
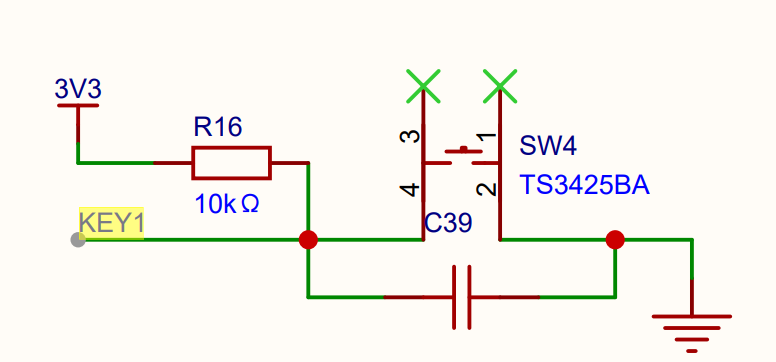
没按下时KEY1连接R16到3V3,所以没按下时是高电平,按下时导通到GND,按下是低电平
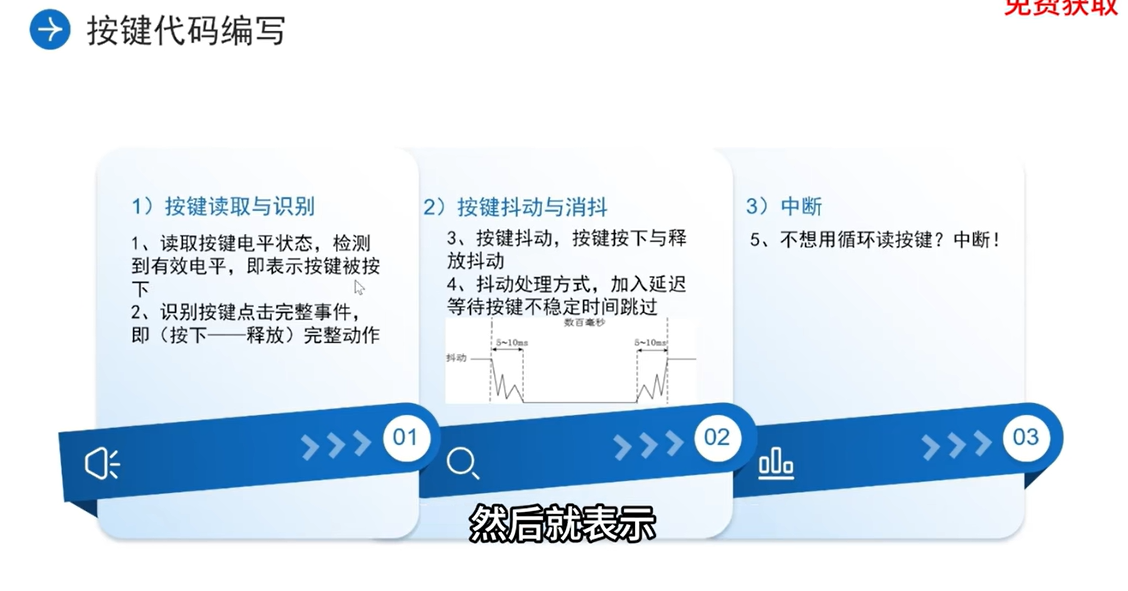
按键是输入,
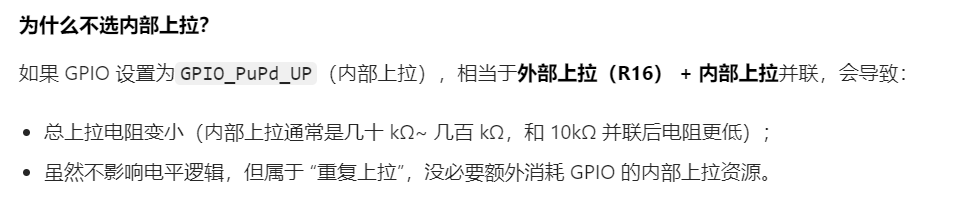
按键对应的GPIO这个不需要设置上拉和下拉

cpp
#include <stdint.h>
#include "stm32f4xx.h"

int main(void)
{
		// KEY1 PA0 KEY2 PC4 KEY3 PC5
		RCC_AHB1PeriphClockCmd(RCC_AHB1Periph_GPIOA,ENABLE);
		RCC_AHB1PeriphClockCmd(RCC_AHB1Periph_GPIOC,ENABLE);

		GPIO_InitTypeDef GPIO_InitStruct;
		GPIO_StructInit(&GPIO_InitStruct);
		GPIO_InitStruct.GPIO_Mode=GPIO_Mode_IN; //输入
		GPIO_InitStruct.GPIO_PuPd=GPIO_PuPd_NOPULL;
		GPIO_InitStruct.GPIO_Speed=GPIO_Medium_Speed;

		GPIO_InitStruct.GPIO_Pin=GPIO_Pin_0;
		GPIO_Init(GPIOA,&GPIO_InitStruct);

		GPIO_InitStruct.GPIO_Pin=GPIO_Pin_4 | GPIO_Pin_5;
		GPIO_Init(GPIOC,&GPIO_InitStruct);


	  while(1)
		{
				uint8_t key1=GPIO_ReadInputDataBit(GPIOA,GPIO_Pin_0);
				if(key1==Bit_RESET)
				{
						//按键被按下
						for(int i=0;i<100;i++);
				}
		}
}
按键LED
main.c
cpp
#include <stdint.h>
#include "stm32f4xx.h"
#include "led.h"

int main(void)
{
		// KEY1 PA0 KEY2 PC4 KEY3 PC5
		RCC_AHB1PeriphClockCmd(RCC_AHB1Periph_GPIOA,ENABLE);
		RCC_AHB1PeriphClockCmd(RCC_AHB1Periph_GPIOC,ENABLE);

		//开启LED灯时钟
		RCC_AHB1PeriphClockCmd(RCC_AHB1Periph_GPIOE,ENABLE);
		RCC_AHB1PeriphClockCmd(RCC_AHB1Periph_GPIOB,ENABLE);

		GPIO_InitTypeDef GPIO_InitStruct;
		GPIO_StructInit(&GPIO_InitStruct);
		GPIO_InitStruct.GPIO_Mode=GPIO_Mode_IN; //输入
		GPIO_InitStruct.GPIO_PuPd=GPIO_PuPd_NOPULL;
		GPIO_InitStruct.GPIO_Speed=GPIO_Medium_Speed;

		GPIO_InitStruct.GPIO_Pin=GPIO_Pin_0;
		GPIO_Init(GPIOA,&GPIO_InitStruct);

		GPIO_InitStruct.GPIO_Pin=GPIO_Pin_4 | GPIO_Pin_5;
		GPIO_Init(GPIOC,&GPIO_InitStruct);

		led_init();


	  while(1)
		{
				led_all_off();

				uint8_t key1=GPIO_ReadInputDataBit(GPIOA,GPIO_Pin_0);
				if(key1==Bit_RESET)
				{
						led_on(1);
				}
				uint8_t key2=GPIO_ReadInputDataBit(GPIOC,GPIO_Pin_4);
				if(key2==Bit_RESET)
				{
						led_on(2);
				}
				uint8_t key3=GPIO_ReadInputDataBit(GPIOC,GPIO_Pin_5);
				if(key3==Bit_RESET)
				{
						led_on(3);
				}
		}
}
led.h
cpp
#ifndef __LED_H__
#define __LED_H__

#include <stdbool.h>
#include <stdint.h>

void led_init(void);
void led_set(uint8_t idx, bool onoff);
void led_on(uint8_t idx);
void led_off(uint8_t idx);
void led_all_off(void);

#endif /* __LED_H__ */
led.c
cpp
#include <stdbool.h>
#include "stm32f4xx.h"

// LED1: PE9
// LED2: PB1
// LED3: PB0

#define LED1_PORT   GPIOE
#define LED1_PIN    GPIO_Pin_9
#define LED2_PORT   GPIOB
#define LED2_PIN    GPIO_Pin_1
#define LED3_PORT   GPIOB
#define LED3_PIN    GPIO_Pin_0

void led_init(void)
{

    GPIO_InitTypeDef GPIO_InitStructure;
    GPIO_StructInit(&GPIO_InitStructure);
    GPIO_InitStructure.GPIO_Mode = GPIO_Mode_OUT;
    GPIO_InitStructure.GPIO_OType = GPIO_OType_PP;
    GPIO_InitStructure.GPIO_Speed = GPIO_High_Speed;
    GPIO_InitStructure.GPIO_PuPd = GPIO_PuPd_NOPULL;

    GPIO_InitStructure.GPIO_Pin = LED1_PIN;
    GPIO_Init(LED1_PORT, &GPIO_InitStructure);

    GPIO_InitStructure.GPIO_Pin = LED2_PIN;
    GPIO_Init(LED2_PORT, &GPIO_InitStructure);

    GPIO_InitStructure.GPIO_Pin = LED3_PIN;
    GPIO_Init(LED3_PORT, &GPIO_InitStructure);
}

void led_set(uint8_t idx, bool onoff)
{
    switch (idx)
    {
        case 1:
            GPIO_WriteBit(LED1_PORT, LED1_PIN, onoff ? Bit_RESET : Bit_SET);
            break;
        case 2:
            GPIO_WriteBit(LED2_PORT, LED2_PIN, onoff ? Bit_RESET : Bit_SET);
            break;
        case 3:
            GPIO_WriteBit(LED3_PORT, LED3_PIN, onoff ? Bit_RESET : Bit_SET);
            break;
        default:
            break;
    }
}

void led_on(uint8_t idx)
{
    led_set(idx, true);
}

void led_off(uint8_t idx)
{
    led_set(idx, false);
}

void led_all_off(void)
{
    led_set(1, false);
    led_set(2, false);
    led_set(3, false);
}
按键串口
cpp
#include <stdint.h>
#include <string.h>
#include "stm32f4xx.h"


static void usart_init(void)
{
		//初始化GPIO的引脚 TX GPIOA9 RX GPIOA10
		GPIO_InitTypeDef GPIO_InitStructure;
		GPIO_StructInit(&GPIO_InitStructure);
		GPIO_InitStructure.GPIO_Mode = GPIO_Mode_AF;
		GPIO_InitStructure.GPIO_Pin = GPIO_Pin_9 | GPIO_Pin_10;
		GPIO_InitStructure.GPIO_PuPd=GPIO_PuPd_UP;
		GPIO_InitStructure.GPIO_Speed = GPIO_Speed_100MHz;
		GPIO_Init(GPIOA, &GPIO_InitStructure);


		//初始化串口
	  USART_InitTypeDef USART_InitStructure;
		USART_StructInit(&USART_InitStructure);

		USART_InitStructure.USART_BaudRate=115200u;
		USART_InitStructure.USART_HardwareFlowControl=USART_HardwareFlowControl_None;
		USART_InitStructure.USART_Mode=USART_Mode_Rx | USART_Mode_Tx;
		USART_InitStructure.USART_Parity=USART_Parity_No; //校验位
		USART_InitStructure.USART_StopBits=USART_StopBits_1;
		USART_InitStructure.USART_WordLength = USART_WordLength_8b;
		GPIO_PinAFConfig(GPIOA,GPIO_PinSource9,GPIO_AF_USART1);
		GPIO_PinAFConfig(GPIOA,GPIO_PinSource10,GPIO_AF_USART1);
		USART_Init(USART1,&USART_InitStructure);


		USART_Cmd(USART1, ENABLE);
}
//单片机发送
static void usart_write(const char str[])
{
		int len=strlen(str);
		for(int i=0;i<len;i++)
		{
				// 等待发送寄存器为空,再写入字符
        while(USART_GetFlagStatus(USART1, USART_FLAG_TXE) == RESET);
				USART_SendData(USART1,(uint16_t) str[i]);
				// 等待字符完全发送完成
				while(USART_GetFlagStatus(USART1, USART_FLAG_TC) == RESET);
		}
}

int main(void)
{
		// KEY1 PA0 KEY2 PC4 KEY3 PC5
		RCC_AHB1PeriphClockCmd(RCC_AHB1Periph_GPIOA,ENABLE);
		RCC_AHB1PeriphClockCmd(RCC_AHB1Periph_GPIOC,ENABLE);


		//开启串口时钟 另外串口的PA9和PA10的GPIOA时钟上面已经开启过
		RCC_APB2PeriphClockCmd(RCC_APB2Periph_USART1, ENABLE);

		GPIO_InitTypeDef GPIO_InitStruct;
		GPIO_StructInit(&GPIO_InitStruct);
		GPIO_InitStruct.GPIO_Mode=GPIO_Mode_IN; //输入
		GPIO_InitStruct.GPIO_PuPd=GPIO_PuPd_NOPULL;
		GPIO_InitStruct.GPIO_Speed=GPIO_Medium_Speed;

		GPIO_InitStruct.GPIO_Pin=GPIO_Pin_0;
		GPIO_Init(GPIOA,&GPIO_InitStruct);

		GPIO_InitStruct.GPIO_Pin=GPIO_Pin_4 | GPIO_Pin_5;
		GPIO_Init(GPIOC,&GPIO_InitStruct);


		usart_init();

	  while(1)
		{


				uint8_t key1=GPIO_ReadInputDataBit(GPIOA,GPIO_Pin_0);
				if(key1==Bit_RESET)
				{
						usart_write("key1 pressed\r\n");
						while(GPIO_ReadInputDataBit(GPIOA,GPIO_Pin_0)==Bit_RESET);
				}

				uint8_t key2=GPIO_ReadInputDataBit(GPIOC,GPIO_Pin_4);
				if(key2==Bit_RESET)
				{
						usart_write("key2 pressed\r\n");
						while(GPIO_ReadInputDataBit(GPIOC,GPIO_Pin_4)==Bit_RESET);
				}

				uint8_t key3=GPIO_ReadInputDataBit(GPIOC,GPIO_Pin_5);
				if(key3==Bit_RESET)
				{
						usart_write("key3 pressed\r\n");
						while(GPIO_ReadInputDataBit(GPIOC,GPIO_Pin_5)==Bit_RESET);
				}
		}
}
按键封装
main.c
按键1我加了消抖,消抖就是延迟再判断一下
按键2和按键3没有消抖,由于板子按键原理图加了电容滤波,发现加不加消抖没什么区别
cpp
#include <stdint.h>
#include <string.h>
#include "stm32f4xx.h"
#include "key.h"
#include "usart.h"
#include "cpu_delay.h"

#define delay(ms) cpu_delay((ms)*100)

int main(void)
{
		// KEY1 PA0 KEY2 PC4 KEY3 PC5
		RCC_AHB1PeriphClockCmd(RCC_AHB1Periph_GPIOA,ENABLE);
		RCC_AHB1PeriphClockCmd(RCC_AHB1Periph_GPIOC,ENABLE);


		//开启串口时钟 另外串口的PA9和PA10的GPIOA时钟上面已经开启过
		RCC_APB2PeriphClockCmd(RCC_APB2Periph_USART1, ENABLE);

		GPIO_InitTypeDef GPIO_InitStruct;
		GPIO_StructInit(&GPIO_InitStruct);
		GPIO_InitStruct.GPIO_Mode=GPIO_Mode_IN; //输入
		GPIO_InitStruct.GPIO_PuPd=GPIO_PuPd_NOPULL;
		GPIO_InitStruct.GPIO_Speed=GPIO_Medium_Speed;

		GPIO_InitStruct.GPIO_Pin=GPIO_Pin_0;
		GPIO_Init(GPIOA,&GPIO_InitStruct);

		GPIO_InitStruct.GPIO_Pin=GPIO_Pin_4 | GPIO_Pin_5;
		GPIO_Init(GPIOC,&GPIO_InitStruct);

		key_init();
		usart_init();

	  while(1)
		{


				if(key_read(1))
				{
						//加消抖的
						delay(10);
						if(key_read(1))
						{
								usart_write("key1 pressed\r\n");
								while(key_read(1));
								delay(10);
						}

				}

				//不加消抖的
				if(key_read(2))
				{
						usart_write("key2 pressed\r\n");
						while(key_read(2));
				}

				//不加消抖的
				if(key_read(3))
				{
						usart_write("key3 pressed\r\n");
						while(key_read(3));
				}
		}
}
key.h
cpp
#ifndef __KEY_H__
#define __KEY_H__

#include <stdbool.h>
#include <stdint.h>

void key_init(void);
bool key_read(uint8_t idx);

#endif /* __KEY_H__ */
key.c
cpp
#include <stdbool.h>
#include "stm32f4xx.h"

// KEY1: PA0
// KEY2: PC4
// KEY3: PC5

#define KEY1_PORT   GPIOA
#define KEY1_PIN    GPIO_Pin_0
#define KEY2_PORT   GPIOC
#define KEY2_PIN    GPIO_Pin_4
#define KEY3_PORT   GPIOC
#define KEY3_PIN    GPIO_Pin_5

void key_init(void)
{

    GPIO_InitTypeDef GPIO_InitStructure;
    GPIO_StructInit(&GPIO_InitStructure);
		GPIO_InitStructure.GPIO_Mode=GPIO_Mode_IN; //输入
		GPIO_InitStructure.GPIO_PuPd=GPIO_PuPd_NOPULL;
		GPIO_InitStructure.GPIO_Speed=GPIO_Medium_Speed;

    GPIO_InitStructure.GPIO_Pin = KEY1_PIN;
    GPIO_Init(KEY1_PORT, &GPIO_InitStructure);

    GPIO_InitStructure.GPIO_Pin = KEY2_PIN;
    GPIO_Init(KEY2_PORT, &GPIO_InitStructure);

    GPIO_InitStructure.GPIO_Pin = KEY3_PIN;
    GPIO_Init(KEY3_PORT, &GPIO_InitStructure);
}

bool key_read(uint8_t idx)
{
    switch (idx)
    {
        case 1:
            return GPIO_ReadInputDataBit(KEY1_PORT, KEY1_PIN)==Bit_RESET;
        case 2:
            return GPIO_ReadInputDataBit(KEY2_PORT, KEY2_PIN)==Bit_RESET;
        case 3:
            return GPIO_ReadInputDataBit(KEY3_PORT, KEY3_PIN)==Bit_RESET;
        default:
            return false;
    }
}
usart.h
cpp
#ifndef __USART_H__
#define __USART_H__


void usart_init(void);
void usart_write(const char str[]);

#endif /* __USART_H__ */
usart.c
cpp
#include <stdint.h>
#include <string.h>
#include "stm32f4xx.h"


void usart_init(void)
{
		//初始化GPIO的引脚 TX GPIOA9 RX GPIOA10
		GPIO_InitTypeDef GPIO_InitStructure;
		GPIO_StructInit(&GPIO_InitStructure);
		GPIO_InitStructure.GPIO_Mode = GPIO_Mode_AF;
		GPIO_InitStructure.GPIO_Pin = GPIO_Pin_9 | GPIO_Pin_10;
		GPIO_InitStructure.GPIO_PuPd=GPIO_PuPd_UP;
		GPIO_InitStructure.GPIO_Speed = GPIO_Speed_100MHz;
		GPIO_Init(GPIOA, &GPIO_InitStructure);


		//初始化串口
	  USART_InitTypeDef USART_InitStructure;
		USART_StructInit(&USART_InitStructure);

		USART_InitStructure.USART_BaudRate=115200u;
		USART_InitStructure.USART_HardwareFlowControl=USART_HardwareFlowControl_None;
		USART_InitStructure.USART_Mode=USART_Mode_Rx | USART_Mode_Tx;
		USART_InitStructure.USART_Parity=USART_Parity_No; //校验位
		USART_InitStructure.USART_StopBits=USART_StopBits_1;
		USART_InitStructure.USART_WordLength = USART_WordLength_8b;
		GPIO_PinAFConfig(GPIOA,GPIO_PinSource9,GPIO_AF_USART1);
		GPIO_PinAFConfig(GPIOA,GPIO_PinSource10,GPIO_AF_USART1);
		USART_Init(USART1,&USART_InitStructure);


		USART_Cmd(USART1, ENABLE);
}
//单片机发送
void usart_write(const char str[])
{
		int len=strlen(str);
		for(int i=0;i<len;i++)
		{
				// 等待发送寄存器为空,再写入字符
        while(USART_GetFlagStatus(USART1, USART_FLAG_TXE) == RESET);
				USART_SendData(USART1,(uint16_t) str[i]);
				// 等待字符完全发送完成
				while(USART_GetFlagStatus(USART1, USART_FLAG_TC) == RESET);
		}
}
cpu_delay.h
cpp
#ifndef __CPU_DELAY_H__
#define __CPU_DELAY_H__
#include <stdint.h>

void cpu_delay(uint32_t us);

#endif /* __CPU_DELAY_H__ */
cpu_delay.c
cpp
#include "stm32f4xx.h"


void cpu_delay(uint32_t us)
{
	//上面处理ms
	while(us>1000)
	{
			//每次循环等待1ms
			SysTick->LOAD=SystemCoreClock/1000;
			SysTick->VAL=0; //当前计数器清0
			SysTick->CTRL = SysTick_CTRL_CLKSOURCE_Msk | SysTick_CTRL_ENABLE_Msk;
			while ((SysTick->CTRL & SysTick_CTRL_COUNTFLAG_Msk) == 0);//等待延迟结束
			SysTick->CTRL = ~SysTick_CTRL_ENABLE_Msk;//关闭
			us-=1000;
	}
	//下面处理us
	if(us>0)
	{
			SysTick->LOAD=(SystemCoreClock/1000/1000)*us-1;//自动转载值 系统主频
			SysTick->VAL=0; //当前计数器清0
			SysTick->CTRL = SysTick_CTRL_CLKSOURCE_Msk | SysTick_CTRL_ENABLE_Msk;
			while ((SysTick->CTRL & SysTick_CTRL_COUNTFLAG_Msk) == 0);//等待延迟结束
			SysTick->CTRL = ~SysTick_CTRL_ENABLE_Msk;//关闭
	}

}