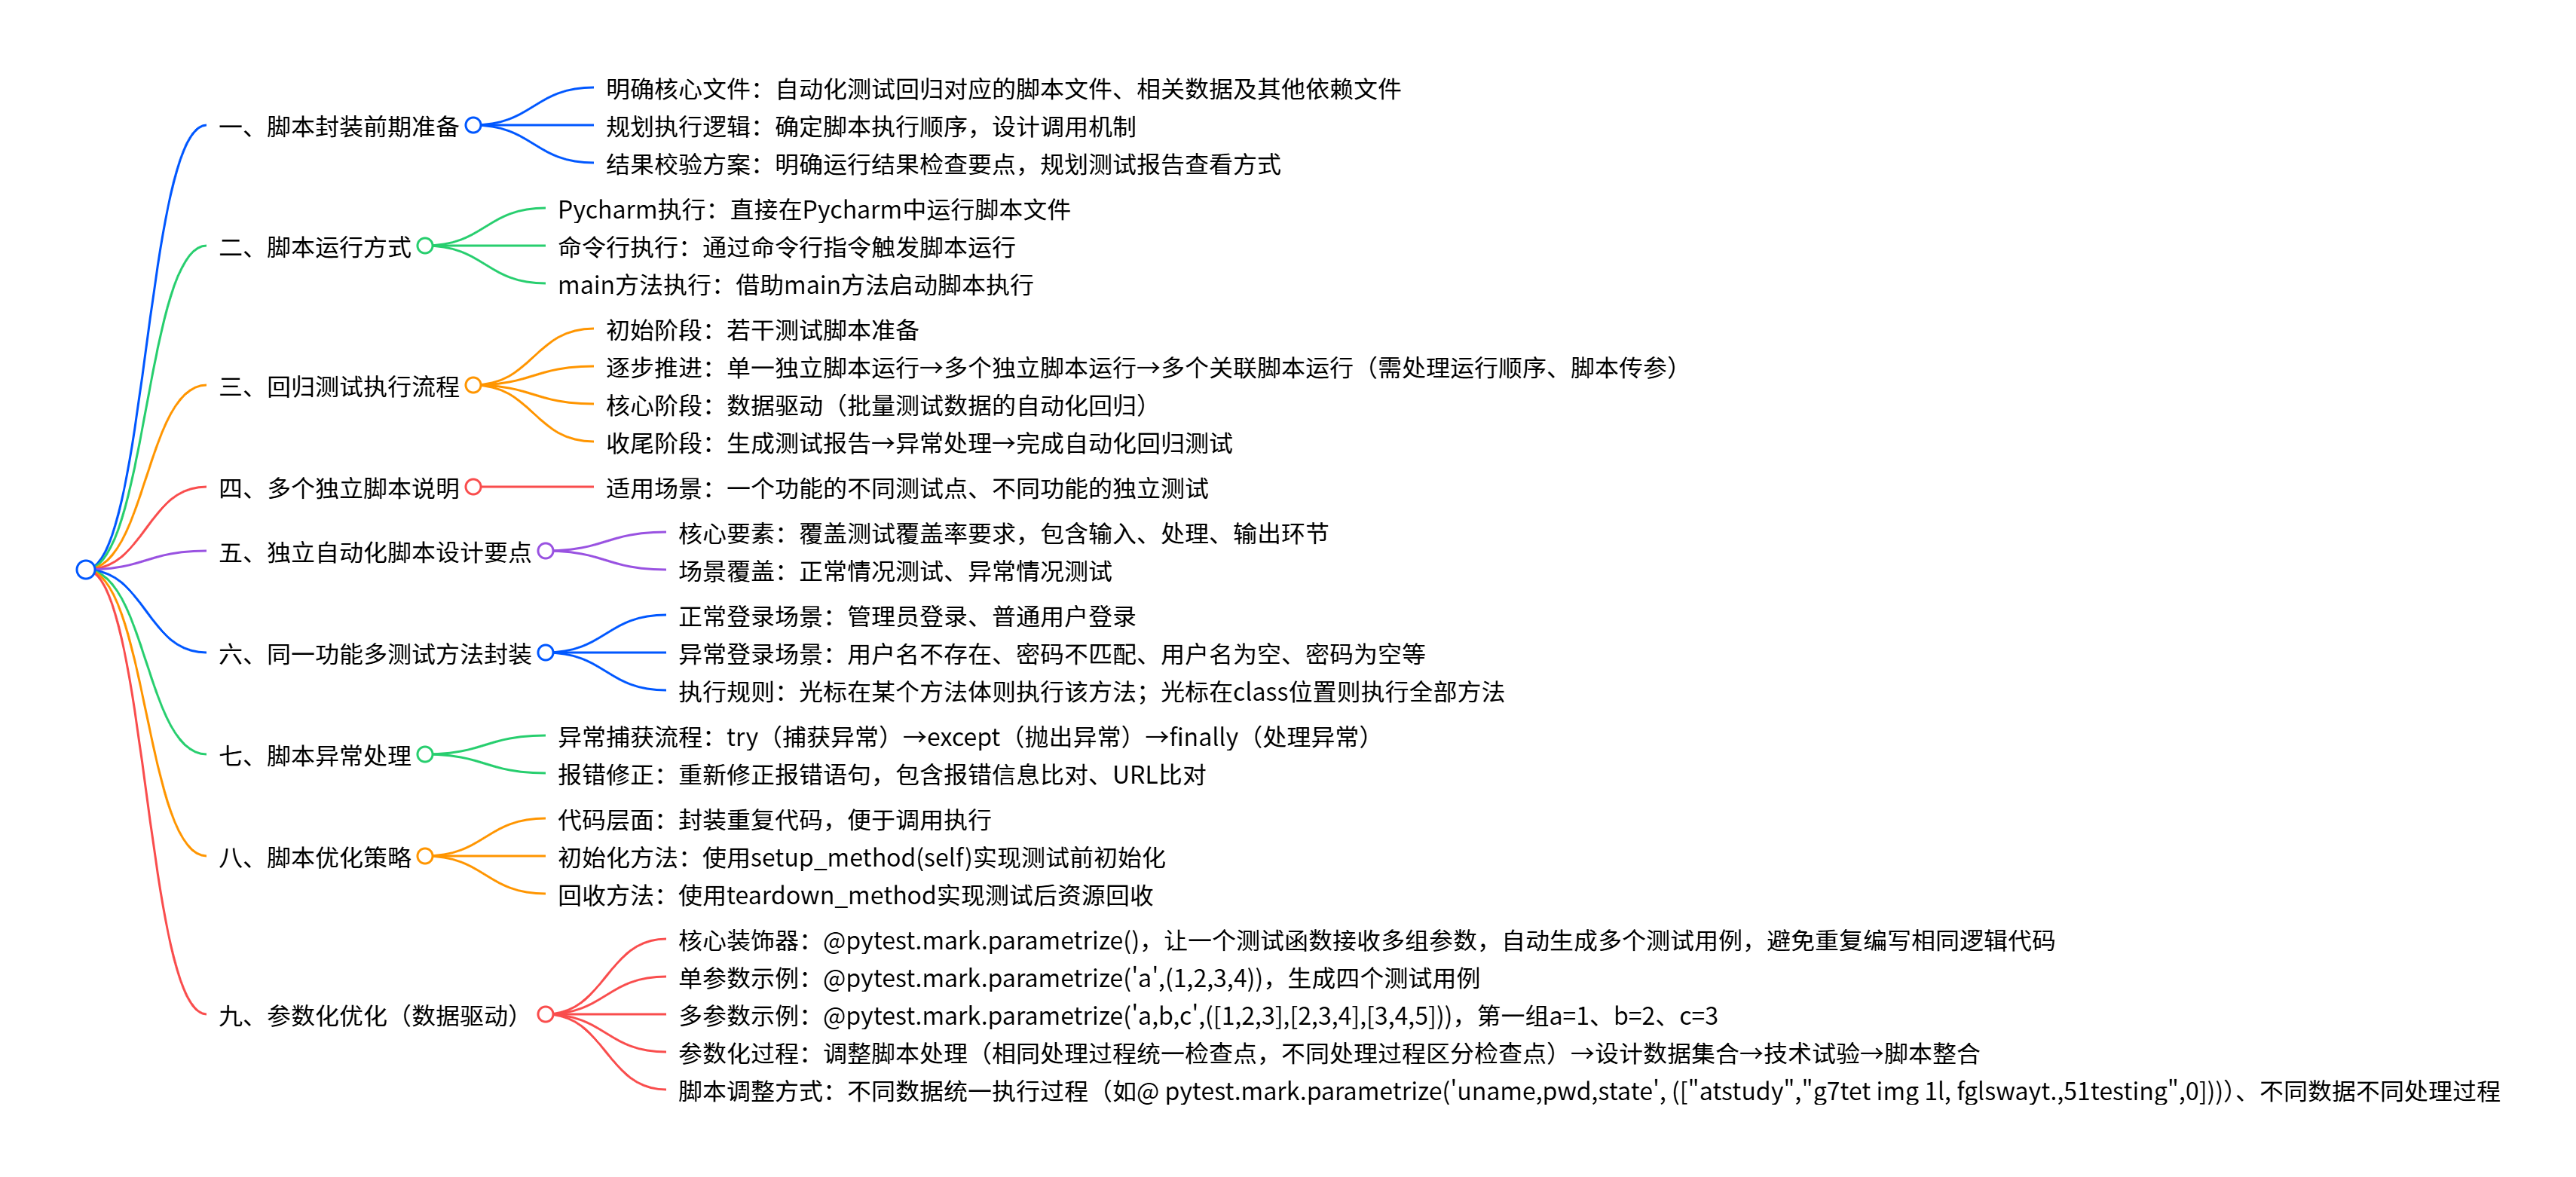
一、Pytest (独立脚本封装)
(1)确定自动化测试回归对应的脚本文件以及相关数据或其他文件
(2)确定执行顺序,调用执行
(3)检查运行结果或测试报告
2.步骤
3.运行
(1)通过Pycharm执行
(2)通过命令行执行
(3)通过main方法执行
若干测试脚本-->自动进行回归测试
(1)若干测试脚本-->单一独立脚本运行-->多个独立脚本运行-->多个关联脚本运行(运行顺序、脚本传参)-->数据驱动(批量的测试数据的自动化回归)-->测试报告-->异常处理-->自动化回归测试
(2)多个独立脚本?
一个功能的不同测试点
不同功能的测试
(3)独立自动化脚本设计:
测试覆盖率、输入、处理、输出
正常情况、异常情况
5.同一个功能,多个测试方法进行封装
(1)正常登录:管理员登录、普通用户登录
(2)异常登录:
用户名不存在、密码不匹配、用户名为空、密码为空、......
(3)# 光标在哪个方法体,就会执行哪个方法;光标在class位置,执行全部方法
python
# shop自动化测试selenium自动化测试脚本-pytest封装
from _pytest import unittest
from selenium import webdriver
from selenium.webdriver.common.by import By
from time import sleep

# 光标在哪个方法体,就会执行哪个方法;光标在class位置,执行全部方法

# 1.创建测试类
class Test_Shop_Login():
# 2.创建测试方法
    # 登录初始化
    def setup_method(self):
        # 1.打开浏览器 --实例化浏览器
        self.driver=webdriver.Chrome()
        # 2.输入url
        self.url="http://60.204.225.104/login?redirect=%2Findex"
        self.driver.get(self.url)
        sleep(2)
    # 正常登录测试方法
    def test_login_01(self):
        # 3.找元素以及操作
        self.driver.find_element(By.XPATH,"//*[@placeholder='账号']").send_keys("admin")
        self.driver.find_element(By.XPATH,"//*[@placeholder='密码']").send_keys("123456")
        self.driver.find_element(By.XPATH,"//*[@placeholder='验证码']").send_keys("2")
        sleep(2)
        self.driver.find_element(By.XPATH,"//*[contains(text(),'登')]").click()
        sleep(5)
        # 检查点  登录成功后出现"发展历程"字样
        el=self.driver.find_element(By.XPATH,"//*[contains(text(),'发展历程')]")
        result_el=el.get_property("innerText")
        print(result_el)
        # 3.通过断言进行判断
        assert result_el == "发展历程"

    # 异常登录测试方法   用户不存在
    def test_login_02(self):

        # 3.找元素以及操作
        self.driver.find_element(By.XPATH,"//*[@placeholder='账号']").send_keys("admi")
        self.driver.find_element(By.XPATH,"//*[@placeholder='密码']").send_keys("123456")
        self.driver.find_element(By.XPATH,"//*[@placeholder='验证码']").send_keys("2")
        sleep(2)
        self.driver.find_element(By.XPATH,"//*[contains(text(),'登')]").click()
        sleep(5)
        # 检查点  登录成功后出现"发展历程"字样

        # -----------------------------异常方法处理一 try finally ---------------------------------
        # try:
        #     el=driver.find_element(By.XPATH,"//*[contains(text(),'发展历程')]")
        #     result_el=el.get_property("innerText")
        #     print(result_el)
        #     # 3.通过断言进行判断
        #     assert result_el == "发展历程"
        # except Exception as e:
        #     登录失败的检查点 "软件测试"
        #     print(e)
        #     el=driver.find_element(By.XPATH,"//*[contains(text(),'软件测试')]")
        #     result_el=el.get_property("innerText")
        #     # 使用包含断言
        #     assert "软件测试" in result_el


        # # ----------------------------异常方法处理二  改变检查点(错误信息比对)--------------------------------------
        # el=driver.find_element(By.XPATH,"//*[contains(text(),'软件测试')]")
        # result_el=el.get_property("innerText")
        # # 使用包含断言
        # assert "测试" in result_el

        # ----------------------------异常方法处理三  改变检查点(进行URL比对)--------------------------------------
        # 登录失败,页面不会跳转,仍为开始URL
        # 获取当前url
        result=self.driver.current_url
        assert result == self.url
6.在脚本中处理异常情况
(1)捕获异常 try-->抛出异常 except -->处理异常 finally
(2)重新修正报错的语句
报错信息 比对 URL比对
7.脚本优化
(1)封装重复代码;调用执行
(2)setup_method(self) 初始化方法
8.Pytest脚本优化 --参数化
(1)数据驱动
python
# 参数化设置
# 1.1一个参数多个值
import pytest
def add(a,b):
    return a+b
# 单个参数的情况
@pytest.mark.parametrize("a", (1,2,3,4))
def test_add(a): # => 作为用例对象,接收装饰器传入的数据
    print('\na的值:',a)
    assert add(a,1) == a+1

if __name__ == '__main__':
    pytest.main(["-s",__file__])
(2)@pytest.mark.parametrize()是pytest的参数化装饰器,作用是:让一个测试函数可以接收多组参数,自动生成多个测试用例执行,避免重复编写相同逻辑的测试代码
----单个值 单个参数
(3)@pytest.mark.parametrize('a',(1,2,3,4)) 生成四个测试用例
---多个值,多个参数
python
# 参数化设置
# 1.1一个参数多个值
import pytest
def add(a,b):
    return a+b
# 单个参数的情况
@pytest.mark.parametrize("a,b,c", ([1,2,3],[4,5,9],[7,8,15]))
def test_add(a,b,c): # => 作为用例对象,接收装饰器传入的数据
    print('\na,b,c的值:',f'{a},{b},{c}')
    assert add(a,b) == c

if __name__ == '__main__':
pytest.main(["-s",__file__])(4)@pytest.mark.parametrize('a,b,c',(1,2,3,2,3,4,3,4,5))
第一组: a :1 b:2 c:3
9.参数化过程
(1)调整脚本处理
相同处理过程 检查点一样
不同处理过程 检查点无法整合成一样的
python
# 不同处理过程
import pytest
from _pytest import unittest
from selenium import webdriver
from selenium.webdriver.common.by import By
from time import sleep


# 1.创建测试类
class Test_Shop_Login():
    # 2.创建测试方法
    # 登录初始化
    def setup_method(self):
        # 1.打开浏览器 --实例化浏览器
        self.driver=webdriver.Chrome()
        # 2.输入url
        self.url="http://60.204.225.104/login?redirect=%2Findex"
        self.driver.get(self.url)
        sleep(2)

    # 正常登录测试方法
    @pytest.mark.parametrize('uname,pwd,veri',(["admin",123456,2],["admi",123456,2])) # state表示登录状态是否正常
    def test_login_01(self,uname,pwd,veri):
        self.driver.find_element(By.XPATH,"//*[@placeholder='账号']").send_keys(uname)
        self.driver.find_element(By.XPATH,"//*[@placeholder='密码']").send_keys(pwd)
        self.driver.find_element(By.XPATH,"//*[@placeholder='验证码']").send_keys(veri)
        self.driver.find_element(By.XPATH,"//*[contains(text(),'登')]").click()
        sleep(5)
        # 不同检查点 不同执行过程
        try:
            el=self.driver.find_element(By.XPATH,"//*[contains(text(),'发展历程')]")
            result_el=el.get_property("innerText")
            print(result_el)
            # 3.通过断言进行判断
            assert result_el == "发展历程"
        except Exception as e:
            # 登录失败的检查点 "软件测试"
            print(e)
            el=self.driver.find_element(By.XPATH,"//*[contains(text(),'软件测试')]")
            result_el=el.get_property("innerText")
            # 使用包含断言
            assert "软件测试" in result_el

    def teardown_method(self,method):
        self.driver.quit()
(2)数据集合设计
(3)技术试验
(4)脚本整合
10.调整脚本方式
(1)不同的数据,统一的执行过程
@ pytest.mark. parametrize('uname,pwd,state', ("atstudy","g7tet img 1l, fglswayt.,51testing",0)
python
# 统一执行过程
import pytest
from _pytest import unittest
from selenium import webdriver
from selenium.webdriver.common.by import By
from time import sleep


# 1.创建测试类
class Test_Shop_Login():
    # 2.创建测试方法
    # 登录初始化
    def setup_method(self):
        # 1.打开浏览器 --实例化浏览器
        self.driver=webdriver.Chrome()
        # 2.输入url
        self.url="http://60.204.225.104/login?redirect=%2Findex"
        self.driver.get(self.url)
        sleep(2)

    # 正常登录测试方法
    @pytest.mark.parametrize('uname,pwd,veri,state',(["admin",123456,2,1],["admi",123456,2,0])) # state表示登录状态是否正常
    def test_login_01(self,uname,pwd,state,veri):
        self.driver.find_element(By.XPATH,"//*[@placeholder='账号']").send_keys(uname)
        self.driver.find_element(By.XPATH,"//*[@placeholder='密码']").send_keys(pwd)
        self.driver.find_element(By.XPATH,"//*[@placeholder='验证码']").send_keys(veri)
        self.driver.find_element(By.XPATH,"//*[contains(text(),'登')]").click()
        sleep(5)
        # 统一检查点
        result=self.driver.current_url
        if state == 1:
            assert result !=self.url
        else:
            assert result == self.url

    def teardown_method(self):
        self.driver.quit()
(2)不同数据不同处理过程
10.pytest的回收方法
(1)teardown_method
二、Pytest业务脚本封装
1.业务脚本
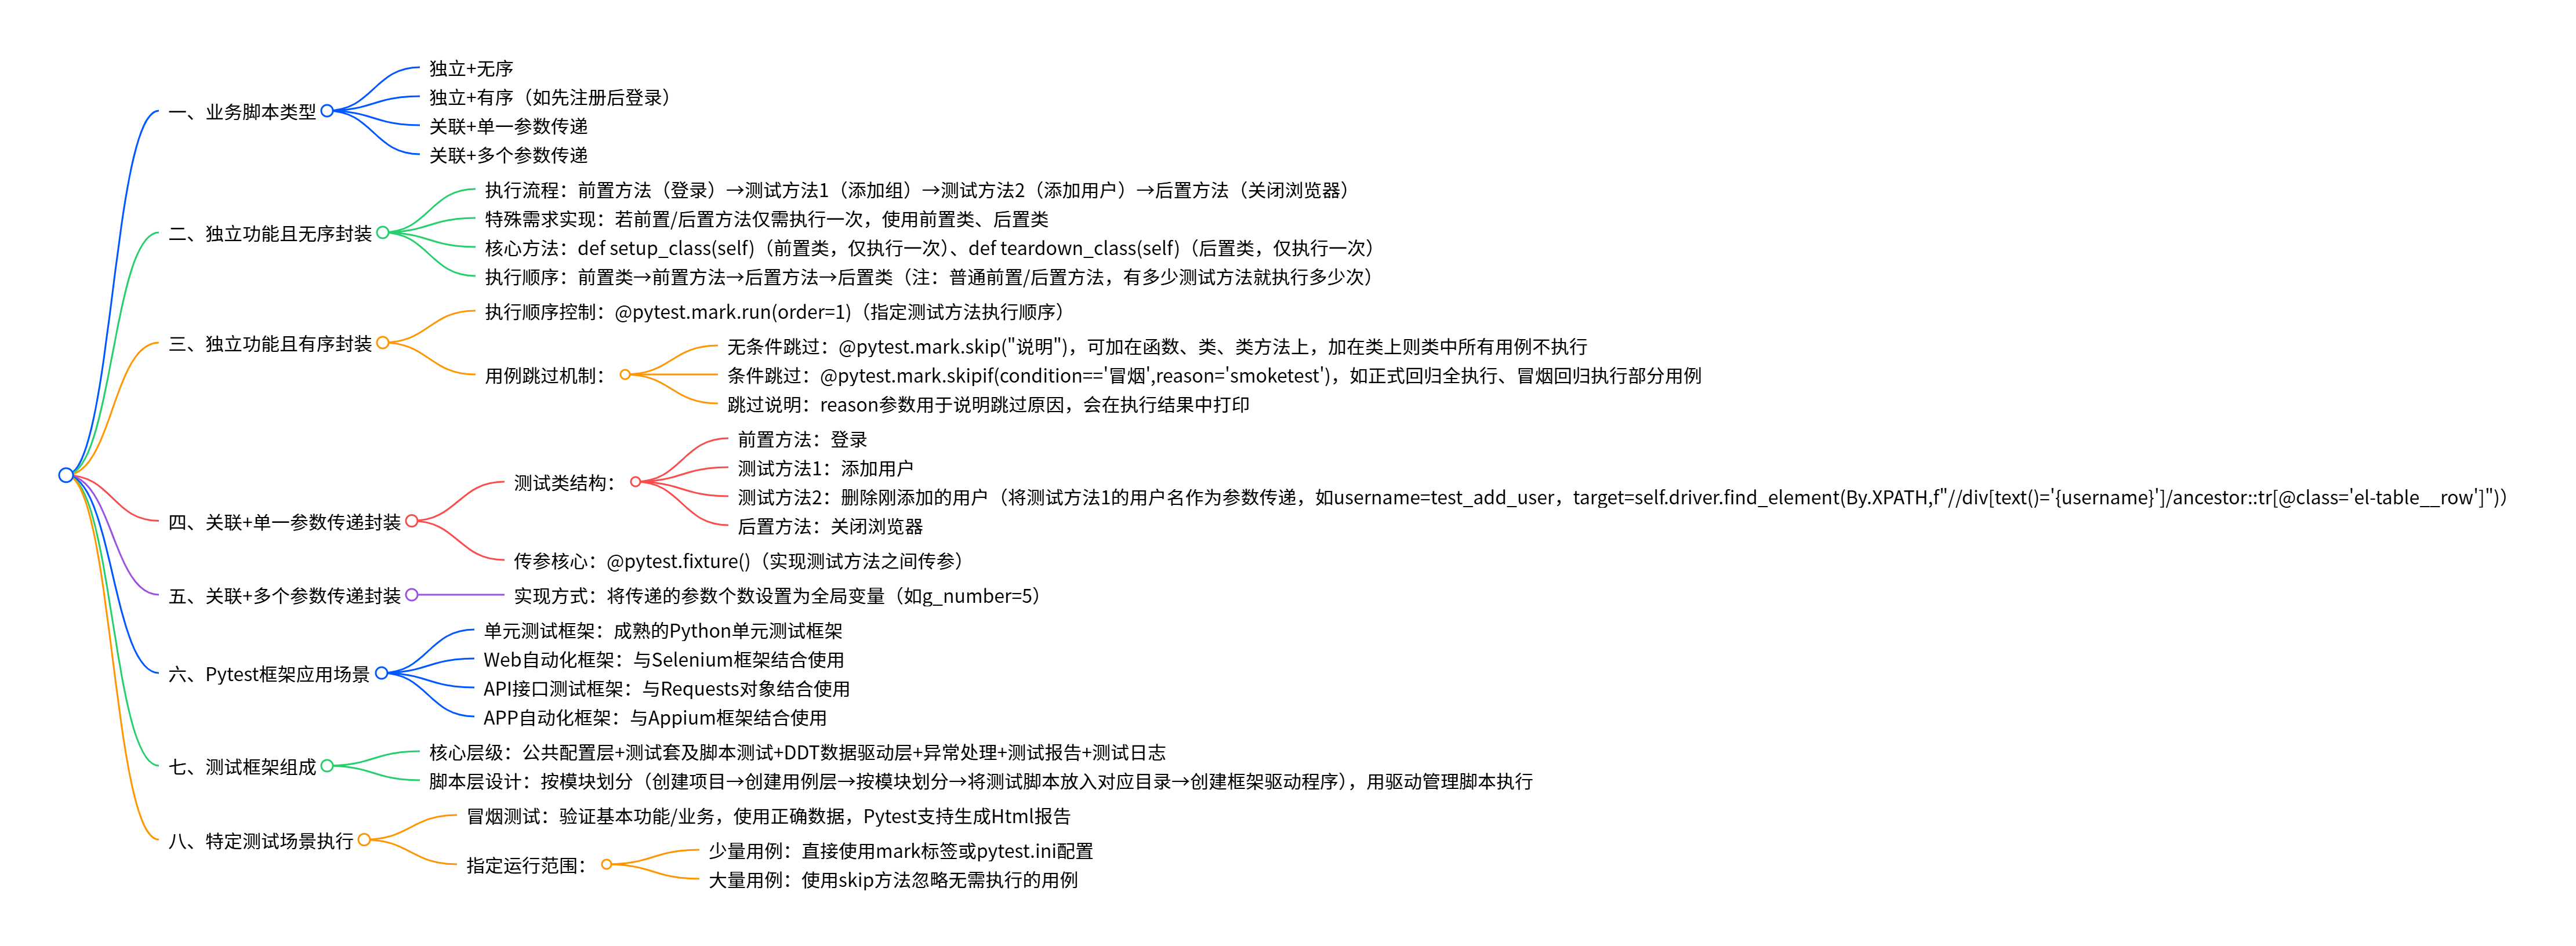
(1)独立+无序
(2)独立+有序(如先注册,后登录)
(3)关联+单一参数传递
(4)关联+多个参数传递
2.独立功能且无序--业务脚本的封装
(1)前置方法(登录)--> 测试方法1(添加组)-->测试方法2(添加用户)-->后置方法(关闭浏览器)
(2)若只想前置方法(登录)、后置方法(关闭浏览器)只执行一次:使用前置类、后置类
(3)def setup_class(self)
def teardown_class(self) --只执行一次;前置、后置方法:有多少个测试方法,就执行多少次
(4)执行顺序:
前置类--前置方法--后置方法--后置类
python
import pytest
from selenium.webdriver.common.by import By
from selenium import webdriver
from time import sleep
# 1.创建业务流程测试类(独立+无序)
@pytest.mark.smoke1
class Test_add_user_record():
    # 只做一次的前置方法
    def setup_class(self):
        # 1.打开浏览器 --实例化浏览器
        self.driver=webdriver.Chrome()
        # 2.输入url
        self.url="http://60.204.225.104/login?redirect=%2Findex"
        self.driver.get(self.url)
        sleep(2)
        self.driver.find_element(By.XPATH,"//*[@placeholder='账号']").send_keys("admin")
        self.driver.find_element(By.XPATH,"//*[@placeholder='密码']").send_keys("123456")
        self.driver.find_element(By.XPATH,"//*[@placeholder='验证码']").send_keys("2")
        self.driver.find_element(By.XPATH,"//*[contains(text(),'登')]").click()
        sleep(5)

    # 测试添加用户
    def test_add_user(self):
        # 登录成功后进入 客户页面
        self.driver.get("http://60.204.225.104/relation/customer")
        sleep(5)
        # 定位新增按钮,添加数据
        self.driver.find_element(By.XPATH,"//*[contains(text(),'新增')]").click()
        sleep(5)
        self.driver.find_element(By.XPATH,"//div[@aria-label='添加客户']//input[@placeholder='请输入编号']").send_keys("12345")
        sleep(5)
        self.driver.find_element(By.XPATH,"//div[@aria-label='添加客户']//input[@placeholder='请输入名称']").send_keys("12345")
        sleep(2)
        self.driver.find_element(By.XPATH,"//*[@placeholder='请输入银行卡号']").send_keys("621700256666666")
        sleep(2)
        self.driver.find_element(By.XPATH, "(//div[@class='el-dialog__footer'])[2]//button[1]").click()

        # self.driver.find_element(By.XPATH,"(//*[contains(text(),'确定')])[2]").click()
        sleep(3)

    def teardown_class(self):
        self.driver.quit()
3.独立功能且有序 ---业务脚本封装2
(1)测试方法的顺序可控
@pytest.mark.run(order=1)
(2)测试方法的跳过--单独某个跳过
@pytest.mark.skip("说明")
(3)测试方法的跳过--满足条件的某些
如,方法集:正式回归测试时全部执行,冒烟回归测试时执行一部分
@pytest.mark.skipif(condition=='冒烟',reason='smoketest')
(4)skip:跳过执行测试用例,有可选参数 reason:跳过的原因,会在执行结果中打印
(5)@pytest.mark.skip可以加在函数上,类上,类方法上
如果加在类上面,类里面的所有测试用例都不会执行
python
"""
脚本的封装2--独立且有序
"""
import pytest


class Test_Class():
    @pytest.mark.skip("测试不执行")
    def test_case1(self):
        print("测试方法1")

    @pytest.mark.run(order=1)
    def test_case2(self):
        print("测试方法2")

    @pytest.mark.run(order=2)
    def test_case3(self):
        print("测试方法3")
4.业务脚本封装3---关联+传递单一参数
(1)测试类:
前置方法:登录
测试方法1:添加用户
测试方法2:删除刚添加的用户 将测试方法1的用户名作为参数传递给测试方法2 f{}
username=test_add_user target=self.driver.find_element(By.XPATH,f"//divtext()='{username}'/ancestor::tr@class='el-table__row'")
测试方法之间传参: @pytest.fixture()
后置方法:关闭浏览器
python
# 测试方法之间传参
import pytest


class Test_pytest_fixture():
    @pytest.fixture()
    def test_fixture(self):
        username='user1'
        return username

    def test_fixture2(self,test_fixture):
        uname=test_fixture
        print(uname)
5.业务脚本封装4--关联+多个参数传递
(1)传递的参数个数设置成全局变量 g_number=5
python
# 测试方法之间传递多个参数  列表[] 数据字典等
import pytest


class Test_pytest_fixture():
    @pytest.fixture()
    def test_fixture(self):
        username=['user1','user2','user3','user4']
        return username

    def test_fixture2(self,test_fixture):
        uname=test_fixture
        print(uname)
三、测试框架
1.Pytest支持的应用
(1)单元测试框架:成熟的Python单元测试框架
(2)web自动化框架:与Selenium框架结合
(3)API接口测试框架:与Requests对象结合
(4)APP自动化框架:与Appium框架结合
2.测试框架的组成:
(1)公共配置层+测试套及脚本测试+DDT数据驱动层+异常处理+测试报告+测试日志=测试框架
(2)测试框架--脚本层设计
按模块进行划分:
创建项目、创建用例层、按模块进行划分、脚测试脚本放入对应目录、创建框架驱动程序
用驱动管理脚本的执行
(3)冒烟测试:基本功能/业务 正确数据 Pytest:Html报告
3.Pytest框架指定特定运行范围:
(1)直接使用mark标签:基本功能、业务数量少
或者pytest.ini
(2)基本功能/业务数量较多:
使用跳过方法(skip)忽略
四、Pytest-fixture
(1)fixture做为参数传入时,会在执行函数之前执行该fixture函数。再将值传入测试函数做为参数使用,这个场景多用于登录
(2)fixture作为参数,互相调用,会先找到所有fixture再一层层执行,但直接被调用的fixture(这里是login)不会将上一层的值自动传回
python
# fixture作为参数,互相调用
import pytest

@pytest.fixture()
def account():
    a="account"
    print("----第一层fixture----")
    return a

#  Fixture的互相调用一定是要在测试类里调用这层fixture才会生效,破铜函数单独调用不生效
@pytest.fixture()
def login(account):
    print("----第二层fixture----")

class TestLogin:
    def test_1(self,login):  # fixture在相互调用时,会先找到所有fixture再一层层执行
        # .format(login): 把login这个fixture的返回值,
        # 填充到字符串里的{}位置,最终输出包含login实际返回值的文本。
        print("直接使用第二层fixture,返回值为{}".format(login)) # 当有多层调用时,直接被调用的fixture(这里是login)不会将上一层的值自动传回
    def test_2(self,account):
        print("只调用account fixture,返回值为{}".format(account))

if __name__ == '__main__':
    pytest.main()
2.在pytest中, fixture 是用于测试用例的前置准备、后置清理,以及测试数据/资源的复用、依赖注入的核心功能,简单说就是为测试用例提供预设的执行环境和数据支持
python
import pytest
# fixture函数(类中) 作为多个参数传入
"""
fixture做为参数传入时,会在执行函数之前执行该fixture函数。
再将值传入测试函数做为参数使用,这个场景多用于登录
"""
@pytest.fixture()
def login():
    print("打开浏览器")
    a = "account"
    return a

@pytest.fixture()
def logout():
    print("关闭浏览器")

class TestLogin:
    #传入lonin fixture
    def test_001(self, login):
        print("001传入了loging fixture")
        assert login == "account"

    #传入logout fixture
    def test_002(self, logout):
        print("002传入了logout fixture")

    def test_003(self, login, logout):
        print("003传入了两个fixture")

    def test_004(self):
        print("004未传入仍何fixture哦")

if __name__ == '__main__':
    pytest.main()
3.核心作用:
(1)1替代传统测试框架的 setUp/tearDown:更灵活地实现测试前的初始化(如连接数据库、启动服务)和测试后的清理(如关闭连接、销毁数据)。
(2)测试资源复用:通过 scope 参数(function、class、module、session)控制fixture的作用域,实现不同粒度的资源复用,避免重复执行初始化逻辑。
(3)参数化与依赖注入:可以向测试用例传递数据,也能让测试用例按需依赖不同的fixture,解耦测试逻辑和环境准备逻辑。
(4)自动调用(autouse):设置 autouse=True 时,符合作用域的测试用例会自动执行该fixture,无需显式调用。
python
# 参数autouse:自动执行 默认False
# 若为True,每个测试函数都会自动调用该fixture,无需传入fixture函数名

# 当autouse=true,即使测试类和测试方法未传入参数名,用例执行时也都调用了fixture

import pytest

@pytest.fixture(autouse=True)
def login():
    print("当autouse为true")

class TestLogin:
    def test_login(self):
        print("测试用例·1")

    def test_login2(self):
        print("测试用例·2")

if __name__ == '__main__':
    pytest.main()
五、.format
- .format() 是Python字符串的格式化方法,核心作用是将变量、数据填充到字符串的指定位置,让字符串能动态包含不同的内容,替代固定的文本占位符。
(1)如
class TestLogin:
def test_1(self, login):
print("直接使用第二层fixture,返回值为{}".format(login))
把 login 这个fixture的返回值,填充到字符串里的 {} 位置,最终输出包含 login 实际返回值的文本。
六、@pytest.mark.
1.pytest.mark 下包含内置标记方法和支持自定义标记,内置方法主要用于控制测试执行、参数化、夹具使用等场景
2.常用方法:
(1)parametrize: 实现测试参数化,对同一个测试函数传入多组数据执行,是数据驱动测试的核心
(2) skip :无条件跳过指定测试用例,可通过 reason 说明跳过原因
(3) skipif :根据指定条件(布尔表达式)判断是否跳过测试,适用于环境依赖、版本兼容等场景。
(4)xfail :标记"预期失败"的测试用例,用于跟踪已知未修复的缺陷,不影响测试结果统计。
(5)usefixtures :为测试类/模块统一应用fixture,无需在测试函数中显式传入fixture参数。
(6) filterwarnings :过滤测试过程中产生的特定警告,可忽略或转为错误
2.自定义标记:
可通过 pytest.ini 注册自定义标记(如 smoke 、 performance ),用于分类执行测试,例如:
ini
pytest
markers =
smoke: 冒烟测试
performance: 性能测试
使用时直接通过 @pytest.mark.smoke 装饰测试用例。
七、sys
1.sys 是Python的内置标准库模块,主要用于与Python解释器和操作系统进行交互,提供了访问解释器运行时环境、系统参数、标准输入输出等功能的接口。
- sys.platform
(1)sys.platform 是 sys 模块的常用属性,用于获取当前运行Python的操作系统平台标识(比如Windows系统返回 win32 / win64 ,Linux返回 linux ,macOS返回 darwin ),可通过它判断是否为Windows平台,进而执行模块级跳过的逻辑。
(2)如:
if sys.platform.startswith("win"):
pytest.skip("跳过Windows平台的测试", allow_module_level=True)
八、skip
1.pytest.skip(..., allow_module_level=True)模块级跳过
(1)python中一个.py文件就是一个模块,
(2)一个模块中(即一个).py文件中可以有多个类 class
2.如果代码中写了多个模块级跳过,按顺序执行:
(1)# 跳过无GPU环境的测试
if not os.environ.get("CUDA_AVAILABLE"):
pytest.skip("需要GPU环境", allow_module_level=True)
跳过特定操作系统的测试
if sys.platform != "linux":
pytest.skip("仅支持Linux系统", allow_module_level=True)
def test_case01():
print("111")
python
# 跳过执行测试用例,有可选参数 reason:跳过的原因,会在执行结果中打印
#
# @pytest.mark.skip可以加在函数上,类上,类方法上
# 如果加在类上面,类里面的所有测试用例都不会执行

import pytest


@pytest.fixture(autouse=True)
def login():
    print("====登录====")


def test_case01():
    print("测试用例A")


@pytest.mark.skip(reason="演示----不执行")
def test_case02():
    print("测试用例B")


class Test1:

    def test_1(self):
        print("%% 类测试用例1 %%")
    @pytest.mark.skip(reason="不执行")
    def test_2(self):
        print("%% 类测试用例2 %%")


@pytest.mark.skip(reason="类也可以跳过不执行")
class TestSkip:
    def test_1(self):
        print("%% 不会执行 %%")
(2)会先判断是否有 CUDA_AVAILABLE 环境变量,没有则直接跳过模块,第二个系统判断不会执行;
若设置了该环境变量,才会执行第二个判断,检查是否为Linux系统,非Linux则跳过模块。
3.跳过标记:
(1)可以将 pytest.mark.skip 和 pytest.mark.skipif 赋值给一个标记变量
skipmark = pytest.mark.skip(reason="不能在window上运行=====")
skipifmark = pytest.mark.skipif(sys.platform == 'win32', reason='..')
(2)在测试方法或类上 添加 @skipmark @skipifmark
python
# 跳过标记
import pytest
import sys


skipmark=pytest.mark.skip(reason='测试skip')
skipifmark=pytest.mark.skipif(sys.platform == 'linux',reason='linux不支持')

@skipmark
class TestSkipMark:

    @skipifmark
    def test_skip_if_mark(self):
        print('test_skipmark11111')

    def test_skip_mark2(self):
        print('test_skipmark22222')

@skipifmark
def test_skip_mark3():
    print('test_skipmark333333')


if __name__ == '__main__':
    pytest.main()
4.自定义标记 @pytest.mark.model
九、参数设置
1.fixture:测试方法之间传参 fixture的返回值作为参数传入测试方法,适合跨方法、类、模块的公共资源传递
2.parametrize:测试用例的参数化 实现"一套逻辑,多组数据"的批量测试
python
# 函数数据参数化--函数返回值做参数

import pytest
def return_test_data():
    return [(1,2),(0,3)]
class TestABC:
    def setup_class(self):
        print('setup_class')
    def teardown_class(self):
        print('teardown_class')
    @pytest.mark.parametrize("a,b", return_test_data())
    def test_function(self, a,b):
        print("test data:a=%d, b=%d"%(a,b))
        assert a +b==3
3.例
(1)fixture
class Test_pytest_fixture():
@pytest.fixture()
def test_fixture(self):
username='user1','user2','user3','user4'
return username
def test_fixture2(self,test_fixture):
uname=test_fixture
print(uname)
(2)parametrize:
import pytest
def add(a,b):
return a+b
单个参数的情况
@pytest.mark.parametrize("a", (1,2,3,4))
def test_add(a): # => 作为用例对象,接收装饰器传入的数据
print('\na的值:',a)
assert add(a,1) == a+1
4.pytest.param()
python
# 自定义mark

import pytest

@pytest.mark.model
def test_model_a():
    print("执行test_model_a")

@pytest.mark.regular
def test_regular_a():
    print("test_regular_a")

@pytest.mark.model
def test_model_b():
    print("test_model_b")

@pytest.mark.regular
class TestClass:
    def test_method(self):
        print("test_method")

def testnoMark():
    print("testnoMark")
(1) pytest.param() 是用于为参数化用例单独设置标记、自定义id或添加额外属性的函数,能让参数化列表中的某一组数据拥有专属的配置,而非对所有参数化用例统一设置规则
python
# 参数params 会循环遍历
# 每个param的值
# fixture都会去调用执行一次,类似for循环

import pytest

@pytest.fixture(params=[1, 2,{'a':1,'b':2},10])
def param1(request):
    return request.param

def test_param1(param1):
    print("值{}".format(param1))
python
# 用例标识ID与params配合使用,一对一关系
# 会在每个测试用例后加上唯一标识[id]
import pytest

@pytest.fixture(params=[1, 2,{'a':1,'b':2},10],ids=['one','two','three','four'])
def param1(request):
    return request.param

def test_param1(param1):
    print("值{}".format(param1))
python
# name参数:fixture的重命名
"""
通常来说使用 fixture 的测试函数会将 fixture 的函数名作为参数传递,但是 pytest 也允许将fixture重命名
如果使用了name,那只能将name传如,函数名不再生效
调用方法:@pytest.mark.usefixtures('fixture1','fixture2')

"""

import pytest
@pytest.fixture(name="new_fixture")
def test_name():
    pass

#使用name参数后,传入重命名函数,执行成功
def test_1(new_fixture):
    print("使用name参数后,传入重命名函数,执行成功")

#使用name参数后,仍传入函数名称,会失败
def test_2(test_name):
    print("使用name参数后,仍传入函数名称,会失败")
十、失败重试
1.使用
(1)优先使用 --reruns 处理偶发失败
(2)--lf 适合在修复环境问题后使用 (当测试全部通过,--if会触发"重新执行所有用例"的无意义操作,)
(3)重试次数不宜过多(通常1-3次)
(4)合理设置延时,避免给系统造成压力
十一、简化总结