一、搭建flowable-ui
docker pull flowable/flowable-ui

docker run -d --restart=always --name flowableui -p 8086:8080 flowable/flowable-ui
http://localhost:8086/flowable-ui访问页面,默认账号admin,密码test
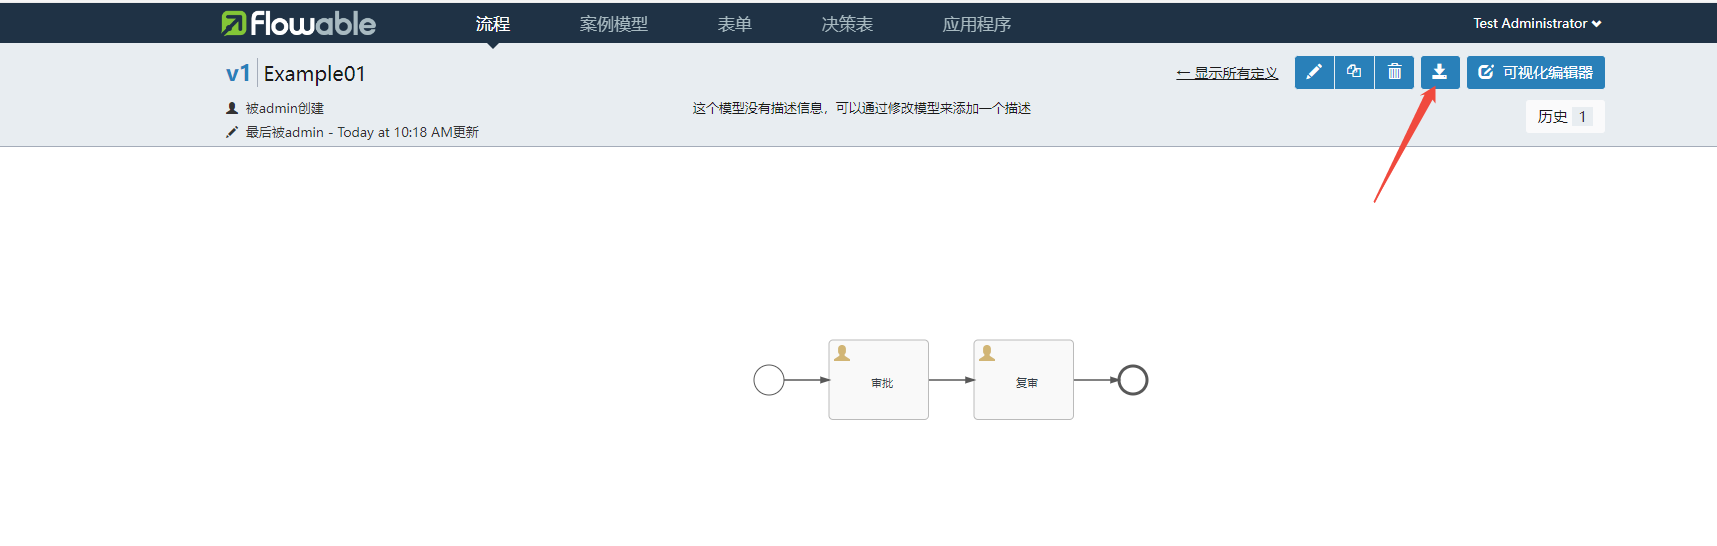
二、画流程,并下载xml文件
三、搭建后端
1、添加maven依赖
<dependency>
            <groupId>com.mysql</groupId>
            <artifactId>mysql-connector-j</artifactId>
            <scope>runtime</scope>
        </dependency>
        <dependency>
            <groupId>org.projectlombok</groupId>
            <artifactId>lombok</artifactId>
            <optional>true</optional>
        </dependency>

        <dependency>
            <groupId>org.flowable</groupId>
            <artifactId>flowable-spring-boot-starter</artifactId>
            <version>7.2.0</version>
        </dependency>

        <dependency>
            <groupId>com.alibaba.fastjson2</groupId>
            <artifactId>fastjson2</artifactId>
            <version>2.0.52</version>
        </dependency>
2、新建线程池类AnsycConfig
package com.example.flowable_eng.config;


import org.springframework.context.annotation.Bean;
import org.springframework.context.annotation.Configuration;
import org.springframework.scheduling.concurrent.ThreadPoolTaskExecutor;

import java.util.concurrent.ThreadPoolExecutor;

@Configuration
public class AnsycConfig {
    @Bean("applicationTaskExecutor")
    public ThreadPoolTaskExecutor applicationTaskExecutor() {
        ThreadPoolTaskExecutor executor=new ThreadPoolTaskExecutor();
        //此方法返回可用处理器的虚拟机的最大数量; 不小于1
        int core= Runtime.getRuntime().availableProcessors();
        executor.setCorePoolSize(core);//设置核心线程数
        executor.setMaxPoolSize(core * 2 + 1);//设置最大线程数
        executor.setKeepAliveSeconds(120);//除核心线程外的线程存活时间
        executor.setQueueCapacity(120);//如果传入值大于0,底层队列使用的是LinkedBlockingQueue,否则默认使用SynchronousQueue
        executor.setThreadNamePrefix("thread-default-execute");//线程名称前缀
        executor.setRejectedExecutionHandler(new ThreadPoolExecutor.AbortPolicy());//设置拒绝策略,抛出 RejectedExecutionException来拒绝新任务的处理。
//        executor.setRejectedExecutionHandler(new ThreadPoolExecutor.CallerRunsPolicy());//设置拒绝策略,使用主线程
//        executor.setRejectedExecutionHandler(new ThreadPoolExecutor.DiscardPolicy());//设置拒绝策略,直接丢弃掉
//        executor.setRejectedExecutionHandler(new ThreadPoolExecutor.DiscardOldestPolicy());//设置拒绝策略,丢弃最早的未处理的任务请求。
        return executor;
    }

}
3、yml配置文件
server:
  port: 2300

spring:
  threads:
    virtual:
      enabled: true
  #配置数据源
  datasource:
    #MySQL
    driver-class-name: com.mysql.cj.jdbc.Driver
    url: jdbc:mysql://localhost:3306/flowable_test?useUnicode=true&characterEncoding=utf-8&serverTimezone=UTC&useSSL=false&allowPublicKeyRetrieval=true
    username: root
    password: xxxxxx
    hikari:
      max-lifetime: 70000

flowable:
  # 开启定时任务JOB
  async-executor-activate: true
  # 在引擎启动时,会自动更新数据库架构
  database-schema-update: true
4、在resources文件夹下,新建文件夹bpmn,用于存放流程xml文件

5、新建IService和Impl
5.1 服务接口IFlowableService
public interface IFlowableService {
    //初始化流程
    String initFlowable();

    //获取所有流程实例
    List<JSONObject> queryAllDeployedProcesses();
}
5.2 实现类FlowableServiceImpl
package com.example.flowable_eng.service.impl;

import com.alibaba.fastjson2.JSONObject;
import com.example.flowable_eng.service.IFlowableService;
import jakarta.annotation.Resource;
import lombok.extern.slf4j.Slf4j;
import org.flowable.engine.*;
import org.flowable.engine.repository.Deployment;
import org.flowable.engine.repository.DeploymentBuilder;
import org.flowable.engine.repository.ProcessDefinition;
import org.springframework.context.annotation.Lazy;
import org.springframework.core.io.ClassPathResource;
import org.springframework.stereotype.Service;
import org.springframework.transaction.annotation.Transactional;

import java.io.File;
import java.util.ArrayList;
import java.util.List;

@Service
@Slf4j
public class FlowableServiceImpl implements IFlowableService {
    @Resource
    @Lazy
    private RepositoryService repositoryService;

    @Resource
    @Lazy
    private RuntimeService runtimeService;

    @Resource
    @Lazy
    private TaskService taskService;

    @Resource
    @Lazy
    private HistoryService historyService;

    @Resource
    @Lazy
    IdentityService identityService;

    @Override
    @Transactional(rollbackFor = Exception.class)
    public String initFlowable() {
        try {
            // 获取bpmn文件夹的所有.bpmn20.xml文件
            ClassPathResource bpmnFolder=new ClassPathResource("bpmn/");
            File[] files= bpmnFolder.getFile().listFiles((dir, name) -> name.endsWith(".bpmn20.xml"));

            if (files != null && files.length > 0) {
                // 创建部署对象
                DeploymentBuilder deploymentBuilder= repositoryService.createDeployment();

                for (var file : files) {
                    // 添加BPMN文件到部署
                    deploymentBuilder.addInputStream(file.getName(), file.toURI().toURL().openStream());
                }

                // 执行部署
                Deployment deployment= deploymentBuilder.deploy();
                return deployment.getId();
            }
        }catch (Exception ex){
            ex.printStackTrace();
        }
        return "OK";
    }

    @Override
    public List<JSONObject> queryAllDeployedProcesses() {
        List<JSONObject> jsonObjects = new ArrayList<>();

        // 查询所有流程定义
        List<ProcessDefinition> processDefinitions = repositoryService.createProcessDefinitionQuery()
                .orderByProcessDefinitionKey().asc() // 按流程定义的 Key 排序
                .latestVersion() // 只查询每个流程定义的最新版本
                .list();

        // 打印所有已部署的流程的 key 和 name
        for (ProcessDefinition processDefinition : processDefinitions) {
            JSONObject object=new JSONObject();
            object.put("id", processDefinition.getId());
            object.put("key", processDefinition.getKey());
            object.put("name", processDefinition.getName());
            object.put("version", processDefinition.getVersion());
            jsonObjects.add(object);
        }

        return jsonObjects;

    }
}
6、新建控制器类FlowableTestController
package com.example.flowable_eng.controller;

import com.alibaba.fastjson2.JSONObject;
import com.example.flowable_eng.service.IFlowableService;
import jakarta.annotation.Resource;
import org.springframework.context.annotation.Lazy;
import org.springframework.web.bind.annotation.GetMapping;
import org.springframework.web.bind.annotation.RequestMapping;
import org.springframework.web.bind.annotation.RestController;

import java.util.List;

@RestController
@RequestMapping("/flowableTest")
public class FlowableTestController {
    @Resource
    @Lazy
    private IFlowableService flowableService;

    //初始化流程
    @GetMapping("/initFlowable")
    public String initFlowable(){
        return flowableService.initFlowable();
    }

    //查询所有的流程实例
    @GetMapping("/queryAllDeployedProcesses")
    public List<JSONObject> queryAllDeployedProcesses(){
        return flowableService.queryAllDeployedProcesses();
    }
}7、前端可用@flowable/vue ,是 Flowable 官方提供的 Vue 插件,支持 Vue 2.x 和 Vue 3.x 版本,后续我还会更新