接上一篇: Electron 初体验
代码完善
上一篇中,就是简单的写了一些demo内容,菜鸟又在其上加上了不少功能,但是感觉从vue到初次开发electron真正需要注意的,还是那些读取文件、连接数据库之类的东西。
而上一篇中就是主要介绍的就是那些,其实看懂一个,后面的都是以此类推即可!
这里之所以要写,只是因为菜鸟后面读取文件的方案感觉还是不好,最后改成连接数据库,就是后端直接在服务器上安装了mySQL,然后我直接用electron去连接即可,这里就是代码,菜鸟也对之前写的代码进行了抽离
main.js
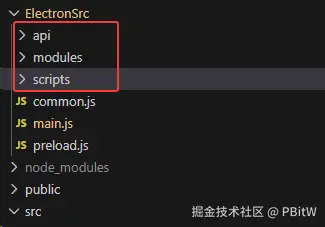
菜鸟的目录结构变成了这样
js
const { app, BrowserWindow, ipcMain, dialog } = require("electron");
const { join } = require("path");
const path = require("path");
const { exec, spawn } = require("child_process");
const fs = require("fs");
const express = require("express");
const mysql = require("mysql2/promise");

// 提出去的读写文件操作
const { selectPath } = require("./modules/selectPath.js");
const { runScript, runScriptNoWait } = require("./modules/runScript.js");
const { readDir } = require("./modules/readDir.js");
const { readConfig } = require("./modules/readConfig.js");
const { writeConfig } = require("./modules/writeConfig.js");
const { saveImageToUserData } = require("./modules/saveImageToUserData.js");
const { loadImageAsBase64 } = require("./modules/loadImageAsBase64.js");
const { getSeqChipPath } = require("./modules/getSeqChipPath.js");
const { readFa, readBFile, readCFile } = require("./modules/readFa.js");

// 提出去的API
const { loginApi } = require("./api/login.js");
const { appraisalRecordAddApi } = require("./api/appraisalRecordAdd.js");
const { appraisalRecordListApi } = require("./api/appraisalRecordList.js");

// 屏蔽安全警告
// ectron Security Warning (Insecure Content-Security-Policy)
process.env["ELECTRON_DISABLE_SECURITY_WARNINGS"] = "true";

// 创建浏览器窗口时,调用这个函数。
const createWindow = () => {
  const win = new BrowserWindow({
    width: 1920,
    height: 1080,
    fullscreen: false, // 👈 一启动就全屏
    autoHideMenuBar: true,
    webPreferences: {
      preload: path.join(__dirname, "preload.js"),
      contextIsolation: true,
      nodeIntegration: false
    }
  });

  // 启动时最大化(保留窗口按钮)
  win.maximize();

  // win.loadURL('http://localhost:3000')
  // development模式
  if (process.env.VITE_DEV_SERVER_URL) {
    win.loadURL(process.env.VITE_DEV_SERVER_URL);
    // 开启调试台
    win.webContents.openDevTools();
  } else {
    win.loadFile(join(__dirname, "../dist/index.html"));
  }
};

// Electron 会在初始化后并准备
app.whenReady().then(async () => {
  await startLocalApi(); // ⭐ 启动本地 API
  createWindow();
  app.on("activate", () => {
    if (BrowserWindow.getAllWindows().length === 0) createWindow();
  });
});

app.on("window-all-closed", () => {
  if (process.platform !== "darwin") app.quit();
});

// 保存配置 - 用于设置脚本执行目录
const userDataPath = app.getPath("userData");
const scriptDir = path.join(userDataPath, "scripts"); // 目标文件夹
const defaultScriptDir = path.join(__dirname, "scripts"); // 源文件夹
// 如果目标文件夹不存在,先创建
if (!fs.existsSync(scriptDir)) {
  fs.mkdirSync(scriptDir, { recursive: true }); // 递归创建目录
}
// 读取默认目录下的文件列表,逐个拷贝
fs.readdirSync(defaultScriptDir).forEach((file) => {
  const srcFile = path.join(defaultScriptDir, file);
  const destFile = path.join(scriptDir, file);
  // 只拷贝文件
  if (fs.lstatSync(srcFile).isFile()) {
    fs.copyFileSync(srcFile, destFile);
    console.log(`${file} has copy to scripts`);
  }
});

// 选择路径
selectPath(ipcMain, dialog);
// 运行脚本 -- 等待结果
runScript(ipcMain, app, path, fs, exec);
// 运行脚本 -- 不等待结果
runScriptNoWait(ipcMain, app, path, fs, spawn);
// 读取某个文件夹下是否有文件
readDir(ipcMain, fs);
// 读取配置文件
readConfig(ipcMain, app, path, fs);
// 写入配置文件
writeConfig(ipcMain, app, path, fs);
// 保存用户上传的图片到用户目录 ------ 防止用户删除
saveImageToUserData(ipcMain, app, path, fs);
// 加载图片作为 base64 编码 ------
loadImageAsBase64(ipcMain, app, path, fs);
// 获取配置文件下的测序路径,并将下面的文件返回成select可以使用的选项
getSeqChipPath(ipcMain, app, path, fs);
// 读取 FA 文件
readFa(ipcMain, fs, path);
// 读取 B 文件
readBFile(ipcMain, fs, path);
// 读取 C 文件
readCFile(ipcMain, fs, path);


// 连接数据库 -- 重点
let apiServer;
let apiPort;
let mysqlPool;

async function startLocalApi() {
  const api = express();
  api.use(express.json());

  // ⚠️ MySQL 连接池(只初始化一次)
  mysqlPool = mysql.createPool({
    host: "xxx.xx.xxx.xx", // 数据库地址
    port: 13306, // 端口
    user: "barcode_for_medicinal", // 数据库账号
    password: "xxxxxxxx", // 数据库密码
    database: "barcode_for_medicinal", // 数据库名称
    connectionLimit: 5 // 连接池最大连接数
  });

  // 解决跨域
  api.use((req, res, next) => {
    res.setHeader("Access-Control-Allow-Origin", "*");
    res.setHeader("Access-Control-Allow-Methods", "GET,POST,PUT,DELETE,OPTIONS");
    res.setHeader("Access-Control-Allow-Headers", "Content-Type");
    next();
  });

  // 登录接口
  loginApi(api, mysqlPool);
  // 鉴定记录添加接口
  appraisalRecordAddApi(api, mysqlPool);
  // 鉴定记录列表接口
  appraisalRecordListApi(api, mysqlPool);

  // ⭐ 随机端口,只监听本机
  apiServer = api.listen(0, "127.0.0.1", () => {
    apiPort = apiServer.address().port;
    console.log("Local API started on port:", apiPort);
  });
}

// 获取本地 API 端口
ipcMain.handle("getApiPort", () => {
  return apiPort;
});
如何使用接口?
菜鸟直接将API的端口存在了pinia中,避免每次调用还要去和electron通信
port.js
js
import { ref } from "vue";
import { defineStore } from "pinia";

export const usePortStore = defineStore("port", () => {
  let port = ref(null);

  // 异步 action
  async function fetchPort() {
    port.value = await window.electronAPI.getApiPort();
  }

  function getPort() {
    return port.value;
  }

  return { port, fetchPort, getPort };
});
login.vue
js
<script setup>
import router from "@/router";
import { NForm, NFormItemRow, NInput, NButton, useMessage } from "naive-ui";
import { reactive, ref } from "vue";
import logo from "@/assets/img/logo.png";

import { usePortStore } from "@/stores/port";
import { useUserStore } from "@/stores/user";
const portStore = usePortStore();
const userStore = useUserStore();

const message = useMessage();
const formData = reactive({
  username: "xxx",
  password: "xxxxx"
});

const rules = reactive({
  username: [{ required: true, message: "请输入用户名", trigger: ["blur"] }],
  password: [{ required: true, message: "请输入密码", trigger: ["blur"] }]
});

const formRef = ref(null);
const login = () => {
  formRef.value?.validate(async (errors) => {
    if (!errors) {
      try {
        const res = await fetch(`http://127.0.0.1:${portStore.getPort()}/login`, {
          method: "POST",
          headers: { "Content-Type": "application/json" },
          body: JSON.stringify({ username: formData.username, password: formData.password })
        });

        const result = await res.json();
        console.log("登录响应:", result);

        if (result.ok) {
          // 可以存到 Pinia 或 localStorage
          userStore.setUser(result.user);
          router.replace("/home");
        } else {
          message.error("登录失败:" + result.message);
        }
      } catch (err) {
        console.error("请求错误:", err);
      }
    } else {
      console.log(errors);
    }
  });
};

const model = ref({
  leftLogo: [
    {
      url: logo
    }
  ],
  rightLogo: [
    {
      url: logo
    }
  ]
});
// 读取配置文件
const readConfig = async () => {
  try {
    const config = await window.electronAPI.readConfig();
    console.log("读取到的配置:", config);

    if (config.leftLogo[0]?.name) {
      model.value.leftLogo = [
        {
          url: await window.electronAPI.loadImageAsBase64(config.leftLogo[0].name)
        }
      ];
    }

    if (config.rightLogo[0]?.name) {
      model.value.rightLogo = [
        {
          url: await window.electronAPI.loadImageAsBase64(config.rightLogo[0].name)
        }
      ];
    }

    // 文本类配置(直接覆盖没问题)
    if (config?.supportText) {
      model.value.supportText = config.supportText;
    }

    console.log("配置后的模型:", model.value);
  } catch (err) {
    console.error("读取配置文件失败:", err);
  }
};
readConfig();
</script>

<template>
  <div class="flex h-full flex-col items-center justify-center">
    <header class="w-full">
      <div class="mb-4 flex items-center justify-evenly">
        <img class="w-[200px]" :src="model.leftLogo[0]?.url" alt="logo" />
        <img class="w-[200px]" :src="model.rightLogo[0]?.url" alt="logo" />
      </div>
    </header>

    <main class="loginBox relative h-[70%] w-full">
      <div
        class="loginForm absolute top-[50%] left-[80%] w-[400px] translate-x-[-50%] translate-y-[-50%] rounded-[10px] bg-white p-[30px]"
      >
        <n-form ref="formRef" :model="formData" :rules="rules">
          <n-form-item-row label="用户名" path="username">
            <n-input placeholder="请输入用户名" v-model:value="formData.username" />
          </n-form-item-row>
          <n-form-item-row label="密码" path="password">
            <n-input
              type="password"
              show-password-on="mousedown"
              placeholder="请输入密码"
              v-model:value="formData.password"
            />
          </n-form-item-row>
        </n-form>
        <n-button type="primary" block secondary strong @click="login"> 登录 </n-button>
      </div>
    </main>

    <footer>
      <p class="text-center whitespace-pre-line">
        {{ model.supportText }}
      </p>
    </footer>
  </div>
</template>

<style scoped>
.loginBox {
  background-image: url("@/assets/img/bg.jpg");
  background-size: 100% 100%;
}
.loginForm {
  box-shadow: 0 0 10px rgba(0, 0, 0, 0.5);
}
</style>
基本上最基础的electron就是这些,菜鸟这个主要就是读取配置文件、连接数据库读写数据,没有很复杂的操作!
在乌班图上打包
上一篇有说,windows上打包有缺陷,所以这里菜鸟用的方式是:让公司给开一个乌班图的服务器,在服务器上配置一下node环境,将本地代码搞成压缩包传到服务器,在服务器上解压后执行npm i,并打包!
配置服务器上的node环境
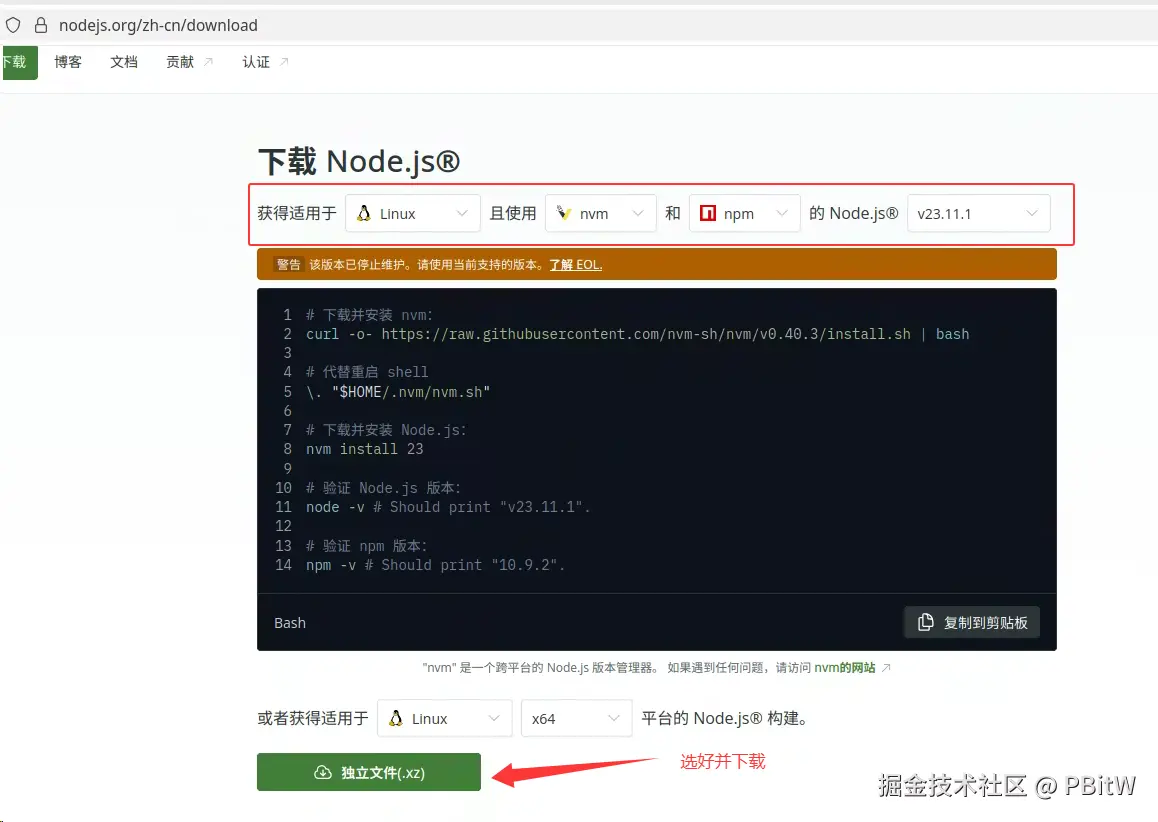
第一步:
在乌班图的浏览器上,访问:nodejs.org/zh-cn/downl... ,并选择对应的版本下载即可!
第二步:
进入下载目录解压,解压后将其转移到 /usr/local/node 目录
shell
cd yourDwonloadPath
tar -xvf node-vxx.xx.xx-linux-x64.tar.xz
移动目录
shell
sudo mv node-vxx.xx.xx-linux-x64 /usr/local/node第三步:
设置环境变量
shell
vim ~/.bashrc并添加
shell
export NODE_HOME=/usr/local/node
export PATH=$NODE_HOME/bin:$PATH
让其生效
bash
source ~/.bashrc然后就可以 node -v 和 npm -v 看看是否真的生效了!
运行
将本地代码,打包并上传到乌班图服务器
解压之前需要下载解压软件
shell
sudo apt update
sudo apt install -y p7zip-full
解压
shell
cd 你上传的文件路径

解压到当前目录
7z x file.7z

解压到指定目录
7z x file.7z -o/home/p/output然后执行npm i、npm run dev 看能不能运行,如果出现白屏需要修改main.js
js
const { app, BrowserWindow, ipcMain, dialog } = require("electron");
const { join } = require("path");
const path = require("path");
const { exec, spawn } = require("child_process");
const fs = require("fs");
const express = require("express");
const mysql = require("mysql2/promise");

// 提出去的读写文件操作
const { selectPath } = require("./modules/selectPath.js");
const { runScript, runScriptNoWait } = require("./modules/runScript.js");
const { readDir } = require("./modules/readDir.js");
const { readConfig } = require("./modules/readConfig.js");
const { writeConfig } = require("./modules/writeConfig.js");
const { saveImageToUserData } = require("./modules/saveImageToUserData.js");
const { loadImageAsBase64 } = require("./modules/loadImageAsBase64.js");
const { getSeqChipPath } = require("./modules/getSeqChipPath.js");
const { readFa, readBFile, readCFile } = require("./modules/readFa.js");

// 提出去的API
const { loginApi } = require("./api/login.js");
const { appraisalRecordAddApi } = require("./api/appraisalRecordAdd.js");
const { appraisalRecordListApi } = require("./api/appraisalRecordList.js");

// 打包其实这几个配置无效 ------ 如果需要在linux系统上npm run dev运行,要加上 ------ 后面有说明(见下方deb包)
// 禁 GPU(消掉噪音) -- 新增
app.disableHardwareAcceleration();
// 关 sandbox(关键)-- 新增
app.commandLine.appendSwitch("disable-gpu");
app.commandLine.appendSwitch("no-sandbox");
app.commandLine.appendSwitch("disable-setuid-sandbox");

// 屏蔽安全警告
// ectron Security Warning (Insecure Content-Security-Policy)
process.env["ELECTRON_DISABLE_SECURITY_WARNINGS"] = "true";

// 新增 -- 看启动是否成功
const htmlPath = join(__dirname, "../dist/index.html");
console.log("Trying to load HTML:", htmlPath);
console.log("Exists:", fs.existsSync(htmlPath));

// 创建浏览器窗口时,调用这个函数。
const createWindow = () => {
  const win = new BrowserWindow({
    width: 1920,
    height: 1080,
    fullscreen: false, // 👈 一启动就全屏
    autoHideMenuBar: true,
    webPreferences: {
      preload: path.join(__dirname, "preload.js"),
      contextIsolation: true,
      nodeIntegration: false
    }
  });

  // 启动时最大化(保留窗口按钮)
  win.maximize();

  // win.loadURL('http://localhost:3000')
  // development模式
  if (process.env.VITE_DEV_SERVER_URL) {
    win.loadURL(process.env.VITE_DEV_SERVER_URL);
    // 开启调试台
    win.webContents.openDevTools();
  } else {
    win.loadFile(join(__dirname, "../dist/index.html"));
  }
};

// Electron 会在初始化后并准备
app.whenReady().then(async () => {
  await startLocalApi(); // ⭐ 启动本地 API
  createWindow();
  app.on("activate", () => {
    if (BrowserWindow.getAllWindows().length === 0) createWindow();
  });
});

app.on("window-all-closed", () => {
  if (process.platform !== "darwin") app.quit();
});

// 保存配置 - 用于设置脚本执行目录
const userDataPath = app.getPath("userData");
const scriptDir = path.join(userDataPath, "scripts"); // 目标文件夹
// 如果目标文件夹有东西,就不拷贝 -- 避免每次运行,都会导致之前配置没有了
if (fs.readdirSync(scriptDir).length > 0) {
  console.log("scripts folder is not empty, skip copy");
} else {
  const defaultScriptDir = path.join(__dirname, "scripts"); // 源文件夹
  // 如果目标文件夹不存在,先创建
  if (!fs.existsSync(scriptDir)) {
    fs.mkdirSync(scriptDir, { recursive: true }); // 递归创建目录
  }
  // 读取默认目录下的文件列表,逐个拷贝
  fs.readdirSync(defaultScriptDir).forEach((file) => {
    const srcFile = path.join(defaultScriptDir, file);
    const destFile = path.join(scriptDir, file);
    // 只拷贝文件
    if (fs.lstatSync(srcFile).isFile()) {
      fs.copyFileSync(srcFile, destFile);
      console.log(`${file} has copy to scripts`);
    }
  });
}

// 选择路径
selectPath(ipcMain, dialog);
// 运行脚本 -- 等待结果
runScript(ipcMain, app, path, fs, exec);
// 运行脚本 -- 不等待结果
runScriptNoWait(ipcMain, app, path, fs, spawn);
// 读取某个文件夹下是否有文件
readDir(ipcMain, fs);
// 读取配置文件
readConfig(ipcMain, app, path, fs);
// 写入配置文件
writeConfig(ipcMain, app, path, fs);
// 保存用户上传的图片到用户目录
saveImageToUserData(ipcMain, app, path, fs);
// 加载图片作为 base64 编码
loadImageAsBase64(ipcMain, app, path, fs);
// 获取配置文件下的测序路径,并将下面的文件返回成select可以使用的选项
getSeqChipPath(ipcMain, app, path, fs);
// 读取 FA 文件
readFa(ipcMain, fs, path);
// 读取 B 文件
readBFile(ipcMain, fs, path);
// 读取 C 文件
readCFile(ipcMain, fs, path);


// 连接数据库
let apiServer;
let apiPort;
let mysqlPool;

async function startLocalApi() {
  const api = express();
  api.use(express.json());

  // ⚠️ MySQL 连接池(只初始化一次)
  mysqlPool = mysql.createPool({
    host: "xxx.xxx.xx.xx",
    port: 13306,
    user: "barcode_for_medicinal", // 数据库账号
    password: "xxxx", // 数据库密码
    database: "barcode_for_medicinal", // 数据库名称
    connectionLimit: 5 // 连接池最大连接数
  });

  api.use((req, res, next) => {
    res.setHeader("Access-Control-Allow-Origin", "*");
    res.setHeader("Access-Control-Allow-Methods", "GET,POST,PUT,DELETE,OPTIONS");
    res.setHeader("Access-Control-Allow-Headers", "Content-Type");
    next();
  });

  // 登录接口
  loginApi(api, mysqlPool);
  // 鉴定记录添加接口
  appraisalRecordAddApi(api, mysqlPool);
  // 鉴定记录列表接口
  appraisalRecordListApi(api, mysqlPool);

  // ⭐ 随机端口,只监听本机
  apiServer = api.listen(0, "127.0.0.1", () => {
    apiPort = apiServer.address().port;
    console.log("Local API started on port:", apiPort);
  });
}

// 获取本地 API 端口
ipcMain.handle("getApiPort", () => {
  return apiPort;
});
修改后,会发现可以运行,但是连不上数据库!
这个时候需要修改 main.js 中连接数据库的地方,不能再用ip地址了,要用本地ip地址
js
// 连接数据库
let apiServer;
let apiPort;
let mysqlPool;

async function startLocalApi() {
  const api = express();
  api.use(express.json());

  // ⚠️ MySQL 连接池(只初始化一次)
  mysqlPool = mysql.createPool({
    host: "127.0.0.1", // 修改成这个或者localhost
    port: 13306,
    user: "barcode_for_medicinal", // 数据库账号
    password: "xxxx", // 数据库密码
    database: "barcode_for_medicinal", // 数据库名称
    connectionLimit: 5 // 连接池最大连接数
  });

  api.use((req, res, next) => {
    res.setHeader("Access-Control-Allow-Origin", "*");
    res.setHeader("Access-Control-Allow-Methods", "GET,POST,PUT,DELETE,OPTIONS");
    res.setHeader("Access-Control-Allow-Headers", "Content-Type");
    next();
  });

  // 登录接口
  loginApi(api, mysqlPool);
  // 鉴定记录添加接口
  appraisalRecordAddApi(api, mysqlPool);
  // 鉴定记录列表接口
  appraisalRecordListApi(api, mysqlPool);

  // ⭐ 随机端口,只监听本机
  apiServer = api.listen(0, "127.0.0.1", () => {
    apiPort = apiServer.address().port;
    console.log("Local API started on port:", apiPort);
  });
}
整个功能可以正常使用后,就可以到打包这一步了。
打包
需要修改package.json(这里已经是菜鸟试错多次后修改好的文件了,所以就不一一列举是怎么踩坑的了)
json
{
  "name": "barcode-medicinal",
  "productName": "Barcode Medicinal",
  "version": "1.0.0",
  "private": true,
  "homepage": "http://xxx.xxx.xxx.xx:5050/other/barcodeformedicinal.git", // 一定要有,不然会报错(随便放个git地址即可)
  "main": "ElectronSrc/main.js",
  "engines": {
    "node": "^20.19.0 || >=22.12.0"
  },
  "scripts": {
    "dev": "vite",
    "dev:electron": "electron .",
    "dev:full": "npm run dev & npm run dev:electron",
    "build:vue": "vite build",
    "build:electron": "electron-builder",
    "build": "npm run build:vue && npm run build:electron -- --linux",
    "preview": "vite preview",
    "lint": "eslint . --fix --cache",
    "format": "prettier --write src/"
  },
  "build": {
    "appId": "com.example.barcodeformedicinal",
    "productName": "barcode-medicinal", // 一定要用英文,windows上可以中文
    "asar": true,
    "directories": {
      "output": "dist_electron"
    },
    "files": [
      "dist/**",
      "ElectronSrc/**",
      "package.json"
    ],
    // 这样写可以打包4个出来
    "linux": {
      "target": [
        {
          "target": "deb",
          "arch": [
            "x64",
            "arm64"
          ]
        },
        "AppImage",
        // 可不要
        {
          "target": "rpm",
          "arch": [
            "x64"
          ]
        }
      ],
      "category": "Utility",
      "description": "Barcode Medicinal Electron",
      "maintainer": "Your Name <youremail@example.com>" // 必须写,假的也行,不然报错
    }
  },
  "dependencies": {
    ......
  },
  "devDependencies": {
    ......
  }
}
执行 npm run build,你会得到三个文件,打包后的文件,在package.json中的这里
json
"directories": {
  "output": "dist_electron"
},
里面应该有几个乌班图可以运行的文件

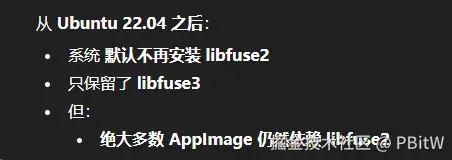
运行AppImage
其中AppImage文件运行需要下载libfuse2
shell
sudo apt update
sudo apt install libfuse2

cd dist_electron
chmod +x xxxx.AppImage
./xxxx.AppImage
AI给了第二种方式,但是菜鸟试了不行

运行deb
运行deb文件
bash
sudo dpkg -i dist_electron/barcode-medicinal_1.0.0_amd64.deb就会自动帮你安装,如果看到 依赖错误,则继续执行下面的代码(一般不会)
sudo apt -f install卸载
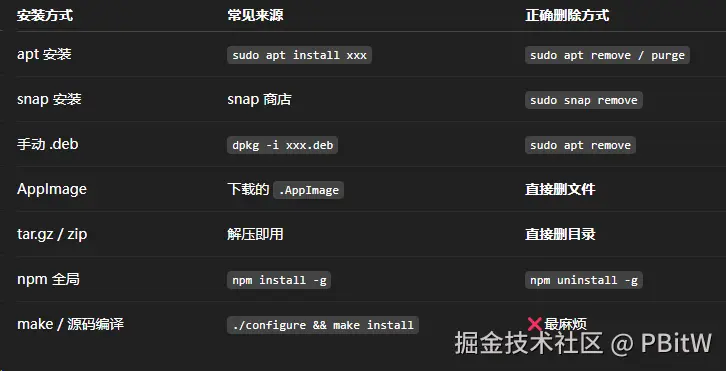
安装后想删除?
这里还挺复杂,不同的安装方式,删除不一样,这里菜鸟只给出用sudo dpkg安装的卸载方法!
shell
一般执行这一个就行了
sudo apt purge 你的应用名(就是package.json中build中的productName)

清理垃圾 ------ 可不执行
sudo apt autoremove
sudo apt autoclean

确保卸载
dpkg -l | grep barcode(没有输出就是正确的)
槽点
这里有一个槽点,你就算执行了清理垃圾这步操作,其实用户数据还是会存在,需要手动删除
shell
cd ~/.config

ll

cd 你的软件名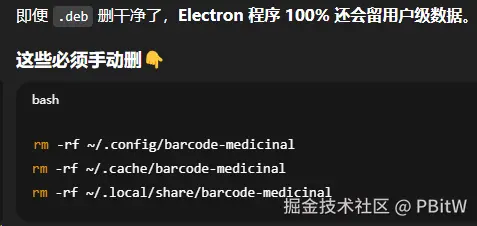
至于更深层的菜鸟就没搞了
都是白屏
这里不管是哪一种,都是白屏!
然后菜鸟执行了这些,Trae查看我的整个项目后给出的(完全不知道原因)
shell
sudo apt install -y libnss3 libatk-bridge2.0-0 libxss1 libgbm-dev libx11-xcb1 libxcomposite1 libxcursor1 libxdamage1 libxi6 libxtst6 libxrandr2 libpangocairo-1.0-0 libgtk-3-0 libdrm2 libxkbcommon0 libwayland-client0 libwayland-server0

./barcode-medicinal-1.0.0.AppImage --disable-dev-shm-usage --no-sandbox --disable-gpu
就成功运行出来了,但是用户肯定不会这样运行啊!
所以还是要看deb,怎么搞?
deb包
一开始菜鸟,按照GPT说的加上了
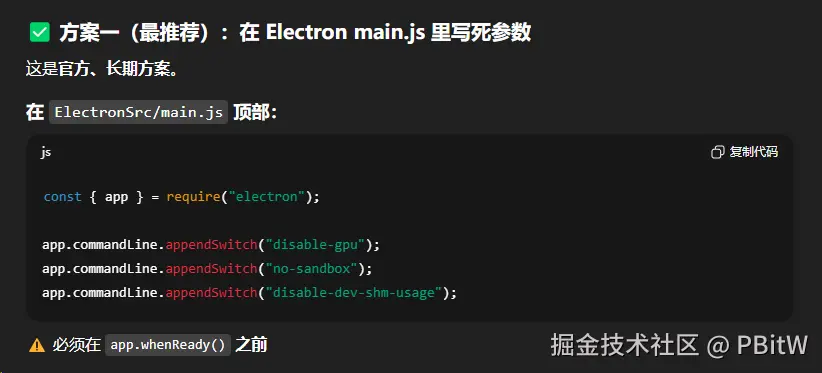
却没有任何效果,后面才发现在main.js上加,在打包过程中会直接被忽略,应该写在package.json中的linux配置里,打包好后再按照上面的deb运行方式就可以运行不白屏了!
json
"linux": {
  "target": [
    {
      "target": "deb",
      "arch": [
        "x64",
        "arm64"
      ]
    },
    "AppImage",
    // 可不要
    {
      "target": "rpm",
      "arch": [
        "x64"
      ]
    }
  ],
  "executableArgs": [
    "--no-sandbox",
    "--disable-setuid-sandbox",
    "--disable-dev-shm-usage",
    "--disable-gpu"
  ],
  "category": "Utility",
  "description": "Barcode Medicinal Electron",
  "maintainer": "Your Name <youremail@example.com>" // 必须写,假的也行,不然报错
}
AppImage包 ------ 骚操作
一开始菜鸟是试的deb不行(但是后面搞好了),那就直接自己创建一个桌面快捷键,然后运行面的命令不就行了?
所以就按照这个来就行
shell
# 创建 .desktop 文件
cat > ~/.local/share/applications/barcode-medicinal.desktop <<EOL
[Desktop Entry]
Name=Barcode Medicinal
Comment=Barcode Medicinal App
Exec=/home/bnzycjd/pbw/dist_electron/barcode-medicinal-1.0.0.AppImage --disable-dev-shm-usage --no-sandbox --disable-gpu
Icon=/home/bnzycjd/Pictures/logo.png
Terminal=false
Type=Application
Categories=Utility;
StartupWMClass=barcode-medicinal
EOL

# 赋予执行权限
chmod +x ~/.local/share/applications/barcode-medicinal.desktop

# 标记为可信任
gio set ~/.local/share/applications/barcode-medicinal.desktop metadata::trusted true

# 刷新应用菜单
update-desktop-database ~/.local/share/applications
建议提前都写好,不然很难敲,感觉vim不好用!
还有这个icon如果一开始没写,后面写了也可能半天不刷新。
这里有一个骚操作,就是在Show Apps里右键先将其Pin to Dash,然后再弄回来就好了!
问GPT为什么?

反正菜鸟感觉是服务器里面东西不全,所以导致需要这些操作,感觉和代码没啥关系!