前言
本博客中,我们将通过具体的代码示例,逐步演示如何使用 Spring 的注解来实现 AOP。我们将涵盖切面(Aspect)、通知(Advice)、连接点(Join Point)等基本概念,并展示如何将这些概念应用于实际项目中。无论你是 AOP 的新手还是希望深入了解其高级用法的开发者,都能从本文中获得有价值的见解。
XML方式原理剖析
动态代理的实现的选择,在调用getProxy(方法时,我们可选用的AopProxy接口有两个实现类,如上图,这两种都是动态生成代理对象的方式,一种就是基于JDK的,一种是基于Cglib的

java
package com.itheima.test;

import com.itheima.advice.MyAdvice;
import com.itheima.service.impl.UserServiceImpl;
import org.springframework.cglib.proxy.Enhancer;
import org.springframework.cglib.proxy.MethodInterceptor;
import org.springframework.cglib.proxy.MethodProxy;

import java.lang.reflect.Method;

public class CGlibTest {

    public static void main(String[] args) {

        //CGlib基于父类(目标类)生成Proxy

        //目标对象
        Target target = new Target();
        //通知对象(增强对象)
        MyAdvice4 myAdvice4 = new MyAdvice4();

        //编写CGlib的代码
        Enhancer enhancer = new Enhancer();
        //设置父类
        enhancer.setSuperclass(Target.class);//生成的代理对象就是Target的子类
        //设置回调
        enhancer.setCallback(new MethodInterceptor() {
            @Override
            //intercept方法相当于JDK的Proxy的invoke方法
            public Object intercept(Object o, Method method, Object[] objects, MethodProxy methodProxy) throws Throwable {
                myAdvice4.before();
                Object res = method.invoke(target, objects); //执行目标方法
                myAdvice4.after();
                return res;
            }
        });

        //生成代理对象
        Target proxy = (Target) enhancer.create();

        //测试
        proxy.show();

    }

}
java
package com.itheima.test;

public class MyAdvice4 {

    public void before(){
        System.out.println("前置增强");
    }

    public void after(){
        System.out.println("后置增强");
    }

}

package com.itheima.test;

public class Target {

    public void show(){
        System.out.println("show..");
    }


}
基于注解配置的AOP
注解方式AOP的基本使用
Spring的AOP也提供了注解方式配置,使用相应的注解替代之前的xml配置,xml配置AOP时,我们主要配置了三部分:目标类被Spring容器管理、通知类被Spring管理、通知与切点的织入(切面),如下:
xml
<!--配置目标-->
<bean id="target" class="com.itheima.aop.TargetImpl"></bean>
<!--配置通知-->
<bean id="advices" class="com.itheima.aop.Advices"></bean>
<!--配置aop-->
<aop:config proxy-target-class=" true">
	<aop:aspect ref="advices">
	<aop:around method-"around" Pointcut="execution(* com.itheima.aop.*,*(..))"/></aop:aspect>
<aop:config>
java
//增强类,内部提供增强方法
@Component("myAdvice")
@Aspect
public class MyAdvice {

    @Before("execution(* com.itheima.service.impl.*.*(..))")
    public void beforeAdvice() {
        System.out.println("前置的增强");
    }
    ....

}
java
<?xml version="1.0" encoding="UTF-8"?>
<beans xmlns="http://www.springframework.org/schema/beans"
       xmlns:xsi="http://www.w3.org/2001/XMLSchema-instance"
       xmlns:aop="http://www.springframework.org/schema/aop"
       xsi:schemaLocation="http://www.springframework.org/schema/beans
       http://www.springframework.org/schema/beans/spring-beans.xsd
       http://www.springframework.org/schema/aop
       http://www.springframework.org/schema/aop/spring-aop.xsd
">

   <!--使用注解配置AOP,需要开启AOP的自动代理-->
    <aop:aspectj-autoproxy/>
    <!--组件扫描-->
    <context:component-scan base-package="com.itheima"></context:component-scan>

</beans>
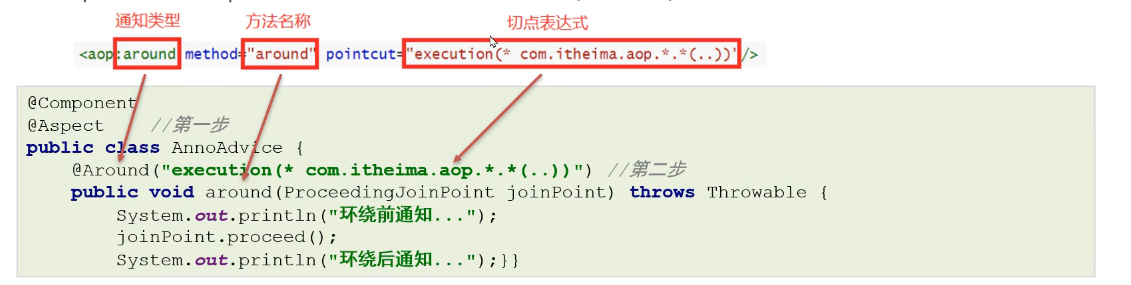
配置aop,其实配置aop主要就是配置通知类中的哪个方法(通知类型)对应的切点表达式是什么
注解@Aspect、@Around需要被Spring解析,所以在Spring核心配置文件中需要配置aspectj的自动代理
xml
<aop:aspectj-autoproxy/>注解方式配置AOP详解
各种注解方式通知类型
java
//前置通知
@Before("execution(* com.itheima.aop.*.*(..))")
publie void before (JoinPoint joinPoint) {}
//后置通知
@AfterReturning("execution(* com.itheima.aop.*.*(..))")
publie void AfterReturning(JoinPoint joinPoint) {}
//环绕通知
@Around("execution(* com.itheima.aop.*.*(..))")
pub1lic void around(ProceedingJoinPoint joinPoint) throws Throwable {}
//异常通知
@AfterThrowing("execution(* com.itheima.aop.*.*(..))")
publie void AfterThrowing(JoinPoint joinPoint) {}
//最终通知
@After("execution(* com.itheima.aop.*.*(..))")
publie void After (JoinPoint joinPoint) {}
java
@Component("myAdvice")
@Aspect
public class MyAdvice {

    @Before("MyAdvice.myPointcut()")
    public void beforeAdvice(JoinPoint joinPoint) {
        System.out.println("前置的增强");
    }
    ...
    //切点表达式的抽取
    @Pointcut("execution(* com.itheima.service.impl.*.*(..))")
    public void myPointcut(){
    }
}
@Before("MyAdvice.myPointcut()"): 定义一个前置通知,该通知将在执行切点方法之前执行。这里的切点引用到 myPointcut() 方法。
@Pointcut: 用来定义切点表达式。在这个例子中,它指的是 com.itheima.service.impl 包下的所有类的所有方法。
java
package com.itheima.config;

import org.springframework.context.annotation.ComponentScan;
import org.springframework.context.annotation.Configuration;
import org.springframework.context.annotation.EnableAspectJAutoProxy;

@Configuration
@ComponentScan("com.itheima")
@EnableAspectJAutoProxy(proxyTargetClass = true)
public class SpringConfig {
}
测试代码:
java
	public static void main(String[] args) {
        ApplicationContext applicationContext = new AnnotationConfigApplicationContext(SpringConfig.class);
        UserService bean = applicationContext.getBean(UserService.class);
        bean.show1();
    }
运行结果:

之前在使用xml配置AOP时,是借助的Spring的外部命名空间的加载方式完成的,使用注解配置后,就抛弃了< aop:config>标签,而该标签最终加载了名为AspectAwareAdvisorAutoProxyCreator的BeanPostProcessor,最终,在该BeanPostProcessor中完成了代理对象的生成。
同样,从aspectj-autoproxy标签的解析器入手
java
this.registerBeanDefinitionParser("aspectj-autoproxy",newAspectJAutoProxyBeanDefinitionParser ());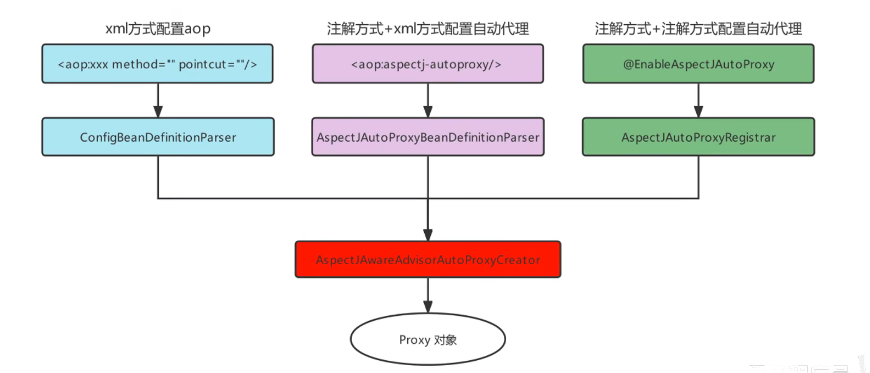
基于AOP的声明式事务控制
Spring事务编程概述
事务是开发中必不可少的东西,使用JDBC开发时,我们使用connnection对事务进行控制,使用MyBatis时,我们使用SqISession对事务进行控制,缺点显而易见,当我们切换数据库访问技术时,事务控制的方式总会变化,Spring就将这些技术基础上,提供了统一的控制事务的接口。Spring的事务分为:编程式事务控制和声明式事务控制

Spring事务编程相关的类主要有如下三个

搭建测试环境
搭建一个转账的环境,dao层一个转出钱的方法,一个转入钱的方法,service层一个转账业务方法,内部分别调用dao层转出钱和转入钱的方法,准备工作如下:
- 数据库准备一个账户表tb account;
- dao层准备一个AccountMapper,包括incrMoney和decrMoney两个方法;
- service层准备一个transferMoney方法,分别调用incrMoney和decrMoney方法;
- 在applicationContext文件中进行Bean的管理配置;测试正常转账与异常转账。
java
package com.itheima.mapper;

import org.apache.ibatis.annotations.Param;
import org.apache.ibatis.annotations.Update;

public interface AccountMapper {
    //+钱
    @Update("update account set money = money + #{money} where account_name = #{countName} ")
    public void incrMoney(@Param("countName")String countName,@Param("money") double money);

    //-钱
    @Update("update account set money = money - #{money} where account_name = #{countName} ")
    public void decrMoney(@Param("countName")String countName,@Param("money")double money);

}
java
package com.itheima.service;

public interface AccountService {

    void transforMoney(String outAccount,String inAccount,double money);
}
java
package com.itheima.service.impl;

import com.itheima.mapper.AccountMapper;
import com.itheima.service.AccountService;
import org.springframework.beans.factory.annotation.Autowired;
import org.springframework.stereotype.Service;


@Service("accountService")
public class AccountServiceImpl  implements AccountService {

    @Autowired
    private AccountMapper accountMapper;

    @Override
    public void transforMoney(String outAccount, String inAccount, double money) {
        accountMapper.decrMoney(outAccount,money);
        accountMapper.incrMoney(inAccount,money);
    }
}
xml
<?xml version="1.0" encoding="UTF-8"?>
<beans xmlns="http://www.springframework.org/schema/beans"
xmlns:xsi="http://www.w3.org/2001/XMLSchema-instance"
xmlns:context="http://www.springframework.org/schema/context"
xmlns:aop="http://www.springframework.org/schema/aop"
xsi:schemaLocation="
http://www.springframework.org/schema/beans
http://www.springframework.org/schema/beans/spring-beans.xsd
http://www.springframework.org/schema/context
http://www.springframework.org/schema/context/spring-context.xsd
http://www.springframework.org/schema/aop
http://www.springframework.org/schema/aop/spring-aop.xsd
">
<!--组件扫描-->
<context:component-scan base-package="com.itheima"/>
<!--加载properties文件-->
<context:property-placeholder location="classpath:jdbc.properties"/>
<!--配置数据源信息-->
<bean id="dataSource" class="com.alibaba.druid.pool.DruidDataSource">
<property name="driverClassName" value="${jdbc.driver}"></property>
<property name="url" value="${jdbc.url}"></property>
<property name="username" value="${jdbc.username}"></property>
<property name="password" value="${jdbc.password}"></property>
</bean>
<!--配置SqlSessionFactoryBean,作用将SqlSessionFactory存储到spring容器-->
<bean class="org.mybatis.spring.SqlSessionFactoryBean">
<property name="dataSource" ref="dataSource"></property>
</bean>
<!--MapperScannerConfigurer,作用扫描指定的包,产生Mapper对象存储到Spring容器-->
<bean class="org.mybatis.spring.mapper.MapperScannerConfigurer">
<property name="basePackage" value="com.itheima.mapper"></property>
</bean>
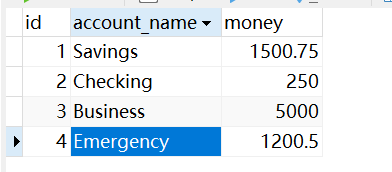
</beans>运行前:
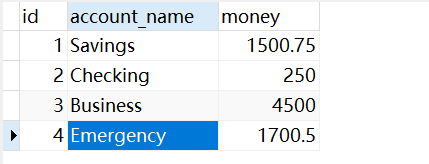
运行后:
总结
希望通过本文的学习,能够帮助你更好地理解和运用 AOP,提升你在日常开发中的效率与质量。AOP 是一种强大的工具,掌握它将使你在软件开发的道路上更加游刃有余。