1.基本介绍
1.1概念
Spring Cloud Config 是分布式系统中, 为服务端和客⼾端解决配置管理的⽅案. 它提供了集中化的配置管理, 使得在不同环境(开发, 测试, ⽣产) 中管理应⽤程序配置变得更加简单和⼀致. 它⽀持配置的动态刷新, 允许在不重启应⽤的情况下更新配置, 提⾼了系统的灵活性和响应速度。
1.2核心组成
Spring Cloud Config 是⼀个分布式配置管理系统, 它主要包括以下⼏个⽅⾯:
- Config Server(配置服务器)
Config Server 是⼀个配置管理服务器, 负责从各种后端存储(如Git、SVN、本地⽂件系统等)中拉取
配置信息, 并提供REST API供客⼾端使⽤.
- Config Client(配置客⼾端)
Config Client 是应⽤程序中⼀个组件, 它允许应⽤程序通过Config Client连接到Config Server并动
态获取配置信息. 客⼾端可以根据环境, 服务名等动态选择对应的配置⽂件.
- 版本控制集成
Spring Cloud Config 默认使⽤Git作为配置存储的后端, 这样可以利⽤Git的版本控制功能来管理配置⽂件的版本. 每个环境对应⼀个特定的版本, 可以通过切换版本号来⾃动获取对应环境下的配置.
2.Config Server
(1)创建项目

(2)完善pom,添加启动类
xml
<dependency>
  <groupId>org.springframework.boot</groupId>
  <artifactId>spring-boot-starter-web</artifactId>
</dependency>
 <build>
        <plugins>
            <plugin>
                <groupId>org.springframework.boot</groupId>
                <artifactId>spring-boot-maven-plugin</artifactId>
            </plugin>
        </plugins>
    </build>
xml
@SpringBootApplication
public class ConfigServerApplication {
    public static void main(String[] args) {
        SpringApplication.run(ConfigServerApplication.class,args);
    }

}
(3)添加依赖
xml
 <dependency>
        <groupId>org.springframework.cloud</groupId>
        <artifactId>spring-cloud-config-server</artifactId>
</dependency>
(4)启用Config Server
在启动类上添加@EnableConfigServer注解
(5)完善配置
xml
server:
  port: 7071
spring:
  application:
    name: config-server # 应⽤名称
  cloud:
    config:
      server:
        git:
          uri: https://gitee.com/dang-kunyu/config-server.git #配置⽂件Git 地址
          default-label: master #配置⽂件分⽀
          search-paths: config #配置⽂件所在根⽬录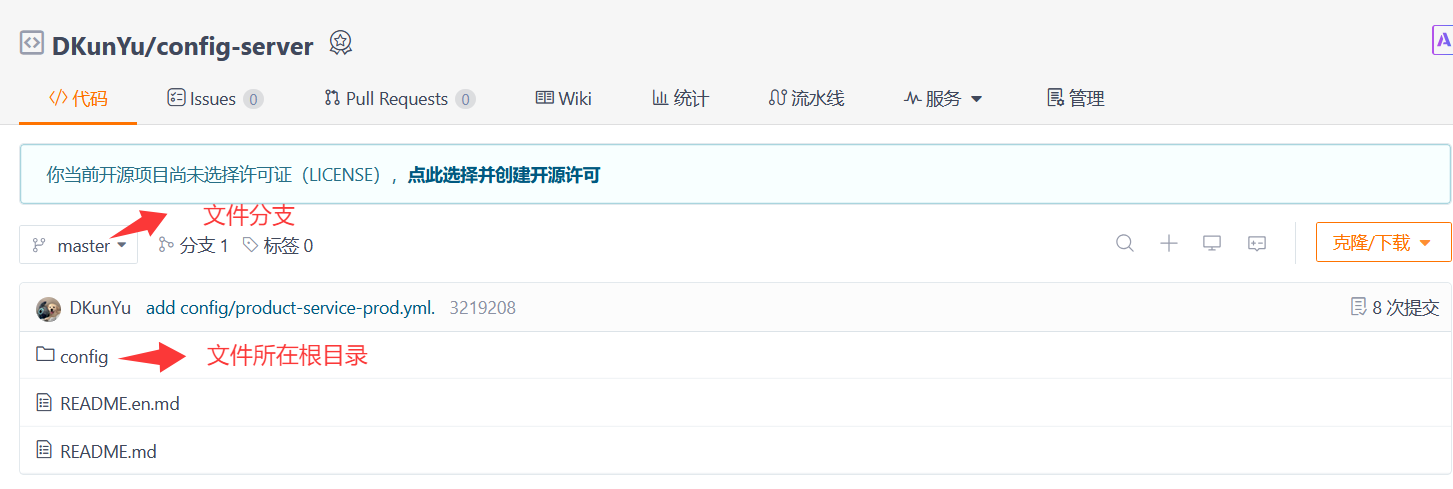
(6)初始化Git仓库,上传配置信息
config/config-server-dev.yml
yaml
data:
  env: config-dev
  user:
    username: config-dev
    password: config-dev
config/config-server-prod.yml
yaml
data:
  env: config-prod
  user:
    username: config-prod
    password: config-prod
(7)测试
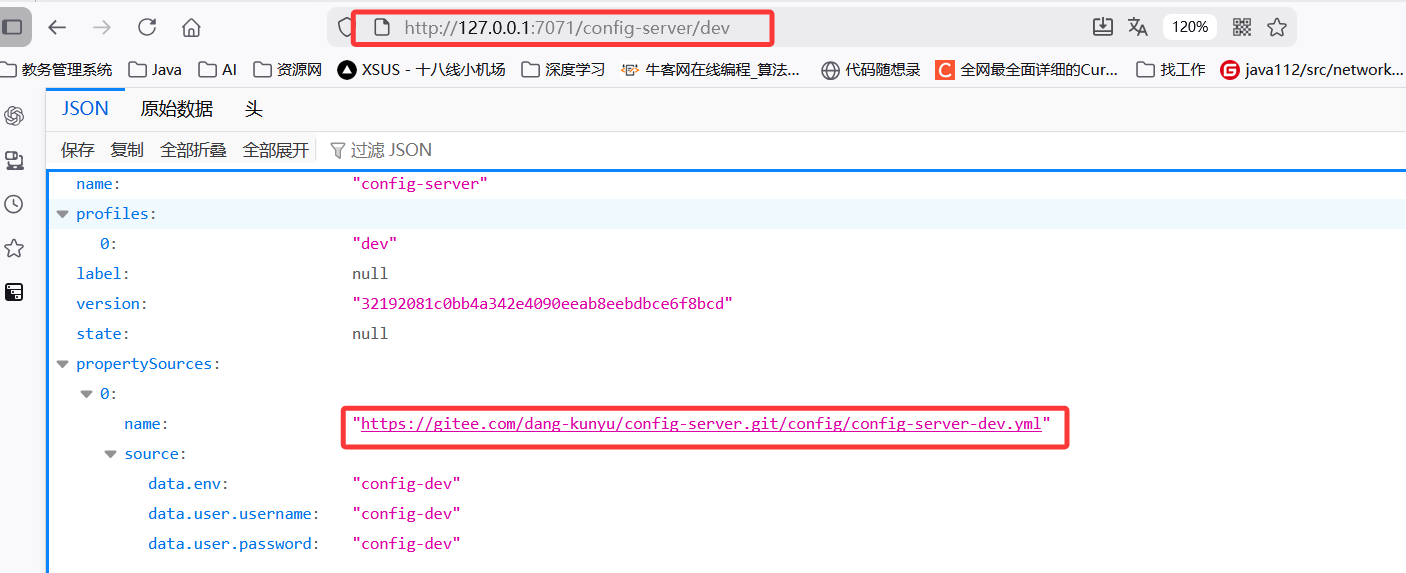
Spring Cloud Config 有它的⼀套访问规则,我们通过这套规则在浏览器上直接访问就可以。
/{application}/{profile}/{label}
/{application}-{profile}.yml
/{label}/{application}-{profile}.yml
/{application}-{profile}.properties
/{label}/{application}-{profile}.properties
{application}: 表⽰微服务的名称, 对应于配置中的 spring.application.name 属性.
{profile}: 表⽰当前环境的配置⽂件, 如dev, test, prod等, 对应于 spring.profiles.active属性.
{label}: 表⽰Git仓库中的分⽀, 标签或提交ID. 这个参数是可选的, 如果省略, 默认会使⽤ master
分⽀. {label} 对于回滚到以前的配置版本⾮常有⽤

3.Config Client
Config Client 简单来说, 就是应⽤程序连接到Config Server并动态获取配置信息. 客⼾端的配置相对简单, 只需引⼊相关依赖并配置好配置服务端的地址.
(1)配置管理
访问仓库中的配置文件,观察是否设置成功

(2)添加依赖
Spring Cloud 会创建⼀个 Bootstrap Context , 作为Spring 应⽤"Application Context" 的⽗上下⽂. 在Spring应⽤启动的初始化阶段, Bootstrap Context 负责从外部源(如Consul)加载配置属性并解析配置. 所以除了添加 spring-cloud-starter-config 依赖之外, 还需要加⼊依赖 spring-cloud-starter-bootstrap 来实现
xml
<dependency>
  <groupId>org.springframework.cloud</groupId>
  <artifactId>spring-cloud-starter-bootstrap</artifactId>
</dependency>
(3)配置文件
bootstrap.yml 主要⽤于配置应⽤启动时所需的外部依赖和环境, ⽽ application.yml ⽤于业务逻辑相关的配置(如数据库连接等)
在product-service下创建bootstra.yml文件
yaml
spring:
profiles:
active: dev
application:
name: product-service
cloud:
config:
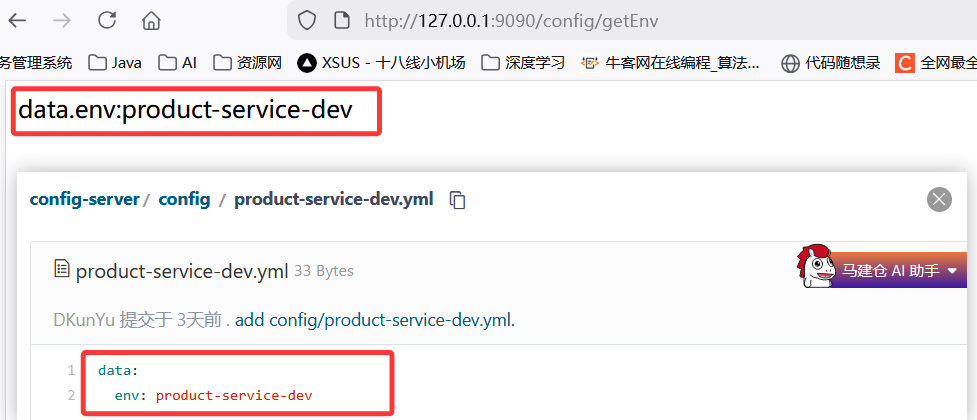
uri: http://127.0.0.1:7071 #指定配置服务端的地址(4)读取配置
java
@RestController
@RequestMapping("/config")
public class ConfigController {
    @Value("${data.env}")
    private String env;

    @RequestMapping("/getEnv")
    public String getEnv(){
        return "data.env:"+env;
    }
}
@Value注解代表从Spring 环境配置中读值
(5)测试
(6)多平台配置
java
spring:
  profiles:
    active: dev

#多平台配置
---
spring:
  config:
    activate:
      on-profile: dev
  cloud:
    config:
      uri: http://127.0.0.1:7071

---
spring:
  config:
    activate:
      on-profile: prod
  cloud:
    config:
      uri: http://39.107.107.71:7073
spring.profiles.active指定当前运行环境为dev,所以下面只有第一段生效
4.配置中心自动生效
Spring Cloud Config 在项⽬启动时加载配置内容这⼀机制, 导致了它存在⼀个缺陷, 修改配置⽂件内容
后, 不会⾃动刷新. Spring Cloud Config提供了⼀个刷新机制, 但是需要我们主动触发.
(1)添加依赖
⾃动刷新机制, 需要借助 Actuator提供的功能, 所以需要添加 spring-boot-starter-actuator依赖
xml
<dependency>
  <groupId>org.springframework.boot</groupId>
  <artifactId>spring-boot-starter-actuator</artifactId>
</dependency>
(2)添加注解@RefreshScope
java
@RefreshScope
@RestController
@RequestMapping("/config")
public class ConfigController {
@Value("${data.env}")
private String env;
@RequestMapping("/getEnv")
public String getEnv(){
return "data.env:"+env;
}
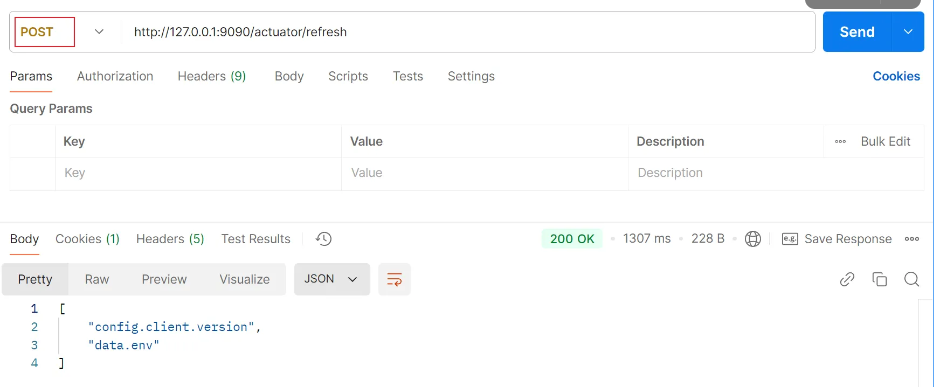
}(3)开启端点
yaml
#需要开启的端点, 这⾥主要⽤到的是refresh端点, 只开启这⼀个就可以, 为了⽅便, 可以开启所有端点, 除了shutdown端点
management:
  endpoint:
    shutdown:
      enabled: false
  endpoints:
    web:
      exposure:
        include: "*"
(4)手动刷新
(5)添加webhook
每次修改都需要⼿动访问refresh接⼝, 这样也很不⽅便.Gitee 提供了⼀种 webhook 的⽅式, 当有代码变更的时候, 会调⽤我们设置的地址,来实现我们想达到的⽬的.
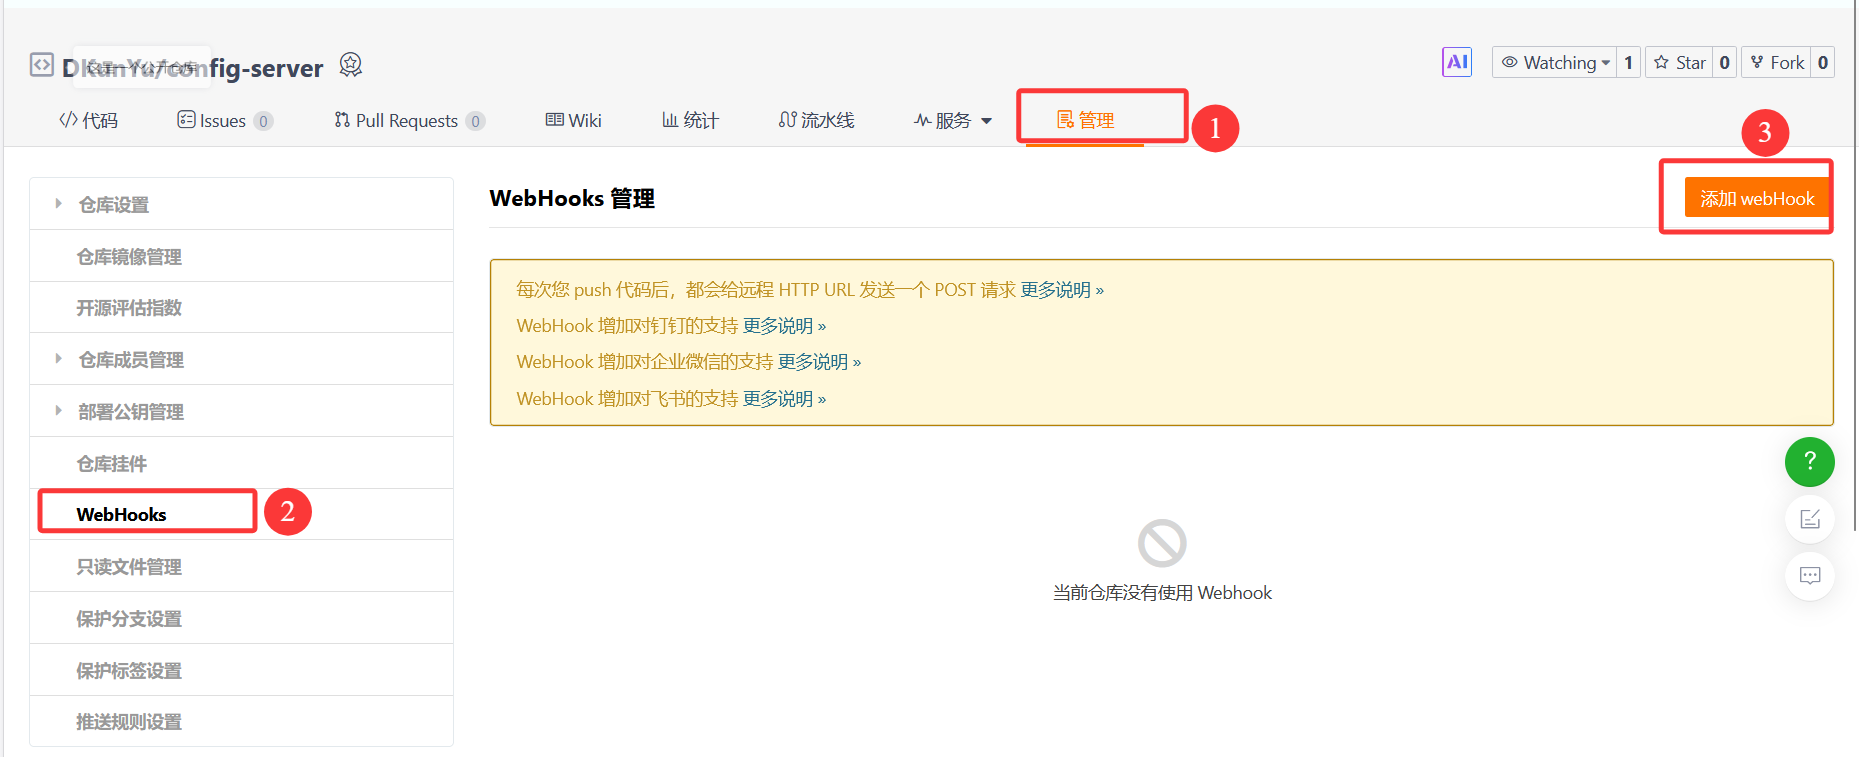
此处的URL需要为⼀个域名, 在没有公⽹和域名的情况下, 我们可以采⽤内⽹穿透的技术, 暴露给外⽹实现内⽹穿透, 常⻅的⽅法是使⽤第三⽅⼯具或服务. 如ngrok, cpolar
- cpolar操作: https://dashboard.cpolar.com/get-started
- ngrok操作: https://ngrok.com/
5.SpringCloudBus自动刷新
(1)问题
启动多个服务, 修改配置, 会发现只有⼀个配置webHook刷新url的服务⽣效, 如果需要其他服务⽣效, 需要再调⽤其他服务的刷新接⼝.
(2)介绍
Spring Cloud Bus 是Spring Cloud体系中的⼀个组件, 主要⽤于在集群环境中传播分布式系统的配置变更, 以及提供事件驱动的通信机制. Spring Cloud Bus 核⼼原理其实就是利⽤消息队列做⼴播,所以要先有个消息队列, ⽬前Spring Cloud Bus ⽀持两种消息代理:RabbitMQ和Kafka
(3)添加配置
yaml
  rabbitmq:
    addresses: ampq://root:DKY020717.@39.107.107.71:5672/blog
/blog为Virtual Hosts参数
(4)添加依赖
xml
<dependency>
  <groupId>org.springframework.cloud</groupId>
  <artifactId>spring-cloud-starter-bus-amqp</artifactId>
</dependency>
(5)刷新配置
启动服务, 修改配置, 刷新任⼀节点.
使用http://localhost:9090/actuator/busrefresh post⽅法
所有节点全部⽣效了
webHook刷新的url可以修改为 /actuator/busrefresh
6.加密解密
6.1问题
在微服务开发中, 配置⽂件可能包含⼀些敏感信息, ⽐如数据库密码, API密码等, 直接明⽂存储这些信息在配置⽂件中是⾮常危险的, 尤其是当配置⽂件存储在版本控制系统(如Git)中时. 这时候我们就需要对这些敏感信息进⾏加密. 针对这个问题, Spring Cloud Config提供了对属性进⾏加密解密的功能, 以保护配置⽂件中的敏感数据不被泄露.
6.2对称加密
(1)下载jar包
xml
https://www.oracle.com/java/technologies/javase-jce8-downloads.html(2)查找jdk所在位置
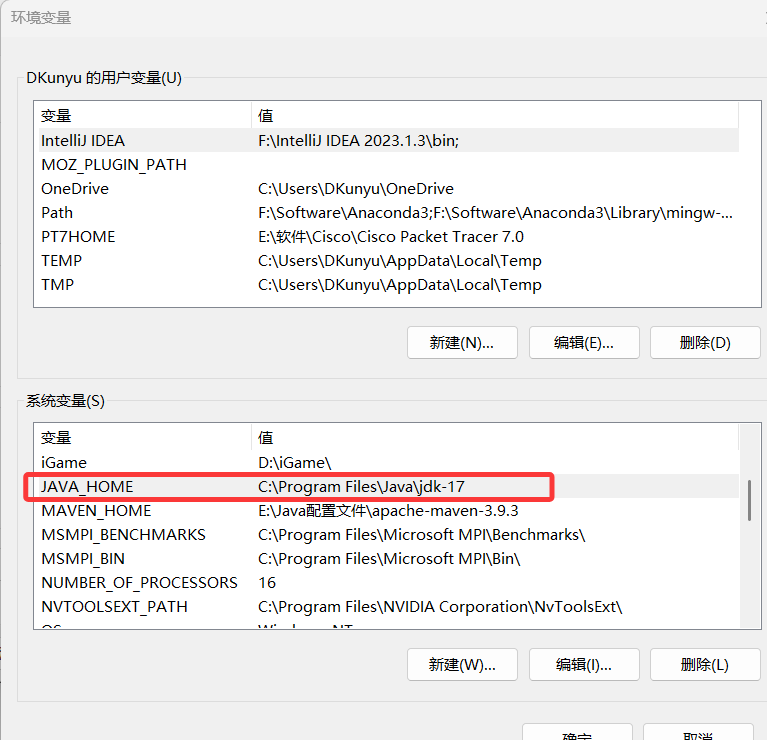
(3)添加jar包
要将 local_policy.jar 和 US_export_policy.jar 两个⽂件复制到$JAVA_HOME/jre/lib/security ⽬录下

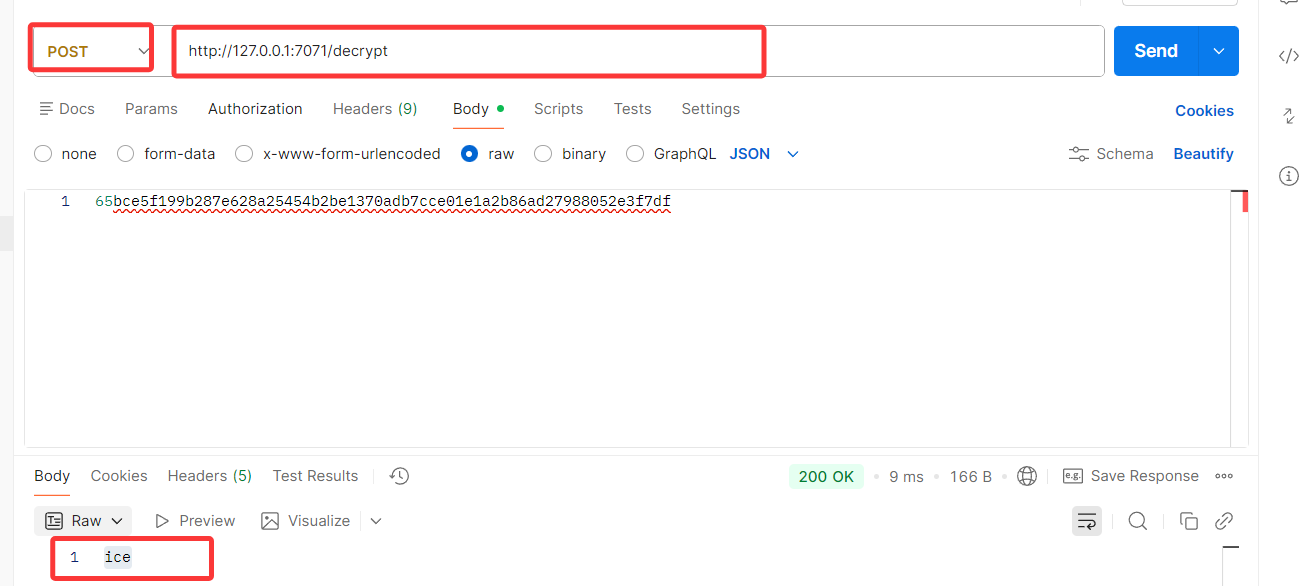
(4)添加配置
在Config Server服务中添加bootstrap.yml⽂件, 设置密钥
yaml
#对称加密
encrypt:
  key: ice
(5)添加bootstrap依赖
xml
<dependency>
  <groupId>org.springframework.cloud</groupId>
  <artifactId>spring-cloud-starter-bootstrap</artifactId>
</dependency>
(6)测试

(7)加密解密

(8)加密解密实现
通过Config Server 可以对数据进⾏加密, 那么在Config Client中, 就可以使⽤加密后的数据进⾏传输了. 把加密后的数据, 更新到git配置⽂件中, 并在加密结果前添加 {cipher} , 如果远程属性源包含加密的内容(以 {cipher} 开头), 则将其解密, 通过Http发送给客⼾端
修改配置:
yaml
data:
  env: product-service-prod
  password:
    '{cipher}edf62f27bc6dbc7655f1acb810003eef2004d0e4bc0a3bc193b451cdd7b5648d'
读取配置:
java
@Value("${data.password}")
private String password;
@RequestMapping("/getPassword")
public String getPassword(){
    return "password:"+ password;
}
6.3非对称加密
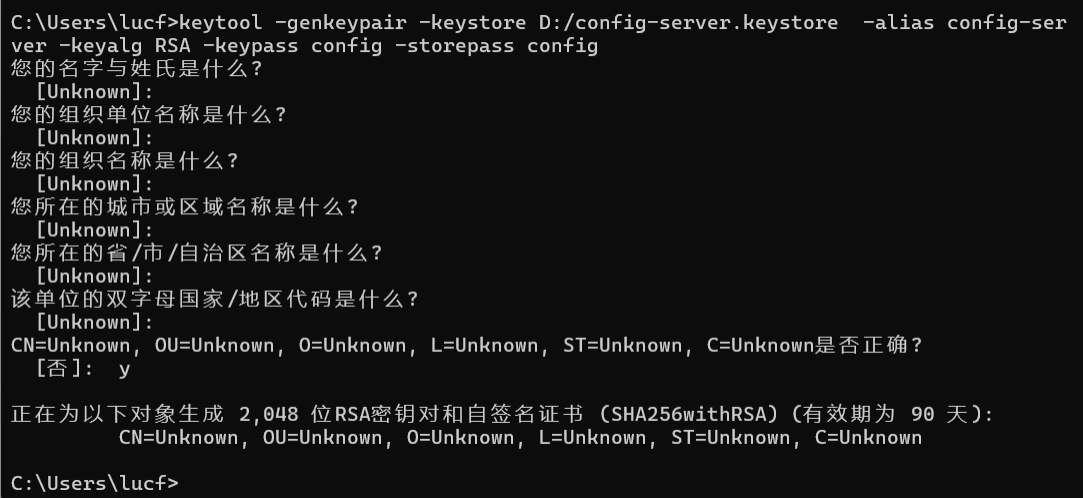
(1)生成密钥
⾮对称加密要求我们先⽣成密钥对, 密钥的⽣成我们可以使⽤ JDK 中⾃带的 keytool.
keytool 是⼀个 Java ⾃带的数字证书管理⼯具 , keytool 将密钥(key)和证书 (certificates)存在⼀个称
为 keystore 的⽂件中. 它的位置在: %JAVA_HOME%\bin\keytool.exe,可以直接使⽤cmd来调⽤
java
keytool -genkeypair -keystore D:/config-server.keystore -alias config-server
-keyalg RSA -keypass config -storepass config
-genkeypair 表⽰⽣成密钥对
-alias 表⽰ keystore 关联的别名
-keyalg 表⽰指定密钥⽣成的算法
-keystore 指定密钥库的位置和名称
-keypass -storepass : 密钥库⼝令和密钥⼝令
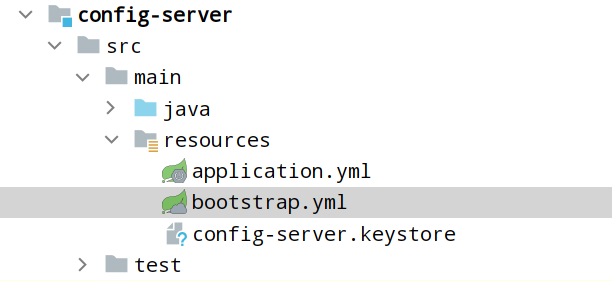
(2)添加密钥文件
(3)添加相关配置
yaml
encrypt:
 key-store:
   location: config-server.keystore #keystore⽂件存储路径
   alias: config-server #密钥别名
   password: config #storepass密钥仓库
   secret: config #keypass ⽤来保护所⽣成密钥对中的密钥