目录
- [一、Hal 文件实现](#一、Hal 文件实现)
- [二、Hal 文件生成 CPP 代码](#二、Hal 文件生成 CPP 代码)
- 三、服务端实现
- 四、客户端实现
- [五、selinux 配置](#五、selinux 配置)
-
- [5.1 `hwservice.te`](#5.1
hwservice.te) - [5.2 `hwservice_contexts`](#5.2
hwservice_contexts) - [5.3 `hello_hidl.te`:](#5.3
hello_hidl.te:) - [5.4 `hello_hidl_test.te`:](#5.4
hello_hidl_test.te:) - [5.5 `file_contexts`](#5.5
file_contexts)
- [5.1 `hwservice.te`](#5.1
- 六、编译执行
|--------------------|
| 简单 HIDL HAL 实现 |
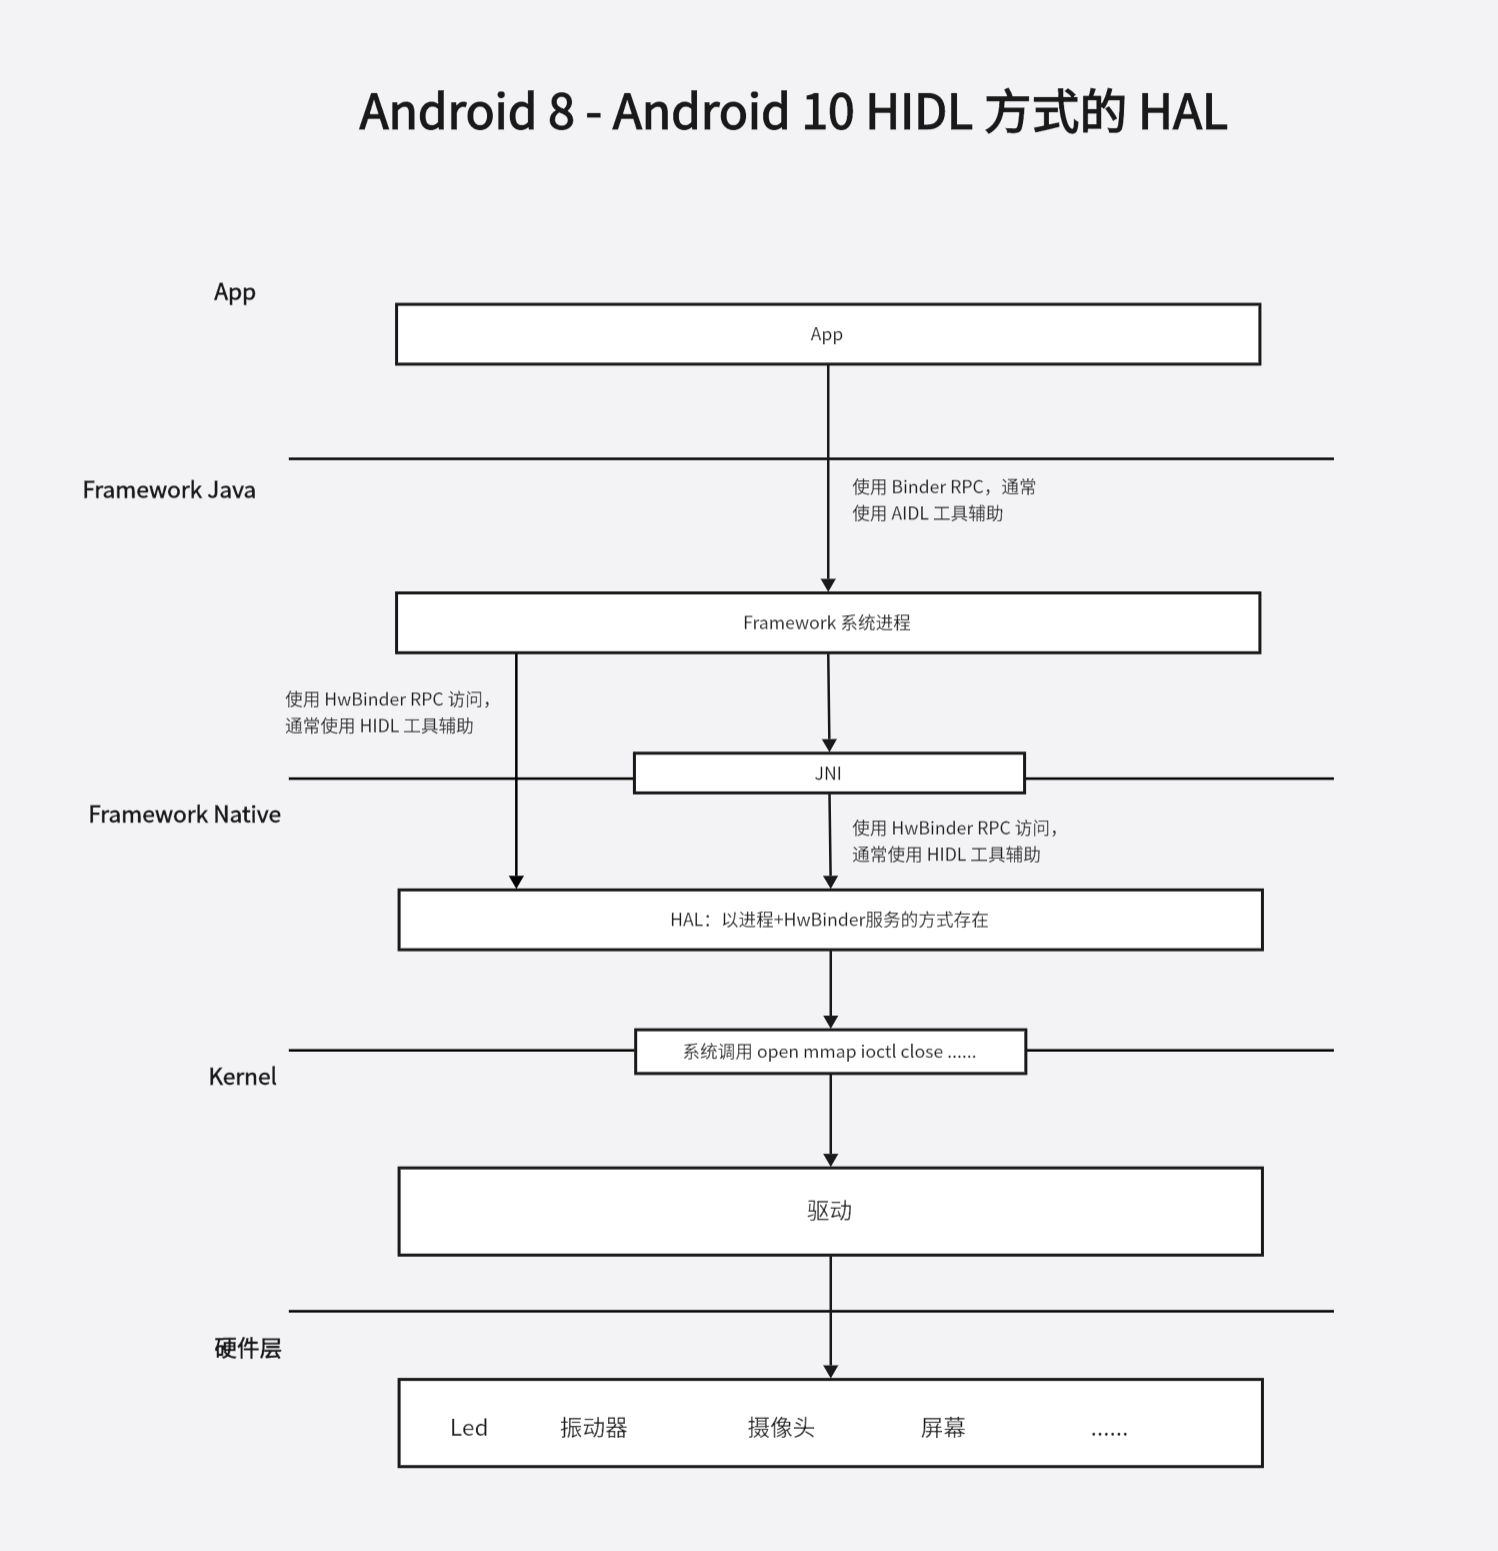
HIDL HAL 的整体架构如下图所示:
上一节我们实现了一个简单的驱动,本节继续从下往上实现一个简单的 HIDL HAL 模块
这部分内容主要是在HIDL Hal 开发笔记2----HIDL HAL 实例程序 基础上做一些修改,添加驱动访问的代码。
一、Hal 文件实现
Hal 层的实现一般放在 hardware、vendor 或者 device 目录下。
我们的示例就放在 vendor 目录下。
创建目录:
c
# 系统源码目录下
mkdir -p henry/hardware/interfaces/hello_hidl/1.0
接着在 vendor/henry/hardware/interface/hello_hidl/1.0 目录下创建 Hal 文件 IHello.hal
c
//定义包名,最后跟一个版本号
package henry.hardware.hello_hidl@1.0;
//定义 hidl 服务对外提供的接口
interface IHello {
    //for test,generates 后面跟的是返回类型
    addition_hidl(uint32_t a,uint32_t b) generates (uint32_t total);
    //写 hello 驱动
    write(string name) generates (uint32_t result);
    //读 hello 驱动
    read() generates (string name);
};
这里的 IHello.hal 定义了我们的服务对外提供了哪些函数。可以认为这就是我们服务的对外协议。协议一般定义好就不会再修改,以保持对外的稳定性。 关于 hal 的写法,可以参考官方的文档,另外也可以参考 hardware 目录下系统自带的 hal 的写法。
二、Hal 文件生成 CPP 代码
接着我们使用 hidl-gen 命令将我们写的 hal 文件转换为 C++ 文件:
在系统源码下依次执行下面的命令:
c
hidl-gen -o vendor/henry/hardware/interfaces/hello_hidl/1.0/default -Lc++-impl \
-r henry.hardware:vendor/henry/hardware/interfaces \
-r android.hardware:hardware/interfaces henry.hardware.hello_hidl@1.0
执行完上面的命令后,在 vendor/henry/hardware/interfaces/hello_hidl/1.0/default 目录下会生成 Hello.cpp 和 Hello.h。
c
vendor/henry/hardware/interfaces/hello_hidl/1.0$ tree
.
├── default
│   ├── Hello.cpp
│   └── Hello.h
└── IHello.hal

1 directory, 3 files
接着修改 vendor/henry/hardware/interfaces/hello_hidl/1.0/default 目录下生成的 Hello.cpp:
c
// FIXME: your file license if you have one

#include "Hello.h"
#include <log/log.h>
#include <sys/types.h>
#include <sys/stat.h>
#include <fcntl.h>
#include <unistd.h>
#include <stdio.h>

namespace henry{
namespace hardware {
namespace hello_hidl {
namespace V1_0 {
namespace implementation {

// Methods from ::jelly::hardware::hello_hidl::V1_0::IHello follow.
Return<uint32_t> Hello::addition_hidl(uint32_t a, uint32_t b) {
    ALOGE("hello_hidl service is init success....a :%d,b:%d",a,b);
    return uint32_t {};
}

Return<uint32_t> Hello::write(const hidl_string& name) {

    int fd = open("/dev/hello", O_RDWR);
    if (fd == -1)
	{
		printf("can not open file /dev/hello\n");
		return  uint32_t { 0 };
	}

    ::write(fd, name.c_str(), 100);

    close(fd);
    return uint32_t { 1 };
}

//通过 read_cb function 回调函数,回传数据
Return<void> Hello::read(read_cb _hidl_cb) {
    char buf[100];
    int fd = open("/dev/hello", O_RDWR);
    if (fd == -1)
	{
		printf("can not open file /dev/hello\n");
		return Void();
	}

    ::read(fd, buf, 100);

    hidl_string result(buf);
    _hidl_cb(result);

    close(fd);
    return Void();
}

}  // namespace implementation
}  // namespace V1_0
}  // namespace hello_hidl
}  // namespace hardware
}  // namespace jelly
这里主要是对我们的协议进行实现,实现了对上一节实现的设备文件 /dev/hello 的读写。至此我们的 hidl 服务就定义好了
三、服务端实现
接着我们需要写一个 Server 端来向 HwServiceManager 注册我们的服务。在 vendor/henry/hardware/interfaces/hello_hidl/1.0/default 目录下添加 service.cpp:
c
#include <hidl/HidlTransportSupport.h>
#include <utils/Looper.h>
#include <utils/StrongPointer.h>
#include <log/log.h>
#include "Hello.h"

using android::hardware::configureRpcThreadpool;
using android::hardware::joinRpcThreadpool;
using jelly::hardware::hello_hidl::V1_0::IHello;
using jelly::hardware::hello_hidl::V1_0::implementation::Hello;

int main() {
    ALOGD("hello-hidl is starting...");

    // 配置 Binder 的线程数
    configureRpcThreadpool(4, true /* callerWillJoin */);

    // 初始化一个 Hello 服务端对象
    android::sp<IHello> service = new Hello();
    // 注册服务
    android::status_t ret = service->registerAsService();

    if (ret != android::NO_ERROR) {
    }

    // 当前线程成为 HwBinder 线程
    joinRpcThreadpool();

    return 0;
    //Passthrough模式
    //return defaultPassthroughServiceImplementation<IHello>(4);
}
这里使用的是 libhwbinder 库来做实现,接口上与 libbinder 库大体类似。
我们的服务端需要在开机时启动,创建
vendor/henry/hardware/interfaces/hello_hidl/1.0/default/henry.hardware.hello_hidl@1.0-service.rc文件:
c
service vendor_hello_hidl_service /vendor/bin/hw/henry.hardware.hello_hidl@1.0-service
        class hal
        user system
        group system
接着我们需要添加 VINTF 对象,对于注册到 hwservicemanager 的服务都需要添加一个 VINTF 对象。对于编码来说 VINTF 对象就是一个 xml 文件,创建 vendor/henry/hardware/interfaces/hello_hidl/1.0/default/jelly.hardware.hello_hidl@1.0-service.xml 文件:
c
<manifest version="1.0" type="device">
  <hal format="hidl">
        <name>jelly.hardware.hello_hidl</name>
        <transport>hwbinder</transport>
        <version>1.0</version>
        <interface>
            <name>IHello</name>
            <instance>default</instance>
        </interface>
    </hal>
</manifest>
上面的这种添加 VINTF 对象的方式仅在 Andorid 11 及以后才支持。我们当前版本是 Android10,需要修改 device/softwinner/ceres/common/system/manifest.xml,在其中添加:
c
<hal format="hidl">
      <name>henry.hardware.hello_hidl</name>
      <transport>hwbinder</transport>
      <version>1.0</version>
      <interface>
          <name>IHello</name>
          <instance>default</instance>
      </interface>
</hal>
接着我们使用 hidl-gen 命令来生成对应的 Android.bp 文件:
c
hidl-gen -o vendor/henry/hardware/interfaces/hello_hidl/1.0/default -Landroidbp-impl \
-r henry.hardware:vendor/henry/hardware/interfaces \
-r android.hardware:hardware/interfaces henry.hardware.hello_hidl@1.0
这个命令会在 vendor/henry/hardware/interfaces/hello_hidl/1.0/default 目录下生成一个 Android.bp,我们在生成的基础上稍作修改如下:
c
// FIXME: your file license if you have one

cc_library_shared {
    name: "henry.hardware.hello_hidl@1.0-impl", // 模块名(HIDL实现库命名规范:{包名}@{版本号}-impl)
    relative_install_path: "hw", // 安装路径:/vendor/lib/hw 或 /vendor/lib64/hw(vendor分区)
    proprietary: true, // 标识为厂商专有模块(Android 10前的写法,后续被vendor: true替代)
    srcs: [ "Hello.cpp" ], // 编译源文件:HIDL接口的具体实现
    shared_libs: [ // 依赖的共享库
        "libhidlbase", // HIDL基础库(核心数据结构、接口基类)
        "libutils", // Android基础工具库(智能指针、字符串等)
        "libhidltransport", // HIDL通信库(Binder/HwBinder传输)
        "liblog", // 日志库(ALOGD/ALOGE等)
        "henry.hardware.hello_hidl@1.0", // hidl-gen自动生成的HIDL接口库(包含IHello的声明)
    ],
}

cc_binary {
    name: "henry.hardware.hello_hidl@1.0-service", // 服务端可执行程序名(命名规范:{包名}@{版本号}-service)
    init_rc: ["henry.hardware.hello_hidl@1.0-service.rc"], // 关联init启动脚本(系统启动时自动启动服务)
    defaults: ["hidl_defaults"], // 继承HIDL默认编译配置(如编译选项、头文件路径)
    relative_install_path: "hw", // 安装路径:/vendor/lib/hw 或 /vendor/lib64/hw
    vendor: true, // 明确归属vendor分区(Android 10+推荐写法,替代proprietary)
    srcs: ["service.cpp", "Hello.cpp"], // 编译源文件:服务注册逻辑+接口实现
    shared_libs: [ // 依赖的共享库
        "henry.hardware.hello_hidl@1.0", // HIDL接口库
        "libhardware", // Android HAL基础库(可选,这里无实际依赖)
        "libhidlbase", "libhidltransport", "libutils", "liblog", // 基础依赖库
    ],
}
上面生成的 Android.bp 里面有一个依赖 henry.hardware.hello_hidl@1.0,目前编译系统中还没有这个库,接着我们来生成 henry.hardware.hello_hidl@1.0 库对应的 Android.bp。
进入源码根目录下,cd到 hardware/interfaces 目录下,将 update-makefiles.sh 拷贝到 vendor/henry/hardware/interfaces/ 目录下,并修改如下:
c
#!/bin/bash

source $ANDROID_BUILD_TOP/system/tools/hidl/update-makefiles-helper.sh

do_makefiles_update \
  "henry.hardware:vendor/henry/hardware/interfaces"
接着在系统源码目录下执行:
c
./vendor/henry/hardware/interfaces/update-makefiles.sh就会生成 vendor/henry/hardware/interfaces/hello_hidl/1.0/Android.bp:
c
// This file is autogenerated by hidl-gen -Landroidbp.

hidl_interface {
    name: "henry.hardware.hello_hidl@1.0",  // HIDL接口唯一标识(名称@版本)
    root: "henry.hardware",                 // 接口根命名空间
    system_ext_specific: true,              // 标识为System Ext分区专属
    srcs: [                                 // HIDL接口源文件列表
        "IHello.hal",
    ],
    interfaces: [                           // 依赖的基础HIDL接口
        "android.hidl.base@1.0",
    ],
    gen_java: true,                         // 开启生成Java绑定代码
}
其中的 hidl_interface 是 hidl 独有的,当编译源码时,它会将 out/soong/.intermediates/vendor/henry/hardware/interfaces/hello_hidl/1.0/henry.hardware.hello_hidl@1.0_genc++/gen/henry/hardware/hello_hidl/1.0 和 out/soong/.intermediates/vendor/henry/hardware/interfaces/hello_hidl/1.0/henry.hardware.hello_hidl@1.0_genc++_headers/gen/henry/hardware/hello_hidl/1.0 目录下的源码编译为 henry.hardware.hello_hidl@1.0.so 文件,并预制到手机的 /vendor/lib 和 /vendor/lib64/ 目录下。
为了使编译通过,新建 vendor/henry/hardware/interfaces/Android.bp 文件:
c
hidl_package_root {
name: "henry.hardware",
path: "vendor/henry/hardware/interfaces",
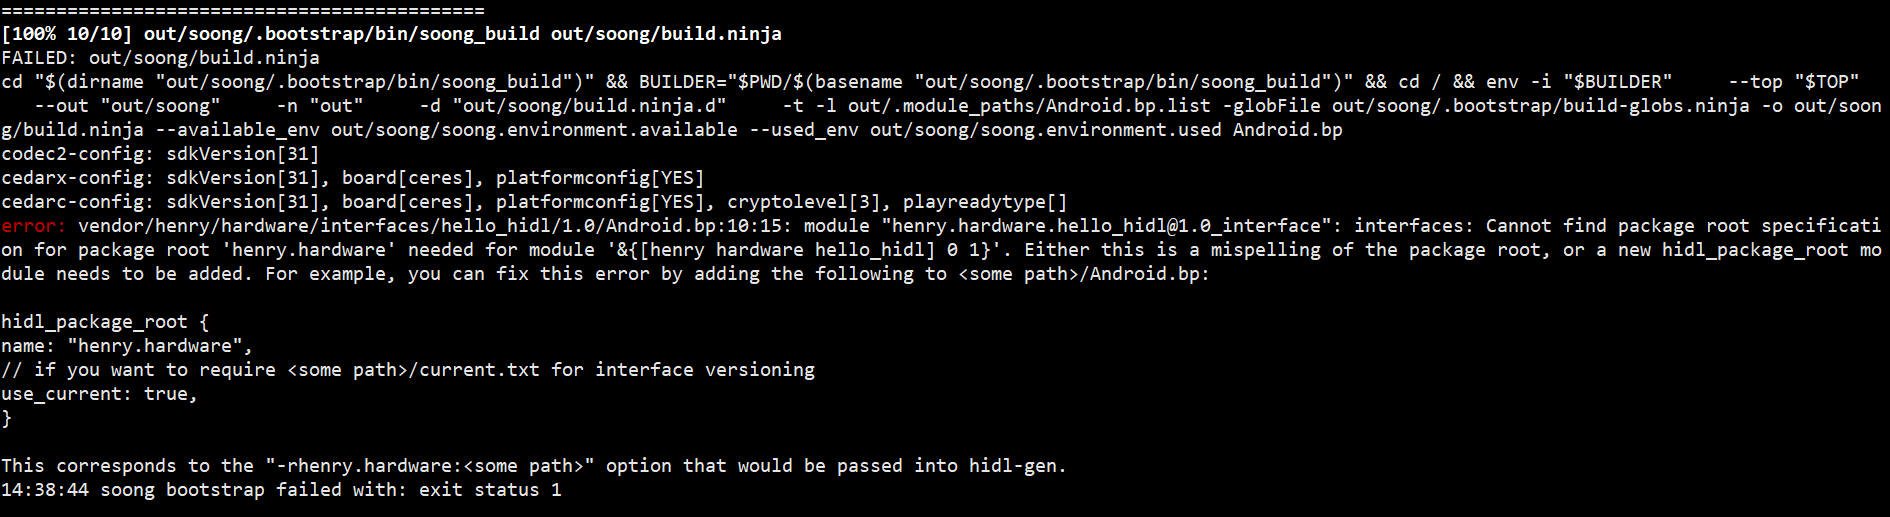
}这个 Android.bp 的作用是告诉编译系统包名与路径的映射关系。
如果没有这个文件,会编译报错
接着新建 vendor/henry/hardware/interfaces/current.txt 文件,current.txt 记录了所有 hal 接口的 hash 值,接口有变化时,同时需要更新 current.txt 中的 hash 值,这是我们先随便设置一个 hash 值:
c
123456 henry.hardware.hello_hidl@1.0::IHello再执行一遍 update-makefiles.sh,这个时候就会发现提示 hash 值不正确了,同时会给出正确的 hash 值,我们把正确的 hash 值替换到 current.txt 即可。
四、客户端实现
在 vendor/henry/hardware/interfaces/hello_hidl/1.0/default 目录下创建如下的文件和文件夹:
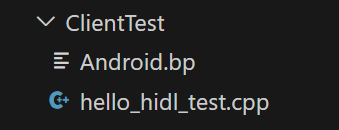
其中 hello_hidl_test.cpp:
c
#include <henry/hardware/hello_hidl/1.0/IHello.h>
#include <hidl/LegacySupport.h>

#define LOG_TAG "hello_hidl"
#include <log/log.h>

using android::sp;
using henry::hardware::hello_hidl::V1_0::IHello;
using android::hardware::Return;
using android::hardware::hidl_string;

int main(){
    // 获取服务代理端对象
    android::sp<IHello> hw_device = IHello::getService();
    if (hw_device == nullptr) {
              ALOGD("failed to get hello-hidl");
              return -1;
        }
    ALOGD("success to get hello-hidl....");
    // 通过代理端对象发起远程调用
    Return<uint32_t> total = hw_device->addition_hidl(3,4);
    hw_device->write("hello");
    hw_device->read([&](hidl_string result){
        ALOGD("%s\n", result.c_str());
    });
    return 0;
}
这里使用的是 libhwbinder 接口,与 binder 大体一致。
Android.bp:
c
cc_binary {
    name: "hello_hidl_test",
    srcs: ["hello_hidl_test.cpp"],
    vendor: true,
    shared_libs: [
        "liblog",
        "henry.hardware.hello_hidl@1.0",
        "libhidlbase",
        "libhidltransport",
        "libhwbinder",
        "libutils",
    ],
}
五、selinux 配置
在自己的项目下更改或添加如下规则
5.1 hwservice.te
c
type hello_hidl_hwservice, hwservice_manager_type;| 规则语句 | 含义作用 |
|---|---|
| type hello_hidl_hwservice | 声明一个名为hello_hidl_hwservice的 SELinux 类型(自定义名称,需与其他配置保持一致); |
| hwservice_manager_type | 这是 Android 系统预定义的「父类型」,标识该类型属于「硬件服务管理器(hwservicemanager)管理的服务类型」,是 HIDL 服务必须关联的基础类型。 |
|------------------------------------|
| 作用:为 HIDL 硬件服务定义专属的 SELinux 类型 |
5.2 hwservice_contexts
c
henry.hardware.hello_hidl::IHello u:object_r:hello_hidl_hwservice:s0| 规则语句 | 含义作用 |
|---|---|
| henry.hardware.hello_hidl::IHello | HIDL 服务的「完全限定名」(对应.hal文件中定义的接口名) |
| u:object_r:hello_hidl_hwservice:s0 | SELinux 标签的完整格式(用户:角色:类型:级别)u:SELinux 用户(默认u);object_r:角色(object_r表示对象角色,对应文件 / 服务;r是role缩写);hello_hidl_hwservice:关联到上面定义的服务类型;s0:MLS/MCS 安全级别(默认级别,无需修改) |
|----------------------------------------------------------------------------|
| 作用:将 HIDL 服务「逻辑名称」映射到上面定义的 SELinux 类型,让系统知道「哪个 HIDL 服务对应哪个 SELinux 标签」 |
5.3 hello_hidl.te:
c
type hello_hidl, domain;
type hello_hidl_exec, exec_type, vendor_file_type, file_type;

init_daemon_domain(hello_hidl);
add_hwservice(hello_hidl, hello_hidl_hwservice)
hwbinder_use(hello_hidl)

allow hello_hidl hello_hidl_hwservice:hwservice_manager { add };
allow hello_hidl hello_dev_t:chr_file { open read write };
binder_call(hello_hidl,hwservicemanager)
get_prop(hello_hidl,hwservicemanager_prop)| 规则语句 | 含义作用 |
|---|---|
| type hello_hidl, domain; | 定义服务进程的SELinux域(进程的类型称为「域」) |
| type hello_hidl_exec, exec_type, vendor_file_type, file_type; | 定义服务可执行文件的SELinux类型 |
| init_daemon_domain(hello_hidl); | 初始化守护进程域(系统宏) |
| add_hwservice(hello_hidl, hello_hidl_hwservice) | 允许向hwservicemanager注册该硬件服务(系统宏) |
| hwbinder_use(hello_hidl) | 允许该进程使用HWBinder通信(HIDL核心依赖) |
| allow hello_hidl hello_hidl_hwservice:hwservice_manager { add }; | 显式允许服务进程向hwservicemanager添加该服务(兜底权限) |
| allow hello_hidl hello_dev_t:chr_file { open read write }; | 允许服务进程访问字符设备文件(hello_dev_t)的打开/读/写权限 |
| binder_call(hello_hidl,hwservicemanager) | 允许服务进程与hwservicemanager进行Binder调用(系统宏) |
| get_prop(hello_hidl,hwservicemanager_prop) | 允许服务进程读取hwservicemanager相关的系统属性 |
- domain:进程的 SELinux 类型称为「域」,hello_hidl是你的服务进程运行的域;
- exec_type/vendor_file_type:hello_hidl_exec的父类型,标识这是「可执行文件」且位于/vendor分区(Android/vendor 分区存放厂商定制代码);
- 系统宏(如init_daemon_domain/add_hwservice/binder_call):Android 预定义的宏,封装了一组常用权限规则,避免重复写多条allow规则;
- hello_dev_t:chr_file:允许服务进程访问自定义字符设备(hello_dev_t是设备文件的 SELinux 类型),open/read/write是对字符设备的基础操作权限;
- hwservicemanager_prop:允许读取硬件服务管理器的系统属性(如服务注册状态)
|---------------------|
| 作用:服务端进程的权限配置核心 |
5.4 hello_hidl_test.te:
c
type  hello_hidl_test, domain;
type  hello_hidl_test_exec, exec_type, vendor_file_type, file_type;

domain_auto_trans(shell, hello_hidl_test_exec, hello_hidl_test);

get_prop(hello_hidl_test, hwservicemanager_prop)
allow hello_hidl_test hello_hidl_hwservice:hwservice_manager find;
hwbinder_use(hello_hidl_test);| 规则语句 | 含义作用 |
|---|---|
| type hello_hidl_test, domain; | 定义测试程序进程的SELinux域 |
| type hello_hidl_test_exec, exec_type, vendor_file_type, file_type; | 定义测试程序可执行文件的SELinux类型\ |
| domain_auto_trans(shell, hello_hidl_test_exec, hello_hidl_test); | 域自动转换(系统宏):shell进程执行测试程序时,自动切换到hello_hidl_test域 |
| get_prop(hello_hidl_test, hwservicemanager_prop) | 允许测试程序读取hwservicemanager相关的系统属性 |
| allow hello_hidl_test hello_hidl_hwservice:hwservice_manager find; | 允许测试程序在hwservicemanager中「查找」该硬件服务(客户端核心权限) |
| hwbinder_use(hello_hidl_test); | 允许测试程序使用HWBinder与服务端通信 |
- domain_auto_trans(shell, hello_hidl_test_exec, hello_hidl_test):当你在adb shell中执行hello_hidl_test程序时,shell 进程(域为shell)会自动切换到hello_hidl_test域,这是客户端程序的标准配置;
- find权限:客户端访问 HIDL 服务的第一步是「查找」服务是否存在,这是客户端最核心的权限(服务端是add,客户端是find);
- 测试程序无需add权限(只有服务端需要注册服务),只需要find+hwbinder_use即可与服务端通信。
|---------------------|
| 作用:客户端进程的权限配置核心 |
5.5 file_contexts
c
/vendor/bin/hw/henry.hardware.hello_hidl@1.0-service    u:object_r:hello_hidl_exec:s0
/vendor/bin/hello_hidl_test u:object_r:hello_hidl_test_exec:s0| 规则语句 | 含义作用 |
|---|---|
| /vendor/bin/hw/henry.hardware.hello_hidl@1.0-service u:object_r:hello_hidl_exec:s0 | 服务端可执行文件路径 → 对应hello_hidl_exec类型 |
| /vendor/bin/hello_hidl_test u:object_r:hello_hidl_test_exec:s0 | 测试程序可执行文件路径 → 对应hello_hidl_test_exec类型 |
- /vendor/bin/hw/:Android 规范中,HIDL 硬件服务的可执行文件默认放在这个路径下;
- 当系统启动你的 HIDL 服务进程(henry.hardware.hello_hidl@1.0-service)时,会自动给这个进程打上hello_hidl域(因为可执行文件类型是hello_hidl_exec,且通过init_daemon_domain关联了域);
- 测试程序hello_hidl_test放在/vendor/bin/下,类型绑定到hello_hidl_test_exec,执行时自动切换到hello_hidl_test域。
|---------------------------|
| 作用:绑定文件路径与 SELinux 类型 |
六、编译执行
不要忘了将上面的模块统统打包到系统配置里去,我本地是 device/softwinner/ceres/ceres_b7.mk
c
@@ -82,6 +82,10 @@ PRODUCT_PACKAGES += \
                                        openssl \
                                        GoogleTTSEngine \
                                        SystemUpdaterSample\
+                                       henry.hardware.hello_hidl@1.0-service \
+                                       hello_hidl_test \
+                                       henry.hardware.hello_hidl@1.0-impl \
最后编译烧录测试
c
source build/envsetup.sh
lunch xxxxx
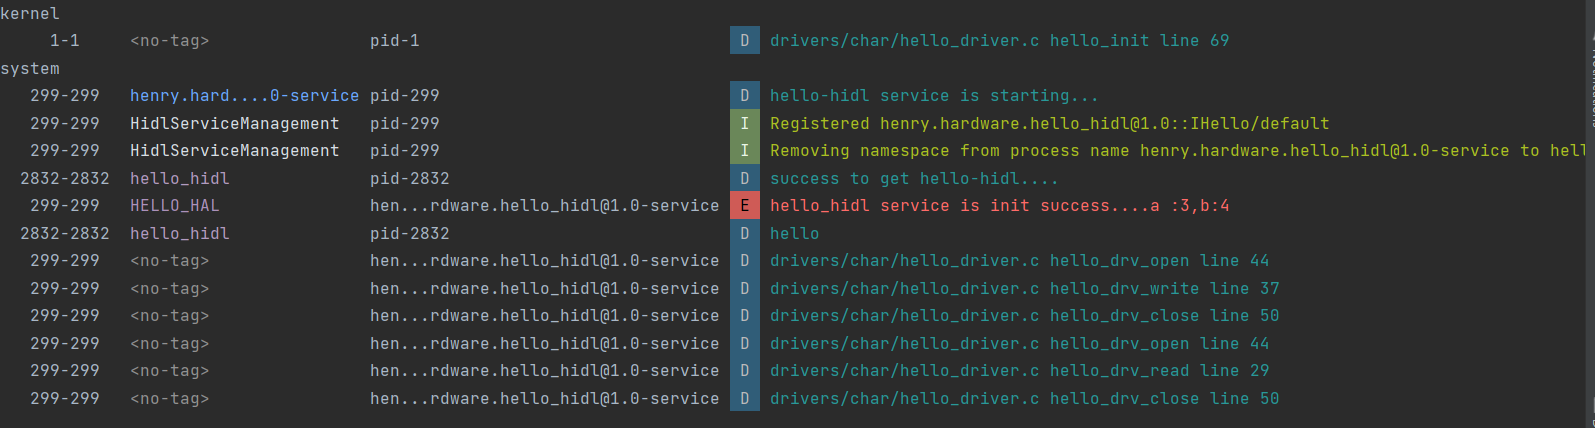
make -j32最后测试:可以看到 Hello.cpp里面的log以及驱动log都成功打印了