前言
通过这篇博客,您将获得关于如何在 Web 应用中有效利用 Spring 框架的深入理解,并掌握一些实际操作技能,为今后的开发工作打下坚实的基础。
Spring整合web环境
java
package com.itheima.listener;

import org.springframework.context.support.ClassPathXmlApplicationContext;

import javax.servlet.ServletContextEvent;
import javax.servlet.ServletContextListener;

public class ContextLoaderListener implements ServletContextListener {
    @Override
    public void contextInitialized(ServletContextEvent sce) {
        //1.创建Spring容器
        ClassPathXmlApplicationContext applicationContext = new ClassPathXmlApplicationContext("applicationContext2.xml");
        //2.将容器存储到servletContext容器中
        sce.getServletContext().setAttribute("applicationContext", applicationContext);
    }
}
java
package com.itheima.web;


import com.itheima.service.AccountService;

import org.springframework.context.ApplicationContext;
import org.springframework.context.support.ClassPathXmlApplicationContext;

import javax.servlet.ServletContext;
import javax.servlet.ServletException;
import javax.servlet.annotation.WebServlet;
import javax.servlet.http.HttpServlet;
import javax.servlet.http.HttpServletRequest;
import javax.servlet.http.HttpServletResponse;
import java.io.IOException;

@WebServlet(urlPatterns = "/accountServlet")
public class AccountServlet extends HttpServlet {

    protected void doGet(HttpServletRequest request, HttpServletResponse response) throws ServletException, IOException {
        //web层调用service层,获得AccountService,accountService存在applicationContext中
        //ClassPathXmlApplicationContext applicationContext = new ClassPathXmlApplicationContext("applicationContext2.xml");
        ServletContext servletContext = request.getServletContext();
        ApplicationContext applicationContext =(ApplicationContext) servletContext.getAttribute("applicationContext");
        AccountService bean = applicationContext.getBean(AccountService.class);
        bean.transforMoney("Business","Emergency",500);
    }
}
xml
<?xml version="1.0" encoding="UTF-8"?>
<web-app xmlns="http://xmlns.jcp.org/xml/ns/javaee"
         xmlns:xsi="http://www.w3.org/2001/XMLSchema-instance"
         xsi:schemaLocation="http://xmlns.jcp.org/xml/ns/javaee
                             http://xmlns.jcp.org/xml/ns/javaee/web-app_3_1.xsd"
         version="3.1">

    <!--配置Listener-->
    <listener>
        <listener-class>com.itheima.listener.ContextLoaderListener</listener-class>
    </listener>

</web-app>
< listener> 标签用于在 web.xml 文件中声明一个 ServletContextListener。
这个标签告诉 Servlet 容器在启动时需要加载和初始化指定的监听器类。
< listener-class> 元素指定了监听器的实现类,这里是 com.itheima.listener.ContextLoaderListener。
这个类之前定义的 ContextLoaderListener,它负责在 Servlet 上下文被初始化时创建 Spring 应用上下文并将其存储在 ServletContext 中。
当 Web 应用程序启动时,Servlet 容器会扫描 web.xml 文件并识别其中定义的监听器。
在 Servlet 上下文被初始化时,ContextLoaderListener 的 contextInitialized 方法将被调用。这使得 Spring 容器能够在应用程序开始处理请求之前就已经准备好,确保应用上下文中的 Bean 可以在整个应用程序生命周期内使用。
xml
<?xml version="1.0" encoding="UTF-8"?>
<web-app xmlns="http://xmlns.jcp.org/xml/ns/javaee"
         xmlns:xsi="http://www.w3.org/2001/XMLSchema-instance"
         xsi:schemaLocation="http://xmlns.jcp.org/xml/ns/javaee
                             http://xmlns.jcp.org/xml/ns/javaee/web-app_3_1.xsd"
         version="3.1">

    <!--定义全局参数-->
    <context-param>
        <param-name>contextConfigLocation</param-name>
        <param-value>classpath:applicationContext.xml</param-value>
    </context-param>

    <!--配置Listener-->
    <listener>
        <listener-class>com.itheima.listener.ContextLoaderListener</listener-class>
    </listener>

</web-app>
java
public class ContextLoaderListener implements ServletContextListener {
    private String CONTEXT_CONFIG_LOCATION = "contextConfigLocation";
    @Override
    public void contextInitialized(ServletContextEvent sce) {
        ServletContext servletContext = sce.getServletContext();
        //获取contextConfigLocation配置文件的名称
        String contextConfigLocation = servletContext.getInitParameter(CONTEXT_CONFIG_LOCATION);
        //解析出配置文件的名称
        contextConfigLocation = contextConfigLocation.substring("classpath:".length());
        //1.创建Spring容器
        ClassPathXmlApplicationContext applicationContext = new ClassPathXmlApplicationContext(contextConfigLocation);
        //2.将容器存储到servletContext容器中
        sce.getServletContext().setAttribute("applicationContext", applicationContext);
    }
}
java
package com.itheima;

import org.springframework.context.ApplicationContext;

import javax.servlet.ServletContext;

public class WebApplicationContextUtils {

    public static ApplicationContext getWebApplicationContext(ServletContext servletContext) {
        ApplicationContext applicationContext = (ApplicationContext)servletContext.getAttribute("applicationContext") ;
        return applicationContext;
    }
}
java
@WebServlet(urlPatterns = "/accountServlet")
public class AccountServlet extends HttpServlet {

    protected void doGet(HttpServletRequest request, HttpServletResponse response) throws ServletException, IOException {
        //web层调用service层,获得AccountService,accountService存在applicationContext中
        ServletContext servletContext = request.getServletContext();
        ApplicationContext applicationContext = WebApplicationContextUtils.getWebApplicationContext(servletContext);
        AccountService bean = applicationContext.getBean(AccountService.class);
        bean.transforMoney("Business","Emergency",500);
    }
}
这样我们就可以只需要在web.xml文件中选定我们使用哪一个配置文件,将耦合的字符串给提取出来。
Spring的web开发组件spring-web
到此,就将一开始的诉求都解决了,当然我们能想到的Spring框架自然也会想到,Spring其实已经为我们定义好了一个ContextLoaderListener,使用方式跟我们上面自己定义的大体一样,但是功能要比我们强百倍,所以,遵循Spring"拿来主义"的精神,我们直接使用Spring提供的就可以了,开发如下:
先导入Spring-web的坐标:
xml
<dependency>
	<groupId>org.springframework</groupId>
	<artifactId>spring-web</artifactrd>
	<version>5.3.7</version>
</dependency>
xml
<?xml version="1.0" encoding="UTF-8"?>
<web-app xmlns="http://xmlns.jcp.org/xml/ns/javaee"
         xmlns:xsi="http://www.w3.org/2001/XMLSchema-instance"
         xsi:schemaLocation="http://xmlns.jcp.org/xml/ns/javaee
                             http://xmlns.jcp.org/xml/ns/javaee/web-app_3_1.xsd"
         version="3.1">

    <!--定义全局参数-->
    <context-param>
        <param-name>contextConfigLocation</param-name>
        <param-value>classpath:applicationContext.xml</param-value>
    </context-param>

    <!--配置Listener-->
    <listener>
        <listener-class>org.springframework.web.context.ContextLoaderListener</listener-class>
    </listener>

</web-app>
java
import org.springframework.web.context.support.WebApplicationContextUtils;

@WebServlet(urlPatterns = "/accountServlet")
public class AccountServlet extends HttpServlet {

    protected void doGet(HttpServletRequest request, HttpServletResponse response) throws ServletException, IOException {
        //web层调用service层,获得AccountService,accountService存在applicationContext中
        //ClassPathXmlApplicationContext applicationContext = new ClassPathXmlApplicationContext("applicationContext2.xml");
        ServletContext servletContext = request.getServletContext();
        ApplicationContext applicationContext = WebApplicationContextUtils.getWebApplicationContext(servletContext);
        AccountService bean = applicationContext.getBean(AccountService.class);
        bean.transforMoney("Business","Emergency",500);
    }
}
当我们使用注解配置类SpringConfig.java的时候,该如何配置
java
package com.itheima.config;

import org.springframework.web.context.support.AnnotationConfigWebApplicationContext;

public class MyAnnotationConfigWebApplicationContext  extends AnnotationConfigWebApplicationContext {

    public MyAnnotationConfigWebApplicationContext() {
        super();
        this.register(SpringConfig.class);
    }
}
公共类 MyAnnotationConfigWebApplicationContext,它继承自 AnnotationConfigWebApplicationContext。通过扩展该类,可以创建一个具备特定功能的应用上下文。
web.xml文件内容如下:
xml
<?xml version="1.0" encoding="UTF-8"?>
<web-app xmlns="http://xmlns.jcp.org/xml/ns/javaee"
         xmlns:xsi="http://www.w3.org/2001/XMLSchema-instance"
         xsi:schemaLocation="http://xmlns.jcp.org/xml/ns/javaee
                             http://xmlns.jcp.org/xml/ns/javaee/web-app_3_1.xsd"
         version="3.1">

    <!--定义全局参数-->
    <context-param>
        <param-name>contextClass</param-name>
        <param-value>com.itheima.config.MyAnnotationConfigWebApplicationContext</param-value>
    </context-param>

    <!--配置Listener-->
    <listener>
        <listener-class>org.springframework.web.context.ContextLoaderListener</listener-class>
    </listener>

</web-app>
定义全局参数: 使用 context-param 定义了一个上下文参数 contextClass,指定了 Spring 应用上下文的实现类。这使得应用程序能够使用自定义的 Spring 上下文配置。
配置 Servlet 监听器: 注册了 ContextLoaderListener,它会在应用程序启动时自动创建 Spring 应用上下文并进行初始化。这样,Web 应用程序就可以利用 Spring 管理的 Bean
web层MVC框架思想
Java程序员在开发一般都是MVC+三层架构,MVC是web开发模式,传统的Javaweb技术栈实现的MVC如下
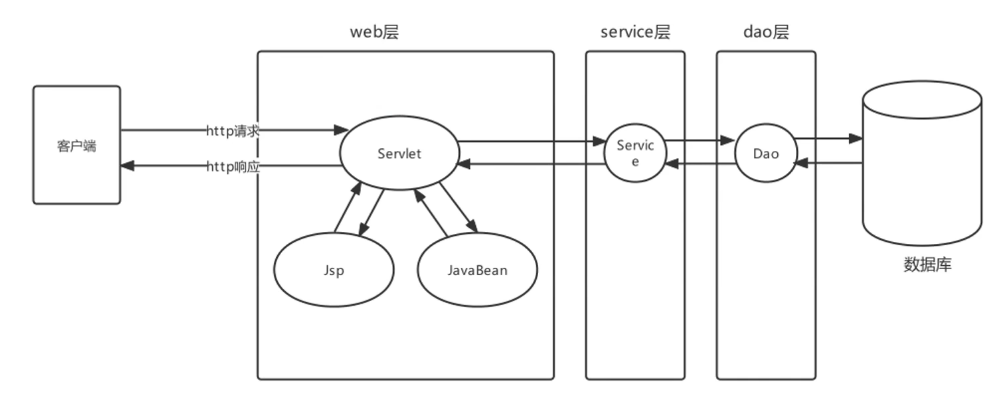
原始Javaweb开发中,Servlet充当Controller的角色,Jsp充当View角色,JavaBean充当模型角色,后期Ajax异步流行后,在加上现在前后端分离开发模式成熟后,View就被原始Html+Vue替代。原始Javaweb开发中,Service充当Controller有很多弊端,显而易见的有如下几个:

负责共有行为的Servlet称之为前端控制器,负责业务行为的JavaBean称之为控制器Controller
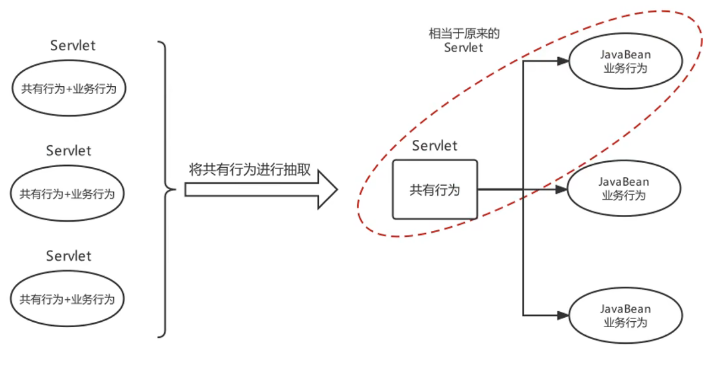
分析前端控制器基本功能如下:
1、具备可以映射到业务Bean的能力
2、具备可以解析请求参数、封装实体等共有功能
3、具备响应视图及响应其他数据的功能
总结
希望读者在了解 Spring 整合 Web 环境的过程中,能够获取更多的灵感和实践经验,将这些知识应用到实际项目中,构建出高效、稳定的 Web 应用。未来,随着技术的不断演进,Spring 框架也将继续为我们提供更多的工具和功能,助力我们在 Web 开发的道路上不断前行。感谢您的阅读,期待您在开发中能有更多的发现和收获!