简介
本文介绍了:
- Python绿色版构建
- FreeThreaded安装
- Node.js配置
- JupyterLab环境搭建的全过程。
- JupyterLab可用的常用插件
首先通过备份和脚本配置实现Python便携化;
然后解决FreeThreaded安装失败问题,提供命令行安装方案;
接着配置Node.js环境并设置国内镜像源;
最后创建虚拟环境安装JupyterLab并完成汉化。
文中详细列出了各步骤的命令行操作、下载地址和常见问题解决方法,
为开发者提供了一套完整的Python科学计算环境配置指南。
一、python安装(构建绿色版):
-
下载地址:
-
安装到 \apply\Python3142
-
拷贝\apply\Python3142 到\apply\Python3142_bak
-
卸载python3.14.2
-
拷贝\apply\Python3142_bak 到\apply\Python3142
-
添加环境变量:\apply\Python3142\Scripts和\apply\Python3142 到PATH
-
在\apply\Python3142 添加两个文件python3.14.2.bat 和 python3142.bat,内容如下:
commandline@echo off echo 原始命令:%~f0 %* echo 运行命令:%~d0%~p0python.exe %* %~d0%~p0python.exe %* -
在\apply\Python3142 添加两个文件python3.14.2.sh 和 python3142.sh,内容如下:
bashbase_dir=$(cd $(dirname $0);pwd) echo 原始命令:$0 $* echo 运行命令:${base_dir}/python.exe $* ${base_dir}/python.exe $* -
在\apply\Python3142\Scripts添加两个文件pip3.14.2.bat 和 pip3142.bat,内容如下:
commandline@echo off echo 原始命令:%~f0 %* echo 运行命令:%~d0%~p0pip.exe %* %~d0%~p0pip.exe %* -
在\apply\Python3142\Scripts添加两个文件 pip3.14.2.sh 和 pip3142.sh,内容如下:
bashbase_dir=$(cd $(dirname $0);pwd) echo 原始命令:$0 $* echo 运行命令:${base_dir}/pip.exe $* ${base_dir}/pip.exe $* -
测试:
-
在cmd窗口中
commandlinepython3.14.2 --version pip3142 --version -
在gitbash窗口中
shellpython3.14.2.sh --version pip3142.sh --version
-
二、安装freethreaded:
-
使用安装程序直接安装:
勾选需要现在的软件,如下图:
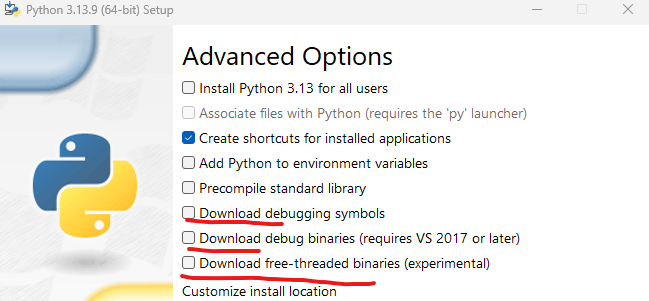
在这里插入图片描述
十分遗憾,在国内会报错,表示安装失败,日志中告诉你下载core_pdb.msi或freethreaded.msi 失败
-
手工下载安装:
从下面网站直接下载,注意相应的版本号,例如3.14.2,对应的是:
https://mirrors.ustc.edu.cn/python/3.14.2/amd64/
https://www.python.org/ftp/python/3.14.2/
https://www.python.org/ftp/python/3.14.2/amd64/freethreaded.msi
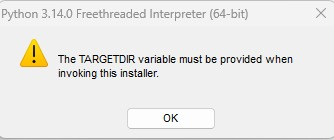
遗憾的是直接点击安装,依然报错:
"The TARGETDIR variable must be provided when invoking this installer"
-
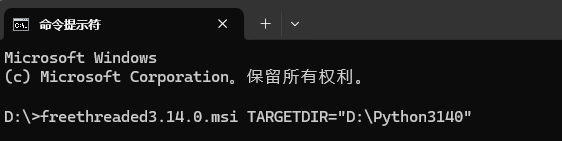
命令行安装
使用命令行安装,指定TARGETDIR,例如我的python安装目录是"D:\apply\Python3142",所以命令是:
freethreaded3.14.2.msi TARGETDIR="D:\apply\Python3142"
在这里插入图片描述
-
总结:
安装python时,在"Advanced Options"中,含有"Download"开头的几个选项一定不要选。
手工现在msi,从 https://www.python.org/ftp/python/3.14.2/amd64/中现在3.14.2的freethreaded.msi
打开命令行窗口,执行命令行命令,指定你的python安装名目录,我的是"D:\Python3142",所以命令是:
freethreaded3.14.2.msi TARGETDIR="D:\apply\Python3142"
三、安装nodejs
-
安装node:
- 官网: https://nodejs.org/zh-cn/download
- 版本:v20.19.6 (LTS)
- 下载独立文件.zip
- 放到d:\apply目录下
- 解压到此目录
- 设置环境变量: PATH包含:D:\apply\node-v20.19.6-win-x64
-
验证:
shellnode -v # Should print "v18.20.8". # 验证 npm 版本: npm -v # Should print "10.8.2". -
设置
shellnpm config set registry https://repo.huaweicloud.com/repository/npm/ mkdir D:\apply\node_repo mkdir D:\apply\node_repo\node_global mkdir D:\apply\node_repo\node_cache npm config set prefix "D:\apply\node_repo\node_global" npm config set cache "D:\apply\node_repo\node_cache" D:\apply\node-v18.17.1-win-x64\npm install -g ijavascript进入环境变量对话框,在【系统变量】下新建【NODE_PATH】,
输入【D:\apply\node_repo\node_global\node_modules】,
将【用户变量】下的【Path】修改为【D:\apply\node_repo\node_global】
四、安装jupyter
-
创建虚拟环境
-
cmd窗口
commandlinemkdir .\my_jupyterlab4.5 cd .\my_jupyterlab4.5 python3.14.2 -m venv jupyter_venv .\jupyter_venv\Scripts\activate pip install requests deactivate -
Git Bash窗口
shellmkdir ./my_jupyterlab4.5 cd ./my_jupyterlab4.5 python3.13.3.sh -m venv jupyter_venv source ./jupyter_venv/Scripts/activate pip install requests deactivate
-
-
安装jupyterlab
-
相关网址:
-
安装:
shellpip install jupyterlab
-
-
汉化:
-
相关网址:
-
安装:
shellpip install jupyterlab-language-pack-zh-CN -
设置:
【Settings】-->【Language】-->【Chinese (simplified, China)】
-
四、插件:
-
可用插件相关网址:
-
安装插件:
- 可以直接安装的插件
shellpip install --upgrade pip setuptools wheel pip install jupyterlab-lsp pip install python-lsp-server pip install "python-lsp-server[all]" pip install jupyterlab-code-formatter pip install black isort pip install jupyterlab-git pip install ipywidgets jupyter labextension enable @jupyter-widgets/jupyterlab-manager pip install qgrid # 安装MikTeX https://miktex.org/ pip install jupyterlab-theme-solarized-dark pip install jupyterlab-solarized-light-theme pip install jupyter-launcher-shortcuts pip install ipympl pip install matplotlib pip install jupyterlab-spreadsheet-editor pip install jupyterlab-spreadsheet pip install jupyterlab_iframe pip install jupyterlab_execute_time pip install bash_kernel pip install jupyterlab_myst pip install jupyterlab-latex npm install sql-language-server pip install jupyterlab_sql_editor[all] pip install bqplot pip install json-lsp pip install yaml-lsp pip install sshkernel # pip install metakernel==0.25.* # pip install metakernel==0.30.3 # 安装matplotlib 插件 pip install ipympl pip install npm pip install nodejs jupyter labextension install @jupyter-widgets/jupyterlab-manager jupyter-matplotlib # 安装lsp插件 pip install jupyter-lsp pip install python-lsp-server[all] pip install --upgrade pyflakes flake8 pyright pip install --upgrade basedpyright pip install --upgrade jedi-language-server npm install -g bash-language-server npm install -g dockerfile-language-server-nodejs npm install -g javascript-typescript-langserver npm install -g typescript-language-server typescript npm install -g vscode-css-languageserver-bin npm install -g javascript-typescript-langserver npm install -g vscode-html-languageserver-bin npm install -g vscode-json-languageserver-bin npm install -g yaml-language-server npm install -g unified-language-server # 安装code formatter 插件 pip install jupyterlab_code_formatter pip install black isort pip install jupyterlab_latex pip install jupyterlab-dash # 该插件可以在Lab中展示plotly可视化效果。 pip install jupyterlab-fasta pip install jupyterlab-geojson pip install jupyterlab-katex # 该插件可以在Lab中展示bokeh可视化效果。 pip install jupyter_bokeh # jupyter lab clean # jupyter-lab build --log-level=10 # jupyter labextension list && start_lab.cmd- pypi最新的jupyterlab插件
shellpip install jupyterlab-sql-editor pip install jupyterlab-git pip install jupyterlab-materialdarker pip install jupyterlab-show-commands-reference-extension pip install jupyterlab-markdown-switch-tab-scrolling-fix pip install jupyterlab-export-markdown-extension pip install stellars-jupyterlab-darcula-theme pip install stellars-jupyterlab-sublime-theme pip install jupyterlab-vscode-icons-extension pip install jupyterlab_highlight_selected_word pip install jupyterlab-solarized-light-theme pip install jupyterlab-execute-time pip install jupyterlab-classiq pip install jupyterlab-markdown-insert-content-extension pip install jupyterlab-drawio-render-extension pip install jupyterlab-mmd-to-png-extension pip install jupyterlab-latex pip install jupyterlab-favorites pip install jupyterlab-js pip install jupyterlab-myst pip install jupyterlab-doc-reader-extension pip install qsharp-jupyterlab pip install jupyterlab-orm-test pip install jupyterlab_h5web[full] pip install jupyterlab-colourful-tab-extension pip install jupyterlab-ai-commands pip install jupyterlab-block-copy pip install jupyterlab-makefile-file-type-extension pip install jupyterlab-zip-extension pip install jupyterlab-todo-list pip install jupyterlab-nbconvert-nocode pip install jupyterlab-markdown-viewer-toc-fix pip install jupyterlab-close-all-tabs-extension pip install jupyterlab-filesystem-access pip install jupyterlab-quick-share pip install jupyterlab-templates pip install jupyterlab-cell-lock pip install jupyterlab-quickopen pip install jupyterlab-slideshow pip install jupyterlab-autodocstring pip install jupyterlab-code-formatter pip install jupyterlab-xssguard pip install jupyterlab-language-pack-zh-CN # pip install stellars_jupyterlab_extensions # pip install jupyterlab-refresh-view-extension # pip uninstall jupyterlab-fold-all-code-extension # pip uninstall jupyterlab-github-markdown-alerts-extension # pip install sagemaker-jupyterlab-extension-common # pip install stellars-jupyterlab-favourites # pip install atoti-jupyterlab # pip uninstall jupyterlab-ghostty # pip install jupyterlab-judge # pip install jupyterlab-server # pip uninstall jupyterlab-chat # pip uninstall jupyter-collaboration-ui # pip uninstall jupyter-collaboration # pip install jupyter-scheduler jupyter labextension list -
插件管理
注意:如果没有出现插件选项卡,可以通过 setting-->Advanced Settings Editor--Extension Manager : 在User Overrides 添加语句{"enabled": true},最后保存,就可以出现插件选项 当然,你也可以使用命令行方式进行插件的查看、安装、更新和删除 查看已安装插件:jupyter labextension list 更新已安装插件:jupyter labextension update --all 安装插件toc:jupyter labextension install @jupyterlab/toc 删除插件toc:jupyter labextension uninstall @jupyterlab/toc -
手工安装插件
shell# 1. 安装扩展管理依赖(如果没装过) pip install jupyterlab_server jupyter labextension list # 2. 安装本地扩展包 jupyter labextension install jupyterlab-htmlviewer-4.5.1.tgz # 3. 重建 JupyterLab(确保扩展生效) jupyter lab build # 4. 启动 JupyterLab jupyter lab- 安装列表
shell# 5. 命令如下: cd E:\my_jupyterlab4.5\jupyter_plus jupyter labextension install jupyterlab-application-4.5.1.tgz jupyter labextension install jupyterlab-application-extension-4.5.1.tgz jupyter labextension install jupyterlab-apputils-4.6.1.tgz jupyter labextension install jupyterlab-apputils-extension-4.5.1.tgz jupyter labextension install jupyterlab-attachments-4.5.1.tgz jupyter labextension install jupyterlab-audio-extension-4.5.1.tgz jupyter labextension install jupyterlab-builder-4.5.1.tgz jupyter labextension install jupyterlab-buildutils-4.5.1.tgz jupyter labextension install jupyterlab-cells-4.5.1.tgz jupyter labextension install jupyterlab-celltags-extension-4.5.1.tgz jupyter labextension install jupyterlab-cell-toolbar-4.5.1.tgz jupyter labextension install jupyterlab-cell-toolbar-extension-4.5.1.tgz jupyter labextension install jupyterlab-codeeditor-4.5.1.tgz jupyter labextension install jupyterlab-codemirror-4.5.1.tgz jupyter labextension install jupyterlab-codemirror-extension-4.5.1.tgz jupyter labextension install jupyterlab-completer-4.5.1.tgz jupyter labextension install jupyterlab-completer-extension-4.5.1.tgz jupyter labextension install jupyterlab-console-4.5.1.tgz jupyter labextension install jupyterlab-console-extension-4.5.1.tgz jupyter labextension install jupyterlab-coreutils-6.5.1.tgz jupyter labextension install jupyterlab-csvviewer-4.5.1.tgz jupyter labextension install jupyterlab-csvviewer-extension-4.5.1.tgz jupyter labextension install jupyterlab-debugger-4.5.1.tgz jupyter labextension install jupyterlab-debugger-extension-4.5.1.tgz jupyter labextension install jupyterlab-docmanager-4.5.1.tgz jupyter labextension install jupyterlab-docmanager-extension-4.5.1.tgz jupyter labextension install jupyterlab-docregistry-4.5.1.tgz jupyter labextension install jupyterlab-documentsearch-4.5.1.tgz jupyter labextension install jupyterlab-documentsearch-extension-4.5.1.tgz jupyter labextension install jupyterlab-extensionmanager-4.5.1.tgz jupyter labextension install jupyterlab-extensionmanager-extension-4.5.1.tgz jupyter labextension install jupyterlab-filebrowser-4.5.1.tgz jupyter labextension install jupyterlab-filebrowser-extension-4.5.1.tgz jupyter labextension install jupyterlab-fileeditor-4.5.1.tgz jupyter labextension install jupyterlab-fileeditor-extension-4.5.1.tgz jupyter labextension install jupyterlab-galata-5.5.1.tgz jupyter labextension install jupyterlab-help-extension-4.5.1.tgz jupyter labextension install jupyterlab-htmlviewer-4.5.1.tgz jupyter labextension install jupyterlab-htmlviewer-extension-4.5.1.tgz jupyter labextension install jupyterlab-hub-extension-4.5.1.tgz jupyter labextension install jupyterlab-imageviewer-4.5.1.tgz jupyter labextension install jupyterlab-imageviewer-extension-4.5.1.tgz jupyter labextension install jupyterlab-inspector-4.5.1.tgz jupyter labextension install jupyterlab-inspector-extension-4.5.1.tgz jupyter labextension install jupyterlab-javascript-extension-4.5.1.tgz jupyter labextension install jupyterlab-json-extension-4.5.1.tgz jupyter labextension install jupyterlab-launcher-4.5.1.tgz jupyter labextension install jupyterlab-launcher-extension-4.5.1.tgz jupyter labextension install jupyterlab-logconsole-4.5.1.tgz jupyter labextension install jupyterlab-logconsole-extension-4.5.1.tgz jupyter labextension install jupyterlab-lsp-4.5.1.tgz jupyter labextension install jupyterlab-lsp-extension-4.5.1.tgz jupyter labextension install jupyterlab-mainmenu-4.5.1.tgz jupyter labextension install jupyterlab-mainmenu-extension-4.5.1.tgz jupyter labextension install jupyterlab-markdownviewer-4.5.1.tgz jupyter labextension install jupyterlab-markdownviewer-extension-4.5.1.tgz jupyter labextension install jupyterlab-markedparser-extension-4.5.1.tgz jupyter labextension install jupyterlab-mathjax-extension-4.5.1.tgz jupyter labextension install jupyterlab-mermaid-4.5.1.tgz jupyter labextension install jupyterlab-mermaid-extension-4.5.1.tgz jupyter labextension install jupyterlab-metadataform-4.5.1.tgz jupyter labextension install jupyterlab-metadataform-extension-4.5.1.tgz jupyter labextension install jupyterlab-metapackage-4.5.1.tgz jupyter labextension install jupyterlab-nbconvert-css-4.5.1.tgz jupyter labextension install jupyterlab-nbformat-4.5.1.tgz jupyter labextension install jupyterlab-notebook-4.5.1.tgz jupyter labextension install jupyterlab-notebook-extension-4.5.1.tgz jupyter labextension install jupyterlab-observables-5.5.1.tgz jupyter labextension install jupyterlab-outputarea-4.5.1.tgz jupyter labextension install jupyterlab-pdf-extension-4.5.1.tgz jupyter labextension install jupyterlab-pluginmanager-4.5.1.tgz jupyter labextension install jupyterlab-pluginmanager-extension-4.5.1.tgz jupyter labextension install jupyterlab-property-inspector-4.5.1.tgz jupyter labextension install jupyterlab-rendermime-4.5.1.tgz jupyter labextension install jupyterlab-rendermime-extension-4.5.1.tgz jupyter labextension install jupyterlab-rendermime-interfaces-3.13.1.tgz jupyter labextension install jupyterlab-running-4.5.1.tgz jupyter labextension install jupyterlab-running-extension-4.5.1.tgz jupyter labextension install jupyterlab-services-7.5.1.tgz jupyter labextension install jupyterlab-services-extension-4.5.1.tgz jupyter labextension install jupyterlab-settingeditor-4.5.1.tgz jupyter labextension install jupyterlab-settingeditor-extension-4.5.1.tgz jupyter labextension install jupyterlab-settingregistry-4.5.1.tgz jupyter labextension install jupyterlab-shortcuts-extension-5.3.1.tgz jupyter labextension install jupyterlab-statedb-4.5.1.tgz jupyter labextension install jupyterlab-statusbar-4.5.1.tgz jupyter labextension install jupyterlab-statusbar-extension-4.5.1.tgz jupyter labextension install jupyterlab-template-4.5.1.tgz jupyter labextension install jupyterlab-terminal-4.5.1.tgz jupyter labextension install jupyterlab-terminal-extension-4.5.1.tgz jupyter labextension install jupyterlab-testing-4.5.1.tgz jupyter labextension install jupyterlab-testutils-4.5.1.tgz jupyter labextension install jupyterlab-theme-dark-extension-4.5.1.tgz jupyter labextension install jupyterlab-theme-dark-high-contrast-extension-4.5.1.tgz jupyter labextension install jupyterlab-theme-light-extension-4.5.1.tgz jupyter labextension install jupyterlab-toc-6.5.1.tgz jupyter labextension install jupyterlab-toc-extension-6.5.1.tgz jupyter labextension install jupyterlab-tooltip-4.5.1.tgz jupyter labextension install jupyterlab-tooltip-extension-4.5.1.tgz jupyter labextension install jupyterlab-translation-4.5.1.tgz jupyter labextension install jupyterlab-translation-extension-4.5.1.tgz jupyter labextension install jupyterlab-ui-components-4.5.1.tgz jupyter labextension install jupyterlab-ui-components-extension-4.5.1.tgz jupyter labextension install jupyterlab-vega5-extension-4.5.1.tgz jupyter labextension install jupyterlab-video-extension-4.5.1.tgz jupyter labextension install jupyterlab-workspaces-4.5.1.tgz jupyter labextension install jupyterlab-workspaces-extension-4.5.1.tgz
五、安装内核:
(一)、安装java内核:
-
安装jdk(openjdk):
- 官网:
- 下载版本:(11 GA (build 11+28) Windows 64-bit)
- 安装:
将openjdk-11_windows-x64_bin.zip解压到指定目录:/path/to
-
安装ijava:
- 官网:https://github.com/SpencerPark/IJava/releases
- 解压:ijava-1.3.0.zip到\my_jupyter\packages目录下
- 安装内核:
shellcd E:\my_jupyterlab4.5\packages\ijava-1.3.0 python install.py --prefix=E:\my_jupyterlab4.5\jupyter_venv jupyter kernelspec list -
修改配置文件:
- 文件:E:\my_jupyterlab4.5\jupyter_venv\share\jupyter\kernels\java\kernel.json
- 修改:将java指定其绝对路径(将\path\to换成自己的真实路径)
- 内容示例如下:
json{ "argv": [ "D:\\Program Files\\Java\\jdk-23\\bin\\java.exe", "-jar", "E:\\my_jupyterlab4.5\\jupyter_venv\\share\\jupyter\\kernels\\java/ijava-1.3.0.jar", "{connection_file}" ], "display_name": "Java", "env": {}, "interrupt_mode": "message", "language": "java" }
(二)安装javascript
-
安装node:
- 官网: https://nodejs.org/zh-cn/download
- 下载zip,解压,添加到环境变量中 使用版本18.20.8
-
验证:
shellnode -v # Should print "v18.20.8". # 验证 npm 版本: npm -v # Should print "10.8.2". -
设置
shellnpm config set registry https://repo.huaweicloud.com/repository/npm/ mkdir D:\apply\node_repo mkdir D:\apply\node_repo\node_global mkdir D:\apply\node_repo\node_cache npm config set prefix "D:\apply\node_repo\node_global" npm config set cache "D:\apply\node_repo\node_cache" npm install -g zeromq@5.3.1 npm install -g ijavascript进入环境变量对话框,在【系统变量】下新建【NODE_PATH】,
输入【D:\apply\node_repo\node_global\node_modules】,
将【用户变量】下的【Path】修改为【D:\apply\node_repo\node_global】
-
安装内核:
shellcd E:\my_jupyterlab4.5\jupyter_venv Scripts\activate jupyter kernelspec list # 初始化ijavascript内核(关键:让JupyterLab识别) ijsinstall --install=global
(三)安装typescript(tslab)
-
安装node:
- 官网: https://nodejs.org/zh-cn/download
- 下载zip,解压,添加到环境变量中 使用版本18.20.8
-
验证:
shellnode -v # Should print "v20.19.6". # 验证 npm 版本: npm -v # Should print "10.8.2". -
设置
shellnpm install -g tslab --location=global进入环境变量对话框,在【系统变量】下新建【NODE_PATH】,
输入【D:\apply\node_repo\node_global\node_modules】,
将【用户变量】下的【Path】修改为【D:\apply\node_repo\node_global】
-
安装内核:
shellcd E:\my_jupyterlab4.5\jupyter_venv Scripts\activate jupyter kernelspec list tslab install --prefix E:\my_jupyterlab4.5\jupyter_venv
(四)扩展ijavascript支持typescript
-
安装node:
- 官网: https://nodejs.org/zh-cn/download
- 下载zip,解压,添加到环境变量中 使用版本20.19.6
-
验证:
shellnode -v # Should print "v20.19.6". # 验证 npm 版本: npm -v # Should print "10.8.2". -
设置
shellnpm install -g ts-node typescript --location=global npm install -g itypescript --location=global进入环境变量对话框,在【系统变量】下新建【NODE_PATH】,
输入【D:\apply\node_repo\node_global\node_modules】,
将【用户变量】下的【Path】修改为【D:\apply\node_repo\node_global】
-
安装内核:
shellcd E:\my_jupyterlab4.5\jupyter_venv Scripts\activate jupyter kernelspec list # 初始化ijavascript内核(关键:让JupyterLab识别) # 全局安装(推荐) its --install=global # 或仅在当前用户目录安装 its --install=local
六、配置
1. 生成配置文件
jupyter-lab build --log-level=10
jupyter-lab --generate-config
存放路径:C:\Users%USERNAME%.jupyter\jupyter_lab_config.py
2. 生成并保存密码:
shell
python -c "from jupyter_server.auth import passwd;print(passwd())"3. 修改配置文件:
然后修改生成的配置文件 C:\Users%USERNAME%.jupyter\jupyter_lab_config.py 就可以了
python3
c.ServerApp.allow_remote_access = False
c.ServerApp.open_browser = True
c.ServerApp.browser = 'C:/Program Files/Google/Chrome/Application/chrome.exe --app=%s'
c.ServerApp.root_dir = "/path/to/my_jupyter/jupyter_data"

c.ServerApp.ip = '0.0.0.0'
c.ServerApp.port = 8888

# c.ServerApp.password = ''
c.PasswordIdentityProvider.hashed_password = "argon2:$arg********A"
c.PasswordIdentityProvider.password_required = True
4. 将配置文件移动到自己的my_jupyter目录下
七、启动
1. 命令行启动
shell
# 在命令行中运行  来清除所有临时文件和配置缓存,会删除所有安装的插件
######## jupyter lab clean --all
jupyter-lab build --log-level=10

cd E:\my_jupyterlab4.5\config
jupyter-lab --config=./config/jupyter_lab_config.py
\path\to\my_jupyter\jupyter_venv\Scripts\jupyter-lab.exe --config=\path\to\my_jupyter\jupyter_lab_config.py
2. 命令行指定root-dir
shell
jupyter-lab --config=../jupyter_lab_config.py --notebook-dir=\path\to\my_jupyter\jupyter_data
\path\to\my_jupyter\jupyter_venv\Scripts\jupyter-lab.exe --config=\path\to\my_jupyter\jupyter_lab_config.py  --notebook-dir=\path\to\my_jupyter\jupyter_data
2. 桌面快捷方式
- 2.1 创建jupyter-lab.exe快捷方式
- 2.2 修改启动命令,添加参数: --config=\path\to\my_jupyter\jupyter_lab_config.py
- 2.3 下载一个jupyter-lab图片,使用GIMP2导出为ico
- 2.4 修改快捷方式的图标
3. 直接下载桌面应用
八、drawio
-
下载:
https://github.com/jgraph/drawio-desktop/releases/latest -
jupyterlab使用
shellpip install jupyterlab-drawio-render-extension
九、conda包转wheel包
pypi中无法安装的包(需要本地编译,例如y-py需要Rust语言环境),而conda中有编译好的包,
但是不是wheel,需要转换。所以本章节就处理这种包。
-
下载:
- 官网:
- 跳过注册:【Skip registration】
-
设置国内源
shell# 清华源 conda config --add channels https://mirrors.tuna.tsinghua.edu.cn/anaconda/pkgs/free/ conda config --add channels https://mirrors.tuna.tsinghua.edu.cn/anaconda/pkgs/main/ conda config --add channels https://mirrors.tuna.tsinghua.edu.cn/anaconda/cloud/conda-forge/ #设置搜索时显示通道地址 conda config --set show_channel_urls yes # 中科大镜像源 conda config --add channels https://mirrors.ustc.edu.cn/anaconda/pkgs/main/ conda config --add channels https://mirrors.ustc.edu.cn/anaconda/pkgs/free/ conda config --add channels https://mirrors.ustc.edu.cn/anaconda/cloud/conda-forge/ conda config --add channels https://mirrors.ustc.edu.cn/anaconda/cloud/msys2/ conda config --add channels https://mirrors.ustc.edu.cn/anaconda/cloud/bioconda/ conda config --add channels https://mirrors.ustc.edu.cn/anaconda/cloud/menpo/ #设置搜索时显示通道地址 conda config --set show_channel_urls yes -
创建虚拟环境:
shellcd /path/to/ conda create --name conda_py312_venv python=3.12 conda create --name conda_py313_venv python=3.13 conda activate conda_py313_venv conda env list conda install y-py conda deactivate -
打包环境:
shellconda install -c conda-forge conda-pack conda pack -n conda_py313_venv -o conda_py313_venv.tar.gz -
下载conda包:
-
将conda包转为wheel包(以y-py为例)
-
下载对应的包:
- 官网:https://anaconda.org/anaconda/y-py/files
- 相应版本:win-64/y-py-0.6.2-py313h636fa0f_2.tar.bz2
- 下载:地址
-
解压(Git Bash):
shelltar -xvjf y-py-0.6.2-py313h636fa0f_2.tar.bz2 cd ./Lib/site-packages -
创建pyproject.toml文件
[build-system] requires = ["setuptools", "wheel"] build-backend = "setuptools.build_meta" [project] name = "y-py" version = "0.6.2" [tool.setuptools.packages.find] exclude = ["build"] [tool.setuptools.package-data] "*" = ["*.pyd"] "y_py" = ["*.pyd"] -
打包为wheel
shellpip install build wheel python -m build python -m build --wheel pip install dist\y_py-0.6.2-py3-none-any.whl -
安装测试:
shellpip install dist\y_py-0.6.2-py3-none-any.whl -
验证:
pythonimport y_py as Y d1 = Y.YDoc() print(d1)
-
-
其他包(下面两个包使用的是jupyter-lab3):
conda install conda-forge::jupyterlab-markup
conda install conda-forge::jupyterlab-drawio
© 著作权归作者所有