1、前言
Modbus功能码01 :读取线圈状态
功能描述
Modbus功能码01(0x01)用于读取远程设备中线圈(Coils)的开关状态。线圈是Modbus协议中的二进制输出,每个线圈占用1位(0或1),通常对应实际设备的继电器、指示灯等开关量输出。
常见应用场景
- PLC控制中读取继电器状态
- 工业自动化设备监控开关量输出
- 能源管理系统采集设备开关信号
请求格式
请求报文包含以下字段(以Modbus RTU为例):
-
设备地址:1字节(从站地址)
-
功能码:1字节(0x01)
-
起始地址:2字节(大端序,线圈的起始地址)
-
线圈数量:2字节(大端序,需读取的线圈数量)
示例请求帧(读取地址0x0000开始的10个线圈):
[设备地址][0x01][0x00][0x00][0x00][0x0A][CRC校验]
响应格式
响应报文包含以下字段:
- 设备地址:1字节
- 功能码:1字节(0x01)
- 字节计数:1字节(表示后续数据字节数)
- 线圈状态:N字节(每个字节包含8个线圈状态,LSB优先)
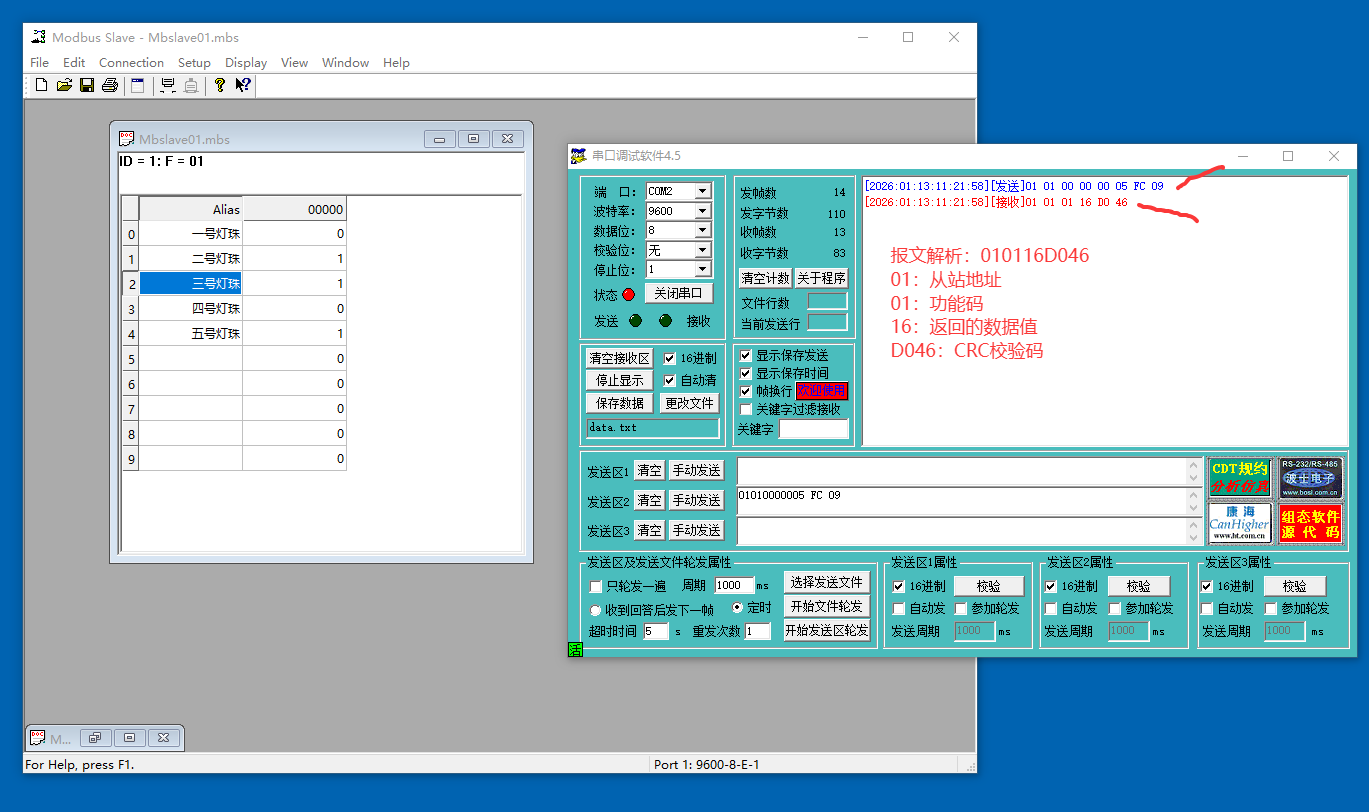
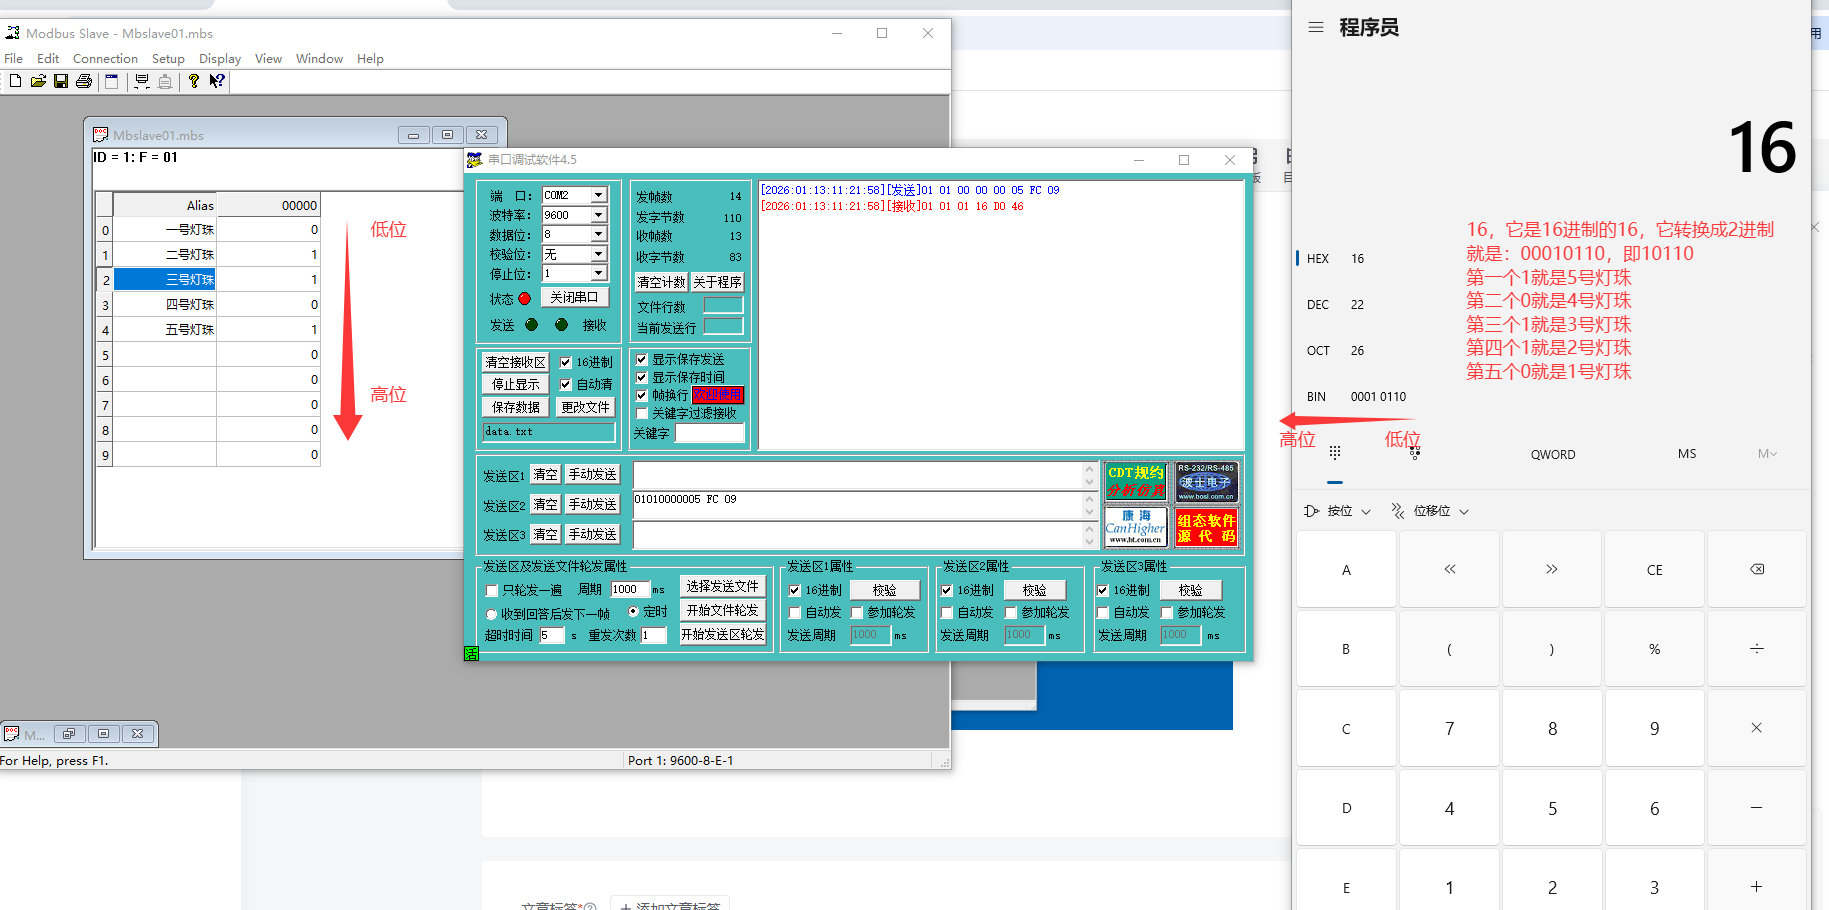
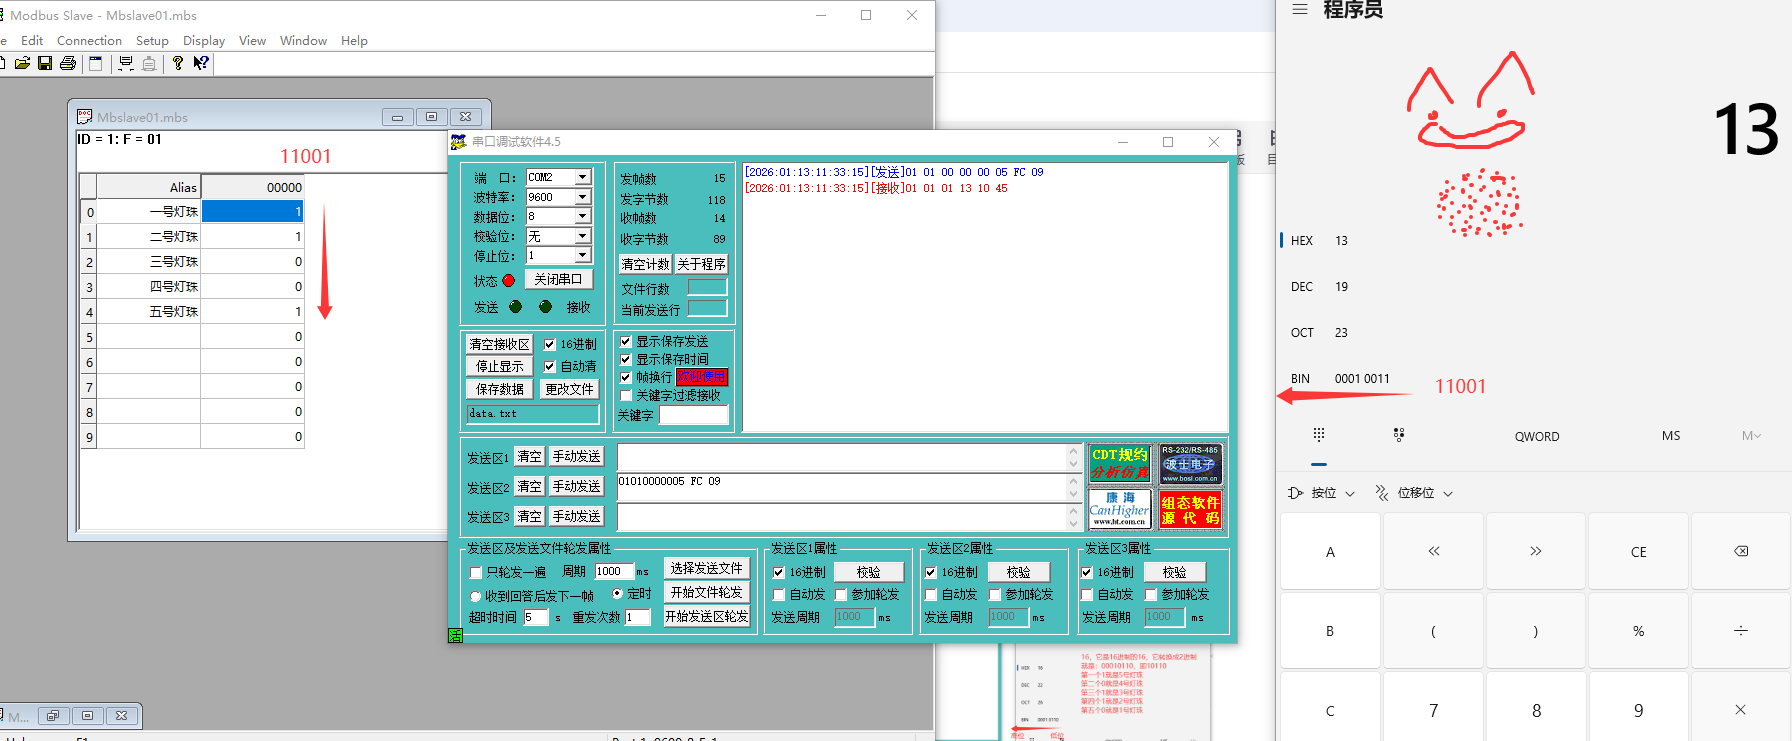
示例响应帧(前10个线圈状态为0xCD即1100 1101):
[设备地址][0x01][0x02][0xCD][0x01][CRC校验]
解析:
- 字节1:
1100 1101(线圈1=1,线圈2=0,线圈3=1...线圈8=1) - 字节2:
0000 0001(线圈9=1,线圈10=0,其余未使用)
操作实例
2、加油干
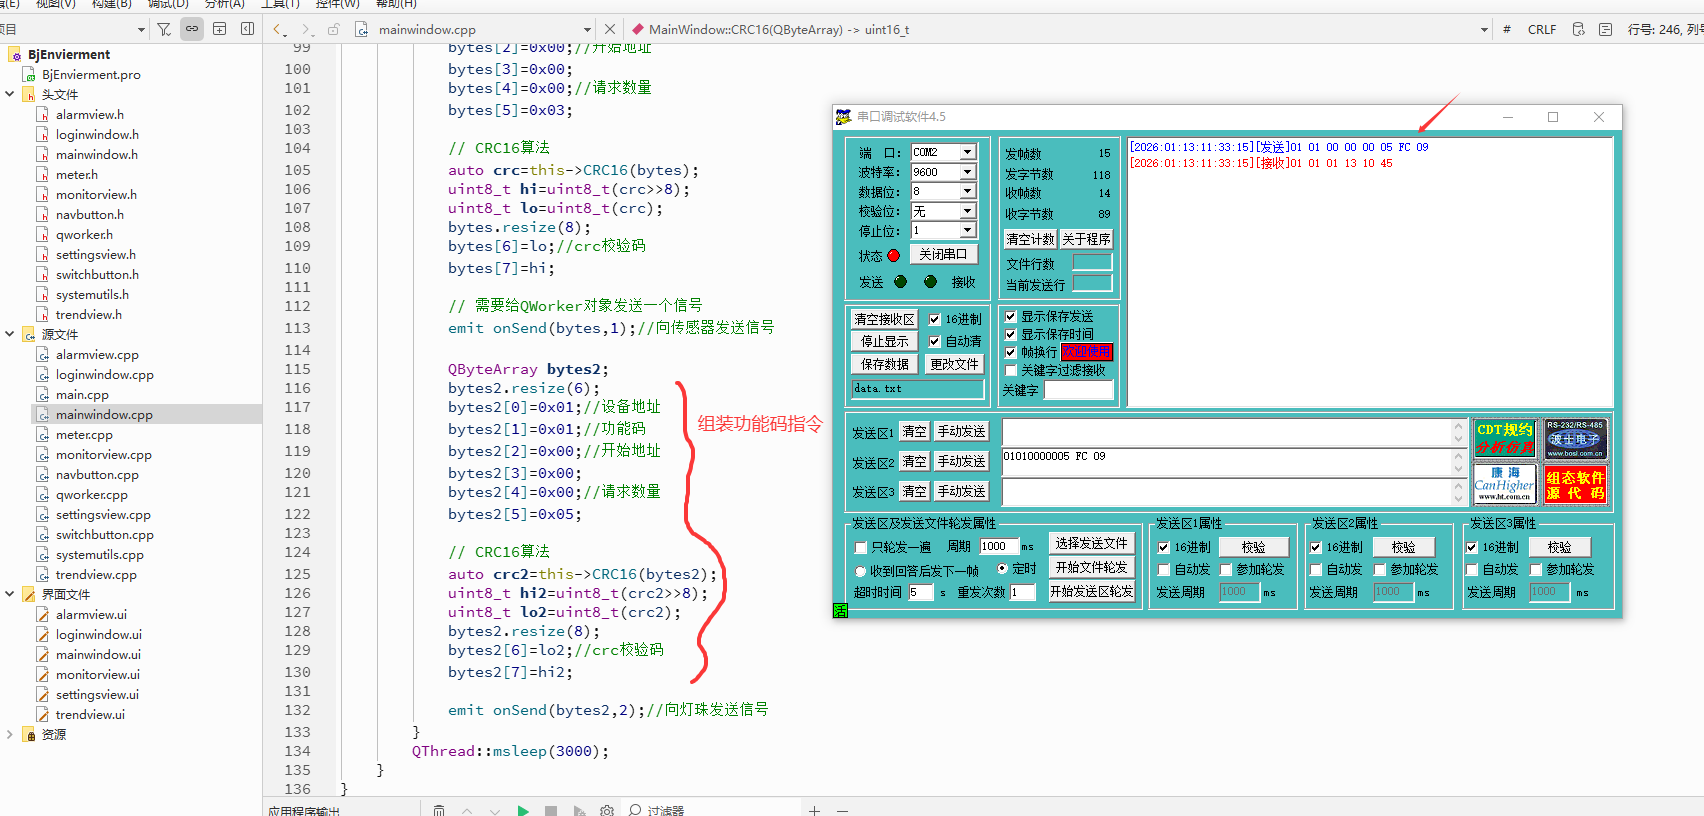
1、组装功能码
2、解析数据
cpp
#include "mainwindow.h"
#include "systemutils.h"
#include "ui_mainwindow.h"
#include <QMessageBox>
#include <QMouseEvent>
#include <QThread>
#include <QtConcurrent/QtConcurrentRun>
#include <QDebug>
MainWindow::MainWindow(QWidget *parent)
: QMainWindow(parent)
, ui(new Ui::MainWindow)
{
ui->setupUi(this);
// 1.设置窗口无边框和窗口透明
this->setWindowFlags(Qt::FramelessWindowHint);
this->setAttribute(Qt::WA_TranslucentBackground);
// 设置相关阴影效果
SystemUtils * utils=new SystemUtils();
utils->SetDropShadowEffect(ui->wdg_root,Qt::gray,10);
//设置关闭,最小,最大的图标
// 设置相关字体图标
QFont font=QFont(QString("zx_icons"),9);
// 关闭
ui->pb_close->setFont(font);
ui->pb_close->setText(QChar(0xe653));
// 最大化
ui->pb_max->setFont(font);
ui->pb_max->setText(QChar(0xe694));
// 最小化
ui->pb_min->setFont(font);
ui->pb_min->setText(QChar(0xe7e6));
//设置第二行消息的图标
ui->lbl_message_icon->setFont(font);
ui->lbl_message_icon->setText(QChar(0xe7ff));
//设置标题字体
QFont font2=QFont(QString("钉钉进步体"),14);
ui->lbl_title->setFont(font2);
//设置"实时监控"按钮的信号和槽函数
connect(ui->nb_monitor,SIGNAL(onClicked(int)),SLOT(onNavClicked(int)));
//设置"趋势图表"导航按钮的信号和槽函数
connect(ui->nb_trend,SIGNAL(onClicked(int)),SLOT(onNavClicked(int)));
//设置"异常报警"导航按钮的信号和槽函数
connect(ui->nb_alarm,SIGNAL(onClicked(int)),SLOT(onNavClicked(int)));
//设置"系统设置"导航按钮的信号和槽函数
connect(ui->nb_settings,SIGNAL(onClicked(int)),SLOT(onNavClicked(int)));
//绑定监控页面Monitor的信号和槽函数关联,即monitor页面中的信号函数onConnect由本页面的槽函数onConnect响应处理
connect(ui->Monitor,SIGNAL(onConnect(QString,QString,QString,QString,QString)),SLOT(onConnect(QString,QString,QString,QString,QString)));
//绑定监控页面Monitor的信号和槽函数关联,即monitor页面中的信号函数onTextSend由本页面的槽函数onTextCompleted响应处理
connect(ui->Monitor,SIGNAL(onTextSend(QString)),this,SLOT(onTextCompleted(QString)));
//创建线程及对象,处理串口
thread=new QThread();
worker=new QWorker();
//1、本页面的信号函数onOpen由worker对象的槽函数openPort响应处理
connect(this,SIGNAL(onOpen(QString,QString,QString,QString,QString)),worker,SLOT(openPort(QString,QString,QString,QString,QString)));
//2、worker对象中的信号函数openCompleted由本页面的onSetopenState槽函数响应处理
connect(worker,SIGNAL(openCompleted(bool)),this,SLOT(onSetopenState(bool)));
//3、本页面的信号函数onSend由worker对象的槽函数sendData响应处理
connect(this,SIGNAL(onSend(QByteArray,int)),worker,SLOT(sendData(QByteArray,int)));
//4、worker对象中的信号函数sendCompleted由本页面的槽函数onSendCompleted响应处理
connect(worker,SIGNAL(sendCompleted(QByteArray,int)),this,SLOT(onSendCompleted(QByteArray,int)));
worker->moveToThread(thread);//把对象worker放在多线程中
thread->start();//启动线程
//f1=QtConcurrent::run(this,&MainWindow::onMonitor);//这是qt5.X的写法,这个写法在6.x中不支持
//实例化异步任务
f1 = QtConcurrent::run([this]() {
this->onMonitor(); // 替换为你的成员函数名
});
}
MainWindow::~MainWindow()
{
delete ui;
}
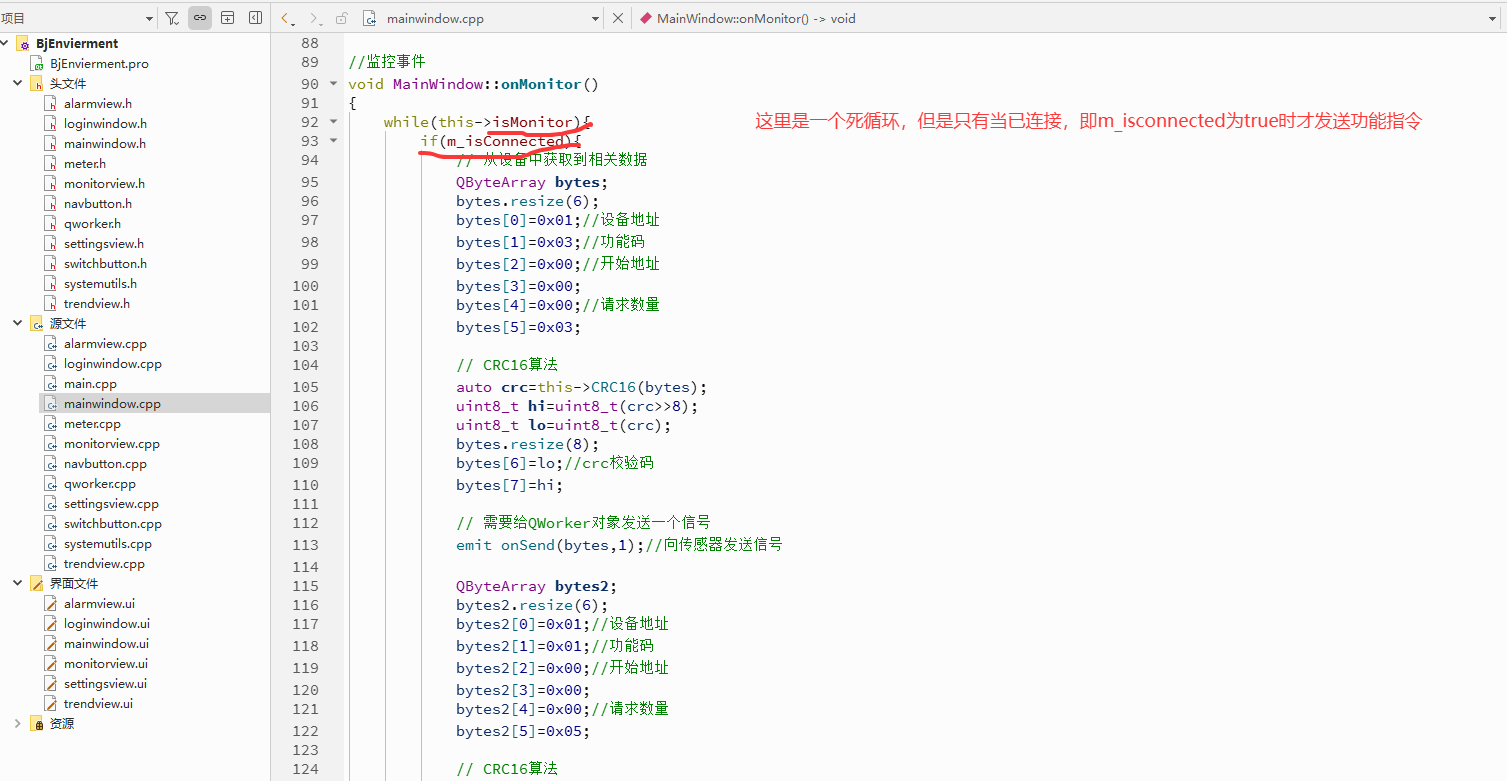
//监控事件
void MainWindow::onMonitor()
{
while(this->isMonitor){
if(m_isConnected){
// 从设备中获取到相关数据
QByteArray bytes;
bytes.resize(6);
bytes[0]=0x01;//设备地址
bytes[1]=0x03;//功能码
bytes[2]=0x00;//开始地址
bytes[3]=0x00;
bytes[4]=0x00;//请求数量
bytes[5]=0x03;
// CRC16算法
auto crc=this->CRC16(bytes);
uint8_t hi=uint8_t(crc>>8);
uint8_t lo=uint8_t(crc);
bytes.resize(8);
bytes[6]=lo;//crc校验码
bytes[7]=hi;
// 需要给QWorker对象发送一个信号
emit onSend(bytes,1);//向传感器发送信号
QByteArray bytes2;
bytes2.resize(6);
bytes2[0]=0x01;//设备地址
bytes2[1]=0x01;//功能码
bytes2[2]=0x00;//开始地址
bytes2[3]=0x00;
bytes2[4]=0x00;//请求数量
bytes2[5]=0x05;
// CRC16算法
auto crc2=this->CRC16(bytes2);
uint8_t hi2=uint8_t(crc2>>8);
uint8_t lo2=uint8_t(crc2);
bytes2.resize(8);
bytes2[6]=lo2;//crc校验码
bytes2[7]=hi2;
emit onSend(bytes2,2);//向灯珠发送信号
}
QThread::msleep(3000);
}
}
//鼠标按下事件
void MainWindow::mousePressEvent(QMouseEvent *event){
if (event->button() == Qt::LeftButton) { // 如果按下左边按钮
m_drag = true;//表示要移动
// 获取当前光标的位置
m_dragPos = event->pos();
// 当前鼠标点相对于桌面屏幕左上角的坐标(0,0),全局坐标;
m_resizeDownPos = event->globalPosition().toPoint();
// 获取当前窗口的相关参数,包括位置,大小等等各种参数
m_mouseDownRect = this->rect();
}
}
//鼠标移动事件
void MainWindow::mouseMoveEvent(QMouseEvent *event){
// 如果是鼠标在拖动时,当前窗口是全屏,不做任何处理
if (isFullScreen()) {
return;
}
if (m_move) {
move(event->globalPosition().toPoint() - m_dragPos);
return;
}
setCursor(Qt::ArrowCursor);
if (m_drag && (event->buttons() & Qt::LeftButton)) {
m_move = true;
move(event->globalPosition().toPoint() - m_dragPos);
}
}
//鼠标释放事件
void MainWindow::mouseReleaseEvent(QMouseEvent *event){
Q_UNUSED(event)
m_drag = false;
if (m_move) {
m_move = false;
}
setCursor(Qt::ArrowCursor);
}
//关闭事件
void MainWindow::on_pb_close_clicked()
{
QMessageBox::StandardButton ret=QMessageBox::question(this,tr("关闭系统运行"),tr("您确定要退出系统吗?"),QMessageBox::Yes | QMessageBox::No,QMessageBox::Yes );
if(ret== QMessageBox::Yes){
this->isMonitor=false;
this->close();
}
}
//最大化
void MainWindow::on_pb_max_clicked()
{
this->showFullScreen(); // 全屏展示
}
//最小化
void MainWindow::on_pb_min_clicked()
{
this->showMinimized();
}
//窗体双击事件
void MainWindow::mouseDoubleClickEvent(QMouseEvent *event)
{
Q_UNUSED(event); // 标记参数未使用,消除警告
if (isFullScreen()) {
showNormal(); // 如果是全屏,就恢复到非全屏
} else {
showFullScreen(); // 否则就变成全屏的
}
}
//导航按钮的点击响应事件
void MainWindow::onNavClicked(int index)
{
ui->sw_pages->setCurrentIndex(index);
}
//连接串口设备
void MainWindow::onConnect(QString port, QString baud, QString parity, QString data, QString stop)
{
//执行串口对象的连接动作,动作必须在后台线程中处理
//触发信号,让qworker这个对象来接收信号
emit onOpen(port,baud,parity,data,stop);
}
//串口连接状态
void MainWindow::onSetopenState(bool state)
{
m_isConnected=true;
//接收到worker对象中的打开状态信号
ui->Monitor->setOpenState(state);
}
//计算CRC校验码
uint16_t MainWindow::CRC16(QByteArray bytes)
{
int len=bytes.size();
uint16_t wcrc=0XFFFF;//预置16位crc寄存器,初值全部为1
uint8_t temp;//定义中间变量
int i=0,j=0;//定义计数
for(i=0;i<len;i++)//循环计算每个数据
{
temp=bytes.at(i);
wcrc^=temp;
for(j=0;j<8;j++){
//判断右移出的是不是1,如果是1则与多项式进行异或。
if(wcrc&0X0001){
wcrc>>=1;//先将数据右移一位
wcrc^=0XA001;//与上面的多项式进行异或
}
else//如果不是1,则直接移出
wcrc>>=1;//直接移出
}
}
temp=wcrc;//crc的值
return wcrc;
}
//发送完成后
void MainWindow::onSendCompleted(QByteArray bytes, int flag)
{
if(flag==1){
if(bytes.length()>3&&(bytes[1]&0x80)==0){//这个条件说明返回的数据没有问题,这里只是一个简单的判断
bool ok;
//截取指定位置指定长度的数据,转换成16进制,再转换成10进制
uint16_t temp=bytes.mid(3,2).toHex().toUInt(&ok,16);
uint16_t humi=bytes.mid(5,2).toHex().toUInt(&ok,16);
uint16_t bright=bytes.mid(7,2).toHex().toUInt(&ok,16);
// qDebug()<<"温度:"<<temp;
// qDebug()<<"湿度:"<<humi;
// qDebug()<<"亮度:"<<bright;
ui->Monitor->setValue(temp,humi,bright);
}
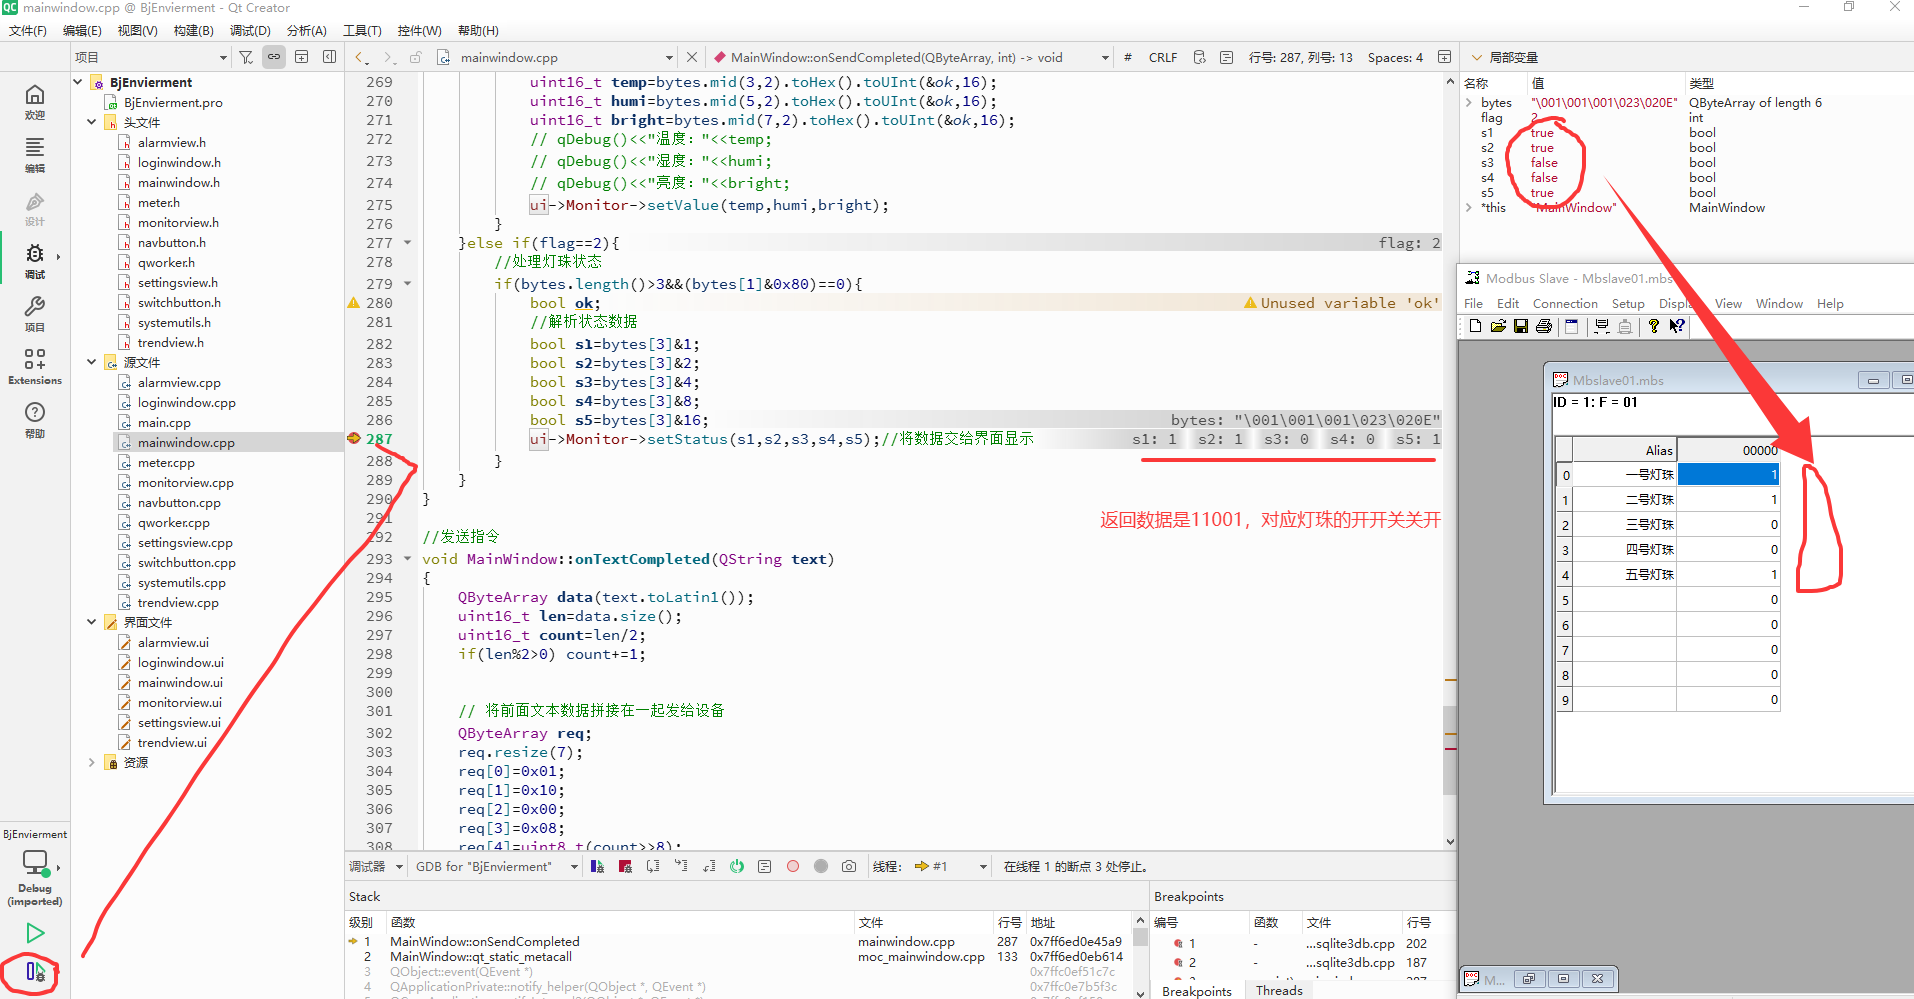
}else if(flag==2){
//处理灯珠状态
if(bytes.length()>3&&(bytes[1]&0x80)==0){
bool ok;
//解析状态数据
bool s1=bytes[3]&1;
bool s2=bytes[3]&2;
bool s3=bytes[3]&4;
bool s4=bytes[3]&8;
bool s5=bytes[3]&16;
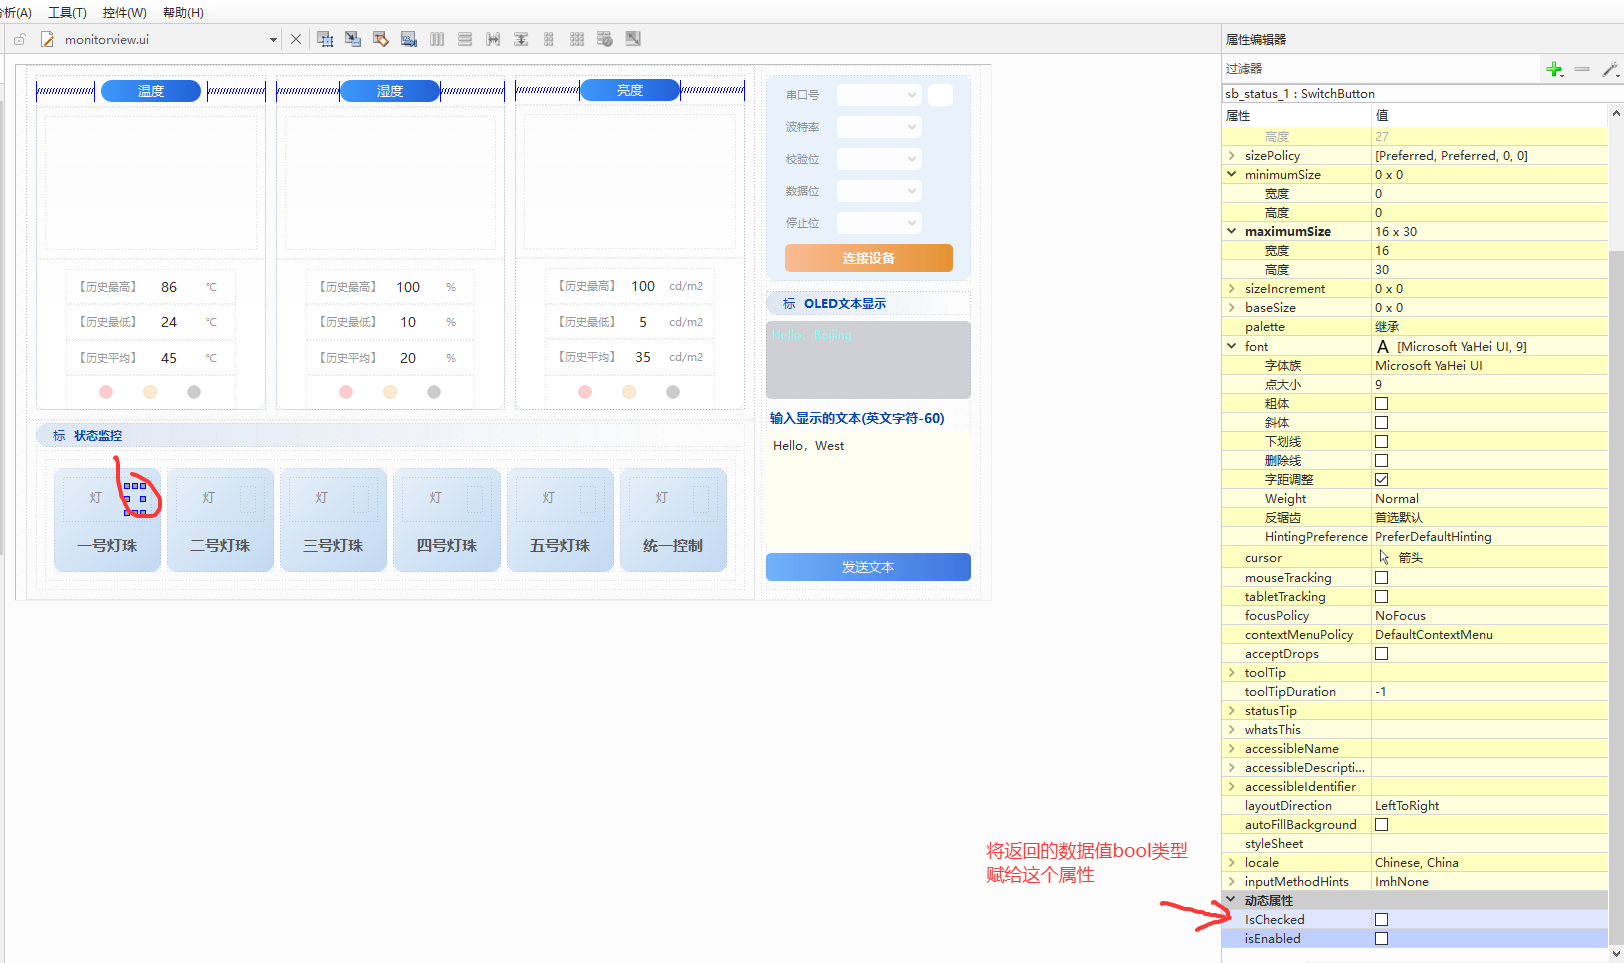
ui->Monitor->setStatus(s1,s2,s3,s4,s5);//将数据交给界面显示
}
}
}
//发送指令
void MainWindow::onTextCompleted(QString text)
{
QByteArray data(text.toLatin1());
uint16_t len=data.size();
uint16_t count=len/2;
if(len%2>0) count+=1;
// 将前面文本数据拼接在一起发给设备
QByteArray req;
req.resize(7);
req[0]=0x01;
req[1]=0x10;
req[2]=0x00;
req[3]=0x08;
req[4]=uint8_t(count>>8);
req[5]=uint8_t(count);
req[6]=len;
req.append(data);
auto crc=this->CRC16(req);
uint8_t hi=uint8_t(crc>>8);
uint8_t lo=uint8_t(crc);
req.append(lo);
req.append(hi);
// 将指定数据指令发到QWorker里处理
emit onSend(req,3);
}3、显示数据

4、运行测试


5、小结
Modbus功能码01(0x01)用于读取远程设备中线圈(Coils)的开关状态。线圈是Modbus协议中的二进制输出,每个线圈占用1位(0或1),通常对应实际设备的继电器、指示灯等开关量输出。
原创不易,打字不易,截图不易,撸码不易,整理不易,走过路过,不要错过,欢迎点赞,收藏,转载,复制,抄袭,留言,灌水,请动动你的金手指,祝您早日实现财务自由。