简介
什么是NFS:network filesystem 网络文件系统,服务端给客户端共享一个硬盘上的目录。
NFS的使用场景:将数据中心的数据共享给其他服务器,其他服务器在使用共享目录时,感受跟本地没有区别
NFS涉及到的服务 :
1.rpcbind: 服务中介 固定端口111。因为nfs-server端口为多个,且不固定,
客户端如果想要使用nfs-server,但是没有办法知道nfs-server的具体端口信息,
所以rpcbind就会提供服务将nfs-server具体端口信息给到客户端。
2.nfs-server :真正提供数据资源的服务器
nfs的使用
1.安装
客户端和服务端都安装 nfs-utils
#yum install nfs-utils -y
2.配置文件
主配置文件/etc/exports,在该配置文件中,
1.写入要共享目录
2.要共享给谁
3.被共享人所拥有权限 : ro,rw
4.账户映射设定:root_squash(只将root映射为nobody),
no_root_squash(直接将客户端的root在服务器也映射为root),
all_squash(所有账户在服务器上都被映射为nobody)(推荐)
no_all_squash(除了root其他账户都不映射)
5.同步/异步读写:
sync:同步方式,一端写入内容,另一端同步在内存和硬盘中写入同样内容,然后回执。(推荐)
async:异步方式,一端写入内容,另一端会将内容暂存在内存中,然后回执,只有当内存中的数据积累到一定量
时再写入到硬盘。
6.指定用户的映射身份:
-
共享控制/usr/sbin/exportfs :常用于刷新共享目录的配置信息
-
使用nfs实现一个共享目录
-
实验1:服务端建立nfs服务 客户端挂载该服务
bash
#服务端
#1.安装nfs-utils
dnf install nfs-utils -y
#2.创建要共享的目录并在其中写入文件
mkdir /nfs_server
echo "hello nfs" > /nfs_server/hello.txt
#3.在/etc/exports添加要共享的目录 并指定接受共享的主机ip,该主机的权限,该主机映射为nobody,同步方式读写
vim /etc/exports
###########
/nfs_server xxx.xxx.xxx.xxx/xx(rw,all_squash,sync)
###########

# 4.启动服务
systemctl enable --now nfs-server
----------------------------------------------------------
#客户端
#1.安装nfs-utils
dnf install nfs-utils -y

#2.创建接受共享的目录
mkdir /nfs_client

#3.将服务端的目录挂在到nfs_client下
showmount -e 192.168.31.100
mount 172.25.254.100:/nfs_server /nfs_client

#4. 尝试在该目录写入文件如果不行,请思考该怎么办?实验2:尝试写文件,如果不行为什么?
#因为此时客户端的用户身份被映射为了服务器上的nobody,而nobody没有写文件的权限,所以无法创建。
实验3:将客户端的账户映射为redhat
bash
# 以下操作是建立在实验1的基础之上
# 1.修改/etc/exports文件
vim /etc/exports
##########
/nfs_server xxx.xxx.xxx.xxx/xx(rw,all_squash,sync,anonuid=1000,anongid=1000)
##########

# 2.使用exportfs命令更新共享目录的设置
exportfs -rv

-------------------------
# 客户端
# 此时在共享目录中创建新的文件 观察该文件属于谁
[root@client nfs_client]# touch 333
[root@client nfs_client]# ll
总用量 8
-rw-r--r-- 1 redhat redhat  0 10月 28 16:51 333
-rw-r--r-- 1 root   root   10 10月 28 15:32 hello.txt
-rw-r--r-- 1 nobody nobody 22 10月 28 15:55 thanks.txt
自动挂载
本质:惰性挂载
- autofs:默认情况下autofs会将共享目录挂在到net目录下,当你进入到指定ip的目录那一瞬间时
autofs会自动将该ip中的共享目录挂在到指定ip的目录下。
autofs还支持自动卸载
- 配置文件/etc/autofs.conf
- 在这个文件中 我们可以修改自动卸载的时长
- 配置文件/etc/auto.master
3.我们可以指定自动挂载的目录
- 实现自动挂载
客户端
1.将之前做的实验取消挂载
umount /nfs_client
2.安装autofs
dnf install autofs -y
3. 进入/net/xxx.xxx.xxx.xxx/nfs_server,观察是否报错
4. 如果没有报错并且可以查看到 服务端的共享目录中文件 那么说明自动挂载出发成功
修改自动卸载的时长
1./etc/autofs.conf
timeout = 5
2.重启autofs
systemctl restart autofs
3.进入/net/xxx.xxx.xxx.xxx/nfs_server,再回到根目录
root@client /# cd /net/192.168.31.100/nfs
4.第一时间df 查看挂载信息
bash
[root@client /]# df
文件系统                      1K-块    已用     可用 已用% 挂载点
。。。。
172.25.254.100:/nfs_server 42467328 1988352 40478976    5% /net/172.25.254.100/nfs_server
[root@client nfs_server]# cd /
# 5.过5秒钟 再使用df命令 发现工项目 已经卸载了
[root@client /]# df
文件系统                 1K-块    已用     可用 已用% 挂载点
devtmpfs                  4096       0     4096    0% /dev
tmpfs                   872836       0   872836    0% /dev/shm
tmpfs                   349136    5284   343852    2% /run
/dev/mapper/rhel-root 42467328 1990920 40476408    5% /
/dev/sda2               983040  200180   782860   21% /boot
/dev/mapper/rhel-home 20701184  177448 20523736    1% /home
/dev/sda1               613160    7140   606020    2% /boot/efi
tmpfs                   174564       0   174564    0% /run/user/0
5.实现指定目录的自动挂载
bash
# 1.修改/etc/auto.master 新增自动挂载的目录 并指定该目录的子配置文件
vim /etc/auto.master
#####
/nfs_auto /etc/auto.nfs_auto
#####
# 2.实现一下子配置文件/etc/auto.nfs_auto
vim /etc/auto.nfs_auto
#####
fromserver 172.25.254.100:/nfs_server
#####
# 3.重启autofs
systemctl restart autofs
# 4.重启过会发现 根目录中自动创建了 /nfs_auto目录 我们进入其中的fromserver 那就是服务端共享目录
[root@client /]# cd /nfs_auto/fromserver
[root@client fromserver]# ls
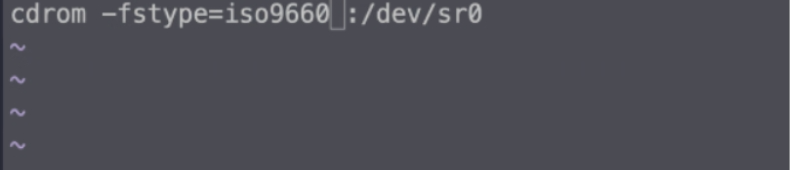
333 444 hello.txt thanks.txt实验5:实现光盘挂载
实验五: #vim /etc/auto.master
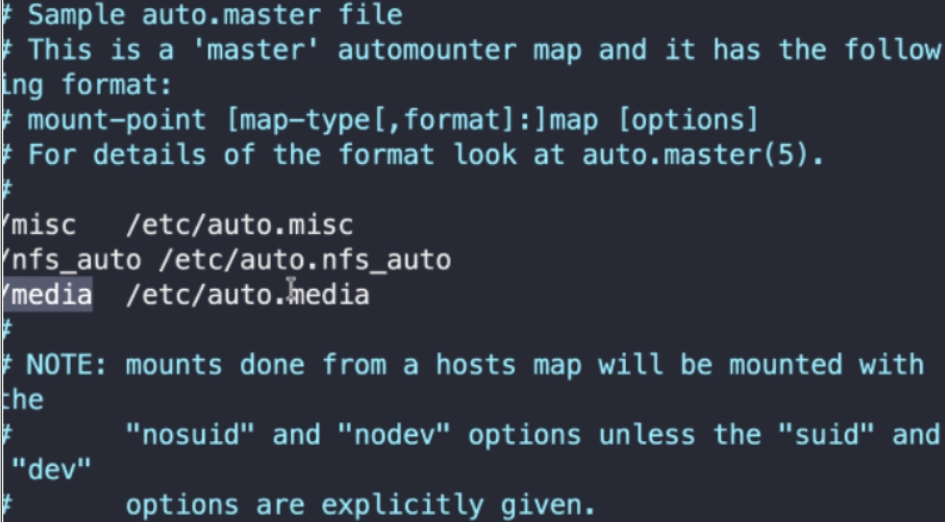
#vim /etc/auto.media
 #systemctl restart autofs
#tree /media