本文是我之前在安装和使用 jupyterhub 过程中的配置记录,仅作为思路参考。
#1 、操作系统ubuntu18.04服务器版
#2、修改清华源
sudo sed -i s@/archive.ubuntu.com/@/mirrors.tuna.tsinghua.edu.cn/@g /etc/apt/sources.list & sudo apt update#3、安装python
apt-get install -y python-software-properties
apt-get install -y software-properties-common
add-apt-repository ppa:deadsnakes/ppa
apt-get update
apt-get -y install python3.6 python3.6-dev python3-pip python3.6-venv curl git
#4、修改python下载国内源
mkdir ~/.pip & cd ~/.pip

vim pip.conf

[global]
index-url = http://pypi.douban.com/simple
[install]
use-mirrors =true
mirrors =http://pypi.douban.com/simple/
trusted-host =pypi.douban.com
#5、下载tljh安装包
git clone https://github.com/jupyterhub/the-littlest-jupyterhub

 mv the-littlest-jupyterhub /opt

python3 /opt/the-littlest-jupyterhub/bootstrap/bootstrap.py  --admin admin
或
python3 /opt/the-littlest-jupyterhub/bootstrap/bootstrap.py --admin admin:密码等待几分钟后 成功报错 都会有掉示 脚本只支持ubuntu的amd64位
arm64操作系统暂没有识配下载地址
#6、安装成功
service jupyterhub start
service traefik start
#7、启动网址
http:/ip开放80端口
sudo ufw allow 80

sudo ufw reload
#8、带日志启动
service jupyterhub stop

/opt/tljh/hub/bin/python3 -m jupyterhub.app -f /opt/tljh/hub/lib/python3.6/site-packages/tljh/jupyterhub_config.py --upgrade-db

如果出来日志报错如图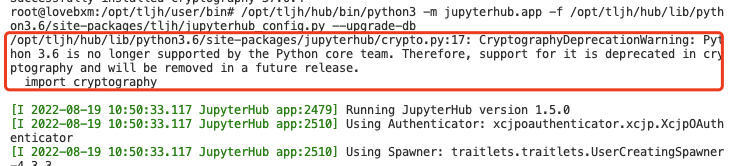
运行报错:
CryptographyDeprecationWarning: Python 3.6 is no longer supported by the Python core team.x509。
解决方案:
 /opt/tljh/hub/bin/pip uninstall cryptography

/opt/tljh/hub/bin/pip install -i https://mirror.baidu.com/pypi/simple --trusted-host mirror.baidu.com  cryptography==36.0.2
#9、Iframe不让新窗口打开修改方法
第一次查找
find  /opt/tljh/user/ -name main.min.js

vim /root/one.sh
内容如下所示 注意版本号
sed -i 's/_blank/_self/'  /opt/tljh/user/lib/python3.9/site-packages/nbclassic/static/tree/js/main.min.js
sed -i 's/_blank/_self/'  /opt/tljh/user/lib/python3.9/site-packages/nbclassic/static/auth/js/main.min.js
sed -i 's/_blank/_self/'  /opt/tljh/user/lib/python3.9/site-packages/nbclassic/static/notebook/js/main.min.js
sed -i 's/_blank/_self/'  /opt/tljh/user/lib/python3.9/site-packages/nbclassic/static/terminal/js/main.min.js
sed -i 's/_blank/_self/'  /opt/tljh/user/lib/python3.9/site-packages/nbclassic/static/edit/js/main.min.js
sed -i 's/_blank/_self/'  /opt/tljh/user/lib/python3.9/site-packages/notebook/static/tree/js/main.min.js
sed -i 's/_blank/_self/'  /opt/tljh/user/lib/python3.9/site-packages/notebook/static/auth/js/main.min.js
sed -i 's/_blank/_self/'  /opt/tljh/user/lib/python3.9/site-packages/notebook/static/notebook/js/main.min.js
sed -i 's/_blank/_self/'  /opt/tljh/user/lib/python3.9/site-packages/notebook/static/terminal/js/main.min.js
sed -i 's/_blank/_self/' /opt/tljh/user/lib/python3.9/site-packages/notebook/static/edit/js/main.min.js

chmod +x /root/one.sh & /root/one.sh
第二次查找
find  /opt/tljh/hub/ -name main.min.js

vim /root/two.sh

sed -i 's/_blank/_self/'  /opt/tljh/hub/lib/python3.6/site-packages/notebook/static/tree/js/main.min.js
sed -i 's/_blank/_self/'  /opt/tljh/hub/lib/python3.6/site-packages/notebook/static/auth/js/main.min.js
sed -i 's/_blank/_self/' /opt/tljh/hub/lib/python3.6/site-packages/notebook/static/notebook/js/main.min.js
sed -i 's/_blank/_self/' /opt/tljh/hub/lib/python3.6/site-packages/notebook/static/terminal/js/main.min.js
sed -i 's/_blank/_self/' /opt/tljh/hub/lib/python3.6/site-packages/notebook/static/edit/js/main.min.js

chmod +x /root/two.sh & /root/two.sh
第三次修改 注意版本号
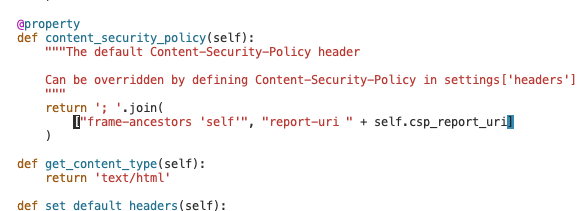
vim /opt/tljh/user/lib/python3.9/site-packages/jupyterhub/handlers/base.py
vim /opt/tljh/hub/lib/python3.6/site-packages/jupyterhub/handlers/base.py
#按退出键:/frame-ancestors 修改下面的图
#上面两个shift+gg 最后一行注掉  # (r'/security/csp-report', CSPReportHandler),
修改如图所示
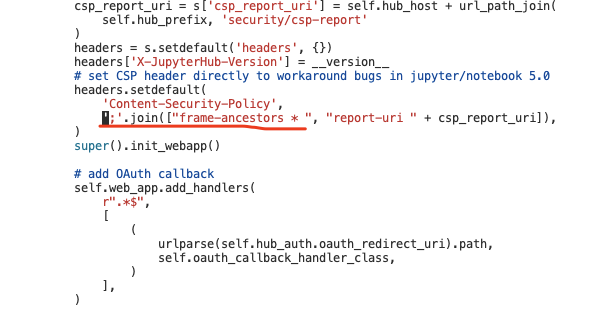
vim /opt/tljh/hub/lib/python3.6/site-packages/jupyterhub/singleuser/mixins.py
vim /opt/tljh/user/lib/python3.9/site-packages/jupyterhub/singleuser/mixins.py
修改如图
#10、安装插件
ln -s /opt/tljh/user/bin/pip3 /usr/local/bin/pip3
ln -s /opt/tljh/user/bin/pip3 /usr/local/bin/pip
ln -s /opt/tljh/user/bin/jupyter /usr/local/bin/jupyter

opt/tljh/user/bin/jupyter contrib nbextension install --sys-prefix
/opt/tljh/user/bin/pip  install jupyter_contrib_nbextensions

jupyter contrib nbextension install  --sys-prefix
#11、设置内存
sudo tljh-config  set limits.memory '500M'
sudo tljh-config  set limits.cpu 1
sudo tljh-config   reload
#12、 开启启动
sudo systemctl enable jupyterhub
sudo systemctl daemon-reload
sudo systemctl restart jupyterhub
sudo systemctl stop jupyterhub
sudo systemctl status jupyterhub

sudo systemctl enable traefik
sudo systemctl restart traefik
sudo systemctl status traefik
#14、参考文档
https://tljh.jupyter.org/en/latest/howto/index.html
https://github.com/jupyterhub/jupyterhub-idle-culler
https://tljh.jupyter.org/en/latest/topic/idle-culler.html
配置方法idle-culler
默认情况下,JupyterHub将每隔60秒ping用户笔记本服务器以检查其状态。每台空闲超过10分钟的服务器都将被淘汰。
services.cull.every = 60
services.cull.timeout = 600

sudo tljh-config set services.cull.timeout <max-idle-sec-before-server-is-culled>
sudo tljh-config reload

sudo tljh-config set services.cull.every <number-of-sec-this-check-is-done>
sudo tljh-config reload