0、开发路线图
第一步 (基础):在 Ubuntu24.04 x64上交叉编译 SOEM,并编写一个简单的 CLI 程序,能够读到 SVD60N 的 Statusword (6041h)。
第二步 (逻辑):移植 SVD60NController 状态机,实现一键使能/断开。
第三步 (核心):建立 PDO 通讯线程,实现位置/速度反馈的稳定读取。
第四步 (UI):使用 Qt Creator 搭建布局,集成 QCustomPlot 进行绘图。
第五步 (高级):实现正弦波和三角波的生成算法,并进行 10ms 循环的稳定性测试。
1、第一步(基础)
在 Ubuntu24.04 x64上交叉编译 SOEM,并编写一个简单的 CLI 程序,能够读到 SVD60N 的 Statusword (6041h)。
1.1 下载 SOEM-v1.4.0 并编译
首先修改CMakeList.txt的第一行为:
bash
cmake_minimum_required(VERSION 3.5)然后执行编译步骤
bash
# 进入 SOEM 源码目录
cd SOEM-1.4.0

# 创建并进入构建目录
mkdir build
cd build

# 配置 CMake (生成静态库)
cmake -DCMAKE_C_FLAGS="-Wno-stringop-truncation -Wno-error=stringop-truncation" -DCMAKE_BUILD_TYPE=Release ..

# 编译
make -j$(nproc)
1.2 编写测试程序(基于SOD)
新建一个文件夹,并写入main.cpp
cpp
#include <iostream>
#include <cstdio>
#include <cstring>
#include <unistd.h>

extern "C" {
#include "ethercat.h"
}

int main(int argc, char *argv[]) {
    if (argc < 2) {
        std::printf("Usage: sudo ./svd60n_basic_test [ifname]\n");
        return 1;
    }

    char *ifname = argv[1];
    char IOmap[4096]; // 临时创建一个 IOmap

    if (ec_init(ifname)) {
        // 1. 扫描并初始化从站
        if (ec_config_init(FALSE) > 0) {
            std::printf("Found %d slaves.\n", ec_slavecount);

            // 2. 配置 IOMAP (这一步会设置 SyncManagers,对 SDO 通讯非常重要)
            // 即使我们暂时不用 PDO,这一步也能确保 Mailbox 初始化完成
            ec_config_map(&IOmap);

            // 3. 等待从站达到 PRE_OP 状态 (最长等待 2 秒)
            std::printf("Waiting for slaves to reach PRE_OP state...\n");
            ec_statecheck(0, EC_STATE_PRE_OP,  EC_TIMEOUTSTATE * 4);

            if (ec_slave[1].state == EC_STATE_PRE_OP) {
                std::printf("Slave 1 is in PRE_OP. Attempting SDO read...\n");

                uint16_t statusword = 0;
                int size = sizeof(statusword);

                // 4. 读取 SDO 0x6041
                int result = ec_SDOread(1, 0x6041, 0x00, FALSE, &size, &statusword, EC_TIMEOUTRXM);

                if (result > 0) {
                    std::printf("\n[SUCCESS] Slave 1 Statusword: 0x%04X\n", statusword);
                    // 打印二进制状态位以便分析
                    for(int i=15; i>=0; i--) std::printf("%d", (statusword >> i) & 1);
                    std::printf("\n");
                } else {
                    // 如果失败,打印错误码
                    std::printf("\n[ERROR] SDO read failed. Result: %d\n", result);
                    // 打印从站当前的 AL 状态码,看看为什么拒绝通讯
                    uint16_t al_status = 0;
                    int al_size = sizeof(al_status);
                    ec_SDOread(1, 0x120, 0x00, FALSE, &al_size, &al_status, EC_TIMEOUTRXM);
                    std::printf("AL Status Code: 0x%04X\n", ec_slave[1].ALstatuscode);
                }
            } else {
                std::printf("Slave did not reach PRE_OP. Current State: 0x%02X\n", ec_slave[1].state);
            }
        }
        ec_close();
    }
    return 0;
}
CMakeList如下:
cpp
cmake_minimum_required(VERSION 3.10)
project(svd60n_basic_test)
set(CMAKE_CXX_STANDARD 17)
# --- 配置 SOEM 路径 (根据实际修改) ---
set(SOEM_DIR "/home/timgao/SOEM-1.4.0")
include_directories(${SOEM_DIR}/soem)
include_directories(${SOEM_DIR}/osal)
include_directories(${SOEM_DIR}/osal/linux)
include_directories(${SOEM_DIR}/oshw)
include_directories(${SOEM_DIR}/oshw/linux)
# 链接 SOEM 编译出的库文件 (注意路径可能因 build 目录结构不同而异)
# 通常在 SOEM/build/libsoem.a
link_directories(${SOEM_DIR}/build)
add_executable(svd60n_basic_test main.cpp)
# SOEM 在 Linux 上需要 pthread 和 rt 库
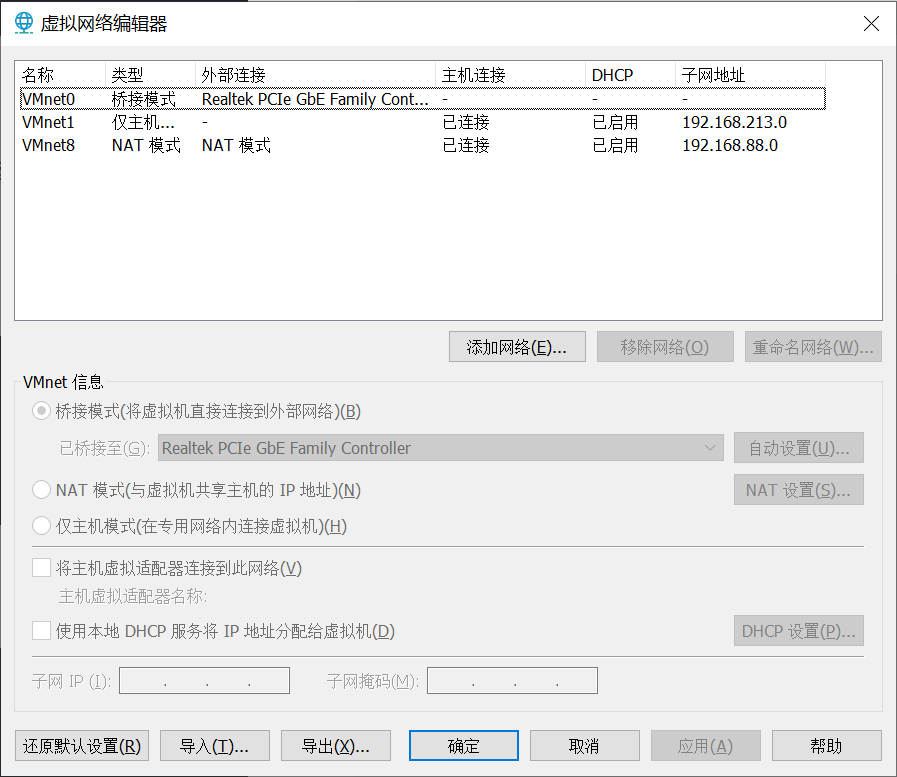
target_link_libraries(svd60n_basic_test soem pthread rt)1.3 配置VMware网卡
在WMware虚拟网络编辑器,确保VMnet0处于桥接模式,并手动选择外部连接为对应的物理网口(而不是自动)。
1.4 编译并运行测试程序
bash
mkdir build && cd build
cmake ..
make

sudo ./svd60n_basic_test ens34
应该看到输出:
bash
Found 1 slaves.
Waiting for slaves to reach PRE_OP state...
Slave 1 is in PRE_OP. Attempting SDO read...

[SUCCESS] Slave 1 Statusword: 0x0250
0000001001010000
2、第二步(逻辑)
移植 SVD60NController 状态机,实现一键使能/断开。
逻辑拆分为三个核心组件:
- EtherCATMaster (底层驱动封装)
职责:负责 SOEM 的生命周期(网卡打开、从站扫描、PDO/SDO 原始读写)。
特性:作为一个单例或管理类,不包含具体的电机业务逻辑,只负责"发信"。
- SVD60NDevice (电机逻辑类)
职责:封装 DS402 状态机(State Machine)。
对应 Matlab 文件:SVD60NController.m + SVD60NDictionary.m。
核心方法:
requestState(TargetState):请求切换状态(如:请求"使能")。
processInternalState():由定时器或线程调用,检查当前 Statusword,发送对应的 Controlword。
- ControlThread (高优先级循环)
职责:驱动通讯循环。
特性:在 Linux 下使用 std::thread 或 QThread,以 10ms 的周期不断调用从站的数据交换。