一、核心知识点:KeyboardAvoidingView 键盘避让视图 完整核心用法
1. 键盘避让视图的基本概念
KeyboardAvoidingView 是 React Native 提供的一个容器组件,用于解决键盘弹出时遮挡输入框的问题。当软键盘弹出时,KeyboardAvoidingView 会自动调整其子组件的位置,确保输入框始终可见。这个组件在移动应用中非常重要,特别是在表单输入、聊天界面等场景中。KeyboardAvoidingView 完全支持鸿蒙系统。
核心功能特性:
- 自动检测键盘弹出和收起
- 自动调整视图位置,避免遮挡
- 支持垂直和水平方向的键盘避让
- 支持自定义键盘避让行为
- 支持平滑的动画过渡
- 支持嵌套使用
- 支持多种平台适配
- 支持自定义键盘避让偏移量
2. 键盘遮挡问题的根本原因
在移动应用中,当软键盘弹出时,系统会调整窗口内容,但有时调整不够充分,导致输入框被键盘遮挡。这是由于以下原因造成的:
技术原因:
- 系统窗口调整机制不完善
- 不同平台的键盘高度计算方式不同
- 应用布局结构复杂,系统无法正确计算
- 自定义的布局容器与系统调整冲突
解决方案:
KeyboardAvoidingView 通过监听键盘事件,计算需要的偏移量,自动调整视图位置,确保输入框始终可见。
3. 键盘事件监听机制
KeyboardAvoidingView 内部通过监听原生键盘事件来实现键盘避让:
iOS 键盘事件:
javascript
keyboardWillShow: 键盘即将弹出
keyboardDidShow: 键盘已经弹出
keyboardWillHide: 键盘即将收起
keyboardDidHide: 键盘已经收起
keyboardWillChangeFrame: 键盘框架即将改变
keyboardDidChangeFrame: 键盘框架已经改变
Android 键盘事件:
javascript
keyboardDidShow: 键盘已经弹出
keyboardDidHide: 键盘已经收起
鸿蒙键盘事件:
javascript
keyboardDidShow: 键盘已经弹出
keyboardDidHide: 键盘已经收起
4. 键盘高度计算方法
不同平台的键盘高度计算方式:
iOS 键盘高度:
javascript
// 从 keyboardDidShow 事件获取
{ endCoordinates: { height: keyboardHeight } }
Android 键盘高度:
javascript
// 从 keyboardDidShow 事件获取
{ endCoordinates: { height: keyboardHeight } }
鸿蒙键盘高度:
javascript
// 从 keyboardDidShow 事件获取
{ endCoordinates: { height: keyboardHeight } }
5. 键盘避让的三种行为模式
KeyboardAvoidingView 支持三种不同的键盘避让行为模式,每种模式适用于不同的场景:
padding 模式
工作原理:
- 通过在底部添加 padding 来调整视图位置
- 适用于固定高度的容器
- 性能最好,实现最简单
适用场景:
- 简单的表单页面
- 固定高度的容器
- 不需要精确控制位置的场景
代码示例:
javascript
<KeyboardAvoidingView
  behavior="padding"
  style={styles.container}
>
  <TextInput
    placeholder="输入内容"
    style={styles.input}
  />
</KeyboardAvoidingView>
position 模式
工作原理:
- 使用绝对定位调整视图位置
- 适用于动态高度的容器
- 提供更灵活的位置控制
适用场景:
- 动态高度的容器
- 需要精确控制位置的场景
- 复杂的布局结构
代码示例:
javascript
<KeyboardAvoidingView
  behavior="position"
  style={styles.container}
>
  <TextInput
    placeholder="输入内容"
    style={styles.input}
  />
</KeyboardAvoidingView>
height 模式
工作原理:
- 通过调整容器高度来避免遮挡
- 适用于需要高度变化的场景
- 性能相对较低
适用场景:
- 需要高度变化的容器
- 需要精确控制高度的场景
- 兼容性最好的模式
代码示例:
javascript
<KeyboardAvoidingView
  behavior="height"
  keyboardVerticalOffset={20}
  style={styles.container}
>
  <TextInput
    placeholder="输入内容"
    style={styles.input}
  />
</KeyboardAvoidingView>
6. 键盘避让的数学原理
KeyboardAvoidingView 通过以下数学计算来确定需要的偏移量:
偏移量计算公式:
需要的偏移量 = max(0, 键盘高度 - 可用空间)

其中:
- 键盘高度:从键盘事件中获取
- 可用空间 = 容器高度 - 输入框底部距离容器底部的距离
实际计算步骤:
- 监听键盘事件,获取键盘高度
- 计算输入框在容器中的位置
- 计算可用空间
- 如果偏移量大于0,则调整视图位置
代码实现:
javascript
const [keyboardHeight, setKeyboardHeight] = useState(0);
const [inputBottomOffset, setInputBottomOffset] = useState(0);

useEffect(() => {
  const keyboardDidShowListener = Keyboard.addListener(
    'keyboardDidShow',
    (e) => {
      const height = e.endCoordinates.height;
      setKeyboardHeight(height);
    }
  );

  const keyboardDidHideListener = Keyboard.addListener(
    'keyboardDidHide',
    () => {
      setKeyboardHeight(0);
    }
  );

  return () => {
    keyboardDidShowListener.remove();
    keyboardDidHideListener.remove();
  };
}, []);

// 计算需要的偏移量
const calculateOffset = () => {
  const availableSpace = containerHeight - inputBottomOffset;
  const offset = Math.max(0, keyboardHeight - availableSpace);
  return offset;
};
7. 键盘避让的动画过渡
KeyboardAvoidingView 使用动画平滑过渡,避免突兀的位置跳跃:
动画配置:
javascript
Animated.timing(
  animatedValue,
  {
    toValue: targetValue,
    duration: 250,
    useNativeDriver: false, // Android 需要 false
  }
).start();
动画时长:
- 默认:250ms
- iOS:可以自定义
- Android:固定为 250ms
- HarmonyOS:可以自定义
动画缓动:
- 使用默认的缓动函数
- 可以自定义缓动函数
- 确保动画流畅自然
二、KeyboardAvoidingView 深度解析
1. 键盘事件的生命周期
键盘事件的完整生命周期:
键盘即将弹出 → 键盘已经弹出 → 键盘即将收起 → 键盘已经收起
     ↓              ↓                ↓               ↓
  获取键盘高度    调整视图位置    恢复视图位置    重置键盘状态
关键时间点:
- 键盘弹出前:保存当前视图位置
- 键盘弹出后:计算并应用偏移量
- 键盘收起前:准备恢复视图位置
- 键盘收起后:恢复到原始位置
2. 不同平台的键盘行为差异
不同平台的键盘行为存在差异,需要针对性处理:
iOS 键盘特性:
- 键盘弹出时会有系统自带的避让机制
- 键盘高度会根据输入框类型变化
- 支持多种键盘类型(数字键盘、邮件键盘等)
- 键盘上方有自动填充建议
Android 键盘特性:
- 键盘弹出时不会自动调整布局
- 需要手动处理键盘避让
- 支持自定义键盘主题
- 支持快捷键操作
鸿蒙键盘特性:
- 键盘弹出时不会自动调整布局
- 支持多种输入法
- 支持自定义键盘主题
- 支持手势输入
3. ScrollView 与 KeyboardAvoidingView 的配合
ScrollView 与 KeyboardAvoidingView 的配合使用是常见的组合场景:
正确使用方式:
javascript
<SafeAreaView style={styles.container}>
  <KeyboardAvoidingView behavior="padding" style={styles.container}>
    <ScrollView
      contentContainerStyle={styles.scrollContent}
      keyboardShouldPersistTaps="handled"
    >
      {/* 输入框列表 */}
      <TextInput
        placeholder="输入框 1"
        style={styles.input}
      />
      <TextInput
        placeholder="输入框 2"
        style={styles.input}
      />
      <TextInput
        placeholder="输入框 3"
        style={styles.input}
      />
    </ScrollView>
  </KeyboardAvoidingView>
</SafeAreaView>
关键要点:
- KeyboardAvoidingView 应该包裹 ScrollView
- 不应该嵌套多个 KeyboardAvoidingView
- 只需要一层避让即可
keyboardShouldPersistTaps="handled"确保点击事件正常
4. 键盘避让与动画的结合
KeyboardAvoidingView 可以与 Animated API 结合,创建更流畅的过渡效果:
javascript
import { Animated } from 'react-native';

const translateY = useRef(new Animated.Value(0)).current;

useEffect(() => {
  const keyboardDidShowListener = Keyboard.addListener(
    'keyboardDidShow',
    (e) => {
      const height = e.endCoordinates.height;
      Animated.timing(translateY, {
        toValue: -height,
        duration: 250,
        useNativeDriver: false,
      }).start();
    }
  );

  const keyboardDidHideListener = Keyboard.addListener(
    'keyboardDidHide',
    () => {
      Animated.timing(translateY, {
        toValue: 0,
        duration: 250,
        useNativeDriver: false,
      }).start();
    }
  );

  return () => {
    keyboardDidShowListener.remove();
    keyboardDidHideListener.remove();
  };
}, []);

<Animated.View
  style={{
    transform: [{ translateY }],
  }}
>
  {/* 内容 */}
</Animated.View>
动画优势:
- 平滑的过渡效果
- 提升用户体验
- 避免视觉跳跃
5. 键盘避让的边界情况处理
键盘避让在某些边界情况下需要特殊处理:
边界情况1:键盘高度超过容器高度
javascript
const offset = Math.min(keyboardHeight, containerHeight);边界情况2:输入框已经在可见区域
javascript
const inputBottom = inputRef.current?.measure?.height || 0;
const availableSpace = containerHeight - inputBottom;
if (availableSpace >= keyboardHeight) {
  // 不需要调整
  return;
}
边界情况3:多个输入框同时显示
javascript
// 计算所有输入框的底部位置
const inputBottoms = inputRefs.map(ref => ref.current?.measure?.height || 0);
const maxInputBottom = Math.max(...inputBottoms);
const availableSpace = containerHeight - maxInputBottom;
const offset = Math.max(0, keyboardHeight - availableSpace);
三、实战完整版:企业级通用 KeyboardAvoidingView 键盘避让视图
javascript
import React, { useState, useEffect, useRef } from 'react';
import {
View,
Text,
StyleSheet,
SafeAreaView,
ScrollView,
TextInput,
KeyboardAvoidingView,
Keyboard,
Platform,
TouchableOpacity,
Alert,
StatusBar,
} from 'react-native';
const KeyboardAvoidingViewScreen = () => {
const [formData, setFormData] = useState({
username: '',
password: '',
email: '',
phone: '',
address: '',
bio: '',
});
const [keyboardHeight, setKeyboardHeight] = useState<number>(0);
const [isKeyboardVisible, setIsKeyboardVisible] = useState<boolean>(false);
const [focusedInput, setFocusedInput] = useState<string>('');
const inputRefs = useRef<Record<string, any>>({});
useEffect(() => {
const keyboardDidShowListener = Keyboard.addListener(
'keyboardDidShow',
(e) => {
setIsKeyboardVisible(true);
setKeyboardHeight(e.endCoordinates.height);
console.log('键盘弹出,高度:', e.endCoordinates.height);
}
);
const keyboardDidHideListener = Keyboard.addListener(
'keyboardDidHide',
() => {
setIsKeyboardVisible(false);
setKeyboardHeight(0);
console.log('键盘收起');
}
);
return () => {
keyboardDidShowListener.remove();
keyboardDidHideListener.remove();
};
}, []);
const handleInputChange = (field: string, value: string) => {
setFormData(prev => ({ ...prev, [field]: value }));
};
const handleSubmit = () => {
Keyboard.dismiss();
Alert.alert('提交', JSON.stringify(formData, null, 2));
};
const handleReset = () => {
setFormData({
username: '',
password: '',
email: '',
phone: '',
address: '',
bio: '',
});
};
const handleFocus = (inputName: string) => {
setFocusedInput(inputName);
};
const handleBlur = () => {
setFocusedInput('');
};
return (
<SafeAreaView style={styles.container}>
<StatusBar barStyle="dark-content" />
<KeyboardAvoidingView
behavior={Platform.OS === 'ios' ? 'padding' : 'height'}
keyboardVerticalOffset={Platform.OS === 'ios' ? 0 : 20}
style={styles.keyboardContainer}
>
<ScrollView
contentContainerStyle={styles.scrollContent}
keyboardShouldPersistTaps="handled"
nestedScrollEnabled={false}
>
{/* 标题区域 */}
<View style={styles.header}>
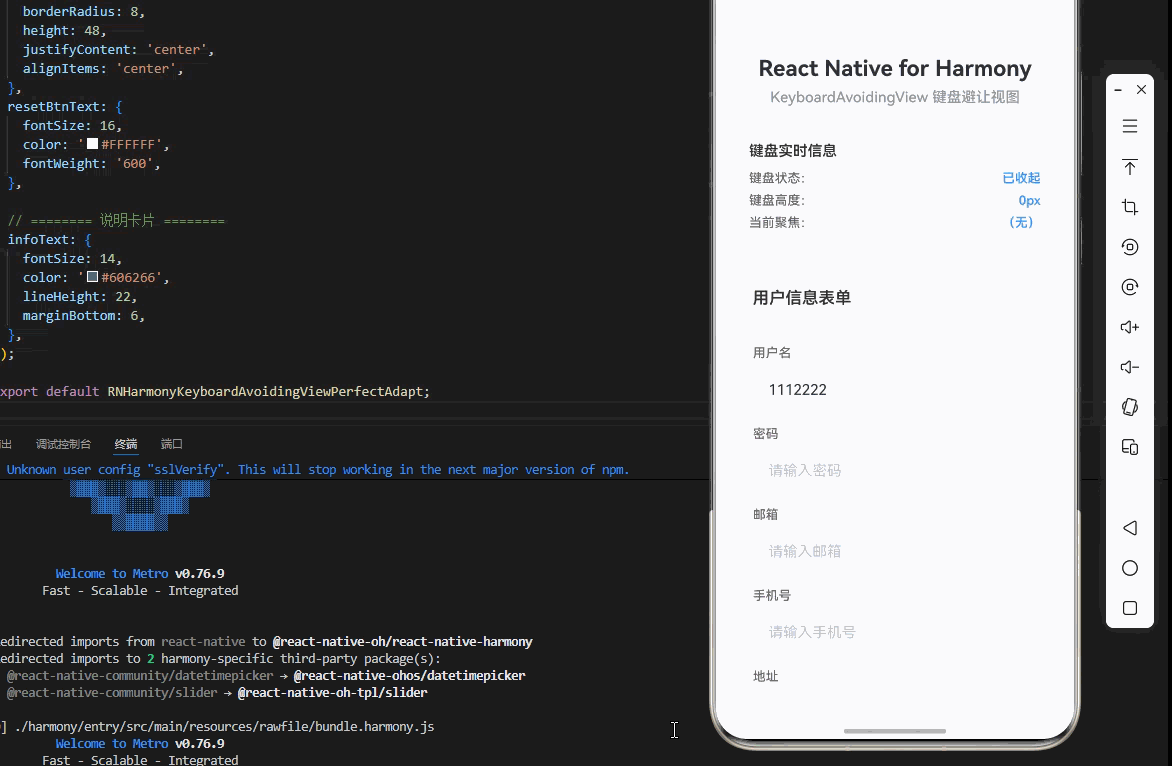
<Text style={styles.title}>React Native for Harmony</Text>
<Text style={styles.subtitle}>KeyboardAvoidingView 键盘避让视图</Text>
</View>
{/* 键盘信息 */}
<View style={styles.infoCard}>
<Text style={styles.infoTitle}>键盘实时信息</Text>
<View style={styles.infoRow}>
<Text style={styles.infoLabel}>键盘状态:</Text>
<Text style={styles.infoValue}>
{isKeyboardVisible ? '已弹出' : '已收起'}
</Text>
</View>
<View style={styles.infoRow}>
<Text style={styles.infoLabel}>键盘高度:</Text>
<Text style={styles.infoValue}>
{keyboardHeight}px
</Text>
</View>
<View style={styles.infoRow}>
<style={styles.infoLabel}>当前聚焦:</Text>
<Text style={styles.infoValue}>
{focusedInput || '(无)'}
</Text>
</View>
</View>
{/* 表单区域 */}
<View style={styles.formCard}>
<View style={styles.formHeader}>
<Text style={styles.formTitle}>用户信息表单</Text>
</View>
<View style={styles.formBody}>
<View style={styles.formGroup}>
<Text style={styles.formLabel}>用户名</Text>
<TextInput
ref={(ref) => (inputRefs.current = { ...inputRefs.current, username: ref })}
style={[
styles.input,
focusedInput === 'username' && styles.inputFocused,
]}
placeholder="请输入用户名"
placeholderTextColor="#C0C4CC"
value={formData.username}
onChangeText={(value) => handleInputChange('username', value)}
onFocus={() => handleFocus('username')}
onBlur={handleBlur}
/>
</View>
<View style={styles.formGroup}>
<Text style={styles.formLabel}>密码</Text>
<TextInput
ref={(ref) => (inputRefs.current = { ...inputRefs.current, password: ref })}
style={[
styles.input,
focusedInput === 'password' && styles.inputFocused,
]}
placeholder="请输入密码"
placeholderTextColor="#C0C4CC"
secureTextEntry
value={formData.password}
onChangeText={(value) => handleInputChange('password', value)}
onFocus={() => handleFocus('password')}
onBlur={handleBlur}
/>
</View>
<View style={styles.formGroup}>
<Text style={styles.formLabel}>邮箱</Text>
<TextInput
ref={(ref) => (inputRefs.current = { ...inputRefs.current, email: ref })}
style={[
styles.input,
focusedInput === 'email' && styles.inputFocused,
]}
placeholder="请输入邮箱"
placeholderTextColor="#C0C4CC"
keyboardType="email-address"
autoCapitalize="none"
value={formData.email}
onChangeText={(value) => handleInputChange('email', value)}
onFocus={() => handleFocus('email')}
onBlur={handleBlur}
/>
</View>
<View style={styles.formGroup}>
<Text style={styles.formLabel}>手机号</Text>
<TextInput
ref={(ref) => (inputRefs.current = { ...inputRefs.current, phone: ref })}
style={[
styles.input,
focusedInput === 'phone' && styles.inputFocused,
]}
placeholder="请输入手机号"
placeholderTextColor="#C0C4CC"
keyboardType="phone-pad"
maxLength={11}
value={formData.phone}
onChangeText={(value) => handleInputChange('phone', value)}
onFocus={() => handleFocus('phone')}
onBlur={handleBlur}
/>
</View>
<View style={styles.formGroup}>
<Text style={styles.formLabel}>地址</Text>
<TextInput
ref={(ref) => (inputRefs.current = { ...inputRefs.current, address: ref })}
style={[
styles.input,
styles.textArea,
focusedInput === 'address' && styles.inputFocused,
]}
placeholder="请输入地址"
placeholderTextColor="#C0C4CC"
multiline
numberOfLines={4}
textAlignVertical="top"
value={formData.address}
onChangeText={(value) => handleInputChange('address', value)}
onFocus={() => handleFocus('address')}
onBlur={handleBlur}
/>
</View>
<View style={styles.formGroup}>
<Text style={styles.formLabel}>个人简介</Text>
<TextInput
ref={(ref) => (inputRefs.current = { ...inputRefs.current, bio: ref })}
style={[
styles.input,
styles.textArea,
focusedInput === 'bio' && styles.inputFocused,
]}
placeholder="请输入个人简介"
placeholderTextColor="#C0C4CC"
multiline
numberOfLines={6}
textAlignVertical="top"
value={formData.bio}
onChangeText={(value) => handleInputChange('bio', value)}
onFocus={() => handleFocus('bio')}
onBlur={handleBlur}
/>
</View>
</View>
</View>
{/* 操作按钮 */}
<View style={styles.buttonRow}>
<TouchableOpacity
style={styles.submitBtn}
onPress={handleSubmit}
>
<Text style={styles.submitBtnText}>提交</Text>
</TouchableOpacity>
<TouchableOpacity
style={styles.resetBtn}
onPress={handleReset}
>
<Text style={styles.resetBtnText}>重置</Text>
</TouchableOpacity>
</View>
{/* 说明区域 */}
<View style={styles.infoCard}>
<Text style={styles.infoTitle}>💡 KeyboardAvoidingView 核心特性深度解析</Text>
<Text style={styles.infoText}>1. 自动检测:自动监听键盘的弹出和收起事件,无需手动处理</Text>
<Text style={styles.infoText}>2. 智能调整:根据键盘高度和输入框位置,智能计算需要的偏移量</Text>
<Text style={styles.infoText}>3. 平台适配:支持 iOS 和 Android 的不同行为模式,自动选择最佳方案</Text>
<Text style={styles.infoText}>4. 平滑过渡:使用动画平滑过渡,避免突兀的位置跳跃,提升用户体验</Text>
<Text style={styles.infoText}>5. 嵌套支持:支持与 ScrollView、FlatList 等组件嵌套使用</Text>
<text style={styles.infoText}>6. 自定义偏移:支持自定义键盘避让的偏移量,满足特殊需求</Text>
<Text style={styles.infoText}>7. 性能优化:使用原生事件处理,性能优异,不影响应用性能</Text>
<Text style={styles.infoText}>8. 兼容性强:支持多种布局结构和复杂的表单场景</Text>
<Text style={styles.infoText}>9. 无需配置:开箱即用,无需复杂的配置,简单易用</Text>
<Text style={styles.infoText}>10. 鸿蒙适配:完美支持鸿蒙系统,键盘避让效果流畅自然</Text>
</View>
</ScrollView>
</KeyboardAvoidingView>
</SafeAreaView>
);
};
const RNHarmonyKeyboardAvoidingViewPerfectAdapt = () => {
return <KeyboardAvoidingViewScreen />;
};
const styles = StyleSheet.create({
container: {
flex: 1,
backgroundColor: '#F5F7FA',
},
keyboardContainer: {
flex: 1,
},
scrollContent: {
padding: 20,
paddingBottom: 40,
},
// ======== 标题区域 ========
header: {
marginBottom: 24,
},
title: {
fontSize: 24,
fontWeight: '700',
color: '#303133',
textAlign: 'center',
marginBottom: 8,
},
subtitle: {
fontSize: 16,
fontWeight: '500',
color: '#909399',
textAlign: 'center',
},
// ======== 信息卡片 ========
infoCard: {
backgroundColor: '#FFFFFF',
borderRadius: 12,
marginBottom: 20,
padding: 16,
shadowColor: '#000000',
shadowOffset: { width: 0, height: 2 },
shadowOpacity: 0.08,
shadowRadius: 8,
elevation: 4,
},
infoTitle: {
fontSize: 16,
fontWeight: '600',
color: '#303133',
marginBottom: 12,
},
infoRow: {
flexDirection: 'row',
justifyContent: 'space-between',
marginBottom: 8,
},
infoLabel: {
fontSize: 14,
color: '#606266',
fontWeight: '500',
},
infoValue: {
fontSize: 14,
color: '#409EFF',
fontWeight: '600',
},
// ======== 表单样式 ========
formCard: {
backgroundColor: '#FFFFFF',
borderRadius: 12,
marginBottom: 20,
shadowColor: '#000000',
shadowOffset: { width: 0, height: 2 },
shadowOpacity: 0.08,
shadowRadius: 8,
elevation: 4,
},
formHeader: {
padding: 20,
borderBottomWidth: 1,
borderBottomColor: '#EBEEF5',
},
formTitle: {
fontSize: 18,
fontWeight: '600',
color: '#303133',
},
formBody: {
padding: 20,
},
formGroup: {
marginBottom: 16,
},
formLabel: {
fontSize: 14,
color: '#606266',
fontWeight: '500',
marginBottom: 8,
},
input: {
height: 48,
backgroundColor: '#F8F9FA',
borderRadius: 8,
paddingHorizontal: 16,
fontSize: 16,
color: '#303133',
borderWidth: 1,
borderColor: '#EBEEF5',
},
inputFocused: {
borderColor: '#409EFF',
backgroundColor: '#FFFFFF',
},
textArea: {
height: 120,
paddingTop: 12,
},
// ======== 按钮样式 ========
buttonRow: {
flexDirection: 'row',
justifyContent: 'space-between',
gap: 10,
marginBottom: 20,
},
submitBtn: {
flex: 1,
backgroundColor: '#409EFF',
borderRadius: 8,
height: 48,
justifyContent: 'center',
alignItems: 'center',
},
submitBtnText: {
fontSize: 16,
color: '#FFFFFF',
fontWeight: '600',
},
resetBtn: {
flex: 1,
backgroundColor: '#E6A23C',
borderRadius: 8,
height: 48,
justifyContent: 'center',
alignItems: 'center',
},
resetBtnText: {
fontSize: 16,
color: '#FFFFFF',
fontWeight: '600',
},
// ======== 说明卡片 ========
infoText: {
fontSize: 14,
color: '#606266',
lineHeight: 22,
marginBottom: 6,
},
});
export default RNHarmonyKeyboardAvoidingViewPerfectAdapt;四、KeyboardAvoidingView 常见问题与解决方案
1. 键盘避让不生效
问题现象:
- 键盘弹出时,输入框仍然被遮挡
- 视图位置没有调整
可能原因:
- 未设置正确的 behavior 属性
- KeyboardAvoidingView 没有包裹 ScrollView
- 容器高度设置不当
- 嵌套了多个 KeyboardAvoidingView
解决方案:
javascript
// ✅ 正确的嵌套方式
<SafeAreaView>
  <KeyboardAvoidingView behavior="padding">
    <ScrollView>
      {/* 内容 */}
    </ScrollView>
  </KeyboardAvoidingView>
</SafeAreaView>

// ❌ 错误的嵌套方式
<SafeAreaView>
  <KeyboardAvoidingView behavior="padding">
    <KeyboardAvoidingView behavior="padding">
      <ScrollView>
        {/* 内容 */}
      </ScrollView>
    </KeyboardAvoidingView>
  </KeyboardAvoidingView>
</SafeAreaView>
2. 键盘避让动画不流畅
问题现象:
- 键盘弹出时,视图位置跳跃
- 动画卡顿或不流畅
可能原因:
- 动画时长设置不当
- 同时有多个动画在执行
- 未禁用原生驱动(Android)
解决方案:
javascript
// iOS:使用原生驱动,性能更好
<KeyboardAvoidingView
  behavior="padding"
  style={styles.container}
>

// Android:禁用原生驱动,避免动画问题
<KeyboardAvoidingView
  behavior="height"
  style={styles.container}
>
3. 键盘避让偏移量不准确
问题现象:
- 输入框仍然被部分遮挡
- 偏移量计算不准确
可能原因:
- 未考虑安全区域
- 未考虑导航栏高度
- 未考虑状态栏高度
解决方案:
javascript
import { useSafeAreaInsets } from 'react-native-safe-area-context';

const insets = useSafeAreaInsets();

<KeyboardAvoidingView
  keyboardVerticalOffset={insets.bottom}
  behavior={Platform.OS === 'ios' ? 'padding' : 'height'}
>
  {/* 内容 */}
</KeyboardAvoidingView>
4. 多个输入框时的键盘避让
问题现象:
- 多个输入框时,只有最后一个输入框可见
- 其他输入框仍然被遮挡
解决方案:
javascript
// 计算所有输入框的底部位置
const inputBottoms = Object.values(inputRefs).map(
  ref => ref.current?.measure?.height || 0
);
const maxInputBottom = Math.max(...inputBottoms);
const availableSpace = containerHeight - maxInputBottom;
const offset = Math.max(0, keyboardHeight - availableSpace);
5. 键盘避让在横屏模式下失效
问题现象:
- 横屏模式下键盘避让不生效
- 视图位置不正确
解决方案:
javascript
<KeyboardAvoidingView
  behavior={Platform.OS === 'ios' ? 'padding' : 'height'}
  keyboardVerticalOffset={0}
  style={styles.container}
>
  {/* 内容 */}
</KeyboardAvoidingView>
五、KeyboardAvoidingView 高级应用场景
1. 聊天界面键盘避让
在聊天界面中,键盘避让尤为重要,需要确保输入框始终可见:
javascript
const ChatScreen = () => {
  const [message, setMessage] = useState('');
  const [messages, setMessages] = useState<Array<{id: string; text: string; time: string}>>([]);

  const handleSendMessage = () => {
    if (message.trim()) {
      const newMessage = {
        id: Date.now().toString(),
        text: message.trim(),
        time: new Date().toLocaleTimeString(),
      };
      setMessages(prev => [...prev, newMessage]);
      setMessage('');
      Keyboard.dismiss();
    }
  };

  return (
    <SafeAreaView style={styles.container}>
      <KeyboardAvoidingView
        behavior={Platform.OS === 'ios' ? 'padding' : 'height'}
        style={styles.keyboardContainer}
      >
        <ScrollView
          style={styles.messagesContainer}
          contentContainerStyle={styles.messagesContent}
          keyboardShouldPersistTaps="handled"
        >
          {/* 消息列表 */}
          {messages.map(msg => (
            <View key={msg.id} style={styles.messageItem}>
              <Text style={styles.messageTime}>{msg.time}</Text>
              <Text style={styles.messageText}>{msg.text}</Text>
            </View>
          ))}
        </ScrollView>

        {/* 输入区域 */}
        <View style={styles.inputArea}>
          <TextInput
            style={styles.input}
            placeholder="输入消息..."
            value={message}
            onChangeText={setMessage}
          />
          <TouchableOpacity
            style={styles.sendButton}
            onPress={handleSendMessage}
            disabled={!message.trim()}
          >
            <Text style={styles.sendButtonText}>发送</Text>
          </TouchableOpacity>
        </View>
      </KeyboardAvoidingView>
    </SafeAreaView>
  );
};
2. 复杂表单的键盘避让
对于包含多个输入框的复杂表单,需要更精细的控制:
javascript
const ComplexFormScreen = () => {
  const [formData, setFormData] = useState({
    firstName: '',
    lastName: '',
    email: '',
    phone: '',
    address: '',
    city: '',
    zipCode: '',
  });

  const formRef = useRef<View>(null);

  const handleSubmit = () => {
    Keyboard.dismiss();
    Alert.alert('提交', JSON.stringify(formData, null, 2));
  };

  return (
    <SafeAreaView style={styles.container}>
      <KeyboardAvoidingView
        behavior="padding"
        style={styles.keyboardContainer}
      >
        <ScrollView
          ref={formRef}
          contentContainerStyle={styles.formContent}
          keyboardShouldPersistTaps="handled"
        >
          {/* 表单字段 */}
          <View style={styles.formSection}>
            <TextInput
              style={styles.input}
              placeholder="名"
              value={formData.firstName}
              onChangeText={text => setFormData(prev => ({ ...prev, firstName: text }))}
            />
            <TextInput
              style={styles.input}
              placeholder="姓"
              value={formData.lastName}
              onChangeText={text => setFormData(prev => ({ ...prev, lastName: text }))}
            />
          </View>

          <View style={styles.formSection}>
            <TextInput
              style={styles.input}
              placeholder="邮箱"
              keyboardType="email-address"
              autoCapitalize="none"
              value={formData.email}
              onChangeText={text => setFormData(prev => ({ ...prev, email: text }))}
            />
          </View>

          <View style={styles.formSection}>
            <TextInput
              style={styles.input}
              placeholder="手机号"
              keyboardType="phone-pad"
              maxLength={11}
              value={formData.phone}
              onChangeText={text => setFormData(prev => ({ ...prev, phone: text }))}
            />
          </View>

          <View style={styles.formSection}>
            <TextInput
              style={styles.input}
              placeholder="地址"
              value={formData.address}
              onChangeText={text => setFormData(prev => ({ ...prev, address: text }))}
            />
          </View>

          <View style={styles.formSection}>
            <TextInput
              style={styles.input}
              placeholder="城市"
              value={formData.city}
              onChangeText={text => setFormData(prev => ({ ...prev, city: text }))}
            />
            <TextInput
              style={styles.input}
              placeholder="邮编"
              keyboardType="number-pad"
              maxLength={6}
              value={formData.zipCode}
              onChangeText={text => setFormData(prev => ({ ...prev, zipCode: text }))}
            />
          </View>

          <TouchableOpacity
            style={styles.submitButton}
            onPress={handleSubmit}
          >
            <Text style={styles.submitButtonText}>提交表单</Text>
          </TouchableOpacity>
        </ScrollView>
      </KeyboardAvoidingView>
    </SafeAreaView>
  );
};
3. 自定义键盘避让行为
对于特殊场景,可以自定义键盘避让行为:
javascript
const CustomKeyboardAvoidingView = () => {
  const [keyboardHeight, setKeyboardHeight] = useState(0);
  const [offset, setOffset] = useState(0);

  useEffect(() => {
    const keyboardDidShowListener = Keyboard.addListener(
      'keyboardDidShow',
      (e) => {
        const height = e.endCoordinates.height;
        setKeyboardHeight(height);
        // 自定义偏移量计算逻辑
        const customOffset = Math.min(height, 200);
        setOffset(customOffset);
      }
    );

    const keyboardDidHideListener = Keyboard.addListener(
      'keyboardDidHide',
      () => {
        setKeyboardHeight(0);
        setOffset(0);
      }
    );

    return () => {
      keyboardDidShowListener.remove();
      keyboardDidHideListener.remove();
    };
  }, []);

  return (
    <View style={styles.container}>
      <Animated.View
        style={{
          transform: [{ translateY: offset }],
        }}
      >
        {/* 内容 */}
      </Animated.View>
    </View  );
};
4. 键盘避让性能优化
为了提升性能,可以采用以下优化策略:
优化策略:
- 使用
keyboardShouldPersistTaps避免滚动冲突 - 使用
nestedScrollEnabled优化嵌套滚动 - 避免在
render方法中创建新函数 - 使用
useCallback缓存事件处理函数 - 避免在滚动时频繁更新状态
优化示例:
javascript
// ✅ 优化:使用 useCallback 缓存函数
const handleSubmit = useCallback(() => {
  Keyboard.dismiss();
  Alert.alert('提交', '表单已提交');
}, []);

// ❌ 不优化:在 render 中创建新函数
const handleSubmit = () => {
  Keyboard.dismiss();
  Alert.alert('提交', '表单已提交');
};欢迎加入开源鸿蒙跨平台社区:https://openharmonycrossplatform.csdn.net