摘要
在上一篇博客中,我们学习了如何使用PyVista构建静态的3D战场场景。本文是"PyVista雷达电子对抗战场态势仿真"系列的第二篇,将深入探讨如何让战场"活"起来。通过详细的代码示例和原理讲解,我们将掌握PyVista中实现动态更新的核心技术,包括网格更新、动画制作、回调函数、实时交互等。文章包含三个完整的实战案例,帮助读者从静态可视化向动态仿真迈出关键一步。
1. 引言:为什么需要动态可视化?
在军事仿真、作战训练和态势分析中,静态的场景展示远远不够。真实的战场是动态变化的:飞机在飞行、雷达在扫描、导弹在追击、部队在机动。动态可视化不仅能提供更真实的环境感知,还能支持时间序列分析、决策推演和作战效果评估。
1.1 动态可视化的关键价值
时间维度的重要性
传统的3D可视化主要关注空间维度,而战场态势的本质是时空一体化的。动态可视化引入了时间轴,使我们能够:
-
观察作战单元的移动轨迹和运动规律
-
分析战术动作的时间协调性
-
评估作战行动的时序约束
-
回放历史态势用于复盘分析
交互反馈的实时性
动态系统需要实时响应用户交互和外部数据输入,这对于指挥决策支持系统尤为重要。PyVista的回调函数机制和实时更新能力,使其成为构建交互式战场仿真的理想选择。
教学演示的生动性
对于教学和训练场景,动态演示比静态图片更能吸引注意力,帮助学员理解复杂的时空关系和战术动作。
1.2 PyVista动态可视化的核心技术
PyVista提供了多种实现动态可视化的方法,我们将重点介绍:
| 技术手段 | 适用场景 | 特点 |
|---|---|---|
plotter.open_gif() |
预计算动画 | 生成GIF/MP4文件,适合演示和报告 |
| 回调函数(callback) | 实时交互 | 支持用户输入和外部数据驱动 |
| 网格实时更新 | 动态场景 | 更新位置、姿态、属性 |
| 时间标签系统 | 时空同步 | 显示仿真时间和时间缩放 |
2. 动态可视化基础:动画制作与实时更新
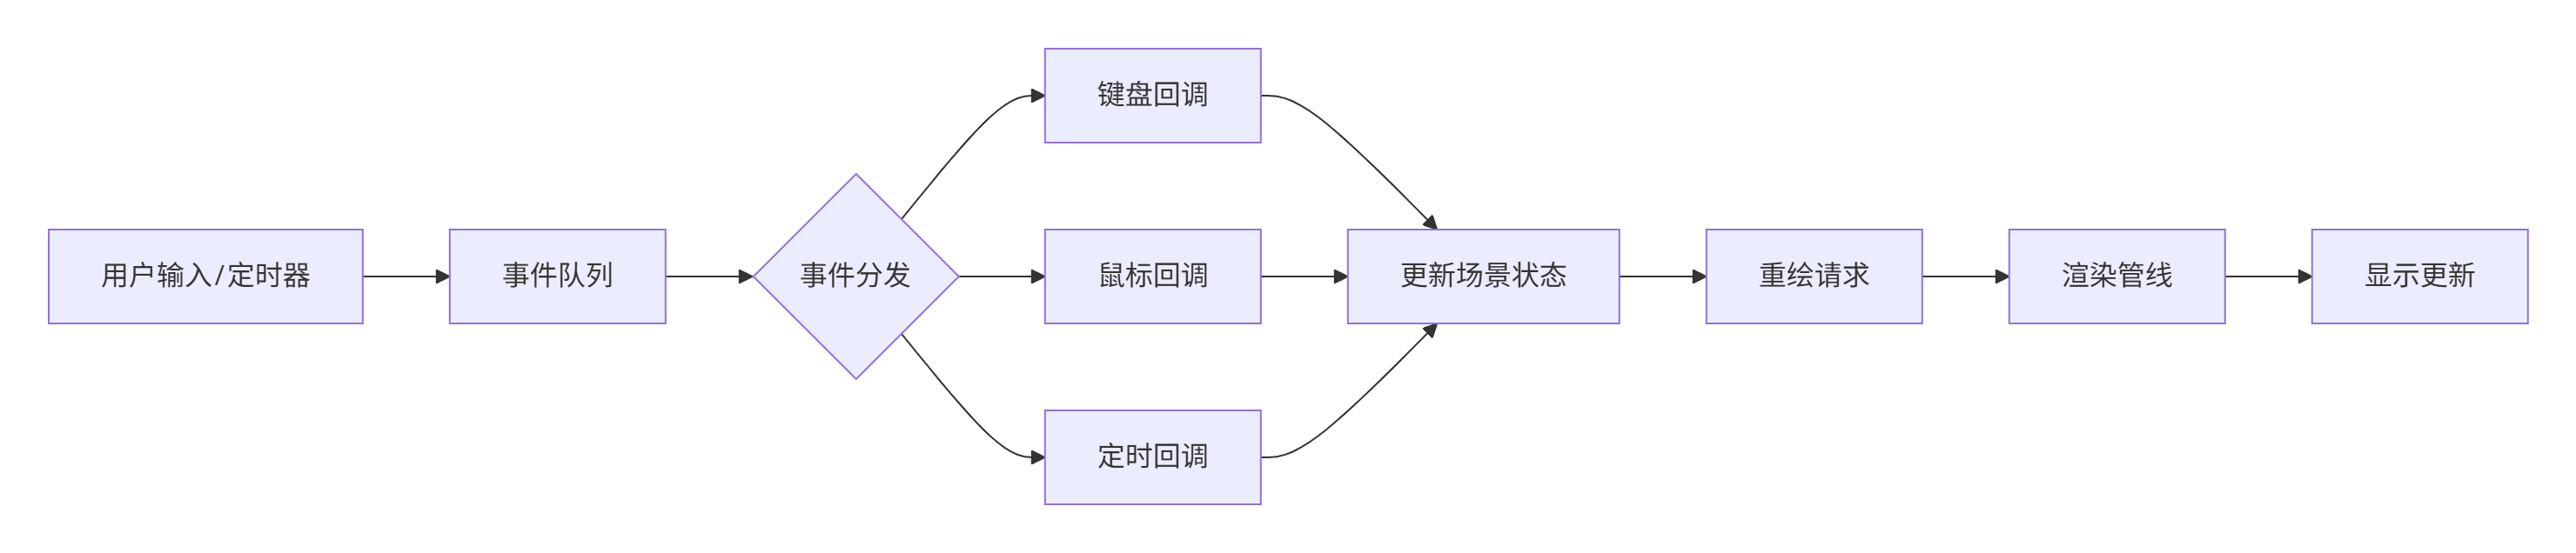
2.1 PyVista动画系统架构
PyVista的动画系统建立在两个核心概念上:时间步 和更新回调。让我们通过一个简单的架构图来理解:
2.2 基础动画制作:open_gif方法
open_gif是PyVista生成动画最简单的方法。我们先从一个基础示例开始:
python
import numpy as np
import pyvista as pv

def basic_animation_demo():
    """基础动画演示:旋转的立方体"""
    # 创建绘图器
    plotter = pv.Plotter(window_size=[800, 600], title="基础动画演示")

    # 创建立方体
    cube = pv.Cube(center=(0, 0, 0))

    # 添加立方体到场景
    actor = plotter.add_mesh(cube, color='red', show_edges=True)

    # 打开GIF文件
    plotter.open_gif("basic_animation.gif", fps=20)

    # 动画循环
    n_frames = 50
    for i in range(n_frames):
        # 计算旋转角度
        angle = i * 360 / n_frames

        # 创建新的立方体(旋转后)
        rotated_cube = cube.copy()
        rotated_cube.rotate_z(angle, inplace=True)

        # 更新actor
        plotter.add_mesh(rotated_cube, color='red', show_edges=True, name='cube')

        # 写入帧
        plotter.write_frame()

    # 关闭GIF
    plotter.close()

    print("动画已保存为 basic_animation.gif")

if __name__ == "__main__":
    basic_animation_demo()
关键要点:
-
open_gif方法创建动画文件 -
每次循环需要重新添加网格(或更新actor)
-
write_frame捕获当前帧 -
控制帧率(fps)影响动画流畅度
2.3 高级动画制作:open_movie方法
对于更复杂、更长的动画,推荐使用open_movie方法,它支持更多格式和编码选项:
python
def advanced_animation_demo():
    """高级动画演示:多对象协同动画"""
    plotter = pv.Plotter(window_size=[1024, 768], title="高级动画演示")

    # 创建多个几何体
    sphere = pv.Sphere(center=(-2, 0, 0), radius=0.5)
    cube = pv.Cube(center=(0, 0, 0))
    cylinder = pv.Cylinder(center=(2, 0, 0), direction=(0, 0, 1), radius=0.5, height=1)

    # 添加网格
    sphere_actor = plotter.add_mesh(sphere, color='red')
    cube_actor = plotter.add_mesh(cube, color='green', show_edges=True)
    cylinder_actor = plotter.add_mesh(cylinder, color='blue')

    # 设置相机位置
    plotter.camera_position = [(0, 0, 8), (0, 0, 0), (0, 1, 0)]

    # 打开电影文件
    plotter.open_movie(
        "advanced_animation.mp4",
        framerate=30,
        quality=8,  # 0-10,越高画质越好
        codec='libx264'  # 视频编码
    )

    # 动画参数
    n_frames = 150
    orbit_radius = 3.0
    orbit_height = 1.0

    for i in range(n_frames):
        # 计算时间参数
        t = i / n_frames * 2 * np.pi

        # 1. 球体:轨道运动
        sphere_x = orbit_radius * np.cos(t)
        sphere_y = orbit_radius * np.sin(t)
        sphere_z = orbit_height * np.sin(2 * t)

        new_sphere = sphere.copy()
        new_sphere.translate([sphere_x + 2, sphere_y, sphere_z], inplace=True)

        # 2. 立方体:旋转+脉动
        scale = 1.0 + 0.3 * np.sin(t * 2)
        new_cube = cube.copy()
        new_cube.scale([scale, scale, scale], inplace=True)
        new_cube.rotate_x(t * 180 / np.pi, inplace=True)
        new_cube.rotate_y(t * 90 / np.pi, inplace=True)

        # 3. 圆柱体:沿Z轴旋转+上下移动
        new_cylinder = cylinder.copy()
        new_cylinder.rotate_z(t * 360 / np.pi, inplace=True)
        cylinder_z = np.sin(t * 3) * 2
        new_cylinder.translate([2, 0, cylinder_z], inplace=True)

        # 清除旧网格
        plotter.remove_actor(sphere_actor)
        plotter.remove_actor(cube_actor)
        plotter.remove_actor(cylinder_actor)

        # 添加新网格
        sphere_actor = plotter.add_mesh(new_sphere, color='red')
        cube_actor = plotter.add_mesh(new_cube, color='green', show_edges=True)
        cylinder_actor = plotter.add_mesh(new_cylinder, color='blue')

        # 更新相机(模拟轨道观察)
        if i % 30 == 0:  # 每30帧更新一次相机
            cam_pos = (8 * np.sin(t/5), 8 * np.cos(t/5), 4)
            plotter.camera_position = [cam_pos, (0, 0, 0), (0, 0, 1)]

        # 写入帧
        plotter.write_frame()

        # 打印进度
        if i % 10 == 0:
            progress = (i + 1) / n_frames * 100
            print(f"生成进度: {progress:.1f}%")

    # 关闭电影文件
    plotter.close()

    print("动画已保存为 advanced_animation.mp4")

# 运行演示
advanced_animation_demo()
编码选项说明:
-
framerate:帧率,控制动画流畅度
-
quality:视频质量,0-10,数值越高文件越大
-
codec:视频编码器,常用有:
-
'libx264':H.264编码,兼容性好 -
'libx265':H.265编码,压缩率高 -
'mpeg4':MPEG-4编码
-
2.4 性能优化:网格复用与增量更新
在动态场景中,频繁创建和销毁网格对象会导致性能问题。下面介绍两种优化方法:
python
def optimized_animation_demo():
    """优化动画演示:网格复用技术"""
    plotter = pv.Plotter(window_size=[800, 600], title="优化动画演示")

    # 创建初始网格
    sphere = pv.Sphere(center=(0, 0, 0), radius=1.0)

    # 添加网格并获取actor
    actor = plotter.add_mesh(sphere, color='red')

    # 打开GIF
    plotter.open_gif("optimized_animation.gif", fps=30)

    n_frames = 100

    for i in range(n_frames):
        # 方法1:直接更新actor的属性(高效)
        # 计算新的位置
        t = i / n_frames * 2 * np.pi
        x = 3 * np.sin(t)
        y = 3 * np.cos(t)
        z = 2 * np.sin(2 * t)

        # 创建变换矩阵
        transform_matrix = np.eye(4)
        transform_matrix[:3, 3] = [x, y, z]  # 平移

        # 直接设置actor的变换矩阵
        actor.user_matrix = transform_matrix

        # 方法2:更新颜色(随时间变化)
        # 计算HSV颜色
        hue = i / n_frames  # 0-1
        import colorsys
        rgb = colorsys.hsv_to_rgb(hue, 1.0, 1.0)

        # 更新actor颜色
        actor.mapper.dataset.active_scalars_name = None
        plotter.update_scalars(rgb, actor.renderer)

        # 写入帧
        plotter.write_frame()

        # 方法3:增量更新(适用于轨迹)
        if i > 0:
            # 添加轨迹线
            prev_t = (i-1) / n_frames * 2 * np.pi
            prev_x = 3 * np.sin(prev_t)
            prev_y = 3 * np.cos(prev_t)
            prev_z = 2 * np.sin(2 * prev_t)

            # 创建线段
            line = pv.Line(pointa=(prev_x, prev_y, prev_z),
                          pointb=(x, y, z))

            # 只添加新线段,保留旧的
            if i == 1:  # 第一段轨迹
                line_actor = plotter.add_mesh(line, color='blue', line_width=2)
            else:
                # 更新轨迹网格
                line_actor.mapper.dataset.overwrite(line)

    plotter.close()
    print("优化动画已保存")

# 运行演示
optimized_animation_demo()
优化技巧总结:
-
复用网格对象:避免频繁创建新网格
-
直接更新actor属性 :使用
user_matrix等属性 -
增量更新:只更新变化的部分
-
批处理更新:合并多个更新操作
3. 实时更新:回调函数与交互控制
对于需要用户交互或实时数据驱动的应用,预计算的动画不够用。PyVista的回调函数机制提供了实时更新的能力。
3.1 回调函数基础
回调函数是在特定事件发生时被调用的函数。在PyVista中,主要通过add_callback和add_key_event等方法实现。
python
def callback_basic_demo():
    """回调函数基础演示"""
    import time

    class RealtimeVisualizer:
        def __init__(self):
            self.plotter = pv.Plotter(window_size=[1000, 700],
                                     title="回调函数演示")
            self.cube = pv.Cube(center=(0, 0, 0))
            self.actor = None
            self.angle = 0
            self.last_time = time.time()
            self.fps = 0
            self.frame_count = 0

        def initialize(self):
            """初始化场景"""
            # 添加立方体
            self.actor = self.plotter.add_mesh(self.cube, color='cyan',
                                              show_edges=True)

            # 添加坐标系
            self.plotter.add_axes()

            # 添加信息文本
            self.info_text = self.plotter.add_text("", position='upper_left',
                                                  font_size=10, color='white')

            # 添加网格统计
            self.stats_text = self.plotter.add_text("", position='upper_right',
                                                   font_size=10, color='yellow')

            # 设置相机
            self.plotter.camera_position = [(5, 5, 5), (0, 0, 0), (0, 0, 1)]

            # 添加键盘事件
            self.plotter.add_key_event("r", self.reset_scene)
            self.plotter.add_key_event("space", self.toggle_rotation)
            self.plotter.add_key_event("c", self.change_color)
            self.plotter.add_key_event("Up", self.increase_speed)
            self.plotter.add_key_event("Down", self.decrease_speed)

            # 添加鼠标事件
            self.plotter.track_click_position(self.on_click, side='left')

            # 添加回调函数
            self.plotter.add_callback(self.update_callback, interval=16)  # ~60FPS

            # 控制变量
            self.rotation_speed = 1.0
            self.is_rotating = True
            self.colors = ['cyan', 'red', 'green', 'blue', 'yellow', 'magenta']
            self.color_index = 0

        def update_callback(self):
            """更新回调函数"""
            current_time = time.time()
            delta_time = current_time - self.last_time
            self.last_time = current_time

            # 更新FPS计算
            self.frame_count += 1
            if self.frame_count % 30 == 0:
                self.fps = 1.0 / delta_time if delta_time > 0 else 0

            # 更新旋转
            if self.is_rotating:
                self.angle += self.rotation_speed * delta_time * 60
                self.angle %= 360

                # 创建旋转后的立方体
                rotated_cube = self.cube.copy()
                rotated_cube.rotate_x(self.angle, inplace=True)
                rotated_cube.rotate_y(self.angle * 0.7, inplace=True)
                rotated_cube.rotate_z(self.angle * 0.3, inplace=True)

                # 更新actor
                self.actor.mapper.dataset.overwrite(rotated_cube)

            # 更新信息文本
            info = f"FPS: {self.fps:.1f}\n"
            info += f"角度: {self.angle:.1f}°\n"
            info += f"旋转速度: {self.rotation_speed:.1f}x\n"
            info += f"旋转: {'开启' if self.is_rotating else '关闭'}\n"
            info += f"颜色: {self.colors[self.color_index]}"

            self.info_text.SetText(3, info)  # VTK方法更新文本

            # 更新网格统计
            stats = f"顶点数: {self.cube.n_points}\n"
            stats += f"面数: {self.cube.n_faces}\n"
            stats += f"内存: {self.cube.n_bytes / 1024:.1f} KB"

            self.stats_text.SetText(3, stats)

            # 请求重绘
            self.plotter.update()

        def reset_scene(self):
            """重置场景"""
            self.angle = 0
            self.rotation_speed = 1.0
            self.is_rotating = True
            print("场景已重置")

        def toggle_rotation(self):
            """切换旋转状态"""
            self.is_rotating = not self.is_rotating
            state = "开启" if self.is_rotating else "关闭"
            print(f"旋转{state}")

        def change_color(self):
            """改变颜色"""
            self.color_index = (self.color_index + 1) % len(self.colors)
            self.actor.prop.color = self.colors[self.color_index]
            print(f"颜色更改为: {self.colors[self.color_index]}")

        def increase_speed(self):
            """增加旋转速度"""
            self.rotation_speed = min(self.rotation_speed + 0.5, 10.0)
            print(f"旋转速度: {self.rotation_speed:.1f}x")

        def decrease_speed(self):
            """减少旋转速度"""
            self.rotation_speed = max(self.rotation_speed - 0.5, 0.1)
            print(f"旋转速度: {self.rotation_speed:.1f}x")

        def on_click(self, position):
            """鼠标点击事件"""
            if position:  # position是(x, y)屏幕坐标
                # 转换为3D坐标
                picker = self.plotter.iren.get_picker()
                if picker:
                    # 这里可以添加点击拾取逻辑
                    print(f"点击位置: {position}")

        def run(self):
            """运行可视化"""
            self.initialize()
            print("控制说明:")
            print("  R键: 重置场景")
            print("  空格: 切换旋转")
            print("  C键: 改变颜色")
            print("  上箭头: 增加速度")
            print("  下箭头: 减少速度")
            print("  鼠标左键: 点击交互")
            print("  Q键: 退出")

            self.plotter.show()

    # 创建并运行可视化
    visualizer = RealtimeVisualizer()
    visualizer.run()

# 运行演示
callback_basic_demo()
回调函数的核心机制:
3.2 高级回调:多线程与异步更新
对于需要处理复杂计算或外部数据源的场景,我们需要多线程支持:
python
import threading
import queue
import time

class ThreadedVisualizer:
    """多线程可视化器"""

    def __init__(self):
        self.plotter = pv.Plotter(window_size=[1200, 800],
                                 title="多线程可视化演示")

        # 数据队列
        self.data_queue = queue.Queue(maxsize=100)

        # 线程控制
        self.data_thread = None
        self.is_running = False

        # 可视化对象
        self.point_cloud = None
        self.point_actor = None

        # 统计
        self.point_count = 0
        self.update_rate = 0

    def initialize(self):
        """初始化场景"""
        # 创建初始点云
        self.point_cloud = pv.PolyData()

        # 添加点云
        self.point_actor = self.plotter.add_mesh(
            self.point_cloud,
            color='white',
            point_size=5,
            render_points_as_spheres=True
        )

        # 添加统计信息
        self.stats_text = self.plotter.add_text(
            "",
            position='upper_left',
            font_size=12,
            color='yellow'
        )

        # 添加控制说明
        self.help_text = self.plotter.add_text(
            "空格: 开始/停止数据流",
            position='lower_left',
            font_size=10,
            color='cyan'
        )

        # 设置相机
        self.plotter.camera_position = [(0, 0, 20), (0, 0, 0), (0, 1, 0)]

        # 添加键盘事件
        self.plotter.add_key_event("space", self.toggle_data_stream)

        # 添加回调函数
        self.plotter.add_callback(self.update_callback, interval=33)  # ~30FPS

    def data_generation_thread(self):
        """数据生成线程"""
        print("数据生成线程启动")

        frame_id = 0
        while self.is_running:
            try:
                # 生成模拟雷达点云数据
                n_points = np.random.randint(100, 1000)

                # 生成点在球坐标系
                theta = np.random.uniform(0, 2*np.pi, n_points)
                phi = np.random.uniform(0, np.pi, n_points)
                r = np.random.uniform(5, 10, n_points)

                # 转换为直角坐标
                x = r * np.sin(phi) * np.cos(theta)
                y = r * np.sin(phi) * np.sin(theta)
                z = r * np.cos(phi)

                # 添加噪声
                x += np.random.normal(0, 0.2, n_points)
                y += np.random.normal(0, 0.2, n_points)
                z += np.random.normal(0, 0.2, n_points)

                # 创建点云
                points = np.column_stack([x, y, z])

                # 添加强度信息
                intensities = np.random.uniform(0.1, 1.0, n_points)

                # 创建PolyData
                cloud = pv.PolyData(points)
                cloud['intensity'] = intensities

                # 添加到队列
                data = {
                    'frame_id': frame_id,
                    'cloud': cloud,
                    'timestamp': time.time()
                }

                self.data_queue.put(data, timeout=0.1)

                frame_id += 1

                # 控制数据生成速率
                time.sleep(0.05)  # 20Hz

            except queue.Full:
                # 队列满,跳过一帧
                pass
            except Exception as e:
                print(f"数据生成错误: {e}")
                break

        print("数据生成线程停止")

    def update_callback(self):
        """更新回调函数"""
        # 从队列获取数据
        data_list = []
        while not self.data_queue.empty():
            try:
                data = self.data_queue.get_nowait()
                data_list.append(data)
            except queue.Empty:
                break

        if data_list:
            # 使用最新数据
            latest_data = data_list[-1]

            # 更新点云
            self.point_cloud = latest_data['cloud']

            # 更新actor
            self.point_actor.mapper.dataset.overwrite(self.point_cloud)

            # 根据强度设置颜色
            if 'intensity' in self.point_cloud.array_names:
                self.point_actor.mapper.set_scalars(
                    self.point_cloud['intensity']
                )
                self.plotter.update_scalars(
                    self.point_cloud['intensity'],
                    self.point_actor.renderer
                )

            # 更新统计
            self.point_count = self.point_cloud.n_points
            self.update_rate = len(data_list) / 0.033  # 估算更新率

            # 更新文本
            stats = f"点云帧ID: {latest_data['frame_id']}\n"
            stats += f"点数: {self.point_count}\n"
            stats += f"更新率: {self.update_rate:.1f} Hz\n"
            stats += f"队列深度: {self.data_queue.qsize()}"

            self.stats_text.SetText(3, stats)

        # 请求重绘
        self.plotter.update()

    def toggle_data_stream(self):
        """切换数据流"""
        if self.is_running:
            # 停止数据流
            self.is_running = False
            if self.data_thread:
                self.data_thread.join(timeout=2.0)
            print("数据流已停止")
        else:
            # 启动数据流
            self.is_running = True
            self.data_thread = threading.Thread(
                target=self.data_generation_thread,
                daemon=True
            )
            self.data_thread.start()
            print("数据流已启动")

    def run(self):
        """运行可视化"""
        self.initialize()

        print("多线程可视化演示")
        print("控制说明:")
        print("  空格: 开始/停止数据流")
        print("  Q键: 退出")

        self.plotter.show()

        # 清理
        self.is_running = False
        if self.data_thread:
            self.data_thread.join(timeout=1.0)

# 运行演示
visualizer = ThreadedVisualizer()
visualizer.run()
多线程架构说明:
python
"""
线程安全注意事项:
1. 数据传递使用队列(queue.Queue),避免共享状态
2. 主线程(GUI线程)只从队列读取数据
3. 工作线程只生成数据,不进行GUI操作
4. 使用超时机制避免线程阻塞
"""
4. 案例1:目标沿预定轨迹运动
在这个案例中,我们将创建一个完整的战场目标运动演示,包括直线运动、圆周运动和复杂轨迹。
4.1 轨迹运动基类设计
python
class MovingTarget:
    """运动目标基类"""

    def __init__(self, initial_position, target_type, color='red'):
        self.initial_position = np.array(initial_position, dtype=float)
        self.current_position = self.initial_position.copy()
        self.target_type = target_type
        self.color = color
        self.mesh = None
        self.trajectory = []
        self.trajectory_mesh = None
        self.velocity = np.array([0.0, 0.0, 0.0])
        self.acceleration = np.array([0.0, 0.0, 0.0])
        self.max_speed = 50.0  # 单位/秒
        self.orientation = 0.0  # 朝向角度(度)

    def create_geometry(self, scale=1.0):
        """创建目标几何体"""
        if self.target_type == 'aircraft':
            # 飞机模型
            fuselage = pv.Cylinder(center=[0, 0, 0], direction=[1, 0, 0],
                                  radius=1*scale, height=6*scale)
            wing = pv.Box(bounds=[-0.5, 0.5, -4*scale, 4*scale, -0.2*scale, 0.2*scale])
            tail = pv.Box(bounds=[-3*scale, -2*scale, -1.5*scale, 1.5*scale, -0.5*scale, 0.5*scale])

            self.mesh = fuselage.boolean_union(wing)
            self.mesh = self.mesh.boolean_union(tail)

        elif self.target_type == 'missile':
            # 导弹模型
            body = pv.Cylinder(center=[0, 0, 0], direction=[1, 0, 0],
                              radius=0.5*scale, height=8*scale)
            nose = pv.Cone(center=[4*scale, 0, 0], direction=[1, 0, 0],
                          height=2*scale, radius=0.5*scale)
            fins = []
            for angle in [0, 90, 180, 270]:
                fin = pv.Box(bounds=[-4*scale, -3*scale, -0.1*scale, 0.1*scale,
                                    -1*scale, 1*scale])
                fin.rotate_z(angle, inplace=True)
                fins.append(fin)

            self.mesh = body.boolean_union(nose)
            for fin in fins:
                self.mesh = self.mesh.boolean_union(fin)

        elif self.target_type == 'vehicle':
            # 车辆模型
            chassis = pv.Cube(center=[0, 0, 0.8*scale],
                             x_length=4*scale, y_length=2*scale, z_length=1.6*scale)
            turret = pv.Cylinder(center=[0.5*scale, 0, 1.8*scale],
                                direction=[0, 0, 1], radius=0.8*scale, height=0.8*scale)

            self.mesh = chassis.boolean_union(turret)

        # 初始位置
        self.mesh.translate(self.current_position, inplace=True)

        return self.mesh

    def update_position(self, delta_time):
        """更新目标位置"""
        # 更新速度
        self.velocity += self.acceleration * delta_time

        # 限制最大速度
        speed = np.linalg.norm(self.velocity)
        if speed > self.max_speed:
            self.velocity = self.velocity / speed * self.max_speed

        # 更新位置
        displacement = self.velocity * delta_time
        self.current_position += displacement

        # 记录轨迹
        self.trajectory.append(self.current_position.copy())

        # 保持轨迹长度
        if len(self.trajectory) > 1000:
            self.trajectory.pop(0)

        # 更新朝向
        if speed > 0.1:
            # 计算前进方向
            forward = self.velocity / speed
            self.orientation = np.degrees(np.arctan2(forward[1], forward[0]))

        return self.current_position

    def get_trajectory_mesh(self):
        """获取轨迹网格"""
        if len(self.trajectory) < 2:
            return None

        points = np.array(self.trajectory)
        lines = np.arange(len(points))
        lines = np.insert(lines, 0, len(points))

        self.trajectory_mesh = pv.PolyData(points, lines=lines)

        # 添加时间属性(用于颜色映射)
        time_values = np.linspace(0, 1, len(points))
        self.trajectory_mesh['time'] = time_values

        return self.trajectory_mesh

    def reset(self):
        """重置目标"""
        self.current_position = self.initial_position.copy()
        self.velocity = np.array([0.0, 0.0, 0.0])
        self.acceleration = np.array([0.0, 0.0, 0.0])
        self.trajectory = []

class LinearTrajectoryTarget(MovingTarget):
    """直线运动目标"""

    def __init__(self, initial_position, target_type, direction, speed=20.0):
        super().__init__(initial_position, target_type)
        self.direction = np.array(direction, dtype=float)
        self.direction = self.direction / np.linalg.norm(self.direction)  # 归一化
        self.speed = speed
        self.velocity = self.direction * self.speed

    def update_position(self, delta_time):
        """直线运动更新"""
        # 简单直线运动
        displacement = self.velocity * delta_time
        self.current_position += displacement

        # 记录轨迹
        self.trajectory.append(self.current_position.copy())
        if len(self.trajectory) > 1000:
            self.trajectory.pop(0)

        return self.current_position

class CircularTrajectoryTarget(MovingTarget):
    """圆周运动目标"""

    def __init__(self, initial_position, target_type, center, radius=50.0,
                 angular_speed=30.0, plane='xy'):
        super().__init__(initial_position, target_type)
        self.center = np.array(center, dtype=float)
        self.radius = radius
        self.angular_speed = angular_speed  # 度/秒
        self.plane = plane
        self.current_angle = 0.0  # 度

        # 计算初始角度
        if plane == 'xy':
            dx = initial_position[0] - center[0]
            dy = initial_position[1] - center[1]
            self.current_angle = np.degrees(np.arctan2(dy, dx))

    def update_position(self, delta_time):
        """圆周运动更新"""
        # 更新角度
        self.current_angle += self.angular_speed * delta_time
        self.current_angle %= 360

        # 计算新位置
        angle_rad = np.radians(self.current_angle)

        if self.plane == 'xy':
            x = self.center[0] + self.radius * np.cos(angle_rad)
            y = self.center[1] + self.radius * np.sin(angle_rad)
            z = self.center[2]
        elif self.plane == 'xz':
            x = self.center[0] + self.radius * np.cos(angle_rad)
            y = self.center[1]
            z = self.center[2] + self.radius * np.sin(angle_rad)
        else:  # 'yz'
            x = self.center[0]
            y = self.center[1] + self.radius * np.cos(angle_rad)
            z = self.center[2] + self.radius * np.sin(angle_rad)

        self.current_position = np.array([x, y, z])

        # 计算速度方向(切线方向)
        if self.plane == 'xy':
            tangent_x = -np.sin(angle_rad)
            tangent_y = np.cos(angle_rad)
            tangent_z = 0
        elif self.plane == 'xz':
            tangent_x = -np.sin(angle_rad)
            tangent_y = 0
            tangent_z = np.cos(angle_rad)
        else:
            tangent_x = 0
            tangent_y = -np.sin(angle_rad)
            tangent_z = np.cos(angle_rad)

        tangent = np.array([tangent_x, tangent_y, tangent_z])
        tangent = tangent / np.linalg.norm(tangent)

        # 计算线速度
        circumference = 2 * np.pi * self.radius
        linear_speed = circumference * (self.angular_speed / 360)
        self.velocity = tangent * linear_speed

        # 更新朝向
        if np.linalg.norm(self.velocity) > 0.1:
            forward = self.velocity / np.linalg.norm(self.velocity)
            self.orientation = np.degrees(np.arctan2(forward[1], forward[0]))

        # 记录轨迹
        self.trajectory.append(self.current_position.copy())
        if len(self.trajectory) > 1000:
            self.trajectory.pop(0)

        return self.current_position

class SplineTrajectoryTarget(MovingTarget):
    """样条曲线轨迹目标"""

    def __init__(self, initial_position, target_type, waypoints, speed=20.0):
        super().__init__(initial_position, target_type)
        self.waypoints = np.array(waypoints, dtype=float)
        self.speed = speed
        self.current_segment = 0
        self.segment_progress = 0.0

        # 计算样条曲线
        self.spline_points = self._calculate_spline()
        self.total_length = self._calculate_spline_length()

        # 初始化位置
        self.current_position = self.spline_points[0]
        self.target_position = initial_position

    def _calculate_spline(self):
        """计算样条曲线"""
        from scipy import interpolate

        # 使用三次样条插值
        t = np.arange(len(self.waypoints))

        # 分别对x,y,z插值
        t_new = np.linspace(0, len(self.waypoints)-1, 1000)

        spline_x = interpolate.CubicSpline(t, self.waypoints[:, 0])
        spline_y = interpolate.CubicSpline(t, self.waypoints[:, 1])
        spline_z = interpolate.CubicSpline(t, self.waypoints[:, 2])

        x_new = spline_x(t_new)
        y_new = spline_y(t_new)
        z_new = spline_z(t_new)

        return np.column_stack([x_new, y_new, z_new])

    def _calculate_spline_length(self):
        """计算样条曲线总长度"""
        distances = np.linalg.norm(
            np.diff(self.spline_points, axis=0),
            axis=1
        )
        return np.sum(distances)

    def update_position(self, delta_time):
        """样条曲线运动更新"""
        # 计算移动距离
        move_distance = self.speed * delta_time

        # 在当前样条曲线上移动
        current_index = 0
        remaining_distance = move_distance

        # 查找当前点在样条曲线上的位置
        distances = np.linalg.norm(
            self.spline_points - self.current_position,
            axis=1
        )
        current_index = np.argmin(distances)

        # 向前移动
        while remaining_distance > 0 and current_index < len(self.spline_points) - 1:
            # 到下一个点的距离
            to_next = np.linalg.norm(
                self.spline_points[current_index + 1] -
                self.spline_points[current_index]
            )

            if remaining_distance <= to_next:
                # 在当前线段内移动
                direction = (self.spline_points[current_index + 1] -
                            self.spline_points[current_index])
                direction = direction / np.linalg.norm(direction)
                self.current_position += direction * remaining_distance
                remaining_distance = 0
            else:
                # 移动到下一个点
                remaining_distance -= to_next
                current_index += 1
                self.current_position = self.spline_points[current_index].copy()

        # 如果到达终点,回到起点
        if current_index >= len(self.spline_points) - 1:
            self.current_position = self.spline_points[0].copy()
            current_index = 0

        # 计算速度方向
        if current_index < len(self.spline_points) - 1:
            self.velocity = (self.spline_points[current_index + 1] -
                            self.spline_points[current_index])
            self.velocity = self.velocity / np.linalg.norm(self.velocity) * self.speed
        else:
            self.velocity = np.zeros(3)

        # 更新朝向
        if np.linalg.norm(self.velocity) > 0.1:
            forward = self.velocity / np.linalg.norm(self.velocity)
            self.orientation = np.degrees(np.arctan2(forward[1], forward[0]))

        # 记录轨迹
        self.trajectory.append(self.current_position.copy())
        if len(self.trajectory) > 1000:
            self.trajectory.pop(0)

        return self.current_position
4.2 轨迹运动演示
python
def trajectory_demo():
    """轨迹运动演示"""
    class TrajectoryDemo:
        def __init__(self):
            self.plotter = pv.Plotter(window_size=[1400, 900],
                                     title="目标轨迹运动演示")
            self.targets = []
            self.actors = {}
            self.trajectory_actors = {}
            self.is_running = True
            self.last_time = time.time()
            self.demo_time = 0.0

        def initialize(self):
            """初始化演示"""
            # 创建多个运动目标
            # 1. 直线运动目标
            linear_target = LinearTrajectoryTarget(
                initial_position=[-50, -50, 20],
                target_type='aircraft',
                direction=[1, 0.5, 0.2],
                speed=30.0
            )
            linear_target.create_geometry(scale=1.0)
            linear_target.color = 'red'
            self.targets.append(linear_target)

            # 2. 圆周运动目标(水平)
            circular_target_xy = CircularTrajectoryTarget(
                initial_position=[0, 50, 30],
                target_type='missile',
                center=[0, 0, 30],
                radius=40.0,
                angular_speed=45.0,
                plane='xy'
            )
            circular_target_xy.create_geometry(scale=0.8)
            circular_target_xy.color = 'green'
            self.targets.append(circular_target_xy)

            # 3. 圆周运动目标(垂直)
            circular_target_xz = CircularTrajectoryTarget(
                initial_position=[50, 0, 50],
                target_type='missile',
                center=[0, 0, 30],
                radius=50.0,
                angular_speed=-30.0,
                plane='xz'
            )
            circular_target_xz.create_geometry(scale=0.8)
            circular_target_xz.color = 'blue'
            self.targets.append(circular_target_xz)

            # 4. 样条曲线目标
            waypoints = np.array([
                [-30, -30, 10],
                [-20, 20, 40],
                [10, 30, 20],
                [30, 10, 50],
                [20, -20, 30],
                [-10, -30, 20]
            ])

            spline_target = SplineTrajectoryTarget(
                initial_position=waypoints[0],
                target_type='aircraft',
                waypoints=waypoints,
                speed=25.0
            )
            spline_target.create_geometry(scale=1.0)
            spline_target.color = 'yellow'
            self.targets.append(spline_target)

            # 添加目标到场景
            for i, target in enumerate(self.targets):
                actor_name = f'target_{i}'
                self.actors[actor_name] = self.plotter.add_mesh(
                    target.mesh,
                    color=target.color,
                    name=actor_name
                )

                # 添加轨迹
                trajectory_mesh = target.get_trajectory_mesh()
                if trajectory_mesh:
                    trajectory_name = f'trajectory_{i}'
                    self.trajectory_actors[trajectory_name] = self.plotter.add_mesh(
                        trajectory_mesh,
                        color=target.color,
                        line_width=2,
                        opacity=0.5,
                        name=trajectory_name
                    )

            # 添加信息显示
            self.info_text = self.plotter.add_text(
                "",
                position='upper_left',
                font_size=10,
                color='white'
            )

            # 添加轨迹点
            self.waypoints_actor = self.plotter.add_points(
                waypoints,
                color='white',
                point_size=10,
                render_points_as_spheres=True,
                name='waypoints'
            )

            # 添加控制说明
            controls = "控制说明:\n"
            controls += "空格: 暂停/继续\n"
            controls += "R: 重置场景\n"
            controls += "1-4: 切换目标轨迹显示\n"
            controls += "T: 切换所有轨迹\n"
            controls += "C: 切换轨迹颜色映射\n"

            self.control_text = self.plotter.add_text(
                controls,
                position='lower_left',
                font_size=9,
                color='cyan'
            )

            # 设置相机
            self.plotter.camera_position = [(150, 150, 100), (0, 0, 30), (0, 0, 1)]

            # 添加网格背景
            self.plotter.add_floor('-z', show_edges=True, opacity=0.3)

            # 添加键盘事件
            self.plotter.add_key_event("space", self.toggle_pause)
            self.plotter.add_key_event("r", self.reset_scene)
            self.plotter.add_key_event("t", self.toggle_trajectories)
            self.plotter.add_key_event("c", self.toggle_trajectory_colormap)

            for i in range(len(self.targets)):
                self.plotter.add_key_event(str(i+1),
                                          lambda idx=i: self.toggle_target_trajectory(idx))

            # 添加回调函数
            self.plotter.add_callback(self.update_callback, interval=16)

            # 控制变量
            self.show_trajectories = True
            self.use_colormap = True

        def update_callback(self):
            """更新回调函数"""
            if not self.is_running:
                return

            current_time = time.time()
            delta_time = current_time - self.last_time
            self.last_time = current_time
            self.demo_time += delta_time

            # 更新所有目标
            for i, target in enumerate(self.targets):
                # 更新目标位置
                new_position = target.update_position(delta_time)

                # 更新目标网格
                actor_name = f'target_{i}'
                if actor_name in self.actors:
                    # 移除旧网格
                    self.plotter.remove_actor(self.actors[actor_name])

                    # 创建新位置和姿态的网格
                    new_mesh = target.mesh.copy()
                    new_mesh.translate(-target.current_position, inplace=True)
                    new_mesh.rotate_z(target.orientation, inplace=True)
                    new_mesh.translate(new_position, inplace=True)

                    # 添加新网格
                    self.actors[actor_name] = self.plotter.add_mesh(
                        new_mesh,
                        color=target.color,
                        name=actor_name
                    )

                # 更新轨迹
                trajectory_name = f'trajectory_{i}'
                if self.show_trajectories:
                    trajectory_mesh = target.get_trajectory_mesh()
                    if trajectory_mesh:
                        if trajectory_name in self.trajectory_actors:
                            self.plotter.remove_actor(self.trajectory_actors[trajectory_name])

                        # 使用颜色映射
                        if self.use_colormap and 'time' in trajectory_mesh.array_names:
                            self.trajectory_actors[trajectory_name] = self.plotter.add_mesh(
                                trajectory_mesh,
                                scalars='time',
                                cmap='plasma',
                                line_width=2,
                                opacity=0.7,
                                name=trajectory_name
                            )
                        else:
                            self.trajectory_actors[trajectory_name] = self.plotter.add_mesh(
                                trajectory_mesh,
                                color=target.color,
                                line_width=2,
                                opacity=0.5,
                                name=trajectory_name
                            )

            # 更新信息
            info = f"仿真时间: {self.demo_time:.1f}s\n"
            info += f"目标数量: {len(self.targets)}\n"
            info += f"轨迹显示: {'开启' if self.show_trajectories else '关闭'}\n"
            info += f"颜色映射: {'开启' if self.use_colormap else '关闭'}\n"

            for i, target in enumerate(self.targets):
                speed = np.linalg.norm(target.velocity)
                info += f"目标{i+1}: 速度{speed:.1f} 位置{target.current_position[:2]}\n"

            self.info_text.SetText(3, info)

            # 请求重绘
            self.plotter.update()

        def toggle_pause(self):
            """切换暂停状态"""
            self.is_running = not self.is_running
            if self.is_running:
                self.last_time = time.time()
            state = "继续" if self.is_running else "暂停"
            print(f"仿真{state}")

        def reset_scene(self):
            """重置场景"""
            for target in self.targets:
                target.reset()
            self.demo_time = 0.0
            print("场景已重置")

        def toggle_trajectories(self):
            """切换所有轨迹显示"""
            self.show_trajectories = not self.show_trajectories
            state = "开启" if self.show_trajectories else "关闭"
            print(f"轨迹显示{state}")

            # 更新轨迹显示
            for trajectory_name in list(self.trajectory_actors.keys()):
                self.plotter.remove_actor(self.trajectory_actors[trajectory_name])
                del self.trajectory_actors[trajectory_name]

        def toggle_target_trajectory(self, target_index):
            """切换单个目标轨迹显示"""
            if 0 <= target_index < len(self.targets):
                trajectory_name = f'trajectory_{target_index}'
                if trajectory_name in self.trajectory_actors:
                    self.plotter.remove_actor(self.trajectory_actors[trajectory_name])
                    del self.trajectory_actors[trajectory_name]
                    print(f"目标{target_index+1}轨迹关闭")
                else:
                    # 重新添加轨迹
                    target = self.targets[target_index]
                    trajectory_mesh = target.get_trajectory_mesh()
                    if trajectory_mesh:
                        self.trajectory_actors[trajectory_name] = self.plotter.add_mesh(
                            trajectory_mesh,
                            color=target.color,
                            line_width=2,
                            opacity=0.5,
                            name=trajectory_name
                        )
                        print(f"目标{target_index+1}轨迹开启")

        def toggle_trajectory_colormap(self):
            """切换轨迹颜色映射"""
            self.use_colormap = not self.use_colormap
            state = "开启" if self.use_colormap else "关闭"
            print(f"轨迹颜色映射{state}")

            # 重新绘制所有轨迹
            for trajectory_name in list(self.trajectory_actors.keys()):
                self.plotter.remove_actor(self.trajectory_actors[trajectory_name])
                del self.trajectory_actors[trajectory_name]

            if self.show_trajectories:
                for i, target in enumerate(self.targets):
                    trajectory_name = f'trajectory_{i}'
                    trajectory_mesh = target.get_trajectory_mesh()
                    if trajectory_mesh:
                        if self.use_colormap and 'time' in trajectory_mesh.array_names:
                            self.trajectory_actors[trajectory_name] = self.plotter.add_mesh(
                                trajectory_mesh,
                                scalars='time',
                                cmap='plasma',
                                line_width=2,
                                opacity=0.7,
                                name=trajectory_name
                            )
                        else:
                            self.trajectory_actors[trajectory_name] = self.plotter.add_mesh(
                                trajectory_mesh,
                                color=target.color,
                                line_width=2,
                                opacity=0.5,
                                name=trajectory_name
                            )

        def run(self):
            """运行演示"""
            self.initialize()

            print("目标轨迹运动演示")
            print("=" * 50)

            self.plotter.show()

    # 创建并运行演示
    demo = TrajectoryDemo()
    demo.run()

# 运行演示
trajectory_demo()
5. 案例2:雷达波束周期性扫描
在这个案例中,我们将创建一个雷达波束扫描的动画演示,包括波束的生成、扫描控制、扫描区域可视化等。
5.1 雷达波束类设计
python
class RadarBeam:
    """雷达波束类"""

    def __init__(self, radar_position, beam_width=10, max_range=100,
                 scan_speed=30, scan_sector=120):
        """
        初始化雷达波束

        参数:
        radar_position: 雷达位置 [x, y, z]
        beam_width: 波束宽度(度)
        max_range: 最大探测距离
        scan_speed: 扫描速度(度/秒)
        scan_sector: 扫描扇区(度),0-360
        """
        self.radar_position = np.array(radar_position, dtype=float)
        self.beam_width = beam_width
        self.max_range = max_range
        self.scan_speed = scan_speed
        self.scan_sector = scan_sector

        # 状态变量
        self.current_angle = 0.0  # 当前波束角度(度)
        self.is_scanning = True
        self.scan_direction = 1  # 扫描方向:1顺时针,-1逆时针

        # 几何网格
        self.beam_mesh = None
        self.scan_area_mesh = None
        self._create_beam_geometry()

        # 探测结果
        self.detected_points = []
        self.detection_history = []

    def _create_beam_geometry(self):
        """创建波束几何体"""
        # 波束使用锥体表示
        beam_height = self.max_range
        beam_radius = beam_height * np.tan(np.radians(self.beam_width / 2))

        # 创建锥体
        cone = pv.Cone(center=[0, 0, 0], direction=[1, 0, 0],
                      height=beam_height, radius=beam_radius, resolution=20)

        # 旋转到当前角度
        cone.rotate_z(self.current_angle, inplace=True)

        # 定位到雷达位置
        cone.translate(self.radar_position, inplace=True)

        self.beam_mesh = cone

        # 创建扫描区域
        self._create_scan_area()

        return self.beam_mesh

    def _create_scan_area(self):
        """创建扫描区域"""
        if self.scan_sector >= 360:
            # 全向扫描,创建圆形区域
            circle = pv.Disc(center=self.radar_position[:2], inner=0,
                            outer=self.max_range, normal=[0, 0, 1])
            self.scan_area_mesh = circle.extrude([0, 0, 0.1])
        else:
            # 扇区扫描
            n_points = 50
            angles = np.linspace(-self.scan_sector/2, self.scan_sector/2, n_points)

            points = [self.radar_position[:2]]  # 雷达位置
            for angle in angles:
                x = self.radar_position[0] + self.max_range * np.cos(np.radians(angle))
                y = self.radar_position[1] + self.max_range * np.sin(np.radians(angle))
                points.append([x, y])

            points = np.array(points)

            # 创建多边形
            faces = [n_points + 1] + list(range(n_points + 1))
            faces = np.array(faces, dtype=np.int64)

            polygon = pv.PolyData(points, faces=faces)
            self.scan_area_mesh = polygon.extrude([0, 0, 0.1])

    def update_scan(self, delta_time):
        """更新扫描"""
        if not self.is_scanning:
            return self.current_angle

        # 更新扫描角度
        angle_change = self.scan_speed * delta_time * self.scan_direction
        self.current_angle += angle_change

        # 处理扫描边界
        if self.scan_sector < 360:
            # 扇区扫描
            if self.current_angle > self.scan_sector / 2:
                self.current_angle = self.scan_sector / 2
                self.scan_direction *= -1
            elif self.current_angle < -self.scan_sector / 2:
                self.current_angle = -self.scan_sector / 2
                self.scan_direction *= -1
        else:
            # 全向扫描
            self.current_angle %= 360

        # 更新波束几何
        self._create_beam_geometry()

        return self.current_angle

    def detect_targets(self, targets):
        """检测目标"""
        self.detected_points = []

        for target in targets:
            if self.is_target_in_beam(target.position):
                self.detected_points.append(target.position.copy())

                # 记录检测
                detection = {
                    'time': time.time(),
                    'target_position': target.position.copy(),
                    'beam_angle': self.current_angle
                }
                self.detection_history.append(detection)

        # 保持历史长度
        if len(self.detection_history) > 1000:
            self.detection_history = self.detection_history[-1000:]

        return len(self.detected_points)

    def is_target_in_beam(self, target_position):
        """判断目标是否在波束内"""
        # 计算相对位置
        relative_pos = target_position - self.radar_position
        distance = np.linalg.norm(relative_pos)

        # 距离检查
        if distance > self.max_range:
            return False

        # 角度检查
        target_angle = np.degrees(np.arctan2(relative_pos[1], relative_pos[0]))
        angle_diff = abs((target_angle - self.current_angle + 180) % 360 - 180)

        if angle_diff > self.beam_width / 2:
            return False

        return True

    def get_detection_points_mesh(self):
        """获取探测点网格"""
        if not self.detected_points:
            return None

        points = np.array(self.detected_points)
        mesh = pv.PolyData(points)

        # 添加探测强度
        distances = np.linalg.norm(points - self.radar_position, axis=1)
        intensities = 1.0 - distances / self.max_range
        mesh['intensity'] = intensities

        return mesh

    def toggle_scanning(self):
        """切换扫描状态"""
        self.is_scanning = not self.is_scanning
        return self.is_scanning

    def set_scan_speed(self, speed):
        """设置扫描速度"""
        self.scan_speed = speed

    def set_scan_sector(self, sector):
        """设置扫描扇区"""
        self.scan_sector = sector
        self._create_scan_area()

class MultiRadarSystem:
    """多雷达系统"""

    def __init__(self):
        self.radars = []
        self.actors = {}
        self.beam_colors = ['#FF0000', '#00FF00', '#0000FF', '#FFFF00', '#FF00FF']

    def add_radar(self, position, **kwargs):
        """添加雷达"""
        radar = RadarBeam(position, **kwargs)
        self.radars.append(radar)
        return radar

    def update_all(self, delta_time):
        """更新所有雷达"""
        for radar in self.radars:
            radar.update_scan(delta_time)

    def get_visualization_data(self):
        """获取所有雷达可视化数据"""
        vis_data = []

        for i, radar in enumerate(self.radars):
            # 波束
            vis_data.append({
                'mesh': radar.beam_mesh,
                'color': self.beam_colors[i % len(self.beam_colors)],
                'opacity': 0.6,
                'name': f'radar_beam_{i}'
            })

            # 扫描区域
            if radar.scan_area_mesh:
                vis_data.append({
                    'mesh': radar.scan_area_mesh,
                    'color': self.beam_colors[i % len(self.beam_colors)],
                    'opacity': 0.1,
                    'name': f'scan_area_{i}'
                })

            # 探测点
            detection_mesh = radar.get_detection_points_mesh()
            if detection_mesh:
                vis_data.append({
                    'mesh': detection_mesh,
                    'color': '#FFFFFF',
                    'point_size': 8,
                    'render_points_as_spheres': True,
                    'opacity': 0.9,
                    'name': f'detection_points_{i}'
                })

        return vis_data
5.2 雷达波束扫描演示
python
def radar_scan_demo():
    """雷达波束扫描演示"""
    class RadarScanDemo:
        def __init__(self):
            self.plotter = pv.Plotter(window_size=[1400, 900],
                                     title="雷达波束扫描演示")
            self.radar_system = MultiRadarSystem()
            self.targets = []
            self.is_running = True
            self.last_time = time.time()
            self.sim_time = 0.0

        def initialize(self):
            """初始化演示"""
            # 创建多个雷达
            radar1 = self.radar_system.add_radar(
                position=[-50, 0, 5],
                beam_width=15,
                max_range=80,
                scan_speed=45,
                scan_sector=120
            )

            radar2 = self.radar_system.add_radar(
                position=[50, 0, 8],
                beam_width=10,
                max_range=100,
                scan_speed=30,
                scan_sector=180
            )

            radar3 = self.radar_system.add_radar(
                position=[0, 50, 6],
                beam_width=20,
                max_range=70,
                scan_speed=60,
                scan_sector=90
            )

            radar4 = self.radar_system.add_radar(
                position=[0, -50, 7],
                beam_width=12,
                max_range=90,
                scan_speed=25,
                scan_sector=360
            )

            # 设置不同的扫描方向
            radar2.scan_direction = -1
            radar3.scan_direction = -1

            # 创建目标
            self._create_targets()

            # 添加可视化对象
            self._add_visualizations()

            # 添加信息显示
            self.info_text = self.plotter.add_text(
                "",
                position='upper_left',
                font_size=10,
                color='white'
            )

            # 添加控制说明
            controls = "雷达扫描演示控制:\n"
            controls += "空格: 暂停/继续扫描\n"
            controls += "1-4: 切换雷达扫描\n"
            controls += "+/-: 调整扫描速度\n"
            controls += "R: 重置所有雷达\n"
            controls += "D: 切换探测点显示\n"
            controls += "A: 切换扫描区域显示\n"

            self.control_text = self.plotter.add_text(
                controls,
                position='lower_left',
                font_size=9,
                color='cyan'
            )

            # 设置相机
            self.plotter.camera_position = [(0, 0, 150), (0, 0, 0), (0, 1, 0)]

            # 添加网格
            self.plotter.add_floor('-z', show_edges=True, opacity=0.2)

            # 添加坐标轴
            self.plotter.add_axes()

            # 添加键盘事件
            self.plotter.add_key_event("space", self.toggle_scan)
            self.plotter.add_key_event("r", self.reset_radars)
            self.plotter.add_key_event("d", self.toggle_detections)
            self.plotter.add_key_event("a", self.toggle_scan_areas)
            self.plotter.add_key_event("equal", self.increase_speed)  # +键
            self.plotter.add_key_event("minus", self.decrease_speed)  # -键

            for i in range(len(self.radar_system.radars)):
                self.plotter.add_key_event(str(i+1),
                                          lambda idx=i: self.toggle_radar_scan(idx))

            # 添加回调函数
            self.plotter.add_callback(self.update_callback, interval=16)

            # 控制变量
            self.show_detections = True
            self.show_scan_areas = True

        def _create_targets(self):
            """创建测试目标"""
            # 直线运动目标
            for i in range(3):
                target = LinearTrajectoryTarget(
                    initial_position=[np.random.uniform(-60, 60),
                                     np.random.uniform(-60, 60),
                                     np.random.uniform(10, 50)],
                    target_type='aircraft',
                    direction=[np.random.uniform(-1, 1),
                              np.random.uniform(-1, 1),
                              np.random.uniform(-0.5, 0.5)],
                    speed=np.random.uniform(10, 30)
                )
                self.targets.append(target)

            # 圆周运动目标
            for i in range(2):
                target = CircularTrajectoryTarget(
                    initial_position=[0, 0, 30],
                    target_type='missile',
                    center=[np.random.uniform(-30, 30),
                           np.random.uniform(-30, 30),
                           30],
                    radius=np.random.uniform(20, 40),
                    angular_speed=np.random.uniform(20, 60),
                    plane='xy'
                )
                self.targets.append(target)

            # 创建目标网格
            for target in self.targets:
                target.create_geometry(scale=0.5)
                target.color = 'gray'

        def _add_visualizations(self):
            """添加可视化对象"""
            # 添加雷达站
            for i, radar in enumerate(self.radar_system.radars):
                # 雷达站模型
                radar_base = pv.Cylinder(center=radar.radar_position,
                                        direction=[0, 0, 1],
                                        radius=3, height=5)
                self.plotter.add_mesh(radar_base, color='darkgray',
                                    name=f'radar_base_{i}')

            # 添加目标
            for i, target in enumerate(self.targets):
                self.plotter.add_mesh(target.mesh, color=target.color,
                                    name=f'target_{i}')

            # 初始化雷达可视化
            self._update_radar_visualizations()

        def _update_radar_visualizations(self):
            """更新雷达可视化"""
            # 移除旧的雷达可视化
            for actor_name in list(self.plotter.actors.keys()):
                if actor_name.startswith(('radar_beam_', 'scan_area_', 'detection_points_')):
                    self.plotter.remove_actor(self.plotter.actors[actor_name])

            # 添加新的雷达可视化
            vis_data = self.radar_system.get_visualization_data()

            for vis in vis_data:
                if ((vis['name'].startswith('radar_beam_')) or
                    (vis['name'].startswith('scan_area_') and self.show_scan_areas) or
                    (vis['name'].startswith('detection_points_') and self.show_detections)):

                    if 'point_size' in vis:
                        # 点数据
                        self.plotter.add_mesh(
                            vis['mesh'],
                            color=vis['color'],
                            point_size=vis['point_size'],
                            render_points_as_spheres=vis.get('render_points_as_spheres', False),
                            opacity=vis.get('opacity', 1.0),
                            name=vis['name']
                        )
                    elif 'scalars' in vis:
                        # 标量数据
                        self.plotter.add_mesh(
                            vis['mesh'],
                            scalars=vis['scalars'],
                            cmap=vis.get('cmap', 'hot'),
                            opacity=vis.get('opacity', 1.0),
                            name=vis['name']
                        )
                    else:
                        # 普通网格
                        self.plotter.add_mesh(
                            vis['mesh'],
                            color=vis['color'],
                            opacity=vis.get('opacity', 1.0),
                            show_edges=vis.get('show_edges', False),
                            name=vis['name']
                        )

        def update_callback(self):
            """更新回调函数"""
            if not self.is_running:
                return

            current_time = time.time()
            delta_time = current_time - self.last_time
            self.last_time = current_time
            self.sim_time += delta_time

            # 更新雷达扫描
            self.radar_system.update_all(delta_time)

            # 更新目标位置
            for target in self.targets:
                target.update_position(delta_time)

                # 更新目标网格
                actor_name = f'target_{self.targets.index(target)}'
                if actor_name in self.plotter.actors:
                    self.plotter.remove_actor(self.plotter.actors[actor_name])

                    new_mesh = target.mesh.copy()
                    new_mesh.translate(-target.current_position, inplace=True)
                    new_mesh.rotate_z(target.orientation, inplace=True)
                    new_mesh.translate(target.current_position, inplace=True)

                    self.plotter.add_mesh(new_mesh, color=target.color,
                                        name=actor_name)

            # 检测目标
            total_detections = 0
            for radar in self.radar_system.radars:
                detections = radar.detect_targets(self.targets)
                total_detections += detections

            # 更新雷达可视化
            self._update_radar_visualizations()

            # 更新信息
            info = f"仿真时间: {self.sim_time:.1f}s\n"
            info += f"雷达数量: {len(self.radar_system.radars)}\n"
            info += f"目标数量: {len(self.targets)}\n"
            info += f"当前探测: {total_detections} 个目标\n"
            info += f"扫描区域显示: {'开启' if self.show_scan_areas else '关闭'}\n"
            info += f"探测点显示: {'开启' if self.show_detections else '关闭'}\n\n"

            for i, radar in enumerate(self.radar_system.radars):
                detections = len(radar.detected_points)
                info += f"雷达{i+1}: 角度{radar.current_angle:.1f}° 速度{radar.scan_speed}°/s 探测{detections}\n"

            self.info_text.SetText(3, info)

            # 请求重绘
            self.plotter.update()


        def toggle_scan(self):
            """切换扫描状态"""
            self.is_running = not self.is_running
            if self.is_running:
                self.last_time = time.time()
            state = "继续" if self.is_running else "暂停"
            print(f"雷达扫描{state}")

        def reset_radars(self):
            """重置所有雷达"""
            for radar in self.radar_system.radars:
                radar.current_angle = 0.0
            self.sim_time = 0.0
            print("所有雷达已重置")

        def toggle_detections(self):
            """切换探测点显示"""
            self.show_detections = not self.show_detections
            state = "开启" if self.show_detections else "关闭"
            print(f"探测点显示{state}")
            self._update_radar_visualizations()

        def toggle_scan_areas(self):
            """切换扫描区域显示"""
            self.show_scan_areas = not self.show_scan_areas
            state = "开启" if self.show_scan_areas else "关闭"
            print(f"扫描区域显示{state}")
            self._update_radar_visualizations()

        def toggle_radar_scan(self, radar_index):
            """切换单个雷达扫描状态"""
            if 0 <= radar_index < len(self.radar_system.radars):
                radar = self.radar_system.radars[radar_index]
                radar.is_scanning = not radar.is_scanning
                state = "开启" if radar.is_scanning else "关闭"
                print(f"雷达{radar_index+1}扫描{state}")

        def increase_speed(self):
            """增加所有雷达扫描速度"""
            for radar in self.radar_system.radars:
                radar.scan_speed = min(radar.scan_speed + 10, 180)
            print(f"扫描速度增加,当前速度: {[r.scan_speed for r in self.radar_system.radars]}")

        def decrease_speed(self):
            """减少所有雷达扫描速度"""
            for radar in self.radar_system.radars:
                radar.scan_speed = max(radar.scan_speed - 10, 5)
            print(f"扫描速度减少,当前速度: {[r.scan_speed for r in self.radar_system.radars]}")

        def run(self):
            """运行演示"""
            self.initialize()

            print("雷达波束扫描演示")
            print("=" * 50)
            print("演示说明:")
            print("- 不同颜色的锥体表示不同雷达的波束")
            print("- 半透明区域表示雷达扫描范围")
            print("- 白色点表示当前探测到的目标")
            print("- 灰色模型表示运动目标")

            self.plotter.show()

    # 创建并运行演示
    demo = RadarScanDemo()
    demo.run()

# 运行演示
radar_scan_demo()
6. 案例3:导弹追踪目标(简易模型)
在这个案例中,我们将实现导弹追踪目标的简易模型,展示导弹如何根据目标位置调整飞行方向。
6.1 导弹追踪系统设计
python
class Missile:
    """导弹类"""

    def __init__(self, initial_position, initial_velocity=None, max_speed=50.0,
                 acceleration=20.0, turn_rate=90.0):
        """
        初始化导弹

        参数:
        initial_position: 初始位置 [x, y, z]
        initial_velocity: 初始速度向量 [vx, vy, vz]
        max_speed: 最大速度
        acceleration: 加速度
        turn_rate: 转向速率(度/秒)
        """
        self.position = np.array(initial_position, dtype=float)
        self.velocity = (initial_velocity if initial_velocity is not None
                         else np.array([0.0, 0.0, 0.0]))
        self.max_speed = max_speed
        self.acceleration = acceleration
        self.turn_rate = turn_rate

        # 导弹属性
        self.mesh = None
        self.trajectory = []
        self.target = None
        self.is_active = True
        self.launch_time = time.time()
        self.orientation = 0.0  # 朝向角度

        # 创建导弹几何
        self._create_missile_geometry()

    def _create_missile_geometry(self):
        """创建导弹几何体"""
        # 导弹主体
        body = pv.Cylinder(center=[0, 0, 0], direction=[1, 0, 0],
                          radius=0.5, height=6)

        # 导弹头部
        nose = pv.Cone(center=[3, 0, 0], direction=[1, 0, 0],
                      height=2, radius=0.5)

        # 尾翼
        fin_positions = [
            [-2, 0, 1], [-2, 0, -1],  # 垂直尾翼
            [-2, 1, 0], [-2, -1, 0]   # 水平尾翼
        ]

        self.mesh = body.boolean_union(nose)

        for pos in fin_positions:
            fin = pv.Box(bounds=[-0.5, 0.5, -0.1, 0.1, -0.5, 0.5])
            fin.translate(pos, inplace=True)
            self.mesh = self.mesh.boolean_union(fin)

        # 初始位置和朝向
        self.mesh.translate(self.position, inplace=True)

    def set_target(self, target_position):
        """设置目标位置"""
        self.target = np.array(target_position, dtype=float)

    def update(self, delta_time):
        """更新导弹状态"""
        if not self.is_active or self.target is None:
            return self.position

        # 计算到目标的向量
        to_target = self.target - self.position
        distance_to_target = np.linalg.norm(to_target)

        # 如果接近目标,爆炸
        if distance_to_target < 2.0:
            self.is_active = False
            print("导弹命中目标!")
            return self.position

        # 计算当前速度方向
        current_speed = np.linalg.norm(self.velocity)
        if current_speed > 0.1:
            current_direction = self.velocity / current_speed
        else:
            current_direction = np.array([1.0, 0.0, 0.0])

        # 计算目标方向
        target_direction = to_target / distance_to_target

        # 计算转向角度
        dot_product = np.dot(current_direction, target_direction)
        dot_product = np.clip(dot_product, -1.0, 1.0)
        angle_to_target = np.degrees(np.arccos(dot_product))

        # 计算转向量
        if angle_to_target > 1.0:  # 避免微小角度抖动
            # 计算转向轴
            turn_axis = np.cross(current_direction, target_direction)
            if np.linalg.norm(turn_axis) > 0.001:
                turn_axis = turn_axis / np.linalg.norm(turn_axis)

                # 计算最大可转向角度
                max_turn_angle = self.turn_rate * delta_time
                turn_ratio = min(1.0, max_turn_angle / angle_to_target)

                # 使用球面线性插值计算新方向
                new_direction = self.slerp(current_direction, target_direction, turn_ratio)

                # 更新速度方向
                new_speed = min(current_speed + self.acceleration * delta_time, self.max_speed)
                self.velocity = new_direction * new_speed
            else:
                # 方向一致,直接加速
                new_speed = min(current_speed + self.acceleration * delta_time, self.max_speed)
                self.velocity = current_direction * new_speed
        else:
            # 方向基本一致,直接加速
            new_speed = min(current_speed + self.acceleration * delta_time, self.max_speed)
            self.velocity = target_direction * new_speed

        # 更新位置
        displacement = self.velocity * delta_time
        self.position += displacement

        # 更新朝向
        if np.linalg.norm(self.velocity) > 0.1:
            forward = self.velocity / np.linalg.norm(self.velocity)
            self.orientation = np.degrees(np.arctan2(forward[1], forward[0]))

        # 记录轨迹
        self.trajectory.append(self.position.copy())
        if len(self.trajectory) > 1000:
            self.trajectory.pop(0)

        return self.position

    def slerp(self, start, end, ratio):
        """球面线性插值"""
        dot = np.dot(start, end)
        dot = np.clip(dot, -1.0, 1.0)

        theta = np.arccos(dot) * ratio
        relative_vec = end - start * dot
        relative_vec = relative_vec / np.linalg.norm(relative_vec)

        return start * np.cos(theta) + relative_vec * np.sin(theta)

    def get_trajectory_mesh(self):
        """获取轨迹网格"""
        if len(self.trajectory) < 2:
            return None

        points = np.array(self.trajectory)
        lines = np.arange(len(points))
        lines = np.insert(lines, 0, len(points))

        trajectory_mesh = pv.PolyData(points, lines=lines)

        # 添加时间属性
        time_values = np.linspace(0, 1, len(points))
        trajectory_mesh['time'] = time_values

        return trajectory_mesh

class MovingTarget:
    """运动目标类(简化版)"""

    def __init__(self, initial_position, velocity=None):
        self.position = np.array(initial_position, dtype=float)
        self.velocity = (velocity if velocity is not None
                         else np.array([0.0, 0.0, 0.0]))
        self.mesh = None
        self.trajectory = []

        # 创建目标几何
        self._create_target_geometry()

    def _create_target_geometry(self):
        """创建目标几何体"""
        # 简单球体表示目标
        self.mesh = pv.Sphere(center=self.position, radius=2.0)

    def update(self, delta_time):
        """更新目标位置"""
        # 简单直线运动
        displacement = self.velocity * delta_time
        self.position += displacement

        # 记录轨迹
        self.trajectory.append(self.position.copy())
        if len(self.trajectory) > 1000:
            self.trajectory.pop(0)

        return self.position

    def get_trajectory_mesh(self):
        """获取轨迹网格"""
        if len(self.trajectory) < 2:
            return None

        points = np.array(self.trajectory)
        lines = np.arange(len(points))
        lines = np.insert(lines, 0, len(points))

        trajectory_mesh = pv.PolyData(points, lines=lines)
        return trajectory_mesh
6.2 导弹追踪演示
python
def missile_tracking_demo():
    """导弹追踪目标演示"""
    class MissileTrackingDemo:
        def __init__(self):
            self.plotter = pv.Plotter(window_size=[1400, 900],
                                     title="导弹追踪目标演示")
            self.missiles = []
            self.targets = []
            self.is_running = True
            self.last_time = time.time()
            self.sim_time = 0.0
            self.missile_counter = 0

        def initialize(self):
            """初始化演示"""
            # 创建目标
            self._create_targets()

            # 添加可视化对象
            self._add_visualizations()

            # 添加信息显示
            self.info_text = self.plotter.add_text(
                "",
                position='upper_left',
                font_size=10,
                color='white'
            )

            # 添加控制说明
            controls = "导弹追踪演示控制:\n"
            controls += "空格: 暂停/继续仿真\n"
            controls += "M: 发射新导弹\n"
            controls += "T: 创建新目标\n"
            controls += "R: 重置场景\n"
            controls += "D: 切换导弹轨迹显示\n"
            controls += "1-9: 选择目标编号发射导弹\n"

            self.control_text = self.plotter.add_text(
                controls,
                position='lower_left',
                font_size=9,
                color='cyan'
            )

            # 设置相机
            self.plotter.camera_position = [(0, 0, 100), (0, 0, 0), (0, 1, 0)]

            # 添加网格地面
            self.plotter.add_floor('-z', show_edges=True, opacity=0.2)

            # 添加坐标轴
            self.plotter.add_axes()

            # 添加键盘事件
            self.plotter.add_key_event("space", self.toggle_simulation)
            self.plotter.add_key_event("m", self.launch_missile)
            self.plotter.add_key_event("t", self.create_target)
            self.plotter.add_key_event("r", self.reset_scene)
            self.plotter.add_key_event("d", self.toggle_trajectories)

            for i in range(1, 10):
                self.plotter.add_key_event(str(i),
                                          lambda idx=i: self.launch_missile_at_target(idx-1))

            # 添加回调函数
            self.plotter.add_callback(self.update_callback, interval=16)

            # 控制变量
            self.show_trajectories = True

        def _create_targets(self):
            """创建初始目标"""
            # 创建3个运动目标
            target1 = MovingTarget(
                initial_position=[-30, -30, 20],
                velocity=np.array([10, 8, 0])
            )

            target2 = MovingTarget(
                initial_position=[0, 30, 30],
                velocity=np.array([-5, -12, 2])
            )

            target3 = MovingTarget(
                initial_position=[40, -10, 25],
                velocity=np.array([-8, 6, -1])
            )

            self.targets = [target1, target2, target3]

        def _add_visualizations(self):
            """添加可视化对象"""
            # 添加目标
            for i, target in enumerate(self.targets):
                self.plotter.add_mesh(
                    target.mesh,
                    color='red',
                    name=f'target_{i}'
                )

            # 添加导弹发射基地
            base_positions = [[-50, -50, 0], [50, -50, 0], [0, 50, 0]]
            for i, pos in enumerate(base_positions):
                base = pv.Cylinder(center=pos, direction=[0, 0, 1],
                                 radius=3, height=5)
                self.plotter.add_mesh(base, color='gray', name=f'base_{i}')

        def update_callback(self):
            """更新回调函数"""
            if not self.is_running:
                return

            current_time = time.time()
            delta_time = current_time - self.last_time
            self.last_time = current_time
            self.sim_time += delta_time

            # 更新目标位置
            for target in self.targets:
                target.update(delta_time)

                # 更新目标网格
                target_idx = self.targets.index(target)
                actor_name = f'target_{target_idx}'
                if actor_name in self.plotter.actors:
                    self.plotter.remove_actor(self.plotter.actors[actor_name])

                new_mesh = pv.Sphere(center=target.position, radius=2.0)
                self.plotter.add_mesh(new_mesh, color='red', name=actor_name)

            # 更新导弹
            active_missiles = []
            for missile in self.missiles:
                if missile.is_active:
                    # 更新导弹位置
                    missile.update(delta_time)

                    # 更新导弹网格
                    missile_idx = self.missiles.index(missile)
                    actor_name = f'missile_{missile_idx}'

                    if actor_name in self.plotter.actors:
                        self.plotter.remove_actor(self.plotter.actors[actor_name])

                    # 创建新位置和姿态的导弹
                    new_mesh = missile.mesh.copy()
                    new_mesh.translate(-missile.position, inplace=True)
                    new_mesh.rotate_z(missile.orientation, inplace=True)
                    new_mesh.translate(missile.position, inplace=True)

                    self.plotter.add_mesh(new_mesh, color='orange', name=actor_name)

                    # 更新导弹轨迹
                    trajectory_name = f'missile_trajectory_{missile_idx}'
                    if trajectory_name in self.plotter.actors:
                        self.plotter.remove_actor(self.plotter.actors[trajectory_name])

                    if self.show_trajectories:
                        trajectory_mesh = missile.get_trajectory_mesh()
                        if trajectory_mesh:
                            self.plotter.add_mesh(
                                trajectory_mesh,
                                color='yellow',
                                line_width=2,
                                opacity=0.7,
                                name=trajectory_name
                            )

                    active_missiles.append(missile)
                else:
                    # 导弹已失效,显示爆炸效果
                    missile_idx = self.missiles.index(missile)
                    actor_name = f'missile_{missile_idx}'

                    if actor_name in self.plotter.actors:
                        self.plotter.remove_actor(self.plotter.actors[actor_name])

                    # 创建爆炸效果
                    explosion = pv.Sphere(center=missile.position, radius=5.0)
                    explosion_actor = self.plotter.add_mesh(
                        explosion,
                        color='red',
                        opacity=0.8,
                        name=f'explosion_{missile_idx}'
                    )

                    # 短暂显示后移除爆炸效果
                    def remove_explosion():
                        if f'explosion_{missile_idx}' in self.plotter.actors:
                            self.plotter.remove_actor(
                                self.plotter.actors[f'explosion_{missile_idx}']
                            )

                    # 设置定时器移除爆炸效果
                    threading.Timer(1.0, remove_explosion).start()

            self.missiles = active_missiles

            # 更新信息
            info = f"仿真时间: {self.sim_time:.1f}s\n"
            info += f"目标数量: {len(self.targets)}\n"
            info += f"活跃导弹: {len(self.missiles)}\n"
            info += f"轨迹显示: {'开启' if self.show_trajectories else '关闭'}\n\n"

            for i, target in enumerate(self.targets):
                info += f"目标{i+1}: 位置{target.position[:2]} 速度{np.linalg.norm(target.velocity):.1f}\n"

            for i, missile in enumerate(self.missiles):
                if missile.target is not None:
                    dist = np.linalg.norm(missile.target - missile.position)
                    info += f"导弹{i+1}: 距目标{dist:.1f} 速度{np.linalg.norm(missile.velocity):.1f}\n"

            self.info_text.SetText(3, info)

            # 请求重绘
            self.plotter.update()

        def toggle_simulation(self):
            """切换仿真状态"""
            self.is_running = not self.is_running
            if self.is_running:
                self.last_time = time.time()
            state = "继续" if self.is_running else "暂停"
            print(f"仿真{state}")

        def launch_missile(self):
            """发射新导弹"""
            if not self.targets:
                print("没有目标可供攻击")
                return

            # 随机选择发射基地和目标
            base_positions = [[-50, -50, 5], [50, -50, 5], [0, 50, 5]]
            launch_base = base_positions[np.random.randint(0, len(base_positions))]
            target = self.targets[np.random.randint(0, len(self.targets))]

            # 创建导弹
            missile = Missile(
                initial_position=launch_base,
                max_speed=60.0,
                acceleration=25.0,
                turn_rate=120.0
            )

            # 设置目标
            missile.set_target(target.position)

            # 设置初始速度(指向目标的大致方向)
            to_target = target.position - launch_base
            if np.linalg.norm(to_target) > 0:
                initial_direction = to_target / np.linalg.norm(to_target)
                missile.velocity = initial_direction * 10.0

            self.missiles.append(missile)
            self.missile_counter += 1

            print(f"发射导弹 #{self.missile_counter} 攻击目标")

        def launch_missile_at_target(self, target_index):
            """向指定目标发射导弹"""
            if 0 <= target_index < len(self.targets):
                base_positions = [[-50, -50, 5], [50, -50, 5], [0, 50, 5]]
                launch_base = base_positions[np.random.randint(0, len(base_positions))]
                target = self.targets[target_index]

                missile = Missile(
                    initial_position=launch_base,
                    max_speed=60.0,
                    acceleration=25.0,
                    turn_rate=120.0
                )

                missile.set_target(target.position)

                to_target = target.position - launch_base
                if np.linalg.norm(to_target) > 0:
                    initial_direction = to_target / np.linalg.norm(to_target)
                    missile.velocity = initial_direction * 10.0

                self.missiles.append(missile)
                self.missile_counter += 1

                print(f"发射导弹 #{self.missile_counter} 攻击目标 {target_index+1}")
            else:
                print(f"目标 {target_index+1} 不存在")

        def create_target(self):
            """创建新目标"""
            # 随机位置和速度
            pos = np.random.uniform(-40, 40, 3)
            pos[2] = np.random.uniform(10, 40)  # 确保一定高度

            vel = np.random.uniform(-15, 15, 3)
            vel[2] = np.random.uniform(-3, 3)

            target = MovingTarget(initial_position=pos, velocity=vel)
            self.targets.append(target)

            # 添加到场景
            target_idx = len(self.targets) - 1
            self.plotter.add_mesh(target.mesh, color='red', name=f'target_{target_idx}')

            print(f"创建新目标 #{len(self.targets)}")

        def reset_scene(self):
            """重置场景"""
            self.missiles = []
            self.targets = []
            self.missile_counter = 0
            self.sim_time = 0.0

            # 重新创建目标
            self._create_targets()

            # 清除所有actor
            for actor_name in list(self.plotter.actors.keys()):
                if not actor_name.startswith(('base_', 'floor', 'axes')):
                    self.plotter.remove_actor(self.plotter.actors[actor_name])

            # 重新添加可视化
            self._add_visualizations()

            print("场景已重置")

        def toggle_trajectories(self):
            """切换轨迹显示"""
            self.show_trajectories = not self.show_trajectories
            state = "开启" if self.show_trajectories else "关闭"
            print(f"导弹轨迹显示{state}")

            # 更新轨迹显示
            for actor_name in list(self.plotter.actors.keys()):
                if actor_name.startswith('missile_trajectory_'):
                    self.plotter.remove_actor(self.plotter.actors[actor_name])

            if self.show_trajectories:
                for i, missile in enumerate(self.missiles):
                    trajectory_mesh = missile.get_trajectory_mesh()
                    if trajectory_mesh:
                        self.plotter.add_mesh(
                            trajectory_mesh,
                            color='yellow',
                            line_width=2,
                            opacity=0.7,
                            name=f'missile_trajectory_{i}'
                        )

        def run(self):
            """运行演示"""
            self.initialize()

            print("导弹追踪目标演示")
            print("=" * 50)
            print("演示说明:")
            print("- 红色球体表示运动目标")
            print("- 橙色模型表示追踪导弹")
            print("- 黄色线条表示导弹飞行轨迹")
            print("- 导弹会自动调整方向追踪目标")

            self.plotter.show()

    # 创建并运行演示
    demo = MissileTrackingDemo()
    demo.run()

# 运行演示
missile_tracking_demo()
7. 知识点总结与提高
7.1 核心技术要点总结
1. 动画制作技术
-
open_gif()和open_movie()方法用于生成预计算动画 -
帧率控制影响动画流畅度
-
合适的编码器选择优化文件大小和质量
2. 实时更新机制
-
回调函数 (
add_callback) 实现实时更新 -
键盘和鼠标事件处理 (
add_key_event,track_click_position) -
多线程架构处理复杂计算和实时渲染
3. 动态对象管理
-
网格位置和姿态的实时更新
-
对象生命周期管理(创建、更新、销毁)
-
轨迹记录和可视化
4. 物理运动模型
-
直线运动、圆周运动、样条曲线运动
-
导弹追踪的转向和加速模型
-
碰撞检测和交互逻辑
7.2 性能优化技巧
内存管理
python
# 重用网格对象,避免频繁创建销毁
mesh = original_mesh.copy()
mesh.transform(transformation_matrix)

# 使用 overwrite 方法更新现有网格
actor.mapper.dataset.overwrite(updated_mesh)
渲染优化
python
# 批量更新减少渲染调用
plotter.render()

# 使用适当的细节层次(LOD)
simplified_mesh = complex_mesh.decimate(0.5)

# 视锥体裁剪
visible_objects = filter_visible_objects(all_objects, camera_frustum)
7.3 扩展应用方向
军事仿真应用
-
实时战场态势可视化
-
作战方案推演和评估
-
训练模拟系统
科学研究应用
-
物理过程动态模拟
-
数据实时监控和分析
-
科学计算可视化
工业应用
-
机械运动仿真
-
工艺流程可视化
-
实时监控系统