引言:异步编程的噩梦
还记得那个让无数开发者抓狂的"回调地狱"吗?
kotlin
// 回调地狱:Android开发的噩梦
fun loadUserData(userId: String) {
    showLoading()

    userApi.fetchUser(userId) { user ->
        if (user != null) {
            friendsApi.fetchFriends(user.id) { friends ->
                if (friends != null) {
                    postsApi.fetchPosts(user.id) { posts ->
                        if (posts != null) {
                            commentsApi.fetchComments(posts[0].id) { comments ->
                                if (comments != null) {
                                    // 终于到这里了...
                                    updateUI(user, friends, posts, comments)
                                    hideLoading()
                                } else {
                                    showError("加载评论失败")
                                }
                            }
                        } else {
                            showError("加载帖子失败")
                        }
                    }
                } else {
                    showError("加载好友失败")
                }
            }
        } else {
            showError("加载用户失败")
        }
    }
}
这段代码有什么问题?
- 嵌套地狱:4层嵌套,难以阅读和维护
- 错误处理混乱:每一层都要处理错误,重复代码多
- 难以取消:用户退出界面后如何取消请求?
- 资源泄漏风险:loading状态可能无法正确关闭
Kotlin协程优雅地解决了这些问题:
kotlin
// 使用协程:简洁、清晰、易维护
suspend fun loadUserData(userId: String) {
    try {
        showLoading()

        val user = userApi.fetchUser(userId)
        val friends = friendsApi.fetchFriends(user.id)
        val posts = postsApi.fetchPosts(user.id)
        val comments = commentsApi.fetchComments(posts[0].id)

        updateUI(user, friends, posts, comments)
    } catch (e: Exception) {
        showError("加载数据失败: ${e.message}")
    } finally {
        hideLoading()
    }
}
代码量减少了60%,可读性提升了300%!这就是协程的魔力。
本文将带你深入理解协程的原理,掌握结构化并发的精髓。
什么是协程?
协程的本质
协程(Coroutine) = Co(协作) + Routine(例程/函数)
协程是一种轻量级线程,或者说是"用户态线程"。它的核心特点:
- 可挂起(Suspendable):执行到某个点可以暂停,稍后恢复
- 非阻塞(Non-blocking):挂起不会阻塞线程
- 轻量级:创建成本极低,可以轻松创建数十万个协程
- 结构化并发:自动管理协程的生命周期
协程 vs 线程
| 特性 | 线程 | 协程 |
|---|---|---|
| 创建成本 | 高(约1MB栈空间) | 极低(约几十字节) |
| 切换成本 | 高(内核态切换) | 低(用户态切换) |
| 数量限制 | 受系统资源限制(通常几千个) | 几乎无限制(可轻松百万级) |
| 调度 | 操作系统抢占式调度 | 协作式调度 |
| 阻塞影响 | 阻塞整个线程 | 只挂起协程,不阻塞线程 |
协程的工作原理
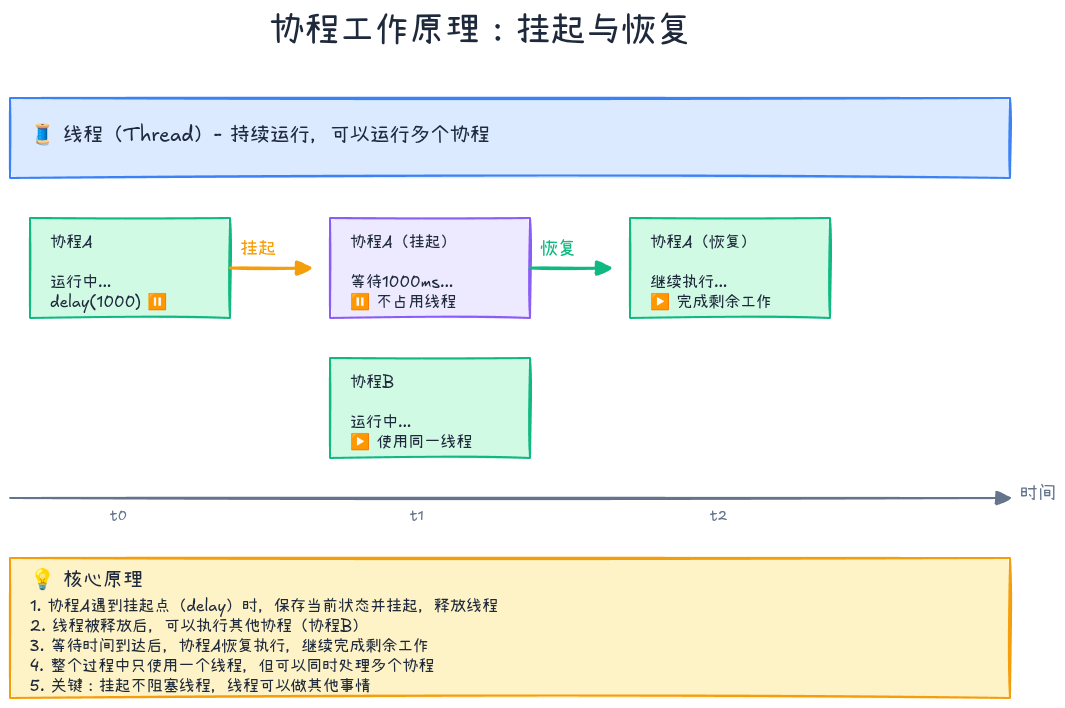
协程通过**挂起函数(suspend function)和延续传递(Continuation Passing Style, CPS)**实现:
kotlin
// 你写的代码
suspend fun fetchData(): String {
    delay(1000)  // 挂起1秒
    return "Data"
}

// 编译器生成的代码(简化版)
fun fetchData(continuation: Continuation<String>): Any? {
    // 状态机实现
    when (continuation.label) {
        0 -> {
            continuation.label = 1
            return delay(1000, continuation)  // 挂起点
        }
        1 -> {
            return "Data"  // 恢复后执行
        }
    }
}编译器将挂起函数转换为状态机,每个挂起点对应一个状态。
第一个协程程序
基础示例
kotlin
import kotlinx.coroutines.*

fun main() = runBlocking {  // 创建协程作用域
    println("主协程开始")

    launch {  // 启动子协程
        delay(1000)
        println("子协程执行")
    }

    println("主协程继续")
    delay(2000)
    println("主协程结束")
}

// 输出:
// 主协程开始
// 主协程继续
// 子协程执行(1秒后)
// 主协程结束(2秒后)关键概念:
- runBlocking:创建阻塞式协程作用域(主要用于main函数和测试)
- launch:启动新协程,返回Job对象
- delay:挂起函数,挂起协程而不阻塞线程
协程的三大构建器
1. launch - 启动协程
kotlin
fun main() = runBlocking {
    val job = launch {
        repeat(5) { i ->
            println("协程工作中 $i")
            delay(500)
        }
    }

    delay(1300)
    println("取消协程")
    job.cancel()  // 取消协程
    job.join()    // 等待协程完成
    println("主协程结束")
}特点:
- 类似于"fire and forget"
- 返回
Job对象,用于管理协程生命周期 - 不返回结果值
2. async - 并发计算
kotlin
fun main() = runBlocking {
    val deferred1 = async {
        delay(1000)
        println("计算1完成")
        100
    }

    val deferred2 = async {
        delay(500)
        println("计算2完成")
        200
    }

    val result = deferred1.await() + deferred2.await()
    println("总和: $result")
}

// 输出:
// 计算2完成(500ms后)
// 计算1完成(1000ms后)
// 总和: 300特点:
- 返回
Deferred<T>对象 - 通过
await()获取结果 - 两个async并发执行,总耗时约1秒而非1.5秒
3. runBlocking - 阻塞式协程
kotlin
fun main() {
    println("开始")

    runBlocking {
        delay(1000)
        println("协程执行")
    }

    println("结束")
}特点:
- 阻塞当前线程,直到协程完成
- 主要用于main函数、测试、桥接阻塞代码
- 生产代码中应避免使用
对比:串行 vs 并发
kotlin
// 串行执行:总耗时2秒
suspend fun serialExecution() {
    val time = measureTimeMillis {
        val one = fetchData1()  // 1秒
        val two = fetchData2()  // 1秒
        println("结果: $one, $two")
    }
    println("串行耗时: $time ms")
}

// 并发执行:总耗时1秒
suspend fun concurrentExecution() {
    val time = measureTimeMillis {
        val one = async { fetchData1() }  // 并发
        val two = async { fetchData2() }  // 并发
        println("结果: ${one.await()}, ${two.await()}")
    }
    println("并发耗时: $time ms")
}
结构化并发:协程的灵魂
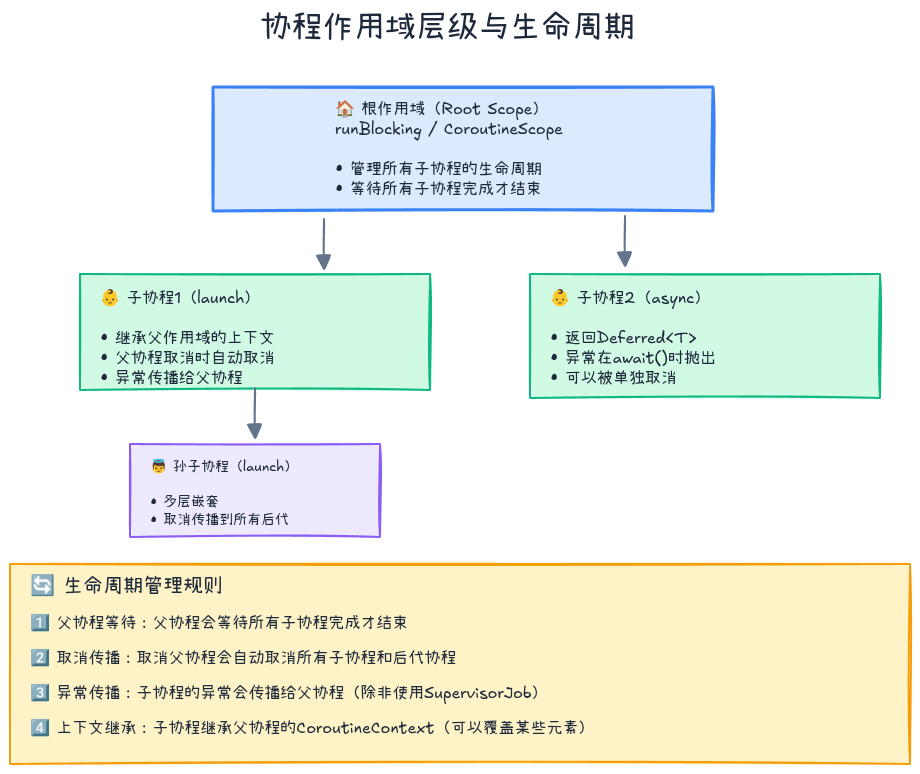
什么是结构化并发?
**结构化并发(Structured Concurrency)**是协程的核心设计理念:
协程必须在明确的作用域内启动,子协程的生命周期不能超过父协程。
这就像"你不能让孩子流落街头"------每个协程都有明确的父协程负责管理。
协程作用域(CoroutineScope)
作用域的作用
kotlin
fun main() = runBlocking {  // 父作用域
    launch {  // 子协程1
        delay(1000)
        println("子协程1完成")
    }

    launch {  // 子协程2
        delay(500)
        println("子协程2完成")
    }

    println("父协程等待子协程...")
}  // 父协程会自动等待所有子协程完成

// 输出:
// 父协程等待子协程...
// 子协程2完成(500ms后)
// 子协程1完成(1000ms后)
// (然后main函数才结束)关键点:
runBlocking会等待所有子协程完成才结束- 这是自动管理,无需手动join
取消传播
kotlin
fun main() = runBlocking {
    val parentJob = launch {
        val child1 = launch {
            repeat(10) {
                println("子协程1工作中 $it")
                delay(200)
            }
        }

        val child2 = launch {
            repeat(10) {
                println("子协程2工作中 $it")
                delay(200)
            }
        }
    }

    delay(500)
    println("取消父协程")
    parentJob.cancel()  // 取消父协程
    delay(1000)
    println("程序结束")
}

// 输出:
// 子协程1工作中 0
// 子协程2工作中 0
// 子协程1工作中 1
// 子协程2工作中 1
// 取消父协程
// 程序结束(子协程也被取消了)取消规则:
- 取消父协程会自动取消所有子协程
- 取消是协作式的,需要检查取消状态
协程上下文(CoroutineContext)
协程上下文是一组元素的集合,包括:
- Job:协程的生命周期管理
- Dispatcher:决定协程运行在哪个线程
- CoroutineName:协程的名称(调试用)
- CoroutineExceptionHandler:异常处理器
kotlin
fun main() = runBlocking {
    val job = launch(
        CoroutineName("MyCoroutine") +  // 设置名称
        Dispatchers.Default  // 指定调度器
    ) {
        println("协程名称: ${coroutineContext[CoroutineName]}")
        println("运行线程: ${Thread.currentThread().name}")
        delay(1000)
    }

    job.join()
}

// 输出:
// 协程名称: CoroutineName(MyCoroutine)
// 运行线程: DefaultDispatcher-worker-1
协程调度器(Dispatchers)
调度器决定协程运行在哪个线程上:
kotlin
import kotlinx.coroutines.*

fun main() = runBlocking {
    // 1. Dispatchers.Default - CPU密集型任务
    launch(Dispatchers.Default) {
        println("Default: ${Thread.currentThread().name}")
        // 适合:计算、数据处理
    }

    // 2. Dispatchers.IO - IO密集型任务
    launch(Dispatchers.IO) {
        println("IO: ${Thread.currentThread().name}")
        // 适合:网络请求、文件读写、数据库操作
    }

    // 3. Dispatchers.Main - 主线程(Android/Swing)
    // launch(Dispatchers.Main) {
    //     println("Main: ${Thread.currentThread().name}")
    //     // 适合:UI更新
    // }

    // 4. Dispatchers.Unconfined - 非受限调度器
    launch(Dispatchers.Unconfined) {
        println("Unconfined 1: ${Thread.currentThread().name}")
        delay(100)
        println("Unconfined 2: ${Thread.currentThread().name}")
        // 第一个挂起点前在调用者线程,恢复后在恢复者线程
    }

    delay(200)
}选择建议:
| 调度器 | 适用场景 | 线程池大小 |
|---|---|---|
| Default | CPU密集型(计算、排序、解析) | CPU核心数 |
| IO | IO密集型(网络、文件、数据库) | 64个线程 |
| Main | UI更新(Android、Swing、JavaFX) | 主线程 |
| Unconfined | 测试、特殊场景 | 不固定 |
切换线程
kotlin
suspend fun loadData() {
    withContext(Dispatchers.IO) {  // 切换到IO线程
        val data = fetchFromNetwork()

        withContext(Dispatchers.Default) {  // 切换到计算线程
            val processed = processData(data)

            withContext(Dispatchers.Main) {  // 切换到主线程
                updateUI(processed)
            }
        }
    }
}关键函数:
withContext:临时切换协程上下文- 自动返回到原调度器
- 返回lambda的结果
协程的取消与超时
协作式取消
协程的取消是协作式的,需要协程主动检查:
kotlin
fun main() = runBlocking {
    val job = launch {
        repeat(1000) { i ->
            if (!isActive) {  // 检查协程是否活跃
                println("协程被取消,清理资源...")
                return@launch
            }
            println("工作中 $i")
            Thread.sleep(100)  // 注意:这是Thread.sleep,不是delay
        }
    }

    delay(500)
    println("取消协程")
    job.cancelAndJoin()
    println("协程已取消")
}
取消检查点
以下函数会自动检查取消状态:
kotlin
// 自动检查取消的挂起函数
delay(1000)      // ✅ 会检查
yield()          // ✅ 会检查
withContext()    // ✅ 会检查
withTimeout()    // ✅ 会检查

// 不会检查取消
Thread.sleep()   // ❌ 不会检查
让不可取消的代码可取消
kotlin
fun main() = runBlocking {
    val job = launch {
        repeat(1000) { i ->
            println("工作中 $i")
            // 方法1: 使用yield()插入取消检查点
            yield()

            // 方法2: 手动检查isActive
            // ensureActive()  // 如果已取消,抛出CancellationException

            Thread.sleep(100)
        }
    }

    delay(500)
    job.cancelAndJoin()
}
不可取消块
有时需要在取消过程中执行清理操作:
kotlin
fun main() = runBlocking {
    val job = launch {
        try {
            repeat(1000) { i ->
                println("工作中 $i")
                delay(100)
            }
        } finally {
            withContext(NonCancellable) {  // 不可取消块
                println("清理资源...")
                delay(500)  // 这里的delay不会被取消
                println("资源清理完成")
            }
        }
    }

    delay(300)
    job.cancelAndJoin()
    println("程序结束")
}
超时处理
kotlin
// 1. withTimeout - 超时抛出异常
suspend fun fetchWithTimeout() {
    try {
        withTimeout(1000) {
            println("开始请求...")
            delay(2000)  // 模拟耗时操作
            println("请求完成")
        }
    } catch (e: TimeoutCancellationException) {
        println("请求超时")
    }
}

// 2. withTimeoutOrNull - 超时返回null
suspend fun fetchWithTimeoutOrNull() {
    val result = withTimeoutOrNull(1000) {
        println("开始请求...")
        delay(2000)
        "数据"
    }

    if (result == null) {
        println("请求超时")
    } else {
        println("请求成功: $result")
    }
}
异常处理
异常传播规则

协程中的异常遵循以下规则:
- launch:异常向上传播给父协程
- async:异常被封装,在await()时抛出
kotlin
// launch的异常传播
fun main() = runBlocking {
    val job = launch {
        println("子协程开始")
        throw RuntimeException("出错了!")
    }

    delay(100)
    println("主协程继续执行?")  // 不会执行,因为异常会传播到主协程
}

// async的异常延迟
fun main() = runBlocking {
    val deferred = async {
        println("子协程开始")
        throw RuntimeException("出错了!")
    }

    delay(100)
    println("主协程继续执行")  // ✅ 会执行

    try {
        deferred.await()  // 异常在这里抛出
    } catch (e: Exception) {
        println("捕获异常: ${e.message}")
    }
}
异常处理器
kotlin
val handler = CoroutineExceptionHandler { context, exception ->
    println("捕获异常: ${context[CoroutineName]} - ${exception.message}")
}

fun main() = runBlocking {
    val job = launch(handler + CoroutineName("MyCoroutine")) {
        throw RuntimeException("出错了!")
    }

    job.join()
    println("程序继续")
}

// 输出:
// 捕获异常: CoroutineName(MyCoroutine) - 出错了!
// 程序继续注意:
- 异常处理器只对根协程有效
- 子协程的异常会传播到父协程,不会被子协程的handler捕获
SupervisorJob
使用SupervisorJob可以让子协程的异常不影响兄弟协程:
kotlin
fun main() = runBlocking {
    val supervisor = SupervisorJob()

    with(CoroutineScope(coroutineContext + supervisor)) {
        val child1 = launch {
            println("子协程1开始")
            delay(100)
            throw RuntimeException("子协程1出错")
        }

        val child2 = launch {
            println("子协程2开始")
            delay(200)
            println("子协程2完成")  // ✅ 仍会执行
        }

        joinAll(child1, child2)
    }

    println("程序结束")
}
supervisorScope
kotlin
fun main() = runBlocking {
    supervisorScope {
        launch {
            println("子协程1开始")
            delay(100)
            throw RuntimeException("子协程1出错")
        }

        launch {
            println("子协程2开始")
            delay(200)
            println("子协程2完成")
        }
    }

    println("主协程继续")
}

// 输出:
// 子协程1开始
// 子协程2开始
// Exception in thread "main" RuntimeException: 子协程1出错
// 子协程2完成
// 主协程继续
supervisorScope vs SupervisorJob:
supervisorScope:创建临时的supervisor作用域SupervisorJob:创建长期的supervisor作用域
实战案例:并发下载文件
让我们通过一个实际案例来综合运用所学知识:
kotlin
import kotlinx.coroutines.*
import java.io.File
import java.net.URL

data class DownloadTask(
    val url: String,
    val fileName: String
)

class FileDownloader {
    private val scope = CoroutineScope(
        SupervisorJob() + Dispatchers.IO
    )

    /**
     * 并发下载多个文件
     */
    suspend fun downloadFiles(tasks: List<DownloadTask>): List<Result<File>> {
        return tasks.map { task ->
            scope.async {
                try {
                    downloadFile(task)
                } catch (e: Exception) {
                    Result.failure(e)
                }
            }
        }.awaitAll()
    }

    /**
     * 下载单个文件(带超时)
     */
    private suspend fun downloadFile(task: DownloadTask): Result<File> {
        return withTimeoutOrNull(30_000) {  // 30秒超时
            try {
                val file = File(task.fileName)
                URL(task.url).openStream().use { input ->
                    file.outputStream().use { output ->
                        input.copyTo(output)
                    }
                }
                Result.success(file)
            } catch (e: Exception) {
                Result.failure(e)
            }
        } ?: Result.failure(TimeoutCancellationException("下载超时"))
    }

    /**
     * 下载文件并显示进度
     */
    suspend fun downloadWithProgress(
        task: DownloadTask,
        onProgress: (Float) -> Unit
    ): Result<File> = withContext(Dispatchers.IO) {
        try {
            val file = File(task.fileName)
            val connection = URL(task.url).openConnection()
            val totalSize = connection.contentLength.toLong()
            var downloadedSize = 0L

            connection.getInputStream().use { input ->
                file.outputStream().use { output ->
                    val buffer = ByteArray(8192)
                    var bytesRead: Int

                    while (input.read(buffer).also { bytesRead = it } != -1) {
                        // 检查取消
                        ensureActive()

                        output.write(buffer, 0, bytesRead)
                        downloadedSize += bytesRead

                        // 报告进度
                        val progress = downloadedSize.toFloat() / totalSize
                        withContext(Dispatchers.Main) {
                            onProgress(progress)
                        }
                    }
                }
            }

            Result.success(file)
        } catch (e: Exception) {
            Result.failure(e)
        }
    }

    /**
     * 关闭下载器
     */
    fun close() {
        scope.cancel()
    }
}

// 使用示例
fun main() = runBlocking {
    val downloader = FileDownloader()

    val tasks = listOf(
        DownloadTask("https://example.com/file1.zip", "file1.zip"),
        DownloadTask("https://example.com/file2.zip", "file2.zip"),
        DownloadTask("https://example.com/file3.zip", "file3.zip")
    )

    println("开始并发下载...")
    val startTime = System.currentTimeMillis()

    val results = downloader.downloadFiles(tasks)

    val elapsedTime = System.currentTimeMillis() - startTime
    println("下载完成,耗时: ${elapsedTime}ms")

    results.forEachIndexed { index, result ->
        result.fold(
            onSuccess = { file ->
                println("文件${index + 1}下载成功: ${file.name}")
            },
            onFailure = { error ->
                println("文件${index + 1}下载失败: ${error.message}")
            }
        )
    }

    downloader.close()
}代码亮点:
- SupervisorJob:一个文件失败不影响其他文件
- Dispatchers.IO:IO操作使用IO调度器
- async/awaitAll:并发下载,提高效率
- withTimeout:防止下载hang住
- ensureActive:支持取消下载
- withContext(Main):切换到主线程更新UI
常见陷阱与最佳实践
❌ 陷阱1:在协程中阻塞线程
kotlin
// ❌ 错误:使用Thread.sleep阻塞线程
launch {
    Thread.sleep(1000)  // 阻塞了线程!
}

// ✅ 正确:使用delay挂起协程
launch {
    delay(1000)  // 只挂起协程,不阻塞线程
}
❌ 陷阱2:忘记处理取消
kotlin
// ❌ 错误:长时间计算不检查取消
launch {
    var sum = 0
    for (i in 1..1_000_000_000) {
        sum += i  // 无法取消
    }
}

// ✅ 正确:定期检查取消
launch {
    var sum = 0
    for (i in 1..1_000_000_000) {
        if (i % 1_000_000 == 0) {
            yield()  // 检查取消
        }
        sum += i
    }
}
❌ 陷阱3:在finally中调用挂起函数
kotlin
// ❌ 错误:finally中的挂起函数会被取消
launch {
    try {
        delay(1000)
    } finally {
        delay(100)  // 可能被取消
        cleanup()
    }
}

// ✅ 正确:使用NonCancellable
launch {
    try {
        delay(1000)
    } finally {
        withContext(NonCancellable) {
            delay(100)  // 保证执行
            cleanup()
        }
    }
}
✅ 最佳实践1:使用structured concurrency
kotlin
// ❌ 避免:GlobalScope启动协程
GlobalScope.launch {
    // 协程生命周期不受控制
}

// ✅ 推荐:使用明确的作用域
class MyViewModel : ViewModel() {
    private val viewModelScope = CoroutineScope(
        SupervisorJob() + Dispatchers.Main
    )

    fun loadData() {
        viewModelScope.launch {
            // 协程生命周期与ViewModel绑定
        }
    }

    override fun onCleared() {
        viewModelScope.cancel()
    }
}
✅ 最佳实践2:合理选择调度器
kotlin
// ✅ 网络请求 → IO调度器
suspend fun fetchUser() = withContext(Dispatchers.IO) {
    api.getUser()
}

// ✅ 数据处理 → Default调度器
suspend fun processData(data: List<Int>) = withContext(Dispatchers.Default) {
    data.map { it * 2 }.filter { it > 100 }
}

// ✅ UI更新 → Main调度器
suspend fun updateUI(data: String) = withContext(Dispatchers.Main) {
    textView.text = data
}
✅ 最佳实践3:使用挂起函数而非回调
kotlin
// ❌ 避免:回调风格
fun loadData(callback: (Result<String>) -> Unit) {
    thread {
        try {
            val data = fetchFromNetwork()
            callback(Result.success(data))
        } catch (e: Exception) {
            callback(Result.failure(e))
        }
    }
}

// ✅ 推荐:挂起函数
suspend fun loadData(): Result<String> = withContext(Dispatchers.IO) {
    try {
        val data = fetchFromNetwork()
        Result.success(data)
    } catch (e: Exception) {
        Result.failure(e)
    }
}
性能对比
让我们用实际数据看看协程的性能优势:
kotlin
fun main() = runBlocking {
    // 测试1:创建10万个协程
    val time1 = measureTimeMillis {
        val jobs = List(100_000) {
            launch {
                delay(1000)
            }
        }
        jobs.forEach { it.join() }
    }
    println("10万个协程耗时: ${time1}ms")  // 约1000ms

    // 测试2:创建10万个线程(慎用!)
    // 大多数系统会OOM或极其缓慢
}结果对比:
| 操作 | 线程 | 协程 |
|---|---|---|
| 创建10万个 | ❌ OOM或极慢 | ✅ 约1秒 |
| 内存占用 | 约100GB | 约几MB |
| 切换成本 | 高(微秒级) | 低(纳秒级) |
小结
本文介绍了Kotlin协程的核心概念和使用方法:
核心概念
- 协程:轻量级线程,可挂起、非阻塞
- 挂起函数 :用
suspend修饰,可以暂停和恢复 - 协程构建器 :
launch、async、runBlocking - 结构化并发:协程必须在作用域内启动
关键技能
- 创建协程:使用launch/async启动协程
- 切换线程:使用Dispatchers和withContext
- 取消协程:协作式取消,使用isActive/yield
- 异常处理:理解传播规则,使用SupervisorJob
- 并发编程:async/await实现并发
最佳实践
- ✅ 使用结构化并发,避免GlobalScope
- ✅ 合理选择调度器
- ✅ 使用delay而非Thread.sleep
- ✅ 定期检查取消状态
- ✅ 使用supervisorScope处理独立任务
下期预告
下一篇文章《Kotlin协程原理与实战(下):Flow与Channel》将介绍:
- Flow:响应式编程的协程实现
- Channel:协程之间的通信
- StateFlow/SharedFlow:状态管理
- 实战案例:构建响应式数据流
练习题
基础练习
练习1:实现一个并发加载图片的函数
kotlin
suspend fun loadImages(urls: List<String>): List<Bitmap> {
    // TODO: 并发加载所有图片
    // 提示:使用async和awaitAll
}练习2:实现一个带重试的网络请求
kotlin
suspend fun <T> retryRequest(
    times: Int = 3,
    delayMillis: Long = 1000,
    block: suspend () -> T
): T {
    // TODO: 失败时重试,最多重试times次
}
进阶练习
练习3:实现一个协程池
kotlin
class CoroutinePool(
    val maxConcurrent: Int
) {
    // TODO: 限制同时运行的协程数量
    suspend fun <T> execute(block: suspend () -> T): T {
        // 实现并发控制
    }
}练习4:实现一个进度聚合器
kotlin
class ProgressAggregator(
    val taskCount: Int
) {
    // TODO: 聚合多个任务的进度
    fun updateProgress(taskId: Int, progress: Float)
    fun getTotalProgress(): Float
}
参考资料
系列文章导航:
- 👉 上一篇: 委托机制与属性委托实战:组合优于继承的最佳实践
如果这篇文章对你有帮助,欢迎点赞、收藏、分享!有任何问题或建议,欢迎在评论区留言讨论。让我们一起学习,一起成长!
也欢迎访问我的个人主页发现更多宝藏资源