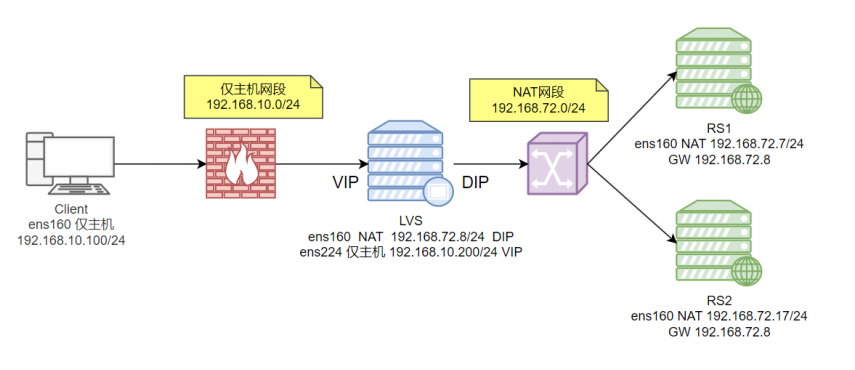
1.1 主机规划
| 主机 | 角色 | 系统 | 网络 | IP |
|---|---|---|---|---|
| client | client | redhat 9.7 | 仅主机 | 192.168.10.18/24 |
| lvs | lvs | redhat 9.7 | 仅主机 NAT | 192.168.10.200/24 VIP 192.168.72.8/24 DIP |
| nginx | rs1 | redhat 9.7 | NAT | 192.168.72.7/24 |
| nginx | rs2 | redhat 9.7 | NAT | 192.168.72.17/24 |
1.2 环境准备
克隆四台虚拟机,需要注意根据主机规划方案来设置网络类型。
1.2.1 配置客户端
1、设置主机名
[root@localhost ~]# hostnamectl set-hostname client && bash
[root@client ~]#
2、修改IP地址
[root@client ~]# nmcli c modify ens160 ipv4.method manual ipv4.addresses 192.168.10.18/24 ipv4.dns 223.5.5.5 connection.autoconnect yes
[root@client ~]# nmcli c up ens160
3、关闭selinux
[root@client ~]# setenforce 0
[root@client ~]# sed -i "s/SELINUX=enforcing/SELINUX=permissive/" /etc/selinux/config
4、关闭防火墙
[root@client ~]# systemctl disable --now firewalld.service
Removed "/etc/systemd/system/multi-user.target.wants/firewalld.service".
Removed "/etc/systemd/system/dbus-org.fedoraproject.FirewallD1.service".
1.2.2 配置LVS
1、设置主机名
[root@localhost ~]# hostnamectl set-hostname lvs && bash
[root@lvs ~]#
2、修改IP地址
# 1. 修改仅主机模式的IP地址
[root@lvs ~]# nmcli c modify ens160 ipv4.method manual ipv4.addresses 192.168.10.200/24 ipv4.dns 223.5.5.5 connection.autoconnect yes
[root@lvs ~]# nmcli c up ens160
# 2. 修改NAT模式的IP地址
[root@lvs ~]# nmcli c mod "Wired connection 1" connection.id ens224
[root@lvs ~]# nmcli c m ens224 ipv4.method manual ipv4.addr 192.168.72.8/24 ipv4.gateway 192.168.72.2 ipv4.dns 223.5.5.5 connection.autoconnect yes
[root@lvs ~]# nmcli c up ens224
Connection successfully activated (D-Bus active path: /org/freedesktop/NetworkManager/ActiveConnection/4)3、关闭selinux
[root@lvs ~]# setenforce 0
[root@lvs ~]# sed -i "s/SELINUX=enforcing/SELINUX=permissive/" /etc/selinux/config
4、关闭防火墙
[root@lvs ~]# systemctl disable --now firewalld.service
Removed "/etc/systemd/system/multi-user.target.wants/firewalld.service".
Removed "/etc/systemd/system/dbus-org.fedoraproject.FirewallD1.service".
1.2.4 配置RS2
1、修改主机名
[root@localhost ~]# hostnamectl set-hostname rs2 && bash
[root@rs2 ~]#
2、修改IP地址
[root@rs2 ~]# nmcli c m ens160 ipv4.method manual ipv4.addr 192.168.72.17/24 ipv4.gateway 192.168.72.8 ipv4.dns 223.5.5.5 connection.autoconnect yes
[root@rs2 ~]# nmcli c up ens160
3、关闭selinux
[root@rs2 ~]# setenforce 0
[root@rs2 ~]# sed -i "s/SELINUX=enforcing/SELINUX=permissive/" /etc/selinux/config
4、关闭防火墙
[root@rs2 ~]# systemctl disable --now firewalld.service
Removed "/etc/systemd/system/multi-user.target.wants/firewalld.service".
Removed "/etc/systemd/system/dbus-org.fedoraproject.FirewallD1.service".
1.3 搭建RS1服务
1、安装nginx
[root@rs1 ~]# dnf install nginx -y2、修改欢迎页
[root@rs1 ~]# echo "$(hostname) $(hostname -I)" > /usr/share/nginx/html/index.html3、启动nginx
[root@rs1 ~]# systemctl start nginx4、运行测试
[root@rs1 ~]# curl localhost
rs1 192.168.72.7
[root@rs1 ~]# curl localhost
rs1 192.168.72.7
1.4 搭建RS2
1、安装nginx
[root@rs2 ~]# dnf install nginx -y2、修改欢迎页
[root@rs2 ~]# echo "$(hostname) $(hostname -I)" > /usr/share/nginx/html/index.html3、启动nginx
[root@rs2 ~]# systemctl start nginx4、访问测试
[root@rs2 ~]# curl localhost
rs2 192.168.72.17
[root@rs2 ~]# curl localhost
rs2 192.168.72.17
1.5 搭建LVS
1、安装ipvsadm
[root@lvs ~]# dnf install ipvsadm -y2、保存配置
[root@lvs ~]# ipvsadm-save -n > /etc/sysconfig/ipvsadm
# 或者执行
[root@lvs ~]# ipvsadm -S > /etc/sysconfig/ipvsadm
3、启动服务
[root@lvs ~]# systemctl start ipvsadm
[root@lvs ~]# systemctl status ipvsadm
● ipvsadm.service - Initialise the Linux Virtual Server
Loaded: loaded (/usr/lib/systemd/system/ipvsadm.service; enabled; preset: disabled)
Active: active (exited) since Sat 2026-01-17 09:57:54 CST; 58min ago
Main PID: 1002 (code=exited, status=0/SUCCESS)
CPU: 45ms
Jan 17 09:57:54 lvs systemd[1]: Starting Initialise the Linux Virtual Server...
Jan 17 09:57:54 lvs systemd[1]: Finished Initialise the Linux Virtual Server.4、查看规则
[root@lvs ~]# ipvsadm -Ln
IP Virtual Server version 1.2.1 (size=4096)
Prot LocalAddress:Port Scheduler Flags
  -> RemoteAddress:Port           Forward Weight ActiveConn InActConn
5、添加规则
[root@lvs ~]# ipvsadm -A -t 192.168.72.8:80 -s rr
[root@lvs ~]# ipvsadm -Ln
IP Virtual Server version 1.2.1 (size=4096)
Prot LocalAddress:Port Scheduler Flags
-> RemoteAddress:Port Forward Weight ActiveConn InActConn
TCP 192.168.72.8:80 rr
6、添加真实主机
[root@lvs ~]# ipvsadm -A -t 192.168.10.200:80 -s rr
[root@lvs ~]# ipvsadm -a -t 192.168.10.200:80 -r 192.168.72.7:80 -m
[root@lvs ~]# ipvsadm -a -t 192.168.10.200:80 -r 192.168.72.17:80 -m
[root@lvs ~]# ipvsadm -Ln
IP Virtual Server version 1.2.1 (size=4096)
Prot LocalAddress:Port Scheduler Flags
-> RemoteAddress:Port Forward Weight ActiveConn InActConn
TCP 192.168.10.200:80 rr
-> 192.168.72.7:80 Masq 1 0 0
-> 192.168.72.17:80 Masq 1 0 0
7、运行测试
[root@lvs ~]# curl 192.168.72.8
rs2 192.168.72.17
[root@lvs ~]# curl 192.168.72.8
rs1 192.168.72.7
[root@lvs ~]# curl 192.168.72.8
rs2 192.168.72.17
[root@lvs ~]# curl 192.168.72.8
rs1 192.168.72.7
[root@lvs ~]# curl 192.168.72.8
rs2 192.168.72.17
[root@lvs ~]# curl 192.168.72.8
rs1 192.168.72.7
[root@lvs ~]# curl 192.168.72.8
rs2 192.168.72.17
[root@lvs ~]# curl 192.168.72.8
rs1 192.168.72.7
[root@lvs ~]# curl 192.168.72.8
rs2 192.168.72.17
如果是配置加权轮询,则配置如下:
# 清理规则
[root@lvs ~]# ipvsadm -C
# 增加规则
[root@lvs ~]# ipvsadm -A -t 192.168.10.200:80 -s wrr
# 增加集群节点
[root@lvs ~]# ipvsadm -a -t 192.168.10.200:80 -r 192.168.72.7:80 -m -w 5
[root@lvs ~]# ipvsadm -a -t 192.168.10.200:80 -r 192.168.72.17:80 -m -w 2
# 查看规则
[root@lvs ~]# ipvsadm -Ln
IP Virtual Server version 1.2.1 (size=4096)
Prot LocalAddress:Port Scheduler Flags
-> RemoteAddress:Port Forward Weight ActiveConn InActConn
TCP 192.168.10.200:80 wrr
-> 192.168.72.7:80 Masq 5 0 0
-> 192.168.72.17:80 Masq 2 0 0 1.6 测试
我们在client端测试
[root@client ~]# curl 192.168.10.200
curl: (7) Failed to connect to 192.168.10.200 port 80: Connection refused
[root@client ~]# curl 192.168.10.200
curl: (7) Failed to connect to 192.168.10.200 port 80: Connection refused
可以发现,访问是被拒绝的。
解决办法是:修改 lvs 服务器中 /etc/sysctl.conf 文件,在这个文件中添加转发功能。
[root@lvs ~]# vim /etc/sysctl.conf文件内容如下:
# sysctl settings are defined through files in
# /usr/lib/sysctl.d/, /run/sysctl.d/, and /etc/sysctl.d/.
#
# Vendors settings live in /usr/lib/sysctl.d/.
# To override a whole file, create a new file with the same in
# /etc/sysctl.d/ and put new settings there. To override
# only specific settings, add a file with a lexically later
# name in /etc/sysctl.d/ and put new settings there.
#
# For more information, see sysctl.conf(5) and sysctl.d(5).
net.ipv4.ip_forward=1
修改保存后,执行如下的命令来让配置生效:
[root@lvs ~]# sysctl -p
net.ipv4.ip_forward = 1
然后再测试:
[root@client ~]# curl 192.168.10.200
rs2 192.168.72.17
[root@client ~]# curl 192.168.72.8
rs1 192.168.72.7
[root@client ~]# curl 192.168.72.8
rs2 192.168.72.17
[root@client ~]# curl 192.168.72.8
rs1 192.168.72.7
[root@client ~]# curl 192.168.72.8
rs2 192.168.72.17
[root@client ~]# curl 192.168.72.8
rs1 192.168.72.7
[root@client ~]# curl 192.168.72.8
rs2 192.168.72.17
[root@client ~]# curl 192.168.72.8
rs1 192.168.72.7
[root@client ~]# curl 192.168.72.8
rs2 192.168.72.17