一、配置nacos所需内容(相关ID和分组都不要变,和后续配置息息相关)
1.创建【seataServer.properties 】 - 【SEATA_GROUP】的配置,注意(格式为propeties、配置信息中的事务分组、变更配置信息中的数据库信息)
java
transport.type=TCP
transport.server=NIO
transport.heartbeat=true
transport.enableClientBatchSendRequest=true
transport.threadFactory.bossThreadPrefix=NettyBoss
transport.threadFactory.workerThreadPrefix=NettyServerNIOWorker
transport.threadFactory.serverExecutorThreadPrefix=NettyServerBizHandler
transport.threadFactory.shareBossWorker=false
transport.threadFactory.clientSelectorThreadPrefix=NettyClientSelector
transport.threadFactory.clientSelectorThreadSize=1
transport.threadFactory.clientWorkerThreadPrefix=NettyClientWorkerThread
transport.threadFactory.bossThreadSize=1
transport.threadFactory.workerThreadSize=default
transport.shutdown.wait=3
# !!!分组
service.vgroupMapping.my_test_tx_group=default
service.default.grouplist=127.0.0.1:8091
service.enableDegrade=false
service.disableGlobalTransaction=false
client.rm.asyncCommitBufferLimit=10000
client.rm.lock.retryInterval=10
client.rm.lock.retryTimes=30
client.rm.lock.retryPolicyBranchRollbackOnConflict=true
client.rm.reportRetryCount=5
client.rm.tableMetaCheckEnable=false
client.rm.tableMetaCheckerInterval=60000
client.rm.sqlParserType=druid
client.rm.reportSuccessEnable=false
client.rm.sagaBranchRegisterEnable=false
client.rm.tccActionInterceptorOrder=-2147482648
client.tm.commitRetryCount=5
client.tm.rollbackRetryCount=5
client.tm.defaultGlobalTransactionTimeout=60000
client.tm.degradeCheck=false
client.tm.degradeCheckAllowTimes=10
client.tm.degradeCheckPeriod=2000
client.tm.interceptorOrder=-2147482648

# !!!数据库配置需要自行变更
store.mode=db
store.db.datasource=druid
store.db.dbType=mysql
store.db.driverClassName=com.mysql.cj.jdbc.Driver
store.db.url=jdbc:mysql://localhost:3306/seata?characterEncoding=UTF-8&serverTimezone=Asia/Shanghai
store.db.user=root
store.db.password=cb19980702
store.db.minConn=5
store.db.maxConn=30
store.db.globalTable=global_table
store.db.branchTable=branch_table
store.db.queryLimit=100
store.db.lockTable=lock_table

store.lock.mode=file
store.session.mode=file
store.publicKey=123
server.recovery.committingRetryPeriod=1000
server.recovery.asynCommittingRetryPeriod=1000
server.recovery.rollbackingRetryPeriod=1000
server.recovery.timeoutRetryPeriod=1000
server.maxCommitRetryTimeout=-1
server.maxRollbackRetryTimeout=-1
server.rollbackRetryTimeoutUnlockEnable=false
server.distributedLockExpireTime=10000
client.undo.dataValidation=true
client.undo.logSerialization=jackson
client.undo.onlyCareUpdateColumns=true
server.undo.logSaveDays=7
server.undo.logDeletePeriod=86400000
client.undo.logTable=undo_log
client.undo.compress.enable=true
client.undo.compress.type=zip
client.undo.compress.threshold=64k
log.exceptionRate=100
transport.serialization=seata
transport.compressor=none
metrics.enabled=false
metrics.registryType=compact
metrics.exporterList=prometheus
metrics.exporterPrometheusPort=9898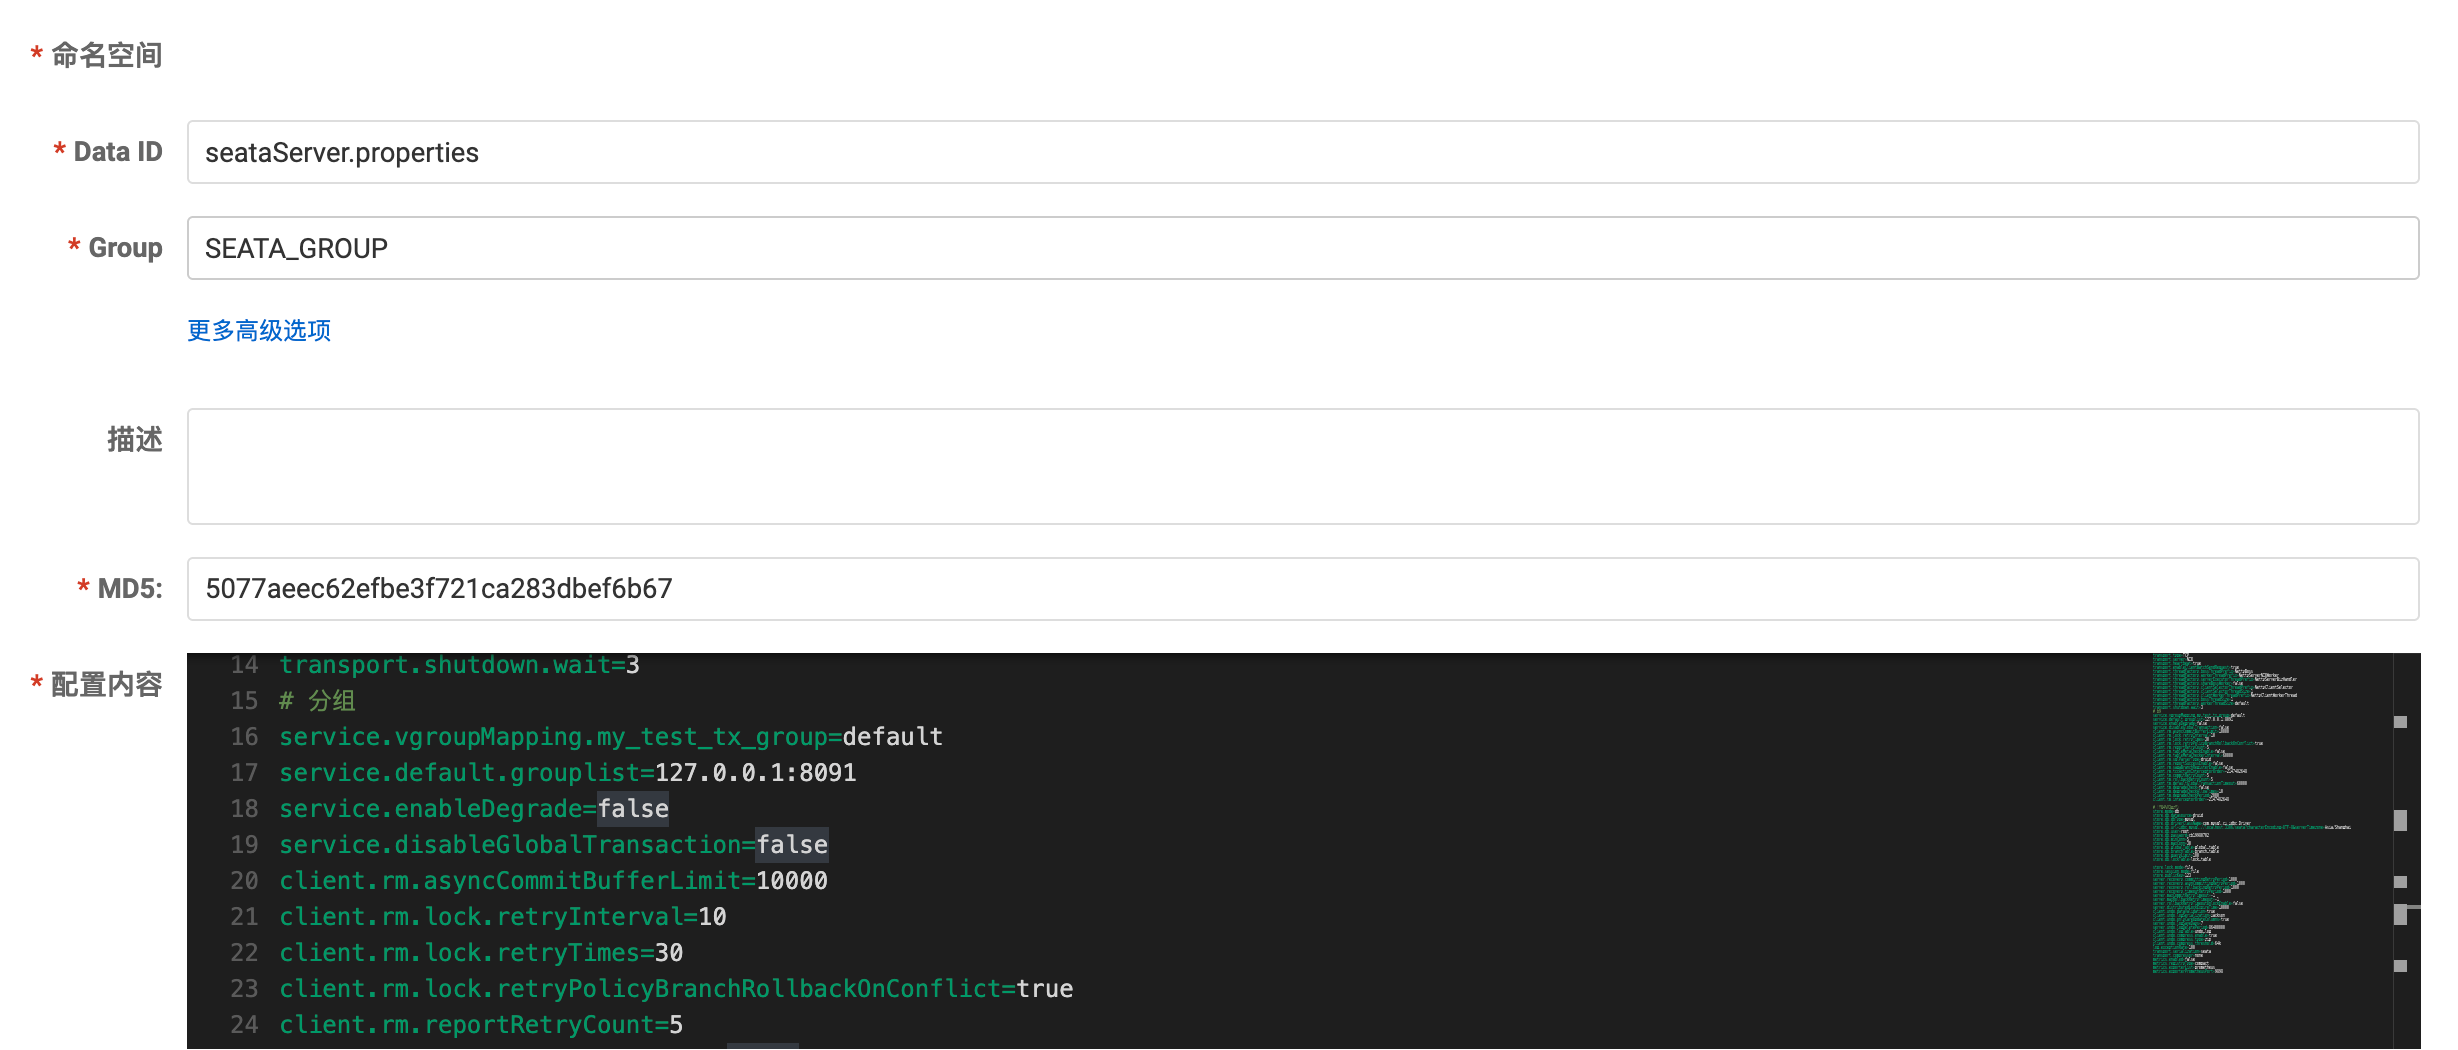
2.创建【common.yml】 - 【SEATA_GROUP】的事务分组配置
java
seata:
  tx-service-group: my_test_tx_group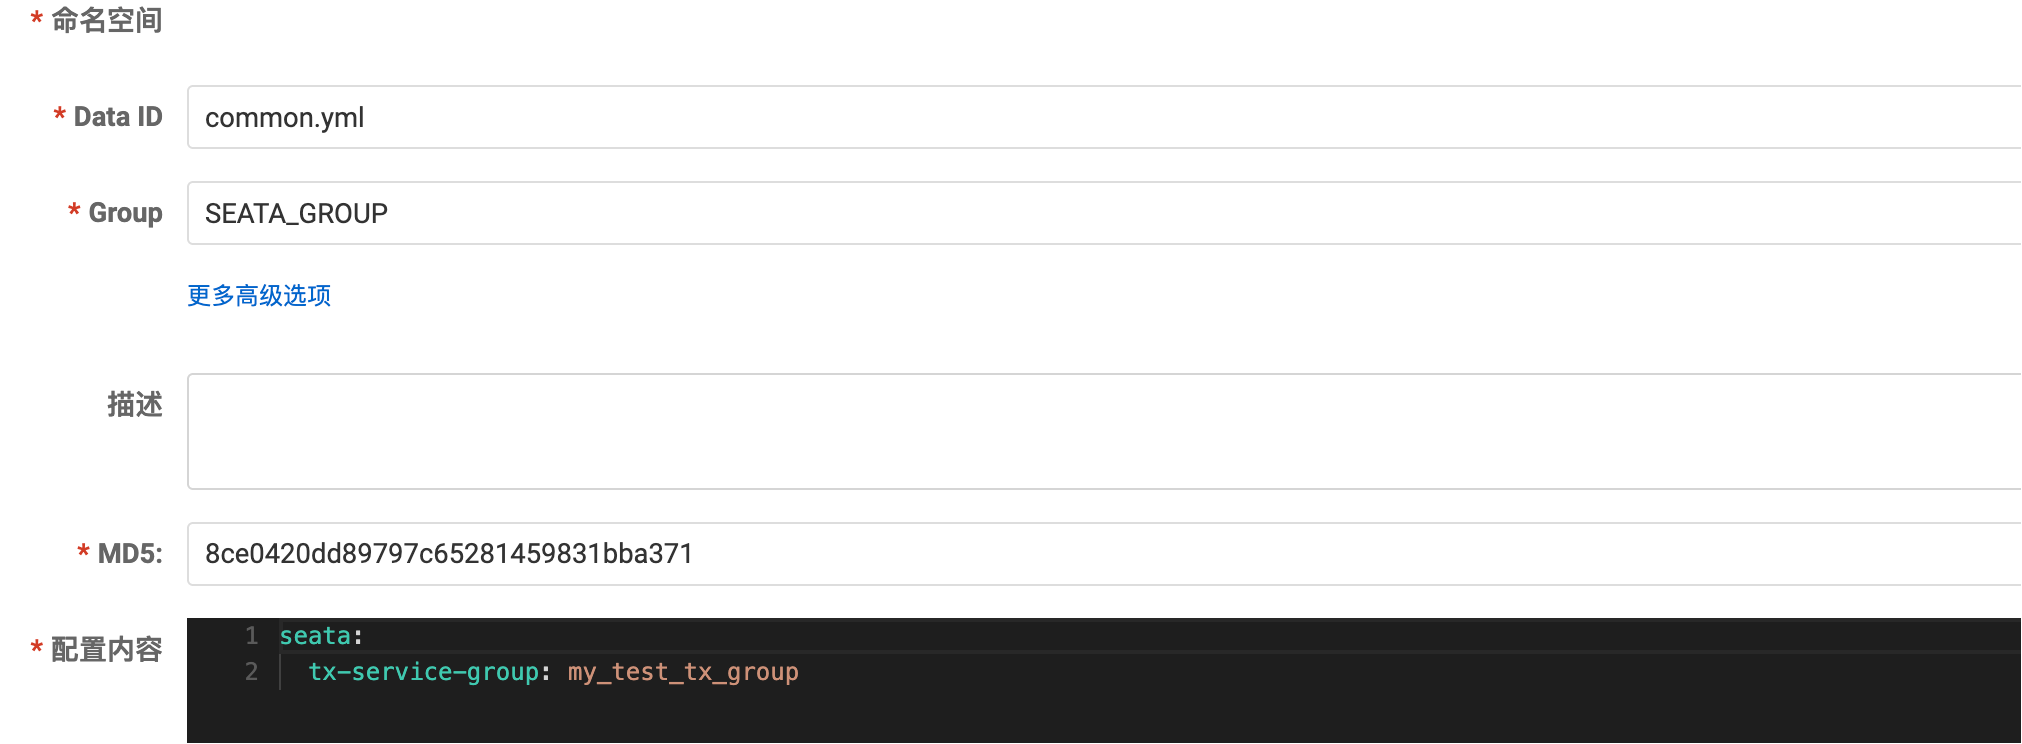
二、数据库建表(步骤一中的指定库名下建)
-- -------------------------------- The script used when storeMode is 'db' --------------------------------
-- the table to store GlobalSession data
CREATE TABLE IF NOT EXISTS `global_table`
(
`xid` VARCHAR(128) NOT NULL,
`transaction_id` BIGINT,
`status` TINYINT NOT NULL,
`application_id` VARCHAR(32),
`transaction_service_group` VARCHAR(32),
`transaction_name` VARCHAR(128),
`timeout` INT,
`begin_time` BIGINT,
`application_data` VARCHAR(2000),
`gmt_create` DATETIME,
`gmt_modified` DATETIME,
PRIMARY KEY (`xid`),
KEY `idx_gmt_modified_status` (`gmt_modified`, `status`),
KEY `idx_transaction_id` (`transaction_id`)
) ENGINE = InnoDB
DEFAULT CHARSET = utf8;
-- the table to store BranchSession data
CREATE TABLE IF NOT EXISTS `branch_table`
(
`branch_id` BIGINT NOT NULL,
`xid` VARCHAR(128) NOT NULL,
`transaction_id` BIGINT,
`resource_group_id` VARCHAR(32),
`resource_id` VARCHAR(256),
`branch_type` VARCHAR(8),
`status` TINYINT,
`client_id` VARCHAR(64),
`application_data` VARCHAR(2000),
`gmt_create` DATETIME(6),
`gmt_modified` DATETIME(6),
PRIMARY KEY (`branch_id`),
KEY `idx_xid` (`xid`)
) ENGINE = InnoDB
DEFAULT CHARSET = utf8;
-- the table to store lock data
CREATE TABLE IF NOT EXISTS `lock_table`
(
`row_key` VARCHAR(128) NOT NULL,
`xid` VARCHAR(96),
`transaction_id` BIGINT,
`branch_id` BIGINT NOT NULL,
`resource_id` VARCHAR(256),
`table_name` VARCHAR(32),
`pk` VARCHAR(36),
`gmt_create` DATETIME,
`gmt_modified` DATETIME,
PRIMARY KEY (`row_key`),
KEY `idx_branch_id` (`branch_id`)
) ENGINE = InnoDB
DEFAULT CHARSET = utf8;
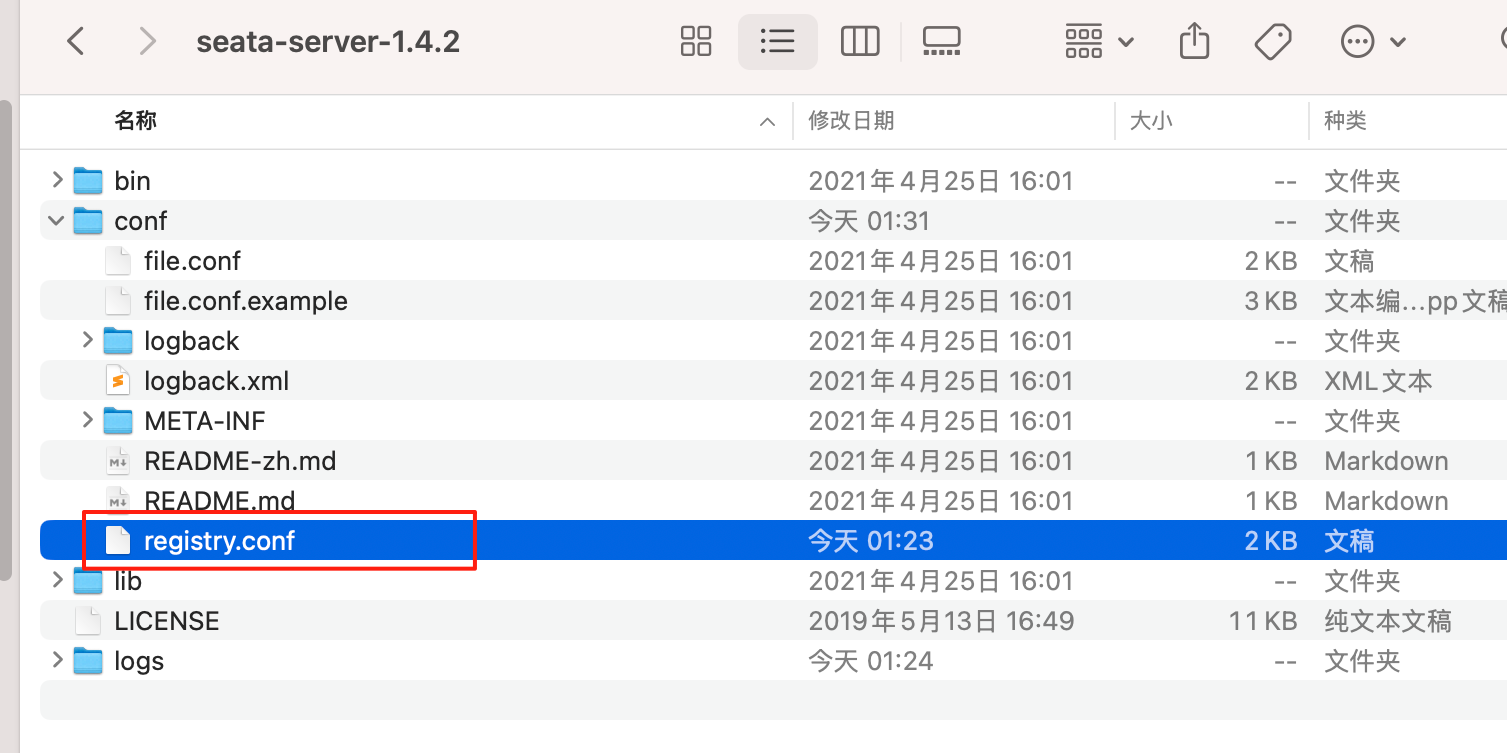
三、下载并启动Seata
1.下载
建议JDK1.8的宝子们 直接下载1.4.2或者以下的版本,以上的版本大多支持更高的JDK版本,导致启动成功后闪退。本人因为版本问题从Seata2.5.0版本一直试到1.4.2,搞了一下午才启动起来........
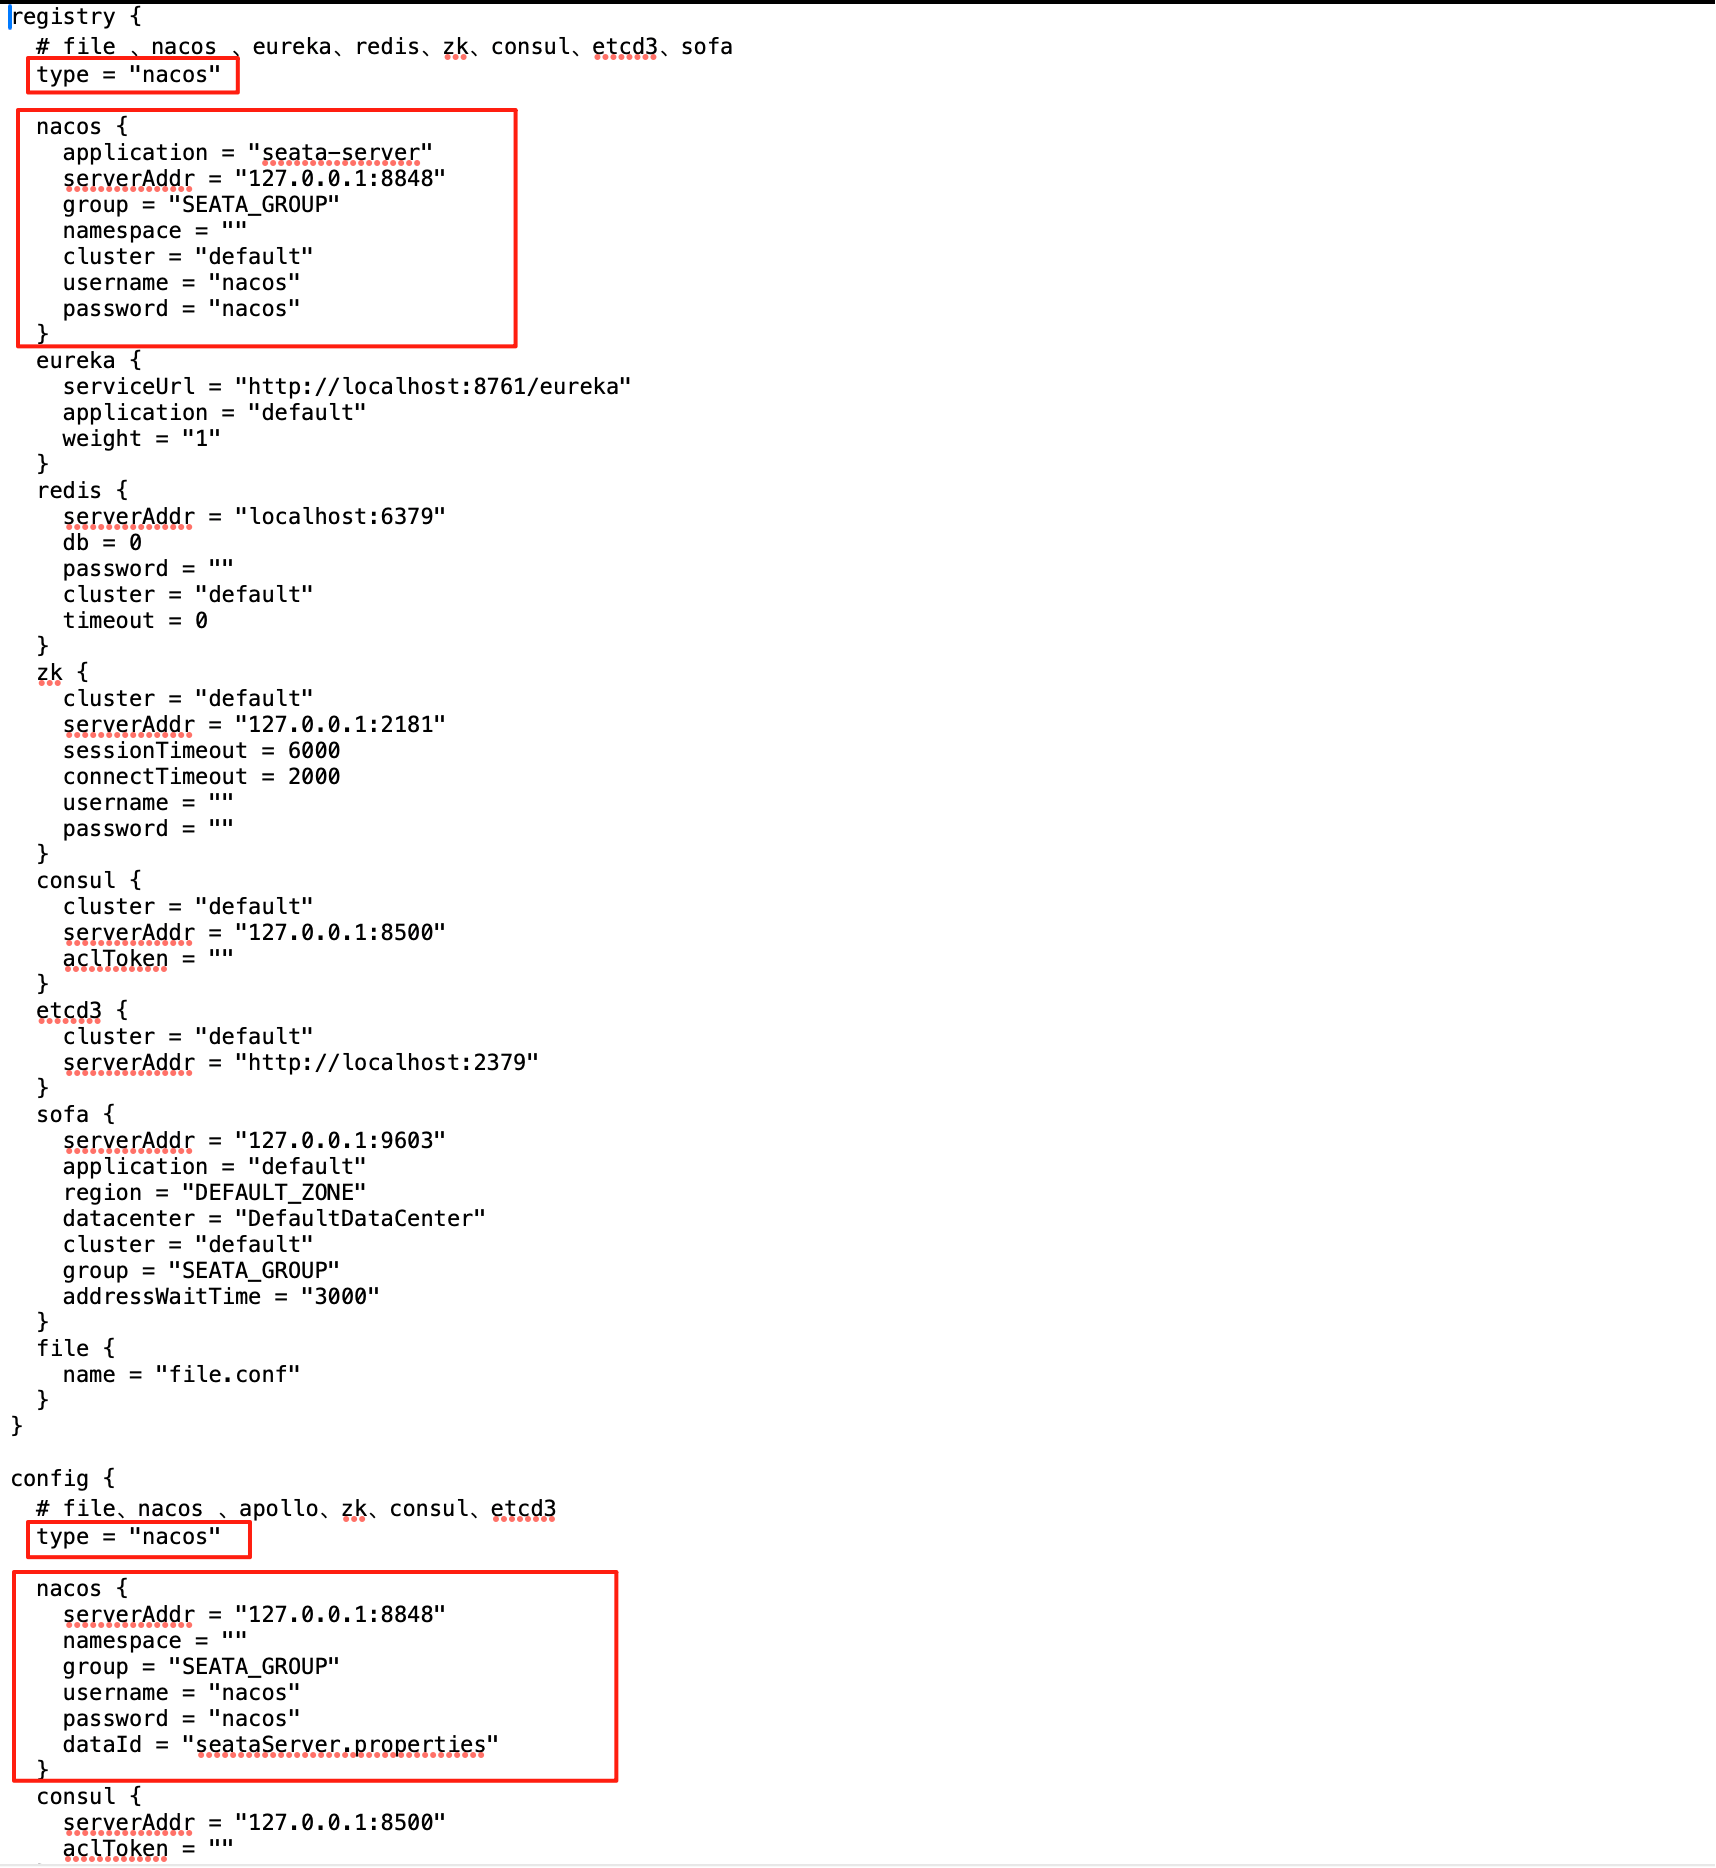
2.修改配置(注册中心和配置中心均设立为nacos方式)
3.启动(bin目录下)
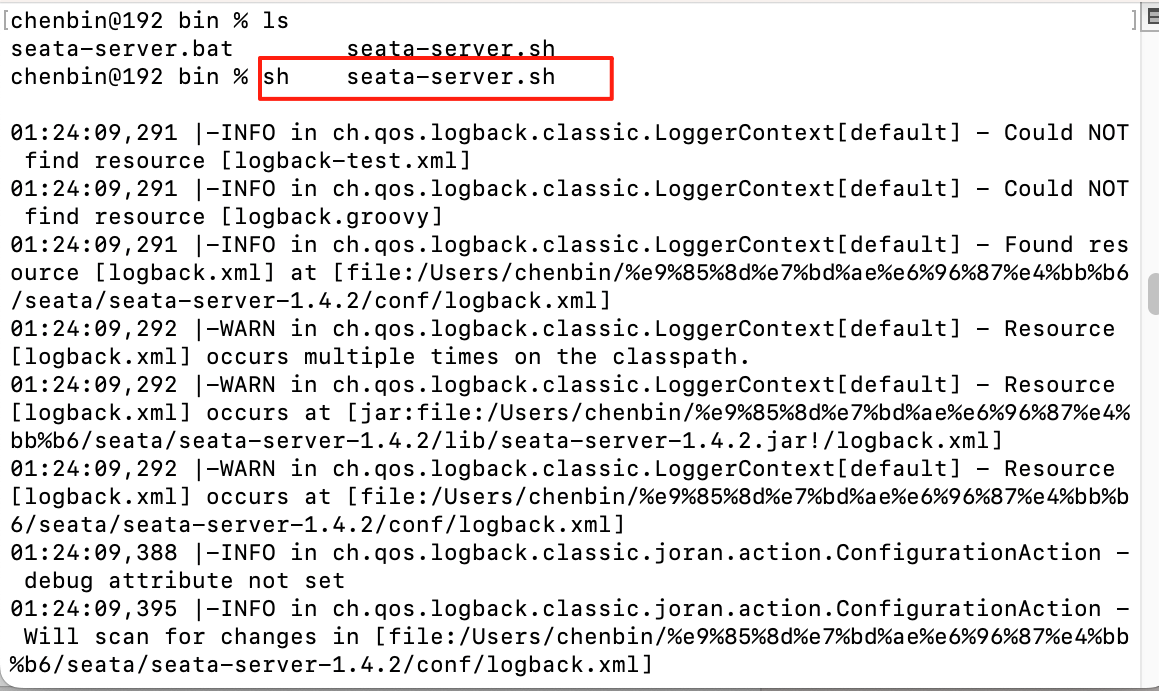
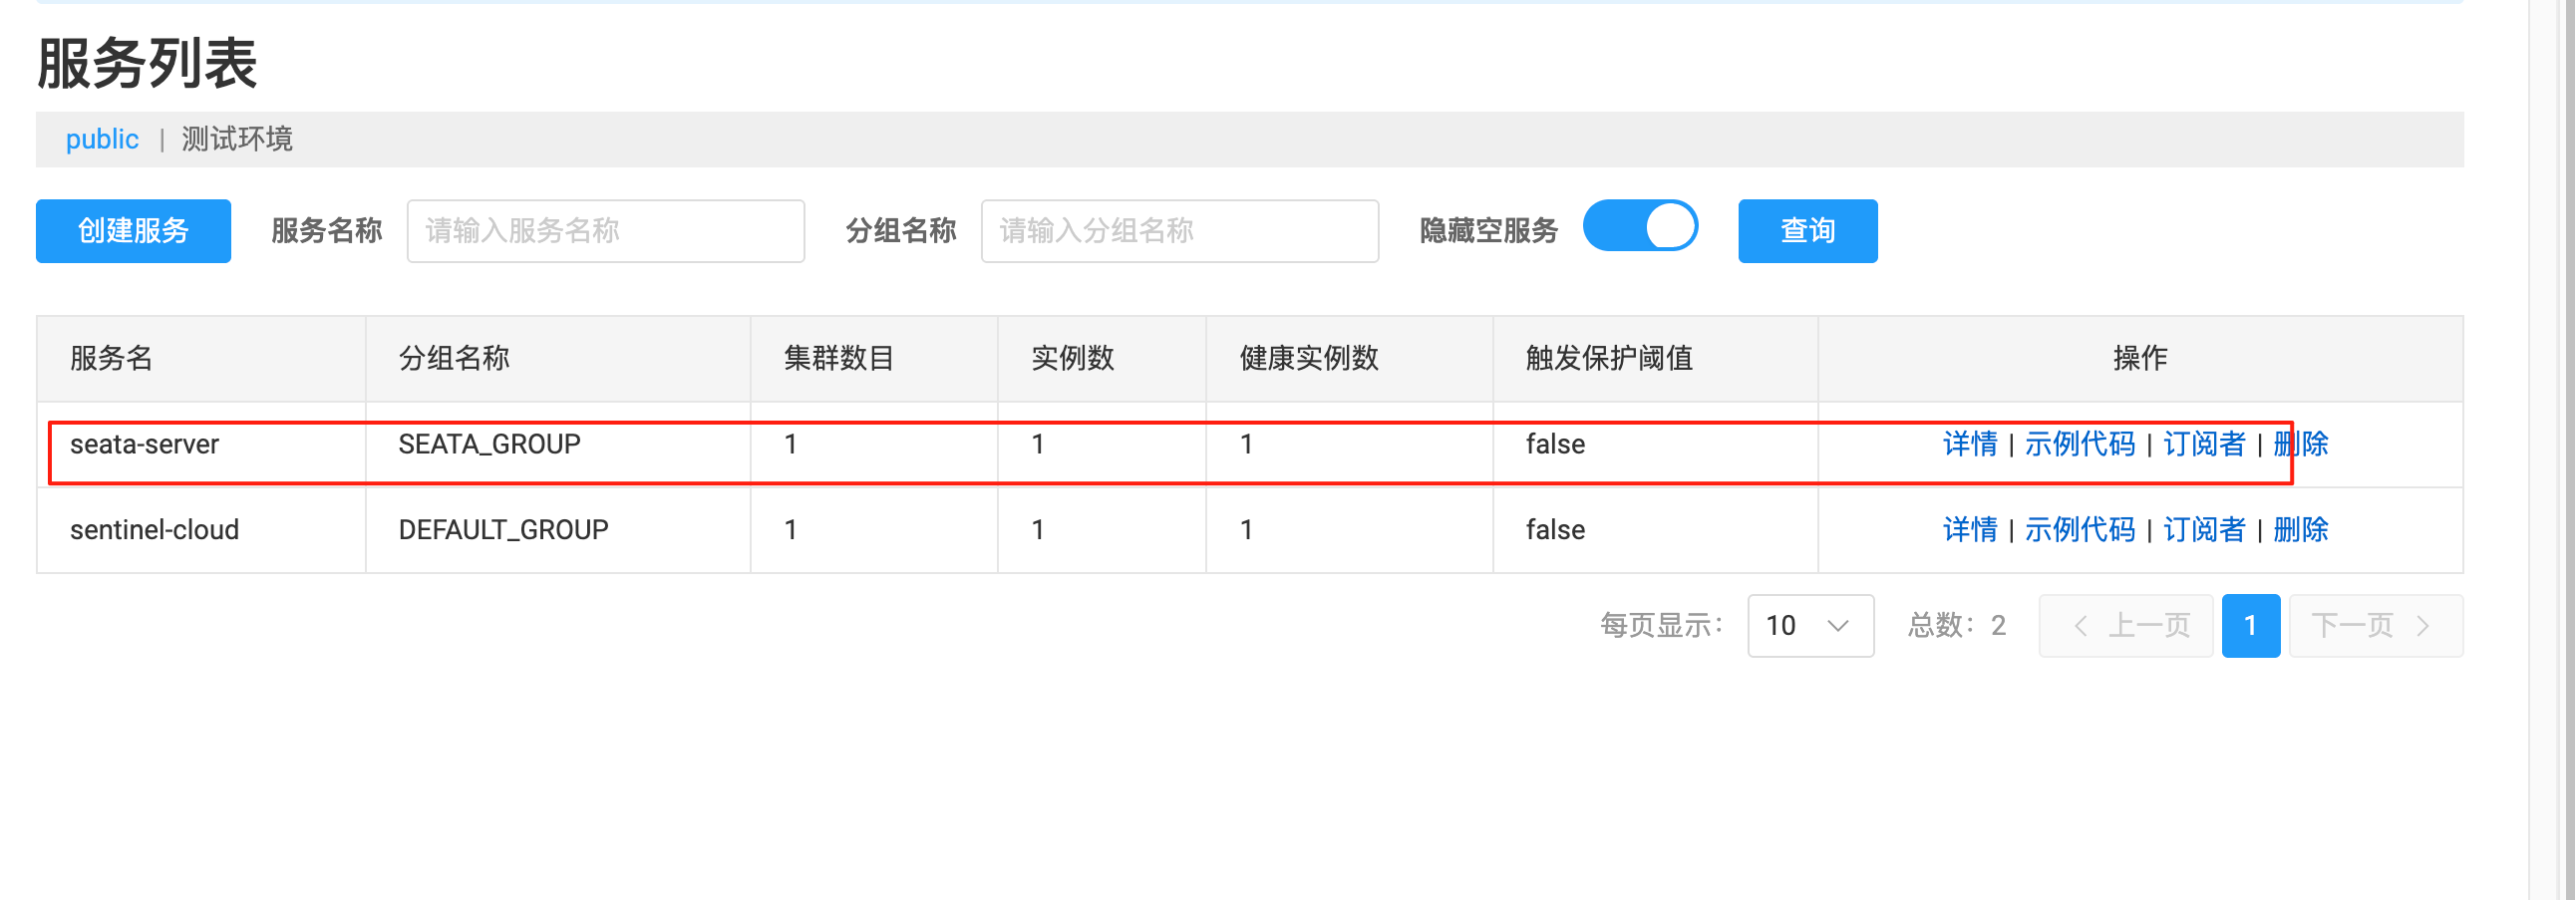
4.检查(是否注册成功)
四、项目实用
1.引入依赖
java
<!--Seata依赖-->
<dependency>
    <groupId>com.alibaba.cloud</groupId>
    <artifactId>spring-cloud-starter-alibaba-seata</artifactId>
    <exclusions>
        <exclusion>
            <groupId>io.seata</groupId>
            <artifactId>seata-spring-boot-starter</artifactId>
        </exclusion>
    </exclusions>
</dependency>
<dependency>
    <groupId>io.seata</groupId>
    <artifactId>seata-spring-boot-starter</artifactId>
    <version>1.4.2</version>
</dependency>
2.引入配置
java
package com.atguigu.config;
import com.alibaba.druid.pool.DruidDataSource;
import io.seata.rm.datasource.DataSourceProxy;
import org.apache.ibatis.session.SqlSessionFactory;
import org.mybatis.spring.SqlSessionFactoryBean;
import org.springframework.boot.context.properties.ConfigurationProperties;
import org.springframework.context.annotation.Bean;
import org.springframework.context.annotation.Configuration;
import javax.sql.DataSource;
@Configuration
public class DataSourceProxyConfig {
    /**
     * 普通数据源
     * @return
     */
    @Bean
    @ConfigurationProperties(prefix = "spring.datasource")
    public DataSource dataSource() {
        return new DruidDataSource();
    }
    /**
     * 代理数据源绑定DataSourceProxy ---> undo_log的操作
     * @param dataSource
     * @return
     */
    @Bean
    public DataSourceProxy dataSourceProxy(DataSource dataSource) {
        return new DataSourceProxy(dataSource);
    }
    /**
     * mybatis--->手动指定sqlSessionFactory所使用的代理数据源
     * @param dataSourceProxy
     * @return
     * @throws Exception
     */
    @Bean
    public SqlSessionFactory sqlSessionFactoryBean(DataSourceProxy dataSourceProxy) throws Exception {
        SqlSessionFactoryBean sqlSessionFactoryBean = new SqlSessionFactoryBean();
        // 换成代理数据源
        sqlSessionFactoryBean.setDataSource(dataSourceProxy);
        return sqlSessionFactoryBean.getObject();
    }
}
3.入口添加全局事务注解
@GlobalTransactional【业务入口添加全局事务即可,后续业务分层使用数据库本地事务即可】
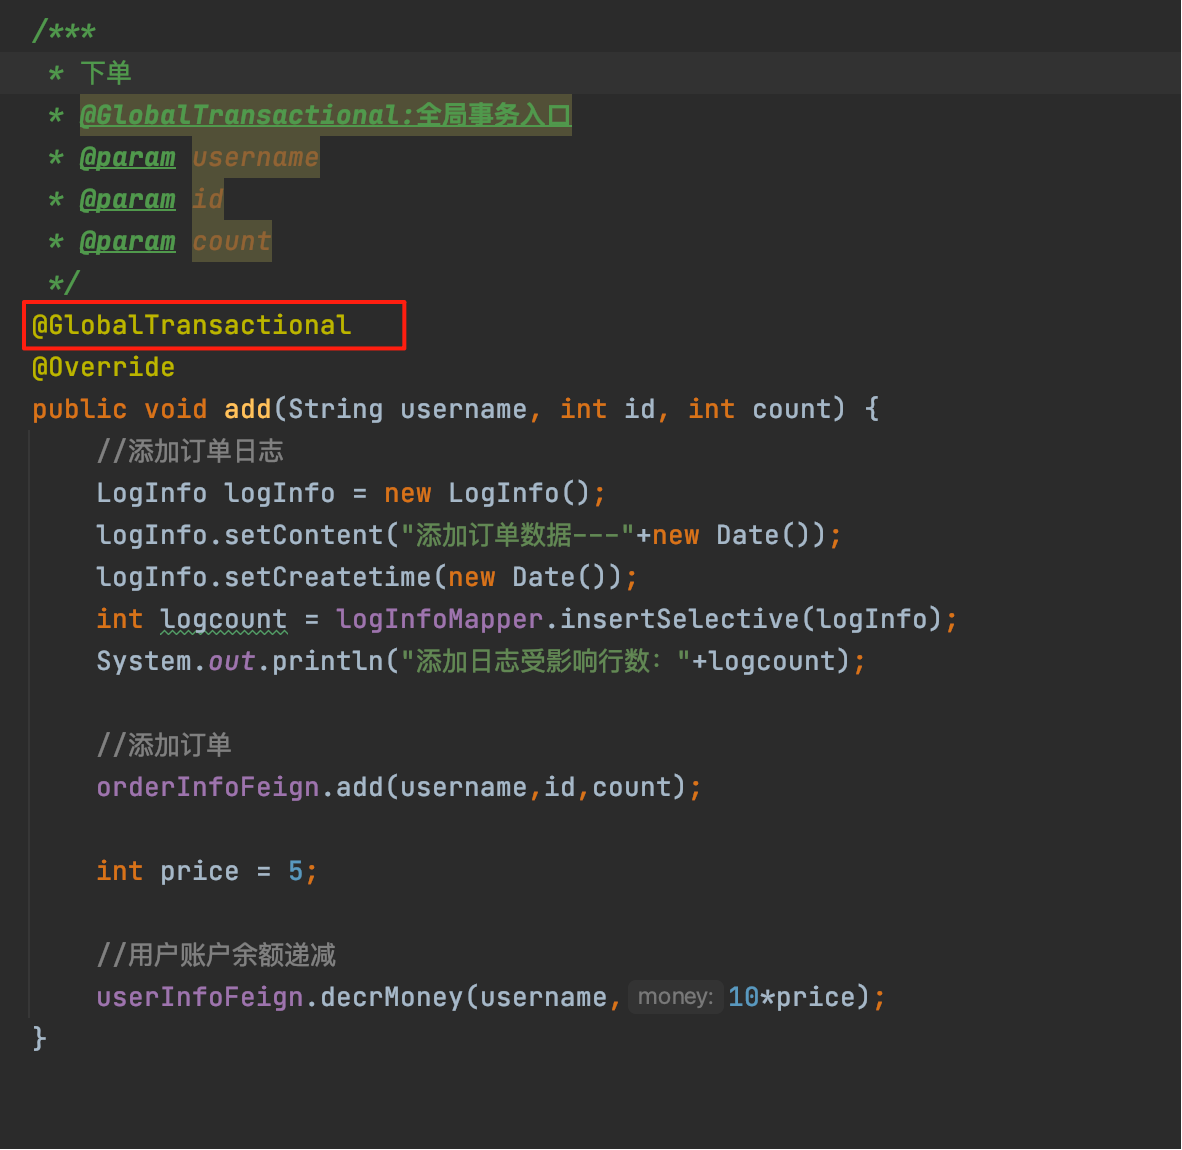
五、原理分析
其包含TC/TM/RM三大组件,工作流程分为二阶段(加载阶段+提交/回滚阶段)
1.流程:
1.TM向TC注册全局事务,并生成一个全局唯一的 XID
2.RM向TC注册分支事务,并向TC汇报资源准备状态
3.TM结束分布式事务,通知TC提交/回滚分布式事务,事务一阶段结束。
4.TC汇总事务信息,决定分布式事务是提交/回滚
5.TC通知所有RM提交/回滚资源,事务二阶段结束。
2.二阶段:
一阶段(加载):
1.解析SQL并找到要更新的业务数据,在业务数据被更新前,将其保存成"before image"【前置镜像】
2.执行sql,更新业务数据
3.将更新后的保存为"after image"【后置镜像】,最后生成行锁。确保原子性
二阶段(提交/回滚):
提交:删除before image、after image、行锁即可
回滚:
1.使用after image和数据库数据比对,避免脏读,如果发生脏读则需要人工处理
2.使用undo Log逆向sql还原数据
3.将还原结果和before image比对
4.删除before image、after image、行锁