
🌷 古之立大事者,不惟有超世之才,亦必有坚忍不拔之志
🎐 个人CSND主页------Micro麦可乐的博客
🐥《Docker实操教程》专栏以最新的Centos版本为基础进行Docker实操教程,入门到实战
🌺《RabbitMQ》专栏19年编写主要介绍使用JAVA开发RabbitMQ的系列教程,从基础知识到项目实战
🌸《设计模式》专栏以实际的生活场景为案例进行讲解,让大家对设计模式有一个更清晰的理解
🌛《开源项目》本专栏主要介绍目前热门的开源项目,带大家快速了解并轻松上手使用
✨《开发技巧》本专栏包含了各种系统的设计原理以及注意事项,并分享一些日常开发的功能小技巧
💕《Jenkins实战》专栏主要介绍Jenkins+Docker的实战教程,让你快速掌握项目CI/CD,是2024年最新的实战教程
🌞《Spring Boot》专栏主要介绍我们日常工作项目中经常应用到的功能以及技巧,代码样例完整
🌞《Spring Security》专栏中我们将逐步深入Spring Security的各个技术细节,带你从入门到精通,全面掌握这一安全技术
如果文章能够给大家带来一定的帮助!欢迎关注、评论互动~
最新Spring Security实战教程(十五)快速集成 GitHub 与 Gitee 的社交登录
- [1. 前言](#1. 前言)
- [2. 原理分析](#2. 原理分析)
- [3. 开发准备](#3. 开发准备)
-
- [3.1 初始化项目](#3.1 初始化项目)
- [3.2 注册 GitHub OAuth 应用](#3.2 注册 GitHub OAuth 应用)
- [3.3 注册 Gitee OAuth 应用](#3.3 注册 Gitee OAuth 应用)
- [4. 实战案例](#4. 实战案例)
-
- [4.1 配置 application.yml](#4.1 配置 application.yml)
- [4.2 自定义用户信息处理](#4.2 自定义用户信息处理)
- [4.3 SecurityConfig配置](#4.3 SecurityConfig配置)
- [4.4 控制器与页面](#4.4 控制器与页面)
- [5. 测试验证](#5. 测试验证)
- [6. 常见问题与扩展](#6. 常见问题与扩展)
- [7. 总结](#7. 总结)
回顾链接:
最新Spring Security实战教程(一)初识Spring Security安全框架
最新Spring Security实战教程(二)表单登录定制到处理逻辑的深度改造
最新Spring Security实战教程(三)Spring Security 的底层原理解析
最新Spring Security实战教程(四)基于内存的用户认证
最新Spring Security实战教程(五)基于数据库的动态用户认证传统RBAC角色模型实战开发
最新Spring Security实战教程(六)最新Spring Security实战教程(六)基于数据库的ABAC属性权限模型实战开发
最新Spring Security实战教程(七)方法级安全控制@PreAuthorize注解的灵活运用
最新Spring Security实战教程(八)Remember-Me实现原理 - 持久化令牌与安全存储方案
最新Spring Security实战教程(九)前后端分离认证实战 - JWT+SpringSecurity无缝整合
最新Spring Security实战教程(十)权限表达式进阶 - 在SpEL在安全控制中的高阶魔法
最新Spring Security实战教程(十一)CSRF攻防实战 - 从原理到防护的最佳实践
最新Spring Security实战教程(十二)CORS安全配置 - 跨域请求的安全边界设定
最新Spring Security实战教程(十三)会话管理机制 - 并发控制与会话固定攻击防护
最新Spring Security实战教程(十四)OAuth2.0精讲 - 四种授权模式与资源服务器搭建
专栏更新完毕后,博主将会上传所有章节代码到CSDN资源免费给大家下载,如你不想等后续章节代码需提前获取,可以私信或留言!
1. 前言
在微服务与前后端分离架构中,第三方社交登录已成为提升用户体验的重要功能。社交登录可以有效降低用户注册成本,同时利用第三方平台的账号体系,实现快速认证与信息获取。Spring Security 6 作为 Java 生态中的安全框架,通过 OAuth2 协议简化了第三方认证的集成流程。
本章节博主将通过完整代码案例,讲解如何基于 Spring Security 6 实现 GitHub 和 Gitee 的社交登录功能。
2. 原理分析
回顾一下我们上一个章节,OAuth 2.0 授权码流程 【最新Spring Security实战教程(十四)OAuth2.0精讲 - 四种授权模式与资源服务器搭建】

其主要包括:
- 跳转授权 :客户端(我们的网站)将用户重定向至第三方授权服务器的授权端点,携带
client_id、redirect_uri、scope等参数 - 用户登录并同意:用户在第三方平台完成登录后,同意授权给客户端指定权限
- 回调获取授权码 :授权服务器重定向回客户端注册的
redirect_uri,并在查询参数中附带code - 交换令牌 :客户端后端使用
code、client_secret等向授权服务器的令牌端点发起POST请求,获取access_token - 获取用户信息 :客户端携带
access_token调用用户信息端点,解析并登录或注册用户
3. 开发准备
3.1 初始化项目
还是继续基于我们之前的项目构建子项目 social-login-spring-security, pom文件引入项目依赖
xml
<dependencies>
        <dependency>
            <groupId>org.springframework.boot</groupId>
            <artifactId>spring-boot-starter-oauth2-client</artifactId>
        </dependency>
    </dependencies>
GitHub/Gitee 开发者账号:用于注册 OAuth 应用。
3.2 注册 GitHub OAuth 应用
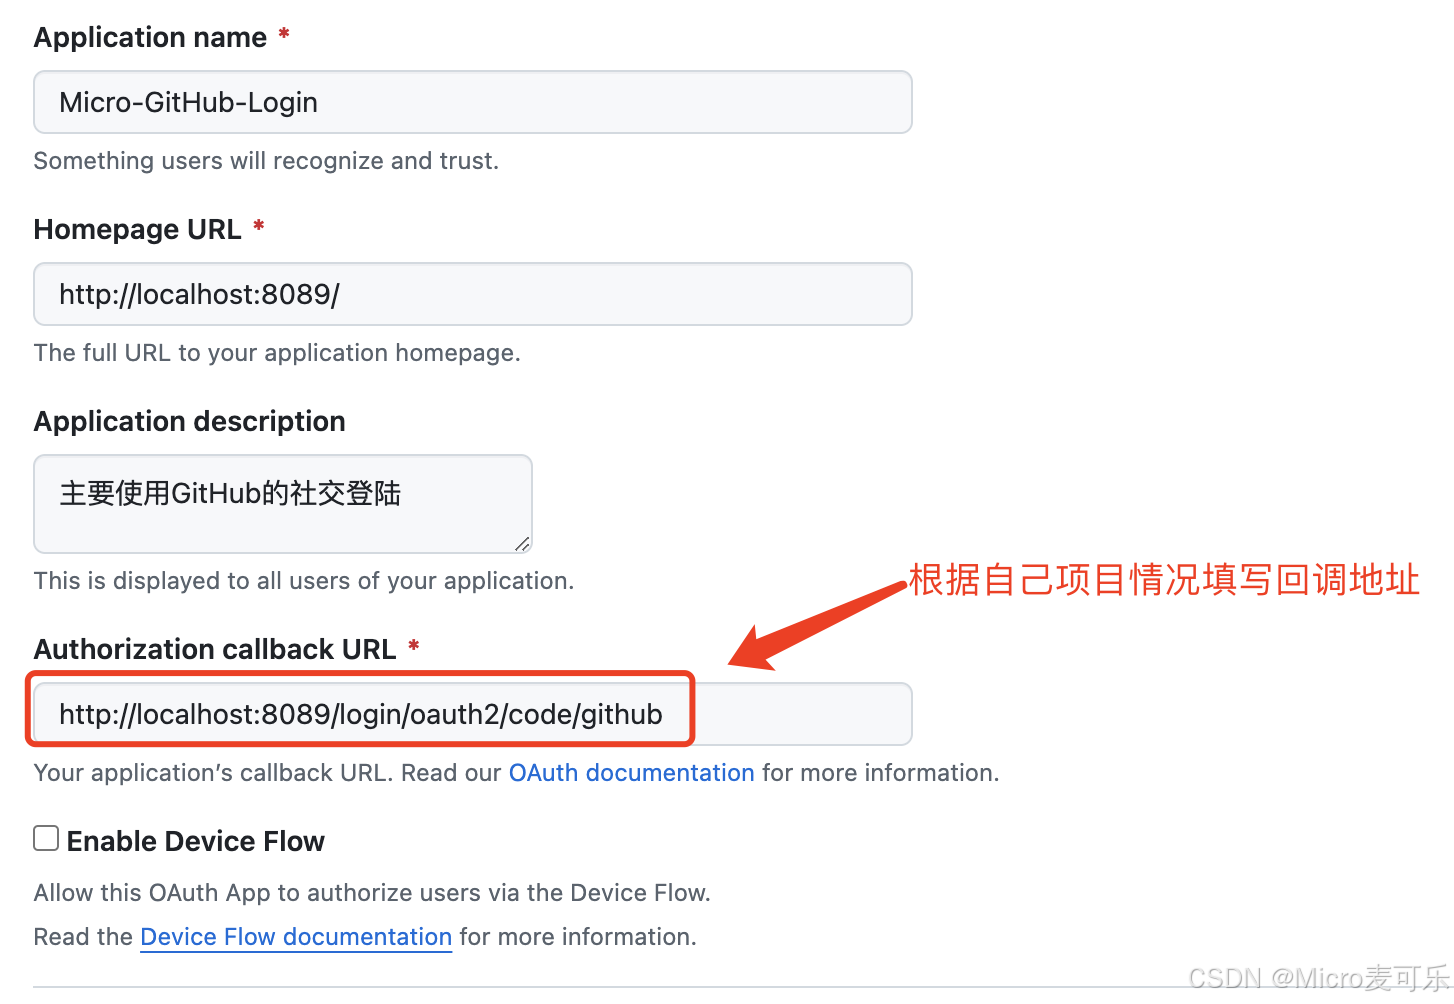
访问 GitHub 设置 → Developer settings → OAuth Apps → New OAuth App,填写应用名、主页 URL、授权回调 URL
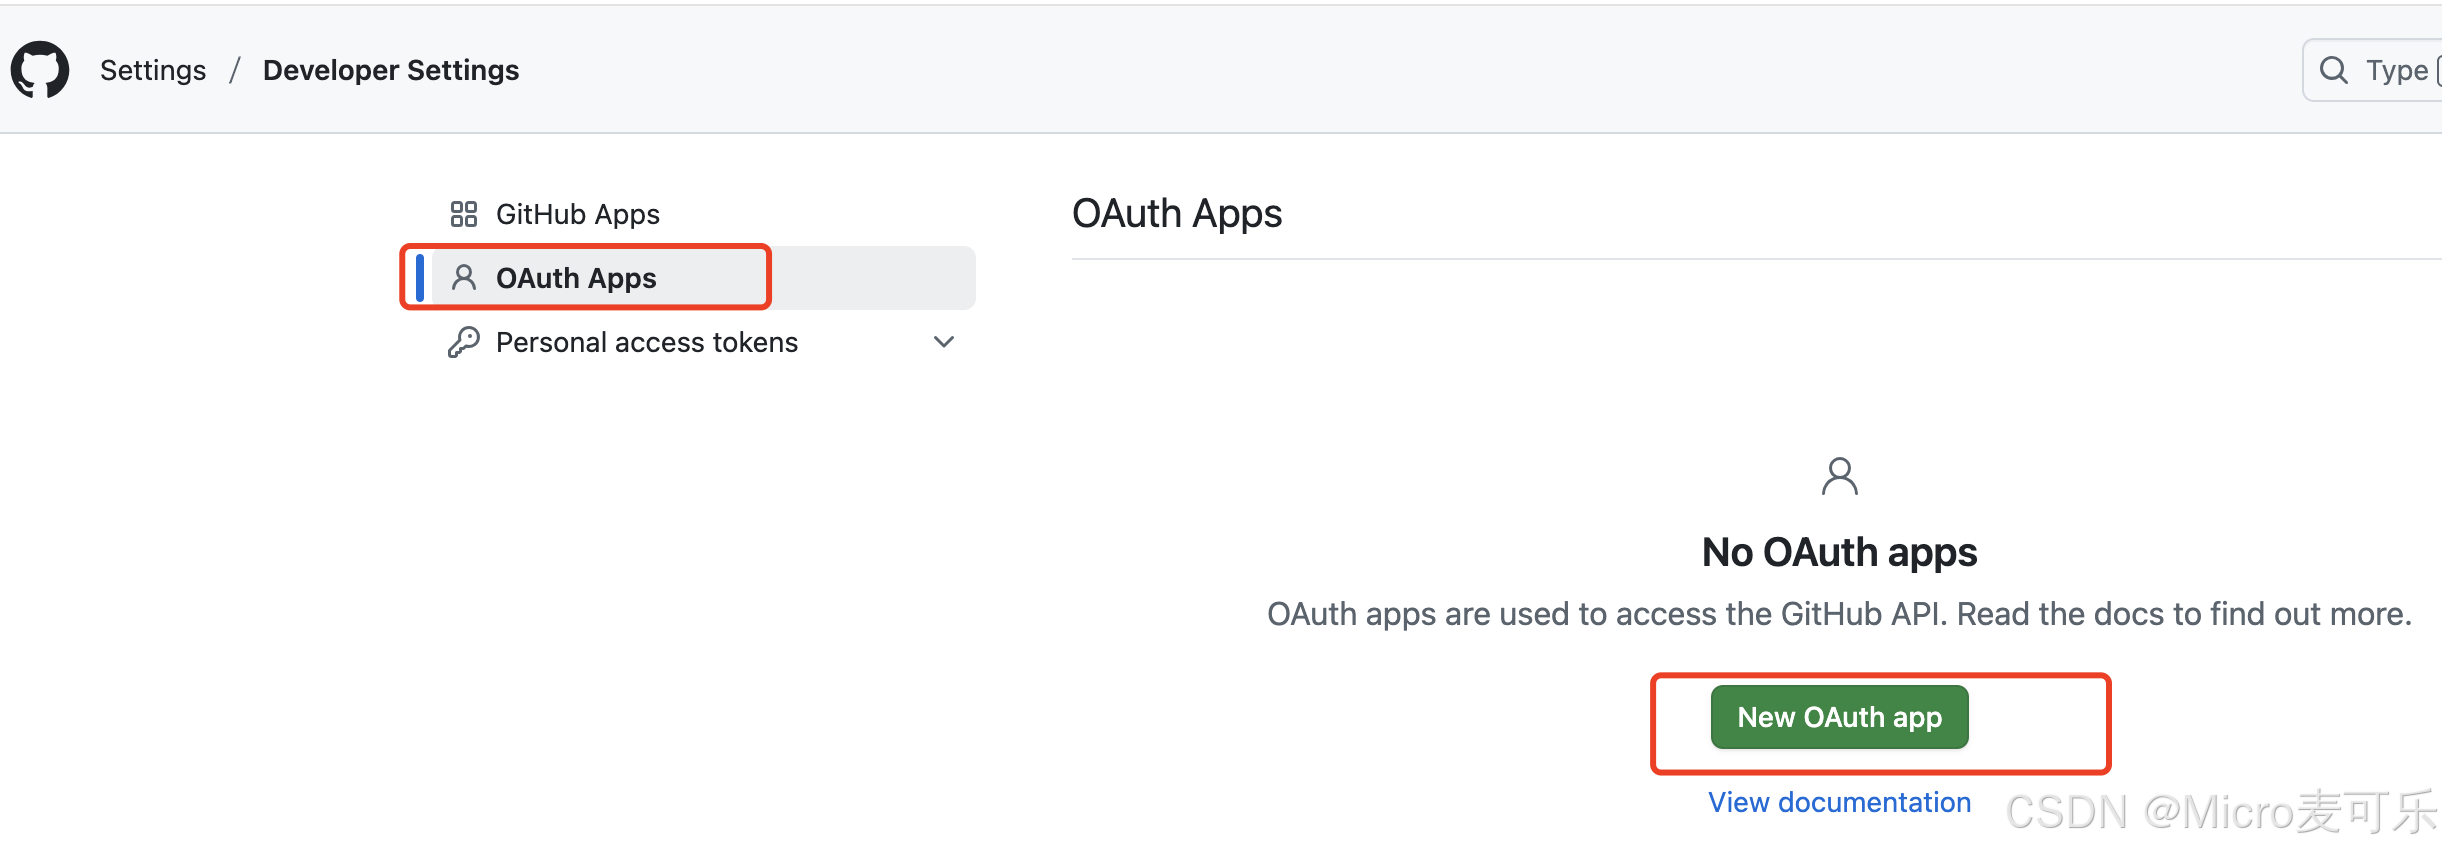
填写应用信息:默认的重定向URI模板为{baseUrl}/login/oauth2/code/{registrationId}。registrationId是ClientRegistration的唯一标识符。
如Github固定写法则为:{baseUrl}//login/oauth2/code/github
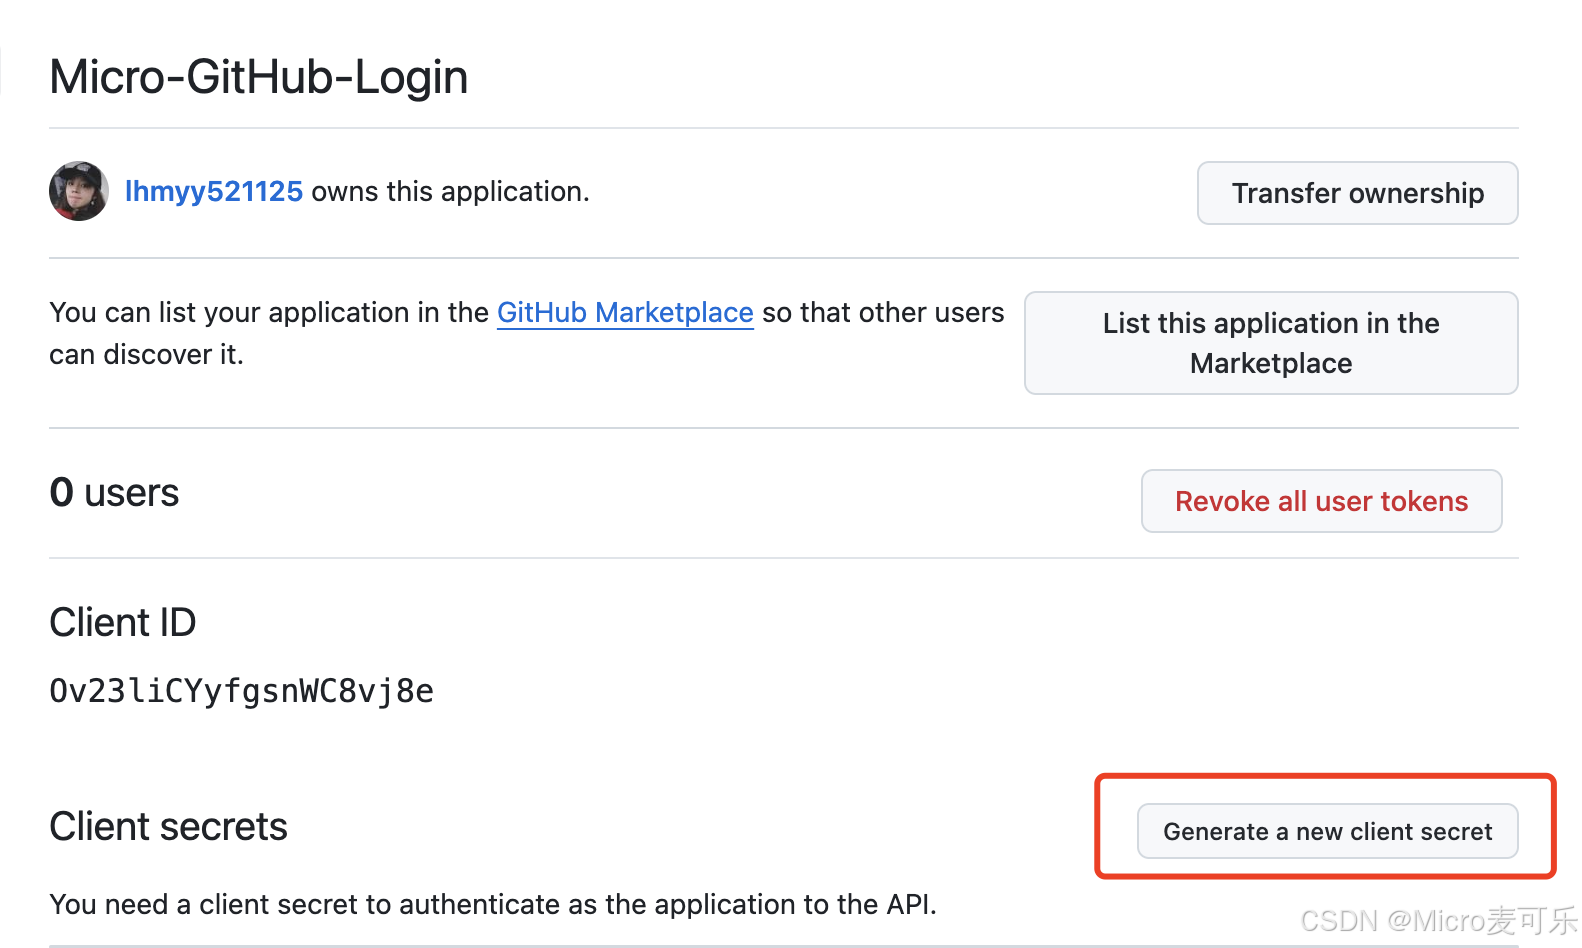
获取应用程序id,生成应用程序密钥:保存好生成的 Client ID 与 Client Secret。
3.3 注册 Gitee OAuth 应用
登陆Gitee 访问 Gitee应用管理,创建新应用

提交创建应用会得到 Client ID 和 Client Secret
4. 实战案例
完成了上述的准备,我们开始来对我们的项目进行配置
4.1 配置 application.yml
yaml
#最新Spring Security实战教程(十五)快速集成 GitHub 与 Gitee 的社交登录
spring:
  application:
    name: social-login-spring-security
  security:
    oauth2:
      client:
        registration:
          github:
            client-id: YOUR_CLIENT_ID
            client-secret: YOUR_CLIENT_SECRET
            scope: user:email
            redirect-uri: "{baseUrl}/login/oauth2/code/{registrationId}"
            authorization-grant-type: authorization_code
            client-name: github
          gitee:
            client-id: YOUR_CLIENT_ID
            client-secret: YOUR_CLIENT_SECRET
            scope: user_info
            client-name: Gitee
            authorization-grant-type: authorization_code
            redirect-uri: "{baseUrl}/login/oauth2/code/{registrationId}"
            provider: gitee
        provider:
          gitee:
            authorization-uri: https://gitee.com/oauth/authorize
            token-uri: https://gitee.com/oauth/token
            user-info-uri: https://gitee.com/api/v5/user
            user-name-attribute: name
server:
  port: 8089
4.2 自定义用户信息处理
GitHub 和 Gitee 返回的用户数据结构不同,需统一处理:
java
public class CustomOAuth2UserService implements OAuth2UserService<OAuth2UserRequest, OAuth2User> {

    @Override
    public OAuth2User loadUser(OAuth2UserRequest userRequest) throws OAuth2AuthenticationException {
        DefaultOAuth2UserService delegate = new DefaultOAuth2UserService();
        OAuth2User oAuth2User = delegate.loadUser(userRequest);

        String registrationId = userRequest.getClientRegistration().getRegistrationId();
        Map<String, Object> attributes = oAuth2User.getAttributes();

        // 根据平台解析用户信息
        if ("github".equals(registrationId)) {
            return new DefaultOAuth2User(
                oAuth2User.getAuthorities(),
                attributes,
                "login"  // GitHub 的用户名字段
            );
        } else if ("gitee".equals(registrationId)) {
            return new DefaultOAuth2User(
                oAuth2User.getAuthorities(),
                attributes,
                "name"  // Gitee 的用户名字段
            );
        }
        throw new OAuth2AuthenticationException("Unsupported platform");
    }
}
4.3 SecurityConfig配置
java
@Configuration
@EnableWebSecurity
public class SecurityConfig {

    @Bean
    public SecurityFilterChain securityFilterChain(HttpSecurity http) throws Exception {
        http
                .authorizeHttpRequests(authorize -> authorize
                        .requestMatchers("/", "/public/**").permitAll()
                        .anyRequest().authenticated()
                )
                .oauth2Login(oauth2 -> oauth2
                        .userInfoEndpoint(userInfo -> userInfo
                                .userService(customOAuth2UserService())
                        )
                )
                .csrf(AbstractHttpConfigurer::disable);
        return http.build();
    }

    @Bean
    public OAuth2UserService<OAuth2UserRequest, OAuth2User> customOAuth2UserService() {
        return new CustomOAuth2UserService();
    }
}
4.4 控制器与页面
编写自定义的登陆页,授权登陆返回授权的用户信息
java
@Controller
public class IndexController {
    @GetMapping("/")
    public String index(Model model, @RegisteredOAuth2AuthorizedClient OAuth2AuthorizedClient authorizedClient,
                        @AuthenticationPrincipal OAuth2User oauth2User) {
        model.addAttribute("userName", oauth2User.getName());
        model.addAttribute("clientName", authorizedClient.getClientRegistration().getClientName());
        model.addAttribute("userAttributes", oauth2User.getAttributes());
        //TODO 可以增加与项目用户注册、绑定等业务service
        return "index";
    }

    @GetMapping("/user")
    @ResponseBody
    public Map<String, Object> userInfo(OAuth2AuthenticationToken authentication) {
        OAuth2User user = authentication.getPrincipal();
        return Map.of(
                "username", user.getName(),
                "authorities", user.getAuthorities().stream()
                        .map(GrantedAuthority::getAuthority)
                        .collect(Collectors.toList())
        );
    }
}
thymeleaf模版页面
html
<!DOCTYPE html>
<html xmlns="http://www.w3.org/1999/xhtml" xmlns:th="https://www.thymeleaf.org" xmlns:sec="https://www.thymeleaf.org/thymeleaf-extras-springsecurity5">
<head>
<title>Spring Security - OAuth 2.0 Login</title>
<meta charset="utf-8" />
</head>
<body>
<div style="float: right" th:fragment="logout" sec:authorize="isAuthenticated()">
<div style="float:left">
<span style="font-weight:bold">User: </span><span sec:authentication="name"></span>
</div>
<div style="float:none"> </div>
<div style="float:right">
<form action="#" th:action="@{/logout}" method="post">
<input type="submit" value="Logout" />
</form>
</div>
</div>
<h1>OAuth 2.0 Login with Spring Security</h1>
<div>
You are successfully logged in <span style="font-weight:bold" th:text="${userName}"></span>
via the OAuth 2.0 Client <span style="font-weight:bold" th:text="${clientName}"></span>
</div>
<div> </div>
<div>
<span style="font-weight:bold">User Attributes:</span>
<ul>
<li th:each="userAttribute : ${userAttributes}">
<span style="font-weight:bold" th:text="${userAttribute.key}"></span>: <span th:text="${userAttribute.value}"></span>
</li>
</ul>
</div>
</body>
</html>5. 测试验证
- 访问首页:
http://localhost:8089,跳转至Spring Security默认登录页
注:应用回调地址如果天蝎的是 localhost,本地访问项目也保持 localhost 访问,如使用127.0.0.1 会导致回调地址不一致出现回调地址错误的异常
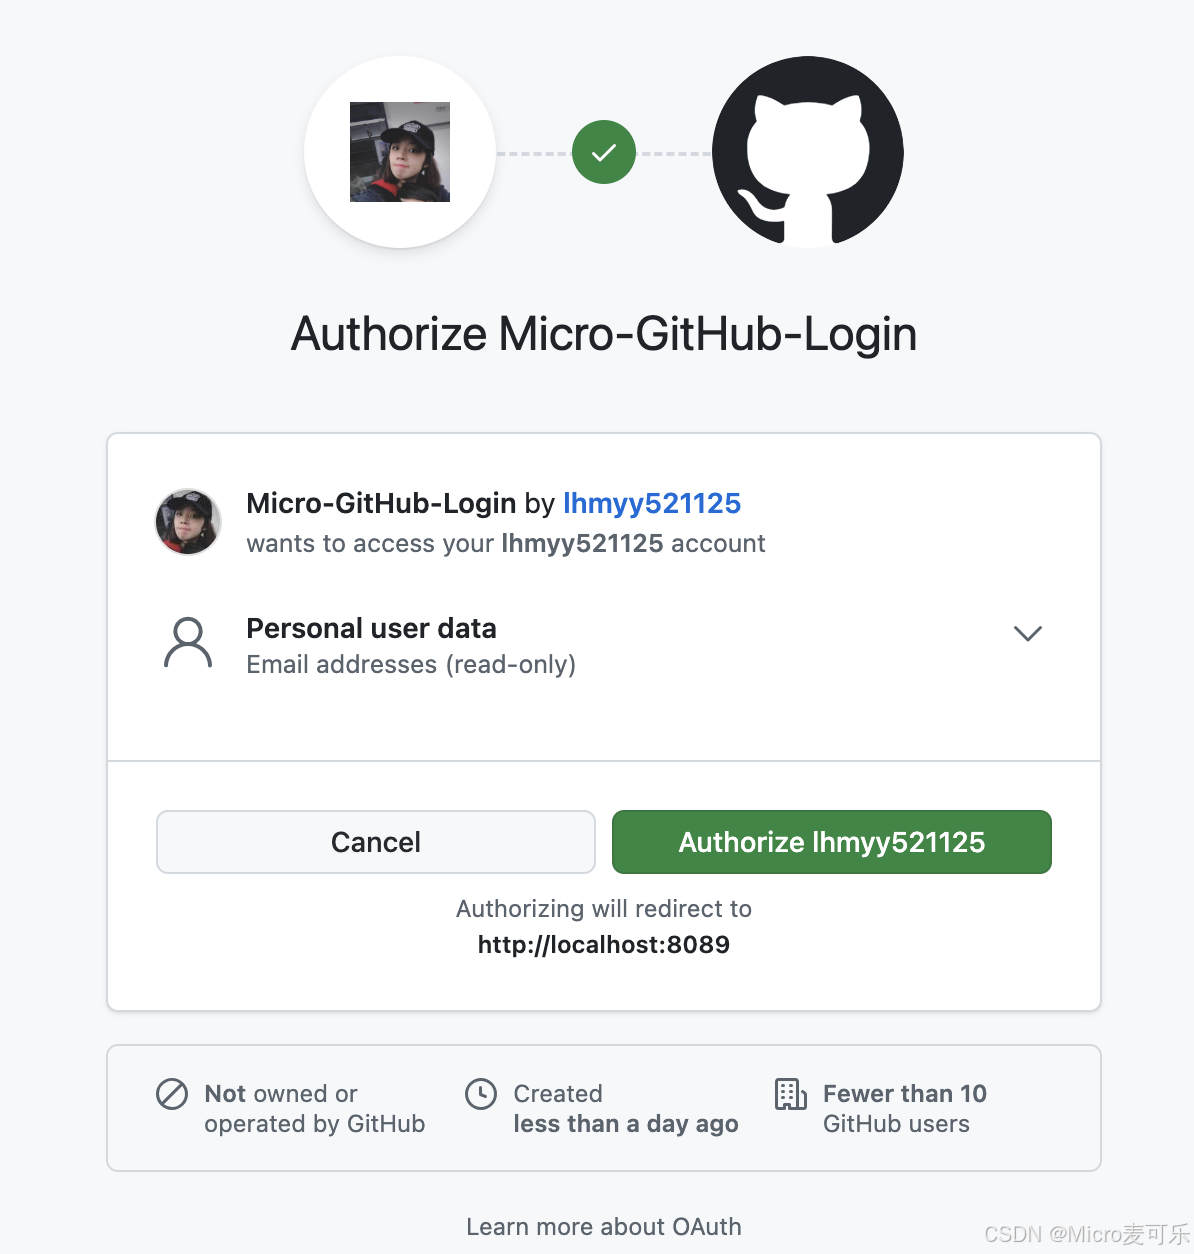
- 选择登录方式:点击
GitHub或Gitee按钮,跳转至对应授权页面
GitHub授权页
Gitee授权页

- 授权登录:同意授权后,自动跳转回应用,显示用户信息
- 访问
http://localhost:8089/user显示经过处理的用户信息
javascript
{
  "authorities": [
    "OAUTH2_USER",
    "SCOPE_user:email"
  ],
  "username": "授权返回的用户名"
}
6. 常见问题与扩展
- 回调地址不匹配:确保
redirect-uri与注册应用时填写的一致 - 跨域问题:前端分离项目需配置
CorsFilter - 用户信息字段缺失:检查
user-info-uri和user-name-attribute配置
7. 总结
通过 Spring Security 6 的 OAuth2 Client 模块,开发者可以快速集成主流社交登录功能。本章节案例以 GitHub 和 Gitee 为例,展示了从应用注册到用户信息处理的完整流程,适用于需要第三方登录的 Web 应用场景。
后续章节博主将继续扩展支持微信、支付宝、QQ、微博等更多平台,进一步提升用户体验。
如果你在实践过程中有任何疑问或更好的扩展思路,欢迎在评论区留言,最后希望大家 一键三连 给博主一点点鼓励!
