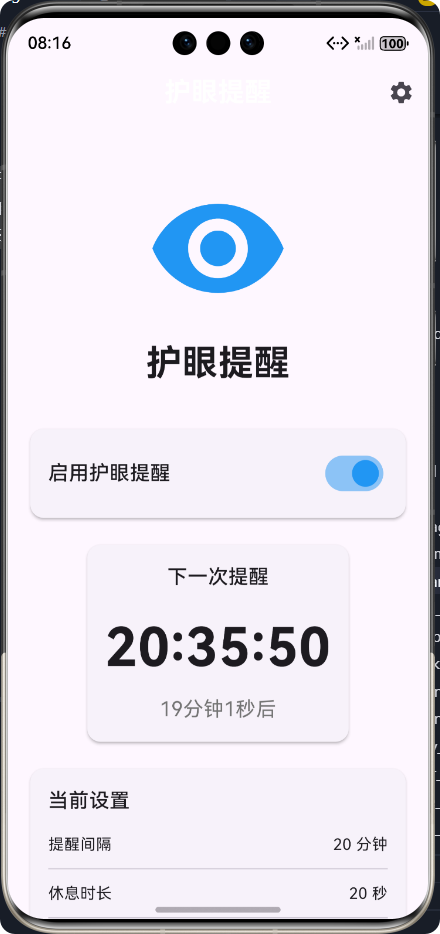
🚀运行效果展示
Flutter框架跨平台鸿蒙开发------护眼提醒APP的开发流程
🌟 前言
随着移动互联网的普及,人们每天面对电子屏幕的时间越来越长,眼睛健康问题日益突出。为了帮助用户养成良好的护眼习惯,我们开发了一款跨平台的护眼提醒APP。本文将详细介绍如何使用Flutter框架开发这款APP,并重点讲解其在鸿蒙系统上的适配与优化。
🎯 Flutter开发鸿蒙应用的优势
- 跨平台能力强:一套代码可运行于Android、iOS、Web、桌面端及鸿蒙系统
- 高性能渲染:基于Skia图形引擎,实现接近原生应用的性能
- 丰富的组件库:提供大量精美的UI组件,快速构建高质量界面
- 热重载:支持实时预览代码修改,提高开发效率
- 良好的鸿蒙系统支持:Flutter已官方支持鸿蒙系统,开发体验流畅
📱 护眼提醒APP介绍
📋 功能概述
护眼提醒APP是一款帮助用户保护眼睛健康的移动应用,主要功能包括:
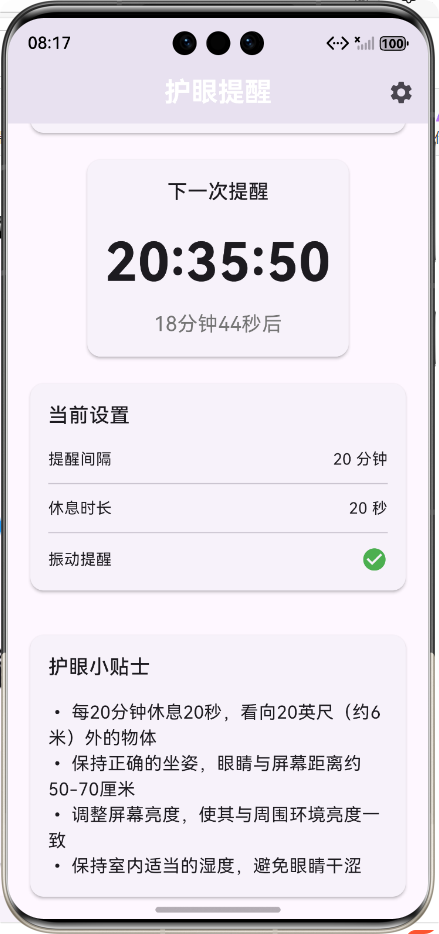
- 🔔 定时护眼提醒
- ⚙️ 自定义提醒设置
- 📊 查看提醒状态
- 💡 护眼小贴士
🎨 设计理念
- 简洁直观:采用清晰的信息层级,便于用户快速获取关键信息
- 友好交互:提供流畅的动画效果和反馈,增强用户体验
- 响应式设计:适配不同屏幕尺寸,确保在各种设备上都有良好表现
- 主题统一:使用蓝色作为主色调,传达清新、舒适的感觉
🔄 开发流程图
测试与优化阶段
核心开发阶段
项目初始化
需求分析与设计
数据模型设计
服务层实现
页面开发
功能测试
鸿蒙系统适配
应用发布
💻 核心功能实现及代码展示
1️⃣ 数据模型设计
数据模型是应用的基础,我们首先需要设计清晰的数据结构来表示护眼提醒设置。
dart
/// 护眼提醒模型
class EyeCareReminder {
  /// 提醒ID
  final String id;

  /// 提醒名称
  final String name;

  /// 提醒间隔(分钟)
  final int intervalMinutes;

  /// 是否启用提醒
  final bool isEnabled;

  /// 提醒铃声路径
  final String? ringtonePath;

  /// 提醒振动
  final bool vibrate;

  /// 休息时长(秒)
  final int restDurationSeconds;

  /// 构造函数
  const EyeCareReminder({
    required this.id,
    required this.name,
    required this.intervalMinutes,
    required this.isEnabled,
    this.ringtonePath,
    required this.vibrate,
    required this.restDurationSeconds,
  });

  /// 从JSON创建提醒对象
  factory EyeCareReminder.fromJson(Map<String, dynamic> json) {
    return EyeCareReminder(
      id: json['id'] as String,
      name: json['name'] as String,
      intervalMinutes: json['intervalMinutes'] as int,
      isEnabled: json['isEnabled'] as bool,
      ringtonePath: json['ringtonePath'] as String?,
      vibrate: json['vibrate'] as bool,
      restDurationSeconds: json['restDurationSeconds'] as int,
    );
  }

  /// 转换为JSON
  Map<String, dynamic> toJson() {
    return {
      'id': id,
      'name': name,
      'intervalMinutes': intervalMinutes,
      'isEnabled': isEnabled,
      'ringtonePath': ringtonePath,
      'vibrate': vibrate,
      'restDurationSeconds': restDurationSeconds,
    };
  }

  /// 创建副本
  EyeCareReminder copyWith({
    String? id,
    String? name,
    int? intervalMinutes,
    bool? isEnabled,
    String? ringtonePath,
    bool? vibrate,
    int? restDurationSeconds,
  }) {
    return EyeCareReminder(
      id: id ?? this.id,
      name: name ?? this.name,
      intervalMinutes: intervalMinutes ?? this.intervalMinutes,
      isEnabled: isEnabled ?? this.isEnabled,
      ringtonePath: ringtonePath ?? this.ringtonePath,
      vibrate: vibrate ?? this.vibrate,
      restDurationSeconds: restDurationSeconds ?? this.restDurationSeconds,
    );
  }
}
2️⃣ 服务层实现
服务层负责处理数据逻辑,包括数据的获取、存储、更新等。我们扩展了现有的StorageService,添加了护眼提醒设置的保存和获取方法。
dart
/// 保存护眼提醒设置
Future<void> saveEyeCareSettings(EyeCareReminder settings) async {
  final json = jsonEncode(settings.toJson());
  await _prefs?.setString('eye_care_settings', json);
}

/// 获取护眼提醒设置
Future<EyeCareReminder> getEyeCareSettings() async {
  try {
    if (_prefs == null) {
      return EyeCareReminder(
        id: '1',
        name: '默认护眼提醒',
        intervalMinutes: 20,
        isEnabled: true,
        vibrate: true,
        restDurationSeconds: 20,
      );
    }

    final json = _prefs!.getString('eye_care_settings');
    if (json == null) {
      return EyeCareReminder(
        id: '1',
        name: '默认护眼提醒',
        intervalMinutes: 20,
        isEnabled: true,
        vibrate: true,
        restDurationSeconds: 20,
      );
    }

    return EyeCareReminder.fromJson(jsonDecode(json) as Map<String, dynamic>);
  } catch (e) {
    debugPrint('获取护眼提醒设置时出错: $e');
    return EyeCareReminder(
      id: '1',
      name: '默认护眼提醒',
      intervalMinutes: 20,
      isEnabled: true,
      vibrate: true,
      restDurationSeconds: 20,
    );
  }
}然后,我们实现了EyeCareService,用于管理护眼提醒的业务逻辑:
dart
/// 护眼提醒服务类,用于管理护眼提醒
class EyeCareService {
  /// 存储服务实例
  static final StorageService _storageService = StorageService();

  /// 获取护眼提醒设置
  static Future<EyeCareReminder> getReminder() async {
    return await _storageService.getEyeCareSettings();
  }

  /// 保存护眼提醒设置
  static Future<void> saveReminder(EyeCareReminder reminder) async {
    await _storageService.saveEyeCareSettings(reminder);
  }

  /// 启用护眼提醒
  static Future<void> enableReminder() async {
    final reminder = await getReminder();
    await saveReminder(reminder.copyWith(isEnabled: true));
  }

  /// 禁用护眼提醒
  static Future<void> disableReminder() async {
    final reminder = await getReminder();
    await saveReminder(reminder.copyWith(isEnabled: false));
  }

  /// 更新提醒间隔
  static Future<void> updateInterval(int minutes) async {
    final reminder = await getReminder();
    await saveReminder(reminder.copyWith(intervalMinutes: minutes));
  }

  /// 更新休息时长
  static Future<void> updateRestDuration(int seconds) async {
    final reminder = await getReminder();
    await saveReminder(reminder.copyWith(restDurationSeconds: seconds));
  }

  /// 切换振动设置
  static Future<void> toggleVibrate() async {
    final reminder = await getReminder();
    await saveReminder(reminder.copyWith(vibrate: !reminder.vibrate));
  }

  /// 计算下一次提醒时间
  static DateTime calculateNextReminderTime(EyeCareReminder reminder) {
    return DateTime.now().add(Duration(minutes: reminder.intervalMinutes));
  }
}
3️⃣ 页面开发
🏠 护眼提醒主页面
主页面是用户进入应用的第一个界面,用于显示提醒状态和下一次提醒时间:
dart
class EyeCareReminderScreen extends StatefulWidget {
/// 构造函数
const EyeCareReminderScreen({super.key});
@override
State<EyeCareReminderScreen> createState() => _EyeCareReminderScreenState();
}
class _EyeCareReminderScreenState extends State<EyeCareReminderScreen> {
/// 护眼提醒设置
EyeCareReminder? _reminder;
/// 加载状态
bool _isLoading = true;
/// 下一次提醒时间
DateTime? _nextReminderTime;
/// 计时器
late Timer _timer;
@override
void initState() {
super.initState();
_initStorage();
// 每秒更新一次时间
_timer = Timer.periodic(const Duration(seconds: 1), (_) {
if (_reminder != null && _reminder!.isEnabled) {
setState(() {
// 更新下一次提醒时间
});
}
});
}
@override
void dispose() {
_timer.cancel();
super.dispose();
}
/// 初始化存储服务
Future<void> _initStorage() async {
// 直接加载提醒设置
await _loadReminder();
}
/// 加载护眼提醒设置
Future<void> _loadReminder() async {
setState(() {
_isLoading = true;
});
try {
final reminder = await EyeCareService.getReminder();
setState(() {
_reminder = reminder;
_nextReminderTime = EyeCareService.calculateNextReminderTime(reminder);
});
} catch (e) {
if (mounted) {
ScaffoldMessenger.of(context).showSnackBar(
const SnackBar(content: Text('加载设置失败')),
);
}
} finally {
setState(() {
_isLoading = false;
});
}
}
@override
Widget build(BuildContext context) {
return Scaffold(
appBar: AppBar(
title: const Text('护眼提醒'),
actions: [
IconButton(
icon: const Icon(Icons.settings),
onPressed: () {
Navigator.push(
context,
MaterialPageRoute(builder: (context) => const EyeCareSettingsScreen()),
).then((_) {
_loadReminder();
});
},
tooltip: '设置',
),
],
),
body: _isLoading
? const Center(child: CircularProgressIndicator())
: _reminder == null
? const Center(child: Text('加载失败'))
: SingleChildScrollView(
padding: const EdgeInsets.all(16.0),
child: Column(
crossAxisAlignment: CrossAxisAlignment.center,
children: [
// 护眼图标和标题
const SizedBox(height: 32),
const Icon(
Icons.remove_red_eye,
size: 128,
color: Colors.blue,
),
const SizedBox(height: 16),
const Text(
'护眼提醒',
style: TextStyle(
fontSize: 32,
fontWeight: FontWeight.bold,
),
),
const SizedBox(height: 32),
// 提醒开关
Card(
elevation: 2,
shape: RoundedRectangleBorder(
borderRadius: BorderRadius.circular(12),
),
child: Padding(
padding: const EdgeInsets.all(16.0),
child: Row(
mainAxisAlignment: MainAxisAlignment.spaceBetween,
children: [
const Text(
'启用护眼提醒',
style: TextStyle(
fontSize: 18,
fontWeight: FontWeight.w500,
),
),
Switch(
value: _reminder!.isEnabled,
onChanged: (_) => _toggleReminder(),
activeColor: Colors.blue,
),
],
),
),
),
// 其他组件...
],
),
),
);
}
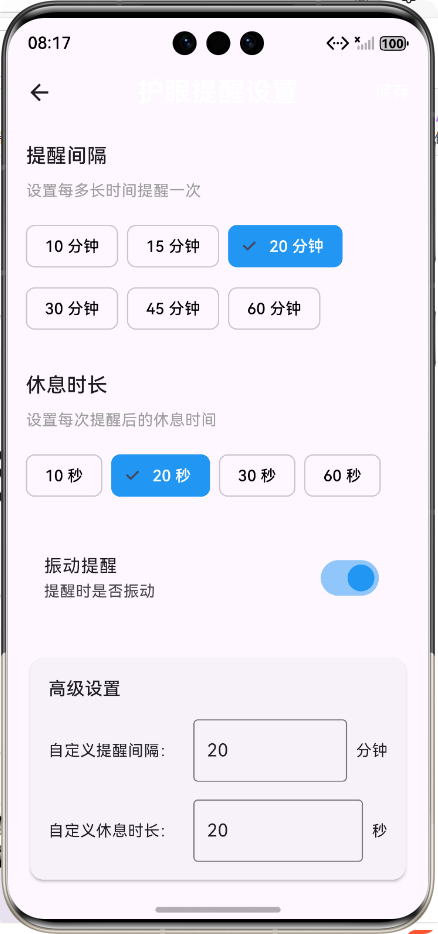
}⚙️ 护眼提醒设置页面
设置页面允许用户调整提醒间隔、休息时长等设置:
dart
class EyeCareSettingsScreen extends StatefulWidget {
  /// 构造函数
  const EyeCareSettingsScreen({super.key});

  @override
  State<EyeCareSettingsScreen> createState() => _EyeCareSettingsScreenState();
}

class _EyeCareSettingsScreenState extends State<EyeCareSettingsScreen> {
  /// 护眼提醒设置
  EyeCareReminder? _reminder;

  /// 加载状态
  bool _isLoading = true;

  /// 提醒间隔选项(分钟)
  final List<int> _intervalOptions = [10, 15, 20, 30, 45, 60];

  /// 休息时长选项(秒)
  final List<int> _restDurationOptions = [10, 20, 30, 60];

  @override
  void initState() {
    super.initState();
    _loadReminder();
  }

  /// 加载护眼提醒设置
  Future<void> _loadReminder() async {
    setState(() {
      _isLoading = true;
    });

    try {
      final reminder = await EyeCareService.getReminder();
      setState(() {
        _reminder = reminder;
      });
    } catch (e) {
      if (mounted) {
        ScaffoldMessenger.of(context).showSnackBar(
          const SnackBar(content: Text('加载设置失败')),
        );
      }
    } finally {
      setState(() {
        _isLoading = false;
      });
    }
  }

  /// 保存护眼提醒设置
  Future<void> _saveReminder() async {
    if (_reminder == null) return;

    setState(() {
      _isLoading = true;
    });

    try {
      await EyeCareService.saveReminder(_reminder!);
      if (mounted) {
        ScaffoldMessenger.of(context).showSnackBar(
          const SnackBar(content: Text('保存成功')),
        );
        Navigator.pop(context);
      }
    } catch (e) {
      if (mounted) {
        ScaffoldMessenger.of(context).showSnackBar(
          const SnackBar(content: Text('保存失败')),
        );
      }
    } finally {
      setState(() {
        _isLoading = false;
      });
    }
  }

  @override
  Widget build(BuildContext context) {
    return Scaffold(
      appBar: AppBar(
        title: const Text('护眼提醒设置'),
        actions: [
          TextButton(
            onPressed: _isLoading ? null : _saveReminder,
            child: const Text(
              '保存',
              style: TextStyle(
                fontSize: 16,
                color: Colors.white,
              ),
            ),
          ),
        ],
      ),
      body: _isLoading
          ? const Center(child: CircularProgressIndicator())
          : _reminder == null
              ? const Center(child: Text('加载失败'))
              : SingleChildScrollView(
                  padding: const EdgeInsets.all(16.0),
                  child: Column(
                    crossAxisAlignment: CrossAxisAlignment.start,
                    children: [
                      // 提醒间隔设置
                      const Text(
                        '提醒间隔',
                        style: TextStyle(
                          fontSize: 18,
                          fontWeight: FontWeight.w500,
                        ),
                      ),
                      const SizedBox(height: 8),
                      const Text(
                        '设置每多长时间提醒一次',
                        style: TextStyle(
                          fontSize: 14,
                          color: Colors.grey,
                        ),
                      ),
                      const SizedBox(height: 16),
                      Wrap(
                        spacing: 8.0,
                        runSpacing: 8.0,
                        children: _intervalOptions.map((minutes) {
                          return ChoiceChip(
                            label: Text('$minutes 分钟'),
                            selected: _reminder!.intervalMinutes == minutes,
                            onSelected: (selected) {
                              if (selected) {
                                _updateInterval(minutes);
                              }
                            },
                            selectedColor: Colors.blue,
                            labelStyle: TextStyle(
                              color: _reminder!.intervalMinutes == minutes ? Colors.white : Colors.black,
                            ),
                          );
                        }).toList(),
                      ),
                      // 其他设置项...
                    ],
                  ),
                ),
    );
  }
}
4️⃣ 应用入口配置
最后,我们需要配置应用的入口文件,设置主题和首页:
dart
import 'package:flutter/material.dart';
import 'screens/eye_care_reminder_screen.dart';

void main() {
  runApp(const EyeCareApp());
}

/// 护眼提醒应用根组件
class EyeCareApp extends StatelessWidget {
  /// 构造函数
  const EyeCareApp({super.key});

  @override
  Widget build(BuildContext context) {
    return MaterialApp(
      title: '护眼提醒',
      debugShowCheckedModeBanner: false,
      theme: ThemeData(
        // 设置主题色为蓝色,符合护眼应用的主题
        primarySwatch: Colors.blue,

        // 设置应用栏主题
        appBarTheme: const AppBarTheme(
          elevation: 0,
          centerTitle: true,
          titleTextStyle: TextStyle(
            fontSize: 24,
            fontWeight: FontWeight.bold,
            color: Colors.white,
          ),
        ),

        // 设置卡片主题
        cardTheme: CardTheme(
          elevation: 2,
          shape: RoundedRectangleBorder(
            borderRadius: BorderRadius.circular(12),
          ),
        ),

        // 设置文本主题
        textTheme: const TextTheme(
          bodyLarge: TextStyle(fontSize: 16),
          bodyMedium: TextStyle(fontSize: 14),
        ),
      ),
      home: const EyeCareReminderScreen(),
    );
  }
}
🚀 鸿蒙系统适配与优化
1️⃣ 鸿蒙系统特性适配
- 响应式设计:使用Flutter的响应式布局,确保应用在不同尺寸的鸿蒙设备上都能良好显示
- 性能优化:针对鸿蒙系统进行性能调优,减少内存占用,提高运行流畅度
- 主题适配:适配鸿蒙系统的深色模式,提供更好的夜间使用体验
2️⃣ 构建与运行
在鸿蒙系统上构建和运行Flutter应用非常简单,只需执行以下命令:
bash
flutter runFlutter会自动检测设备类型,并进行相应的构建和部署。
📊 开发过程中遇到的问题及解决方案
| 问题 | 解决方案 |
|---|---|
| 📱 字符串中的乱码问题 | 检查并修复字符串中的特殊字符,确保使用正确的编码 |
| ⚡ StorageService初始化问题 | 简化初始化流程,直接调用服务层方法获取数据 |
| 🎨 不同设备屏幕尺寸适配 | 使用Flutter的响应式布局,结合MediaQuery和LayoutBuilder组件 |
| 🔄 状态管理复杂 | 使用setState进行局部状态管理,简单高效 |
🎉 总结
通过本文的介绍,我们详细了解了如何使用Flutter框架开发一款跨平台的护眼提醒APP,并重点讲解了其在鸿蒙系统上的适配与优化。Flutter凭借其强大的跨平台能力和丰富的组件库,为开发者提供了高效、便捷的开发体验。
📌 开发心得
- 良好的架构设计是成功的关键:清晰的数据模型和服务层设计,便于后续功能扩展和维护
- 注重用户体验:简洁直观的界面设计,流畅的交互效果,能有效提高用户满意度
- 充分利用Flutter的优势:热重载、响应式布局、丰富的组件库等特性,可大大提高开发效率
- 持续学习和优化:关注Flutter和鸿蒙系统的最新动态,不断优化应用性能和功能
🔮 未来展望
- 增加眼部放松练习:在提醒时提供简单的眼部放松练习指导
- 实现数据分析:统计用户使用习惯,提供个性化的护眼建议
- 添加社交功能:允许用户分享护眼成果,互相鼓励
- 支持多语言:适配不同地区用户的需求
- 集成更多健康功能:如视力测试、蓝光过滤等
📚 参考资料
欢迎加入开源鸿蒙跨平台社区:https://openharmonycrossplatform.csdn.net