文章目录
- [Ⅰ. 指令补充](#Ⅰ. 指令补充)
-
- 一、指令修饰符
- [二、`v-model` 用在其他表单元素上](#二、
v-model用在其他表单元素上)
- [Ⅱ. 样式绑定](#Ⅱ. 样式绑定)
-
- 一、基本介绍
- [二、绑定 `class`](#二、绑定
class) - [三、绑定 `style` 样式](#三、绑定
style样式)
- [Ⅲ. 计算属性 `computed`](#Ⅲ. 计算属性
computed) -
- 一、基本使用
- [二、计算属性 VS 普通函数](#二、计算属性 VS 普通函数)
- 三、计算属性的完整写法
- 案例:全返反选
- [Ⅳ. 侦听器 `watch`](#Ⅳ. 侦听器
watch) - [Ⅴ. 综合案例:成绩管理](#Ⅴ. 综合案例:成绩管理)

Ⅰ. 指令补充
一、指令修饰符
所谓指令修饰符就是让指令的 功能更强大,书写更便捷。
常见指令修饰符如下所示:
- 如何监听回车键和鼠标等?
@keydown.enter-> 回车按下@keyup.enter-> 回车抬起@mouseenter-> 鼠标放置于对应组件中@mouseleave-> 鼠标离开对应组件中
- 如何阻止默认行为、阻止冒泡?
@click.prevent-> 阻止默认行为(比如链接跳转,表单提交后刷新页面等)@click.stop-> 阻止冒泡@click.prevent.stop-> 可以链式调用,二者都阻止
- v-model的三个修饰符的作用是什么?
.lazy-> 失去焦点再同步.trim-> 去除首尾空格.number-> 尝试转数字
二、v-model 用在其他表单元素上
常见的表单元素都可以用 v-model 绑定关联,作用是可以快速获取或设置表单元素的值。
它会根据控件类型自动选取正确的属性来更新元素。
markdown
输入框   input:text     ------> value(直接绑定)
文本域   textarea       ------> value(直接绑定)

下拉菜单 select/option  ------> value(v-model 写在 select 上, 关联 option 中的 value)

单选框   input:radio    ------> value(给单选框添加 value 属性,v-model 收集选中单选框的 value)

复选框   input:checkbox ------> checked / value
    1、一个复选框,v-model绑定 布尔值,关联 checked 属性
    2、一组复选框,v-model绑定 数组,关联 value 属性,给这些复选框手动添加 value
实例代码:
xml
<script setup>
    import { ref } from 'vue'
    // 自我介绍
    const intro = ref('')
    // 收集城市
    const city = ref('SH')
    // 收集血型
    const blood = ref('ab')
    // 是否同意用户协议
    const isAgree = ref(false)
    // 收集爱好
    const hobby = ref(['ZQ', 'PB'])
</script>

<template>
  <div>
    <!-- 文本域 -->
    <textarea
      v-model="intro"
      cols="30"
      rows="4"
      placeholder="请输入自我介绍"></textarea>
    <br />
    <br />

    <!-- 下拉菜单 -->
    <select v-model="city">
      <option value="BJ">北京</option>
      <option value="SH">上海</option>
      <option value="SZ">深圳</option>
      <option value="HZ">杭州</option>
    </select>
    <br />
    <br />

    <!-- 单选框:多个当中只能选择一个,需要给单选框手动添加 value 属性 -->
    <input
      type="radio"
      value="a"
      v-model="blood" />A
    <input
      type="radio"
      value="b"
      v-model="blood" />B
    <input
      type="radio"
      value="ab"
      v-model="blood" />AB
    <input
      type="radio"
      value="o"
      v-model="blood" />O
    <br />
    <br />

    <!-- 复选框:1、一个复选框,v-model绑定 布尔值,关联 checked 属性 -->
    <input
      type="checkbox"
      v-model="isAgree" />是否同意用户协议
    <br />
    <br />

    <!-- 复选框:2、一组复选框,v-model绑定 数组,关联 value 属性,给这些复选框手动添加 value -->
    <input
      v-model="hobby"
      type="checkbox"
      value="LQ" />篮球
    <input
      v-model="hobby"
      type="checkbox"
      value="ZQ" />足球
    <input
      v-model="hobby"
      type="checkbox"
      value="YMQ" />羽毛球
    <input
      v-model="hobby"
      type="checkbox"
      value="PPQ" />乒乓球
  </div>
</template>
Ⅱ. 样式绑定
一、基本介绍
为了方便开发者进行样式控制,Vue 扩展了 v-bind 的语法,可以针对 class 类名和 style 行内样式两个属性进行控制,进而通过数据控制元素的样式。
二、绑定 class
语法如下所示:
javascript
// 语法:
:class = "三元表达式 / 对象"

// 1、三元表达式:
<p :class="条件 ? '类名1' : '类名2'"></p>

// 2、对象:
<p class="box" :class="{ 类名1: 布尔值1, 类名2: 布尔值2 }"></p>
注意事项:
- 当
class动态绑定的是对象时,键就是类名,值就是布尔值,如果值是true,就添加这个类,否则删除这个类。 - 静态
class与动态class共存可以共存,二者会合并。
示例代码:
javascript
<script setup>
    import { ref } from 'vue'
    // 是否处于激活
    const isActive = ref(true)
</script>

<template>
  <div>
    <!-- 1. 三元绑定 -->
    <p :class="isActive ? 'active' : ''">Active1</p>

    <!-- 2. 对象绑定 -->
    <p :class="{ active: isActive }">Active2</p>

    <!-- 3. 静态class与动态class共存 -->
    <p class="item" :class="{ active: isActive }">Active3</p>
  </div>
</template>

<style>
.active {
  color: red;
}
</style>
案例:京东秒杀-tab栏切换导航高亮
当我们点击哪个页签时,哪个页签就高亮:

思路:
- 基于数据,动态渲染页签(
v-for) - 准备一个下标记录高亮哪一个页签
- 基于下标动态切换
class的类名
javascript
<script setup>
    import { ref } from 'vue'
    // tabs 列表
    const tabs = [
      { id: 1, name: '京东秒杀' },
      { id: 2, name: '每日特价' },
      { id: 3, name: '品类秒杀' }
    ]
    // 当前高亮的下标, 默认是第一个, 下标为 0
    const currentIndex = ref(0)
</script>

<template>
  <div>
    <ul>
      <li
        v-for="(item, index) in tabs"
        :key="item.id"
        @click="currentIndex = index">
        <a
          :class="{ active: currentIndex === index }"
          href="#"
        >
            {{ item.name }}
        </a>
      </li>
    </ul>
  </div>
</template>

<style>
* {
  margin: 0;
  padding: 0;
}
ul {
  display: flex;
  border-bottom: 2px solid #e01222;
  padding: 0 10px;
}
li {
  width: 100px;
  height: 50px;
  line-height: 50px;
  list-style: none;
  text-align: center;
}
li a {
  display: block;
  text-decoration: none;
  font-weight: bold;
  color: #333333;
}
li a.active {
  background-color: #e01222;
  color: #fff;
}
</style>
三、绑定 style 样式
javascript
<div class="box" :style="{ CSS属性名1: CSS属性值, CSS属性名2: CSS属性值 }"></div>实例代码:
javascript
<script setup>
    import { reactive } from 'vue'
    // 行内样式对象
    const styleObj = reactive({
      color: '#fff',
      backgroundColor: 'purple'
    })
</script>

<template>
  <div>
    <p :style="styleObj">Some Text...</p>
  </div>
</template>
案例:进度条
javascript
<script setup>
    import { ref } from 'vue'
    // 占比
    const x = ref(0)
</script>

<template>
  <div class="progress">
    <div
      class="inner"
      :style="{ width: `${(x / 4) * 100}%` }">
      <span>{{ (x / 4) * 100 }}%</span>
    </div>
  </div>
  <button @click="x = 1">设置25%</button>
  <button @click="x = 2">设置50%</button>
  <button @click="x = 3">设置75%</button>
  <button @click="x = 4">设置100%</button>
</template>

<style>
.progress {
  height: 25px;
  width: 400px;
  border-radius: 15px;
  background-color: #272425;
  border: 3px solid #272425;
  box-sizing: border-box;
  margin-bottom: 30px;
}
.inner {
  height: 20px;
  border-radius: 10px;
  text-align: right;
  position: relative;
  background-color: #409eff;
  background-size: 20px 20px;
  box-sizing: border-box;
  transition: all 1s;
}
.inner span {
  position: absolute;
  right: -25px;
  bottom: -25px;
}
</style>
Ⅲ. 计算属性 computed
一、基本使用
基于现有的数据,计算出来的新数据;即当现有的数据变化,computed 属性会自动重新计算。
语法如下所示:
javascript
const 新数据 = computed(() => {
  // some code ...
  return 结果
})
💥注意事项:
- 计算属性必须有返回值
- 使用和
ref/reactive数据一样,计算属性可用于插值 ,也可配合指令使用
示例代码:(计算商品总数量)
javascript
<script setup>
    import { computed, ref } from 'vue'
    // 商品列表(原始数据)
    const goodsList = ref([
      { id: 1, name: '篮球', num: 1 },
      { id: 2, name: '玩具', num: 3 },
      { id: 3, name: '书籍', num: 2 }
    ])

    // 由于这里只有原始数据,没有直接提供商品总数量
    // 但是我们可以基于现有的 goodsList 计算得到总数量
    // 那么推荐把总数量声明为 计算属性
    const totalNum = computed(() => {
        return goodsList.value.reduce((prev,item) => prev + item.num, 0)
    })
</script>

<template>
  <h3>礼物清单</h3>
  <table>
    <thead>
      <tr>
        <th>名字</th>
        <th>数量</th>
      </tr>
    </thead>
    <tbody>
      <tr
        v-for="item in goodsList"
        :key="item.id">
        <td>{{ item.name }}</td>
        <td>{{ item.num }}</td>
      </tr>
    </tbody>
  </table>
  <p>礼物总数:{{ totalNum }} 个</p>
</template>

<style>
table {
  width: 350px;
  border: 1px solid #333;
}
table th,
table td {
  border: 1px solid #333;
}
table td {
  text-align: center;
}
</style>
二、计算属性 VS 普通函数
| 对比点 | 计算属性 (computed) | 普通函数 |
|---|---|---|
| 是否有缓存 | 有缓存,依赖的数据不变时,多次访问直接返回缓存结果 | 没有缓存,每次调用都会重新执行 |
| 调用方式 | 当作属性使用:{``{ fullName }} |
当作方法调用:{``{ getFullName() }} |
| 适用场景 | 依赖响应式数据,且结果需要复用、避免重复计算 | 一次性逻辑处理,或者不依赖缓存的情况 |
| 依赖追踪 | 会自动追踪依赖的响应式数据,依赖变动才会重新计算 | 不追踪依赖,调用时才执行 |
| 性能表现 | 更高效,适合复杂或多次使用的计算结果 | 相对低效,调用一次就执行一次 |
| 语义 | 表达式式的属性,像数据 | 行为式的函数,强调动作 |
三、计算属性的完整写法
- 计算属性的默认写法,只能读(展示数据),不能改 (导致
v-model双向绑定不灵了) - 如果要"改",需要用计算属性的完整写法
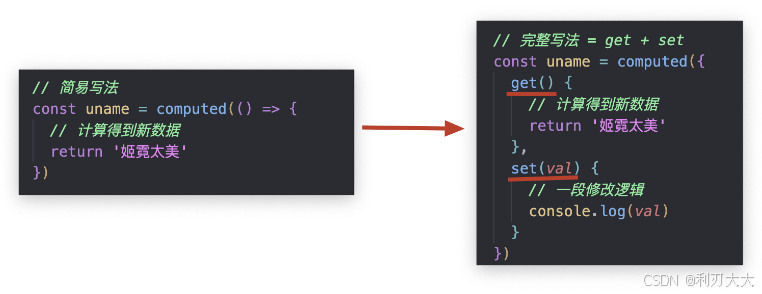
javascript
<script setup>
    import { computed } from 'vue'

    // 完整写法 = get + set
    const uname = computed({
      // 使用计算属性的时候,自动触发get,get内部必须 return 计算结果
      get() {
        // 计算得到新数据
        return '姬霓太美'
      },

      // 给计算属性赋值的时候,自动触发set,并接收赋予的新值val
      set(val) {
        // 一段修改逻辑
        console.log(val)
      }
    })
</script>

<template>
  <input type="text" v-model="uname" />
</template>
案例:全返反选
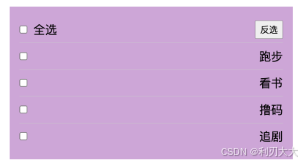
javascript
<script setup>
    import { computed, ref } from 'vue'
    // 计划列表
    const planList = ref([
      { id: 12, name: '跑步', done: false },
      { id: 76, name: '看书', done: false },
      { id: 31, name: '撸码', done: false },
      { id: 49, name: '追剧', done: false }
    ])

    // 是否全部选中
    const isAll = computed({
      // 使用计算属性自动触发 get()
      get() {
        // every: 检测每一个
        return planList.value.every((item) => item.done)
      },
      // 修改计算属性自动触发 set()
      set(val) {
        // val: 给计算属性赋予的新值,在这里就是表全选复选框的状态
        // 遍历 planList 数组,把每个小选的 done 属性与 val 保持一致即可
        planList.value.forEach((item) => (item.done = val))
      }
    })

    // 反选
    const onToggle = () => {
      // 遍历 planList 数组,对每个对象的 done 属性取反即可
      planList.value.forEach((item) => (item.done = !item.done))
    }
</script>

<template>
  <p>
    <span>
      <input
        v-model="isAll"
        type="checkbox"
        id="all" />
      <label for="all">全选</label>
    </span>
    <button @click="onToggle">反选</button>
  </p>
  <ul>
    <li
      v-for="item in planList"
      :key="item.id">
      <input
        type="checkbox"
        v-model="item.done" />
      <span :class="{ completed: item.done }">{{ item.name }}</span>
    </li>
  </ul>
</template>

<style lang="scss">
// npm i sass -D
// npm run dev
* {
  margin: 0;
  padding: 0;
}
ul {
  list-style: none;
}
#app {
  width: 400px;
  margin: 100px auto;
  padding: 15px 18px;
  background: plum;
  p {
    display: flex;
    justify-content: space-between;
    align-items: center;
    height: 40px;
    border-bottom: 1px solid #ccc;
    button {
      padding: 3px 6px;
    }
    input {
      margin-right: 8px;
    }
  }
  ul {
    li {
      display: flex;
      justify-content: space-between;
      align-items: center;
      height: 40px;
      border-bottom: 1px solid #ccc;
      span.completed {
        color: #ddd;
        text-decoration: line-through;
      }
    }
  }
}
</style>
Ⅳ. 侦听器 watch
监视数据变化,一旦数据变化了,可以执行相应的 DOM 操作或异步操作。
语法如下所示:
javascript
<script setup>
    import { ref, watch } from 'vue'

    // 搜索框关键字
    const keyword = ref('')

    // 监视 keyword, 只要 keyword 的值变了, 就会执行回调函数
    watch(keyword, (newVal, oldVal) => {
      // 处理逻辑
    }, { deep: false} )
</script>

<template>
  <div>
    <input
      type="text"
      v-model="keyword"
      placeholder="请输入关键字" />
  </div>
</template>💥注意事项:如果监视的是一个对象里面的数据 ,那么就需要打开 deep:true,才能监视到!
Ⅴ. 综合案例:成绩管理
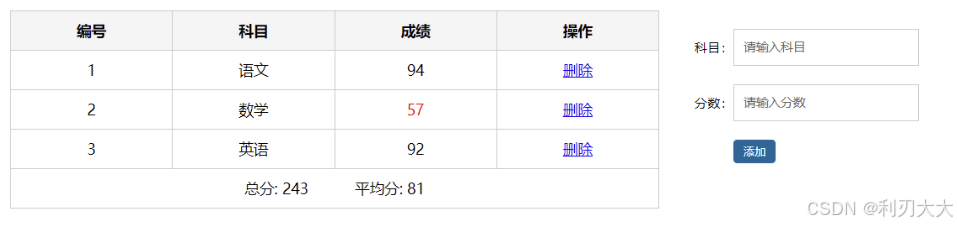
功能描述:
- 渲染成绩
- 添加成绩
- 删除成绩
- 统计总分,求平均分
- 数据持久化
思路分析:
- 渲染功能
v-for:key、v-bind:动态绑定 class 的样式 - 删除功能
v-on绑定事件,阻止 a 标签的默认行为(只是起到点击后删除功能,不要让它跳转) v-model的修饰符.trim、.number、判断数据是否为空后再添加、添加后清空文本框的数据- 使用计算属性
computed计算总分和平均分的值 - 使用
localStorage进行持久化
代码如下所示:
javascript
<script setup>
    import { computed, reactive, ref, watch } from 'vue'
    // 本地存储 key
    const SCORE_LIST_KEY = 'score-list-key'
    // 成绩列表
    const scoreList = ref(
      // 从本地取值
      // 有值就用, 否则用默认的成绩列表
      JSON.parse(localStorage.getItem(SCORE_LIST_KEY)) || [
        { id: 19, subject: '语文', score: 94 },
        { id: 27, subject: '数学', score: 57 },
        { id: 12, subject: '英语', score: 92 }
      ]
    )

    // 成绩表单
    const scoreForm = reactive({
      subject: '', // 科目
      score: ''    // 分数
    })

    // 总分
    const totalScore = computed(() => {
      // reduce 求和
      return scoreList.value.reduce((prev,item) =>prev +item.score, 0)
    })

    // 平均分
    const avgScore = computed(() => {
      return scoreList.value.length
        ? totalScore.value / scoreList.value.length
        : 0
    })

    // 删除
    const onDel = (index) => {
      // 弹窗确认
      if (window.confirm('确认删除么?')) {
        scoreList.value.splice(index, 1)
      }
    }

    // 添加
    const onAdd = () => {
      // 非空校验
      if (!scoreForm.subject || !scoreForm.score)
        return alert('科目或分数不能为空')

      // 添加至数组
      scoreList.value.push({
        ...scoreForm,
        id: Date.now()
      })

      // 清空
      scoreForm.subject = scoreForm.score = ''
    }

    // 监听 scoreList 的变化
    watch(
      scoreList,
      (newVal) => {
        // 存本地
        localStorage.setItem(SCORE_LIST_KEY, JSON.stringify(newVal))
      },
      {
        // 深度监视
        deep: true
      }
    )
</script>

<template>
  <div class="score-case">
    <div class="table">
      <table>
        <thead>
          <tr>
            <th>编号</th>
            <th>科目</th>
            <th>成绩</th>
            <th>操作</th>
          </tr>
        </thead>
        <tbody v-if="scoreList.length">
          <tr
            v-for="(item, index) in scoreList"
            :key="item.id">
            <td>{{ index + 1 }}</td>
            <td>{{ item.subject }}</td>
            <td :class="{ red: item.score < 60 }">{{ item.score }}</td>
            <td>
              <a
                href="#"
                @click="onDel(index)"
              >删除</a
              >
            </td>
          </tr>
        </tbody>
        <tbody v-else>
          <tr>
            <td colspan="5">
              <span class="none">暂无数据</span>
            </td>
          </tr>
        </tbody>
        <tfoot>
          <tr>
            <td colspan="5">
              <span>总分: {{ totalScore }}</span>
              <span style="margin-left: 50px">平均分: {{ avgScore }}</span>
            </td>
          </tr>
        </tfoot>
      </table>
    </div>
    <form class="form">
      <div class="form-item">
        <div class="label">科目:</div>
        <div class="input">
          <input
            type="text"
            placeholder="请输入科目"
            v-model.trim="scoreForm.subject" />
        </div>
      </div>
      <div class="form-item">
        <div class="label">分数:</div>
        <div class="input">
          <input
            type="number"
            placeholder="请输入分数"
            v-model.number="scoreForm.score" />
        </div>
      </div>
      <div class="form-item">
        <div class="label"></div>
        <div class="input">
          <button
            class="submit"
            @click.prevent="onAdd">
            添加
          </button>
        </div>
      </div>
    </form>
  </div>
</template>

<style>
.score-case {
  width: 1000px;
  margin: 50px auto;
  display: flex;
}
.score-case .table {
  flex: 4;
}
.score-case .table table {
  width: 100%;
  border-spacing: 0;
  border-top: 1px solid #ccc;
  border-left: 1px solid #ccc;
}
.score-case .table table th {
  background: #f5f5f5;
}
.score-case .table table tr:hover td {
  background: #f5f5f5;
}
.score-case .table table td,
.score-case .table table th {
  border-bottom: 1px solid #ccc;
  border-right: 1px solid #ccc;
  text-align: center;
  padding: 10px;
}
.score-case .table table td.red,
.score-case .table table th.red {
  color: red;
}
.score-case .table .none {
  height: 100px;
  line-height: 100px;
  color: #999;
}
.score-case .form {
  flex: 1;
  padding: 20px;
}
.score-case .form .form-item {
  display: flex;
  margin-bottom: 20px;
  align-items: center;
}
.score-case .form .form-item .label {
  width: 60px;
  text-align: right;
  font-size: 14px;
}
.score-case .form .form-item .input {
  flex: 1;
}
.score-case .form .form-item input,
.score-case .form .form-item select {
  appearance: none;
  outline: none;
  border: 1px solid #ccc;
  width: 200px;
  height: 40px;
  box-sizing: border-box;
  padding: 10px;
  color: #666;
}
.score-case .form .form-item input::placeholder {
  color: #666;
}
.score-case .form .form-item .cancel,
.score-case .form .form-item .submit {
  appearance: none;
  outline: none;
  border: 1px solid #ccc;
  border-radius: 4px;
  padding: 4px 10px;
  margin-right: 10px;
  font-size: 12px;
  background: #ccc;
}
.score-case .form .form-item .submit {
  border-color: #069;
  background: #069;
  color: #fff;
}
</style>