文章目录
- 绘制流程:RecyclerView的绘制三个步骤
-
- [1. setLayoutManager](#1. setLayoutManager)
- [2. dispatchLayoutStep系列方法](#2. dispatchLayoutStep系列方法)
- [3. onMeasure](#3. onMeasure)
- [4. onLayout](#4. onLayout)
- [5. onDraw](#5. onDraw)
- [6. 绘制流程总结](#6. 绘制流程总结)
- 绘制流程:LinearLayoutManager填充、测量、布局过程
- [RecyclerView 的回收复用缓存机制](#RecyclerView 的回收复用缓存机制)
深入理解 RecyclerView 的绘制流程和滑动原理(匠心巨作-上)
深入理解 RecyclerView 的嵌套滑动机制(匠心巨作-中)
深入理解 RecyclerView 的回收复用缓存机制详解(匠心巨作-下)
绘制流程:RecyclerView的绘制三个步骤
1. setLayoutManager
必要的步骤,给RecyclerView设置布局管理器,常见的布局管理器有:线性布局管理器LinearLayoutManager,网格布局管理器GridLayoutManager,瀑布流式管理器StaggeredGridLayoutManager。
源码解析:重置回收 -> LayoutManager与RecyclerView关联起 -> 请求重绘requestLayout, 进入measure,layout,draw流程
java
public void setLayoutManager(@Nullable LayoutManager layout) {
    // 如果新设置的 LayoutManager 和当前已有的 LayoutManager 是同一个,直接返回,无需操作
    if (layout == mLayout) {
        return;
    }

    // 停止当前的滚动操作(比如快速滑动或 fling 操作)
    stopScroll();

    // 如果当前已经有 LayoutManager,则需要先清理它相关的视图和资源
    if (mLayout != null) {
        // 如果有 ItemAnimator,结束所有正在执行的动画
        if (mItemAnimator != null) {
            mItemAnimator.endAnimations();
        }

        // 移除并回收所有由 LayoutManager管理的视图(包括已废弃的视图)
        mLayout.removeAndRecycleAllViews(mRecycler);
        mLayout.removeAndRecycleScrapInt(mRecycler); // 回收 scrap 中的视图

        // 清空 Recycler 中的所有缓存视图
        mRecycler.clear();

        // 如果 RecyclerView 已经附加到 Window 上,调用 LayoutManager 的 dispatchDetachedFromWindow
        if (mIsAttached) {
            mLayout.dispatchDetachedFromWindow(this, mRecycler);
        }

        // 将 LayoutManager 与 RecyclerView 解除绑定
        mLayout.setRecyclerView(null);

        // 置空当前 LayoutManager
        mLayout = null;
    } else {
        // 如果当前没有 LayoutManager,也清空 Recycler 的缓存视图
        mRecycler.clear();
    }

    // 为了防止 ItemAnimator 出现问题,再次移除所有子视图(防御性操作)
    mChildHelper.removeAllViewsUnfiltered();

    // 将新的 LayoutManager 赋值给成员变量
    mLayout = layout;

    // 如果新 LayoutManager 不为 null
    if (layout != null) {
        // 检查该 LayoutManager 是否已经绑定到另一个 RecyclerView,如果是,抛出异常
        if (layout.mRecyclerView != null) {
            throw new IllegalArgumentException("LayoutManager " + layout
                    + " is already attached to a RecyclerView:"
                    + layout.mRecyclerView.exceptionLabel());
        }

        // 将该 LayoutManager 绑定到当前 RecyclerView
        mLayout.setRecyclerView(this);

        // 如果 RecyclerView 已经附加到 Window 上,通知 LayoutManager 附加事件
        if (mIsAttached) {
            mLayout.dispatchAttachedToWindow(this);
        }
    }

    // 更新 Recycler 的视图缓存大小
    mRecycler.updateViewCacheSize();

    // 请求重新布局,触发 LayoutManager 重新布局子视图
    requestLayout();
}
2. dispatchLayoutStep系列方法
理解measure,layout,draw流程之前需要先理解dispatchLayoutStep系列方法,这一系列方法分别对应 RecyclerView 在执行布局时的三个主要阶段。此处省略源码,只需要理解其核心作用。
- dispatchLayoutStep1()
预处理 :表示进行预布局,适配器更新、动画运行、保存当前视图的信息等工作;
mState.mLayoutStep == State.STEP_START才会执行。
onMeasure,onLayout方法都可能会执行 - dispatchLayoutStep2()
核心阶段 ,测量和布局所有需要显示的 itemView。
onMeasure,onLayout方法都可能会执行 - dispatchLayoutStep3()
后处理 :表示布局最后一步,保存和触发有关动画的信息,相关清理等工作。
onLayout中执行
3. onMeasure
- 源码理解
onMeasure()主要是RecyclerView宽高测量工作,主要有两种情况:
(1)当RecyclerView的宽高为match_parent或者精确值时 ,即measureSpecModeIsExactly = true,此时只需要测量自身的宽高 就知道RecyclerView的宽高,测量方法结束(defaultOnMeasure);
(2)当RecyclerView的宽高为wrap_content时 ,即measureSpecModeIsExactly = false,会往下执行dispatchLayoutStep1()和dispatchLayoutStep2(),就是遍历测量ItemView的大小从而确定RecyclerView的宽高,这种情况真正的测量操作都是在dispatchLayoutStep2()中完成。
java
@Override
protected void onMeasure(int widthSpec, int heightSpec) {
if (mLayout == null) {//如果mLayout为空则采用默认测量,然后结束
defaultOnMeasure(widthSpec, heightSpec);
return;
}
if (mLayout.mAutoMeasure) {//如果为自动测量,默认为true
final int widthMode = MeasureSpec.getMode(widthSpec);
final int heightMode = MeasureSpec.getMode(heightSpec);
mLayout.onMeasure(mRecycler, mState, widthSpec, heightSpec);//测量RecyclerView的宽高
//当前RecyclerView的宽高是否为精确值
final boolean measureSpecModeIsExactly =
widthMode == MeasureSpec.EXACTLY && heightMode == MeasureSpec.EXACTLY;
if (measureSpecModeIsExactly || mAdapter == null) {//如果RecyclerView的宽高为精确值或者mAdapter为空,则结束
return;
}
//RecyclerView的宽高为wrap_content时,即measureSpecModeIsExactly = false则进行测量
//因为RecyclerView的宽高为wrap_content时,需要先测量itemView的宽高才能知道RecyclerView的宽高
if (mState.mLayoutStep == State.STEP_START) {//还没测量过
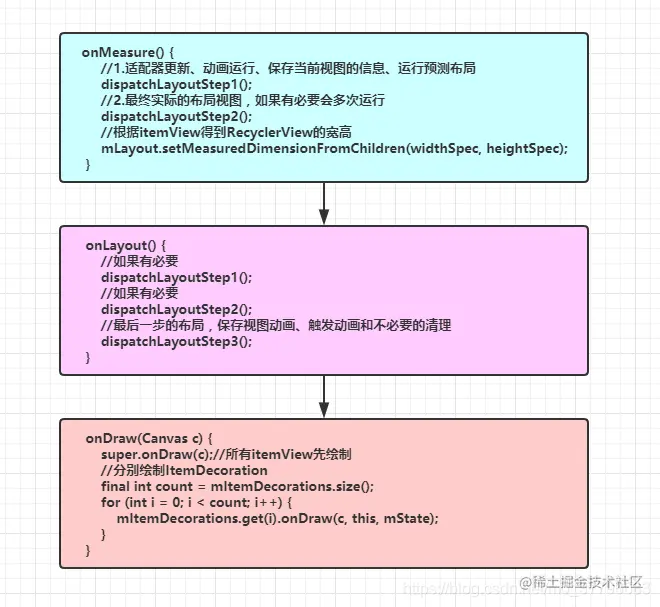
dispatchLayoutStep1();//1.适配器更新、动画运行、保存当前视图的信息、运行预测布局
}
dispatchLayoutStep2();//2.最终实际的布局视图,如果有必要会多次运行
//根据itemView得到RecyclerView的宽高
mLayout.setMeasuredDimensionFromChildren(widthSpec, heightSpec);
}
}4. onLayout
- 源码理解
1、如果没在onMeasure阶段提前测量子ItemView ,即RecyclerView宽高为match_parent或者精确值时,调用dispatchLayoutStep1()和dispatchLayoutStep2()测量itemView宽高 ;
2、如果在onMeasure阶段提前测量子ItemView ,但是子视图发生了改变或者期望宽高和实际宽高不一致,则会调用dispatchLayoutStep2()重新测量 ;
3、最后都会执行dispatchLayoutStep3()方法。
java
   @Override
    protected void onLayout(boolean changed, int l, int t, int r, int b) {
        TraceCompat.beginSection(TRACE_ON_LAYOUT_TAG);
        dispatchLayout(); //直接调用dispatchLayout()方法布局
        TraceCompat.endSection();
        mFirstLayoutComplete = true;
    }

  void dispatchLayout() {
  		······
        mState.mIsMeasuring = false;//设置RecyclerView布局完成状态,前面已经设置预布局完成了。
        if (mState.mLayoutStep == State.STEP_START) {//如果没在OnMeasure阶段提前测量子ItemView
            dispatchLayoutStep1();//布局第一步:适配器更新、动画运行、保存当前视图的信息、运行预测布局
            mLayout.setExactMeasureSpecsFrom(this);
            dispatchLayoutStep2();
        } else if (mAdapterHelper.hasUpdates() || mLayout.getWidth() != getWidth()
                || mLayout.getHeight() != getHeight()) {//前两步完成测量,但是因为大小改变不得不再次运行下面的代码
            mLayout.setExactMeasureSpecsFrom(this);
            dispatchLayoutStep2();//布局第二步:最终实际的布局视图,如果有必要会多次运行
        } else {
            mLayout.setExactMeasureSpecsFrom(this);
        }
        dispatchLayoutStep3();//布局第三步:最后一步的布局,保存视图动画、触发动画和不必要的清理。
    }
5. onDraw
- 源码解析
在 RecyclerView 自身绘制完成后,依次调用所有添加的 ItemDecoration 的 onDraw() 方法,用于在 itemView 绘制之前绘制底层装饰内容。
ItemDecoration 是 RecyclerView 提供的一个抽象类,用于在 item 绘制前后添加装饰效果,比如:设置 item 的间隔,添加分组标题绘制边框、阴影等视觉效果
java
    @Override
    public void onDraw(Canvas c) {
        super.onDraw(c);//所有itemView先绘制
		//分别绘制ItemDecoration
        final int count = mItemDecorations.size();
        for (int i = 0; i < count; i++) {
            mItemDecorations.get(i).onDraw(c, this, mState);
        }
    }
6. 绘制流程总结