文章目录
- ✨参考资料
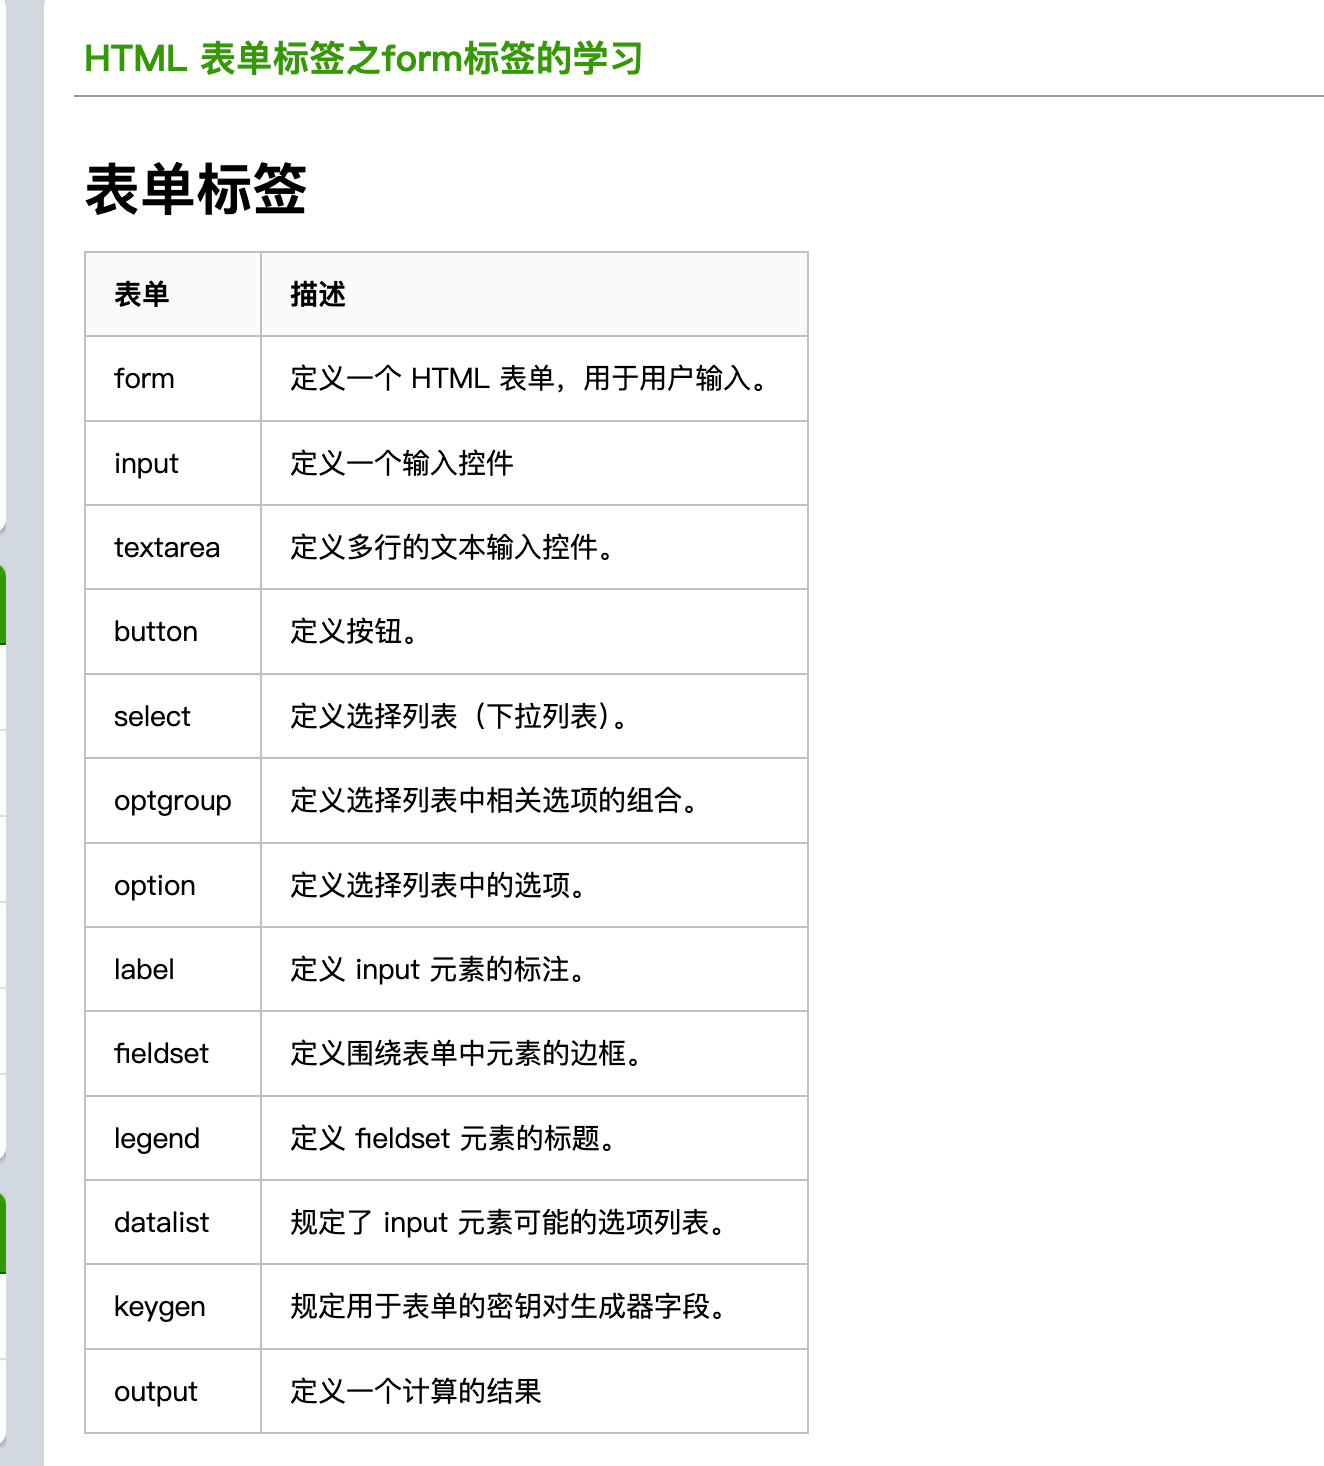
- 组件基本概念
- 组件通信
- [受控组件 & 非受控组件](#受控组件 & 非受控组件)
- 异步组件
- HOC
✨参考资料
视频:BV1mcpPeMETt
文档:https://message163.github.io/react-docs/react/components/hoc.html
组件基本概念
组件 是 UI 的基本构建块。它们接受 props(输入数据)并返回 UI(通常是 JSX)。React 主要有两种类型的组件:
(1)函数组件(Function Component):一个接受 props 并返回 JSX 的普通 JavaScript 函数。
javascript
// 一个简单的函数组件
const MyComponent = (props: { name: string }) => {
  return <div>Hello, {props.name}!</div>;
};
(2)类组件(Class Component):基于类的组件,继承自 React.Component,并实现一个 render() 方法来返回 JSX。
在类组件中,props 通过 this.props 访问,并且需要实现一个 render() 方法来返回 JSX。
javascript
class MyComponent extends React.Component<{ name: string }> {
  render() {
    return <div>Hello, {this.props.name}!</div>;
  }
}
组件通信
props = properties 简称,属性
每一个父组件都可以提供一个属性给他的字组件
父子通信 props
1. props 基本用法
函数式组件第一个参数就是 props
- 父 app.tsx
javascript
import Card from './components/Card'
function App() {

  return (
    <>
      <Card title={'111'}></Card>
      <Card title={'222'}></Card>
    </>
  )
}

export default App- 子组件
javascript
import './index.css'

export default function Card(props) {
    // 函数式组件第一个参数就是 props
    console.log(props);

    return <div className="card">
        <header>
            <div>{props.title}</div>
            <div>副标题</div>
        </header>
        <main>
            内容区域
        </main>
        <footer>
            <button>确认</button>
            <button>取消</button>
        </footer>
    </div>
}
泛型
props 默认是 any 类型,我们要指明
(1)写法 1:interface 安装给 props
javascript
import './index.css'
interface Props {
    title: string
}
export default function Card(props: Props) { }
(2)写法 2:
React.FC<>
javascript
import './index.css'

interface Props {
    title: string
}

const Card: React.FC<Props> = (props) => {
    return <div className="card">
        <header>
            <div>{props.title}</div>
            <div>副标题</div>
        </header>
        <main>
            内容区域
        </main>
        <footer>
            <button>确认</button>
            <button>取消</button>
        </footer>
    </div>
}

export default Card;- 两个写法的区别,之前 的版本中
- 写法2,可以通过 Card.defaultProps 定义默认值,但现在废弃了
- 写法2,props 自带一个 children
2. 默认值
两种方式 解构+默认值
(1)解构
javascript
interface Props {
    title?: string
}

const Card: React.FC<Props> = ({title="默认标题"}) => {
    return <div className="card"><div>
(2)默认值,声明一个默认对象
核心代码 const {title} = {...defaultProps, ...props};
注意这里defaultProps一定要写在前面,因为后面的值会覆盖前面的值,意思是你传了值,我就用你的
javascript
interface Props {
    title: string
}

const defaultProps: Partial<Props> = {
    title: '默认标题'
}

const Card: React.FC<Props> = (props) => {
    const {title} = {...defaultProps, ...props};
    // 注意这里defaultProps一定要写在前面
    // 因为后面的值会覆盖前面的值
    // 意思是你传了值,我就用你的
    return <div className="card">
        <header>
            <div>{title}</div>
            <div>副标题</div>
        </header>
    </div>
}
3. props.children
特殊的 props,类似于 vue 的插槽
- 父元素 app.tsx
直接在双标签中写
传一个就是一个对象
javascript
<Card title={'111'}>
  <div>
    <section>
      <i>我是内容111</i>
    </section>
  </div>
</Card>
传很多个就是数组
javascript
<Card title={'111'}>
 <div>
   <section>
     <i>我是内容111</i>
   </section>
 </div>
 <div>
   <section>
     <i>我是内容222</i>
   </section>
 </div>
</Card>- 子元素 Card/index.tsx
javascript
interface Props {
    title?: string,
    children?: React.ReactNode
}

const defaultProps: Partial<Props> = {
    title: '默认标题'
}

const Card: React.FC<Props> = (props) => {
    const {title} = {...defaultProps, ...props};
    console.log(props.children);

    return <div className="card">
        <header>
            <div>{title}</div>
            <div>副标题</div>
        </header>
        <main>
            {props.children}
        </main>
        <footer>
            <button>确认</button>
            <button>取消</button>
        </footer>
    </div>
}

export default Card;
props 支持的类型
string title={'测试'}
number id={1}
boolean isGirl={false}
null empty={null}
undefined empty={undefined}
object obj={ { a: 1, b: 2 } }
array arr={[1, 2, 3]}
function cb={(a: number, b: number) => a + b}
JSX.Element element={<div>测试</div>}
子父通信 - 函数
-
利用了函数的回调
父组件传递一个函数给子组件,子组件在合适的时候调用
-
父组件
javascript
<Card callback={fn}></Card>- 子组件
javascript
interface Props {
    title?: string
    children?: React.ReactNode
    callback?: (params: string) => void
}

const defaultProps: Partial<Props> = {
    title: '默认标题'
}

const Card: React.FC<Props> = (props) => {
    props.callback && props.callback('我是子组件')
    ...
}
兄弟组件通信
1. 原生浏览器
原理就是发布订阅设计模式
这里假设 在 Card 中发布,在 CardNew 中接收,当然反过来也是可以的
- 父元素
javascript
function App() {
  return (
    <>
      <Card title={'我是兄弟A'}></Card>
      <CardNew title={'我是兄弟B'}></CardNew>
    </>
  )
}- card
javascript
interface Props {
    title?: string
    children?: React.ReactNode
    callback?: (params: string) => void
}

const defaultProps: Partial<Props> = {
    title: '默认标题'
}

const Card: React.FC<Props> = (props) => {
    //------------------------------------
    // 1. 创建自定义事件
    // 名字可以随便写,但是不要与原生事件重复
    const e = new Event('on-card')
    const clickTap = () => {
        e.params = {name: '我是参数'}
        window.dispatchEvent(e)
    }
    //------------------------------------
    props.callback && props.callback('我是子组件')

    const {title} = {...defaultProps, ...props};
    console.log(props.children);

    return <div className="card">
        <header>
            <div>{title}</div>
            <div>副标题</div>
        </header>
        <main>
            {props.children}
        </main>
        <footer>
            <button onClick={clickTap}>确认</button>
            <button>取消</button>
        </footer>
    </div>
}

export default Card;

// 全局声明
// 给所有 Event 类型都额外增加一个 params 属性
// 这样无论你在哪写 Event,TS 都会认为它一定带着 { name: string }。
declare global {
    interface Event {
        params: {name: string}
    }
}- cardnew
javascript
interface Props {
    title?: string
    children?: React.ReactNode
    callback?: (params: string) => void
}

const defaultProps: Partial<Props> = {
    title: '默认标题'
}

const CardNew: React.FC<Props> = (props) => {
    //------------------------------------
    // -- 接收方
    window.addEventListener('on-card', e => {
        console.log('我是 cardnew 收到了', e)
    })
    //------------------------------------
}
2. mitt
略
祖孙组件
useContext
见文章
https://blog.csdn.net/yavlgloss/article/details/155195979?spm=1001.2014.3001.5502
受控组件 & 非受控组件
受控组件 (Controlled Components) 和 非受控组件 (Uncontrolled Components) 是 React 中常见的两种表单组件的管理方式
-
受控组件 更适合需要频繁交互、验证或者需要在应用中获取表单数据的场景,比如复杂的表单、动态表单等。
-
非受控组件 更适合简单的场景,比如简单的表单、只有少量输入,且不需要实时监控表单值的场景。它通常更轻量,适合不需要太多状态管理的情况。
-
表单元素
受控组件
受控组件一般是指表单元素
(1)表单的数据由React的 State 管理
(2)更新数据时,需要手动调用setState()方法,更新数据。
因为React没有类似于Vue的v-model,所以需要自己实现绑定事件。
javascript
function App() {
  const [value, setValue] = useState('')
  const handleChange = (e) => {
    setValue(e.target.value)
  }
  return (
    <>
      <input type="text" value={value} onChange={handleChange}/>
      <h5>{value}</h5>
    </>
  )
}
非受控组件
非受控组件指的是该表单元素不受React的State管理,表单的数据由DOM管理。通过useRef()来获取表单元素的值。
javascript
function App() {
  const value = 'haha'
  const inputRef = useRef(null);
  const handleChange = () => {
    console.log(inputRef.current?.value);

  }
  return (
    <>
      <input onChange={handleChange} type='text' defaultValue={value} ref={inputRef}/>
      <h5>{value}</h5>
    </>
  )
}
特殊的非受控组件
file
javascript
function App() {
  const fileRef = useRef(null);
  const handleChange = () => {
    console.log(fileRef.current?.files);

  }
  return (
    <>
      <input type="file" ref={fileRef} onChange={handleChange}/>
    </>
  )
}
比如 可以等点击了按钮之后,才获取 input 的内容
javascript
function UncontrolledComponent() {
  const inputRef = useRef(null);

  const handleSubmit = () => {
    alert(`输入的内容是:${inputRef.current.value}`);
  };

  return (
    <>
      <input ref={inputRef} type="text" />
      <button onClick={handleSubmit}>提交</button>
    </>
  );
}
异步组件
- 用法
javascript
<Suspense fallback={<div>Loading...</div>}>
  <这里写异步组件>
</Suspense>
异步组件没加载出来会是白屏,用户体验不佳,所以使用suspense,能为用户显示fallback的内容
异步组件加载
一般情况下写了一个组件,在app.tsx 中引入,然后 npm run build 打包
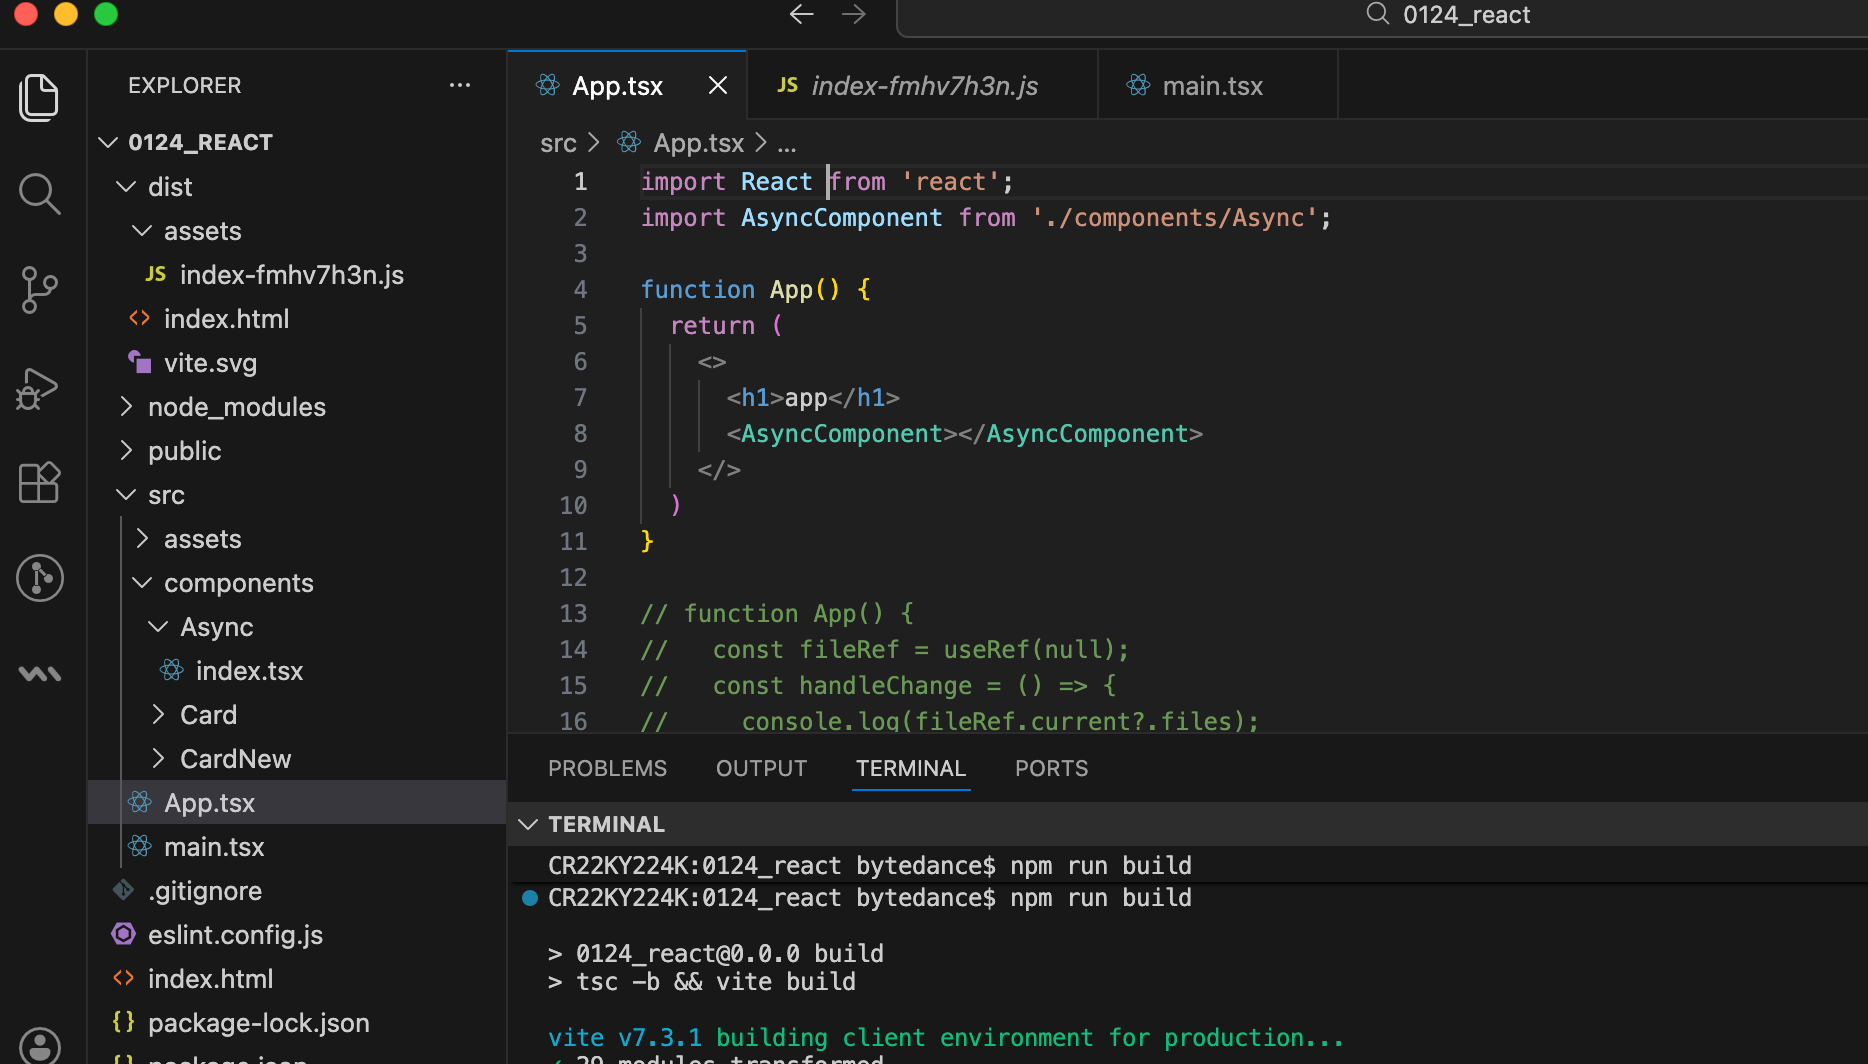
javascript
import React from 'react';
import AsyncComponent from './components/Async';
function App() {
return (
<>
<h1>app</h1>
<AsyncComponent></AsyncComponent>
</>
)
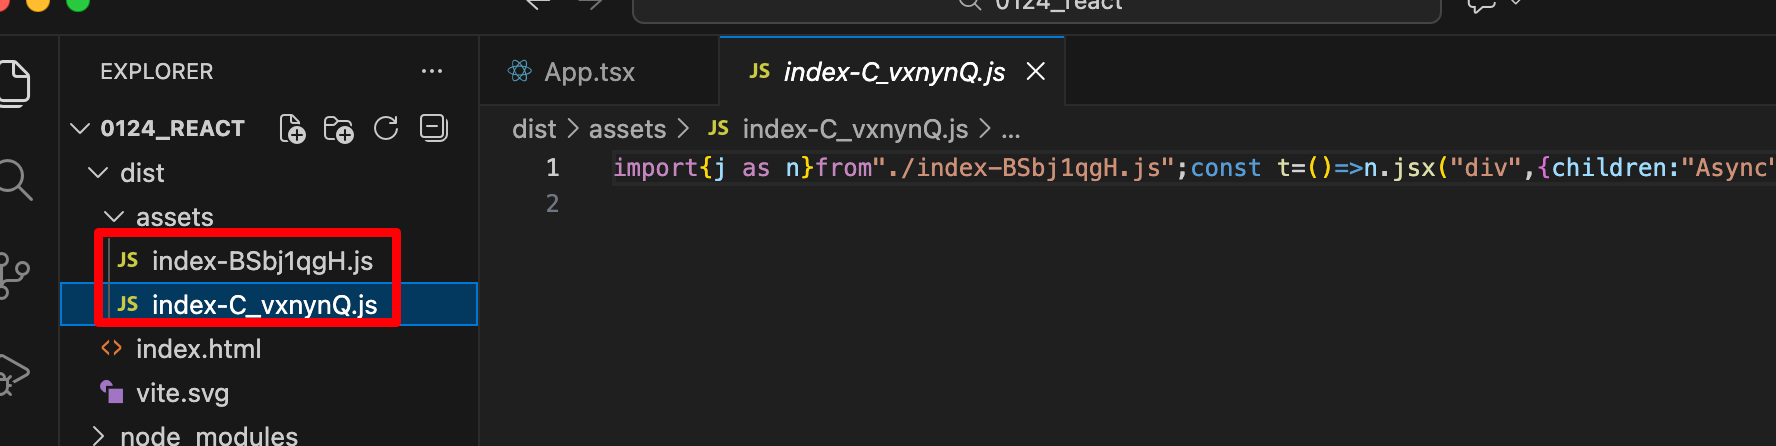
}打包会发现,这个组件被打包进了主包中,这样子就增加了主包的大小,因此需要拆分
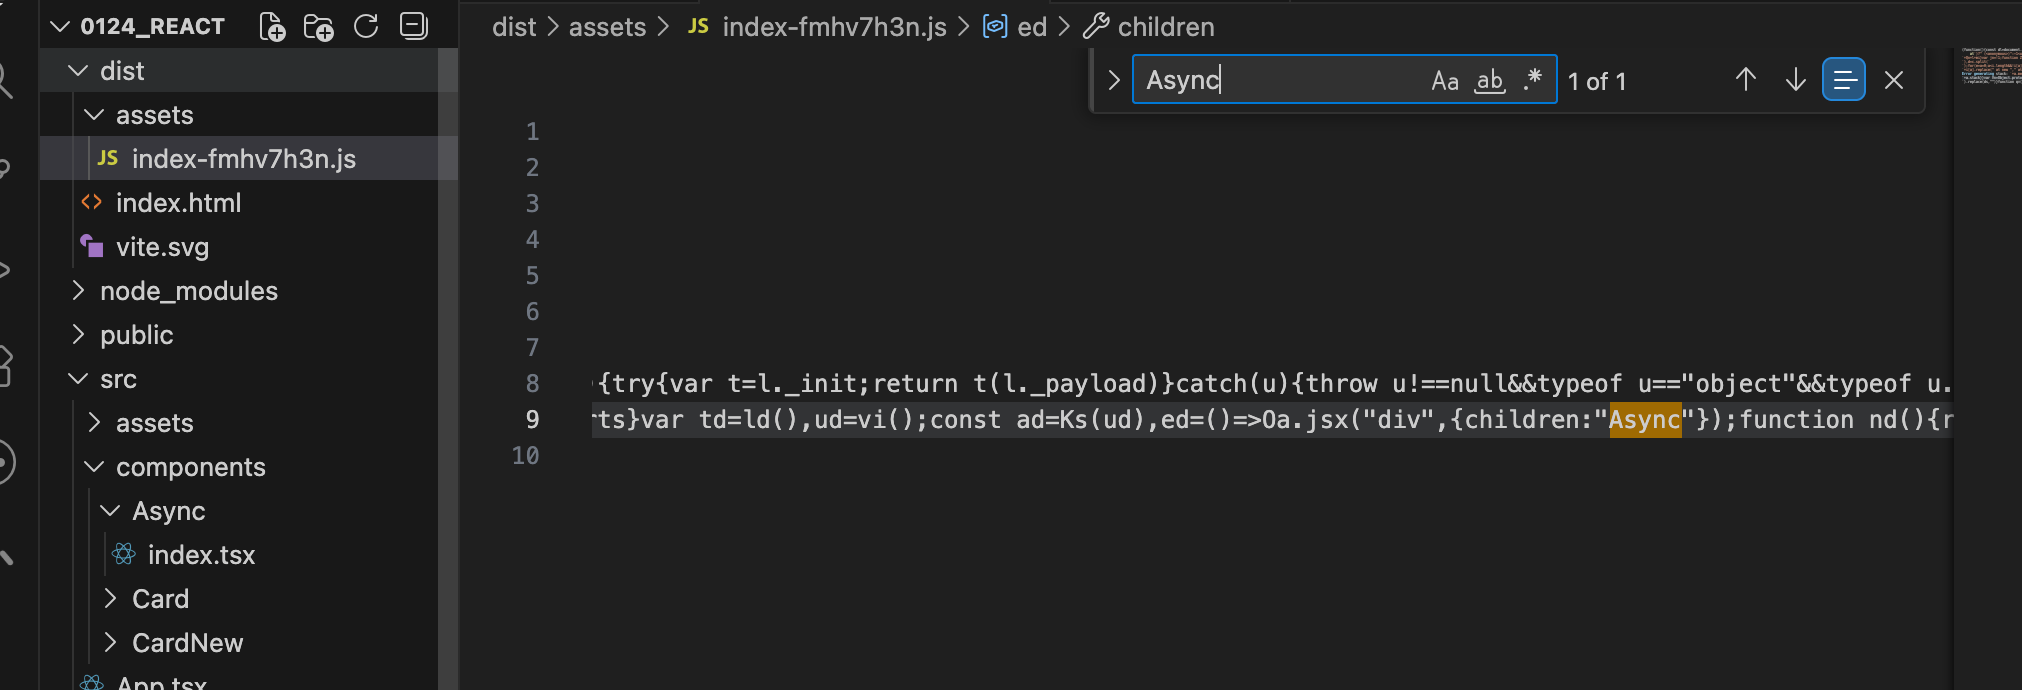
使用异步组件的方式,这样就可以减小主包的一个大小
javascript
import React, {lazy, Suspense} from 'react';
const AsyncComponent = lazy(() => import('./components/Async'))

function App() {
  return (
    <>
      <h1>app</h1>
      <Suspense fallback={<div>loading...</div>}>
        <AsyncComponent></AsyncComponent>
      </Suspense>
    </>
  )
}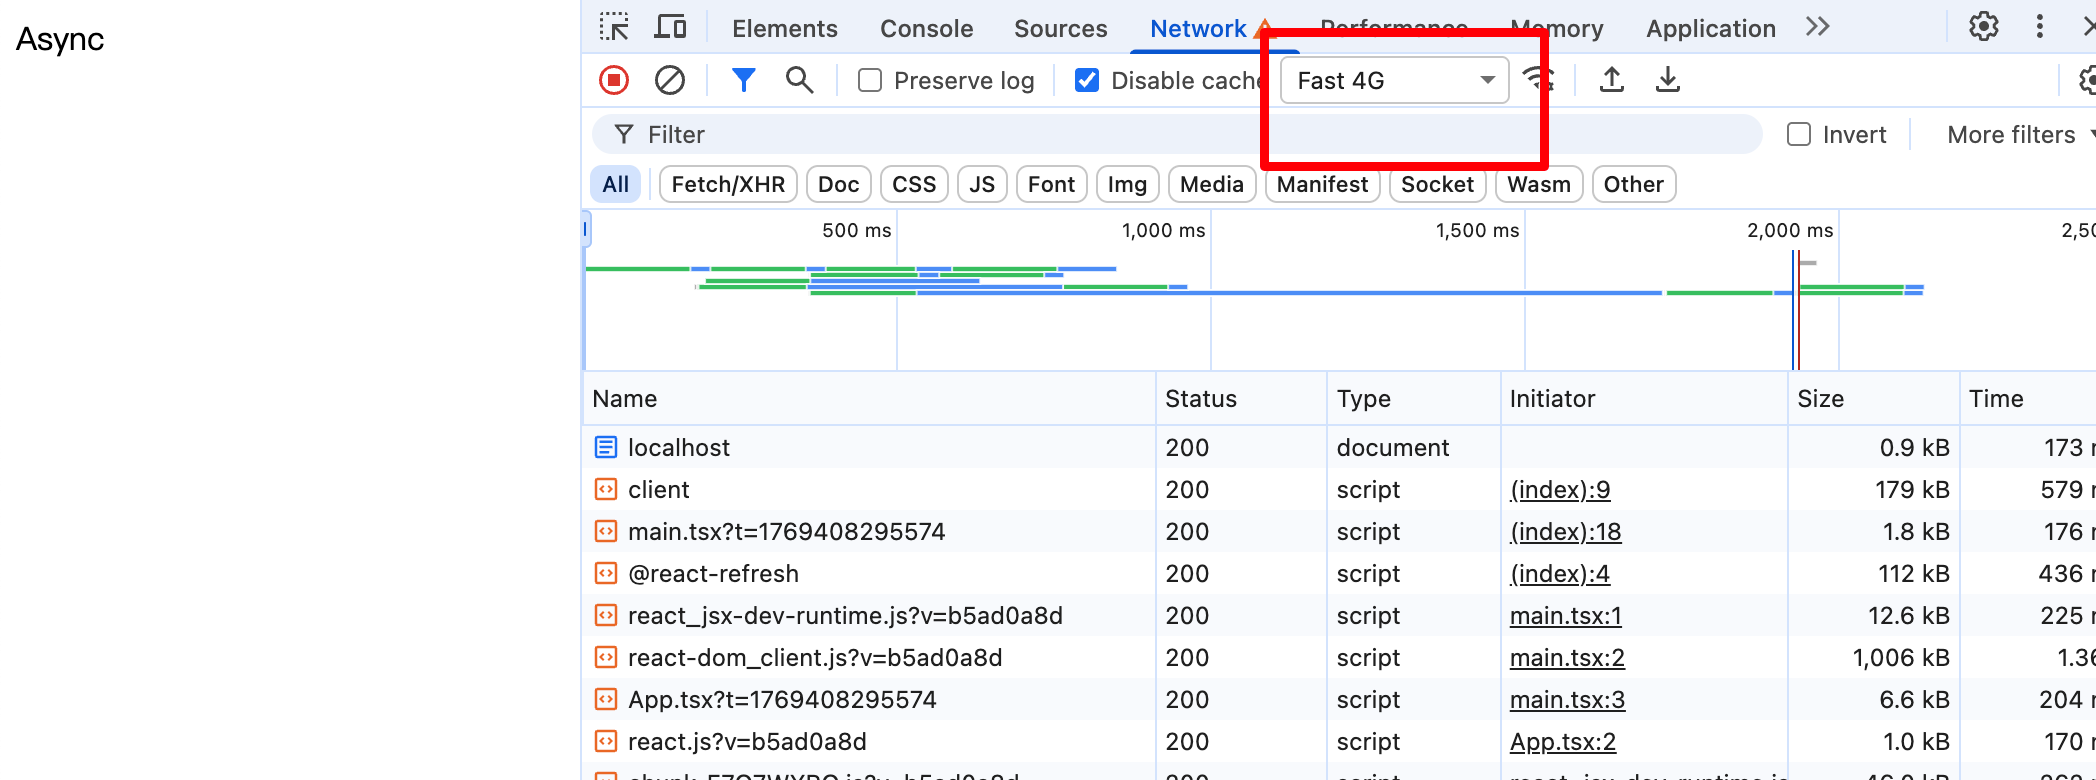
这样 拆分出来之后,npm run build 打包就很小了
异步数据加载
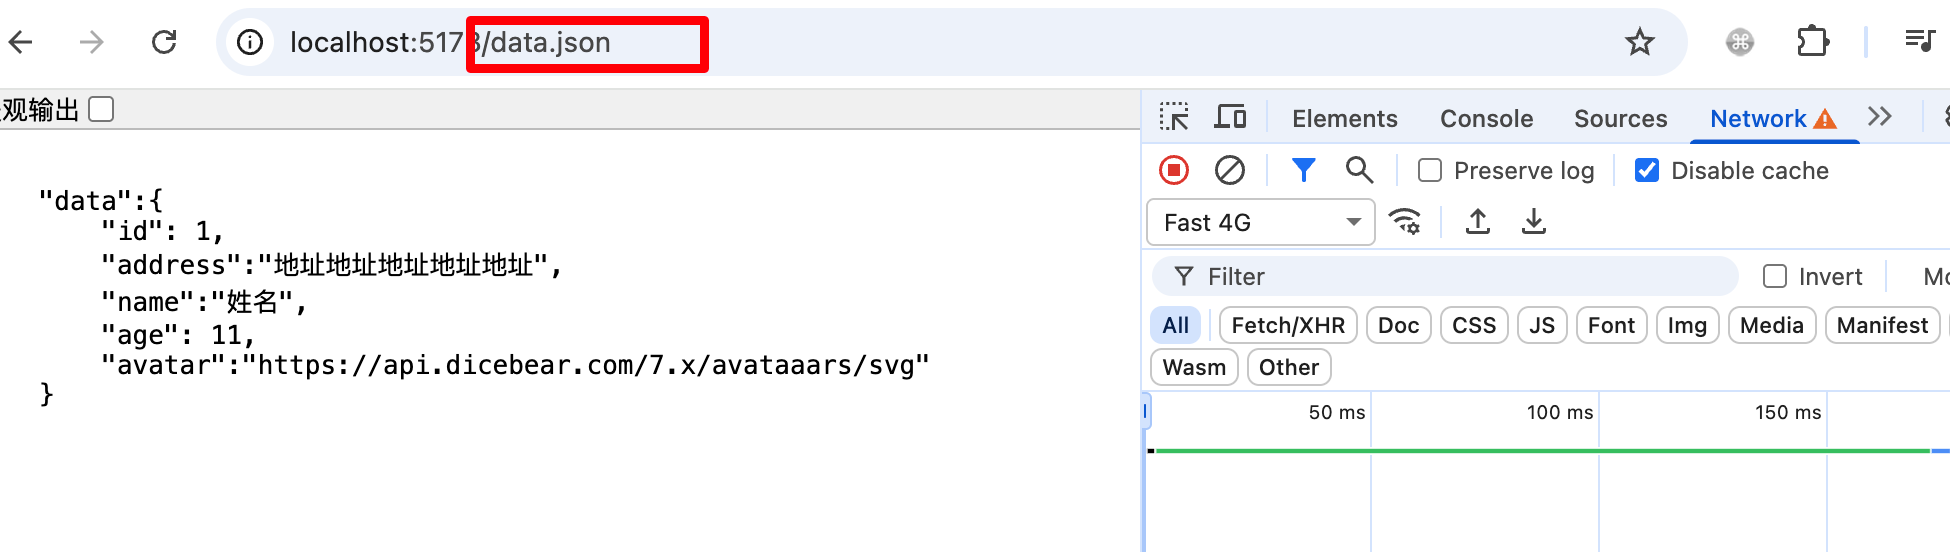
写在public 目录下的数据,可以直接被访问到
- 当加载的时候,展示骨架屏,当加载完成,展示 card
- App.tsx
javascript
import { Skeleton } from './components/Skeleton';
import Card from './components/Card';

function App() {
  return (
    <>
      <Suspense fallback={<Skeleton></Skeleton>}>
        <Card></Card>
      </Suspense>
    </>
  )
}- Card
Suspense 的工作机制是基于use() 的异步操作。它会等待 use() 里的异步数据(dataPromise)加载完成,然后自动渲染出最终的组件。
javascript
import { use } from 'react'
import './index.css'
interface Data {
   name: string
   age: number
   address: string
   avatar: string
}


const sleep = (ms: number) => {
    return new Promise((resolve) => {
        setTimeout(() => {
            resolve('')
        }, ms)
    })
}

const getData = async () => {
    await sleep(2000)
    return await fetch('/data.json').then((res) => res.json())
}

const dataPromise = getData();

const Card: React.FC = () => {
   const { data } = use(dataPromise);
   return <div className="card">
      <header className="card-header">
         <div className="card-name">{data.name}</div>
         <div className="card-age">{data.age}</div>
      </header>
      <section className="card-content">
         <div className="card-address">{data.address}</div>
         <div className="card-avatar">
            <img width={50} height={50} src={data.avatar} alt="" />
         </div>
      </section>
   </div>;
};

export default Card;
HOC
Higher Order Component
高阶组件本质上是一个 函数,而不是组件。它接受一个组件作为输入,返回一个新的组件。这个新的组件可以复用原始组件的逻辑,并且能够添加新的功能或行为。你可以理解为高阶组件在 增强 原组件的能力。
注意事项
- HOC不会修改传入的组件,而是使用组合的方式,通过将原组件包裹在一个容器组件中来实现功能扩展
- 注意避免多层嵌套,一般HOC的嵌套层级不要超过3层
- HOC的命名规范:with开头,如withLoading、withAuth等
简单例子
javascript
enum Role {
  ADMIN = 'admin',
  USER = 'user',
}

const withAuthorization = (role: Role) => {
  return (Component: React.FC) => {
    // 判断是否具有权限的函数
    const isAuthorized = (role: Role) => {
      return role === Role.ADMIN;
    }
    return (props: any) => {
      // 判断是否具有权限
      if (isAuthorized(role)) {
        //把props透传给组件
        return <Component {...props} />
      } else {
        // 没有权限则返回一个提示
        return <div>抱歉,您没有权限访问该页面</div>
      }
    }
  }
}- 接受一个 role 作为参数:role: Role:在这里传入角色类型(ADMIN 或 USER),它决定了权限判断的条件。
- withAuthorization 返回一个接受 Component 组件作为参数的函数。这个返回的函数接收 Component 作为参数,并返回一个新的组件。
javascript
const AdminPage = withAuthorization(Role.ADMIN)(() => {
  return <div>管理员页面</div> //有权限输出
})

const UserPage = withAuthorization(Role.USER)(() => {
  return <div>用户页面</div> //没有权限不输出
})