为pngme拓展加密功能与jpg格式支持
引言
发现了一个好玩的小项目:Introduction - PNGme: An Intermediate Rust Project。这里面提到了根据PNG标准格式特点,将信息写入PNG文件而不影响文件自身被正常解析的功能。这个项目已经被非常多的人复刻了,我自己也想玩一下,不过,我要做一些拓展,包括但不限于:
- 支持utf8。这个,我看rust的支持很不错,相比于大部分人的实现,不要对信息数据逐字节解析为
char,而是要通过String::from_utf8_lossy(self.data())或者其他方法将数据整体转为字符串就可以了,这里不做赘述。 - 支持密文。毕竟都已经实现文件隐写了,加个密岂不是更好玩😋。
- 支持jpg格式。jpg也很常见了,万一一时半会掏不出png岂不是很扫兴。
对于PNGme本身的中文讲解,可以参考PNGme:基于Rust的命令行程序 在PNG图片中隐藏信息 | 乱up廿四。
我的项目名为PngKey(最开始也只是想支持png,后来懒得改名了😂)Smart-Space/pngkey: 将信息文本或密文写入PNG或JPG文件。除了上面所述的三个拓展,还进行了一些其他改进。
信息加密
明文与密文
在pngme的原版实现里,encode命令只包含文件路径、块名称与信息,现在,修改clap的命令行参数,可选支持密码以及输出文件(输出到其他文件很简单,这里不讲):
rust
#[derive(Debug, Args)]
pub struct EncodeArgs {
    /// The file path to the PNG file to be encoded.
    pub file_path: PathBuf,
    /// The chunk type to be used for the message.
    pub chunk_type: String,
    /// The message to be encoded.
    pub message: String,
    /// The output file path. If not specified, the original file will be overwritten.
    #[clap(short, long)]
    pub output: Option<PathBuf>,
    /// The password to be used for encryption. If not specified, the message will be stored in plain text.
    #[clap(short, long)]
    pub password: Option<String>,
}
那么,对密码的处理也很简单,有就是有,没有就是没有:
rust
let password = args.password.unwrap_or_else(|| "".to_string());这样的话,方便后面判断信息应当是明文还是密文:
rust
if !password.is_empty() {
    encrypted_message = key::encrypt(&message, &password)?;
} else {
    encrypted_message = message;
}
加密
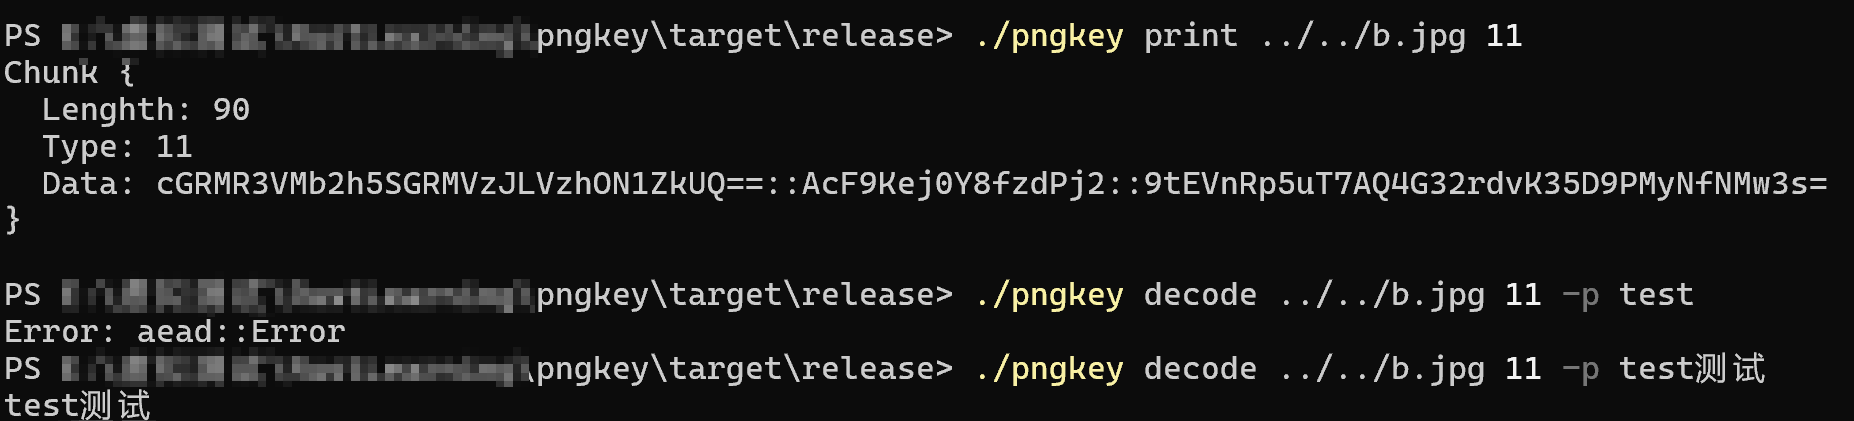
PngKey选择使用ChaCha20-Poly1305方式加密,输入的密码通过Argon2id派生密钥,一通操作下来,将salt、nonce、密文用base64转码,再用::拼接输出。
rust
pub fn encrypt(plaintext: &str, password: &str) -> Result<String> {
    // 生成随机salt
    let salt = SaltString::generate(&mut OsRng);

    // 使用Argon2id派生密钥
    let argon2 = Argon2::default();
    let password_hash = argon2.hash_password(password.as_bytes(), &salt)?;
    let key = password_hash.hash.unwrap();

    // 生成随机nonce(ChaCha20-Poly1305使用12字节nonce)
    let mut nonce_bytes = [0u8; 12];
    OsRng.fill_bytes(&mut nonce_bytes);
    let nonce = Nonce::from_slice(&nonce_bytes);

    // 创建加密器
    let cipher = ChaCha20Poly1305::new_from_slice(key.as_bytes())?;

    // 加密
    let ciphertext = cipher.encrypt(nonce, plaintext.as_bytes())?;

    // 组合:salt + nonce + ciphertext
    let salt_b64 = general_purpose::STANDARD.encode(salt.as_str().as_bytes());
    let nonce_b64 = general_purpose::STANDARD.encode(&nonce_bytes);
    let ciphertext_b64 = general_purpose::STANDARD.encode(&ciphertext);
    let combined = format!("{}::{}::{}", salt_b64, nonce_b64, ciphertext_b64);

    Ok(combined)
}
解密
基本就是加密的逆过程,通过看能不能被::分割判断是否需要密码,那么密码对不对呢?很简单,直接用?自行抛出AEAD的错误就行了,我不管了😇。
rust
pub fn decrypt(encrypted: &str, password: &str) -> Result<String> {
    let parts: Vec<&str> = encrypted.split("::").collect();
    if parts.len() != 3 {
        return Ok(String::from(encrypted));
    }
    if password.is_empty() {
        return Err("Need password to decrypt".into());
    }

    let salt_str = String::from_utf8(general_purpose::STANDARD.decode(parts[0])?)?;
    let nonce_bytes = general_purpose::STANDARD.decode(parts[1])?;
    let ciphertext = general_purpose::STANDARD.decode(parts[2])?;

    let nonce = Nonce::from_slice(&nonce_bytes);

    // 使用Argon2重新派生密钥
    let argon2 = Argon2::default();
    let salt = SaltString::from_b64(&salt_str)?;
    let password_hash = argon2.hash_password(password.as_bytes(), &salt)?;
    let key = password_hash.hash.unwrap();

    // 解密
    let cipher = ChaCha20Poly1305::new_from_slice(key.as_bytes())?;
    let plaintext_bytes = cipher.decrypt(nonce, ciphertext.as_slice())?;

    Ok(String::from_utf8(plaintext_bytes)?)
}
JPG格式支持
JPG格式简读
中文解读可以参考完整教程:【图像处理】jpeg 格式详解 - yangykaifa - 博客园,这里只说明要点。
SOI和EOI均只有两个字节。
SOS的长度信息是6 + 2×组件数量(如3个组件时为00 0C=12字节),不是数据长度信息,SOS的数据会一直持续到下一个块。因此SOS的数据内容需要通过寻找下一个块的位置来间接获得。
块间间隔是0xFF,且后面不应当是0x00,对于数据中出现的0xFF,需要后补0x00。而我们要填入utf8字符串或者密文的块在EOI块后,解析器根本不会理会,因此不需要特殊操作。
代码结构
因为要支持两种格式,肯定需要两套操作,而为了保证编程的方便,两套操作应当封装为具有相同名称的子库,供commands.rs统一调用。
│  args.rs
│  commands.rs
│  jpg.rs
│  key.rs
│  main.rs
│  png.rs
│
├─jpg
│      chunk.rs
│      chunk_type.rs
│      command.rs
│
└─png
        chunk.rs
        chunk_type.rs
command.rs其中,png与jpg模块分别提供is_png和is_jpg供主流程判断该选择进行哪一类操作。
JPG块结构
rust
pub struct Chunk {
    head: u8,
    chunk_type: ChunkType,
    length: u16,
    data: Vec<u8>,
}
显然对于一些块类型,我们没必要去理会它们的长度:
rust
static AVOID_LENGTH_TYPE: [u8; 3] = [0xd8, 0xd9, 0xda];

impl Chunk {
    pub fn new(chunk_type: ChunkType, data: Vec<u8>) -> Chunk {
        let length: u16;
        if AVOID_LENGTH_TYPE.contains(&chunk_type.bytes()) {
            if &chunk_type.bytes() == &0xda {
                // DA的长度放在数据里,这里只是显示头长度
                length = u16::from_be_bytes([data[0], data[1]]);
            } else {
                length = 0;
            }
        } else {
            length = u16::try_from(data.len()).unwrap() + 2;
        }
        Chunk {
            head: 0xff,
            chunk_type,
            length,
            data,
        }
    }
    //...
}
从数据读取为JPG结构
JPG的整体结构跟PNG一样简单:
rust
pub struct Jpg {
    header: [u8; 2],
    chunks: Vec<Chunk>,
}
从数据读取时需要注意SOI和EOI,以及对SOS的读取方式:
rust
fn find_next_marker(bytes: &[u8], start: usize) -> Option<usize> {
    let mut i = start;
    while i + 1 < bytes.len() {
        if bytes[i] == 0xFF && bytes[i+1] != 0x00 {
            return Some(i);
        }
        i += 1;
    }
    None
}

impl TryFrom<&[u8]> for Jpg {
    type Error = Error;

    fn try_from(bytes: &[u8]) -> Result<Jpg> {
        let header: [u8; 2] = [bytes[0], bytes[1]];
        let mut chunks = Vec::new();
        let mut index = 2;
        while index < bytes.len() {
            let marker_type = bytes[index + 1];
            index += 2;

            match marker_type {
                0xD8 => { // SOI
                    chunks.push(Chunk::new(ChunkType::try_from(0xD8).unwrap(), (&[]).to_vec()));
                }
                0xD9 => { // EOI
                    chunks.push(Chunk::new(ChunkType::try_from(0xD9).unwrap(), (&[]).to_vec()));
                    // JPG标准结束
                }
                0xDA => { // SOS
                    // 找到下一个 marker
                    if let Some(next_marker_pos) = find_next_marker(bytes, index) {
                        let chunk_bytes = &bytes[index..next_marker_pos];
                        chunks.push(Chunk::new(ChunkType::try_from(0xDA).unwrap(), chunk_bytes.to_vec()));
                        index = next_marker_pos;
                    } else {
                        return Err("No marker found after SOS chunk".into());
                    }
                }
                _ => {
                    let length_bytes: [u8; 2] = bytes[index..index+2].try_into().unwrap();
                    let length = u16::from_be_bytes(length_bytes) as usize;
                    let chunk_end = index + length;
                    let chunk_bytes = &bytes[index+2..chunk_end];
                    chunks.push(Chunk::new(ChunkType::try_from(marker_type).unwrap(), chunk_bytes.to_vec()));
                    index = chunk_end;
                }
            }

        }
        Ok(Jpg { header, chunks })
    }
}
部分展示