我将以"Redis ZSet+Lua脚本+SpringBoot实战:滑动窗口限流方案从原理到落地"为标题,先拆解滑动窗口限流核心逻辑,再逐层讲清三者协同原理与实现步骤,附完整可复用代码,兼顾理论深度与实战性。
Redis ZSet+Lua脚本+SpringBoot实战:滑动窗口限流方案从原理到落地
在分布式系统中,接口限流是保障服务稳定性的关键手段,可有效防止恶意请求、流量峰值击垮服务。滑动窗口限流因精度高、灵活性强,成为主流限流方案之一。本文将结合Redis ZSet的有序特性、Lua脚本的原子性保障与SpringBoot的工程化能力,由浅入深拆解滑动窗口限流的实现原理,一步步完成落地开发,最终给出完整可运行代码,帮助大家吃透这一高频技术方案。
一、核心概念与原理拆解
在动手开发前,我们先理清核心概念,搞懂"为什么用Redis ZSet+Lua"实现滑动窗口限流,而非单纯依赖Java本地缓存。
1. 滑动窗口限流:比固定窗口更精准的限流方式
限流的核心是控制单位时间内的请求次数,常见方案分为固定窗口与滑动窗口:
-
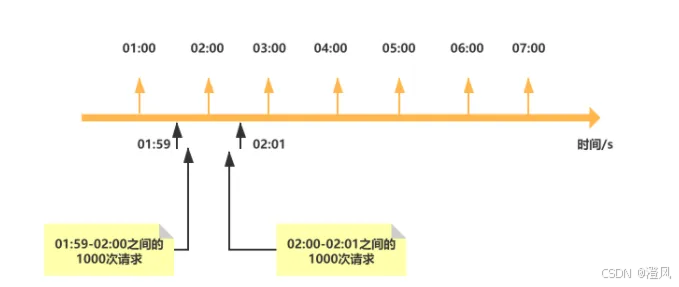
固定窗口限流:将时间划分为固定区间(如1分钟),统计每个区间内的请求数,超过阈值则拒绝。缺点是存在"边界漏洞",例如在两个相邻窗口的交界处(第59秒和第61秒),可能出现两倍阈值的请求,突破限流防线。
-
滑动窗口限流:将固定窗口拆分为多个小时间片,窗口随时间推移逐片滑动,实时统计当前窗口内的请求数。例如1分钟窗口拆分为6个10秒时间片,每过10秒窗口滑动一次,仅统计最近1分钟内的请求,彻底解决边界漏洞,精度更高。
滑动窗口的核心需求的是:快速统计指定时间范围内的请求数,并保证统计与限流判断的原子性,这正是Redis ZSet与Lua脚本的优势所在。
2. Redis ZSet:滑动窗口的"时间容器"
ZSet的"member+score"结构天然适配滑动窗口场景,我们可以这样设计:
-
score字段:存储请求的时间戳(毫秒级),用于标记请求发生的时间点,借助ZSet的有序性快速筛选出"当前窗口内的请求"。
-
member字段:存储唯一标识(如UUID+请求IP),确保每个请求在ZSet中唯一,避免重复统计(也可直接用UUID,无需关联IP,视场景调整)。
核心逻辑:每次请求到来时,先删除ZSet中时间戳早于"当前时间-窗口时长"的元素(清理过期请求),再统计剩余元素数量(当前窗口内请求数)。若数量小于阈值,则允许请求并将当前请求存入ZSet;若大于等于阈值,则拒绝请求。
ZSet关键指令(后续实战核心):
-
ZADD key score member:存入请求时间戳与唯一标识;
-
ZREMRANGEBYSCORE key min max:删除时间戳在min, max区间外的过期请求;
-
ZCARD key:统计当前窗口内的请求数(剩余元素数量);
-
EXPIRE key seconds:给ZSet设置过期时间,避免长期存储无效数据。
3. Lua脚本:原子性保障的"关键锁"
滑动窗口限流的核心痛点是"统计请求数"与"存入新请求"的原子性。若分开执行ZREMRANGEBYSCORE、ZCARD、ZADD三个指令,高并发场景下可能出现以下问题:
请求A清理过期元素后,尚未统计与存入;请求B此时介入清理,导致统计结果失真,最终超出限流阈值。
Lua脚本可将多个Redis指令封装为一个原子操作------Redis执行Lua脚本时,会阻塞其他所有命令,直到脚本执行完成(需控制脚本执行时间在10ms内,避免阻塞Redis),彻底解决并发竞争问题。同时,Lua脚本支持条件判断,可直接在脚本中完成"清理-统计-判断-存储"全流程,减少网络交互开销。
4. SpringBoot:工程化落地的"载体"
SpringBoot通过Spring Data Redis快速整合Redis,提供便捷的API调用与Lua脚本执行能力;同时支持自定义注解+AOP,将限流逻辑与业务代码解耦,实现"注解式限流",开发者只需在需要限流的接口上添加注解,即可快速生效,大幅提升开发效率。
二、协同逻辑与实现步骤
本文以"接口每分钟最多允许10次请求"为实战需求,实现滑动窗口限流方案。整体流程:SpringBoot整合Redis环境 → 编写Lua脚本封装限流核心逻辑 → 自定义限流注解与AOP切面 → 业务接口集成限流功能 → 测试验证效果。
步骤1:SpringBoot整合Redis环境
1.1 引入依赖
在pom.xml中添加Spring Data Redis、Lettuce客户端、AOP(用于切面编程)、工具类依赖:
xml
<dependency>
    <groupId>org.springframework.boot</groupId>
    <artifactId>spring-boot-starter-data-redis</artifactId>
</dependency>
<!-- Lettuce客户端(SpringBoot 2.x+默认集成,显式声明版本更稳定)-->
<dependency>
    <groupId>io.lettuce</groupId>
    <artifactId>lettuce-core</artifactId>
    <version>6.2.6.RELEASE</version>
</dependency>
<!-- AOP依赖,用于实现注解式限流 -->
<dependency>
    <groupId>org.springframework.boot</groupId>
    <artifactId>spring-boot-starter-aop</artifactId>
</dependency>
<!-- 工具类依赖,生成UUID、处理JSON -->
<dependency>
    <groupId>cn.hutool</groupId>
    <artifactId>hutool-all</artifactId>
    <version>5.8.20</version>
</dependency>
1.2 配置Redis连接
在application.yml中配置Redis连接信息、序列化方式(避免存储乱码),同时添加限流相关自定义配置:
yaml
spring:
  redis:
    host: localhost        # Redis服务地址
    port: 6379             # 端口
    password:              # 无密码则留空
    database: 0            # 数据库索引(默认0)
    lettuce:
      pool:
        max-active: 16     # 连接池最大活跃连接数
        max-idle: 8        # 连接池最大空闲连接数
        min-idle: 4        # 连接池最小空闲连接数
        max-wait: 3000ms   # 连接池最大阻塞等待时间

# 自定义限流配置
rate-limit:
  window-size: 60000      # 滑动窗口时长(毫秒),默认1分钟
  limit-count: 10         # 窗口内限流阈值,默认10次
  redis-key-prefix: rate:limit:  # 限流ZSet键前缀,避免key冲突
1.3 配置RedisTemplate与Lua脚本执行器
自定义RedisTemplate解决序列化问题,同时配置Lua脚本执行器,支持加载脚本文件并执行:
java
package com.example.ratelimit.config;
import org.springframework.context.annotation.Bean;
import org.springframework.context.annotation.Configuration;
import org.springframework.data.redis.connection.RedisConnectionFactory;
import org.springframework.data.redis.core.RedisTemplate;
import org.springframework.data.redis.core.script.DefaultRedisScript;
import org.springframework.data.redis.serializer.GenericJackson2JsonRedisSerializer;
import org.springframework.data.redis.serializer.StringRedisSerializer;
import java.io.Serializable;
@Configuration
public class RedisConfig {
/**
* 自定义RedisTemplate,解决key/value序列化乱码问题
*/
@Bean
public RedisTemplate<String, Serializable> redisTemplate(RedisConnectionFactory connectionFactory) {
RedisTemplate<String, Serializable> redisTemplate = new RedisTemplate<>();
redisTemplate.setConnectionFactory(connectionFactory);
// Key序列化:String序列化器(避免key加前缀乱码)
StringRedisSerializer stringSerializer = new StringRedisSerializer();
redisTemplate.setKeySerializer(stringSerializer);
redisTemplate.setHashKeySerializer(stringSerializer);
// Value序列化:Jackson序列化器(支持对象序列化)
GenericJackson2JsonRedisSerializer jacksonSerializer = new GenericJackson2JsonRedisSerializer();
redisTemplate.setValueSerializer(jacksonSerializer);
redisTemplate.setHashValueSerializer(jacksonSerializer);
redisTemplate.afterPropertiesSet();
return redisTemplate;
}
/**
* 配置Lua脚本执行器,指定返回值类型为Boolean(是否允许请求)
*/
@Bean
public DefaultRedisScript<Boolean> rateLimitRedisScript() {
DefaultRedisScript<Boolean> redisScript = new DefaultRedisScript<>();
// 后续指定Lua脚本路径,此处先初始化
redisScript.setResultType(Boolean.class);
return redisScript;
}
}步骤2:编写Lua脚本封装限流核心逻辑
编写Lua脚本,实现"清理过期请求→统计请求数→判断是否允许请求→存入新请求"全流程原子操作。将脚本放在resources/lua目录下(路径:resources/lua/rateLimit.lua),便于SpringBoot加载。
lua
-- 滑动窗口限流Lua脚本
-- 脚本参数说明:
-- KEYS[1]:限流ZSet的key(格式:前缀+接口标识+IP,确保粒度唯一)
-- ARGV[1]:当前请求时间戳(毫秒)
-- ARGV[2]:滑动窗口时长(毫秒)
-- ARGV[3]:窗口内限流阈值
-- ARGV[4]:请求唯一标识(UUID,避免重复统计)
-- ARGV[5]:ZSet过期时间(秒),防止无效数据堆积

local key = KEYS[1]
local currentTime = tonumber(ARGV[1])
local windowSize = tonumber(ARGV[2])
local limitCount = tonumber(ARGV[3])
local requestId = ARGV[4]
local expireTime = tonumber(ARGV[5])

-- 1. 清理过期请求:删除时间戳早于(当前时间-窗口时长)的元素
local minScore = 0
local maxScore = currentTime - windowSize
redis.call('ZREMRANGEBYSCORE', key, minScore, maxScore)

-- 2. 统计当前窗口内的请求数
local currentCount = redis.call('ZCARD', key)

-- 3. 判断是否允许请求:请求数小于阈值则允许,否则拒绝
local allowed = false
if currentCount < limitCount then
    -- 3.1 允许请求,将当前请求存入ZSet(score=时间戳,member=唯一标识)
    redis.call('ZADD', key, currentTime, requestId)
    allowed = true
end

-- 4. 给ZSet设置过期时间,避免长期存储(过期时间略大于窗口时长,确保窗口内数据有效)
redis.call('EXPIRE', key, expireTime)

-- 5. 返回结果:true=允许请求,false=拒绝请求
return allowed
⚠️ 脚本优化点:设置ZSet过期时间(expireTime)时,需略大于窗口时长(如窗口60秒,过期时间设为70秒),避免窗口内数据被提前清理,导致统计失真。
步骤3:自定义限流注解与AOP切面
为了让限流逻辑与业务代码解耦,我们实现"注解式限流"------自定义@RateLimit注解,在需要限流的接口上添加注解,通过AOP切面拦截请求,执行Lua脚本完成限流判断。
3.1 自定义限流注解(RateLimit.java)
支持自定义每个接口的窗口时长、限流阈值,优先级高于全局配置:
java
package com.example.ratelimit.annotation;

import java.lang.annotation.*;

/**
 * 自定义滑动窗口限流注解
 */
@Target({ElementType.METHOD})  // 仅作用于方法(接口)
@Retention(RetentionPolicy.RUNTIME)  // 运行时生效,允许反射获取
@Documented
public @interface RateLimit {

    /**
     * 滑动窗口时长(毫秒),默认取全局配置60000ms(1分钟)
     */
    long windowSize() default 0;

    /**
     * 窗口内限流阈值,默认取全局配置10次
     */
    int limitCount() default 0;

    /**
     * 限流提示信息
     */
    String message() default "请求过于频繁,请稍后再试!";
}
3.2 限流异常处理(RateLimitException.java)
自定义异常类,用于限流触发时抛出,便于全局捕获并返回友好提示:
java
package com.example.ratelimit.exception;

import lombok.Getter;

/**
 * 限流异常类
 */
@Getter
public class RateLimitException extends RuntimeException {

    private final String message;

    public RateLimitException(String message) {
        this.message = message;
    }
}
3.3 全局异常处理器(GlobalExceptionHandler.java)
捕获限流异常,返回标准化JSON响应,避免直接抛出异常给前端:
java
package com.example.ratelimit.handler;

import com.example.ratelimit.exception.RateLimitException;
import lombok.Data;
import org.springframework.web.bind.annotation.ExceptionHandler;
import org.springframework.web.bind.annotation.RestControllerAdvice;

import javax.servlet.http.HttpServletRequest;

/**
 * 全局异常处理器
 */
@RestControllerAdvice
public class GlobalExceptionHandler {

    /**
     * 处理限流异常
     */
    @ExceptionHandler(RateLimitException.class)
    public ResultVO handleRateLimitException(RateLimitException e, HttpServletRequest request) {
        return new ResultVO(429, e.getMessage(), request.getRequestURI());
    }

    /**
     * 统一响应体
     */
    @Data
    public static class ResultVO {
        private int code;        // 状态码(429表示请求过于频繁)
        private String message;  // 提示信息
        private String path;     // 请求路径

        public ResultVO(int code, String message, String path) {
            this.code = code;
            this.message = message;
            this.path = path;
        }
    }
}
3.4 AOP切面实现限流逻辑(RateLimitAspect.java)
切面拦截带有@RateLimit注解的方法,获取请求IP、接口标识,组装参数调用Lua脚本,根据脚本返回结果判断是否允许请求:
java
package com.example.ratelimit.aspect;

import cn.hutool.core.util.IdUtil;
import com.example.ratelimit.annotation.RateLimit;
import com.example.ratelimit.exception.RateLimitException;
import org.aspectj.lang.ProceedingJoinPoint;
import org.aspectj.lang.annotation.Around;
import org.aspectj.lang.annotation.Aspect;
import org.aspectj.lang.reflect.MethodSignature;
import org.springframework.beans.factory.annotation.Autowired;
import org.springframework.beans.factory.annotation.Value;
import org.springframework.data.redis.core.RedisTemplate;
import org.springframework.data.redis.core.script.DefaultRedisScript;
import org.springframework.core.io.ClassPathResource;
import org.springframework.stereotype.Component;
import org.springframework.web.context.request.RequestContextHolder;
import org.springframework.web.context.request.ServletRequestAttributes;

import javax.servlet.http.HttpServletRequest;
import java.lang.reflect.Method;
import java.util.Collections;
import java.util.List;

/**
 * 限流AOP切面
 */
@Aspect
@Component
public class RateLimitAspect {

    @Autowired
    private RedisTemplate<String, Serializable> redisTemplate;

    @Autowired
    private DefaultRedisScript<Boolean> rateLimitRedisScript;

    // 全局限流配置
    @Value("${rate-limit.window-size}")
    private long globalWindowSize;
    @Value("${rate-limit.limit-count}")
    private int globalLimitCount;
    @Value("${rate-limit.redis-key-prefix}")
    private String redisKeyPrefix;

    /**
     * 环绕通知,拦截带有@RateLimit注解的方法
     */
    @Around("@annotation(com.example.ratelimit.annotation.RateLimit)")
    public Object around(ProceedingJoinPoint joinPoint) throws Throwable {
        // 1. 获取请求上下文、目标方法、限流注解
        ServletRequestAttributes attributes = (ServletRequestAttributes) RequestContextHolder.getRequestAttributes();
        HttpServletRequest request = attributes.getRequest();
        MethodSignature signature = (MethodSignature) joinPoint.getSignature();
        Method method = signature.getMethod();
        RateLimit rateLimit = method.getAnnotation(RateLimit.class);

        // 2. 确定限流参数(接口注解配置优先级高于全局配置)
        long windowSize = rateLimit.windowSize() > 0 ? rateLimit.windowSize() : globalWindowSize;
        int limitCount = rateLimit.limitCount() > 0 ? rateLimit.limitCount() : globalLimitCount;
        String message = rateLimit.message();

        // 3. 组装限流ZSet的key:前缀 + 接口全路径 + 请求IP(按IP+接口粒度限流,避免单IP击穿)
        String interfaceName = method.getDeclaringClass().getName() + "." + method.getName();
        String clientIp = getClientIp(request);
        String redisKey = redisKeyPrefix + interfaceName + ":" + clientIp;

        // 4. 组装Lua脚本参数
        long currentTime = System.currentTimeMillis();  // 当前时间戳(毫秒)
        String requestId = IdUtil.fastUUID();          // 请求唯一标识(UUID)
        int expireTime = (int) (windowSize / 1000 + 10);  // ZSet过期时间(秒),比窗口时长多10秒

        List<String> keys = Collections.singletonList(redisKey);
        Object[] args = new Object[]{currentTime, windowSize, limitCount, requestId, expireTime};

        // 5. 加载并执行Lua脚本
        rateLimitRedisScript.setLocation(new ClassPathResource("lua/rateLimit.lua"));
        Boolean allowed = (Boolean) redisTemplate.execute(rateLimitRedisScript, keys, args);

        // 6. 判断是否允许请求:不允许则抛出限流异常
        if (Boolean.FALSE.equals(allowed)) {
            throw new RateLimitException(message);
        }

        // 7. 允许请求,执行目标方法
        return joinPoint.proceed();
    }

    /**
     * 获取客户端真实IP(兼容反向代理场景,如Nginx)
     */
    private String getClientIp(HttpServletRequest request) {
        String ip = request.getHeader("X-Forwarded-For");
        if (ip == null || ip.isEmpty() || "unknown".equalsIgnoreCase(ip)) {
            ip = request.getHeader("Proxy-Client-IP");
        }
        if (ip == null || ip.isEmpty() || "unknown".equalsIgnoreCase(ip)) {
            ip = request.getHeader("WL-Proxy-Client-IP");
        }
        if (ip == null || ip.isEmpty() || "unknown".equalsIgnoreCase(ip)) {
            ip = request.getRemoteAddr();
        }
        // 处理多代理场景,取第一个非unknown的IP
        if (ip != null && ip.contains(",")) {
            ip = ip.split(",")[0].trim();
        }
        return ip;
    }
}
步骤4:业务接口集成限流功能
创建测试接口,在接口上添加@RateLimit注解,可自定义窗口时长与限流阈值,验证限流效果:
java
package com.example.ratelimit.controller;
import com.example.ratelimit.annotation.RateLimit;
import org.springframework.web.bind.annotation.GetMapping;
import org.springframework.web.bind.annotation.RequestMapping;
import org.springframework.web.bind.annotation.RestController;
import java.util.HashMap;
import java.util.Map;
@RestController
@RequestMapping("/api/test")
public class TestController {
/**
* 测试接口1:使用全局限流配置(1分钟10次请求)
*/
@GetMapping("/demo1")
@RateLimit(message = "demo1接口请求过于频繁,请1分钟后再试!")
public Map<String, Object> demo1() {
Map<String, Object> result = new HashMap<>();
result.put("code", 200);
result.put("message", "请求成功");
result.put("data", "demo1接口响应内容");
return result;
}
/**
* 测试接口2:自定义限流配置(30秒5次请求)
*/
@GetMapping("/demo2")
@RateLimit(windowSize = 30000, limitCount = 5, message = "demo2接口请求过于频繁,请30秒后再试!")
public Map<String, Object> demo2() {
Map<String, Object> result = new HashMap<>();
result.put("code", 200);
result.put("message", "请求成功");
result.put("data", "demo2接口响应内容");
return result;
}
}三、完整代码结构与测试验证
3.1 项目结构
3.2 测试验证
启动SpringBoot项目,通过Postman或浏览器频繁访问测试接口,验证限流效果:
-
测试demo1接口:1分钟内连续请求11次,前10次返回成功响应(code=200),第11次返回限流提示(code=429,提示"demo1接口请求过于频繁...");等待1分钟后,可再次正常请求。
-
测试demo2接口:30秒内连续请求6次,前5次成功,第6次触发限流;等待30秒后,请求恢复正常。
-
多IP测试:用不同IP访问同一接口,各自独立统计请求数,互不影响,验证"IP+接口"粒度的限流效果。
同时可通过Redis客户端查看ZSet数据:执行ZRANGE rate:limit:com.example.ratelimit.controller.TestController.demo1:127.0.0.1 0 -1 WITHSCORES,可看到窗口内的请求时间戳与唯一标识,过期请求会被自动清理。
四、进阶优化与注意事项
1. 性能优化
-
Lua脚本缓存 :当前实现每次请求都会加载Lua脚本文件,可缓存脚本的SHA1值,通过
redis.call('EVALSHA', sha1, keyCount, keys, args)执行脚本,减少文件IO开销。 -
Redis连接池优化:根据并发量调整连接池参数(max-active、max-wait等),避免连接池耗尽导致请求阻塞。
-
key粒度优化:除了"IP+接口"粒度,还可根据业务需求调整为"用户ID+接口""APPID+接口"等粒度,适配不同场景。
2. 注意事项
-
Lua脚本执行时间:必须控制在10ms内,避免阻塞Redis主线程。本方案中仅涉及3个核心Redis指令,执行效率极高,可放心使用。
-
Redis高可用:限流依赖Redis可用性,生产环境需部署Redis集群(主从+哨兵或Redis Cluster),避免单点故障导致限流失效。
-
时间同步问题:滑动窗口依赖时间戳,需确保Redis服务器与应用服务器时间同步,否则可能出现统计偏差。
-
大量过期key清理:虽然ZSet设置了过期时间,但大量限流key可能导致Redis主动清理压力增大,可结合定时任务批量清理无效key。
五、总结
本文基于Redis ZSet的有序特性、Lua脚本的原子性与SpringBoot的工程化能力,实现了高精度、高可用的滑动窗口限流方案。核心逻辑是通过ZSet维护请求时间戳,Lua脚本保障"清理-统计-判断-存储"原子性,AOP+自定义注解实现与业务代码解耦。该方案适用于分布式系统的接口限流场景,可根据业务需求灵活调整窗口时长、限流阈值与key粒度。
相比其他限流方案(如Guava RateLimiter),本方案基于Redis实现,支持分布式环境下的统一限流,避免单机限流的局限性;同时滑动窗口精度高于固定窗口,Lua脚本解决了并发安全问题,是生产环境的优选方案。