文章目录
一、核心工具函数解析
首先,我们来看系统依赖的工具函数,这些函数为整个识别过程提供了基础支持:
python
import cv2

def sort_contours(cnts, method='left-to-right'):
    """
    对轮廓进行排序

    参数:
        cnts: 轮廓列表
        method: 排序方法,支持以下四种:
            'left-to-right' - 从左到右(默认)
            'right-to-left' - 从右到左
            'top-to-bottom' - 从上到下
            'bottom-to-top' - 从下到上

    返回值:
        cnts: 排序后的轮廓列表
        boundingBoxes: 对应的边界框列表
    """
    reverse = False
    i = 0

    # 根据排序方法设置参数
    if method == 'right-to-left' or method == 'bottom-to-top':
        reverse = True
    if method == 'top-to-bottom' or method == 'bottom-to-top':
        i = 1

    # 计算每个轮廓的边界框
    boundingBoxes = [cv2.boundingRect(c) for c in cnts]

    # 根据边界框的x或y坐标进行排序
    (cnts, boundingBoxes) = zip(*sorted(zip(cnts, boundingBoxes),
                                        key=lambda b: b[1][i], reverse=reverse))
    return cnts, boundingBoxes


def resize(image, width=None, height=None, inter=cv2.INTER_AREA):
    """
    按比例调整图像大小

    参数:
        image: 输入图像
        width: 目标宽度(可选)
        height: 目标高度(可选)
        inter: 插值方法,默认为cv2.INTER_AREA

    返回值:
        resized: 调整后的图像
    """
    dim = None
    (h, w) = image.shape[:2]

    # 如果未指定尺寸,直接返回原图
    if width is None and height is None:
        return image

    # 根据指定的宽度或高度计算缩放比例
    if width is None:
        r = height / float(h)
        dim = (int(w * r), height)
    else:
        r = width / float(w)
        dim = (width, int(h * r))

    # 执行缩放操作
    resized = cv2.resize(image, dim, interpolation=inter)
    return resized


def cv_show(name, img):
    """
    显示图像窗口

    参数:
        name: 窗口名称
        img: 要显示的图像
    """
    cv2.imshow(name, img)
    cv2.waitKey(0)


# 枚举函数示例
for i, j in enumerate([5, 6, 7]):
    print(i, j)

# 列表推导式示例
a = [i for i in range(5)]
print(a)

# 字符串连接示例
a = ''.join(['4', '0', '0', '0'])
print(a)
关键函数解析:
-
sort_contours() :此函数的核心功能是依据轮廓的空间位置进行排序。在身份证号码识别中,我们需要确保数字按照正确的阅读顺序(从左到右)被处理。函数通过
cv2.boundingRect()获取每个轮廓的边界框,然后根据指定的排序方法对边界框的x或y坐标进行排序。 -
resize() :这是一个灵活的缩放函数,可以根据宽度或高度按比例调整图像大小,保持原始宽高比不变。
cv2.INTER_AREA插值方法特别适合缩小图像,能够减少锯齿效应。 -
cv_show() :简化了图像显示流程,调用
cv2.waitKey(0)使得窗口保持打开直到用户按键。
二、数字模板提取模块
模板匹配的前提是准备好标准的数字模板。以下是模板提取的完整实现:

python
import cv2
import numpy as np
from myutils import sort_contours, cv_show


def process_template():
    """处理模板图像,提取数字模板"""

    # 读取模板图像文件
    img = cv2.imread("ID_Card_tem.png")
    cv_show('Template Original', img)

    # 将图像转换为灰度图
    gray = cv2.cvtColor(img, cv2.COLOR_BGR2GRAY)
    # 对灰度图进行二值化处理
    ref = cv2.threshold(gray, 150, 255, cv2.THRESH_BINARY_INV)[1]
    cv_show('Template Binary', ref)

    # 查找二值图像中的所有轮廓
    _, contours, hierarchy = cv2.findContours(ref.copy(), cv2.RETR_EXTERNAL, cv2.CHAIN_APPROX_SIMPLE)

    # 绘制所有轮廓
    img_copy = img.copy()
    cv2.drawContours(img_copy, contours, -1, (0, 255, 0), 2)
    cv_show('Template Contours', img_copy)

    # 对轮廓进行从左到右排序
    refCnts = sort_contours(contours, method='left-to-right')[0]

    # 创建字典存储数字模板
    digits = {}
    for i, c in enumerate(refCnts):
        # 获取轮廓的边界矩形
        x, y, w, h = cv2.boundingRect(c)
        # 裁剪数字区域并扩展边界
        roi = ref[y - 2:y + h + 2, x - 2:x + w + 2]
        # 调整到标准大小
        roi = cv2.resize(roi, (57, 88))
        # 黑白反转(使数字为白色,背景为黑色)
        roi = cv2.bitwise_not(roi)
        # 存储到字典
        digits[i] = roi

    print(f"Extracted {len(digits)} digit templates")
    return digits
模板提取关键步骤:
-
图像预处理 :首先将彩色模板转换为灰度图像,然后使用固定阈值(150)进行二值化。
THRESH_BINARY_INV参数表示反色二值化,使数字区域变为白色,背景变为黑色。 -
轮廓检测 :
cv2.findContours()函数检测所有外部轮廓。RETR_EXTERNAL只检测最外层轮廓,CHAIN_APPROX_SIMPLE使用简单的轮廓近似,减少点的数量。 -
轮廓排序 :使用自定义的
sort_contours()函数确保数字按正确顺序排列。这对于建立索引(0对应数字0,1对应数字1等)至关重要。 -
模板标准化:将每个数字裁剪出来,统一缩放到57×88像素,并进行黑白反转,为后续的模板匹配做准备。
三、身份证号码识别模块
有了数字模板后,就可以识别实际身份证图像中的号码:

python
def recognize_id_card(digits):
    """识别身份证图像中的号码"""

    # 读取身份证图像
    img = cv2.imread("ID_Card.jpg")
    original_img = img.copy()
    cv_show('ID Card Original', img)

    # 灰度化处理
    gray = cv2.cvtColor(img, cv2.COLOR_BGR2GRAY)
    cv_show('ID Card Gray', gray)

    # 二值化处理
    binary = cv2.threshold(gray, 120, 255, cv2.THRESH_BINARY_INV)[1]
    cv_show('ID Card Binary', binary)

    # 查找所有轮廓
    _, contours, hierarchy = cv2.findContours(binary.copy(), cv2.RETR_EXTERNAL, cv2.CHAIN_APPROX_SIMPLE)

    # 绘制所有轮廓
    img_with_contours = img.copy()
    cv2.drawContours(img_with_contours, contours, -1, (0, 255, 0), 2)
    cv_show('All Contours', img_with_contours)

    # 筛选身份证号码区域
    locs = []
    for i, c in enumerate(contours):
        x, y, w, h = cv2.boundingRect(c)
        # 根据位置筛选(需要根据实际图像调整参数)
        if (y > 330 and y < 360) and x > 220:
            locs.append((x, y, w, h))

    # 按x坐标排序
    locs = sorted(locs, key=lambda x: x[0])

    # 如果没有找到数字区域,输出调试信息
    if len(locs) == 0:
        print("Error: No ID number region found")
        for i, c in enumerate(contours):
            x, y, w, h = cv2.boundingRect(c)
            print(f"Contour{i}: x={x}, y={y}, w={w}, h={h}")
        return

    print(f"Found {len(locs)} digit regions")

    # 识别每个数字区域
    output = []
    for i, (gX, gY, gW, gH) in enumerate(locs):
        # 裁剪数字区域
        group = gray[gY - 2:gY + gH + 2, gX - 2:gX + gW + 2]

        # 使用OTSU方法进行自适应二值化
        group = cv2.threshold(group, 0, 255, cv2.THRESH_BINARY | cv2.THRESH_OTSU)[1]

        # 调整到模板大小
        roi = cv2.resize(group, (57, 88))

        # 模板匹配
        scores = []
        for digit, digitROI in digits.items():
            result = cv2.matchTemplate(roi, digitROI, cv2.TM_CCOEFF)
            _, score, _, _ = cv2.minMaxLoc(result)
            scores.append(score)

        # 选择最佳匹配
        digit_index = np.argmax(scores)
        groupOutput = str(digit_index)
        output.append(groupOutput)

        # 在图像上绘制结果
        cv2.rectangle(original_img, (gX - 5, gY - 5),
                      (gX + gW + 5, gY + gH + 5), (0, 0, 255), 2)
        cv2.putText(original_img, groupOutput, (gX, gY - 15),
                    cv2.FONT_HERSHEY_SIMPLEX, 0.8, (0, 0, 255), 2)

    # 组合识别结果
    id_number = "".join(output)
    print(f"识别到的身份证号码: {id_number}")

    # 显示最终结果
    cv2.putText(original_img, "".join(groupOutput), (gX, gY - 15),
                cv2.FONT_HERSHEY_SIMPLEX, 0.65, (0, 0, 255), 2)
    output.extend(groupOutput)

    cv_show('Recognition Result', original_img)
    return id_number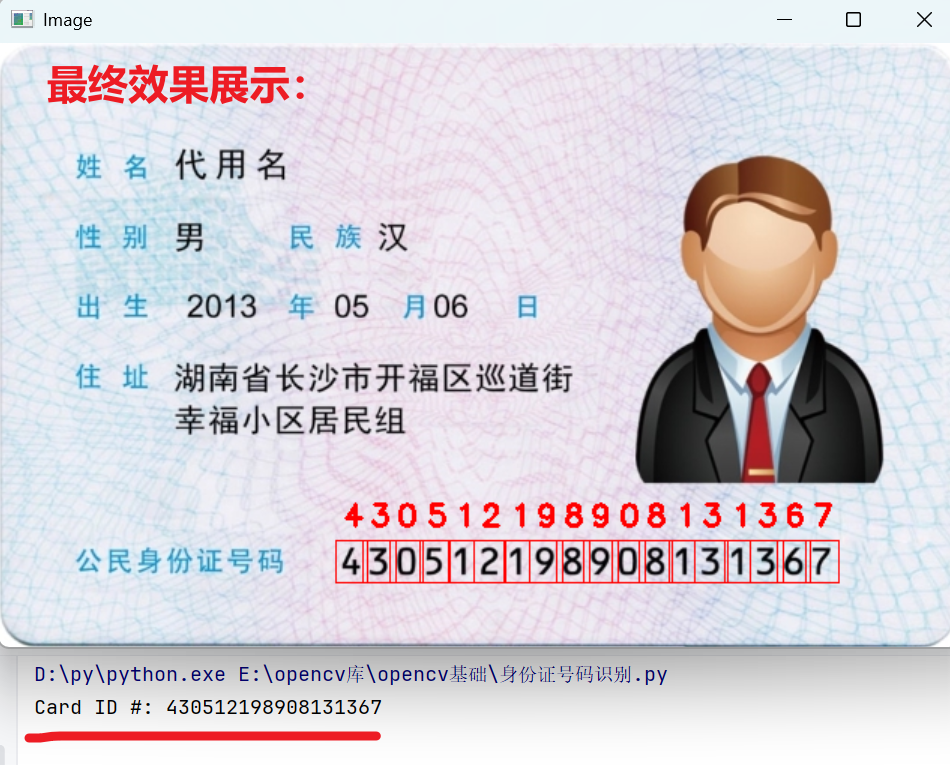
识别过程核心环节:
-
预处理与轮廓检测:与模板处理类似,但对身份证图像使用较低的阈值(120)进行二值化,以适应实际图像中可能存在的亮度变化。
-
区域筛选 :这是识别成功的关键。代码通过位置条件
(y > 330 and y < 360) and x > 220筛选出身份证号码区域。实际应用中,这些参数需要根据具体图像进行调整。 -
自适应二值化 :对于裁剪出的每个数字区域,使用
THRESH_OTSU方法进行自适应阈值处理。OTSU算法能自动计算最佳阈值,特别适合光照不均的图像。 -
模板匹配 :使用
cv2.matchTemplate()函数将当前数字区域与所有模板进行比较。TM_CCOEFF(相关系数匹配)方法计算模板与图像区域的相关系数,值越大表示匹配度越高。 -
结果可视化:识别过程中,在原始图像上用红色矩形框标出每个数字区域,并在上方显示识别结果,提供直观的反馈。