目录
一、前言
C++11发布后,其实现相对来说很快就出现了,C++11的三个完整或几乎完整的实现在2013年面世,C++11在C++98的基础上引入了大量新的语言特性,本文将围绕C++11的进阶特性展开介绍,包括可变参数模板、lambda表达式、异常处理、智能指针等模块,C++之父Bjarne对C++11的评价是:C++11感觉像是一门新的语言,该评价在当时也得到了广泛的认可,C++11相比C++98这种在语言的"感觉"和使用风格上的巨大变化,并不是由某位大师级工匠指导的传统的精心设计过程的结果,而是海量建议经由一大批不断变化的个人层层决策过滤后的结果,使得C++11能够完成向现代C++的转型,在拥挤和变化的世界中茁壮成长。
二、C++11进阶
1、变参模板
C++11支持可变参数模板,即支持可变数量参数的函数模板和类模板,可变数目的参数称为参数包,存在两种参数包:模板参数包,表示0或多个模板参数;函数参数包,表示0或多个函数参数。
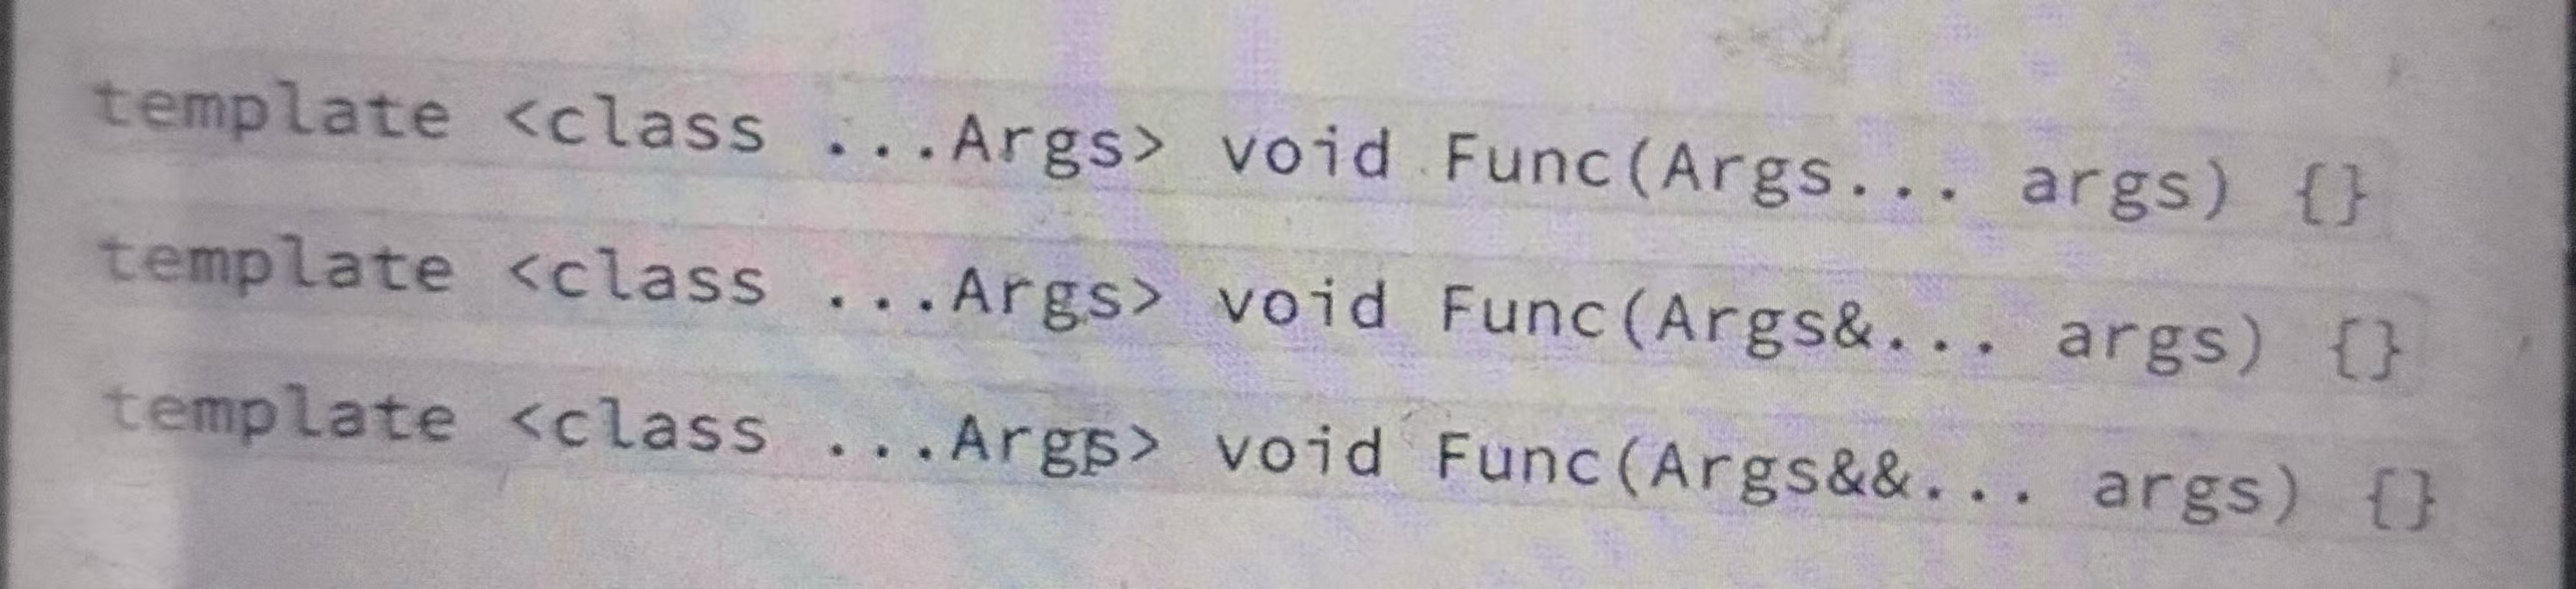
变参模板的表示方法为使用省略号来指出一个模板参数或函数参数的参数包,在模板参数列表中,class...指出接下来的参数表示0或多个类型列表,在函数参数列表中,类型名后面跟...指出接下来表示0或多个形参对象列表,函数参数包可以用左值引用或右值引用表示,与普通模板一样,每个参数实例化时也遵循引用折叠规则。
可变参数模板的原理跟模板类似,本质还是去实例化对应类型和个数的多个函数:
cpp
#include<iostream>
#include<string>
using namespace std;
template<class...Args>
void print(Args&&...args)
{
//...
}
int main()
{
print();
print(1);
print(1, 1.1);
print(1, string("Kzy"), string("2026-1-9"));
return 0;
}print可变参数模板根据参数类型和参数个数生成相应的模板,再实例化出对应的具体函数,实例化出的print函数如下所示:
cpp
void print()
{
//...
}
template<class K1>
void print(K1&& k1)
{
//...
}
void print(int&& k1)
{
//...
}
template<class K1,class K2>
void print(K1&& k1,K2&& k2)
{
//...
}
void print(int&& k1, double&& k2)
{
//...
}
template<class K1,class K2,class K3>
void print(K1&& k1,K2&& k2,K3&& k3)
{
//...
}
void print(int&& k1, string&& k2, string&& k3)
{
//...
}
int main()
{
print();//void print()
print(1);//void print(int&& k1)
print(1, 1.1);//void print(int&& k1,double&& k2)
print(1, string("Kzy"), string("2026-1-9"));//void print(int&& k1,string&& k2,string&& k3)
return 0;
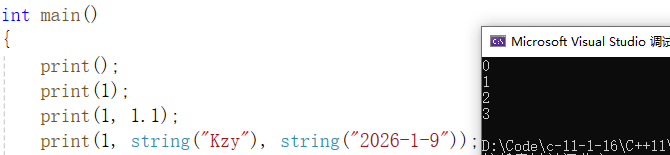
}使用sizeof...运算符可以计算参数包中参数的个数
cpp
#include<iostream>
#include<string>
using namespace std;
template<class...Args>
void print(Args&&...args)
{
	cout << sizeof...(args) << endl;
}
int main()
{
	print();
	print(1);
	print(1, 1.1);
	print(1, string("Kzy"), string("2026-1-9"));
	return 0;
}
print函数参数个数分别为0、1、2、3,结果如下所示:
2、包扩展
对于一个参数包,除了能计算参数包的参数个数,还可以对参数包进行扩展,扩展参数包时,需提供用于每个扩展元素的模式,扩展一个参数包就是将它分解为构成的元素,对每个元素应用模式,获得扩展后的列表,通过在模式的右边放一个省略号来触发扩展操作。
cpp
#include<iostream>
using namespace std;
//包扩展(解析出参数包的内容)
void Showlist()//当参数包参数个数为0时,直接匹配该函数
{
cout << endl;
}
template<class K, class...Argc>
void Showlist(K&& x, Argc&&...argc)
{
cout << x << " ";
Showlist(argc...);
}
template<class...Argc>
void print(Argc&&...argc)
{
Showlist(argc...);
}
int main()
{
print();
print(1);
print(1, 1.1);
print(1, string("Kzy"), string("2026-1-9"));
return 0;
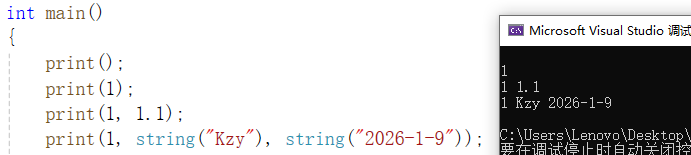
}可以通过包扩展解析出参数包的内容,argc是N个参数的参数包,调用Showlist模板,参数包的第一个参数传给x,剩余N-1个参数传给第二个参数包,Showlist内部再递归调用自身,编译器递归的终止条件:当参数包为0个参数时,直接匹配Showlist函数,这样就能依次解析出参数包的内容,结果如下所示:
print(1,string("Kzy"),string("2026-1-9")),包扩展所实例化的函数如下所示:
cpp
#include<iostream>
using namespace std;
void Showlist()
{
	cout << endl;
}
template<class K, class...Argc>
void Showlist(K&& x, Argc&&...argc)
{
	cout << x << " ";
	Showlist(argc...);
}
void Showlist(string z)
{
	cout << z << " ";
	Showlist();
}
void Showlist(string y, string z)
{
	cout << y << " ";
	Showlist(z);
}
void Showlist(int x, string y, string z)
{
	cout << x << " ";
	Showlist(y, z);
}
template<class...Argc>
void print(Argc&&...argc)
{
	Showlist(argc...);
}
int main()
{
	print(1, string("Kzy"), string("2026-1-9"));
	return 0;
}
包扩展还可以用于进行参数包的传递,Getargc用于获取参数,print将其参数通过Getargc组成参数
cpp
#include<iostream>
#include<string>
using namespace std;
template<class K>
const K& Getargc(const K& x)
{
	cout << x << " ";
	return x;
}
template<class...Argc>
void Arguments(Argc...argc)
{

}
template<class...Argc>
void print(Argc...argc)
{
	 Arguments(Getargc(argc)...);
}
int main()
{
  print(1,string("Kzy"),1.1);
  return 0;
}
包传给Arguments,本质可以理解为编译器编译时,包的扩展模式将print函数模板扩展实例化为void print(int x,string y,double z),如下所示:
cpp
#include<iostream>
#include<string>
using namespace std;
template<class K>
const K& Getargc(const K& x)
{
	cout << x << " ";
	return x;
}
template<class...Argc>
void Arguments(Argc...argc)
{

}
template<class...Argc>
void print(Argc...argc)
{
	 Arguments(Getargc(argc)...);
}
void print(int x, string s, double z)
{
	Arguments(Getargc(x), Getargc(s), Getargc(z));
}
int main()
{
  print(1,string("Kzy"),1.1);//print(int x,string s,double z)
  return 0;
}
3、emplace系列接口
C++11之后STL容器新增了emplace系列的接口,emplace系列的接口均为模板可变参数,功能上兼容push和insert系列,如下所示:
cpp
#include<iostream>
#include<string>
#include<list>
using namespace std;
int main()
{
	list<string> lt;
	string s1("111111");
	string s2("222222");
	lt.emplace_back(s1);
	lt.push_back(s1);
	lt.emplace_back(move(s1));
	lt.push_back(move(s2));
	lt.emplace_back("111111");
	lt.push_back("222222");
	return 0;
}
但emplace也有自己的新玩法,假设容器为container<K>,emplace还支持直接插入构造K对象的参数,这使得emplace在某些场景下会更高效一些,emplace可以直接在容器空间上构造K对象,emplace_back总体而言相比insert和push系列更高效。
鉴于emplace系列接口直接通过参数进行构造的原理,这里模拟实现出list的emplace与emplace_back接口,可通过参数包来模拟实现,如下所示:
cpp
#pragma once
#include<assert.h>
namespace YZK
{
	template<class K>
	struct list_node
	{
		K _data;
		list_node<K>* _next;
		list_node<K>* _prev;
		template<class...Argc>
		list_node(Argc&&...argc)
			:_data(std::forward<Argc>(argc)...)
			, _prev(nullptr)
			, _next(nullptr)
		{
		}
	};
	template<class K, class Ref, class Ptr>
	struct list_iterator
	{
		typedef list_node<K> Node;
		typedef list_iterator<K, Ref, Ptr> Self;
		Node* _PNode;
		list_iterator(Node* PNode)
			:_PNode(PNode)
		{
		}
		Ref operator*()
		{
			return _PNode->_data;
		}
		Ptr operator->()
		{
			return &_PNode->_data;
		}
		Self& operator++()
		{
			_PNode = _PNode->_next;
			return *this;
		}
		Self& operator--()
		{
			_PNode = _PNode->_prev;
			return *this;
		}
		Self operator++(int)
		{
			Self tmp(*this);
			_PNode = _PNode->_next;
			return tmp;
		}
		Self operator--(int)
		{
			Self tmp(*this);
			_PNode = _PNode->_prev;
			return tmp;
		}
		bool operator!=(const Self& s) const
		{
			return _PNode != s._PNode;
		}
		bool operator==(const Self& s) const
		{
			return _PNode == s._PNode;
		}
	};
	template<class K>
	class list
	{
		typedef list_node<K> Node;
	public:
		typedef list_iterator<K, K&, K*> iterator;
		typedef list_iterator<K, const K&, const K*> const_iterator;
		iterator begin()
		{
			return _head->_next;
		}
		iterator end()
		{
			return _head;
		}
		const_iterator begin() const
		{
			return _head->_next;
		}
		const_iterator end() const
		{
			return _head;
		}
		void empty_init()
		{
			_head = new Node;
			_head->_next = _head;
			_head->_prev = _head;
			_size = 0;
		}
		list()
		{
			empty_init();
		}
		list(initializer_list<K> il)
		{
			empty_init();
			for (auto& e : il)
			{
				push_back(e);
			}
		}
		list(const list<K>& lt)
		{
			empty_init();
			for (auto& e : lt)
			{
				push_back(e);
			}
		}
		list<K>& operator=(list<K> lt)
		{
			swap(lt);
			return *this;
		}
		~list()
		{
			clear();
			delete _head;
			_head = nullptr;
		}
		void clear()
		{
			auto it = begin();
			while (it != end())
			{
				it = erase(it);
			}
		}
		void swap(list<K>& lt)
		{
			std::swap(_head, lt._head);
			std::swap(_size, lt._size);
		}
		void push_back(const K& x)
		{
			insert(end(), x);
		}
		void push_back(K&& x)
		{
			insert(end(), forward<K>(x));
		}
		template<class...Argc>
		void emplace_back(Argc&&...argc)
		{
			insert(end(), std::forward<Argc>(argc)...);
		}
		void push_front(const K& x)
		{
			insert(begin(), x);
		}
		template<class...Argc>
		iterator insert(iterator pos, Argc&&...argc)
		{
			Node* cur = pos._PNode;
			Node* prev = cur->_prev;
			Node* newnode = new Node(std::forward<Argc>(argc)...);
			newnode->_next = cur;
			cur->_prev = newnode;
			newnode->_prev = prev;
			prev->_next = newnode;
			++_size;
			return iterator(newnode);
		}
		void pop_back()
		{
			erase(--end());
		}
		void pop_front()
		{
			erase(begin());
		}
		iterator erase(iterator pos)
		{
			assert(pos != end());
			Node* prev = pos._PNode->_prev;
			Node* next = pos._PNode->_next;
			prev->_next = next;
			next->_prev = prev;
			delete pos._PNode;
			--_size;
			return next;
		}
		size_t size() const
		{
			return _size;
		}
		bool empty() const
		{
			return _size == 0;
		}
	private:
		Node* _head;
		size_t _size;
	};
}
通过将参数包不断向下传递,最终在结点的构造中直接匹配容器存储的数据类型K的构造,从而达到了emplace支持直接插入构造K对象的参数,这使得emplace在某些场景下会更高效一些,可以直接在容器空间上构造对象,需要注意的是,在传递参数包的过程中,如果是Argc&&...argc的参数包,需要使用完美转发参数包,即std::forward<Argc>(argc)...,避免编译时包扩展后右值引用变量表达式变成了左值。
cpp
#include<iostream>
#include<string>
#include"list.h"
using namespace std;
int main()
{
	YZK::list<pair<string, int>> lt;
	pair<string, int> kv("Kzy",1 );
	lt.emplace_back(kv);
	lt.emplace_back(move(kv));
	lt.emplace_back("hello",1 );//直接通过参数进行构造
    lt.push_back({ "hello",1 });
	return 0;
}
emplace系列兼容push和insert的功能,相比push、insert最大的区别在于emplace系列可直接通过参数进行构造,push和insert则无法直接通过参数进行构造,因此在某些场景下emplace系列接口更高效一些。
4、lambda表达式
lambda表达式本质是一个匿名函数对象,与普通函数不同的是lambda表达式可以定义在函数内部,lambda表达式语法对于使用层而言没有类型,一般用auto或模板参数定义的对象去接收lambda对象。
lambda表达式的格式为:捕捉列表 (参数列表)->返回值类型 {函数体}
:为捕捉列表,该列表总是出现在lambda函数的开始位置,编译器根据 来判断接下来的代码是否为lambda表达式,捕捉列表能够捕捉上下文中的变量供lambda函数使用,捕捉列表可以传值和传引用捕捉,捕捉列表为空也不能省略。
( ):为参数列表,与普通函数的参数列表功能类似,如果不需要参数传递,则可以连同()一起省略。
->返回值类型:为返回值类型,用追踪返回类型形式声明函数的返回值类型,没有返回值时该部分可省略,一般返回值类型明确的情况下,也可省略,由编译器对返回类型进行推导。
{函数体}:为函数体,函数体内的实现与普通函数实现完全类似,在函数体内,除了可以使用其参数外,还可以使用所有捕获到的变量,需要注意的是,当函数体为空时,函数体也不能省略。
cpp
#include<iostream>
using namespace std;
int main()
{
    auto add = [](int x, int y)->int {return x + y;};
	cout << add(1, 2) << endl;
	auto func1 = []
		{
			cout << "hello lambda" << endl;
			return 0;
		};
	func1();
	return 0;
}
auto add= (int x,int y)->int{ return x+y;};就是一个简单的lambda表达式,该lambda表达式的捕捉列表为空,参数列表为(int x,int y),返回值类型为int,{ return x+y;}即为该lambda表达式的函数体。func1也为lambda表达式,其捕捉列表为空,但不能省略,参数列表为空可以省略,func1返回值类型也可以省略,可由编译器通过返回对象自动推导,{cout<<"hello lambda"<<endl;return 0;}即为func1的函数体。
lambda表达式广泛地运用在C++的各个场景中,如lambda表达式用作STL算法的参数,如下所示
cpp
#include<iostream>
#include<vector>
#include<algorithm>
using namespace std;
int main()
{
	vector<int> v = { 2,3,0,1,4,6,8,9,5,7 };
	sort(v.begin(), v.end(), [](int x, int y) {return x > y;});
	for (auto e : v)
	{
		cout << e << " ";
	}
	return 0;
}
sort(v.begin(),v.end(), (int x,int y) { return x>y;}),使之按降序排列,结果如下所示:

可以看出lambda表达式的简洁与方便了。
lambda表达式中默认只能用lambda函数体和参数中的变量,如果想用外层作用域中的变量就需要进行捕捉,第一种捕捉方式是在捕捉列表中显示的传值捕捉和传引用捕捉,捕捉的多个变量用逗号分隔,如下所示:
cpp
#include<iostream>
using namespace std;
int main()
{
	int a = 0, b = 1, c = 2, d = 3;
	auto func1 = [a,&b](int x)
		{
			a++;
			b++;
			int ret = a + b+x+y;
			return ret;
		};
	cout << func1(1) << endl;
    return 0;
}a,\&b表示a进行值捕捉,b进行引用捕捉。
第二种捕捉方式是在捕捉列表中隐式捕捉,在捕捉列表用"="表示隐式值捕捉,在捕捉列表用"&"表示隐式引用捕捉,lambda表达式用了哪些变量,编译器就会自动捕捉那些变量,如下所示:
cpp
#include<iostream>
using namespace std;
int main()
{
	int a = 0, b = 1, c = 2, d = 3;
	auto func3 = [=]()//隐式值捕捉变量不可修改
		{
			int ret = a + b + c;
			return ret;
		};
	cout << func3() << endl;
	auto func4 = [&]()//隐式引用捕捉变量可修改
		{
			a++;
			b++;
			c++;
			int ret = a + b + c;
			return ret;
		};
    return 0;
}
auto func3==(){ int ret=a+b+c; return ret;};=表示func3的捕捉列表对a、b、c进行隐式值捕捉,同理\&表示func4的捕捉列表对a、b、c进行隐式引用捕捉,隐式值捕捉变量不可修改,隐式引用捕捉变量可修改。
第三种捕捉方式是在捕捉列表中混合使用隐式捕捉和显示捕捉,如下所示:
cpp
#include<iostream>
using namespace std;
int main()
{
	int a = 0, b = 1, c = 2, d = 3;
	auto func5 = [&, a, b]()
		{
			c++;
			int ret = a + b + c;
			return ret;
		};
	return 0;
}\&,a,b表示a、b进行值捕捉,其他变量进行隐式引用捕捉,同理=,\&a,\&b表示a、b进行引用捕捉,其他变量进行隐式值捕捉。当使用混合捕捉时,第一个元素必须为&或=,且&混合捕捉时,后面的捕捉变量必须为值捕捉,同理=混合捕捉时,后面的捕捉变量必须为引用捕捉。
lambda表达式如果在函数局部域中,可以捕捉lambda位置之前定义的变量,但不能捕捉静态局部变量和全局变量,静态局部变量和全局变量也不需要进行捕捉,lambda表达式可以直接使用,这也意味着lambda表达式如果定义在全局位置,捕捉列表必须为空,如下所示:
cpp
#include<iostream>
using namespace std;
int y = 0;
auto func2 = []()
	{
		y++;
		return y;
	};
int main()
{
	int a = 0, b = 1, c = 2, d = 3;
	cout<<func2()<<endl;
    return 0;
}
func2出现在全局位置,则func2的捕捉列表为空。
默认情况下,lambda捕捉列表是被const修饰的,即传值捕捉的对象不能修改,mutable可以取消其常量性,使得传值捕捉的对象能够修改,如下所示:
cpp
#include<iostream>
using namespace std;
int main()
{
	int a = 0, b = 1, c = 2, d = 3;
	auto func1 = [a,&b](int x)mutable
		{
			a++;
			b++;
			int ret = a + b+x+y;
			return ret;
		};
	cout << func1(1) << endl;
    return 0;
}
auto func1=a,\&b(int x)mutable{ a++;b++;int ret=a+b+x+y;return ret;};cout<<func1(1)<<endl;此时就可以对进行值捕捉的a进行修改了,但修改a本质还是修改形参,不会影响实参a,使用mutable后,该lambda表达式的参数列表不可省略,即使参数列表为空,也不能省略。
lambda表达式的底层原理为仿函数对象,编译器会识别lambda表达式,并生成一个对应的仿函数的类,仿函数的类名是编译按一定规则生成的,保证不同的lambda生成的类名不同,lambda参数/返回类型/函数体就是仿函数operator()的参数/返回类型/函数体,lambda的捕捉列表本质是生成的仿函数类的成员变量,捕捉列表的变量都是lambda类构造函数的实参。
可以通过汇编层的角度来观察lambda表达式的底层原理为仿函数,如下所示:
cpp
#include<iostream>
using namespace std;
class Rate
{
public:
	Rate(double rate)
		:_rate(rate)
	{ }
	double operator()(double money, int year)
	{
		return money * year * _rate;
	}
private:
	double _rate;
};
int main()
{
	double rate = 1.17;
	Rate r1(rate);
	r1(10000, 2);
	auto r2 = [rate](double money, int year)
		{
			return rate * money * year;
		};
	r2(10000, 2);
	return 0;
}
Rate r1(rate),r1为仿函数对象,r1(10000,2),即调用r1仿函数,r2为lambda表达式,r2(10000,2),调用r2,下面通过汇编的角度观察:
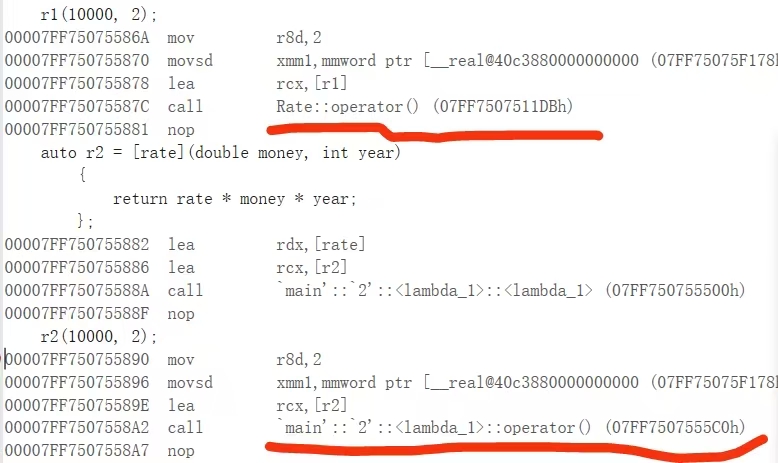
可以看到r1(10000,2),r2(10000,2)底层都调用了operator(),即仿函数对象,故印证了lambda表达式底层原理为仿函数对象。
5、包装器
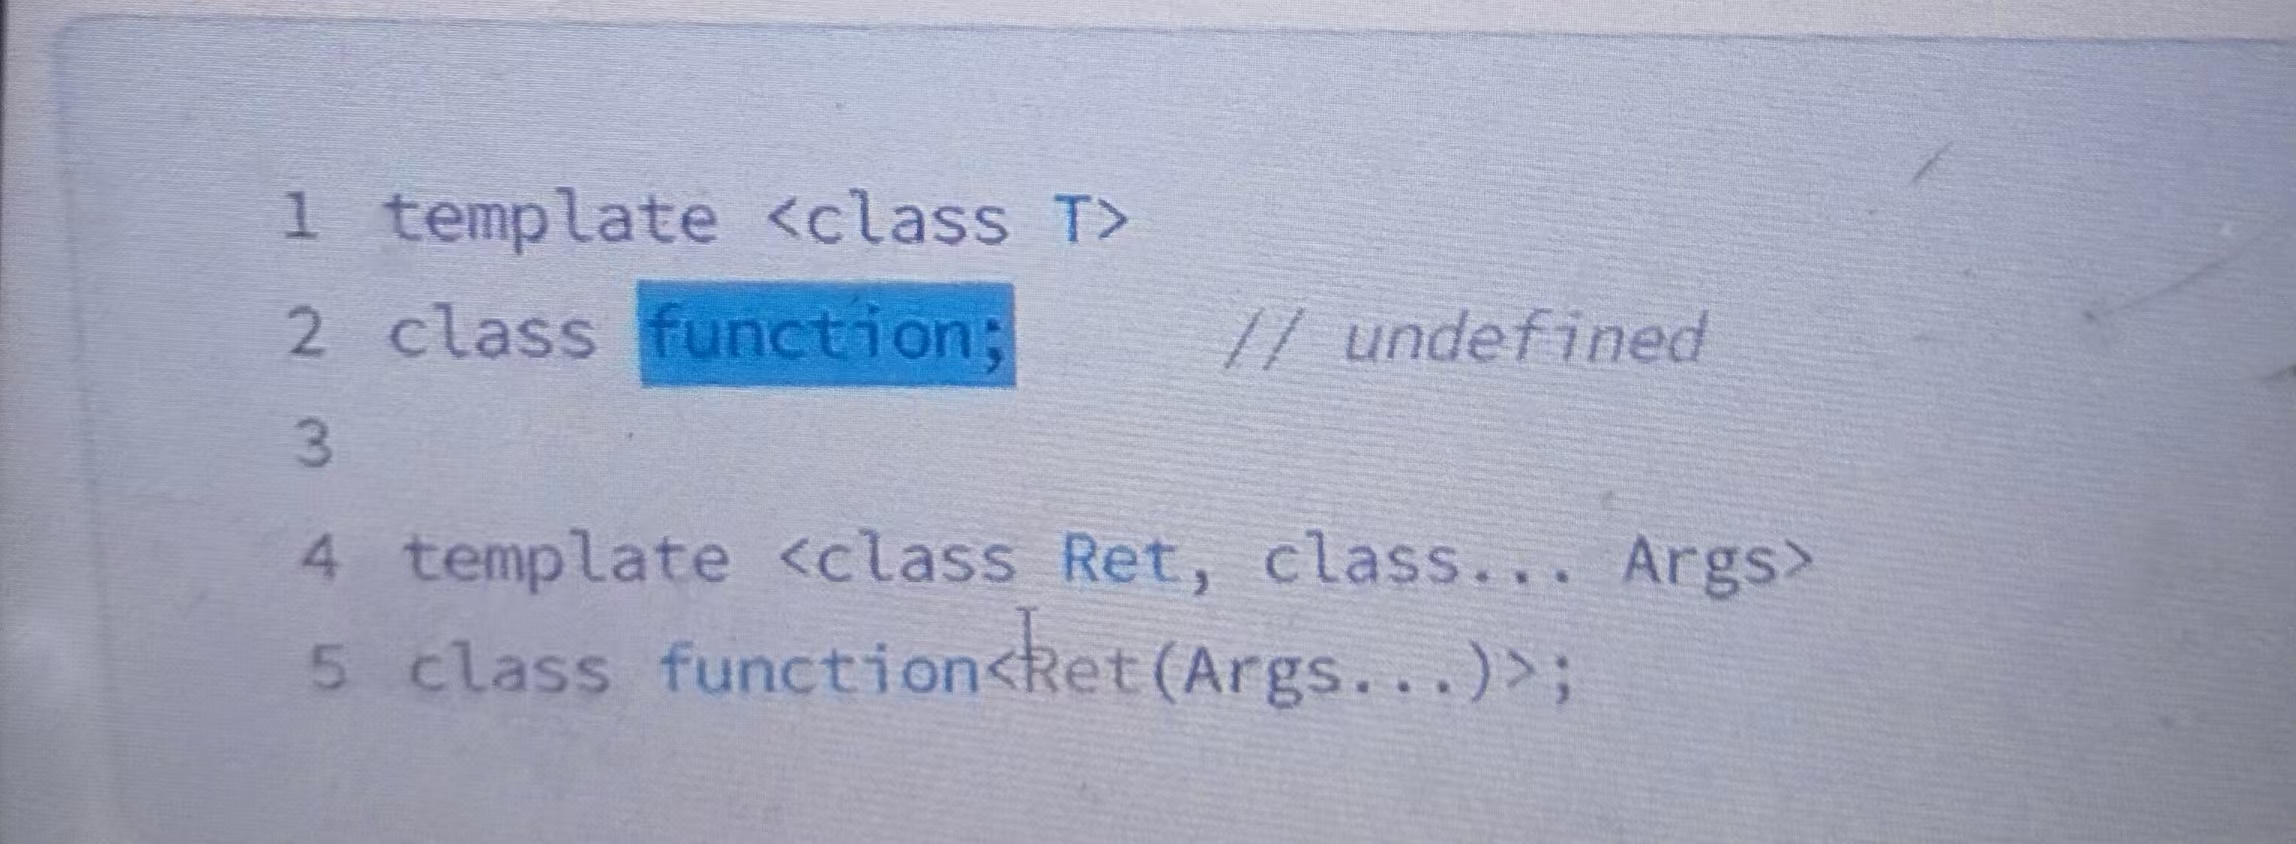
包装器function是一个类模板,也是一个包装器,function的实例化对象可以包装存储其他的可调用对象,包括函数指针、仿函数、lambda、bind表达式等,调用包装器需包含<functional>头文件,函数指针、仿函数、lambda等可调用对象的类型各不相同,function的优势就是统一类型,对它们都可以进行包装,如下所示:
cpp
#include<iostream>
#include<functional>
using namespace std;
int f(int x, int y)
{
	return x + y;
}
struct func
{
public:
	int operator()(int x, int y)
	{
		return x + y;
	}
};
int main()
{
	function<int(int, int)> f1 = f;//包装函数指针
	function<int(int, int)> f2 = func();//包装仿函数
	function<int(int, int)> f3 = [](int a, int b) {
		return a + b;
		};//包装lambda表达式
	cout << f1(1, 1) << endl;
	cout << f2(1, 1) << endl;
	cout << f3(1, 1) << endl;
	return 0;
}
如上,包装器f1、f2、f3分别对函数指针f、仿函数func(),及lambda表达式进行了包装,function<int(int,int)>表示该包装器能够包装返回值为int,两个参数的类型均为int的可调用对象,包装完成后,后续只需调用该包装器对象即可,结果如下所示:

下面看一道经典的利用包装器结合lambda表达式求值问题:
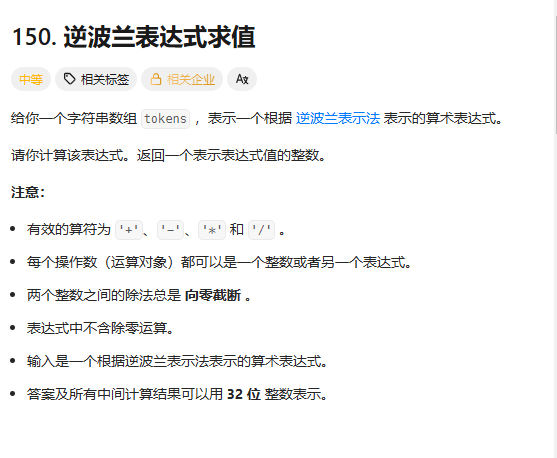
题目给定一个字符串数组,根据逆波兰表示法计算出该表达式的值,算法思路可以考虑将function包装器作为map的映射可调用对象的类型,如下所示:
cpp
class Solution {
public:
	int func(vector<string>& v)
	{
		stack<int> st;
		map<string, function<int(int, int)>> t = { {"+",[](int a,int b) {return a + b;}},
			{"-",[](int a,int b) {return a - b;}},
			{"*",[](int a,int b) {return a * b;}},
			{"/",[](int a,int b) {return a / b;}} };
     	for (auto& str : v)
		{
			if (t.count(str))
			{
				int right = st.top();
				st.pop();
				int left = st.top();
				st.pop();
				int ret = t[str](left, right);
				st.push(ret);
			}
			else
			{
				st.push(stoi(str));
			}
		}
		return st.top();
	}
};
即map<string,function<int(int,int)>> t,function对应相应运算符的lambda表达式,这样通过map的映射关系,及包装器、lambda表达式的结合就简洁地表示出了相应运算符的执行方法,后续求值时结合map的 特性,即tstr(left,right)就可求出表达式的值,这种处理思路可以说是非常巧妙了。
除了能够包装函数指针、仿函数、lambda之外,function也能包装静态成员函数,需要注意的是成员函数需指明类域且加上取地址符&才能获取该成员函数的地址,如下所示:
cpp
class Plus
{
public:
	Plus(int n=10)
		:_n(n)
	{ }
	static int Plusi(int a, int b)
	{
	   return a + b;
	}
	double Plusd(double a, double b)
	{
		return (a + b) * _n;
	}
private:
	int _n;
};
int main()
{
	function<int(int, int)> f1 = &Plus::Plusi;
	cout << f1(1, 1) << endl;
	function<double(Plus*,double, double)> f2 = &Plus::Plusd;
	Plus p1;
	cout << f2(&p1,1.1, 1.1) << endl;
	function<double(Plus, double, double)> f3 = &Plus::Plusd;
	Plus p2;
	cout << f3(p2, 1.1, 1.1) << endl;
    cout<<f3(Plus(),1.1,1.1)<<endl;
	function<double(Plus&&, double, double)> f4 = &Plus::Plusd;
	Plus p3;
	cout << f4(move(p3), 1.1, 1.1) << endl;
	cout << f4(Plus(), 1.1, 1.1) << endl;
    return 0;
}
function<int(int,int)> f1=&Plus::Plusi,对Plusi进行了包装,由于Plusi被static修饰,为全局函数,故Plusi没有this指针,而Plusd为成员函数,没有static修饰,故Plusd有this指针,包装时需加上this指针或其左值右值对象,即function<double(Plus*,double,double)> f2=&Plus::Plusd,function<double(Plus,double,double)> f3=&Plus::Plusd,function<double(Plus&&,double,double)> f4=&Plus::Plusd,调用包装器根据相应参数类型传参即可。
6、bind
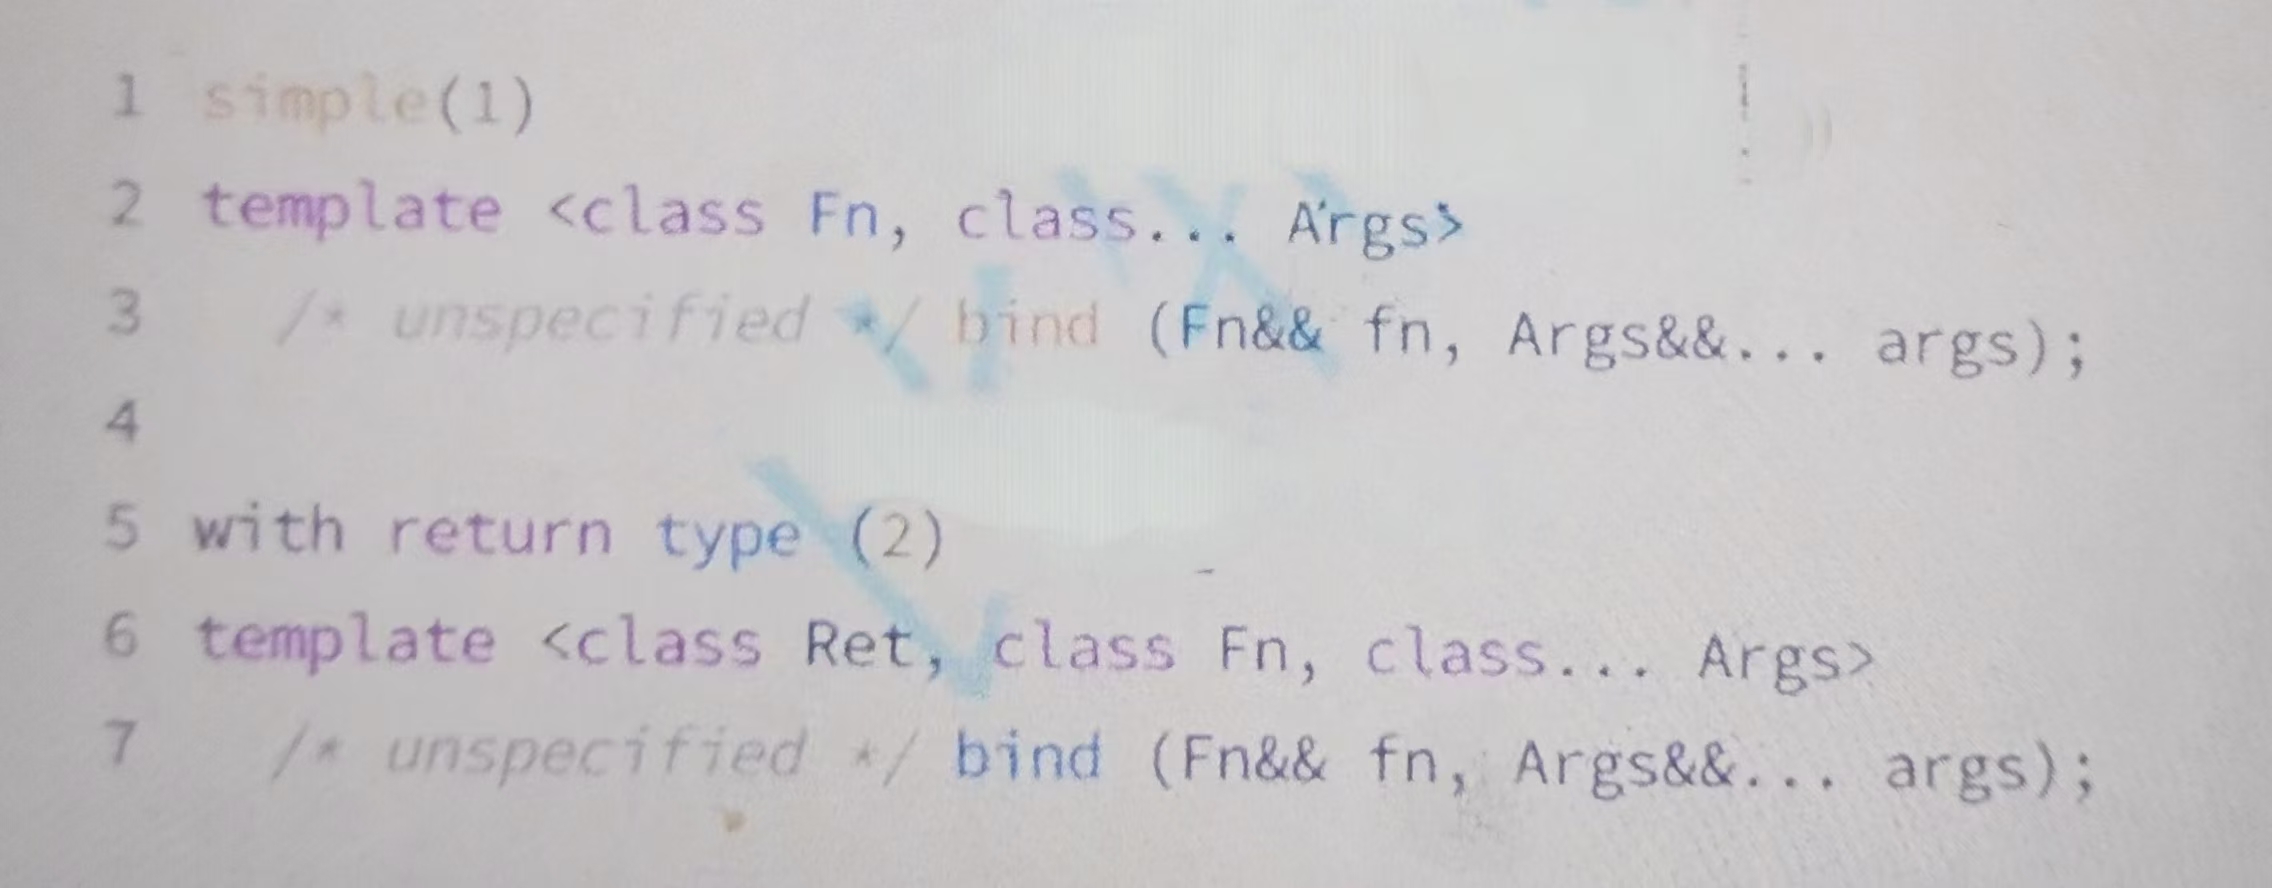
bind是一个函数模板,它也是一个可调用对象的包装器,可以将其看作一个函数适配器,对接收的目标进行处理后返回一个可调用对象,bind可以用来调整参数个数和参数顺序,调用bind也需包含头文件<functional>,bind用法如下:
cpp
#include<iostream>
#include<functional>
using namespace std;
using placeholders::_1;
using placeholders::_2;
using placeholders::_3;
int sub(int a, int b)
{
return (a - b)*10;
}
int main()
{
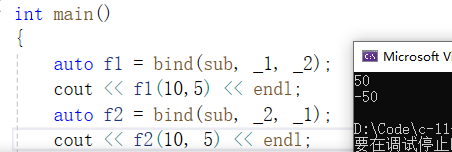
auto f1 = bind(sub, _1, _2);
cout << f1(10,5) << endl;
auto f2 = bind(sub, _2, _1);
cout << f2(10, 5) << endl;
return 0;
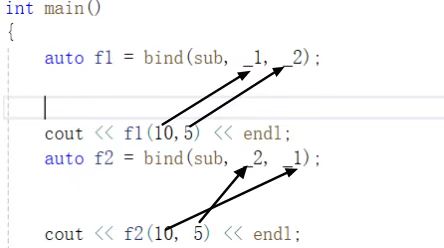
}调用bind的一般形式可参考如上:using placeholders::_1,using placeholders::_2,using placeholders::_3,占位符声明,用于绑定参数,_1、_2、_3代表绑定函数时的参数位置,当调用bind返回的函数对象时,_1对应第一个传入的参数,_2对应第二个传入的参数,_3对应第三个传入的参数,auto f1=bind(sub,_1,_2),f1是一个可调用对象,_1,_2对应给定的f1参数,当调用f1时,f1会调用sub,并传给sub对象_1、_2的参数,如f1(10,5)就等价于sub(10,5),而auto f2=bind(sub,_2,_1),f2(10,5),此时调用f2,10对应_1,5调用对应_2,则f2(10,5)就等价于sub(5,10),二者的对应关系如下图所示:
结果如下所示:
此外,bind还常用于调整参数个数:
cpp
#include<iostream>
#include<functional>
using namespace std;
using placeholders::_1;
using placeholders::_2;
using placeholders::_3;
int sub(int a, int b)
{
return (a - b)*10;
}
int main()
{
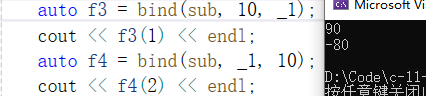
auto f1 = bind(sub, 10, _1);
cout << f1(1) << endl;
auto f2 = bind(sub, _1, 10);
cout << f2(2) << endl;
return 0;
}auto f1=bind(sub,10,_1),auto f2=bind(sub,_1,10),此时f1、f2只需传一个参数即可,二者对应关系如下所示:
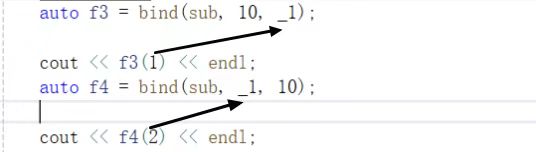
结果如下所示:
bind也可对成员函数对象、lambda表达式进行绑定:
cpp
#include<iostream>
#include<functional>
using namespace std;
class Plus
{
public:
Plus(int n=10)
:_n(n)
{ }
static int Plusi(int a, int b)
{
return a + b;
}
double Plusd(double a, double b)
{
return (a + b) * _n;
}
private:
int _n;
};
int main()
{
//成员函数对象进行绑定,就无需每次都传递了
function<double(double,double)> f9 = bind(&Plus::Plusd, Plus(), _1, _2);
cout << f9(1.1, 1.1) << endl;
//计算复利的lambda
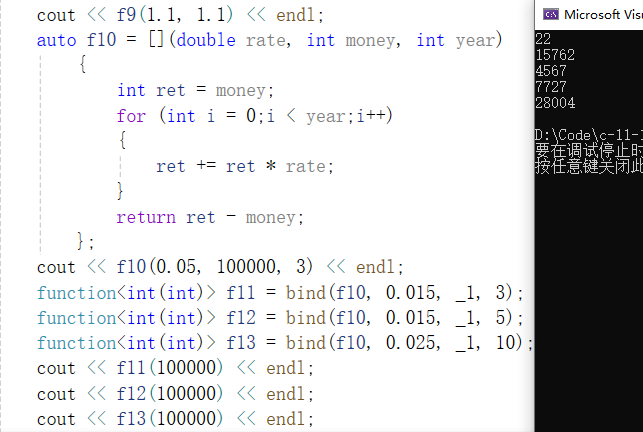
auto f10 = [](double rate, int money, int year)
{
int ret = money;
for (int i = 0;i < year;i++)
{
ret += ret * rate;
}
return ret - money;
};
cout << f10(0.05, 100000, 3) << endl;
function<int(int)> f11 = bind(f10, 0.015, _1, 3);
function<int(int)> f12 = bind(f10, 0.015, _1, 5);
function<int(int)> f13 = bind(f10, 0.025, _1, 10);
cout << f11(100000) << endl;
cout << f12(100000) << endl;
cout << f13(100000) << endl;
return 0;
}function<double(double,double)> f9=bind(&Plus::Plusd,Plus(),_1,_2),对成员函数进行绑定,后续调用就无需传递对象了,直接传参即可,此外,bind也可绑定lambda表达式,如绑定计算复利的lambda表达式f10,f11、f12、f13就可实现出支持不同的年利率,不同金额和不同年份计算出复利的结算利息,结果如下所示:
7、异常
异常处理机制允许程序中独立开发的部分能够在运行时就出现的问题进行通信并做出相应的处理,C语言主要通过错误码的形式处理错误,错误码的本质就是对错误信息进行分类编号,拿到错误码以后查询对应的错误信息,C++异常的处理方式是通过抛出一个对象,这个对象涵盖了更全面的各种信息。
当程序出现异常时,通过throw抛出一个对象来引发异常,抛出异常对象后,会生成一个异常对象的拷贝,由于抛出的异常对象可能是一个局部对象,因此会生成一个拷贝对象,这个拷贝对象会在catch子句后销毁,该对象的类型及当前的调用链决定了由哪个catch的代码来处理该异常。
被选中的catch是调用链中与该对象类型匹配且离抛出异常位置最近的那一个,当throw执行时,throw后面的语句将不再被执行,程序的执行从throw位置跳到与之匹配的catch子句。
cpp
#define _CRT_SECURE_NO_WARNINGS 1
#include<iostream>
#include<string>
#include<exception>
using namespace std;
double Divide(int a, int b)
{
try
{
if (b == 0)
{
string s("Divide by zero condition");
throw s;
cout << __FUNCTION__ << ":" << __LINE__ << "行执行" << endl;
}
else
{
return ((double)a / (double)b);
}
}
catch (const string& errmsg)
{
cout << errmsg << endl;
}
return 0;
}throw s,s为string类,故匹配的catch子句为catch(const string& errmsg),当开始执行异常处理程序时,沿着调用链创建的对象都会被销毁。
抛出异常后,程序会暂停当前函数的执行,开始寻找与之匹配的catch子句,首先检查throw本身是否在try块内部,如果在则查找匹配的catch语句,若存在匹配的,则跳转到匹配的catch子句进行处理,若当前函数中没有try/catch子句,或者有try/catch子句但是类型不匹配,则退出当前函数,继续在外层调用函数链中查找catch,该过程称为栈展开。
cpp
#define _CRT_SECURE_NO_WARNINGS 1
#include<iostream>
#include<string>
#include<exception>
using namespace std;
double Divide(int a, int b)
{
try
{
if (b == 0)
{
string s("Divide by zero condition");
throw s;
cout << __FUNCTION__ << ":" << __LINE__ << "行执行" << endl;
}
else
{
return ((double)a / (double)b);
}
}
catch (int errid)
{
cout << errid << endl;
}
return 0;
}
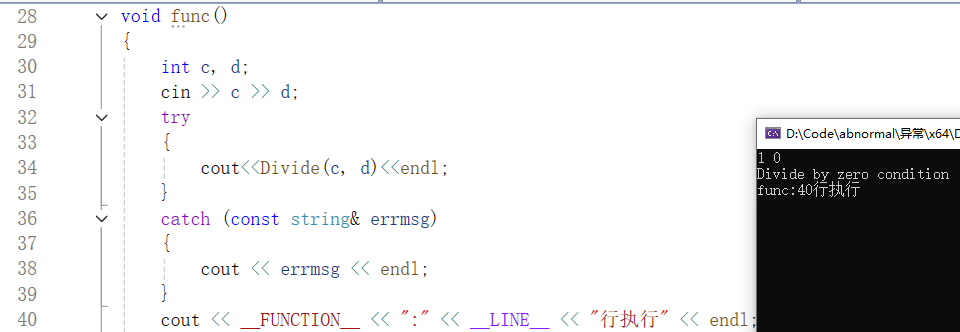
void func()
{
int c, d;
cin >> c >> d;
try
{
cout<<Divide(c, d)<<endl;
}
catch (const string& errmsg)
{
cout << errmsg << endl;
}
cout << __FUNCTION__ << ":" << __LINE__ << "行执行" << endl;
}
int main()
{
while (1)
{
try
{
func();
}
catch(const char* errmsg)
{
cout << errmsg << endl;
}
catch (...)
{
cout << "未知异常" << endl;
}
}
return 0;
}Divide中异常对象s为string类型,而catch子句为catch(int errid),为int类型,可知try/catch子句类型不匹配,则退出Divide函数,继续在外层调用函数链中查找,即跳转到func,func的catch子句为catch(const string& errmsg),匹配成功,则func的catch子句将被执行,如下所示:
一般情况下,抛出对象和catch是类型完全匹配的,但也有例外,允许权限缩小,如非常量向常量的类型转换,数组向指向数组元素指针的类型转换,函数向函数指针的转换,派生类向基类的转换,若存在多个类型匹配,则选择离它位置更近的catch子句,若到达main函数,仍没找到匹配的catch子句,则程序会调用terminate函数终止程序,一般main函数中都会使用catch(...),可以捕捉任意类型的异常,但不知道异常的具体信息。
下面模拟一个服务的几个模块来演示异常的抛出与捕获过程:
cpp
#define _CRT_SECURE_NO_WARNINGS 1
#include<iostream>
#include<string>
#include<exception>
#include<thread>
using namespace std;
class Exception
{
public:
Exception(const string& errmsg,int id)
:_errmsg(errmsg)
,_id(id)
{ }
virtual string what() const
{
return _errmsg;
}
int getid() const
{
return _id;
}
protected:
string _errmsg;
int _id;
};
class sqlexception :public Exception
{
public:
sqlexception(const string& errmsg,int id,const string& sql)
:Exception(errmsg,id)
,_sql(sql)
{ }
virtual string what() const
{
string str = "sqlexception:";
str += _errmsg;
str += "->";
str += _sql;
return str;
}
private:
const string _sql;
};
class catchexception :public Exception
{
public:
catchexception(const string& errmsg,int id)
:Exception(errmsg,id)
{ }
virtual string what()const
{
string str = "catchexception:";
str += _errmsg;
return str;
}
};
class httpexception :public Exception
{
public:
httpexception(const string& errmsg,int id,const string& type)
:Exception(errmsg,id)
,_type(type)
{ }
virtual string what() const
{
string str = "httpexception:";
str += _type;
str += ":";
str += _errmsg;
return str;
}
private:
const string _type;
};
void sqlmgr()
{
if (rand() % 7 == 0)
{
throw sqlexception("权限不足",100,"select*from name='张三'");
}
else
{
cout << "sqlmgr 调用成功" << endl;
}
}
void cachemgr()
{
if (rand() % 5 == 0)
{
throw catchexception("权限不足",100);
}
else if (rand() % 6 == 0)
{
throw catchexception("数据不存在",101);
}
else
{
cout << "cachemgr 调用成功" << endl;
}
sqlmgr();
}
void httpserver()
{
if (rand() % 3 == 0)
{
throw httpexception("请求资源不存在",100,"get");
}
else if (rand() % 4 == 0)
{
throw httpexception("权限不足",101,"post");
}
else
{
cout << "httpserver调用成功" << endl;
}
cachemgr();
}
int main()
{
srand(time(0));
while (1)
{
this_thread::sleep_for(chrono::seconds(1));
try
{
httpserver();
}
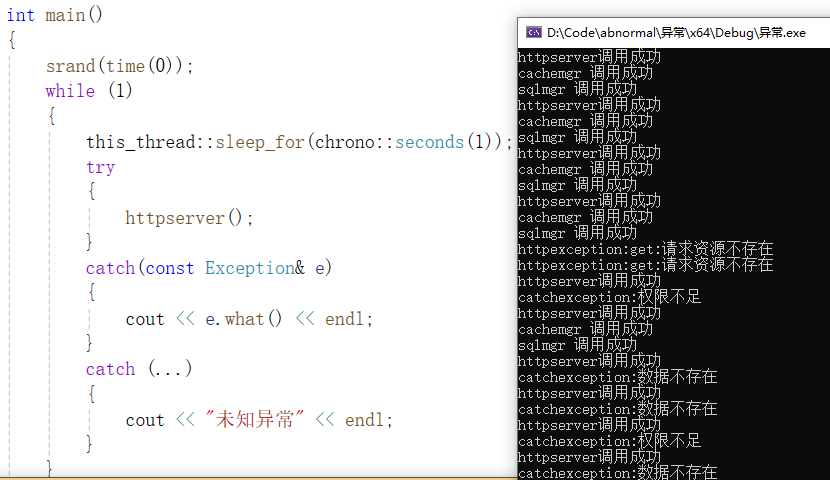
catch(const Exception& e)//基类、派生类都能捕捉
{
cout << e.what() << endl;//多态调用
}
catch (...)//能捕捉任意异常
{
cout << "未知异常" << endl;
}
}
return 0;
}每个模块都是继承Exception的派生类,每个模块可以添加自己的数据,最后进行异常捕获时,只需捕获基类的引用就可实现基类和派生类的捕捉,即catch(const Exception& e),此外,派生类对虚函数what进行了重写,e.what()属于多态调用,根据e的类型来调用相应的虚函数,结果如下所示:
有时catch捕捉到异常对象后,需要对错误进行分类,其中的某种异常需要进行特殊处理,其他异常则需重新抛出给外层调用链处理,捕获异常后再重新抛出,只需throw就可重新抛出。
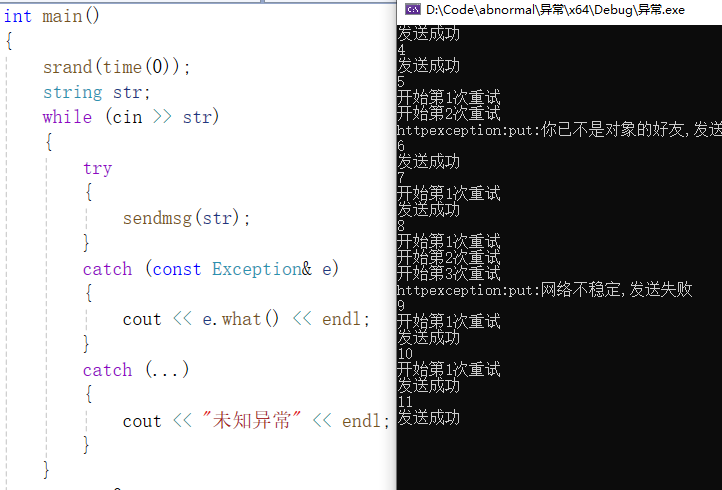
下面演示聊天时发送消息因信号不好,需进行多次尝试,若多次尝试仍发送失败,则就需捕获
cpp
#define _CRT_SECURE_NO_WARNINGS 1
#include<iostream>
#include<string>
#include<exception>
using namespace std;
class Exception
{
public:
	Exception(const string& errmsg,int id)
		:_errmsg(errmsg)
		,_id(id)
	{ }
	virtual string what() const
	{
		return _errmsg;
	}
	int getid() const
	{
		return _id;
	}
protected:
	string _errmsg;
	int _id;
};
class httpexception :public Exception
{
public:
	httpexception(const string& errmsg,int id,const string& type)
		:Exception(errmsg,id)
		,_type(type)
	{ }
	virtual string what() const
	{
		string str = "httpexception:";
		str += _type;
		str += ":";
		str += _errmsg;
		return str;
	}
private:
	const string _type;
};
void _sendmsg(const string& s)
{
	if (rand() % 2 == 0)
	{
		throw httpexception("网络不稳定,发送失败",102,"put");
	}
	else if (rand() % 7 == 0)
	{
		throw httpexception("你已不是对象的好友,发送失败", 103, "put");
	}
	else
	{
		cout << "发送成功" << endl;
	}
}
void sendmsg(const string& s)
{
    //发送消息失败,则再重试3次
	for (size_t i = 0;i < 4;i++)
	{
		try
		{
			_sendmsg(s);
			break;
		}
		catch(const Exception& e)
		{
			if (e.getid() == 102)
			{
				if (i == 3)
				{
					throw;
				}
				cout << "开始第"<<i+1<<"次重试" << endl;
			}
			else
			{
				throw;
			}
		}
	}
}
int main()
{
	srand(time(0));
	string str;
	while (cin >> str)
	{
		try
		{
			sendmsg(str);
		}
		catch (const Exception& e)
		{
			cout << e.what() << endl;
		}
		catch (...)
		{
			cout << "未知异常" << endl;
		}
	}
	return 0;
}
异常再重新抛出,其次若不是信号不好的原因,捕获后也需重新抛出,sendmsg通过for循环进行多次重试,若捕获到异常,检查是否为102号异常,若为102号异常,网络不稳定,则进行重试,若不是102号异常,则将异常重新抛出,i==3说明重试三次以后都失败了,说明网络太差了,则重新抛出异常,过程如下所示:
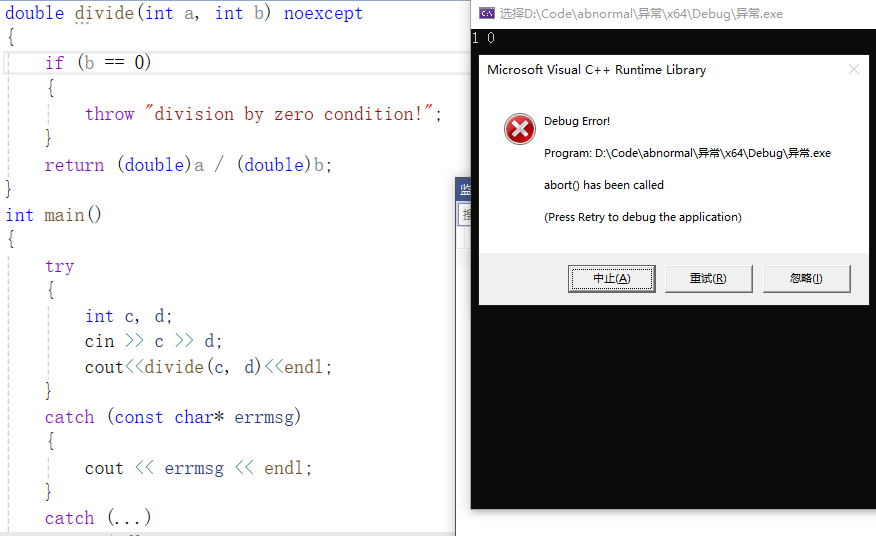
在函数参数列表后加上noexcept表示不会抛出异常,编译器并不会在编译时检查noexcept,因此编译还是可以通过的,但若一个声明了noexcept的函数抛出了异常,程序会调用terminate终止程序。
cpp
#define _CRT_SECURE_NO_WARNINGS 1
#include<iostream>
#include<string>
#include<exception>
using namespace std;
double divide(int a, int b) noexcept
{
	if (b == 0)
	{
		throw "division by zero condition!";
	}
	return (double)a / (double)b;
}
int main()
{
	try
	{
		int c, d;
		cin >> c >> d;
		cout<<divide(c, d)<<endl;
	}
	catch (const char* errmsg)
	{
		cout << errmsg << endl;
	}
	catch (...)
	{
		cout << "未知异常" << endl;
	}
	return 0;
}
divide声明了noexcept,此时若divide抛出了异常,则程序会终止,如下所示:
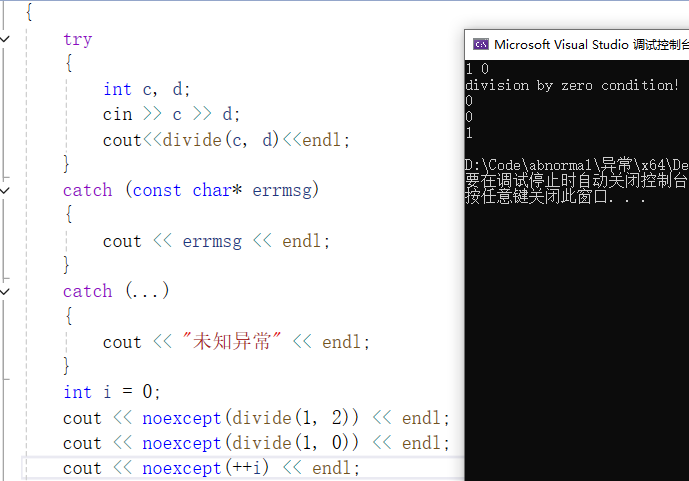
noexcept还可以作为运算符来检测一个表达式是否会抛出异常,可能会返回false,不会返回true。
cpp
#define _CRT_SECURE_NO_WARNINGS 1
#include<iostream>
#include<string>
#include<exception>
using namespace std;
double divide(int a, int b)
{
	if (b == 0)
	{
		throw "division by zero condition!";
	}
	return (double)a / (double)b;
}
int main()
{
	try
	{
		int c, d;
		cin >> c >> d;
		cout<<divide(c, d)<<endl;
	}
	catch (const char* errmsg)
	{
		cout << errmsg << endl;
	}
	catch (...)
	{
		cout << "未知异常" << endl;
	}
	int i = 0;
	cout << noexcept(divide(1, 2)) << endl;
	cout << noexcept(divide(1, 0)) << endl;
	cout << noexcept(++i) << endl;
	return 0;
}
divide可能会抛出异常,故noexcept(divide(1,2))、noexcept(divide(1,0))为0,++i表达式不会抛出异常,故noexcept(++i)为1,结果如下所示:
8、智能指针
智能指针使用场景分析:
cpp
double divide(int a, int b)
{
	if (b == 0)
	{
		throw "division by zero condition!";
	}
	return (double)a / (double)b;
}
void func()
{
	int* arr1 = new int[10];
	int* arr2 = new int[10];
	try
	{
		int c, d;
		cin >> c >> d;
		cout << divide(c, d) << endl;
        delete []arr1;
        delete []arr2;
	}
	catch (...)
	{
		cout << "delete[]" << arr1 << endl;
		cout << "delete[]" << arr2 << endl;
	}
}
从上面的程序可以看出,new和delete都使用了,看似不会内存泄漏,但若divide抛异常,将导致后面的delete没有得到执行,就会导致内存泄漏了,因此需要在new之后捕获异常,捕获到异常后delete释放,再将异常抛出,但由于new本身也可能抛异常,连续的两个new和divide都可能抛异常,处理起来就比较麻烦了,智能指针在这样的场景下就让问题简单多了。
智能指针是一种基于管理资源的类的设计思想而实现的,也称为RAII,本质是一种利用对象生命周期来管理获取到的动态资源,以此来避免内存泄漏,RAII在获取资源时把资源委托给一个对象,进而控制对资源的访问,资源在对象的生命周期内始终保持有效,最后在对象析构时释放资源,这样既保障了资源的正常释放,又避免了资源泄漏问题。
智能指针类除了满足RAII的设计思路,还需方便资源的访问,故智能指针也如迭代器一样,重载operator*/operator->/operator 等运算符,方便访问资源。
C++智能指针的使用需包含头文件<memory>,智能指针大多都满足RAII和指针一样的行为,原理上而言主要是解决智能指针拷贝时的思路不同。
auto_ptr是C++98时设计的智能指针,auto_ptr的特点是拷贝时把被拷贝对象的资源管理权转移给拷贝对象,这将导致被拷贝对象悬空,访问出错,一般不建议使用auto_ptr。
cpp
#include<iostream>
#include<memory>
using namespace std;
class Date
{
public:
	Date(int year=1,int month=1,int day=1)
		:_year(year)
		,_month(month)
		,_day(day)
	{ }
	~Date()
	{
		cout << "~Date()" << endl;
	}
	int _year;
	int _month;
	int _day;
};
int main()
{
	auto_ptr<Date> ap1(new Date);
	auto_ptr<Date> ap2(ap1);
	ap1->_year++;//ap1悬空,访问出错!
    return 0;
}
auto_ptr<Date> ap2(ap1),则ap1的资源管理权转移给ap2,ap1将悬空,ap1->_year++,访问ap1将报错,auto_ptr使得被拷贝对象悬空,故不建议使用auto_ptr。
unique_ptr是C++11设计的智能指针,unique_ptr不支持拷贝,支持移动构造,如果不需要拷贝就可以考虑使用unique_ptr。
cpp
#include<iostream>
#include<memory>
using namespace std;
class Date
{
public:
	Date(int year=1,int month=1,int day=1)
		:_year(year)
		,_month(month)
		,_day(day)
	{ }
	~Date()
	{
		cout << "~Date()" << endl;
	}
	int _year;
	int _month;
	int _day;
};
int main()
{
	unique_ptr<Date> ap1(new Date);
	//unique_ptr<Date> ap2(ap1);//unique_ptr不支持拷贝
	unique_ptr<Date> ap3(move(ap1));//支持移动
    return 0;
}
unique_ptr不支持拷贝,即不支持unique_ptr<Date> ap2(ap1),支持移动,即unique_ptr<Date> ap3(move(ap1))。
shared_ptr也是C++11设计的智能指针,既支持拷贝,也支持移动,需要拷贝的场景就可以考虑使用它了,shared_ptr底层通过引用计数的方式来实现。
cpp
#include<iostream>
#include<memory>
using namespace std;
class Date
{
public:
Date(int year=1,int month=1,int day=1)
:_year(year)
,_month(month)
,_day(day)
{ }
~Date()
{
cout << "~Date()" << endl;
}
int _year;
int _month;
int _day;
};
int main()
{
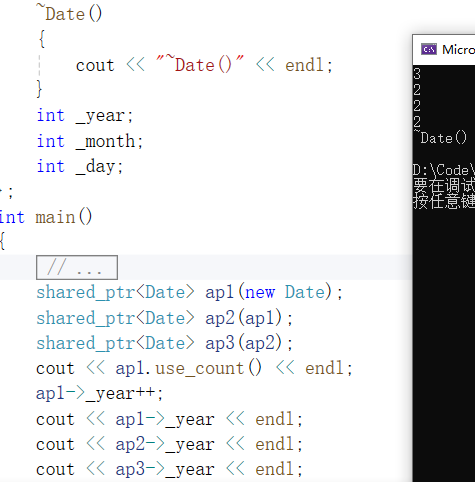
shared_ptr<Date> ap1(new Date);
shared_ptr<Date> ap2(ap1);
shared_ptr<Date> ap3(ap2);
cout << ap1.use_count() << endl;
ap1->_year++;
cout << ap1->_year << endl;
cout << ap2->_year << endl;
cout << ap3->_year << endl;
return 0;
}ap1.use_count()即为引用计数的值,代表有多少个指针指向该资源,可知该引用计数的值为3,ap1->_year++,则ap2、ap3的_year也都会++,结果如下所示:
下面来模拟实现auto_ptr、unique_ptr、shared_ptr:
auto_ptr:
cpp
namespace Kzy
{
    template<class K>
	class auto_ptr
	{
	public:
		auto_ptr(K* ptr)
			:_ptr(ptr)
		{
		}
		auto_ptr(auto_ptr<K>& sp)
			:_ptr(sp._ptr)
		{
			sp._ptr = nullptr;
		}
		auto_ptr<K>& operator=(auto_ptr<K>& sp)
		{
			if (this != &sp)
			{
				if (_ptr)
				{
					delete _ptr;
				}
				_ptr = sp._ptr;
				sp._ptr = nullptr;
			}
			return *this;
		}
		K* operator->()
		{
			return _ptr;
		}
		K& operator*()
		{
			return *_ptr;
		}
	private:
		K* _ptr;
	};
}
auto_ptr实现起来也很简单,其思路是拷贝时转移资源管理权给被拷贝对象,这种方式不提倡,将导致被拷贝对象悬空,因此auto_ptr不建议使用。
unique_ptr:
cpp
    template<class K>
	class unique_ptr
	{
	public:
		explicit unique_ptr(K* ptr)
			:_ptr(ptr)
		{
		}
		~unique_ptr()
		{
			if (_ptr)
			{
				cout << "delete:" << _ptr << endl;
				delete _ptr;
			}
		}
		K& operator*()
		{
			return *_ptr;
		}
		K* operator->()
		{
			return _ptr;
		}
		unique_ptr(const unique_ptr<K>& sp) = delete;
		unique_ptr<K>& operator=(const unique_ptr<K>& sp) = delete;
		unique_ptr(unique_ptr<K>&& sp)
			:_ptr(sp._ptr)
		{
			sp._ptr = nullptr;
		}
		unique_ptr<K>& operator=(unique_ptr<K>&& sp)
		{
			delete _ptr;
			_ptr = sp._ptr;
			sp._ptr = nullptr;
			return *this;
		}
	private:
		K* _ptr;
	};
unique_ptr的实现思路则是不支持拷贝,仅支持移动,故需将其拷贝构造、拷贝赋值函数删除,即unique_ptr(const unique<K>& sp)=delete,unique_ptr<K>& operator=(const unique<K>&sp)=delete, 另外需要注意的是智能指针的构造函数需要explicit修饰,防止原生指针类型转化成智能指针。
shared_ptr:
shared_ptr的实现与auto_ptr、unique_ptr有所不同,体现在其引用计数的设计,由于一份资源就
cpp
    template<class K>
	class shared_ptr
	{
	public:
		explicit shared_ptr(K* ptr)
			:_ptr(ptr)
			, _pcount(new atomic<int>(1))
		{
		}
        //删除器构造
		template<class D>
		shared_ptr(K* ptr, D del)
			: _ptr(ptr)
			, _pcount(new atomic<int>(1))
			, _del(del)
		{
		}
		~shared_ptr()
		{
			if (--(*_pcount) == 0)
			{
				_del(_ptr);
				delete _pcount;
			}
		}
		shared_ptr(const shared_ptr<K>& sp)
			:_ptr(sp._ptr)
			, _pcount(sp._pcount)
		{
			(*_pcount)++;
		}
		shared_ptr<K>& operator=(const shared_ptr<K>& sp)
		{
			if (_ptr != sp._ptr)
			{
				if (--(*_pcount) == 0)
				{
					delete _ptr;
					delete _pcount;
				}
				_ptr = sp._ptr;
				_pcount = sp._pcount;
				(*_pcount)++;
			}
			return *this;
		}
		K& operator*()
		{
			return *(_ptr);
		}
		K* operator->()
		{
			return _ptr;
		}
		int use_count()
		{
			return *(_pcount);
		}
	private:
		K* _ptr;
		atomic<int>* _pcount;
		function<void(K*)> _del = [](K* ptr) {delete ptr;};
	};
需要一个引用计数,因此引用计数需采用堆上动态开辟空间的方式来实现,构造智能指针对象时来一份资源,就需要new一个引用计数,多个shared_ptr指向同一块资源时就++引用计数,shared_ptr对象析构时就--引用计数,引用计数减到0时代表当前析构的shared_ptr是最后一个管理资源的对象,则析构资源,如下图所示:
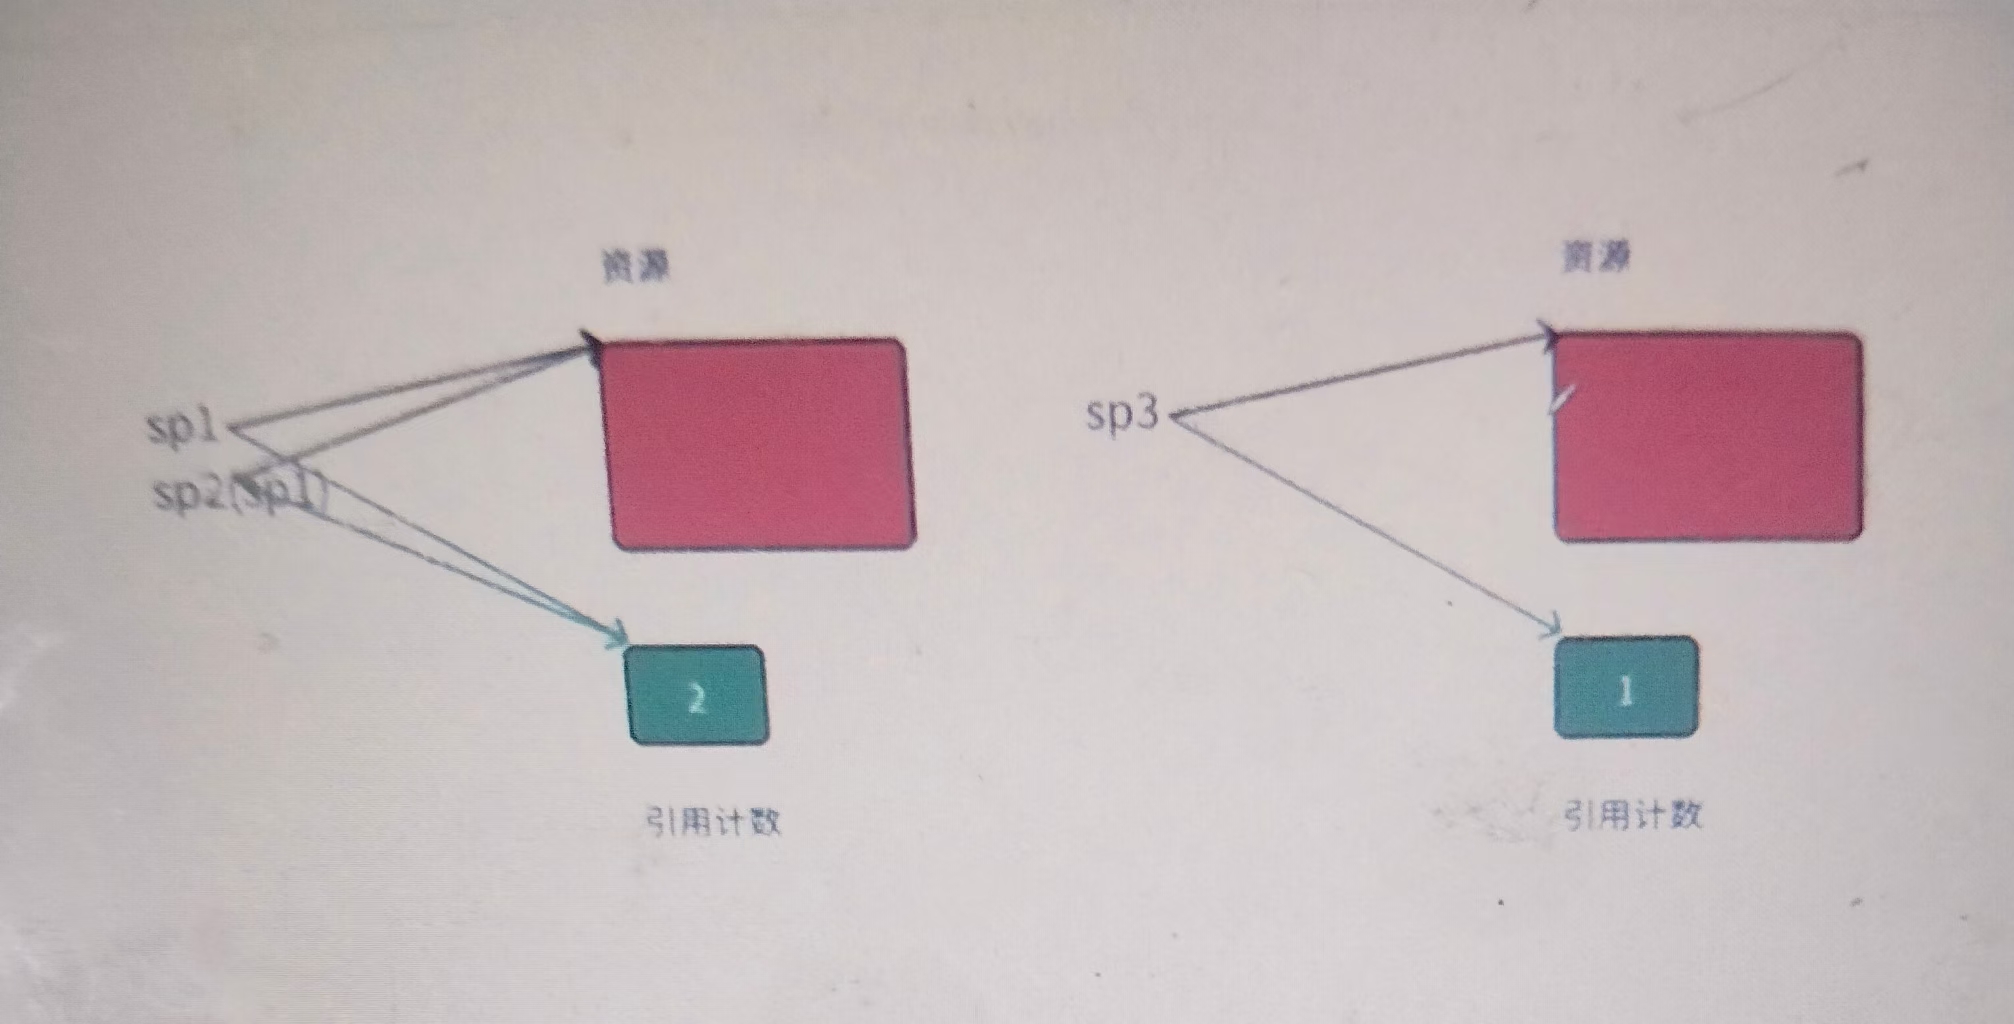
这里还需注意的是,智能指针析构时默认是进行delete释放资源,这就意味着若不是new出来的资源,交给智能指针管理,析构时就会崩溃,因此智能指针支持在构造时增加删除器,删除器本质是一个可调用对象,删除器中实现释放资源的方式,当构造智能指针时,给了定制的删除器,在智能指针析构时就会调用删除器释放资源,此外引用计数的++、--必须为原子操作,即atomic<int>*_pcount,若无原子性,则若多线程对引用计数进行++时,可能会导致引用计数计算出错。
标准库的智能指针也都支持删除器构造,由于new 较常用,故unique_ptr和shared_ptr都特化了一份 的版本,如下所示:
cpp
#define _CRT_SECURE_NO_WARNINGS 1
#include<iostream>
#include<string>
#include<memory>
using namespace std;
struct Date
{
	int _year;
	int _month;
	int _day;
	Date(int year = 1, int month = 1, int day = 1)
		:_year(year)
		, _month(month)
		, _day(day)
	{
	}
	~Date()
	{
		cout << "~Date()" << endl;
	}
};
class Fclose
{
public:
	void operator()(FILE* ptr)
	{
		cout << "fclose:" << ptr << endl;
		fclose(ptr);
	}
};
template<class K>
void Deletearrayfunc(K* ptr)
{
	delete[] ptr;
}
int main()
{
	std::shared_ptr<Date> sp1(new Date);
	std::shared_ptr<Date[]> sp2(new Date[10]);
	std::shared_ptr<Date> sp3(new Date[10], [](Date* ptr) {delete[]ptr;});//lambda删除器
	std::shared_ptr<Date> sp4(new Date[5], Deletearrayfunc<Date>);//函数指针
	std::unique_ptr<Date> up1(new Date);
	std::unique_ptr<Date[]> up2(new Date[10]);
	std::unique_ptr<FILE, Fclose> up3(fopen("test.cpp", "r"));
	std::shared_ptr<FILE> sp5(fopen("test.cpp", "r"), Fclose());//仿函数
	std::shared_ptr<FILE> sp6(fopen("test.cpp", "r"), [](FILE* ptr)
		{
			fclose(ptr);
		});//lambda
	auto fclosefunc = [](FILE* ptr) {fclose(ptr);};
	std::unique_ptr<FILE, decltype(fclosefunc)> up4(fopen("test.cpp", "r"), fclosefunc);//lambda
	return 0;
}
std::shared_ptr<Date > sp2(new Date10),std::unique_ptr<Date > up2(new Date10),即可管理new 的资源,此外,还可支持定制删除器的构造,删除器可以是lambda表达式、仿函数、或函数指针等,如仿函数删除器构造,std::shared_ptr<FILE> sp5(fopen("test.cpp","r"),Fclose()),需要注意的是unique_ptr删除器的构造需先在模板使用decltype声明类型,如std::unique_ptr<FILE,decltype(fclosefunc)> up4(fopen("test.cpp","r"),fclosefunc)。
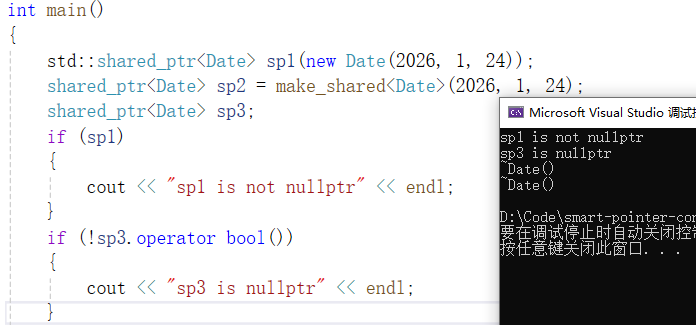
shared_ptr除了支持用指向资源的指针构造,还支持make_shared用初始化资源对象的值直接构造,此外shared_ptr和unique_ptr都支持了operator bool的类型转换,若智能指针为空没有管理资源,则返回false,否则返回true,可以直接把智能指针对象传给if来判断智能指针是否为空,如下所示:
cpp
#include<iostream>
#include<memory>
using namespace std;
struct Date
{
	int _year;
	int _month;
	int _day;
	Date(int year = 1, int month = 1, int day = 1)
		:_year(year)
		, _month(month)
		, _day(day)
	{
	}
	~Date()
	{
		cout << "~Date()" << endl;
	}
};
int main()
{
	std::shared_ptr<Date> sp1(new Date(2026, 1, 24));
	shared_ptr<Date> sp2 = make_shared<Date>(2026, 1, 24);
	shared_ptr<Date> sp3;
	if (sp1)
	{
		cout << "sp1 is not nullptr" << endl;
	}
	if (!sp3.operator bool())
	{
		cout << "sp3 is nullptr" << endl;
	}
    //shared_ptr<Date> sp4=new Date(2026,1,25);不允许原生指针向智能指针的类型转化
	//unique_ptr<Date> up1=new Date(2026, 1, 26);
	return 0;
}
sp2通过make_shared直接进行构造,即shared_ptr<Date> sp2=make_shared<Date>(2026,1,24),if判断sp1、sp3是否为nullptr,智能指针未初始化时为nullptr,此外不支持原生指针隐式类型转化成智能指针,结果如下所示:
shared_ptr大多数情况下管理资源都非常合适,支持RAII,也支持拷贝,但在循环引用的场景下会导致内存泄漏,这种情况下需使用weak_ptr来解决,循环引用的场景如下所示:
cpp
#include<iostream>
#include<memory>
using namespace std;
struct Listnode
{
	int _data;
	std::shared_ptr<Listnode> _prev;
	std::shared_ptr<Listnode> _next;
	~Listnode()
	{
		cout << "~Listnode()" << endl;
	}
};
int main()
{
	std::shared_ptr<Listnode> _n1(new Listnode);
	std::shared_ptr<Listnode> _n2(new Listnode);
	cout << _n1.use_count() << endl;
	cout << _n2.use_count() << endl;
	_n1->_next = _n2;
	_n2->_prev = _n1;
	cout << _n1.use_count() << endl;
	cout << _n2.use_count() << endl;
    return 0;
}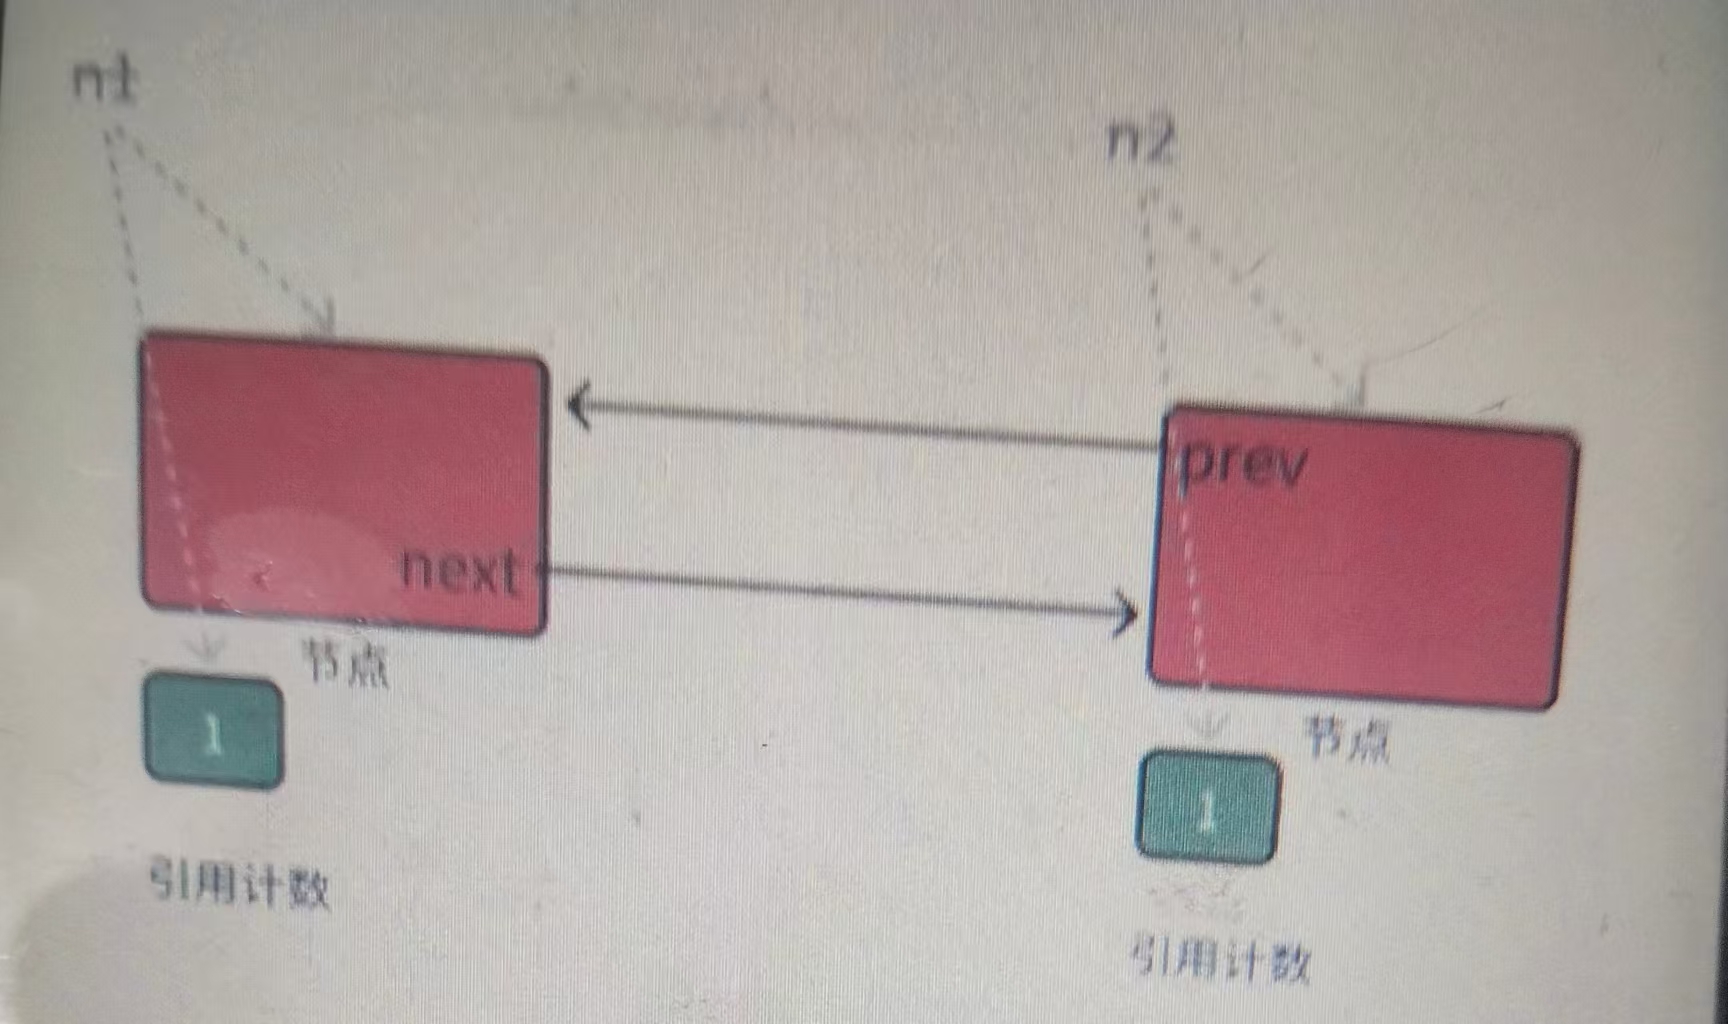
当n1和n2析构后,两个结点的引用计数减到1,当左边结点的_next析构后,右边的结点就释放了,而_next的析构需要左边结点的释放,左边结点的释放又需要右边结点的_prev析构,而_prev的析构需要右边结点的释放,至此逻辑上就形成了循环引用,左右结点都不会释放,导致内存泄漏,这种场景就需要使用weak_ptr来解决,将Listnode的_next和_prev改成weak_ptr,weak_ptr不同于unique_ptr、shared_ptr,weak_ptr不直接管理资源,weak_ptr绑定到shared_ptr时不会增加引用计数,_next和_prev不参与资源释放管理逻辑,从而解决了循环引用。
cpp
#include<iostream>
#include<memory>
using namespace std;
struct Listnode
{
	int _data;
	std::weak_ptr<Listnode> _prev;
	std::weak_ptr<Listnode> _next;
	~Listnode()
	{
		cout << "~Listnode()" << endl;
	}
};
int main()
{
	std::shared_ptr<Listnode> _n1(new Listnode);
	std::shared_ptr<Listnode> _n2(new Listnode);
	cout << _n1.use_count() << endl;
	cout << _n2.use_count() << endl;
	_n1->_next = _n2;
	_n2->_prev = _n1;
	cout << _n1.use_count() << endl;
	cout << _n2.use_count() << endl;
    return 0;
}
weak_ptr中也没有重载operator*、operator->,由于weak_ptr不参与资源管理,那么如果weak_ptr绑定的shared_ptr已经释放了资源,那么它再去访问资源就很危险了。
cpp
#include<iostream>
#include<memory>
using namespace std;
int main()
{
std::shared_ptr<string> sp1(new string("1111111"));
std::shared_ptr<string> sp2(sp1);
std::weak_ptr<string> wp = sp1;
cout << wp.expired() << endl;
cout << wp.use_count() << endl;
sp1 = make_shared<string>("2222222");
cout << wp.expired() << endl;
cout << wp.use_count() << endl;
sp2 = make_shared<string>("3333333");
cout << wp.expired() << endl;
cout << wp.use_count() << endl;
wp = sp1;
shared_ptr<string> sp3 = wp.lock();
cout << wp.expired() << endl;
cout << wp.use_count() << endl;
sp1 = make_shared<string>("4444444");
cout << wp.expired() << endl;
cout << wp.use_count() << endl;
return 0;
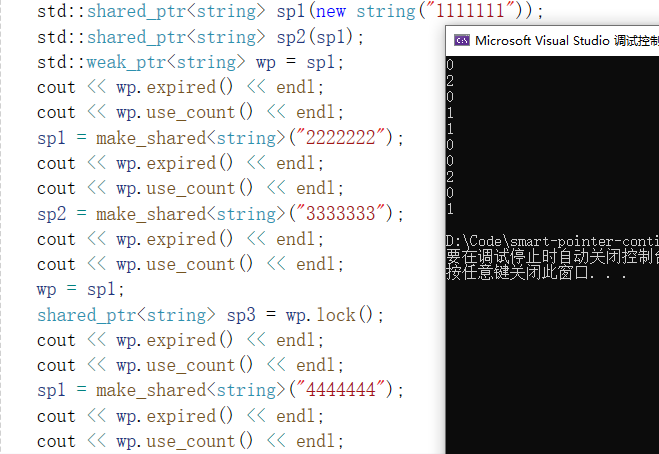
}weak_ptr支持expired检查指向的资源是否过期,use_count也能获取引用计数,weak_ptr访问资源可调用lock返回一个管理资源的shared_ptr,如果资源已释放,则返回的shared_ptr为nullptr,如果资源没有释放,则可通过返回的shared_ptr来访问资源,结果如下所示:
shared_ptr的引用计数对象在堆上,如果多个shared_ptr对象在多个线程中,进行shared_ptr的拷贝析构时会访问修改引用计数,因此就会存在线程安全问题,故shared_ptr引用计数需要加锁或原子操作来保证线程安全。
cpp
#include<iostream>
#include<memory>
#include<atomic>
#include<thread>
#include<mutex>
using namespace std;
struct K
{
	int _k1=0;
	int _k2=0;
	~K()
	{
		cout << "~K()" << endl;
	}
};
int main()
{
	shared_ptr<K> p1(new K);
	const size_t N = 100000;
	mutex mtx;
	auto func = [&]()
		{
	       for(int i=0;i<N;i++)
		   {
			   shared_ptr<K> copy(p1);
			   {
					unique_lock<mutex> lk(mtx);
					copy->_k1++;
					copy->_k2++;
			   }
		   }
		};
	thread t1(func);
	thread t2(func);
	t1.join();
	t2.join();
	cout << p1->_k1 << endl;
	cout << p1->_k2 << endl;
	cout << p1.use_count() << endl;
	return 0;
}
shared_ptr<K> copy(p1),进行智能指针的拷贝会++引用计数,同时++_k1,++_k2,++_k1、++_k2也非原子操作,故需加锁,即unique_lock<mutex> lk(mtx),确保其原子性,结果如下:
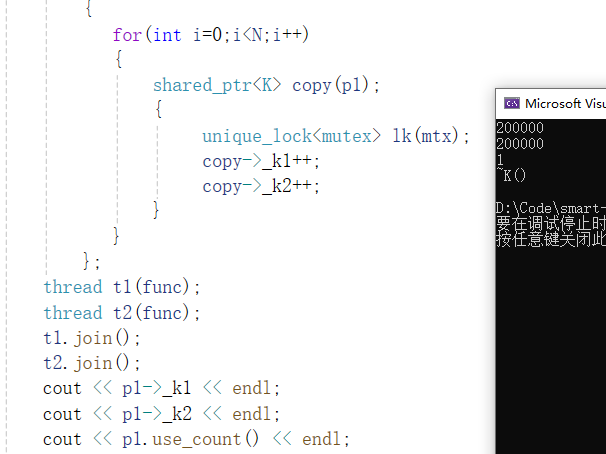
加锁后copy->_k1++,copy->_k2++都为原子操作,故t1、t2两线程执行完成后_k1、_k2都为200000,由于拷贝后copy指针出作用域即被销毁,故最后只有p1指向该资源,故p1.use_count()为1。
三、结语
本文主要围绕C++11相关进阶特性展开介绍,变参模板通过递归来构造参数包,然后在另一个递归过程来使用它,变参模板直接解决了C++98不能实例化包含任意长度参数列表的类模板和函数模板,emplace系列可直接通过参数来进行构造,相比push、insert传统接口在某些场景下更加高效,lambda表达式的原理是编译器在底层实现仿函数并进行传递,捕获的局部变量成为由构造函数初始化的成员,通过汇编角度也印证了这一点,包装器统一了类型,可以包装与之匹配的可调用对象,如函数指针、仿函数、lambda表达式,bind本质上也是一个包装器,对接收的目标进行处理后返回一个可调用对象,bind也可用来调整参数个数和顺序,C++11优化了异常的处理机制,发生异常时抛出一个对象,通过捕获该对象来进行异常的处理或重新抛出,智能指针用于负责资源的管理,智能指针的引入使得内存泄漏、悬空指针的问题显著减少,以unique_ptr和shared_ptr为代表,前者代表独占所有权,支持移动但不支持拷贝,后者代表共享所有权,支持拷贝也支持移动,C++11新特性的引入,标志着C++向更安全、更现代的编程范式迈进,促进了更清晰的所有权语义和更健壮的代码设计,C++仍在不断进化,相信C++的未来一定越来越好,在拥挤和变化的世界中茁壮成长!