十三、K8s 常见持久化存储方案及存储类动态pv
在k8s中为什么要做持久化存储?
在k8s中部署的应用都是以pod容器的形式运行的,假如我们部署MySQL、Redis等数据库,需要对这些数据库产生的数据做备份。因为Pod是有生命周期的,如果pod不挂载数据卷,那pod被删除或重启后这些数据会随之消失,如果想要长久的保留这些数据就要用到pod数据持久化存储。
13.1 K8s 持久化存储:emptyDir
emptyDir类型的Volume是在Pod分配到Node上时被创建,Kubernetes会在Node上自动分配一个目录,因此无需指定宿主机Node上对应的目录文件 。 这个目录的初始内容为空,当Pod从Node上移除时,emptyDir中的数据会被永久删除。emptyDir Volume主要用于某些应用程序无需永久保存的临时目录,多个容器的共享目录等。
我们想要使用存储卷,需要经历如下步骤:
-
定义pod的volume,这个volume指明它要关联到哪个存储上的
-
在容器中要使用volumemounts挂载对应的存储
13.1.1 字段展示
bash
# `#`的属于常用字段
]# kubectl explain pods.spec.volumes
   awsElasticBlockStore	<Object>
   azureDisk	<Object>
   azureFile	<Object>
   cephfs	<Object>				#
   cinder	<Object>
   configMap	<Object>			#
   csi	<Object>
   downwardAPI	<Object>
   emptyDir	<Object>				#
   ephemeral	<Object>
   fc	<Object>
   flexVolume	<Object>
   flocker	<Object>
   gcePersistentDisk	<Object>
   gitRepo	<Object>
   glusterfs	<Object>			#
   hostPath	<Object>				#
   iscsi	<Object>
   name	<string> -required-
   nfs	<Object>					#
   persistentVolumeClaim	<Object>#
   photonPersistentDisk	<Object>
   portworxVolume	<Object>
   projected	<Object>
   quobyte	<Object>
   rbd	<Object>
   scaleIO	<Object>
   secret	<Object>				#
   storageos	<Object>
   vsphereVolume	<Object>
13.1.2 emptyDir示例
bash
]# kubectl explain pods.spec.containers.volumeMounts
]# kubectl explain pods.spec.volumes

[root@k8s-master1 ~]# vim emptydir.yaml
apiVersion: v1
kind: Pod
metadata:
  name: pod-empty
spec:
  containers:
  - name: container-empty
    image: docker.io/library/nginx:latest
    imagePullPolicy: IfNotPresent
    volumeMounts:
    - mountPath: /cache		# 将卷挂载到容器内的 /cache 目录
      name: cache-volume	# 引用卷的名称
  volumes:
  - emptyDir: {}				# 定义emptyDir类型的卷
    name: cache-volume		# 卷的名称为 cache-volume

[root@k8s-master1 ~]# kubectl apply -f emptydir.yaml

# 查看本机临时目录存在的位置,可用如下方法
# 查看pod资源调度到哪台节点
[root@k8s-master1 ~]# kubectl get pods -owide
pod-empty   1/1     Running   10.244.147.244   k8s-node1.kaser.org

# 查看pod资源的uid
[root@k8s-master1 ~]# kubectl get pods -o yaml | grep uid
    uid: 86162f67-c2a6-440f-923e-4a8a30ac4537

# 远程登录上去下载tree命令查看
[root@k8s-master1 ~]# ssh 172.25.254.50
[root@k8s-node1 ~]# yum install -y tree
[root@k8s-node1 ~]# tree /var/lib/kubelet/pods/86162f67-c2a6-440f-923e-4a8a30ac4537
/var/lib/kubelet/pods/86162f67-c2a6-440f-923e-4a8a30ac4537
├── containers
│   └── container-empty
│       └── 03806cf6
├── etc-hosts
├── plugins
│   └── kubernetes.io~empty-dir
│       ├── cache-volume
│       │   └── ready
│       └── wrapped_kube-api-access-k95ch
│           └── ready
└── volumes
    ├── kubernetes.io~empty-dir
    │   └── cache-volume			# 这里
    └── kubernetes.io~projected
        └── kube-api-access-k95ch
            ├── ca.crt -> ..data/ca.crt
            ├── namespace -> ..data/namespace
            └── token -> ..data/token

11 directories, 7 files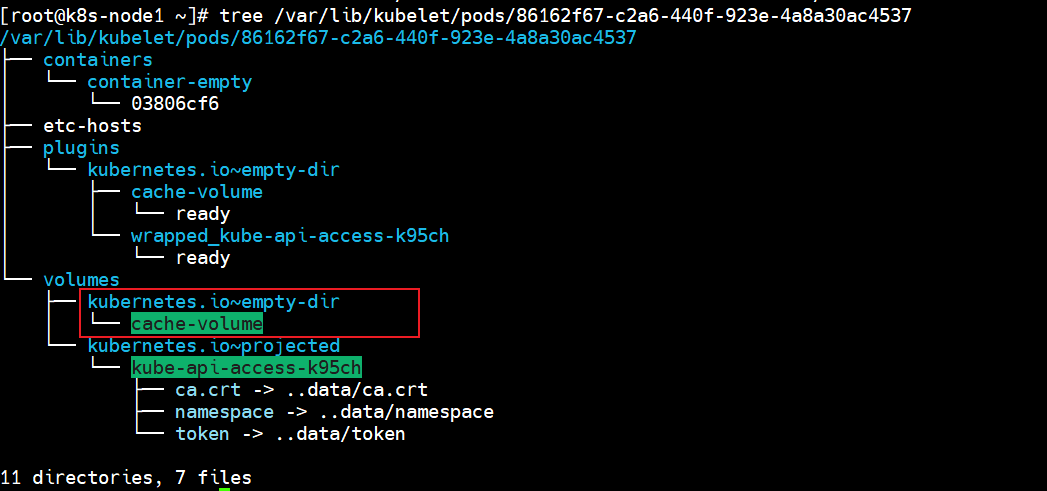
由上可知,临时目录在本地的/var/lib/kubelet/pods/38d60544-8591-468d-b70d-2a66df3a1cf6/volumes/kubernetes.io~empty-dir/cache-volume/下
13.2 K8s 持久化存储:hostPath
hostPath Volume 是指Pod挂载宿主机上的目录或文件 。 hostPath Volume使得容器可以使用宿主机的文件系统进行存储 ,hostpath(宿主机路径):节点级别的存储卷,在pod被删除,这个存储卷还是存在的,不会被删除,所以只要同一个pod被调度到同一个节点上来,在pod被删除重新被调度到这个节点之后,对应的数据依然是存在的。
13.2.1 字段展示
bash
[root@k8s-master1 ~]# kubectl explain pods.spec.volumes.hostPath
  path  <string> -required-
  type  <string>
     - `""` For backwards compatible, leave it empty if unset
     - `"BlockDevice"` A block device must exist at the given path
     - `"CharDevice"` A character device must exist at the given path
     - `"Directory"` A directory must exist at the given path
     - `"DirectoryOrCreate"` If nothing exists at the given path, an empty
     - `"File"` A file must exist at the given path
     - `"FileOrCreate"` If nothing exists at the given path, an empty file
     - `"Socket"` A UNIX socket must exist at the given path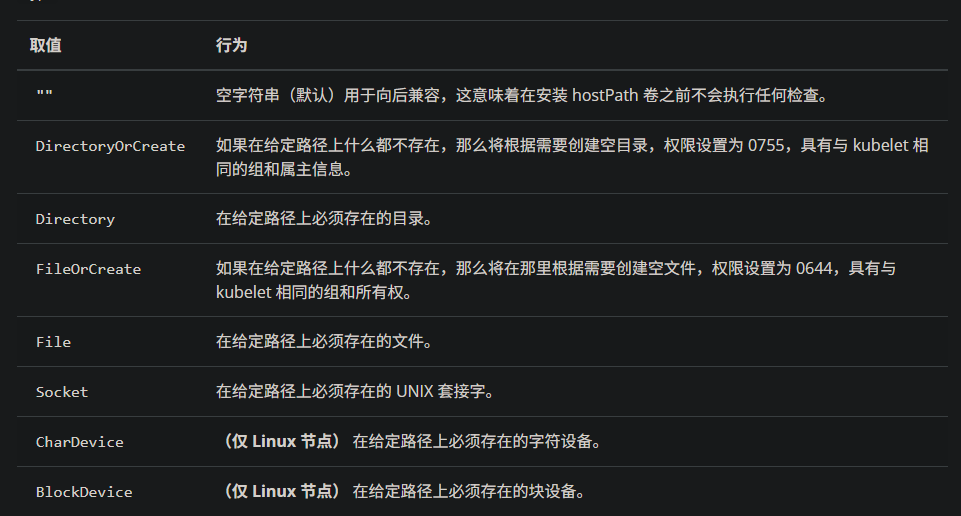
13.2.2 hostPath示例
bash
[root@k8s-master1 ~]# kubectl explain pods.spec.containers
[root@k8s-master1 ~]# kubectl explain pods.spec.containers.volumeMounts

# 创建一个pod,挂载hostPath存储卷
[root@k8s-master1 ~]# vim hostpath.yaml
apiVersion: v1
kind: Pod
metadata:
  name: test-hostpath
spec:
  containers:
  - name: test-nginx
    image: docker.io/library/nginx:latest
    imagePullPolicy: IfNotPresent
    volumeMounts:
    - mountPath: /test-nginx
      name: test-volume
  - name: test-tomcat
    image: docker.io/library/tomcat:8.5-jre8-alpine
    imagePullPolicy: IfNotPresent
    volumeMounts:
    - mountPath: /test-tomcat
      name: test-volume
  volumes:
  - hostPath:
      path: /data1
      type: DirectoryOrCreate
    name: test-volume

 # DirectoryOrCreate表示本地有/data1目录,就用本地的,本地没有就会在pod调度到的节点自动创建一个。

[root@k8s-master1 ~]# kubectl apply -f emptydir.yaml

# 查看调度到哪个节点 --> node1
[root@k8s-master1 ~]# kubectl get pods -owide
test-hostpath   2/2     Running   k8s-node1.kaser.org

# 在node1里面查看是否创建被挂载目录
[root@k8s-node1 ~]# ll / | grep data1
drwxr-xr-x    2 root root   54 Jan 24 16:28 data1

# 进入目录并建立ceshi文件
[root@k8s-node1 ~]# cd /data1/
[root@k8s-node1 data1]# touch ceshi

# 进入test-tomcat容器中的挂载目录/test-tomcat并建立测试文件.txt
~]# kubectl exec -it test-hostpath -c test-tomcat -- /bin/bash
bash-4.4# cd /test-tomcat/
bash-4.4# touch tomcat.txt
bash-4.4# ls
ceshi       tomcat.txt

# 进入test-nginx容器中的挂载目录/test-nginx并建立测试文件.txt
[root@k8s-node1 ~]# kubectl exec -it test-hostpath -c test-nginx -- /bin/bash
root@test-hostpath:/# cd /test-nginx/
root@test-hostpath:/test-nginx# touch nginx.txt
root@test-hostpath:/test-nginx# ls
ceshi  nginx.txt  tomcat.txt

# 进入到调度节点目录,查看目录内容
[root@k8s-node1 ~]# cd /data1/
[root@k8s-node1 data1]# ls
ceshi  nginx.txt  tomcat.txt
#过上面测试可以看到,同一个pod里的test-nginx和test-tomcat这两个容器是共享存储卷的。
hostpath存储卷缺点:
单节点
pod删除之后重新创建必须调度到同一个node节点,数据才不会丢失
可以用分布式存储:
nfs,cephfs,glusterfs
bash
[root@k8s-node2 ~]# ll /data1
ls: cannot access '/data1': No such file or directory
13.3 K8s 持久化存储:nfs
**NFS:网络文件系统,**英文Network File System(NFS),是由SUN公司研制的UNIX表示层协议(presentation layer protocol),能使使用者访问网络上别处的文件就像在使用自己的计算机一样。
13.3.1 nfs示例
bash
[root@k8s-master1 ~]# yum install -y nfs-utils

[root@k8s-master1 ~]# mkdir -p /data/volumes
[root@k8s-master1 ~]# vim /etc/exports
/data/volumes   *(rw,no_root_squash)

# rw 该主机对该共享目录有读写权限
# no_root_squash 登入 NFS 主机使用分享目录的使用者,如果是 root 的话,那么对于这个分享的目录来说,他就具有 root 的权限

[root@k8s-master1 ~]# exportfs -arv
exporting *:/data/volumes

[root@k8s-master1 ~]# systemctl restart nfs-server
[root@k8s-master1 ~]# systemctl enable --now nfs-server.service
[root@k8s-master1 ~]# systemctl status nfs-server.service

n1 && n2 ]# yum install -y nfs-utils
n1 && n2 ]# systemctl enable --now nfs-server

n1 && n2 ]# mkdir -p /test
n1 && n2 ]# mount 172.25.254.10:/data/volumes /test/

# 测试挂载成功之后进行卸载
n1 && n2 ]# df -h | grep test
n1 && n2 ]# umount /test


[root@k8s-master1 ~]# vim nfs.yaml
apiVersion: apps/v1
kind: Deployment
metadata:
   name: test-nfs
spec:
  replicas: 3
  selector:
    matchLabels:
      cunchu: nfs
  template:
    metadata:
      labels:
        cunchu: nfs
    spec:
      containers:
      - name: test-nfs
        image: docker.io/library/nginx:latest
        imagePullPolicy: IfNotPresent
        ports:
        - containerPort: 80
          protocol: TCP
        volumeMounts:
        - name: nfs-volumes
          mountPath: /usr/share/nginx/html
      volumes:
      - name: nfs-volumes
        nfs:
          path: /data/volumes
          server: 172.25.254.10

[root@k8s-master1 ~]# kubectl apply -f nfs.yaml
[root@k8s-master1 ~]# kubectl get pods -owide
test-nfs-7d9c856458-8nf59   1/1     Running   10.244.90.134    k8s-node2.kaser.org
test-nfs-7d9c856458-mkpfd   1/1     Running   10.244.147.246   k8s-node1.kaser.org
test-nfs-7d9c856458-wtdxn   1/1     Running   10.244.90.133    k8s-node2.kaser.org

[root@k8s-master1 ~]# cd /data/volumes/
[root@k8s-master1 volumes]# vim index.html
This is pageeeeeeeeeeeeeeeeeeeeeee!

# 测试
[root@k8s-master1 volumes]# curl 10.244.90.134
This is pageeeeeeeeeeeeeeeeeeeeeee!

# 登录到容器中进行测试
[root@k8s-master1 volumes]# kubectl exec -it test-nfs-7d9c856458-8nf59 -- /bin/bash
root@test-nfs-7d9c856458-8nf59:/# cd /usr/share/nginx/html/
root@test-nfs-7d9c856458-8nf59:/usr/share/nginx/html# cat index.html
This is pageeeeeeeeeeeeeeeeeeeeeee!
....
#上面说明挂载nfs存储卷成功了,nfs支持多个客户端挂载,可以创建多个pod,挂载同一个nfs服务器共享出来的目录;但是nfs如果宕机了,数据也就丢失了,所以需要使用分布式存储,常见的分布式存储有glusterfs和cephfs
13.4 K8s 持久化存储:PVC
13.4.1 PV是什么?PVC是什么?
13.4.1.1 PV概述
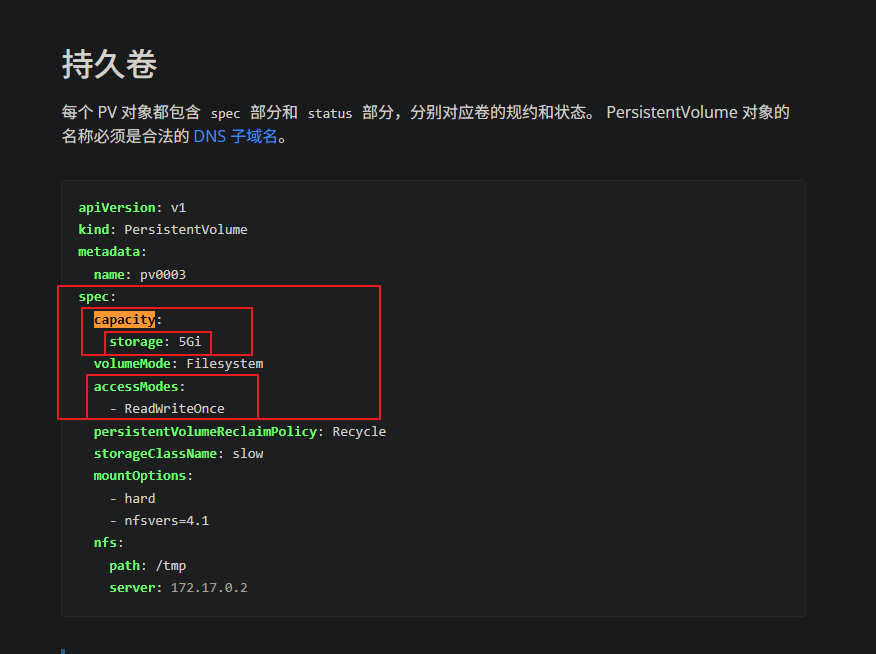
PersistentVolume(PV)是集群中的一块存储 ,由管理员配置或使用存储类动态配置。 它是集群中的资源,就像pod是k8s集群资源一样。 PV是容量插件,如Volumes,其生命周期独立于使用PV的任何单个pod。
13.4.1.2 PVC概述
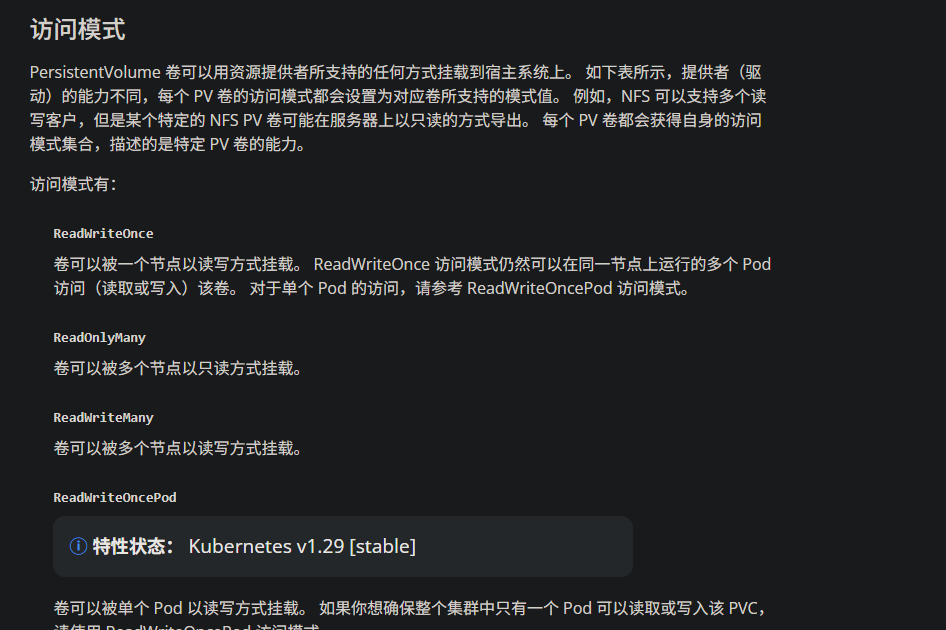
PersistentVolumeClaim(PVC)是一个持久化存储卷 ,我们在创建pod时可以定义这个类型的存储卷。 它类似于一个pod。 Pod消耗节点资源,PVC消耗PV资源。 Pod可以请求特定级别的资源(CPU和内存)。 pvc在申请pv的时候也可以请求特定的大小和访问模式(例如,可以一次读写或多次只读)。
13.4.2 PVC 、PV工作原理
-
PV是群集中的资源。 -
PVC是对这些资源的请求。
PV和PVC之间的相互作用遵循生命周期:
PV的供应方式:
- 静态的:
- 集群管理员创建了许多PV。
- 它们包含可供群集用户使用的实际存储的详细信息。
- 它们存在于Kubernetes API中,可供使用。
- 动态的:
- 当管理员创建的静态PV都不匹配用户的PersistentVolumeClaim时,群集可能会尝试为PVC专门动态配置卷。
- 此配置基于StorageClasses,PVC必须请求存储类,管理员必须创建并配置该类,以便进行动态配置。
**绑定:**用户创建 pvc 并指定需要的资源和访问模式。在找到可用 pv 之前,pvc 会保持未绑定状态。
使用:
- 需要找一个存储服务器,把它划分成多个存储空间;
- k8s 管理员可以把这些存储空间定义成多个 pv;
- 在 pod 中使用 pvc 类型的存储卷之前需要先创建 pvc,通过定义需要使用的 pv 的大小和对应的访问模式,找到合适的 pv;
- pvc 被创建之后,就可以当成存储卷来使用了,我们在定义 pod 时就可以使用这个pvc的存储卷;
- pvc 和 pv 它们是一一对应的关系,pv 如果被 pvc 绑定了,就不能被其他pvc使用了;
- 我们在创建pvc的时候,应该确保和底下的pv能绑定,如果没有合适的pv,那么pvc就会处于pending状态。
**回收策略:**当我们创建 pod 时如果使用 pvc 做为存储卷,那么它会和 pv 绑定,当删除 pod,pvc 和 pv 绑定就会解除,解除之后和 pvc 绑定的 pv 卷里的数据需要怎么处理,目前,卷可以保留,回收或删除:
Retain:当删除 pvc 的时候,pv 仍然存在,处于 released 状态,但是它不能被其他 pvc 绑定使用,里面的数据还是存在的,当我们下次再使用的时候,数据还是存在的,这个是默认的回收策略。Recucle(不推荐使用)Delete:删除 pvc 时即会从 Kubernetes 中移除 PV,也会从相关的外部设施中删除存储资产
13.4.4 PV,PVC结合nfs的示例
先创建 PV 资源,再创建 PVC ,之后为 Pod 或者 Deployment
bash
[root@k8s-master1 ~]# kubectl explain pv.spec.nfs
  path  <string> -required-
  readOnly      <boolean>
  server        <string> -required-
bash
[root@k8s-master1 ~]# mkdir -p /data/volumes_test/v{1..10}
[root@k8s-master1 ~]# vim /etc/exports
/data/volumes *(rw,no_root_squash)
/data/volumes_test/v1 *(rw,no_root_squash)
/data/volumes_test/v2 *(rw,no_root_squash)
/data/volumes_test/v3 *(rw,no_root_squash)
/data/volumes_test/v4 *(rw,no_root_squash)
/data/volumes_test/v5 *(rw,no_root_squash)
/data/volumes_test/v6 *(rw,no_root_squash)
/data/volumes_test/v7 *(rw,no_root_squash)
/data/volumes_test/v8 *(rw,no_root_squash)
/data/volumes_test/v9 *(rw,no_root_squash)
/data/volumes_test/v10 *(rw,no_root_squash)
[root@k8s-master1 ~]# exportfs -arv
[root@k8s-master1 ~]# vim pv_test.yaml
apiVersion: v1
kind: PersistentVolume
metadata:
name: v1
labels:
app: v1
spec:
accessModes:
- ReadWriteMany # 这里不建议使用 ReadWriteOnly
capacity:
storage: 1Gi
nfs:
path: /data/volumes_test/v1
server: 172.25.254.10
---
apiVersion: v1
kind: PersistentVolume
metadata:
name: v2
labels:
app: v2
spec:
accessModes:
- ReadOnlyMany
capacity:
storage: 2Gi
nfs:
path: /data/volumes_test/v2
server: 172.25.254.10
---
apiVersion: v1
kind: PersistentVolume
metadata:
name: v3
labels:
app: v3
spec:
accessModes:
- ReadWriteMany
capacity:
storage: 3Gi
nfs:
path: /data/volumes_test/v3
server: 172.25.254.10
[root@k8s-master1 ~]# kubectl apply -f pv_test.yaml
[root@k8s-master1 ~]# kubectl get pv
v1 1Gi RWX Retain Available
v2 2Gi ROX Retain Available
v3 3Gi RWX Retain Available
# 注解:
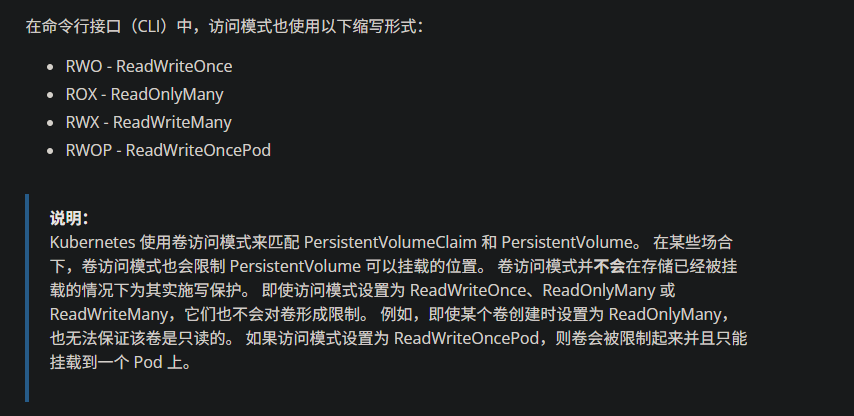
# RWO ReadWritOnce 单路读写,允许同一个 node 节点上的pod访问
# ROX ReadOnlyMany 多路只读,允许不同 node 节点的 pod 以只读方式访问
# RWX ReadWriteMany 多路读写,允许不同的 node 节点的 pod 以读写方式访问
[root@k8s-master1 ~]# vim pvc_test.yaml
apiVersion: v1
kind: PersistentVolumeClaim
metadata:
name: pvc-v1
labels:
app: pvc-v1
spec:
accessModes:
- ReadWriteOnce
resources:
requests:
storage: 1Gi
selector:
matchLabels:
app: v1
---
apiVersion: v1
kind: PersistentVolumeClaim
metadata:
name: pvc-v2
labels:
app: pvc-v2
spec:
accessModes:
- ReadOnlyMany
resources:
requests:
storage: 2Gi
selector:
matchLabels:
app: v2
---
apiVersion: v1
kind: PersistentVolumeClaim
metadata:
name: pvc-v3
labels:
app: pvc-v3
spec:
accessModes:
- ReadWriteMany
resources:
requests:
storage: 3Gi
selector:
matchLabels:
app: v3
[root@k8s-master1 ~]# kubectl apply -f pvc_test.yaml
[root@k8s-master1 ~]# kubectl get pvc
pvc-v1 Bound v1 1Gi RWO
pvc-v2 Bound v2 2Gi ROX
pvc-v3 Bound v3 3Gi RWX
# 看到pvc的status都是bound状态,就说明pvc跟pv已经绑定了
[root@k8s-master1 ~]# vim pod_pvc.yaml
apiVersion: apps/v1
kind: Deployment
metadata:
name: pod-pvc-test
spec:
replicas: 3
selector:
matchLabels:
app: pod-pvc
template:
metadata:
labels:
app: pod-pvc
spec:
containers:
- name: nginx
image: docker.io/library/nginx:latest
imagePullPolicy: IfNotPresent
ports:
- containerPort: 80
protocol: TCP
volumeMounts:
- name: nginx-html
mountPath: /usr/share/nginx/html
volumes:
- name: nginx-html
persistentVolumeClaim:
claimName: pvc-v1
[root@k8s-master1 ~]# kubectl apply -f pod_pvc.yaml
[root@k8s-master1 ~]# kubectl get pods -owide
pod-pvc-test-67d49f5c6f-nbzcx 1/1 Running 10.244.147.249 k8s-node1.kaser.org
pod-pvc-test-67d49f5c6f-qrpkg 1/1 Running 10.244.90.138 k8s-node2.kaser.org
pod-pvc-test-67d49f5c6f-r4wrx 1/1 Running 10.244.147.248 k8s-node1.kaser.org
[root@k8s-master1 ~]# kubectl exec -it pod-pvc-test-67d49f5c6f-nbzcx -- /bin/bash
root@pod-pvc-test-67d49f5c6f-nbzcx:/# cd /usr/share/nginx/html/
root@pod-pvc-test-67d49f5c6f-nbzcx:/usr/share/nginx/html# touch ceshi.txt
root@pod-pvc-test-67d49f5c6f-nbzcx:/usr/share/nginx/html# ls
ceshi.txt
[root@k8s-master1 ~]# cd /data/volumes_test/v1
[root@k8s-master1 v1]# ls
ceshi.txt使用pvc和pv的注意事项
-
我们每次创建 pvc 的时候,需要事先有划分好的 pv,这样可能不方便,那么可以在创建pvc 的时候直接动态创建一个 pv 这个存储类,pv 事先是不存在的
-
pvc 和 pv 绑定,如果使用默认的回收策略 retain,那么删除 pvc 之后,pv 会处于released 状态,我们想要继续使用这个 pv,需要手动删除 pv,kubectl delete pv pv_name,删除 pv,不会删除 pv里的数据,当我们重新创建 pvc 时还会和这个最匹配的pv 绑定,数据还是原来数据,不会丢失。
经过测试,如果回收策略是Delete,删除pv,pv后端存储的数据也不会被删除
先删除使用 pvc 的 pod,再删除 pvc
13.5 K8s 存储类:StorageClass
13.5.1 StorageClass概述
上面介绍的 PV 和 PVC 模式都是需要先创建好 PV,然后定义好 PVC 和 pv 进行一对一的Bond,但是如果 PVC 请求成千上万,那么就需要创建成千上万的 PV,对于运维人员来说维护成本很高,Kubernetes 提供一种自动创建 PV 的机制,叫 StorageClass,它的作用就是创建 PV 的模板。k8s 集群管理员通过创建 StorageClass 可以动态生成一个存储卷 pv 供k8s pvc 使用。
每个 StorageClass 都包含字段 provisioner,parameters 和reclaimPolicy。
具体来说,StorageClass会定义以下两部分:
- PV的属性 ,比如存储的大小、类型等;
- 创建这种PV需要使用到的存储插件,比如Ceph、NFS等
有了这两部分信息,Kubernetes 就能够根据用户提交的 PVC,找到对应的StorageClass,然后 Kubernetes 就会调用 StorageClass 声明的存储插件,创建出需要的 PV。
bash
# 查看 storageclass 的字段
[root@k8s-master1 ~]# kubectl explain sc
   allowVolumeExpansion	<boolean>

   allowedTopologies	<[]Object>

   apiVersion	<string>

   kind	<string>

   metadata	<Object>

   mountOptions	<[]string>

   parameters	<map[string]string>

   provisioner	<string> -required-
   # 供应商,storageclass需要有一个供应者
   # 用来确定我们使用什么样的存储来创建pv资源

   reclaimPolicy	<string>

   volumeBindingMode	<string>
provisioner既可以由内部供应商提供,也可以由外部供应商提供,
如果是外部供应商可以参考:
https://github.com/kubernetes-incubator/external-storage/下提供的方法创建。
https://github.com/kubernetes-sigs/sig-storage-lib-external-provisioner
以 NFS 为例,要想使用 NFS,我们需要一个 nfs-client 的自动装载程序,称之为provisioner,这个程序会使用我们已经配置好的 NFS 服务器自动创建持久卷,也就是自动帮我们创建 PV。
reclaimPolicy:回收策略
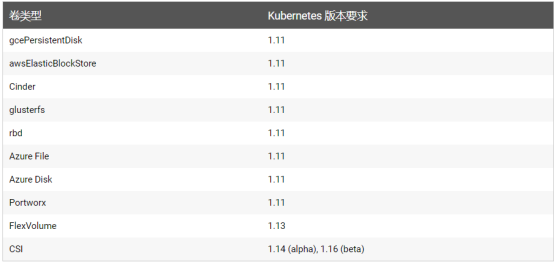
allowVolumeExpansion:允许卷扩展,PersistentVolume 可以配置成可扩展。将此功能设置为 true 时,允许用户通过编辑相应的 PVC 对象来调整卷大小。当基础存储类的allowVolumeExpansion 字段设置为 true 时,以下类型的卷支持卷扩展。
注意:此功能仅用于扩容卷,不能用于缩小卷。
13.5.2 StorageClass示例:nfs provisioner配合存储类动态生成 pv
bash
# 控制节点 + 工作节点完成安装
]# yum install -y nfs-utils | systemctl enable --now nfs-server

# 上传资源包并手动导入
n1 && n2 ]# ctr -n k8s.io images import nfs-subdir-external-provisioner.tar.gz
registry.cn-beijing.aliyuncs.com/mydlq/nfs-subdir-external-provisioner:v4.0.0

]# ctr -n k8s.io images import nginx.tar.gz
docker.io/library/nginx:latest


# 建立sc(storageclass)的目录
[root@k8s-master1 ~]# mkdir sc
[root@k8s-master1 ~]# cd sc

# 创建运行nfs-provisioner所需sa账号
[root@k8s-master1 sc]# vim serviceaccount.yaml
apiVersion: v1
kind: ServiceAccount
metadata:
  name: nfs-provisioner

[root@k8s-master1 sc]# kubectl apply -f serviceaccount.yaml

# 查看状态
[root@k8s-master1 sc]# kubectl get sa
NAME              SECRETS   AGE
default           0         31d
nfs-provisioner   0         27s

# 扩展:什么是sa?
# sa的全称是serviceaccount。
# serviceaccount是为了方便Pod里面的进程调用Kubernetes API或其他外部服务而设计的。
# 指定了serviceaccount之后,我们把pod创建出来了,我们在使用这个pod时,这个pod就有了我们指定的账户的权限了。

[root@k8s-master1 sc]# vim nfs-deployment.yaml
kind: Deployment
apiVersion: apps/v1
metadata:
  name: nfs-provisioner
spec:
  selector:
    matchLabels:
       app: nfs-provisioner
  replicas: 1
  strategy:
    type: Recreate
  template:
    metadata:
      labels:
        app: nfs-provisioner
    spec:
      serviceAccount: nfs-provisioner
      containers:
        - name: nfs-provisioner
          image: registry.cn-beijing.aliyuncs.com/mydlq/nfs-subdir-external-provisioner:v4.0.0
          imagePullPolicy: IfNotPresent
          volumeMounts:
            - name: nfs-client-root
              mountPath: /persistentvolumes
          env:
            - name: PROVISIONER_NAME
              value: example.com/nfs
            - name: NFS_SERVER
              value: 172.25.254.10		# 这里注意使用控制节点的IP
            - name: NFS_PATH
              value: /data/nfs_pro/
      volumes:
        - name: nfs-client-root
          nfs:
            server: 172.25.254.10		# 这里也是一样的
            path: /data/nfs_pro/

# 查看pod资源的状态
[root@k8s-master1 sc]# kubectl apply -f nfs-deployment.yaml
[root@k8s-master1 sc]# kubectl get pods
nfs-provisioner-67985bd4db-kxgd8   1/1     Running   0          3s

# 创建storageclass,动态供给pv
[root@k8s-master1 sc]# vim nfs-storageclass.yaml
apiVersion: storage.k8s.io/v1
kind: StorageClass
metadata:
  name: nfs
provisioner: example.com/nfs			# 注意!!!

[root@k8s-master1 sc]# kubectl apply -f nfs-storageclass.yaml
[root@k8s-master1 sc]# kubectl get sc
nfs    example.com/nfs   Delete          Immediate           false                  41s

# 注意:provisioner处写的example.com/nfs应该跟安装nfs provisioner时候的env下的PROVISIONER_NAME的value值保持一致,如下:
env:
- name: PROVISIONER_NAME
  value: example.com/nfs

# 创建pvc,通过storageclass动态生成pv
[root@k8s-master1 sc]# vim pvc_claim.yaml
kind: PersistentVolumeClaim
apiVersion: v1
metadata:
  name: test-claim1
spec:
  accessModes:  ["ReadWriteMany"]			# 注意!
  resources:								# 资源请求模版
    requests:
      storage: 1Gi
  storageClassName:  nfs

[root@k8s-master1 sc]# kubectl apply -f claim.yaml

# 查看绑定状态Bound(后面的pvc-83ada2b7-2ca1-40de-8332-c2a970985e3b是自动生成的,可以查看一下)
[root@k8s-master1 sc]# kubectl get pvc
test-claim1   Bound    pvc-83ada2b7-2ca1-40de-8332-c2a970985e3b   1Gi        RWX            nfs

# 查看自动生成的pv资源
[root@k8s-master1 sc]# kubectl get pv
pvc-83ada2b7-2ca1-40de-8332-c2a970985e3b   1Gi        RWX            Delete           Bound    default/test-claim1   nfs


# 步骤总结:
1、供应商:创建一个 nfs provisioner
2、创建 storageclass,storageclass 指定刚才创建的供应商
3、创建 pvc,这个 pvc 指定 storageclass

# 创建pod,挂载storageclass动态生成的pvc:test-claim1
[root@k8s-master1 sc]# vim read-pod.yaml
kind: Pod
apiVersion: v1
metadata:
  name: read-pod
spec:
  containers:
  - name: read-pod
    image: docker.io/library/nginx:latest
    imagePullPolicy: IfNotPresent
    volumeMounts:
      - name: nfs-pvc
        mountPath: /usr/share/nginx/html
  restartPolicy: "Never"
  volumes:
    - name: nfs-pvc
      persistentVolumeClaim:
        claimName: test-claim1

[root@k8s-master1 sc]# kubectl apply -f read-pod.yaml
[root@k8s-master1 sc]# kubectl get pods
NAME                               READY   STATUS    RESTARTS   AGE
nfs-provisioner-67985bd4db-kxgd8   1/1     Running   0          28m
read-pod                           1/1     Running   0          2m55s

# 进入容器进行测试
[root@k8s-master1 sc]# kubectl exec -it read-pod -- /bin/bash
root@read-pod:/# cd /usr/share/nginx/html/
root@read-pod:/usr/share/nginx/html# mkdir test_page
root@read-pod:/usr/share/nginx/html# cd test_page/
root@read-pod:/usr/share/nginx/html/test_page# echo "ceshi -- ceshi" >> ceshi.txt
root@read-pod:/usr/share/nginx/html/test_page# cat ceshi.txt
ceshi -- ceshi
root@read-pod:/usr/share/nginx/html/test_page# cd
root@read-pod:~# exit

[root@k8s-master1 ~]# cd /data/nfs_pro/default-test-claim1-pvc-83ada2b7-2ca1-40de-8332-c2a970985e3b/test_page/
[root@k8s-master1 test_page]# ls
ceshi.txt