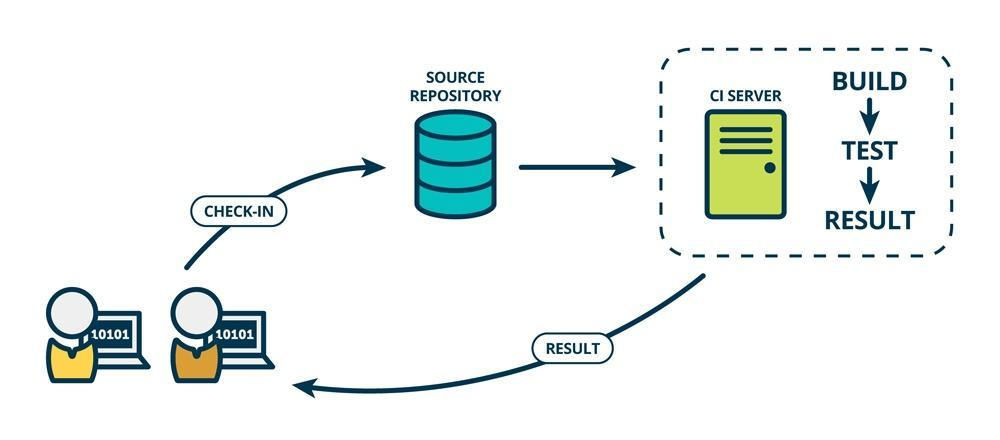
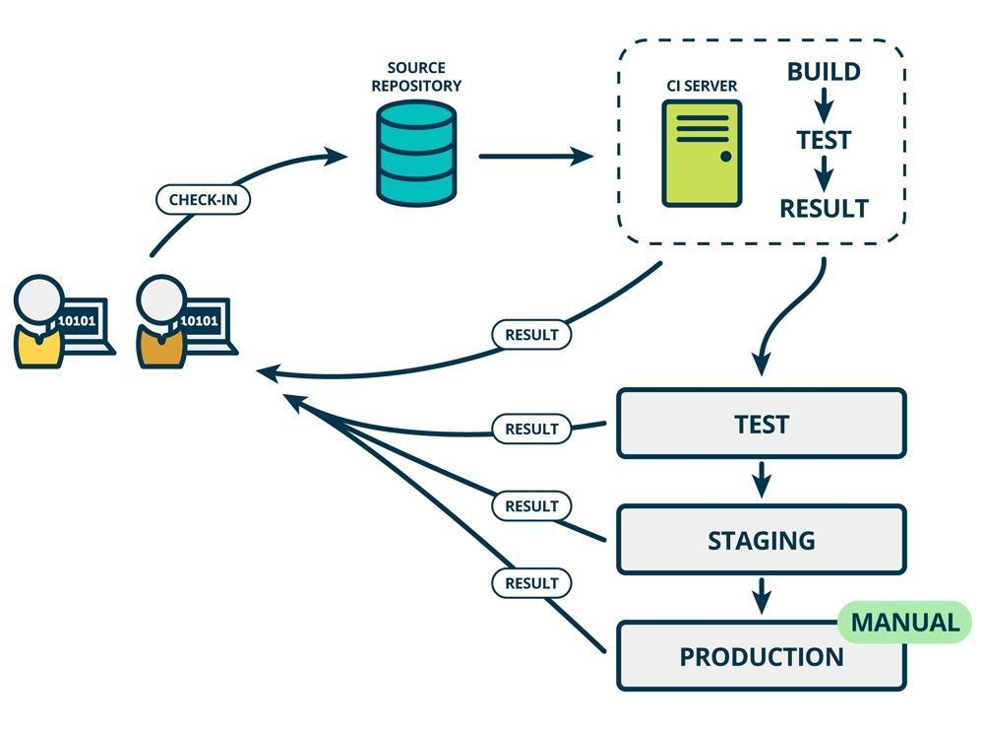
一、CICD是什么
CI/CD 是指持续集成(Continuous Integration)和持续部署(Continuous Deployment)或持续交付(Continuous Delivery)
1.1 持续集成(Continuous Integration)
持续集成是一种软件开发实践,团队成员频繁地将他们的工作集成到共享的代码仓库中。其主要特点包括:
-
频繁提交代码:开发人员可以每天多次提交代码,确保代码库始终保持最新状态。
-
自动化构建:每次提交后,自动触发构建过程,包括编译、测试、静态分析等。
-
快速反馈:如果构建失败或测试不通过,能够快速地向开发人员提供反馈,以便及时修复问题。
1.2 持续部署(Continuous Deployment)
持续部署是在持续集成的基础上,将通过所有测试的代码自动部署到生产环境中。其特点如下:
-
自动化流程:从代码提交到生产环境的部署完全自动化,无需人工干预。
-
高频率部署:可以实现频繁的部署,使得新功能能够快速地提供给用户。
-
风险控制:需要有强大的测试和监控体系来确保部署的稳定性和可靠性。
1.3 持续交付(Continuous Delivery)
持续交付与持续部署类似,但不一定自动部署到生产环境,而是随时可以部署。其重点在于确保软件随时处于可发布状态。
CI/CD 的好处包括:
-
提高开发效率:减少手动操作和等待时间,加快开发周期。
-
尽早发现问题:通过频繁的集成和测试,问题能够在早期被发现和解决。
-
降低风险:减少了大规模部署时可能出现的问题,提高了软件的质量和稳定性。
-
增强团队协作:促进团队成员之间的沟通和协作,提高团队的整体效率。
常见的 CI/CD 工具包括 Jenkins、GitLab CI/CD、Travis CI 等。这些工具可以帮助团队实现自动化的构建、测试和部署流程。
二、git工具介绍
2.1 git 简介
Git 是一个分布式版本控制系统,被广泛用于软件开发中,以管理代码的版本和变更。 主要特点:
-
分布式
-
每个开发者都有完整的代码仓库副本,这使得开发者可以在离线状态下进行工作,并且在网络出现问题时也不会影响开发。
-
即使中央服务器出现故障,开发者仍然可以在本地进行开发和查看项目历史。
-
-
高效的分支管理
-
Git 中的分支创建和切换非常快速和简单。开发人员可以轻松地创建新的分支来进行新功能的开发或修复 bug,而不会影响主分支。
-
合并分支也相对容易,可以使用多种合并策略来满足不同的需求。
-
-
快速的版本回退
-
如果发现某个版本存在问题,可以快速回退到之前的版本。
-
可以查看每个版本的详细变更记录,方便了解代码的演进过程。
-
-
强大的提交管理
-
每个提交都有一个唯一的标识符,可以方便地引用和查看特定的提交。
-
提交可以包含详细的提交信息,描述本次提交的更改内容。
-
-
支持协作开发
-
开发者可以将自己的更改推送到远程仓库,供其他开发者拉取和合并。
-
可以处理多个开发者同时对同一文件进行修改的情况,通过合并冲突解决机制来确保代码的完整性。
-
Git必看秘籍:https://git-scm.com/book/zh/v2
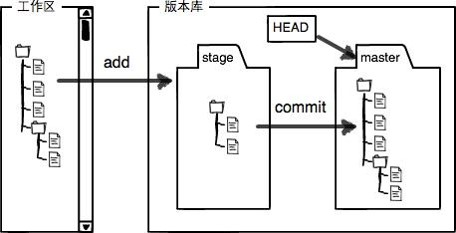
2.2 git 工作流程
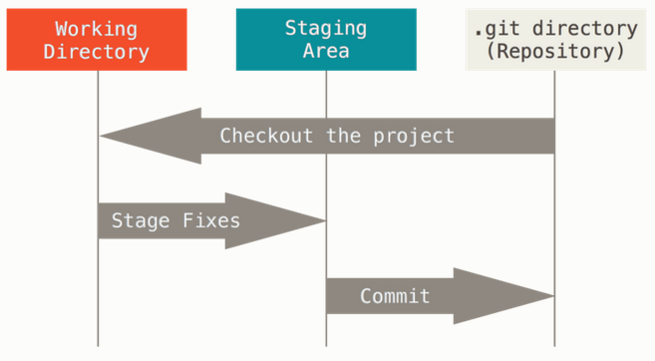
Git 有三种状态:已提交(committed)、已修改(modified) 和 已暂存(staged)。
-
已修改表示修改了文件,但还没保存到数据库中。
-
已暂存表示对一个已修改文件的当前版本做了标记,使之包含在下次提交的快照中。
-
已提交表示数据已经安全地保存在本地数据库中。
这会让我们的 Git 项目拥有三个阶段:工作区、暂存区以及 Git 目录。
三、安装部署git
3.1 安装git
# 安装git
[root@k8s-master ~]# yum install git  -y
3.2 初始化
获取 Git 仓库通常有两种方式:
-
将尚未进行版本控制的本地目录转换为 Git 仓库。
-
从其它服务器克隆 一个已存在的 Git 仓库。比如: git clone
初始化版本库
[root@k8s-master ~]# mkdir obboda
[root@k8s-master obboda]# git init
提示:使用 'master' 作为初始分支的名称。这个默认分支名称可能会更改。要在新仓库中
提示:配置使用初始分支名,并消除这条警告,请执行:
提示:
提示: git config --global init.defaultBranch <名称>
提示:
提示:除了 'master' 之外,通常选定的名字有 'main'、'trunk' 和 'development'。
提示:可以通过以下命令重命名刚创建的分支:
提示:
提示: git branch -m <name>
已初始化空的 Git 仓库于 /root/obboda/.git/
[root@k8s-master obboda]# ls -a
. .. .git
[root@k8s-master obboda]# ls .git/
branches config description HEAD hooks info objects refs
#设定用户信息
[root@k8s-master obboda]# git config --global user.name "obboda"
[root@k8s-master obboda]# git config --global user.email "obboda@163.com"
#查看当前文件状态
[root@k8s-master obboda]# git status
位于分支 master
尚无提交
无文件要提交(创建/拷贝文件并使用 "git add" 建立跟踪)
[root@k8s-master obboda]# git status -s #简化输出!WARNING
.git 目录是 git 跟踪管理版本库的
四、git的基本使用
4.1 常用方法
(1)增加文件
[root@k8s-master obboda]# echo hello > README.md
[root@k8s-master obboda]# git status -s
?? README.md # ?? 表示未添加到版本库
[root@k8s-master obboda]# git add README.md
[root@k8s-master obboda]# git status -s
A README.md # A 表示已添加到暂存区
# 提交暂存区的数据
[root@k8s-master obboda]# git commit -m "add README.md"
[main (root-commit) 429482d] add README.md
1 file changed, 1 insertion(+)
create mode 100644 README.md
[root@k8s-master obboda]# git status -s # 无任何显示,标识已经提交到版本库(2)修改文件
# 修改文件
[root@k8s-master obboda]# vim README.md
hello world
[root@k8s-master obboda]# git status -s
M README.md # 右M 表示文件在工作区被修改
# 撤销修改
[root@k8s-master obboda]# git checkout -- README.md
[root@k8s-master obboda]# cat README.md
hello
[root@k8s-master obboda]# git status -s
# 重新修改、提交暂存区
[root@k8s-master obboda]# echo world >> README.md
[root@k8s-master obboda]# git add README.md
[root@k8s-master obboda]# git status -s
M README.md # 左M表示文件已经在版本库中并被跟踪,
# 从暂存区撤销
[root@k8s-master obboda]# git restore --staged README.md
[root@k8s-master obboda]# git status -s
M README.md
# 重新提交暂存区
[root@k8s-master obboda]# git add README.md
[root@k8s-master obboda]# git status -s
M README.md
# 提交更新
[root@k8s-master obboda]# git commit -m "update v1"
[master 6a14bb5] update v1
1 file changed, 1 insertion(+), 1 deletion(-)
[root@k8s-master obboda]# git status -s(3)更新文件
# 更新文件
[root@k8s-master obboda]# echo 123 >> README.md
[root@k8s-master obboda]# git add README.md
[root@k8s-master obboda]# echo 456 >> README.md
[root@k8s-master obboda]# git status -s
MM README.md # MM表示有一部分在暂存区,还有一部分没有提交
# 如果现在提交只能提交在暂存区中的部分
[root@k8s-master obboda]# git commit -m "update v2"
[master dc9b45f] update v2
1 file changed, 1 insertion(+)
[root@k8s-master obboda]# git status -s
M README.md # 右M还在
# 查看已暂存和未暂存的修改变化
[root@k8s-master obboda]# echo 789 >> README.md
[root@k8s-master obboda]# git diff
diff --git a/README.md b/README.md
index 2acc368..e0caec9 100644
--- a/README.md
+++ b/README.md
@@ -1,3 +1,5 @@
hello
world
123
+456
+789
# 跳过使用暂存区,只能在提交过的在版本库中存在的文件使用如果文件状态是"??"不能用此方法
[root@k8s-master obboda]# git commit -a -m "update v3"
[master 3579560] update v3
1 file changed, 1 insertion(+)(4)删除文件
# 创建文件
[root@k8s-master obboda]# touch haha.txt
[root@k8s-master obboda]# git add haha.txt
[root@k8s-master obboda]# git commit -m "add haha.txt"
[main e2295d2] add haha.txt
1 file changed, 0 insertions(+), 0 deletions(-)
create mode 100644 haha.txt
# 删除文件
[root@k8s-master obboda]# rm -f haha.txt
rm: remove regular empty file 'haha.txt'? y
[root@k8s-master obboda]# git status -s
D haha.txt # 右D表示文件在工作区被删除
[root@k8s-master obboda]# ls
README.md
# 撤销工作区的删除动作
[root@k8s-master obboda]# git checkout -- haha.txt
[root@k8s-master obboda]# ls
haha.txt README.md
# 从版本库删除文件
[root@k8s-master obboda]# git rm -f haha.txt
rm 'haha.txt'
[root@k8s-master obboda]# git status -s
D haha.txt # 左D表示文件删除动作被提交到暂存区
[root@k8s-master obboda]# git commit -m "delete haha.txt"
[main d91afd5] delete lee.txt
1 file changed, 0 insertions(+), 0 deletions(-)
delete mode 100644 haha.txt
[root@k8s-master obboda]# git status -s(5)回退版本
# 查看操作日志
[root@k8s-master obboda]# git log
commit d91afd5ba2b2ca789151369efd7da587a1b476a7 (HEAD -> main)
Author: obboda <obboda@163.com>
Date: Mon Jan 26 13:56:35 2026 +0800
delete haha.txt
commit e2295d2317de0fe4ac7c1757cb8408e8bc9ec3ff
Author: obboda <obboda@163.com>
Date: Mon Jan 26 13:52:27 2026 +0800
add haha.txt
commit cc238e47eef4d7007b57490bb991555cd68ae4ce
Author: obboda <obboda@163.com>
Date: Mon Jan 26 11:33:20 2026 +0800
update v3
commit dc355dad4da3c11e3e46af90ffbe839d0aaed2cc
Author: obboda <obboda@163.com>
Date: Mon Jan 26 11:28:24 2026 +0800
update v2
commit ec252ea69fc43dbb55c549e4a51d2211c930e28e
Author: obboda <obboda@163.com>
Date: Mon Jan 26 11:17:25 2026 +0800
update v1
commit 429482d7b9d69effd9d51015681d35fead7a548e
Author: obboda <obboda@163.com>
Date: Mon Jan 26 11:07:04 2026 +0800
add README.md
# 查看提交动作
[root@k8s-master obboda]# git reflog
d91afd5 (HEAD -> main) HEAD@{0}: commit: delete haha.txt
e2295d2 HEAD@{1}: commit: add haha.txt
cc238e4 HEAD@{2}: commit: update v3
dc355da HEAD@{3}: commit: update v2
ec252ea HEAD@{4}: commit: update v1
429482d HEAD@{5}: commit (initial): add README.md
# 版本回退到删除之前
[root@k8s-master obboda]# git reset --hard e2295d2
HEAD is now at e2295d2 add haha.txt
[root@k8s-master obboda]# ls
haha.txt README.md4.2 git对于文件如何忽略
在做软件开发时对源码编译会产生一些临时文件,我们在提交时需要忽略这些临时文件
[root@k8s-master obboda]# touch .file1
[root@k8s-master obboda]# mkdir dir1/
[root@k8s-master obboda]# touch dir1/.file2
[root@k8s-master obboda]# git status -s
?? .file1
?? dir1/
[root@k8s-master obboda]# echo .file1 > .gitignore
[root@k8s-master obboda]# git status -s
?? .gitignore
?? dir1/
[root@k8s-master obboda]# echo ".*" > .gitignore
[root@k8s-master obboda]# git status -s.gitignore文件格式如下:
# 忽略所有的 .a 文件
*.a
# 但跟踪所有的 lib.a,即便你在前面忽略了 .a 文件
!lib.a
# 只忽略当前目录下的 TODO 文件,而不忽略 subdir/TODO
/TODO
# 忽略任何目录下名为 build 的文件夹
build/
# 忽略 doc/notes.txt,但不忽略 doc/server/arch.txt
doc/*.txt
# 忽略 doc/ 目录及其所有子目录下的 .pdf 文件
doc/**/*.pdf五 、gitlab
5.1 gitlab简介

-
GitLab 是一个用于仓库管理系统的开源项目,使用 Git 作为代码管理工具,并在此基础上搭建起来的 web 服务。
-
GitLab 具有很多功能,比如代码托管、持续集成和持续部署(CI/CD)、问题跟踪、合并请求管理等。它可以帮助开发团队更好地协作开发软件项目,提高开发效率和代码质量。
官网:https://about.gitlab.com/install/
中文站点: https://gitlab.cn/install/
官方包地址:https://packages.gitlab.com/gitlab/gitlab-ce
5.2 gitlab部署实施
5.2.1 部署gitlab
部署gitlab需要内存大于4G
# 在安装包之前需配置好软件仓库来解决依赖性
[root@k8s-master ~]# yum install -y curl policycoreutils-python-utils  openssh-server perl
[root@k8s-master ~]# ls
gitlab-ce-17.1.6-ce.0.el9.x86_64.rpm
[root@k8s-master ~]# dnf install gitlab-ce-17.1.6-ce.0.el9.x86_64.rpm -y
5.2.2 配置gitlab
# 修改配置文件
[root@k8s-master ~]# cd /etc/gitlab/
[root@k8s-master gitlab]# ls
gitlab.rb
[root@k8s-master gitlab]# vim gitlab.rb
32 external_url 'http://192.168.121.12'
# 修改配置文件后需利用gitlab-crt来生效,
[root@k8s-master gitlab]# gitlab-ctl reconfigure
# 执行命令成功后会把所有组件全部启动起来5.2.3 登陆gitlab
用户名默认为 root 。如果在安装过程中指定了初始密码,则用初始密码登录,如果未指定密码,则系统会随机生成一个密码并存储在 /etc/gitlab/initial_root_password 文件中, 查看随机密码并使用 root 用户名登录。
!WARNING
注意:出于安全原因,24 小时后,
/etc/gitlab/initial_root_password会被第一次gitlab-ctl reconfigure自动删除,因此若使用随机密码登录,建议安装成功初始登录成功之后,立即修改初始密码。
# 查看原始密码
[root@k8s-master gitlab]# cat /etc/gitlab/initial_root_password
# WARNING: This value is valid only in the following conditions
# 1. If provided manually (either via `GITLAB_ROOT_PASSWORD` environment variable or via `gitlab_rails['initial_root_password']` setting in `gitlab.rb`, it was provided before database was seeded for the first time (usually, the first reconfigure run).
# 2. Password hasn't been changed manually, either via UI or via command line.
#
# If the password shown here doesn't work, you must reset the admin password following https://docs.gitlab.com/ee/security/reset_user_password.html#reset-your-root-password.
Password: jN9lq6NSP8a2V+4n57djzWlEGP7RZ43DSIse8sXJGTQ= #密码
# NOTE: This file will be automatically deleted in the first reconfigure run after 24 hours.登陆:
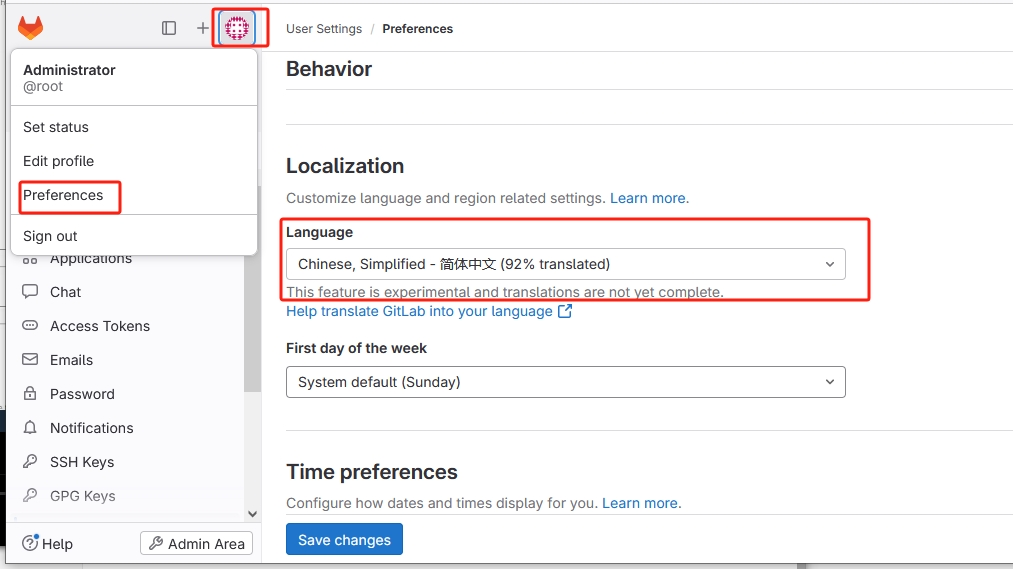
设置语言:
设置密码:

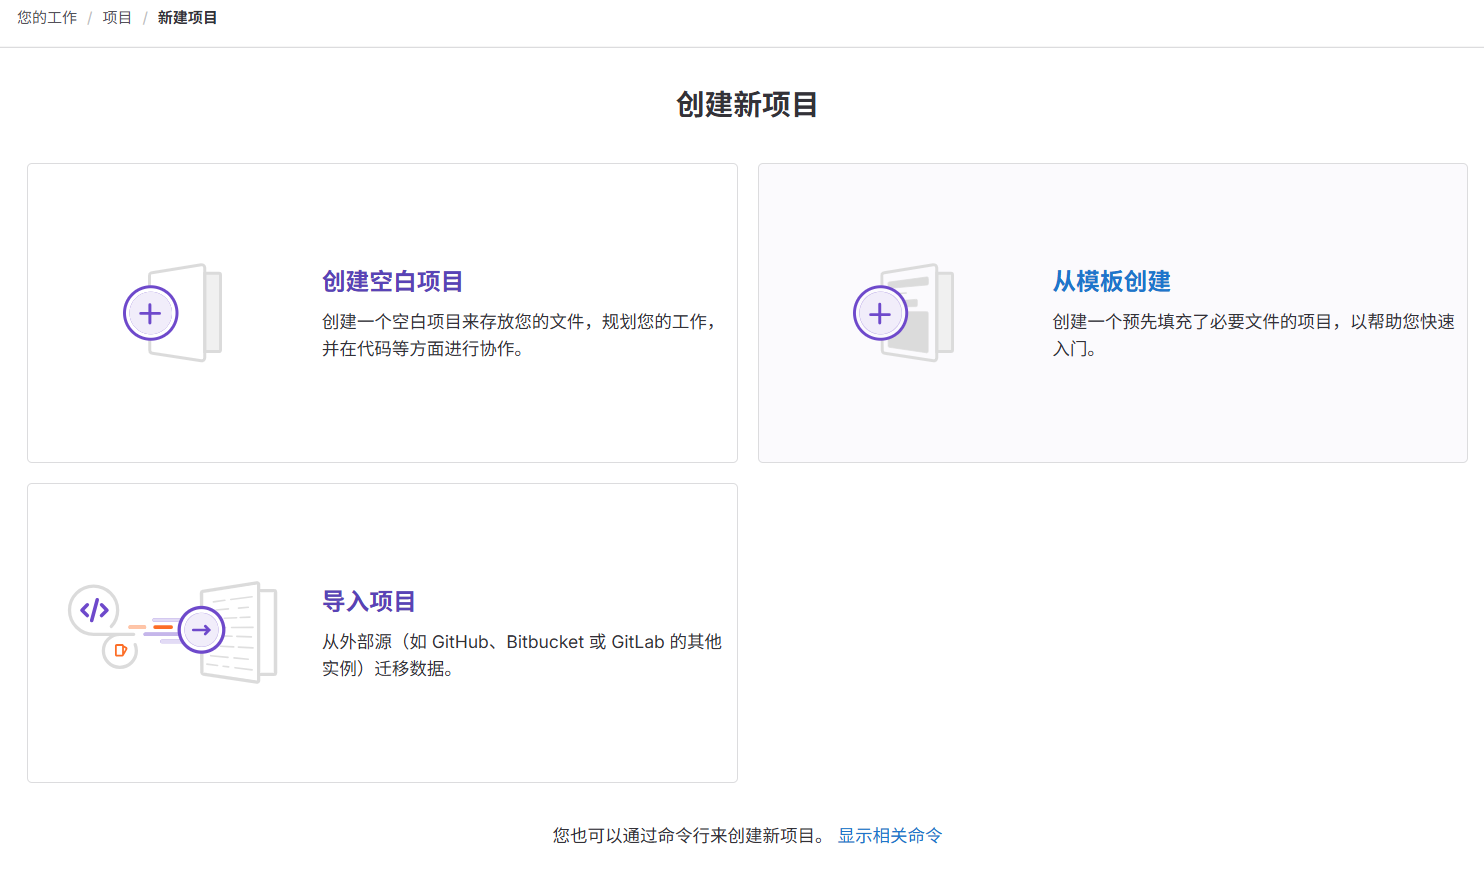
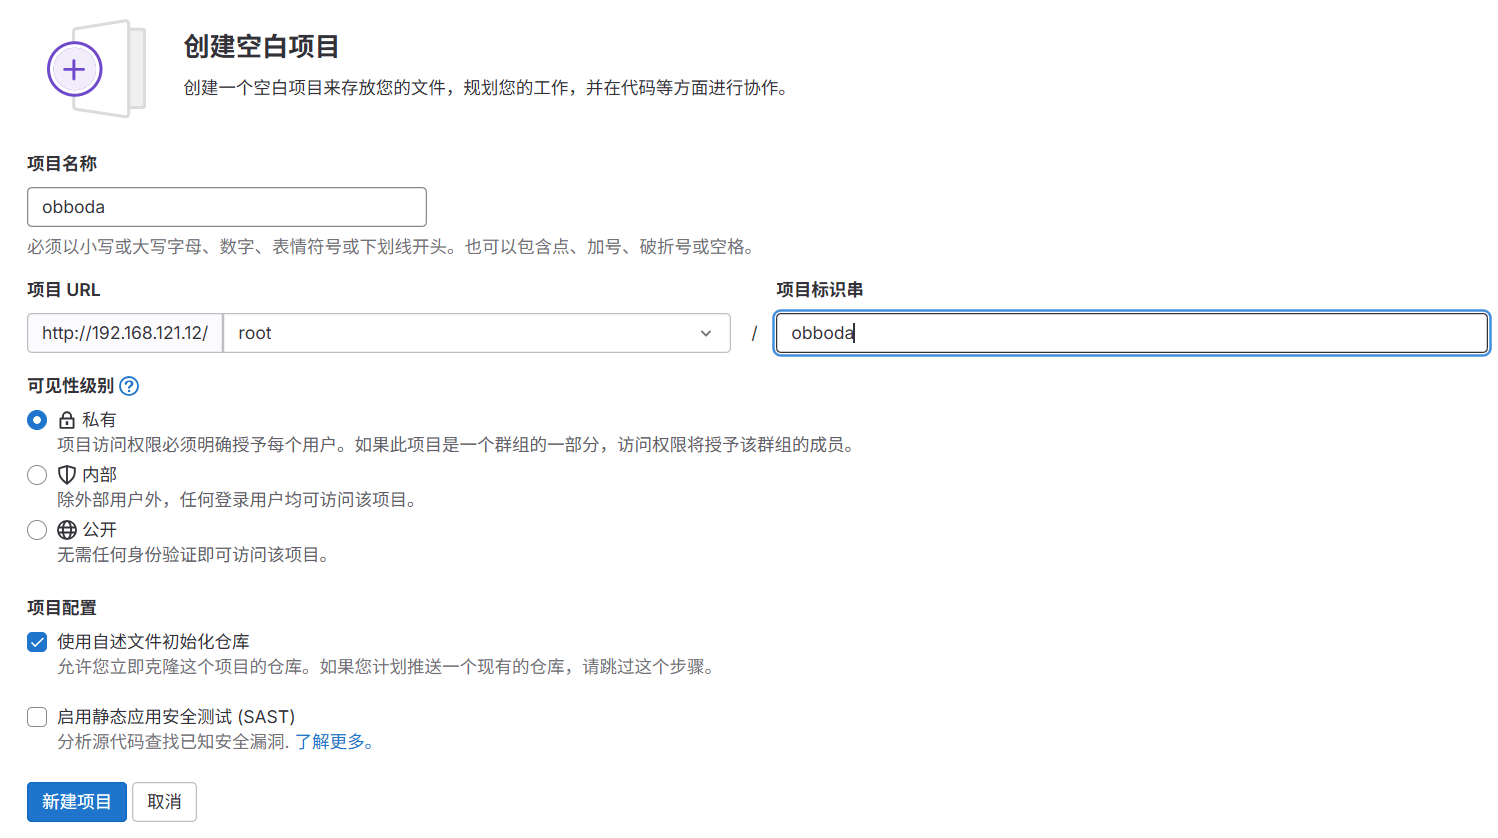
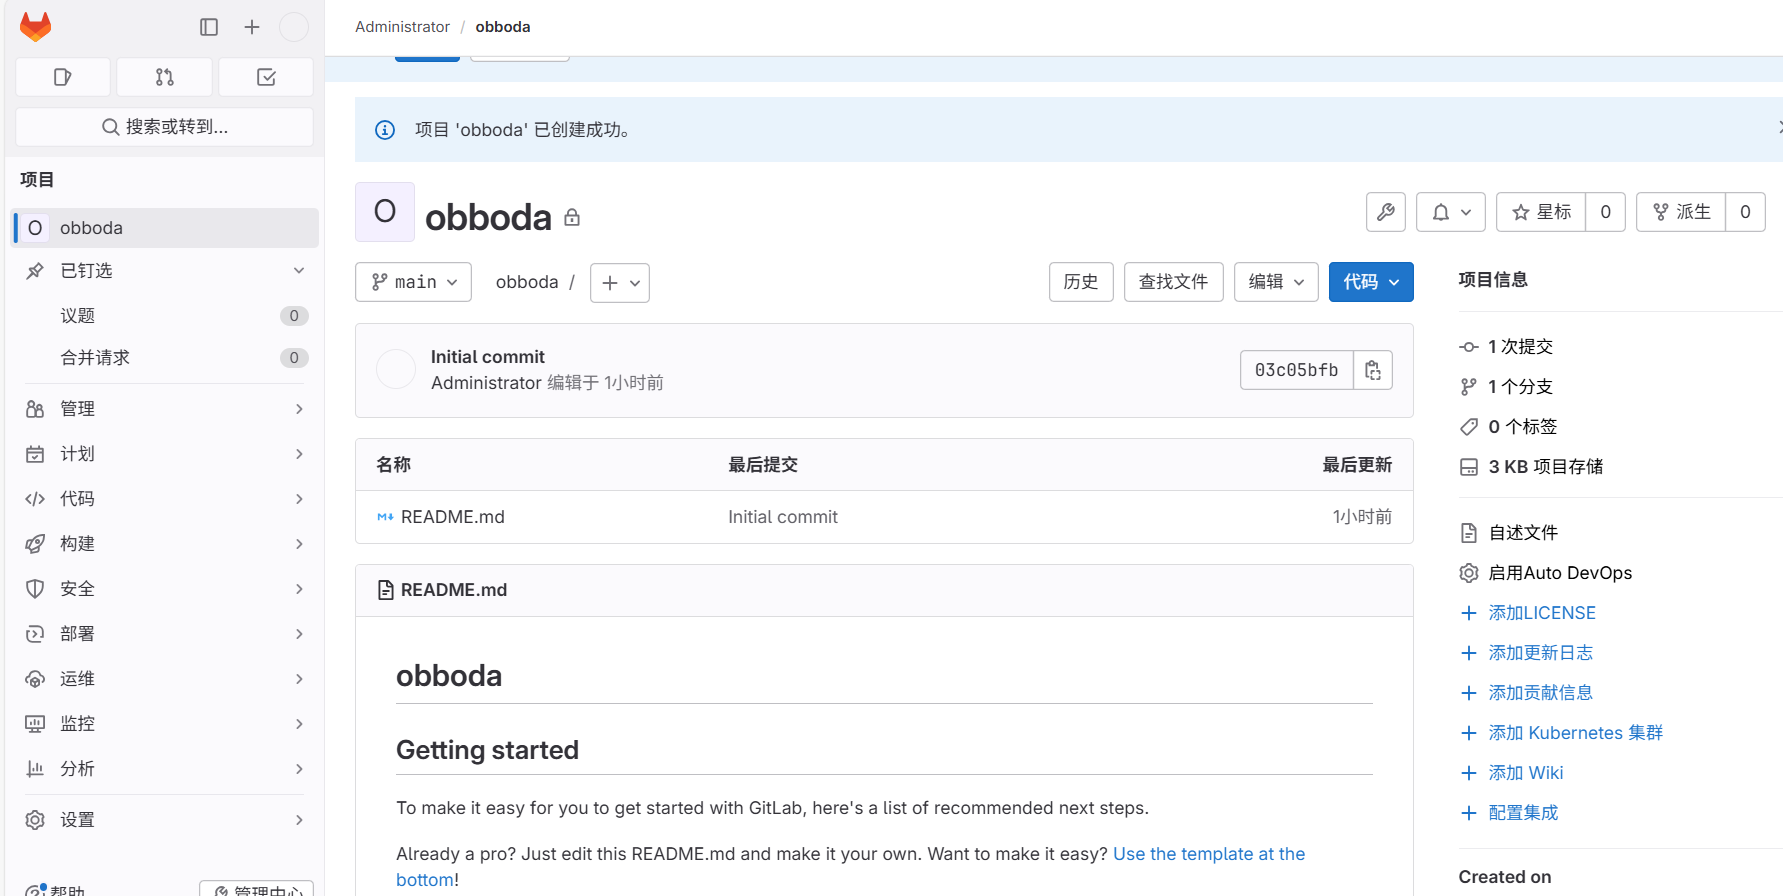
5.3 在gitlab中新建项目
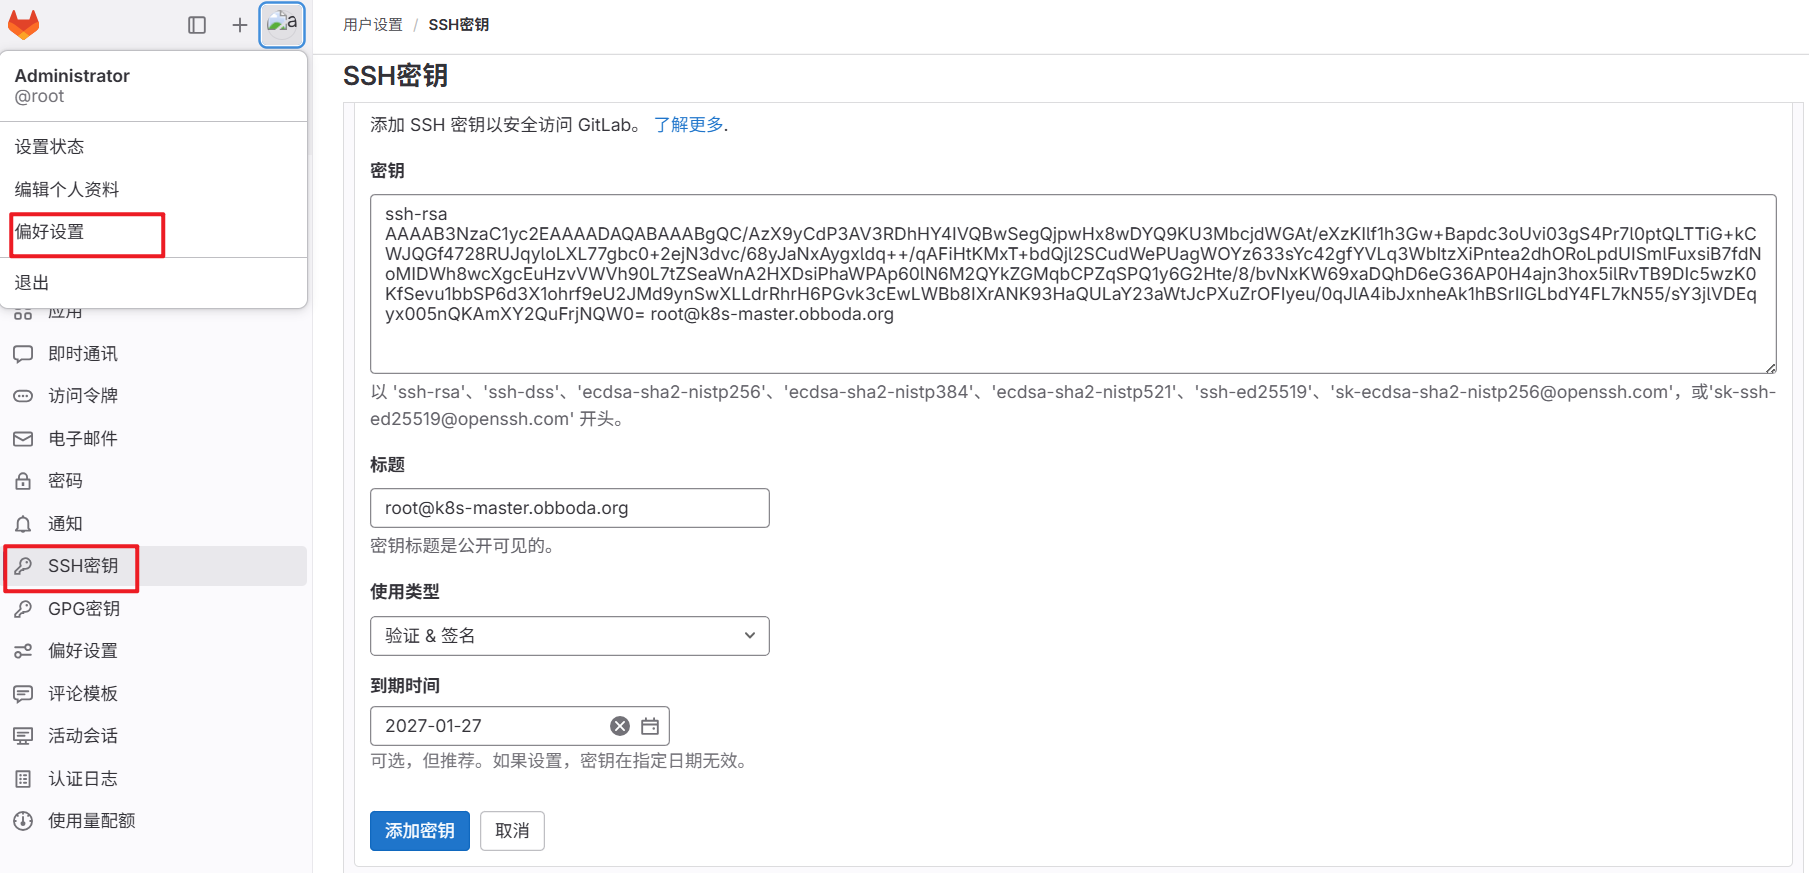
# 生成sshd密钥
[root@k8s-master ~]# ssh-keygen
Generating public/private rsa key pair.
Enter file in which to save the key (/root/.ssh/id_rsa):
Enter passphrase (empty for no passphrase):
Enter same passphrase again:
Your identification has been saved in /root/.ssh/id_rsa
Your public key has been saved in /root/.ssh/id_rsa.pub
The key fingerprint is:
SHA256:30gueQNBUR5a0HHn/4YtT1qP8sBHTgSle7CVZ+QhibU root@k8s-master.obboda.org
The key's randomart image is:
+---[RSA 3072]----+
|        +==.=++..|
|       . +.+ *o+.|
|        o . oE= +|
|         .   * + |
|        S . o + .|
|         * + = o.|
|        o * + = *|
|         o ..o O.|
|             o+ o|
+----[SHA256]-----+

[root@k8s-master ~]# cat .ssh/id_rsa.pub
ssh-rsa AAAAB3NzaC1yc2EAAAADAQABAAABgQC/AzX9yCdP3AV3RDhHY4IVQBwSegQjpwHx8wDYQ9KU3MbcjdWGAt/eXzKIlf1h3Gw+Bapdc3oUvi03gS4Pr7l0ptQLTTiG+kCWJQGf4728RUJqyloLXL77gbc0+2ejN3dvc/68yJaNxAygxldq++/qAFiHtKMxT+bdQjl2SCudWePUagWOYz633sYc42gfYVLq3WbItzXiPntea2dhORoLpdUISmlFuxsiB7fdNoMIDWh8wcXgcEuHzvVWVh90L7tZSeaWnA2HXDsiPhaWPAp60lN6M2QYkZGMqbCPZqSPQ1y6G2Hte/8/bvNxKW69xaDQhD6eG36AP0H4ajn3hox5ilRvTB9DIc5wzK0KfSevu1bbSP6d3X1ohrf9eU2JMd9ynSwXLLdrRhrH6PGvk3cEwLWBb8IXrANK93HaQULaY23aWtJcPXuZrOFIyeu/0qJlA4ibJxnheAk1hBSrIIGLbdY4FL7kN55/sY3jlVDEqyx005nQKAmXY2QuFrjNQW0= root@k8s-master.obboda.org
上传公钥到gitlab中:
下载项目:
[root@k8s-master ~]# git clone git@192.168.121.12:root/obboda.git
Cloning into 'obboda'...
Authorized users only. All activities may be monitored and reported.
remote: Enumerating objects: 3, done.
remote: Counting objects: 100% (3/3), done.
remote: Compressing objects: 100% (2/2), done.
remote: Total 3 (delta 0), reused 0 (delta 0), pack-reused 0 (from 0)
Receiving objects: 100% (3/3), done.
[root@k8s-master ~]# ls -R
.:
obboda
./obboda:
README.md
[root@k8s-master ~]# cd obboda/
[root@k8s-master obboda]# ls
README.md
[root@k8s-master obboda]# git remote -v
origin git@192.168.121.12:root/obboda.git (fetch)
origin git@192.168.121.12:root/obboda.git (push)
# 文件提交
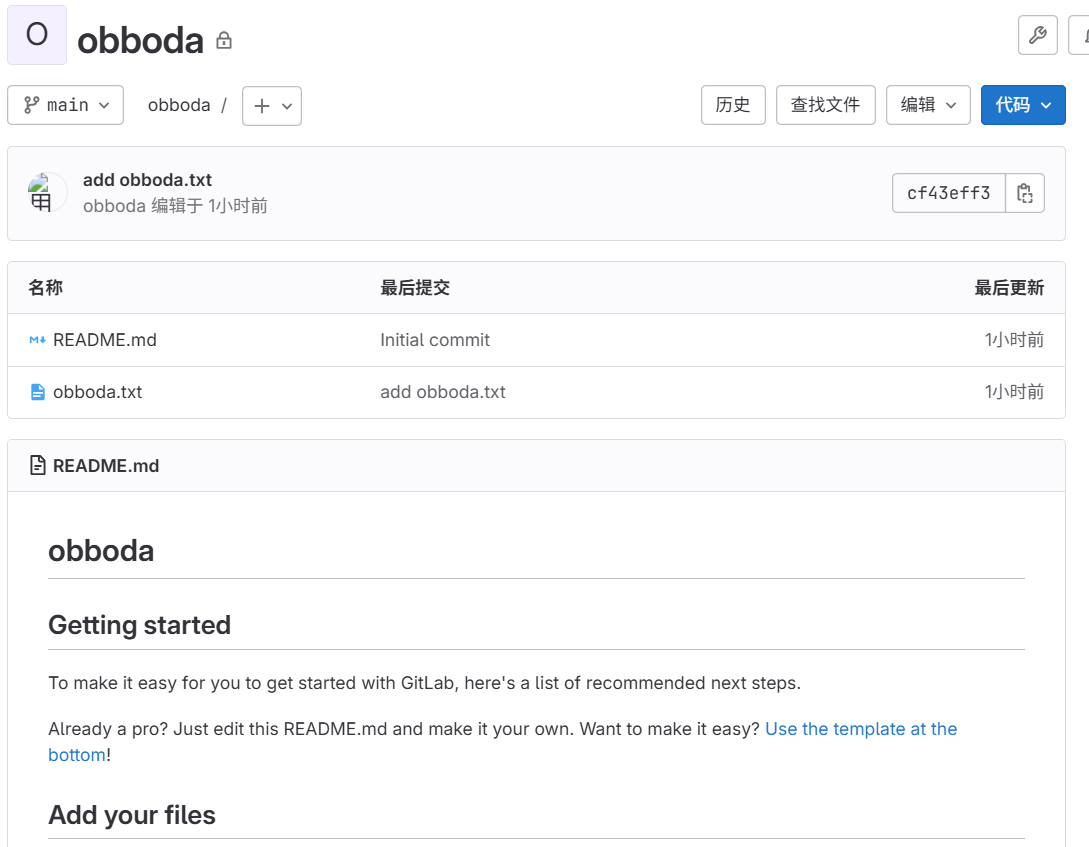
[root@k8s-master obboda]# echo "hello" > obboda.txt
[root@k8s-master obboda]# git add obboda.txt
[root@k8s-master obboda]# git commit -m "add obboda.txt"
[main cf43eff] add obboda.txt
1 file changed, 1 insertion(+)
create mode 100644 obboda.txt
[root@k8s-master obboda]# git push -u origin main
Authorized users only. All activities may be monitored and reported.
Enumerating objects: 4, done.
Counting objects: 100% (4/4), done.
Delta compression using up to 2 threads
Compressing objects: 100% (2/2), done.
Writing objects: 100% (3/3), 271 bytes | 271.00 KiB/s, done.
Total 3 (delta 0), reused 0 (delta 0), pack-reused 0
To 192.168.121.12:root/obboda.git
03c05bf..cf43eff main -> main
Branch 'main' set up to track remote branch 'main' from 'origin'.gitlab查看:
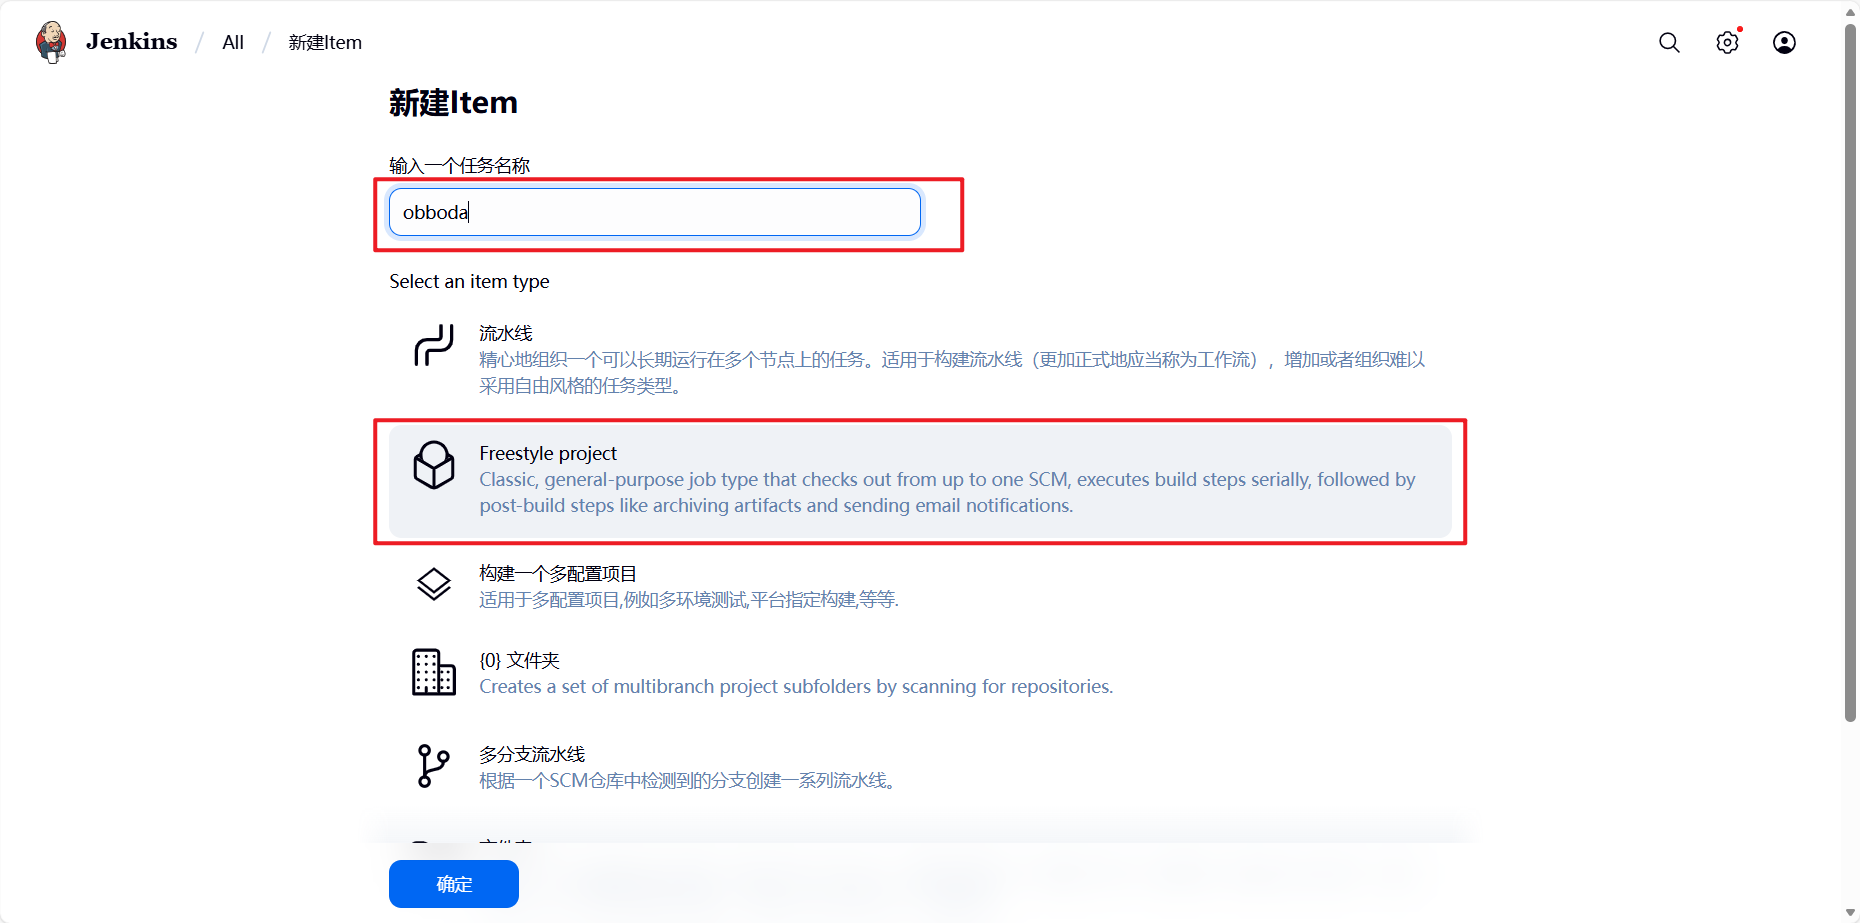
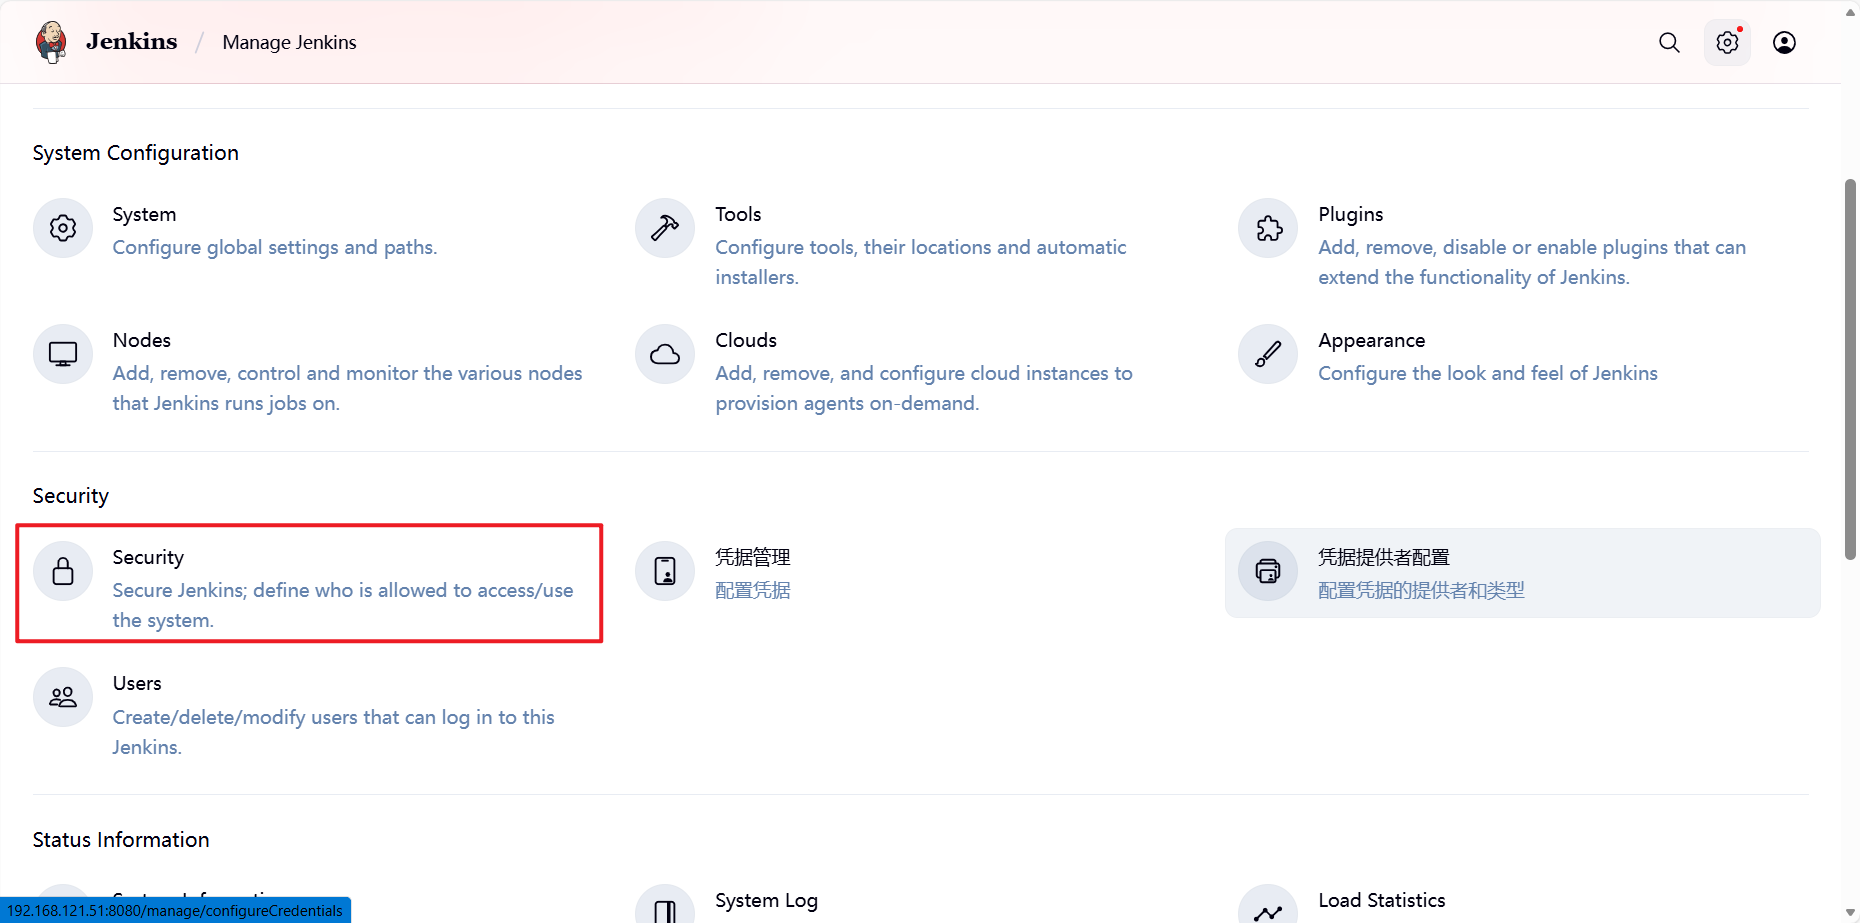
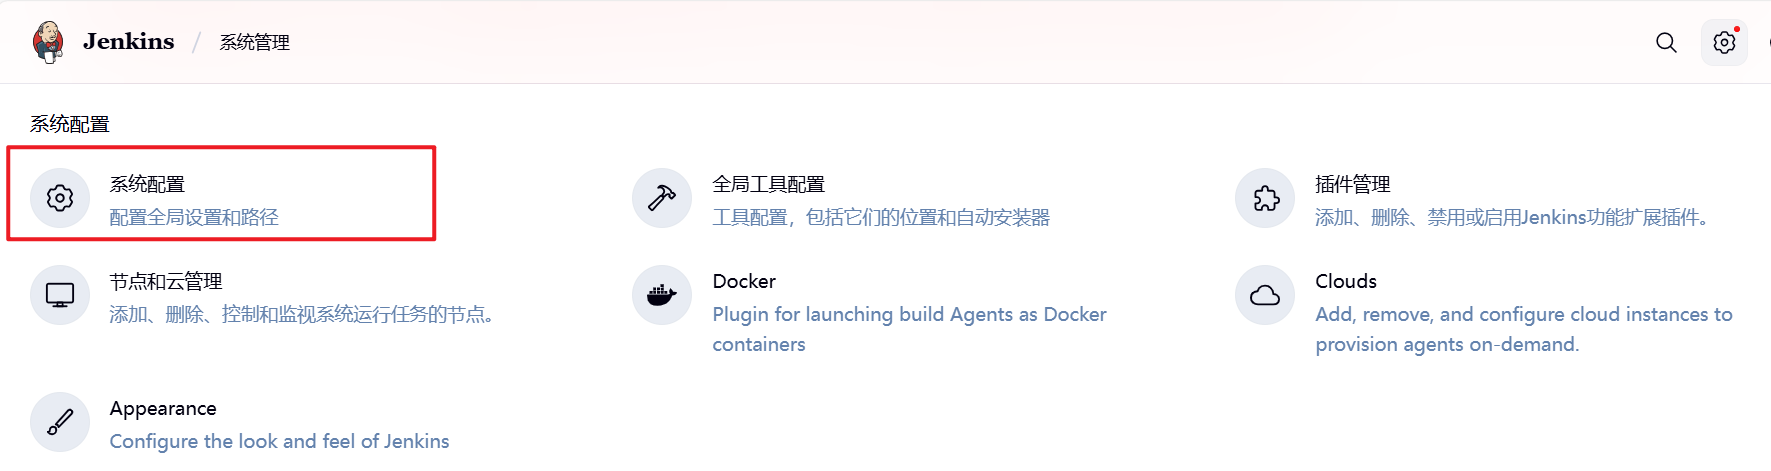
六、jenkins
6.1 jenkins 简介

-
Jenkins是开源CI&CD软件领导者, 提供超过1000个插件来支持构建、部署、自动化, 满足任何项目的需要。
-
Jenkins用Java语言编写,可在Tomcat等流行的servlet容器中运行,也可独立运行
CI(Continuous integration持续集成)持续集成强调开发人员提交了新代码之后,立刻进行构建、(单元)测试。
CD(Continuous Delivery持续交付)是在持续集成的基础上,将集成后的代码部署到更贴近真实运行环境(类生产环境)中
6.2 部署 jenkins
软件下载:https://www.jenkins.io/download/
jenkins需要部署在新的虚拟机中
!WARNING
jenkins需要部署在新的虚拟机中,建议最少4G内存,4核心cpu
# 安装依赖包
[root@jenkins ~]# dnf install fontconfig java-21-openjdk git
# 安装jenkins
[root@jenkins ~]# dnf install jenkins-2.476-1.1.noarch.rpm
# 启动jenkins
[root@jenkins ~]# systemctl enable --now jenkins.service
# 查看原始密码
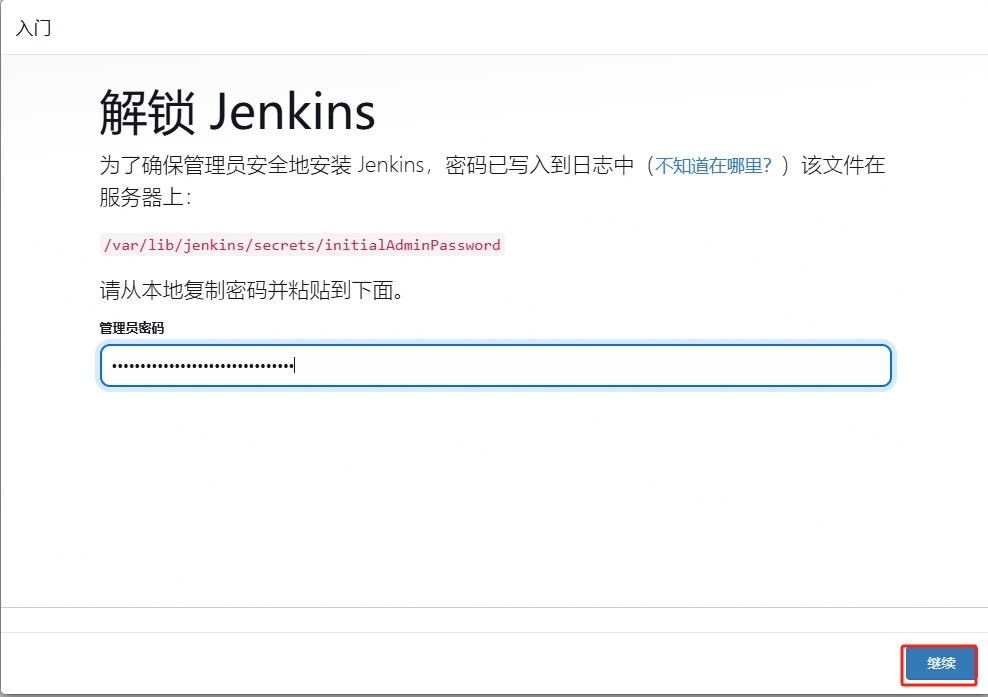
[root@jenkins ~]# cat /var/lib/jenkins/secrets/initialAdminPassword
5c66bda1a7d840ae9dce3d36ad7dde1c
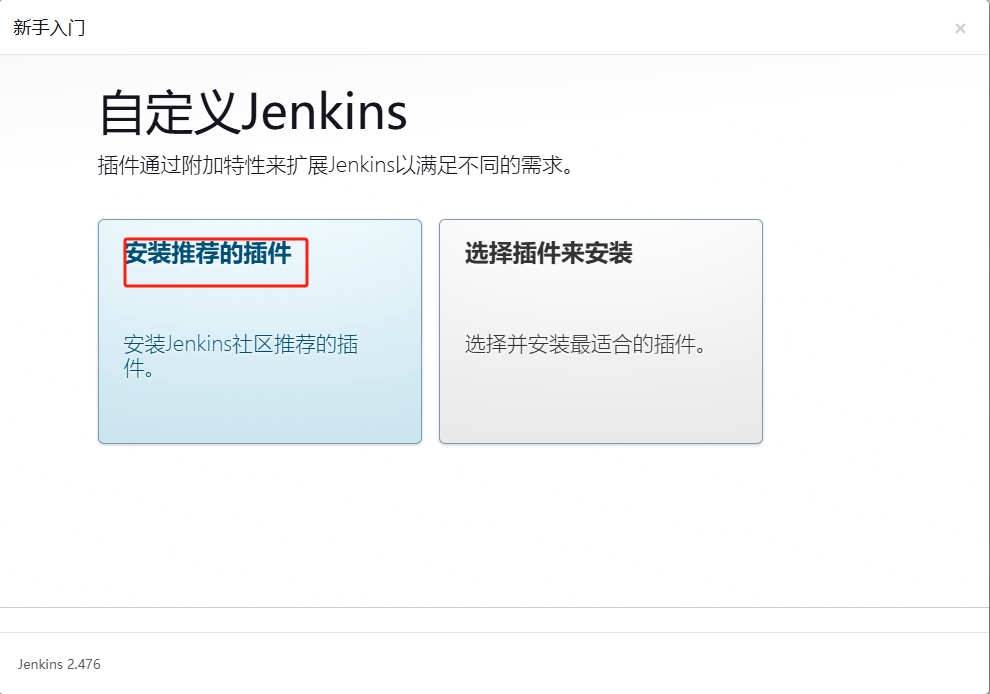
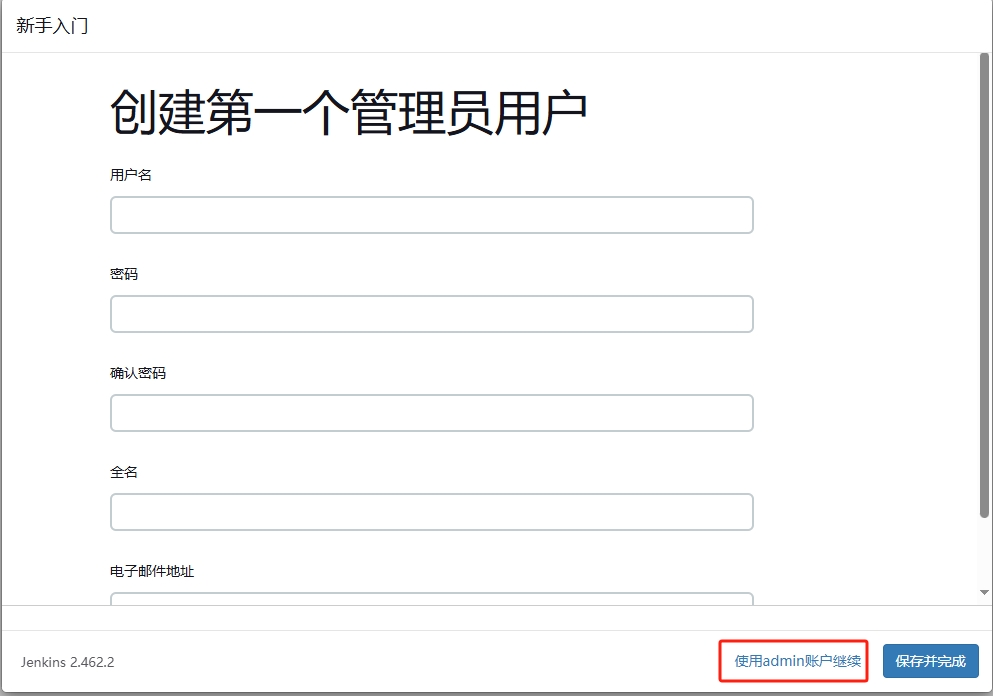
# 浏览器访问 http://ip:8080部署插件
!NOTE
建议修改admin的密码,在admin的设置中修改即可
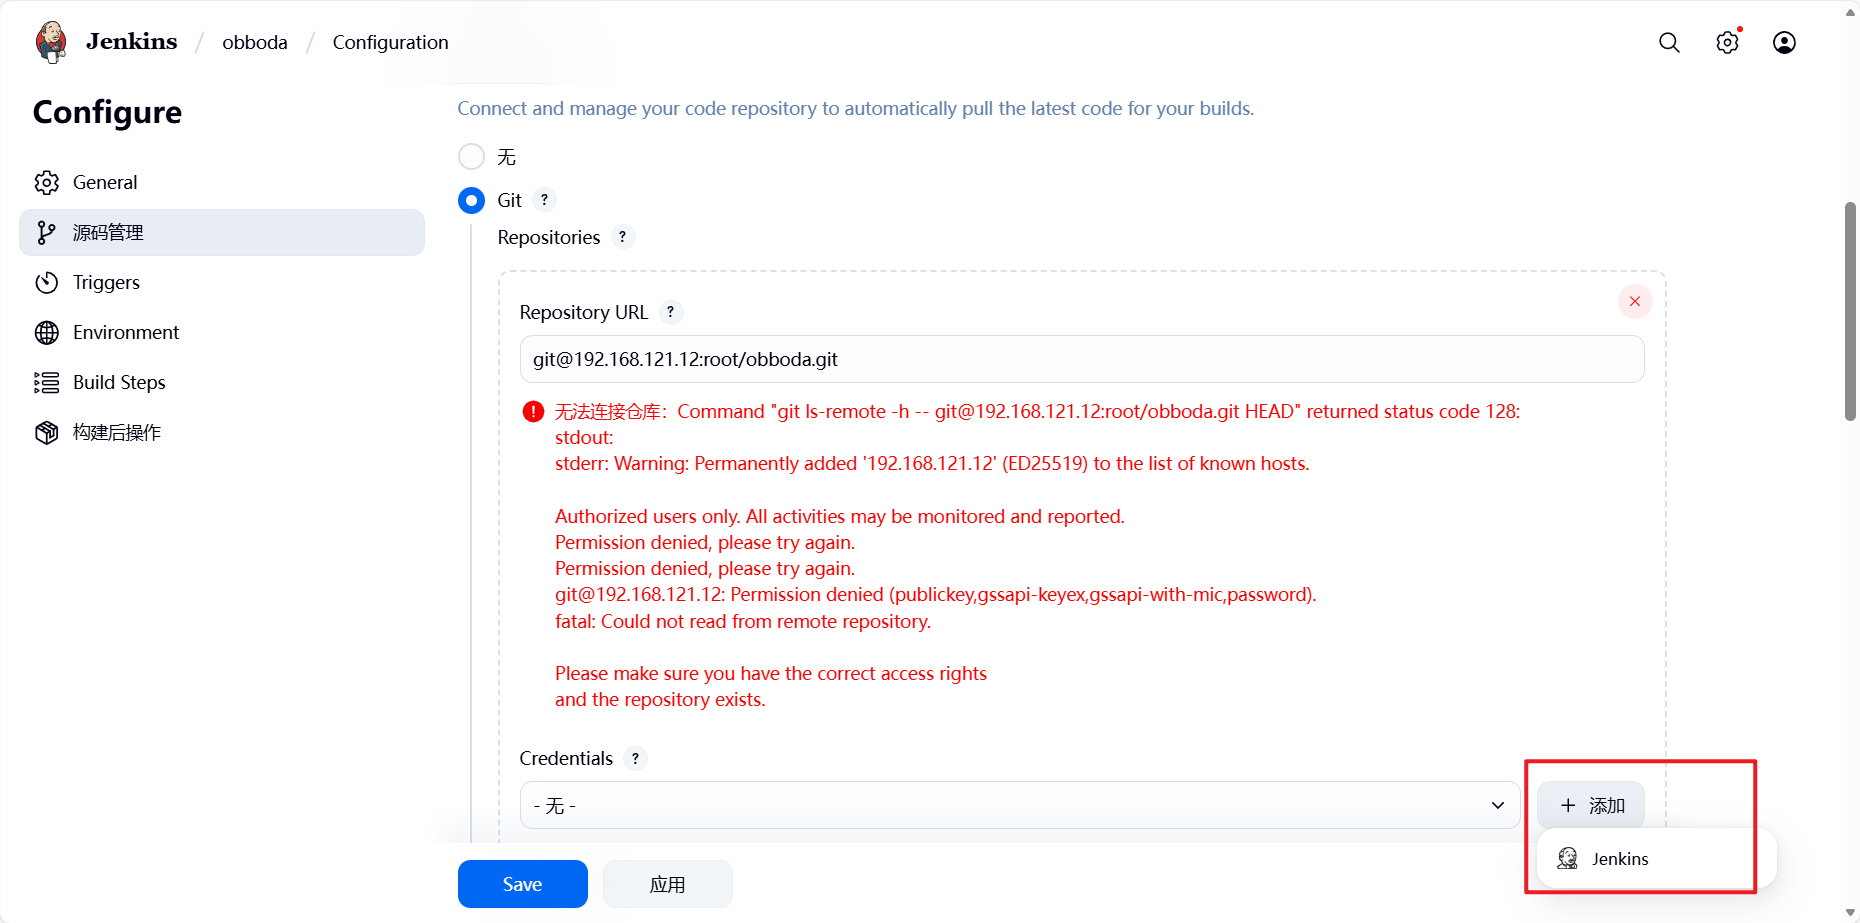
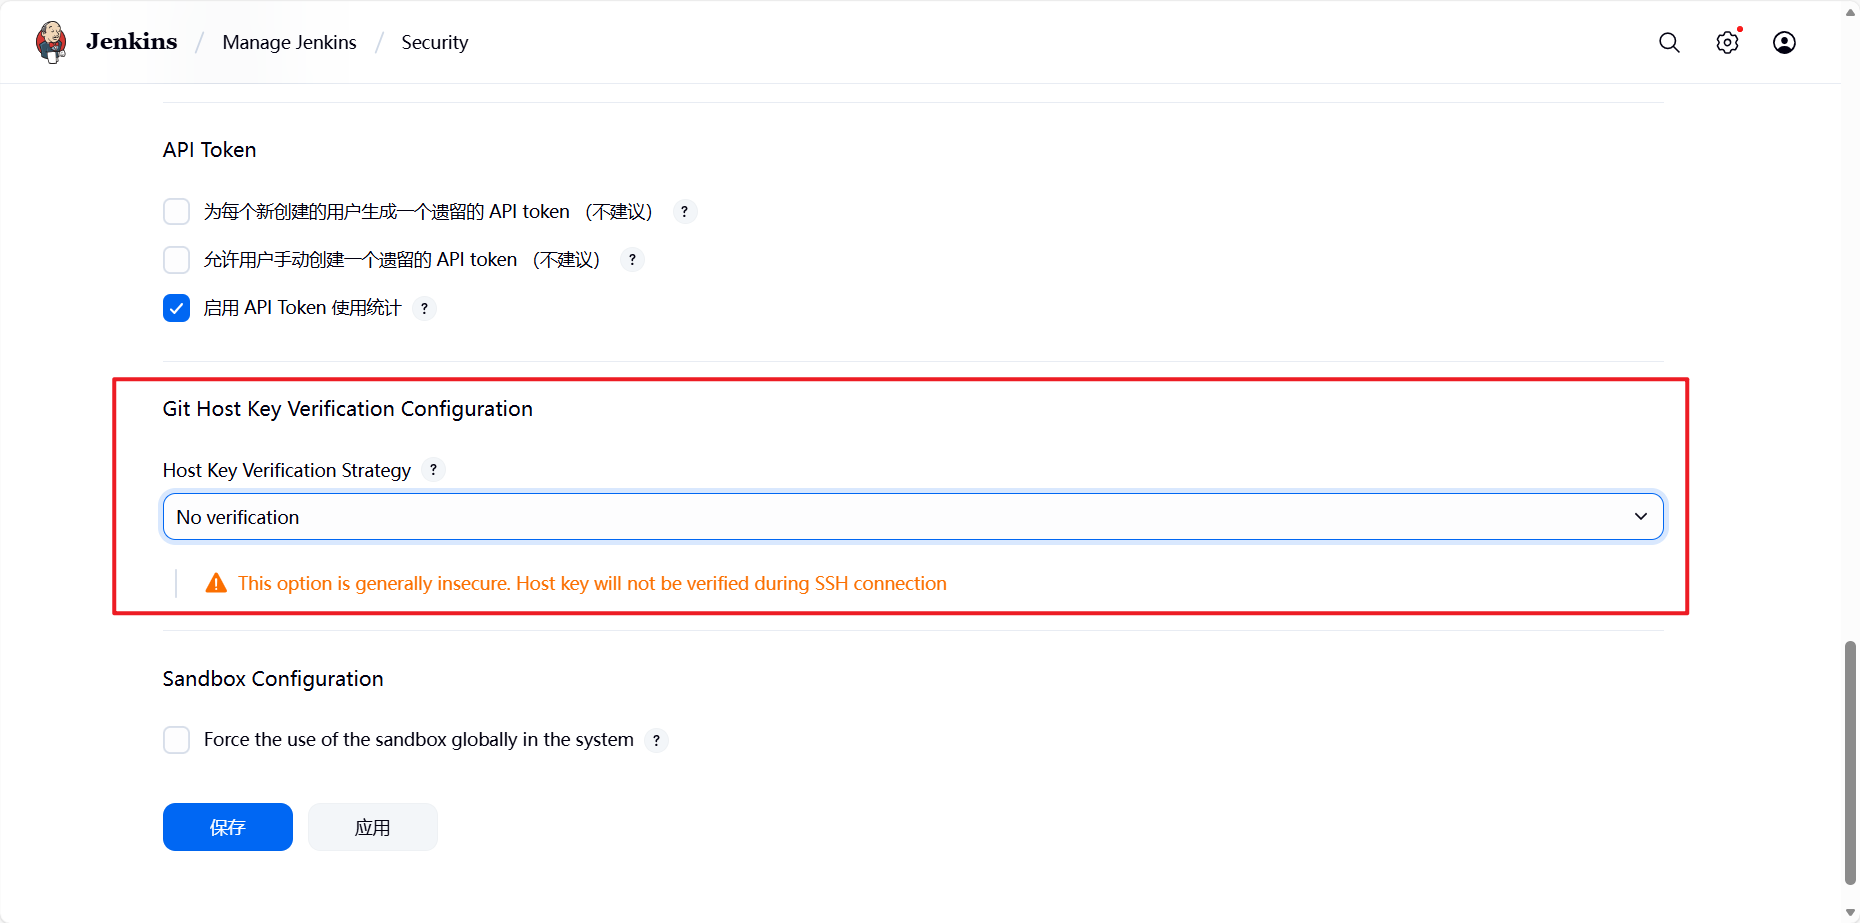
6.3 jenkins 与gitlab的整合

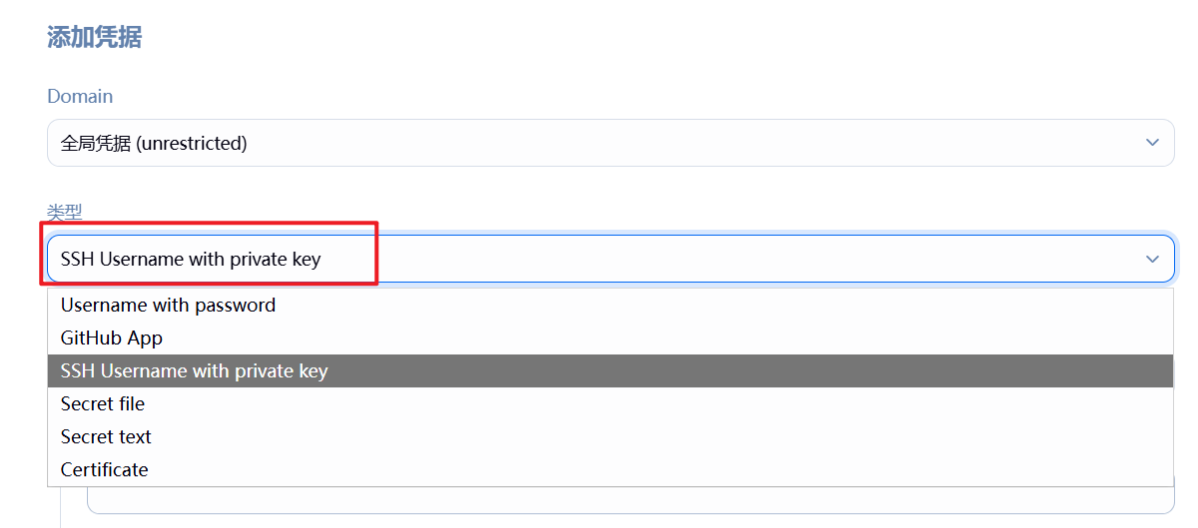
这个错误的原因是因为本机没有gitlab上的sshkey:
[root@jenkins war]# ssh-keygen
Generating public/private rsa key pair.
Enter file in which to save the key (/root/.ssh/id_rsa):
Created directory '/root/.ssh'.
Enter passphrase (empty for no passphrase):
Enter same passphrase again:
Your identification has been saved in /root/.ssh/id_rsa.
Your public key has been saved in /root/.ssh/id_rsa.pub.
The key fingerprint is:
SHA256:irOz6pvIcYqM2l2dw9b9CXihqA7NYT+HGyLbqX6p3zo root@jenkins
The key's randomart image is:
+---[RSA 3072]----+
| |
| |
| |
| |
| o S . |
| = * = + . |
| . .= *.% = + |
|=o+o.OE* * . o . |
|*=*+OOBoo o |
+----[SHA256]-----+
[root@jenkins war]# cat /root/.ssh/id_rsa.pub
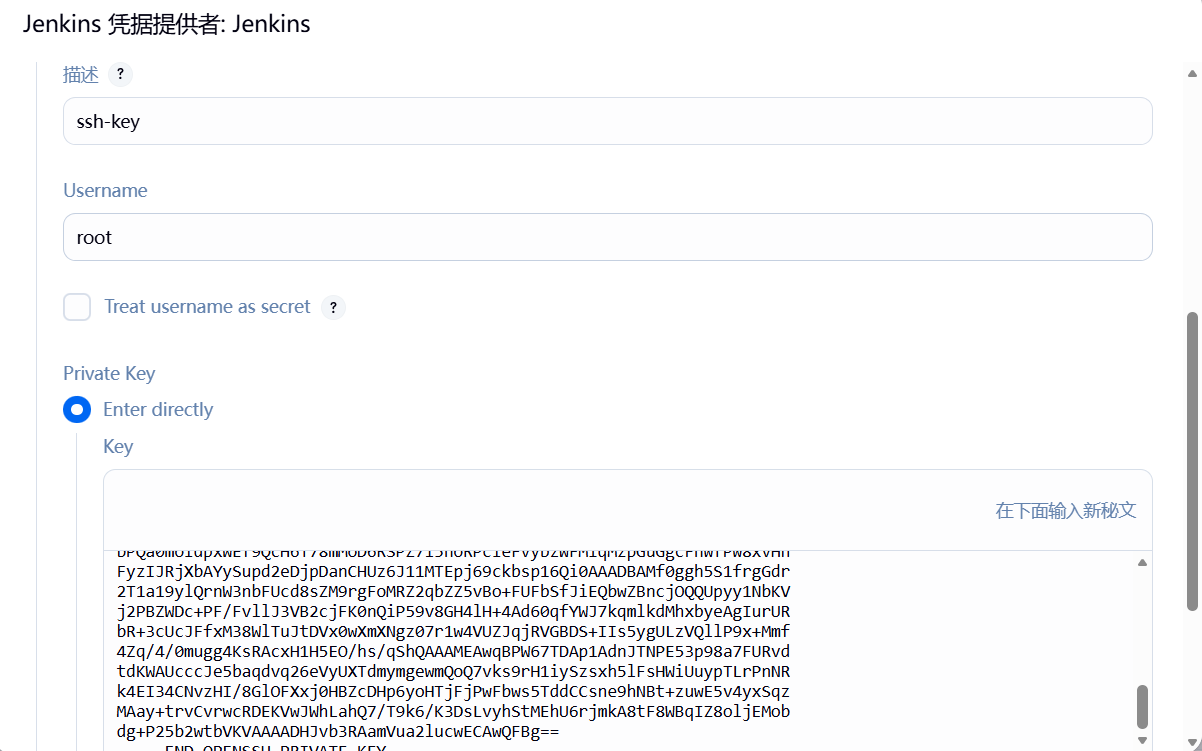
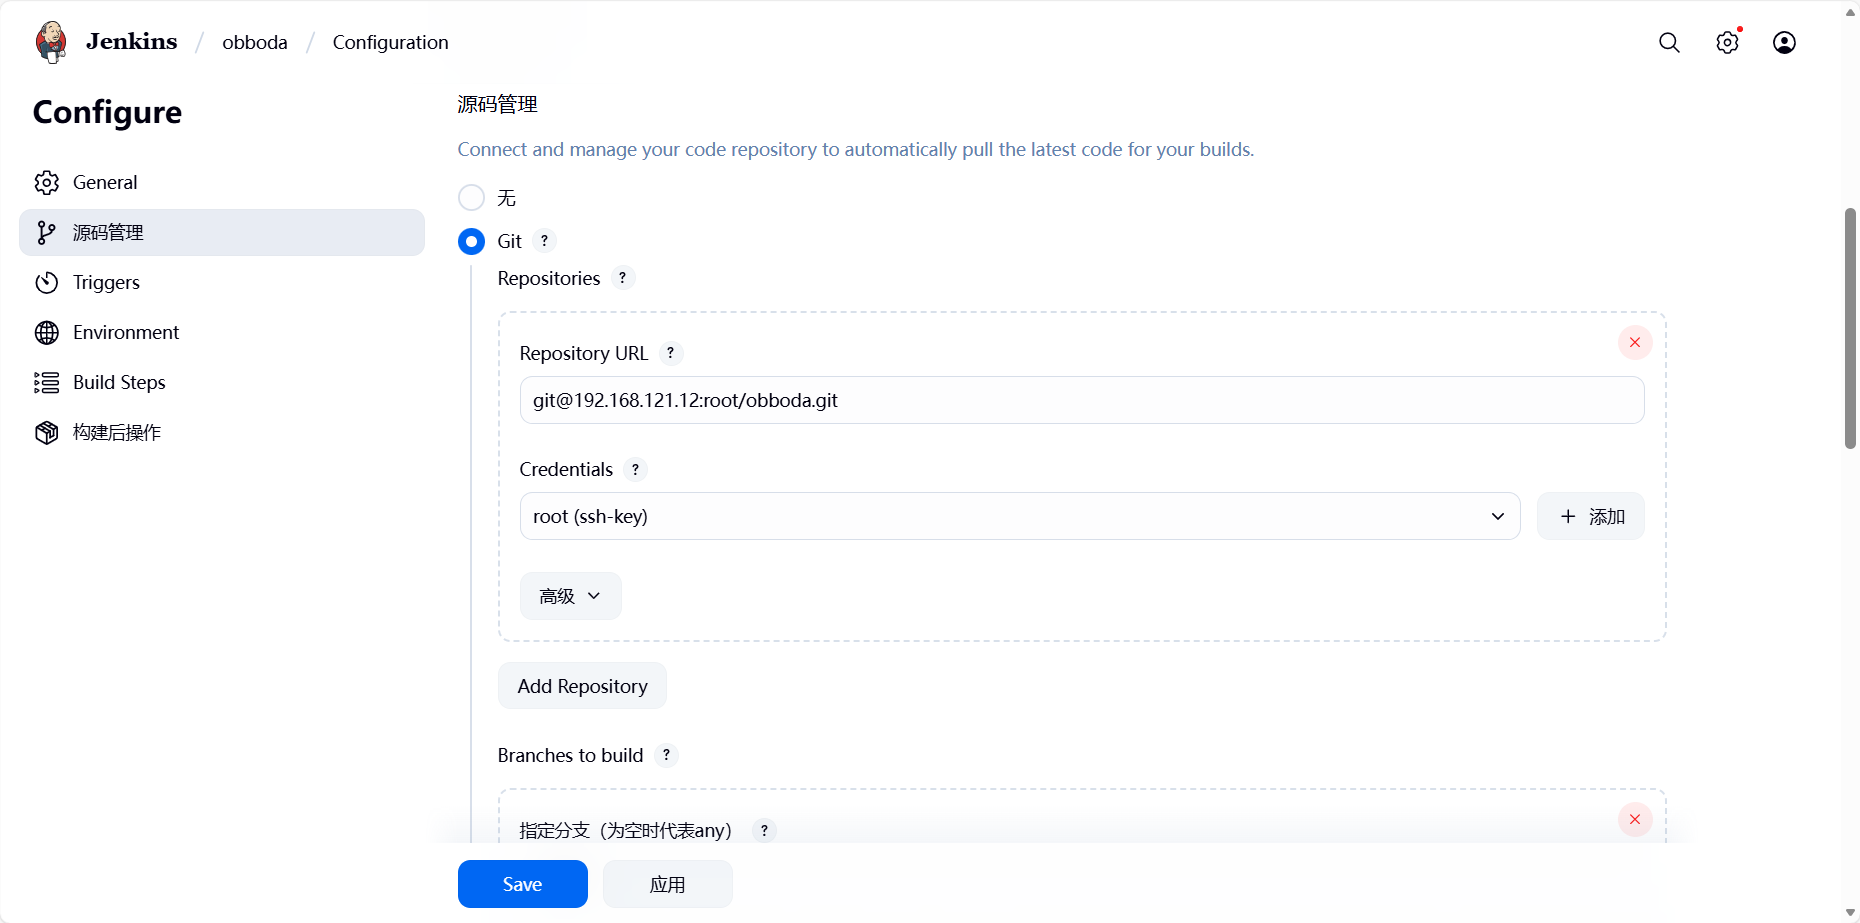
ssh-rsa AAAAB3NzaC1yc2EAAAADAQABAAABgQCYBIFXwc7GeVjfaBJDb1knJQneNMh/gfRG3h2Qdorn9FQTG6IxZgQZuVuiI2434kXM/DNeG3uBM8Xw4fDc/gg6FJ+L2gX/jxeqJRraRa48f2OAFnH11EXU4TnE9agb7upS753ArTaA9dDB8OFOXPHIOv9/fiHCzF3vS9sYaep4dO0x8o+aeABWj6usaJhZSF/P6oKQtJzoLjdRkPdj4x+c7WSCB4BmkNAIJeMF3uiI0J7Y53LxpH1kKAeXa9kvlVqyOi60gtp3y14ylhHAutVsiolT1kd5lH49kwGe3d62Un+tAeOiFD5hcvWezFn9yNBeUcwBE7O3Jw3aCxvgOnf0Pet7xbG7hH3KsTnHTEa1HZJ0pfXTVunKzolUViSH6Pw8WyLEG4VbszZiGD+/3nzbBDHQoxiJN4eg6+hceo8iL1yQYdQ1oq5ztV7PA2QrVN5161ytGdyBIVZxPOg9xe/JIlVy7VizqfFlu2j5JLrp3cXE09kyMxbZGckSkcdm4Wk= root@jenkins把此密钥添加到gitlab上即可。
添加密钥凭据:
下面输入ssh私钥(cat ~/.ssh/id_rsa):
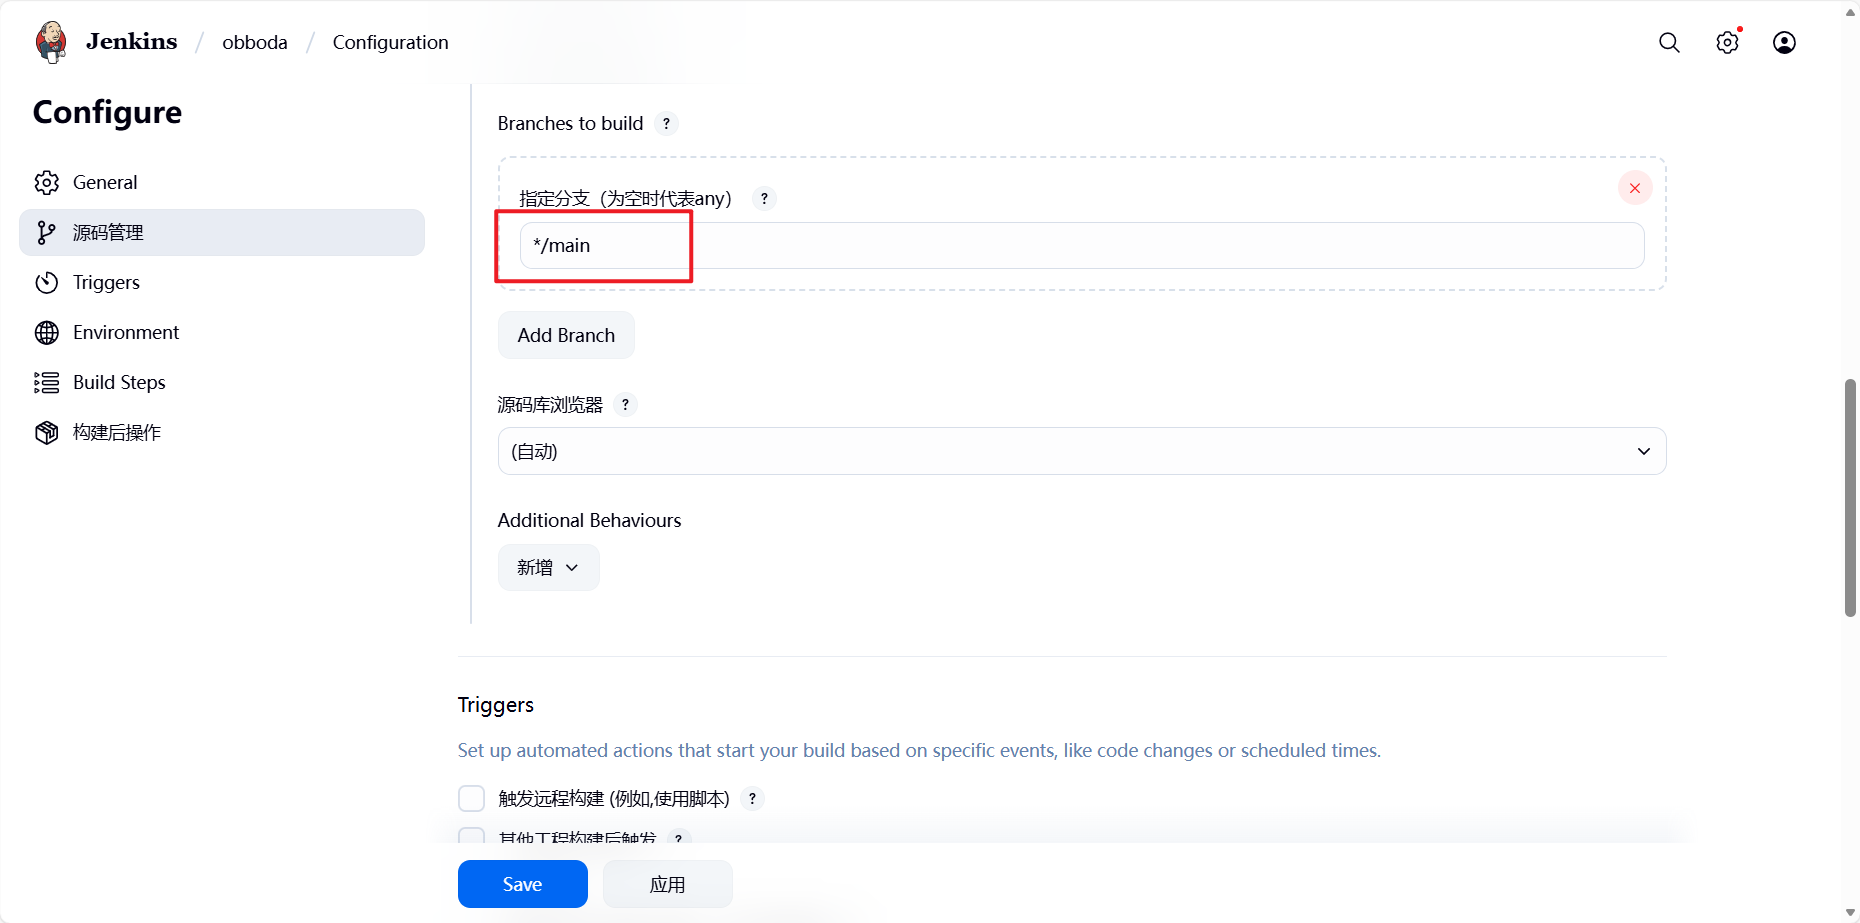
添加完成后报错依然存在,因为ssh首次连接主机是需要签名认证,需要手动输入yes。
(1)方法1:
[root@jenkins ~]# vim /etc/ssh/ssh_config
Host *
    StrictHostKeyChecking no
(2)方法2:
完成此设定即可解决。
选择主分支:
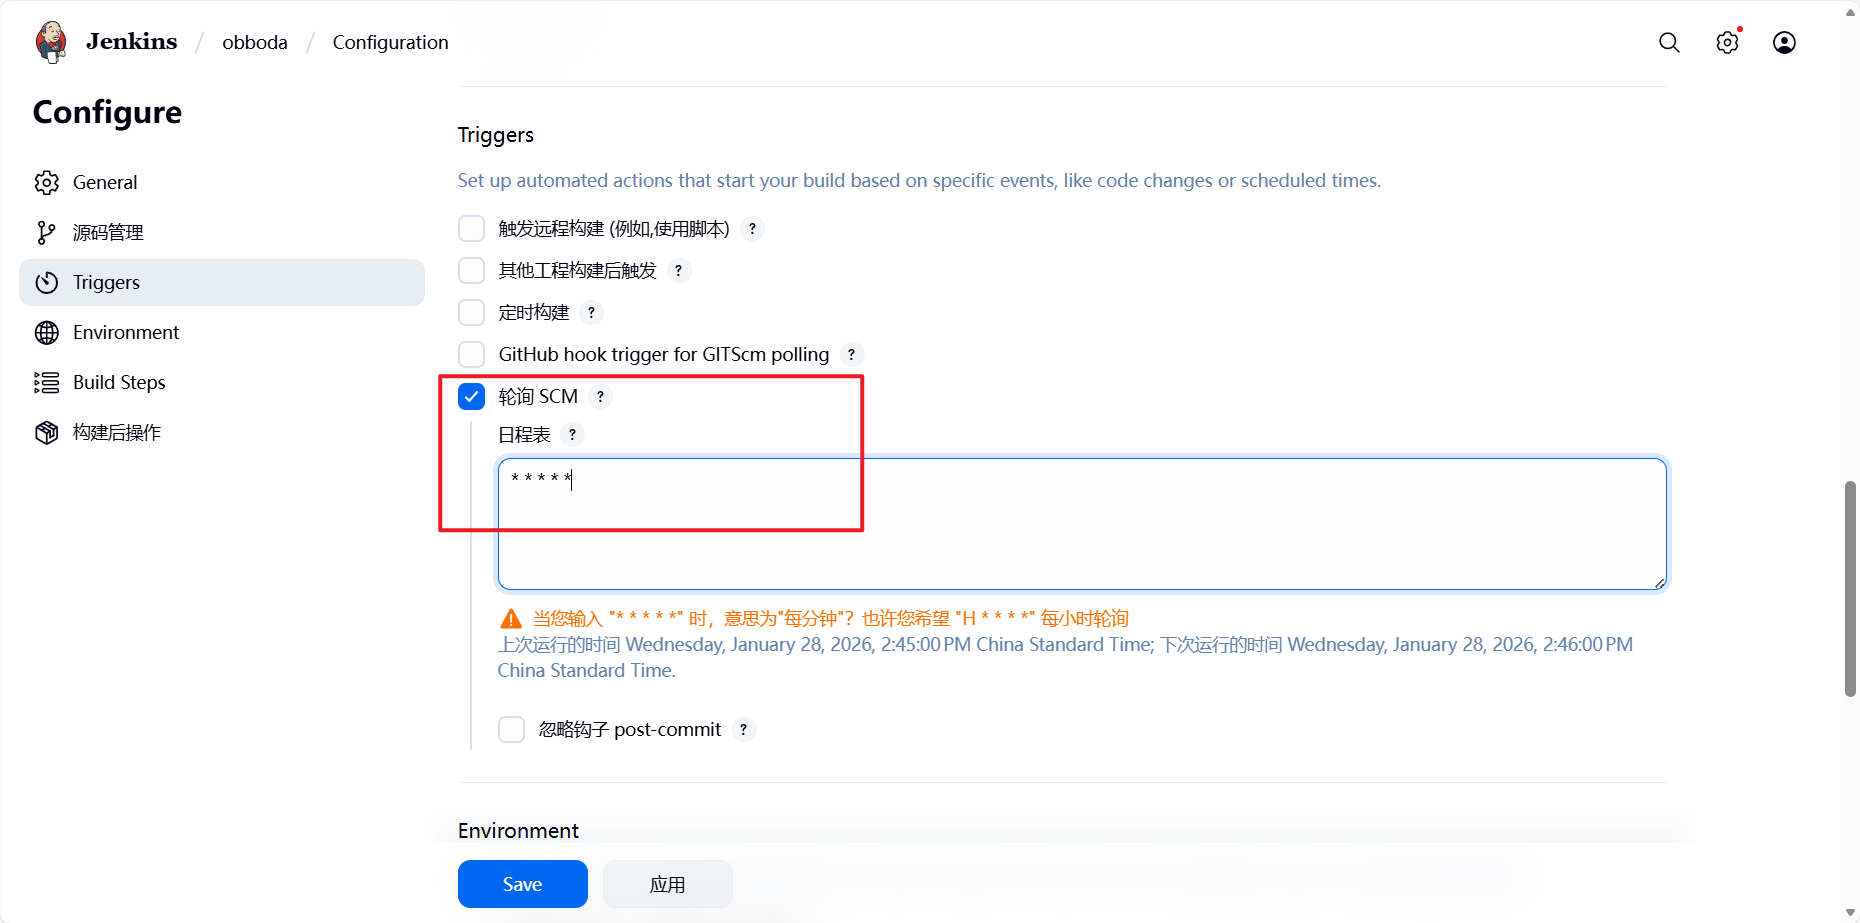
每分钟轮询查看gitlab是否更新:
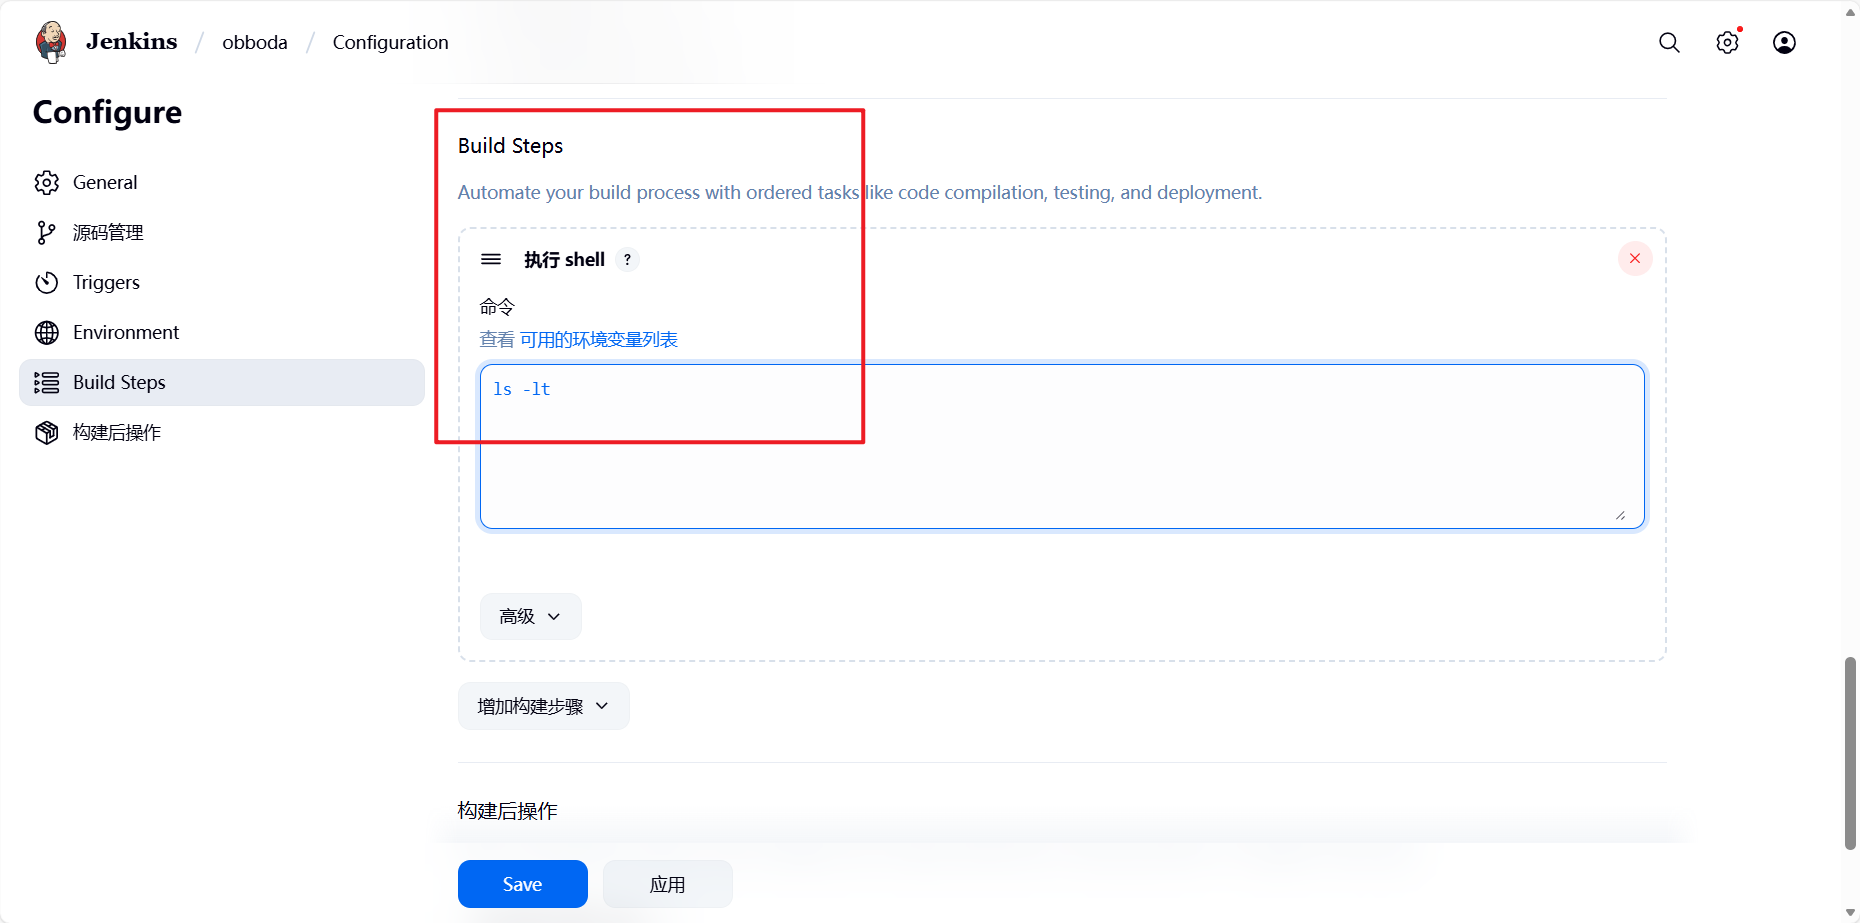
选择构建动作:
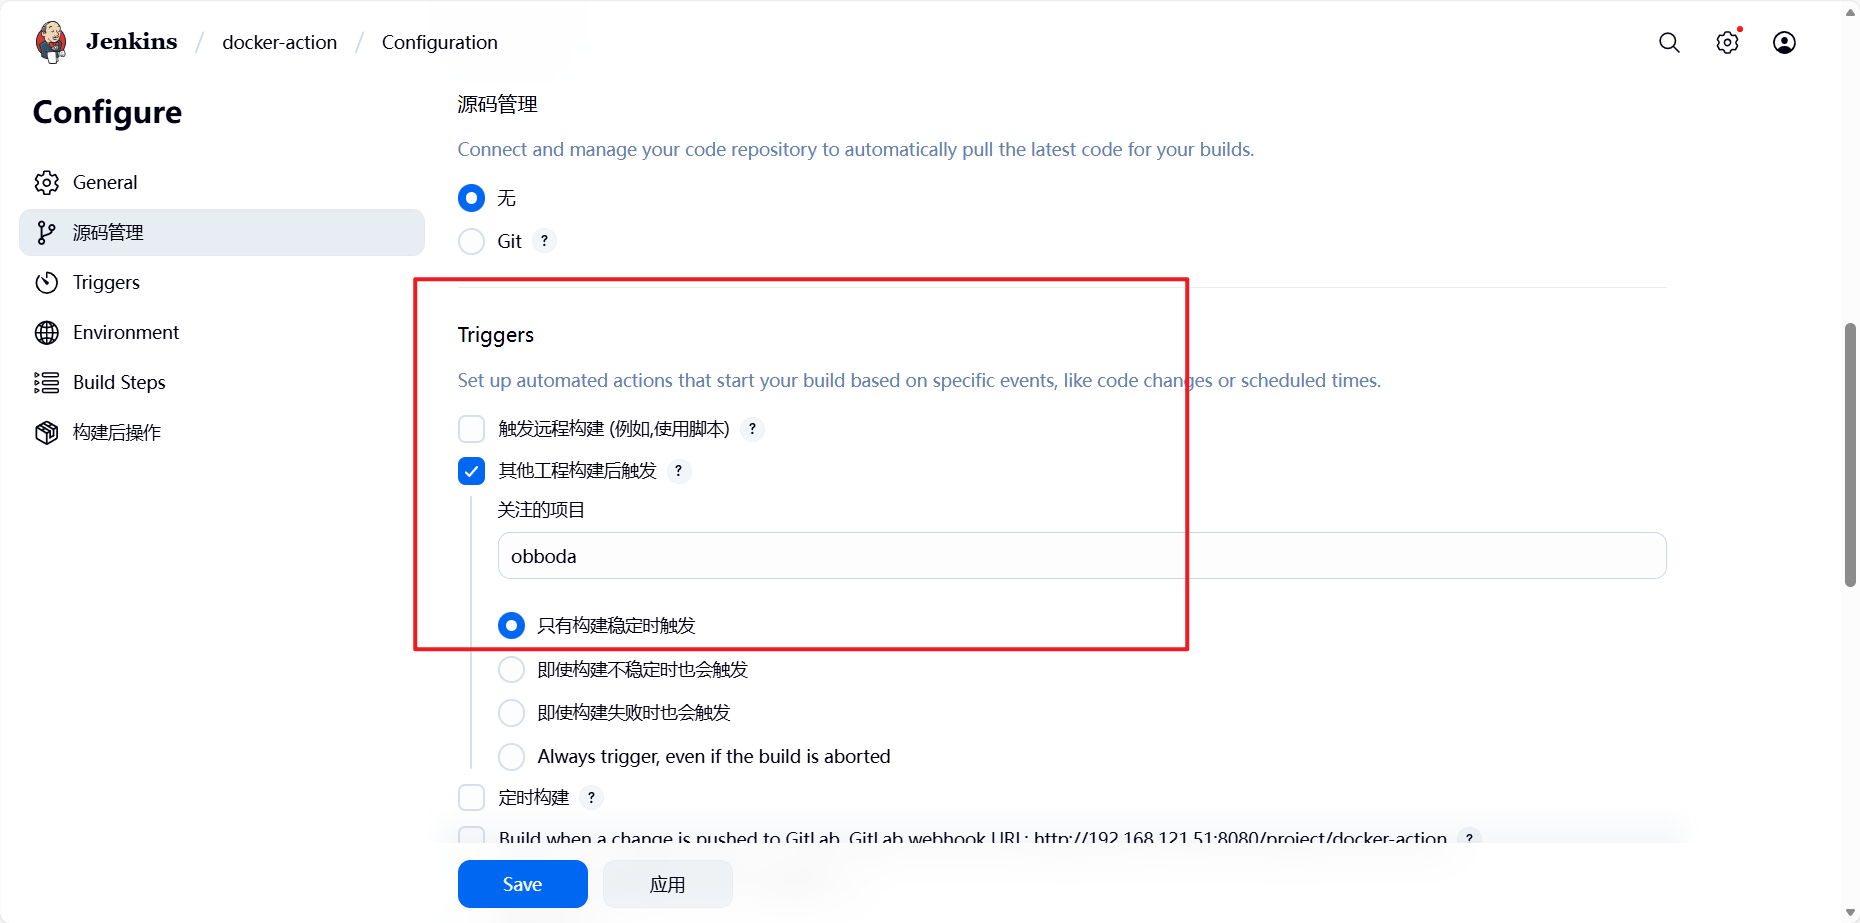
6.4 genkins 中gitlab触发器的部署与使用
在 Jenkins 中配置 GitLab 触发器可以实现代码提交或合并请求时自动触发 Jenkins 流水线
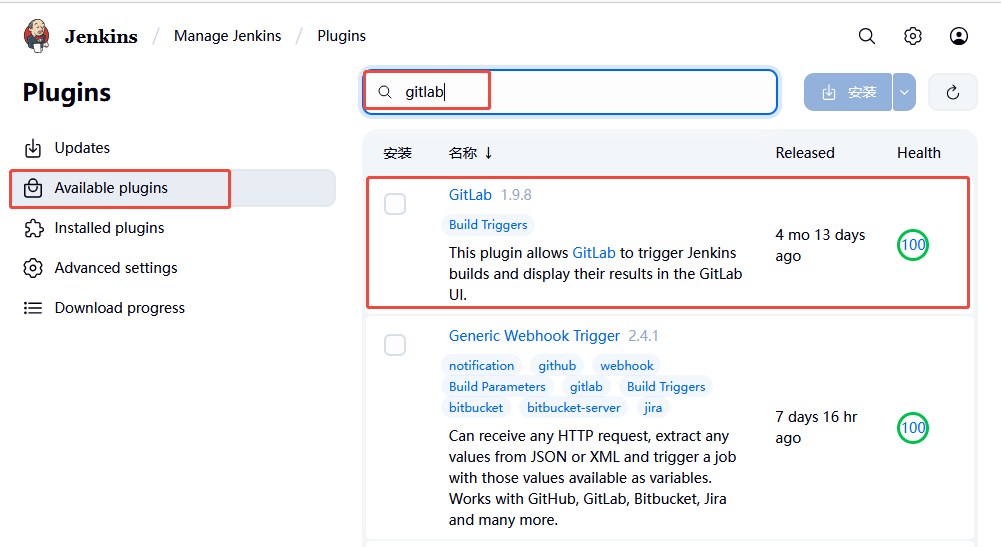
6.4.1 安装插件
如果需要使用gitlab触发器需要安装gitlab插件。

6.4.2 部署自动触发
插件加载完毕后在jenkins中选择之前构建的项目并配置自动触发
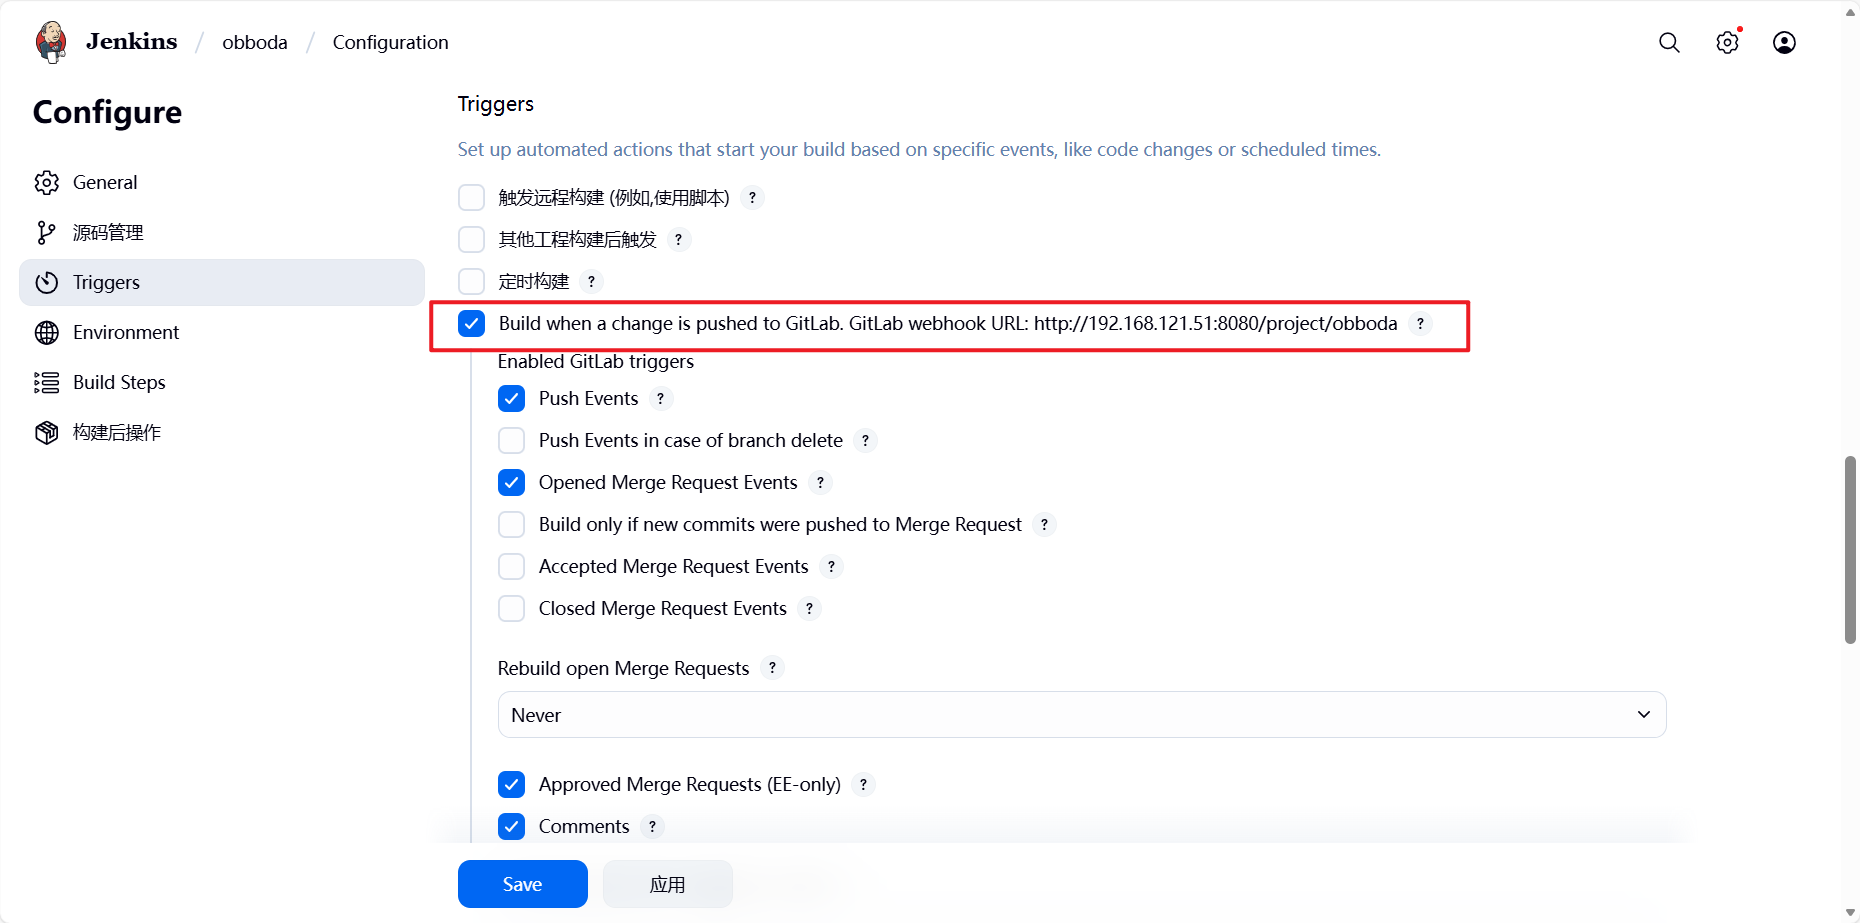
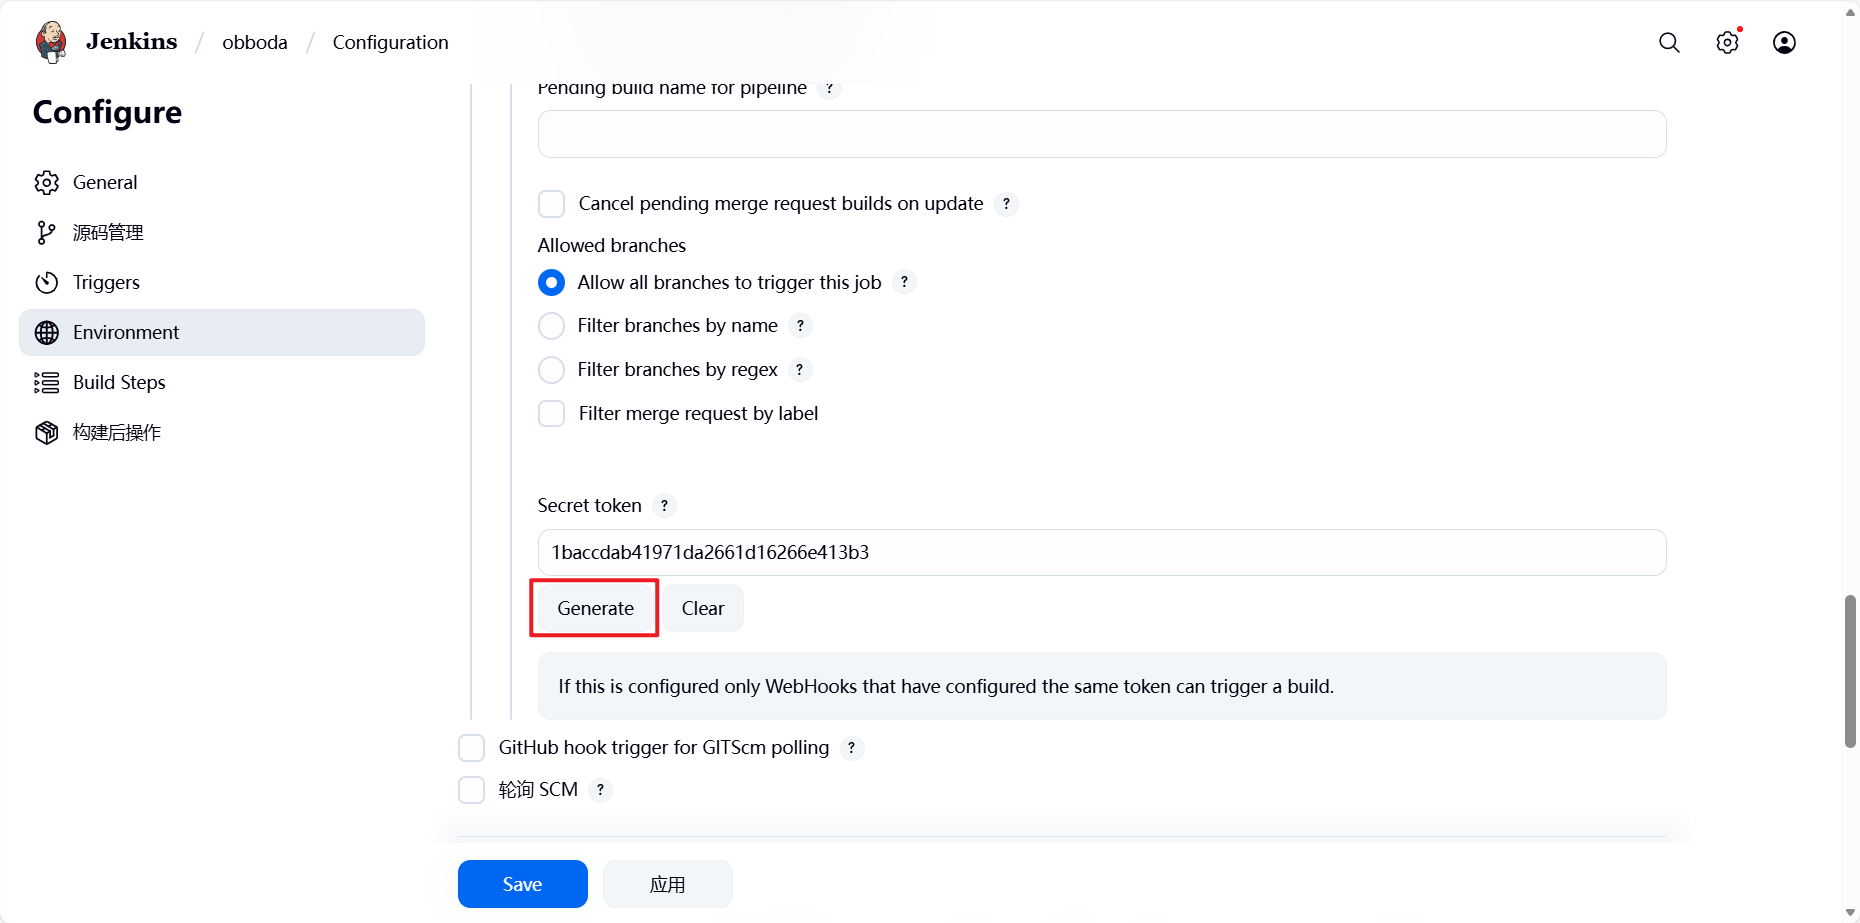
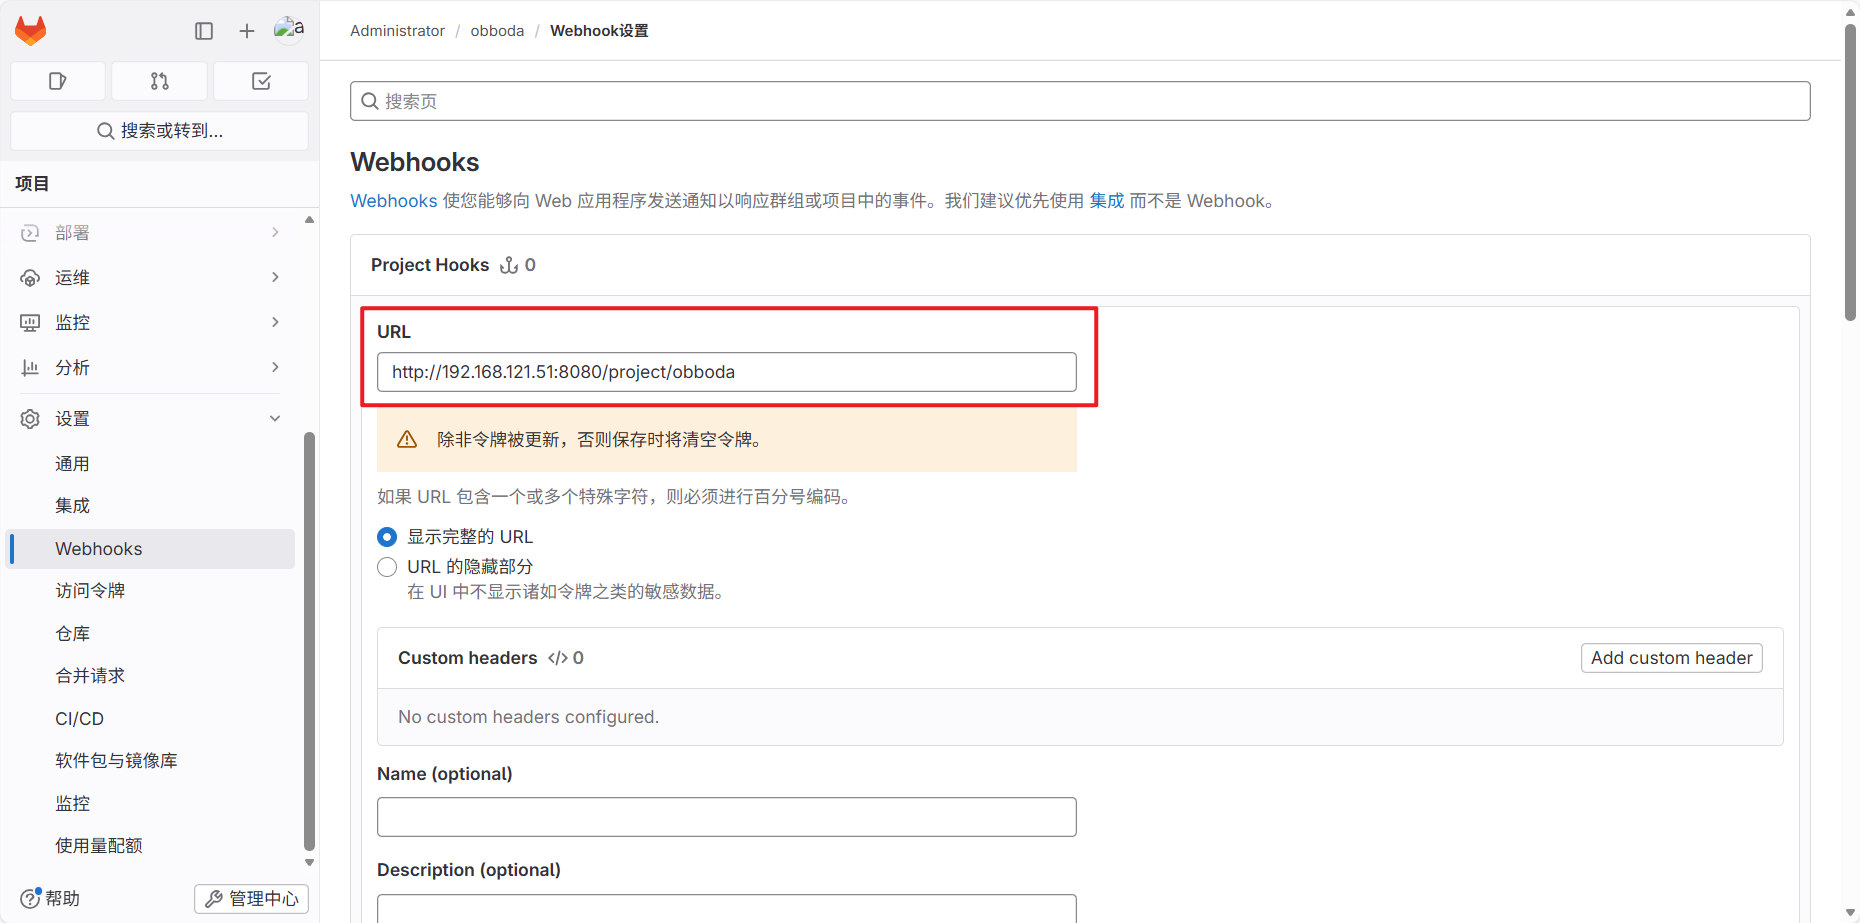
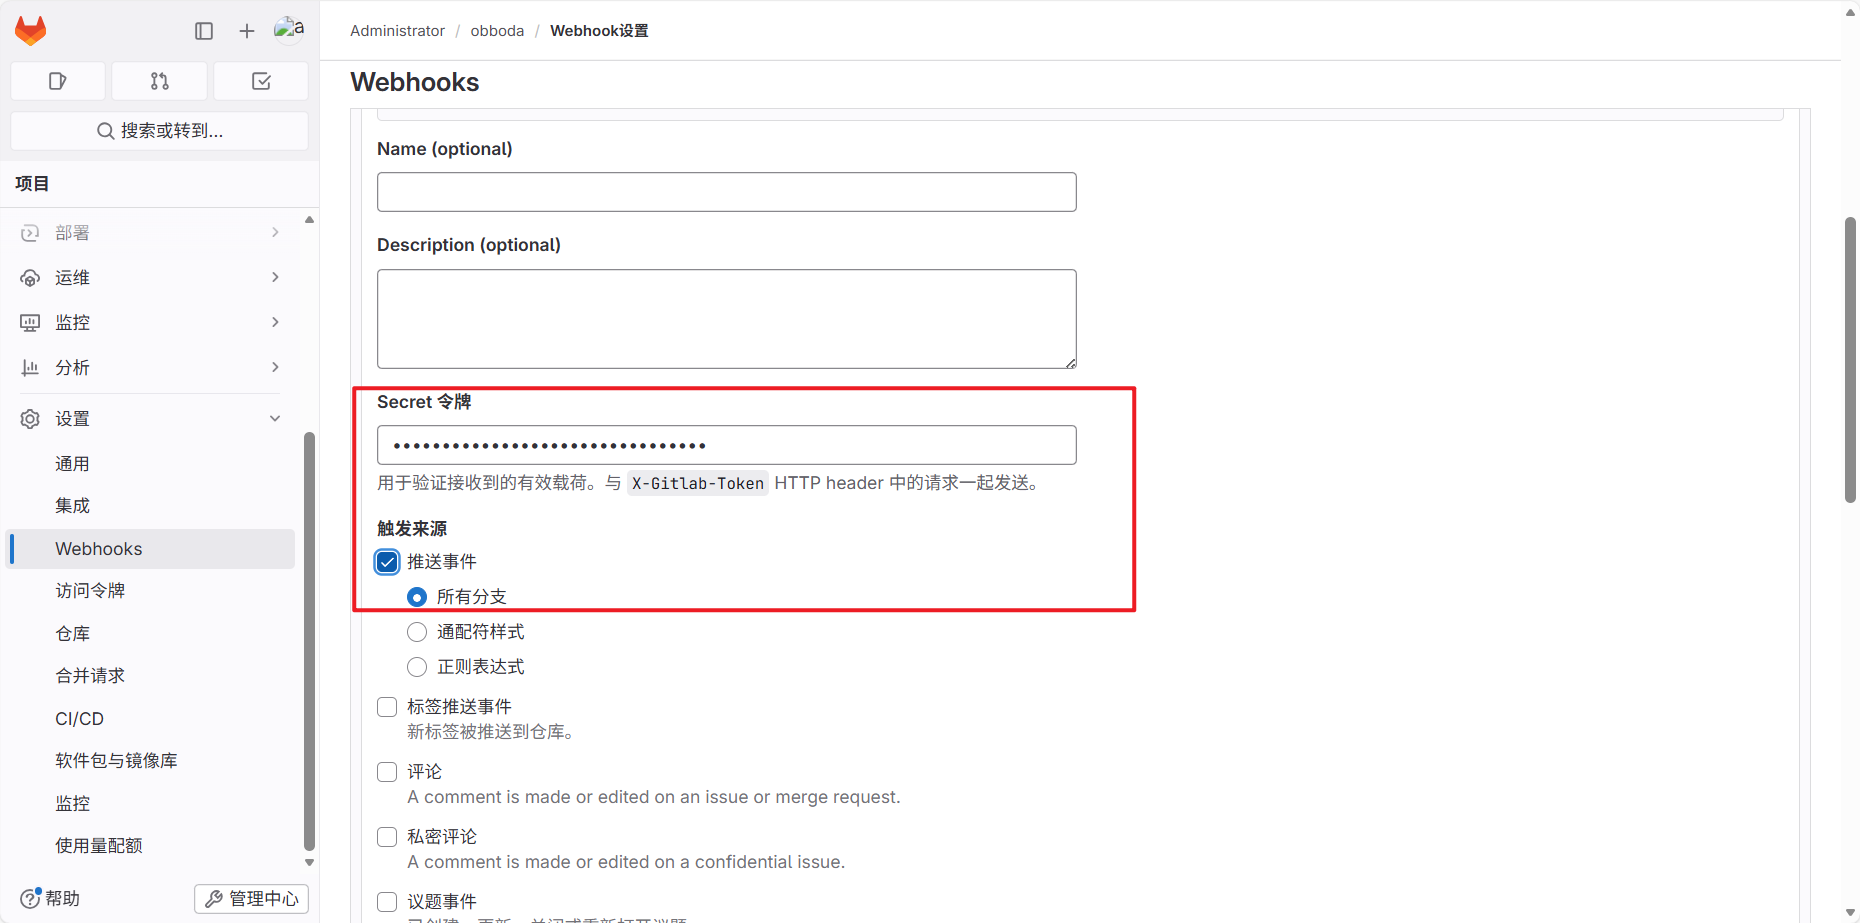
在下方高级选项里面找到Secret token生成:
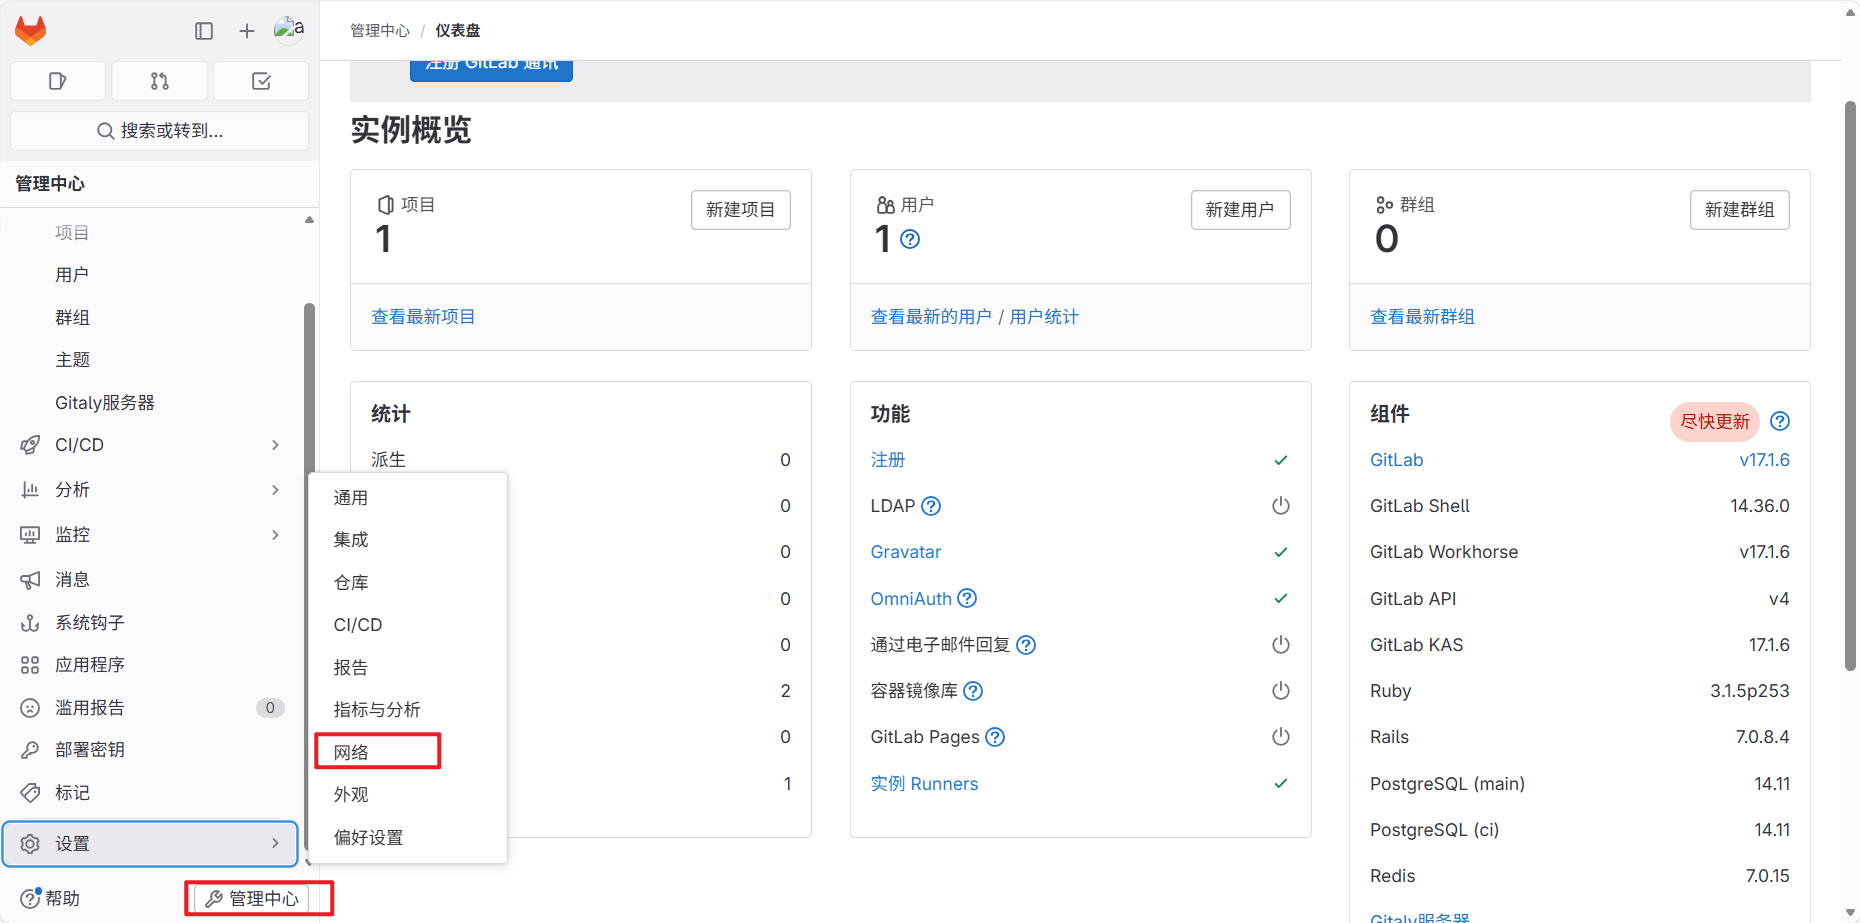
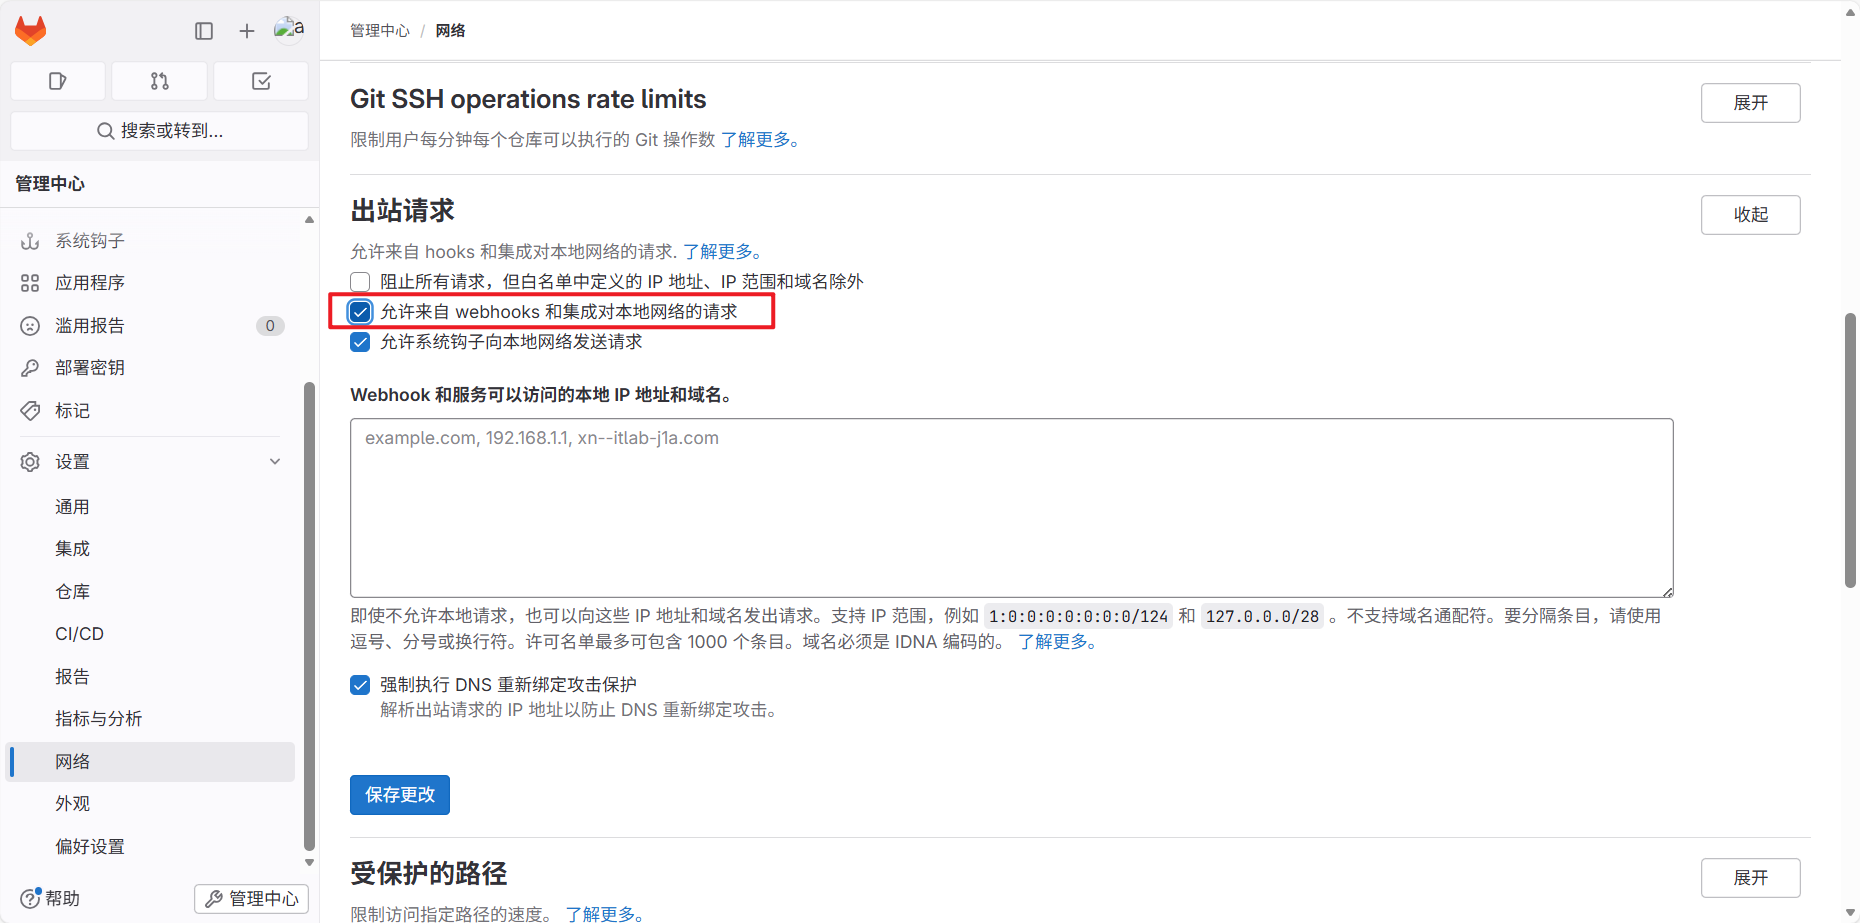
在gitlab中设定,管理中心 > 设置 > 网络:
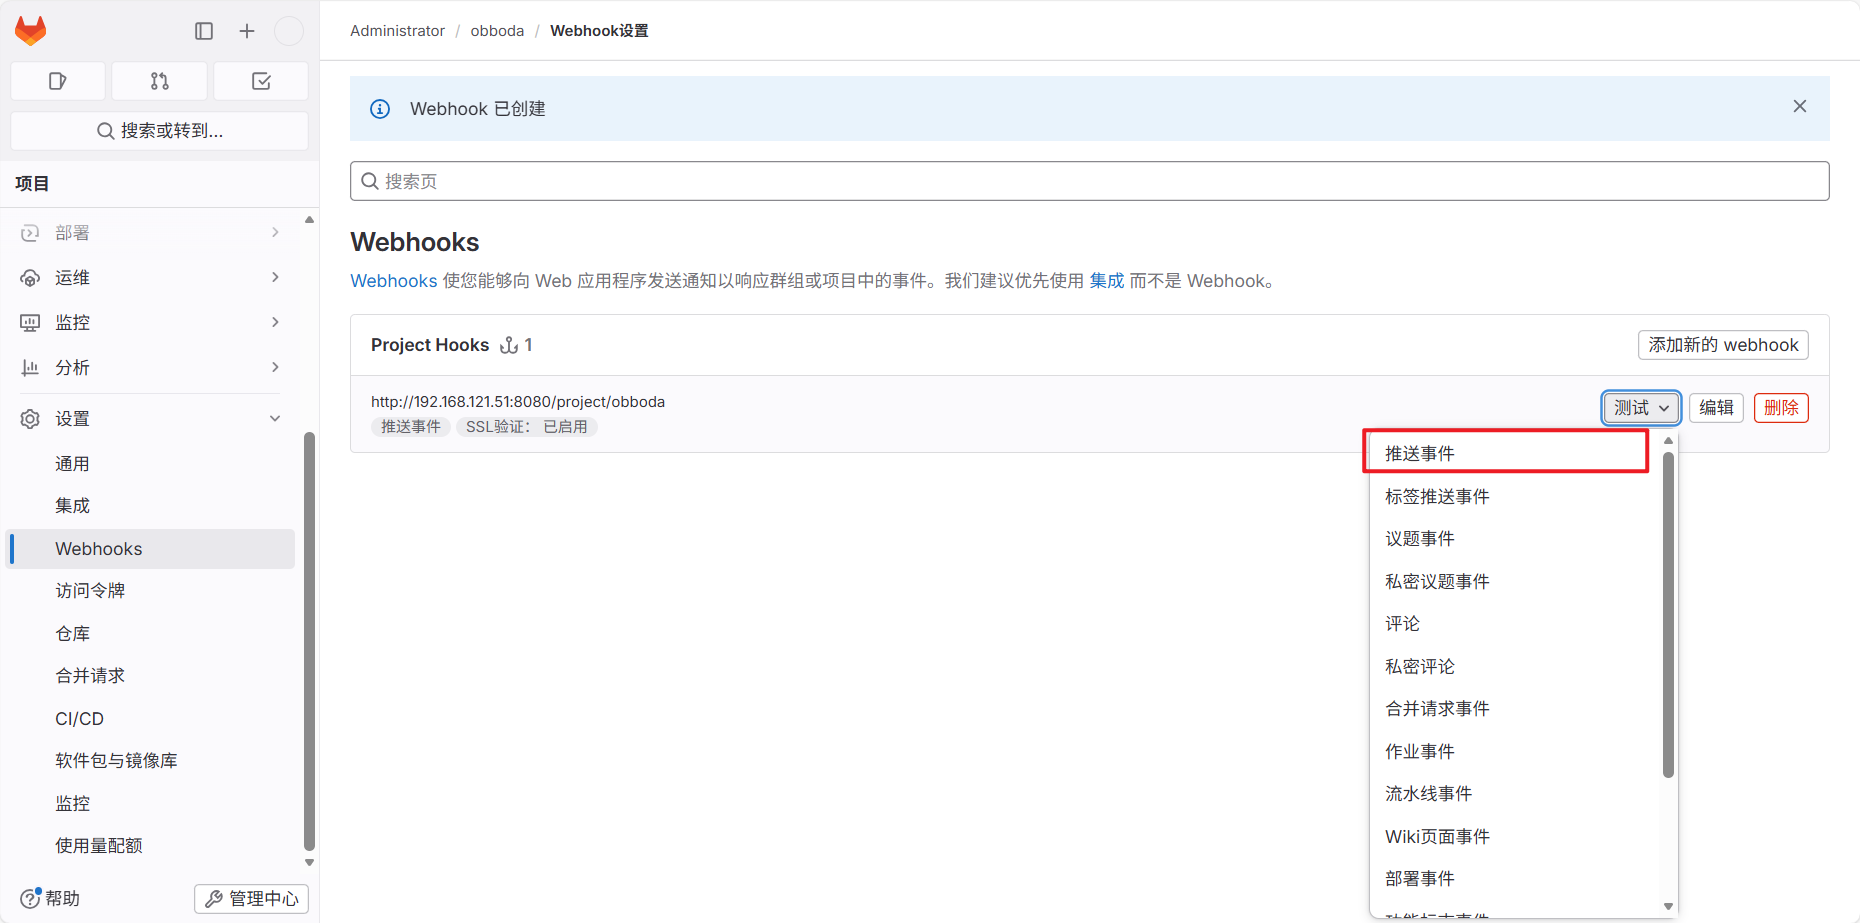
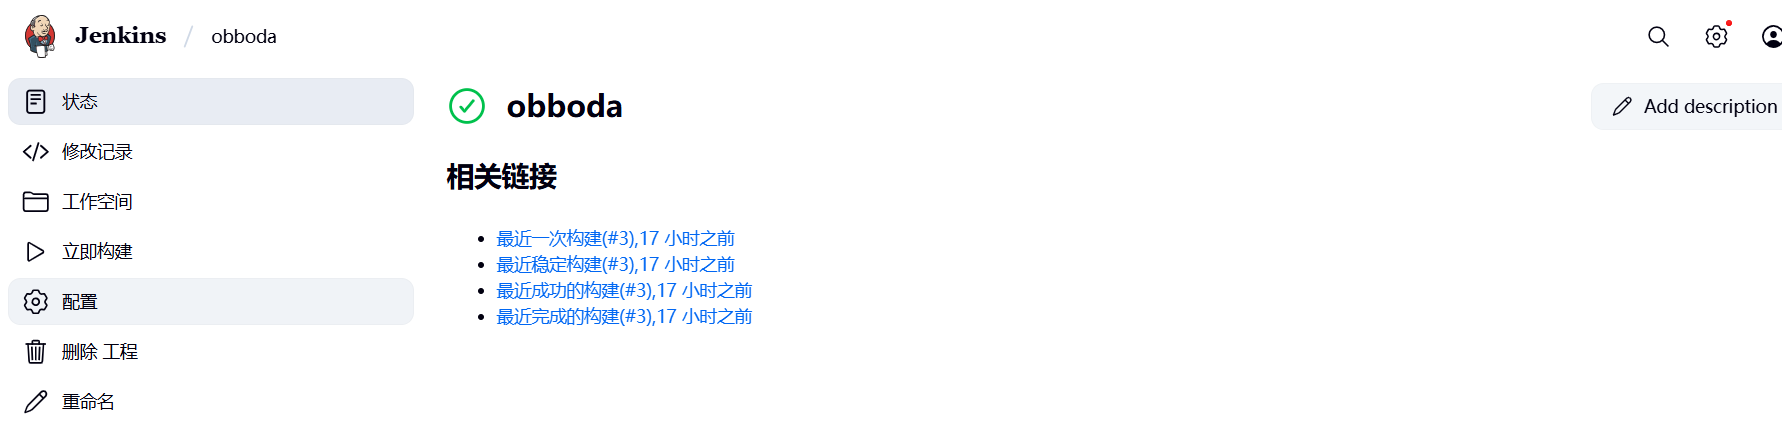
回到原项目:

测试手动触发:
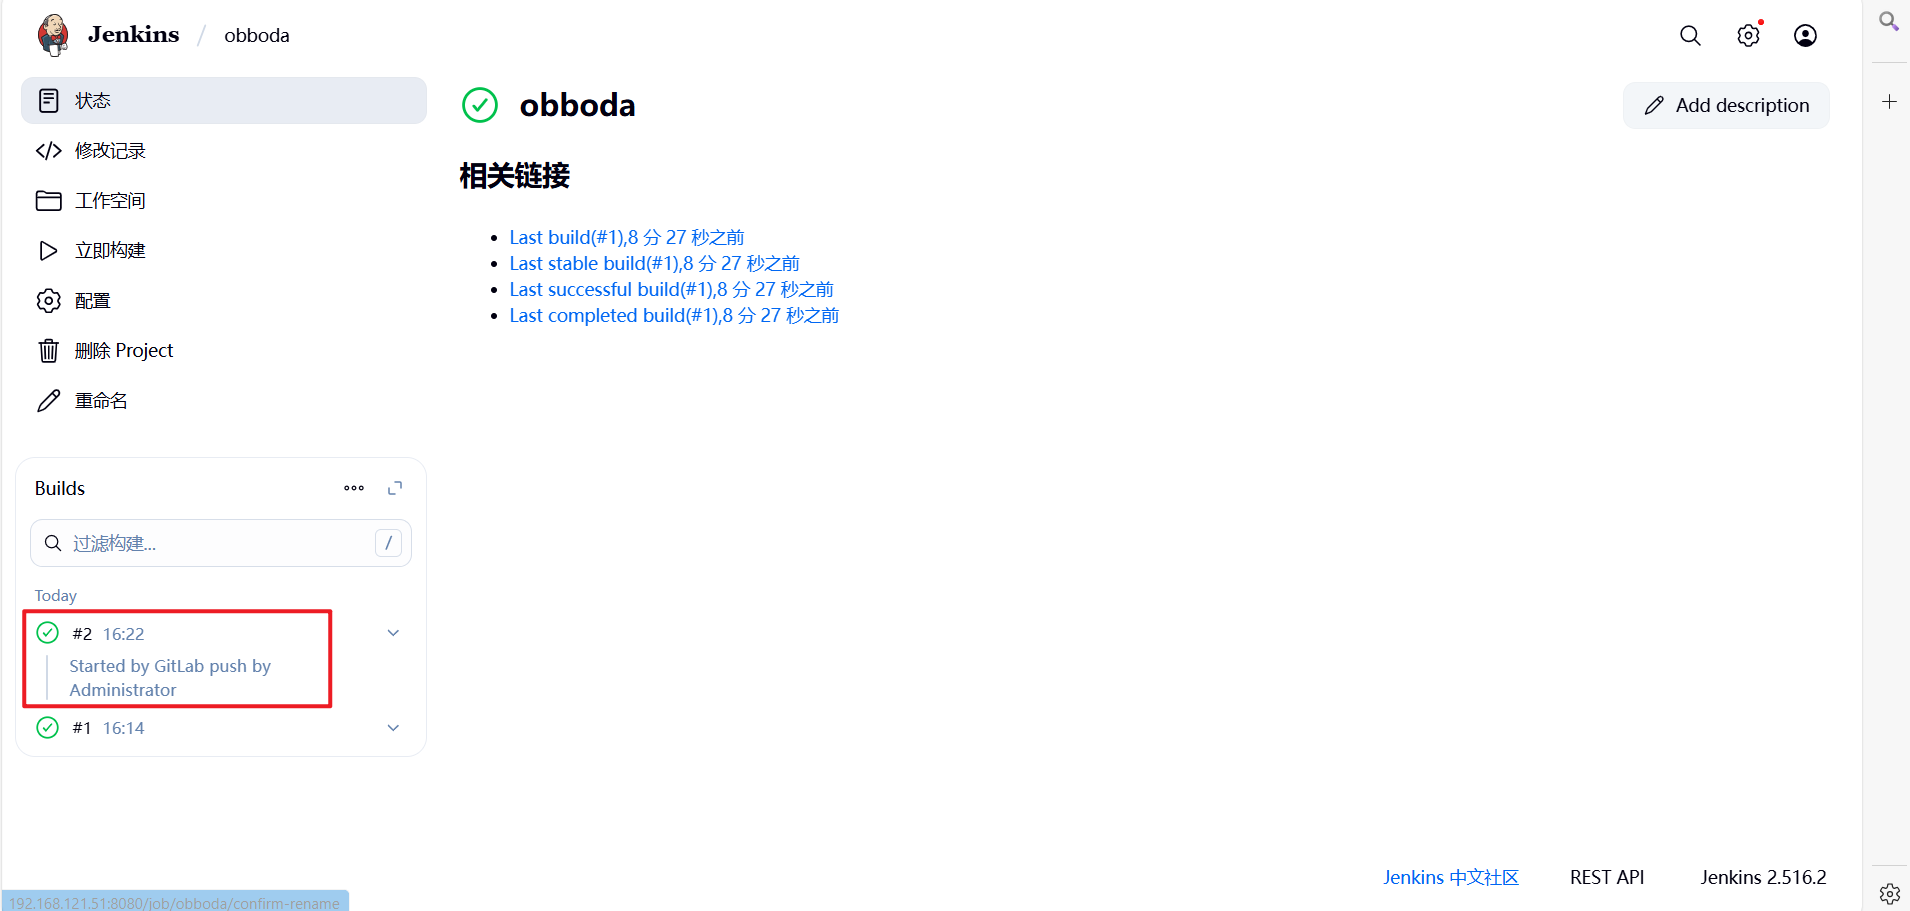
6.4.3 测试自动触发
[root@k8s-master obboda]# cd /gitlab/obboda/
[root@k8s-master obboda]# ls
obboda.txt README.md
[root@k8s-master obboda]# git remote -v
origin git@192.168.121.12:root/obboda.git (fetch)
origin git@192.168.121.12:root/obboda.git (push)
[root@k8s-master obboda]# echo "test" > testfile.txt
[root@k8s-master obboda]# git add testfile.txt
[root@k8s-master obboda]# git commit -m "add testfile.txt"
[main 8231d8d] add testfile.txt
1 file changed, 1 insertion(+)
create mode 100644 testfile.txt
[root@k8s-master obboda]# git push -u origin main
Authorized users only. All activities may be monitored and reported.
Enumerating objects: 4, done.
Counting objects: 100% (4/4), done.
Delta compression using up to 2 threads
Compressing objects: 100% (2/2), done.
Writing objects: 100% (3/3), 308 bytes | 308.00 KiB/s, done.
Total 3 (delta 0), reused 0 (delta 0), pack-reused 0
To 192.168.121.12:root/obboda.git
cf43eff..8231d8d main -> main
Branch 'main' set up to track remote branch 'main' from 'origin'.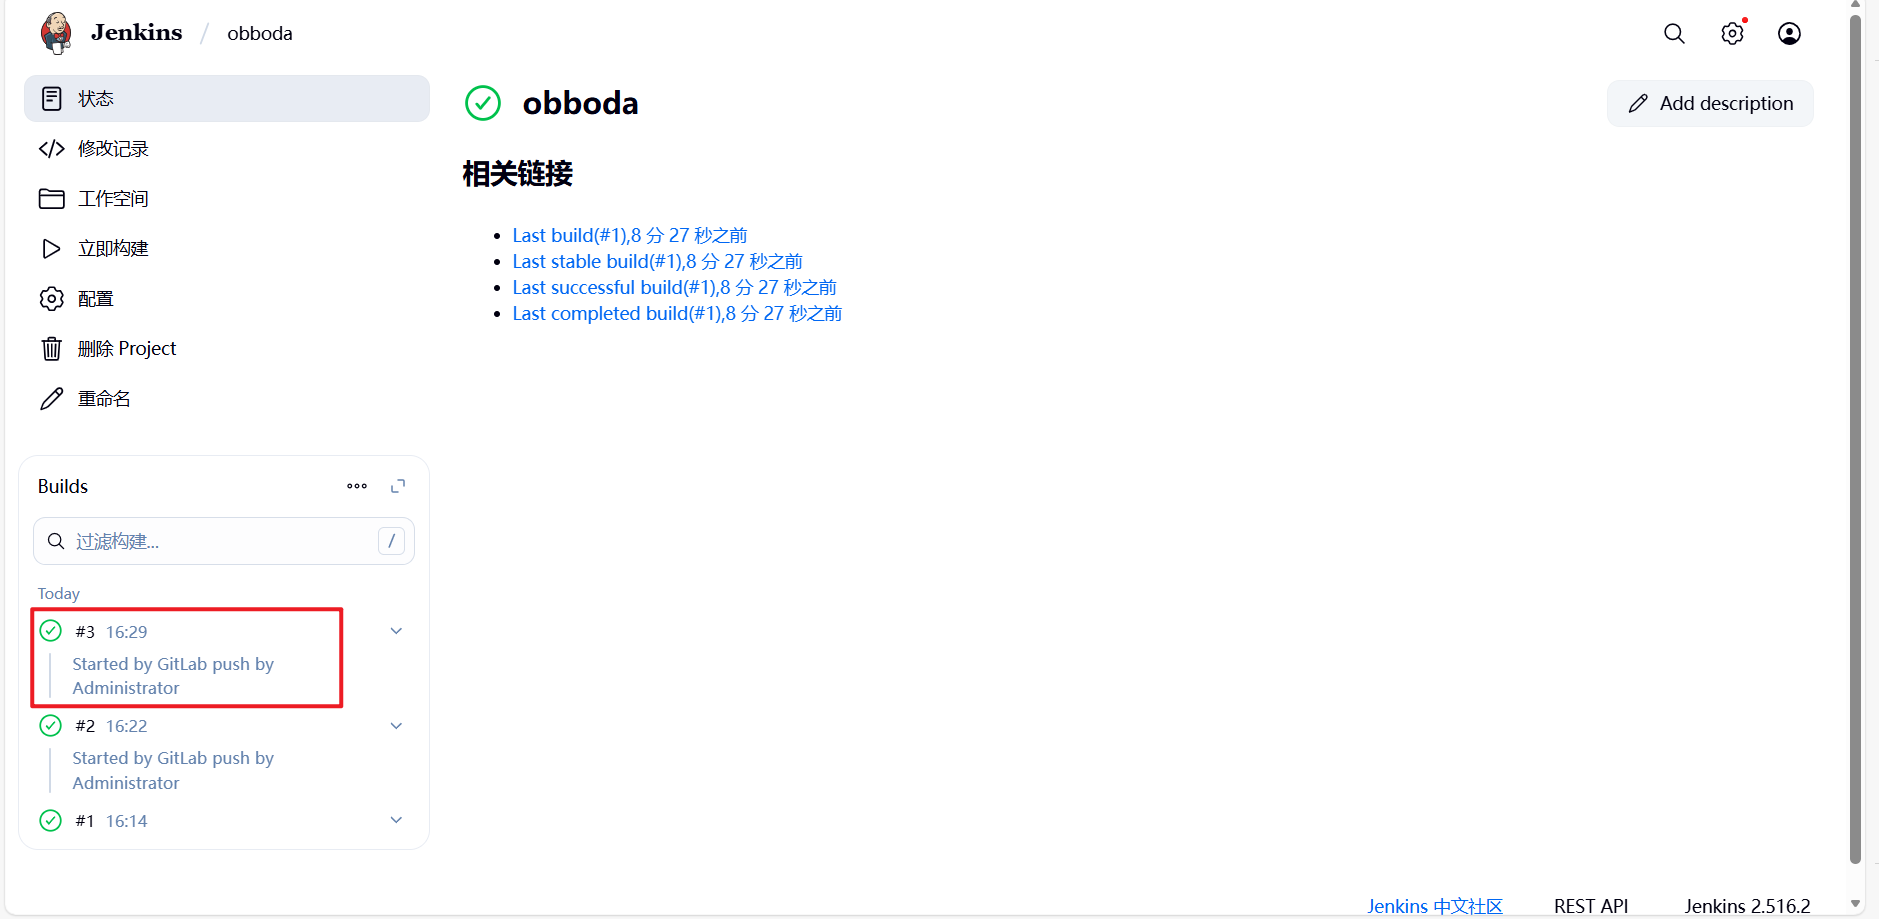
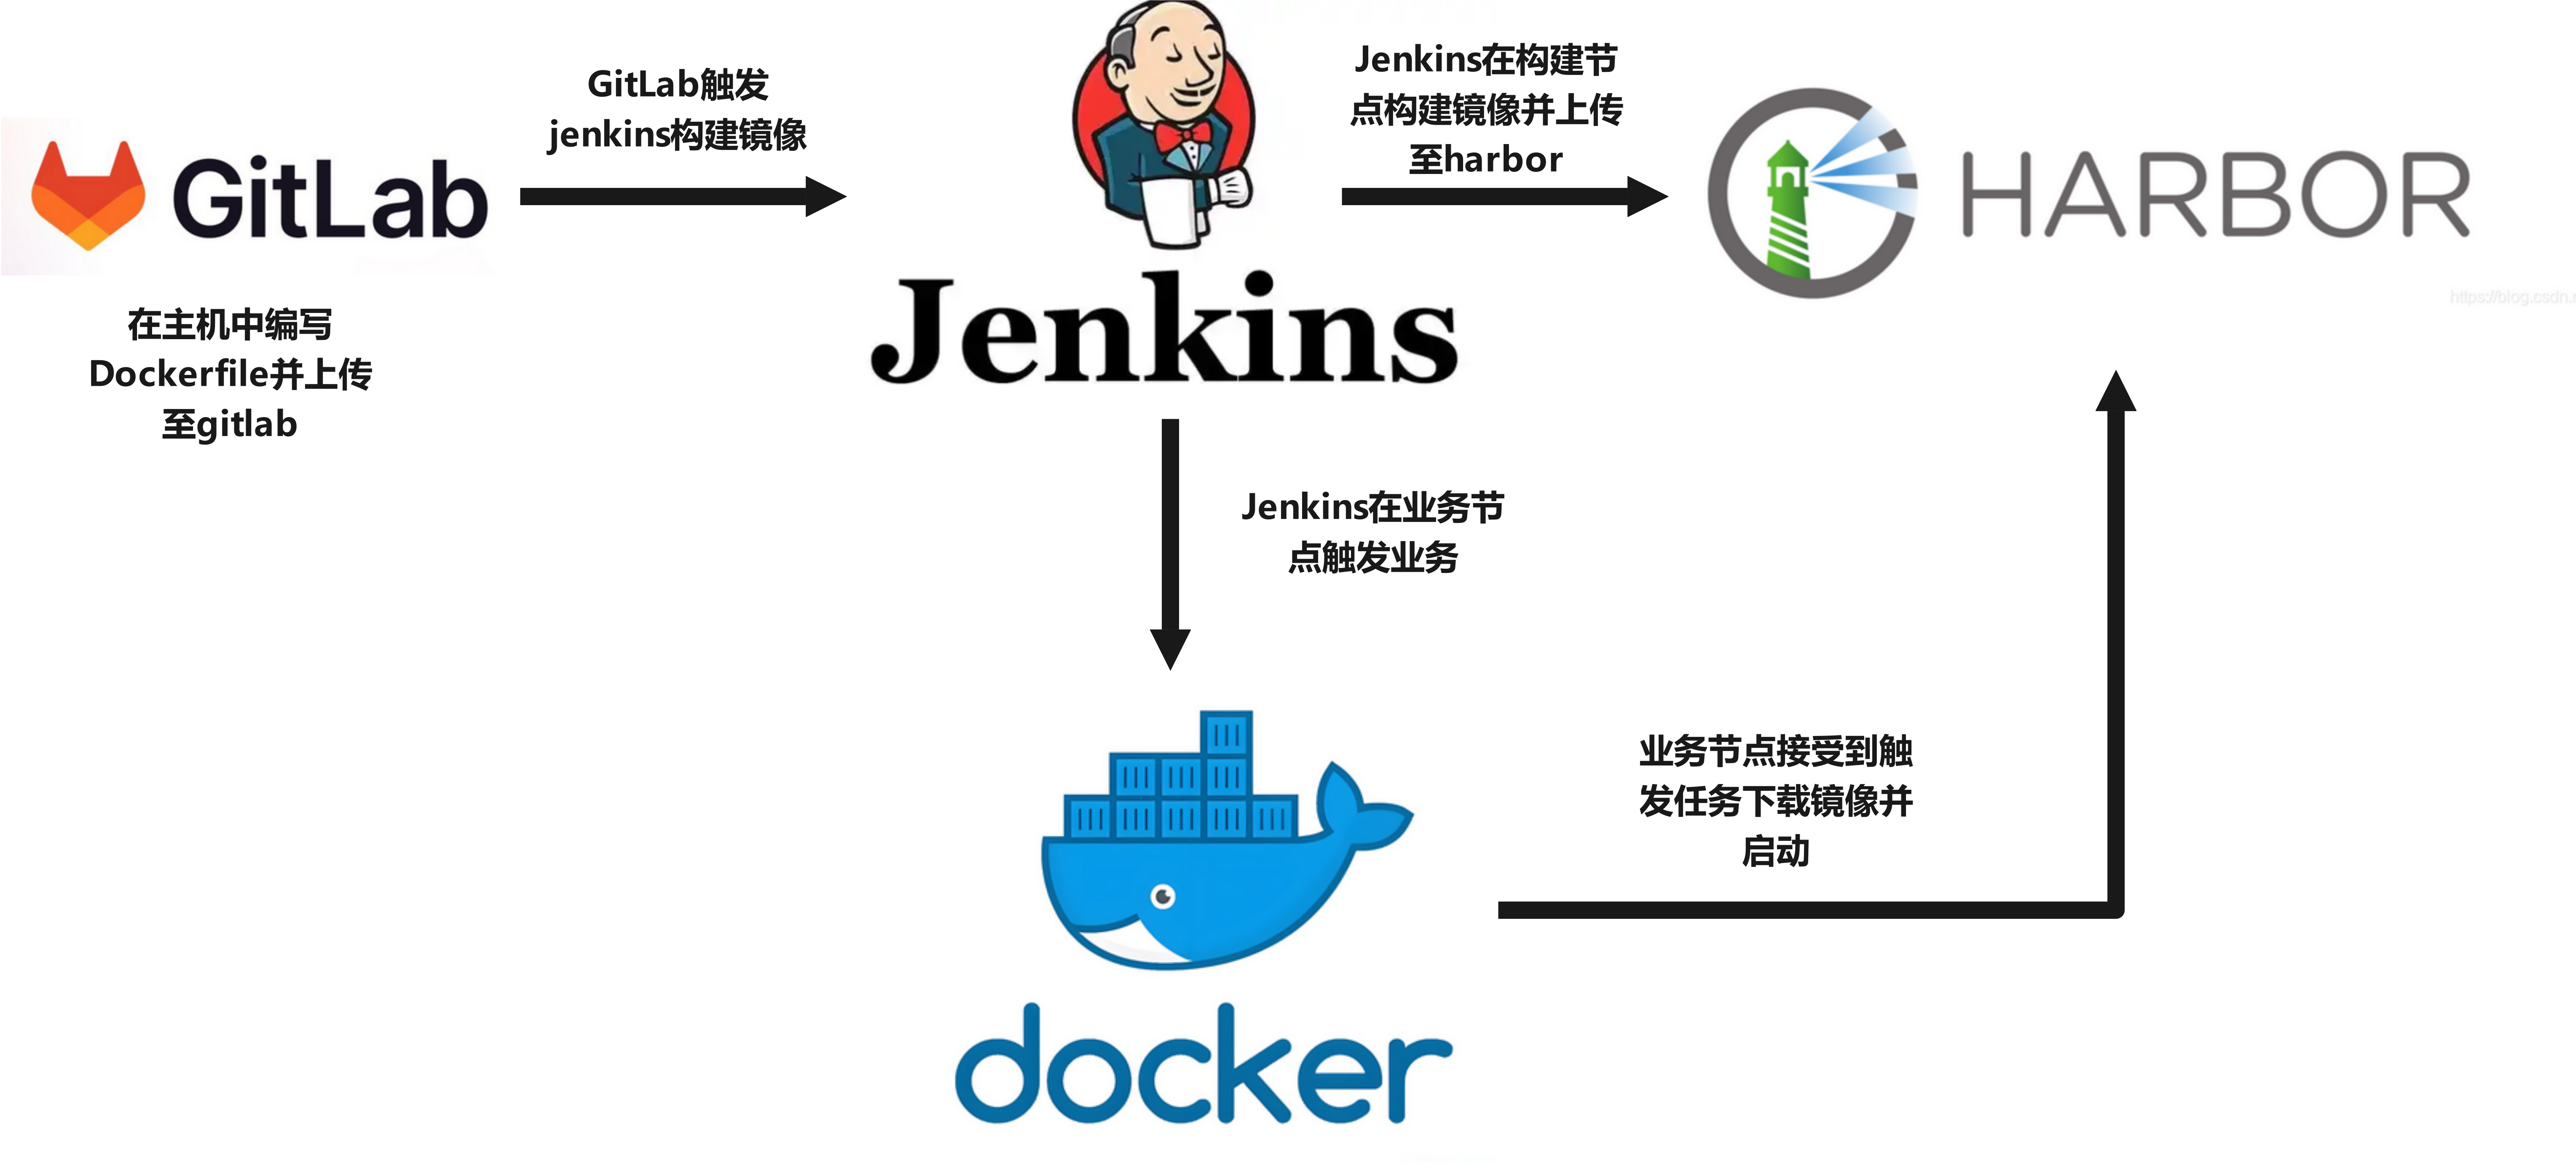
七、CICD 容器构建自动化流程示例
为了让容器构建镜像可以持续集成并自动上传到harbor仓库,业务主机通过持续交付自动从仓库中下载镜像最近版本并实现业务更新
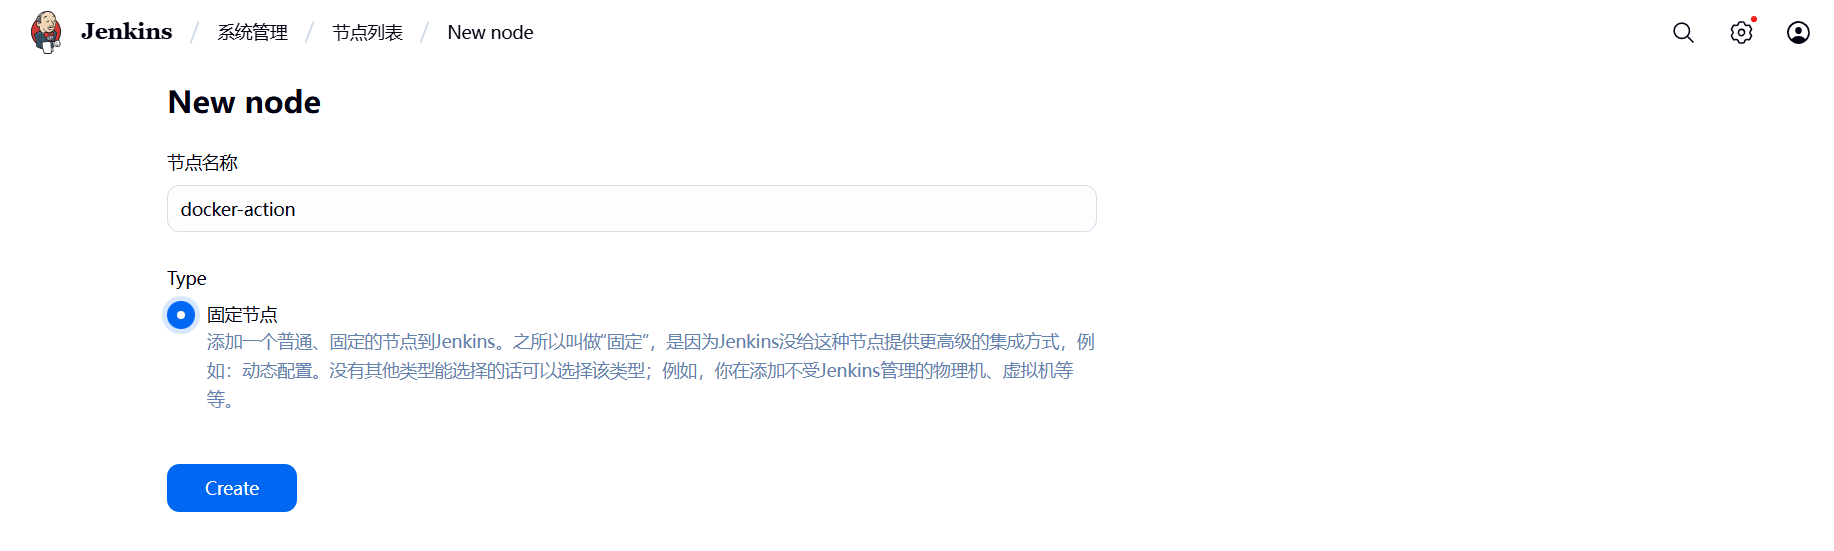
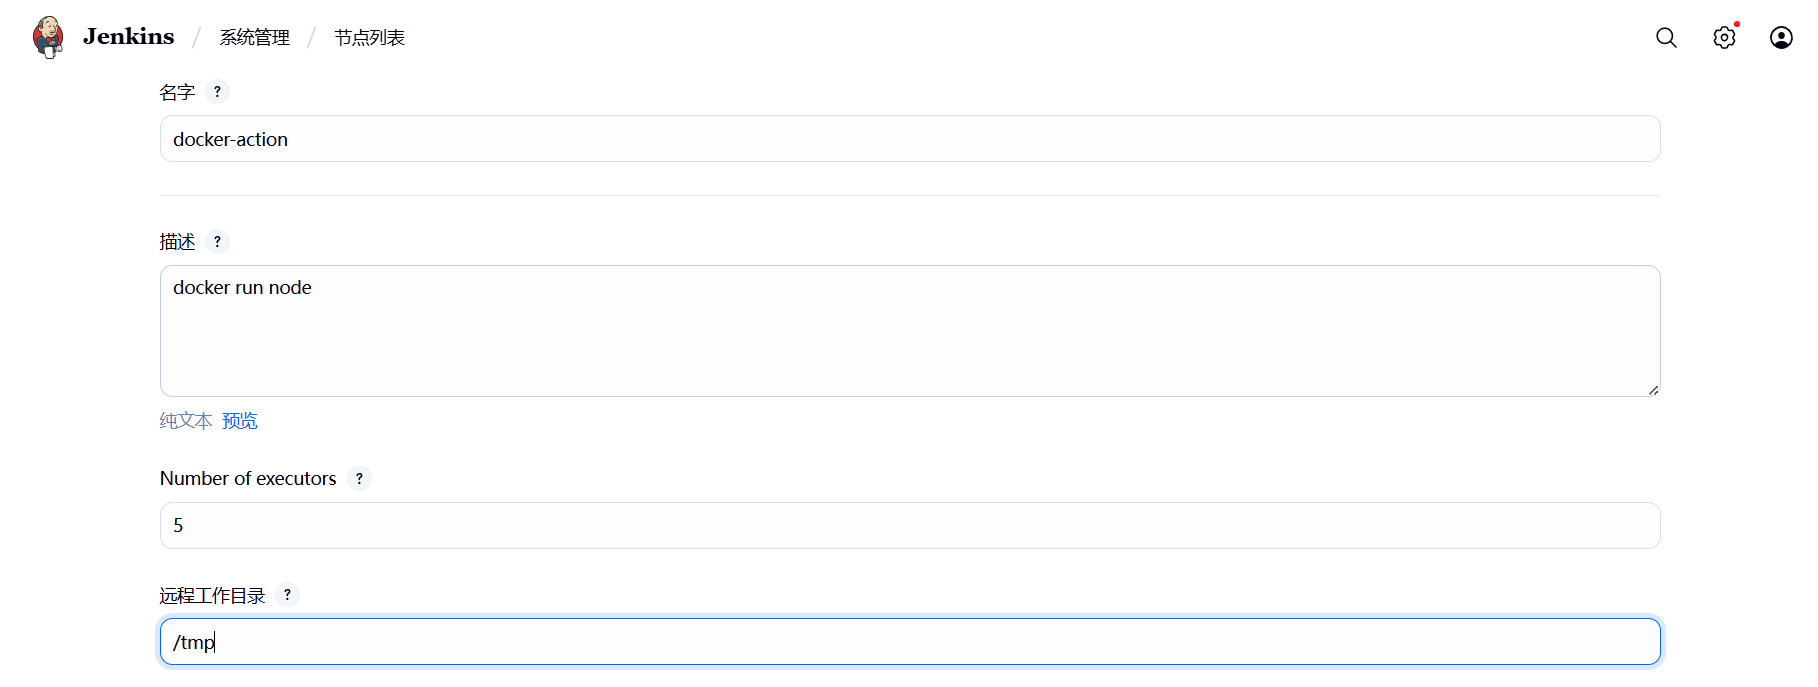
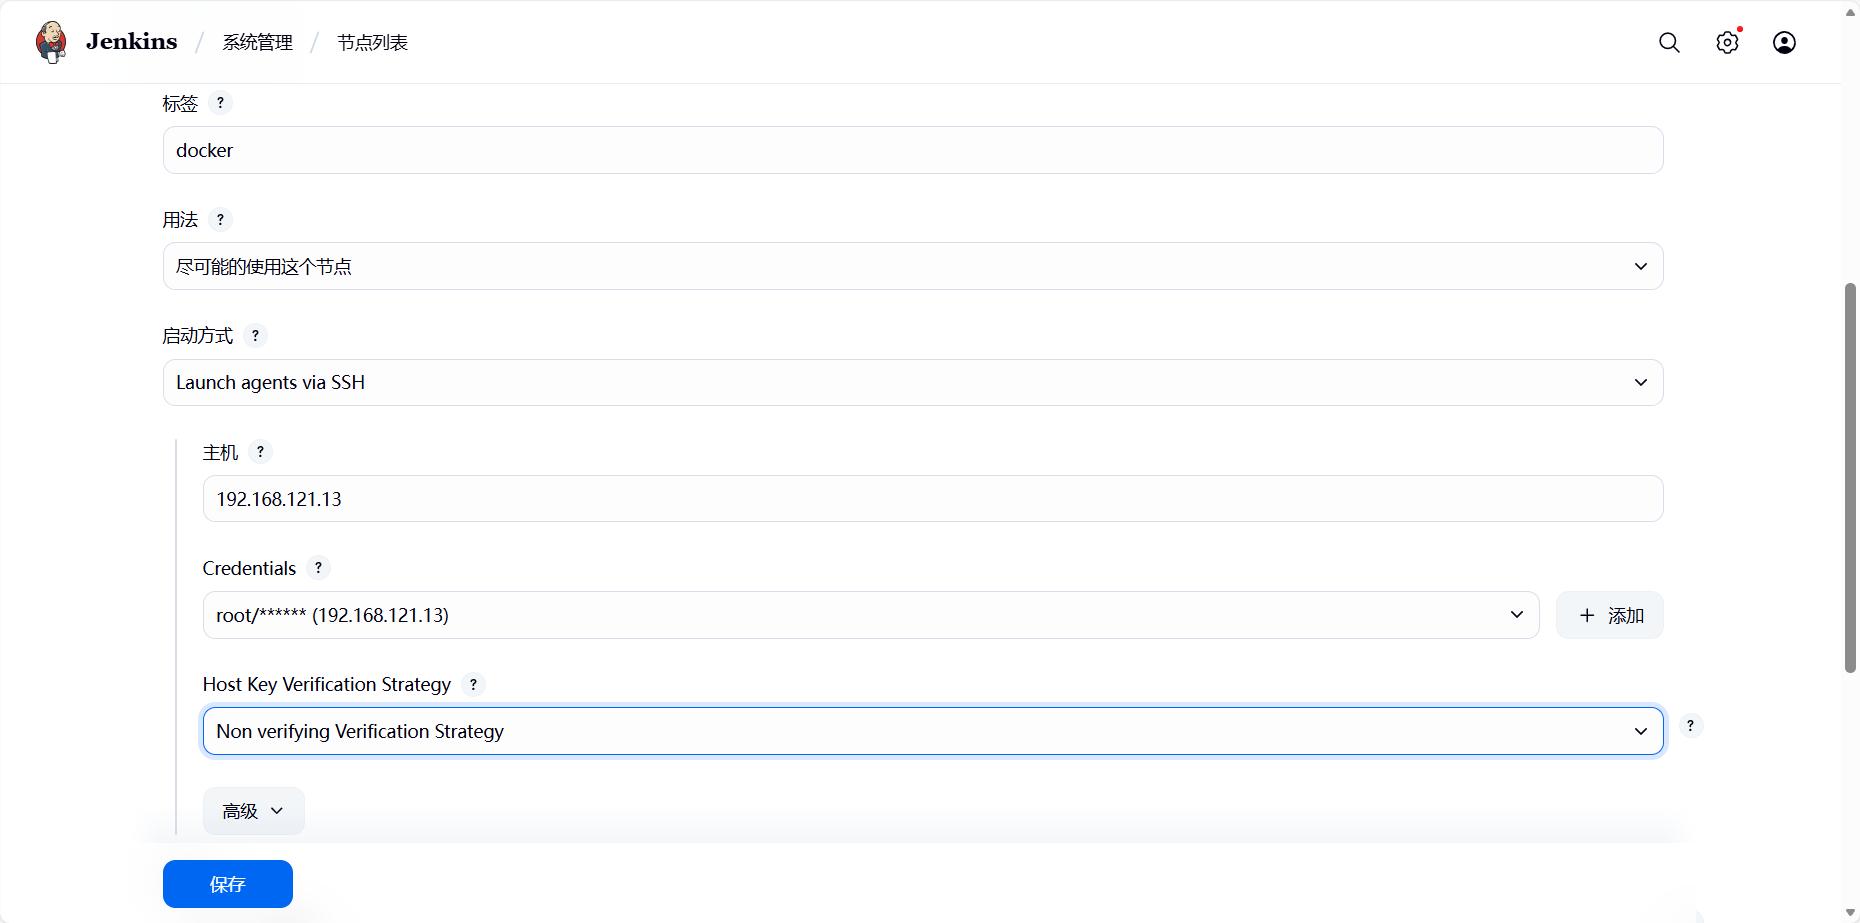
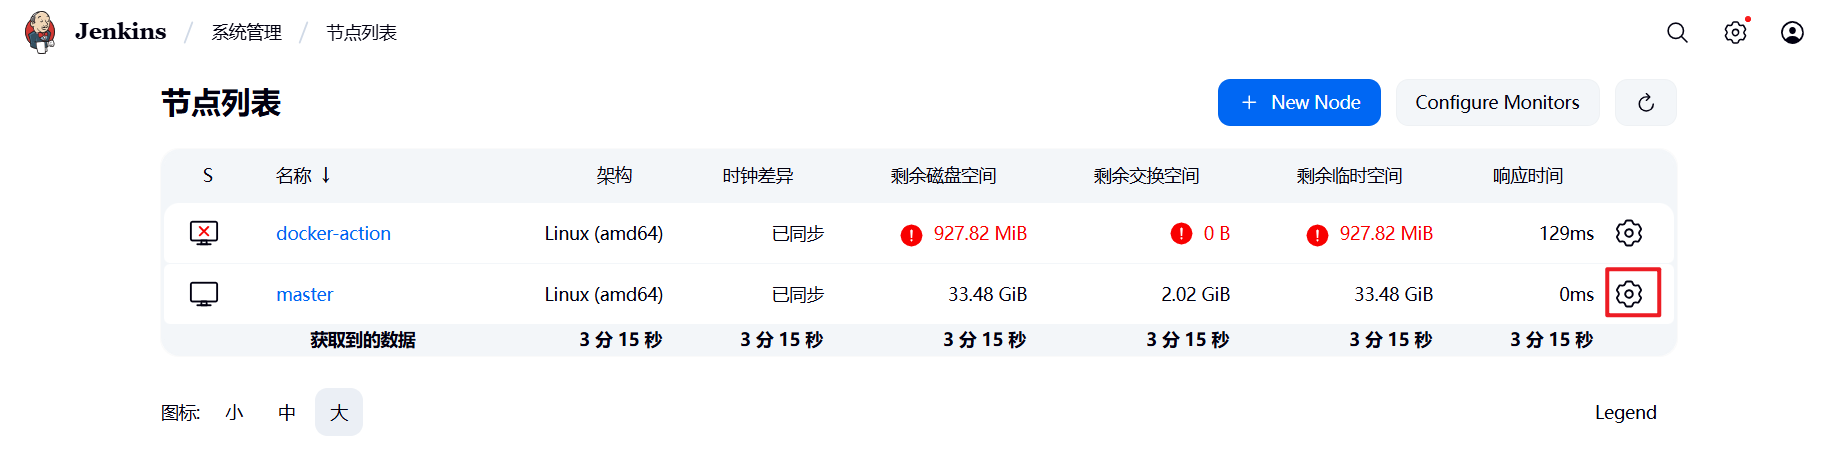
7.1 添加docker-action节点
(1)在业务节点中安装docker和java环境并配置其可以从仓库中下载镜像
[root@docker-action ~]# vim /etc/yum.repos.d/docker.repo
[docker]
name = docker
baseurl = https://mirrors.aliyun.com/docker-ce/linux/rhel/9/x86_64/stable/
gpgcheck = 0
[root@docker-action ~]# dnf install docker-ce fontconfig java-21-openjdk git -y
#从harbor仓库中把认证文件复制到当前主机
[root@docker-action ~]# mkdir /etc/docker/certs.d/harbor.obboda.org/ -p
[root@docker-action ~]# scp root@192.168.121.11:/data/certs/obboda.org.crt /etc/docker/certs.d/harbor.obboda.org/ca.crt
[root@docker-action ~]# vim /etc/docker/daemon.json
{
"registry-mirrors":[
"https://harbor.obboda.org"
]
}
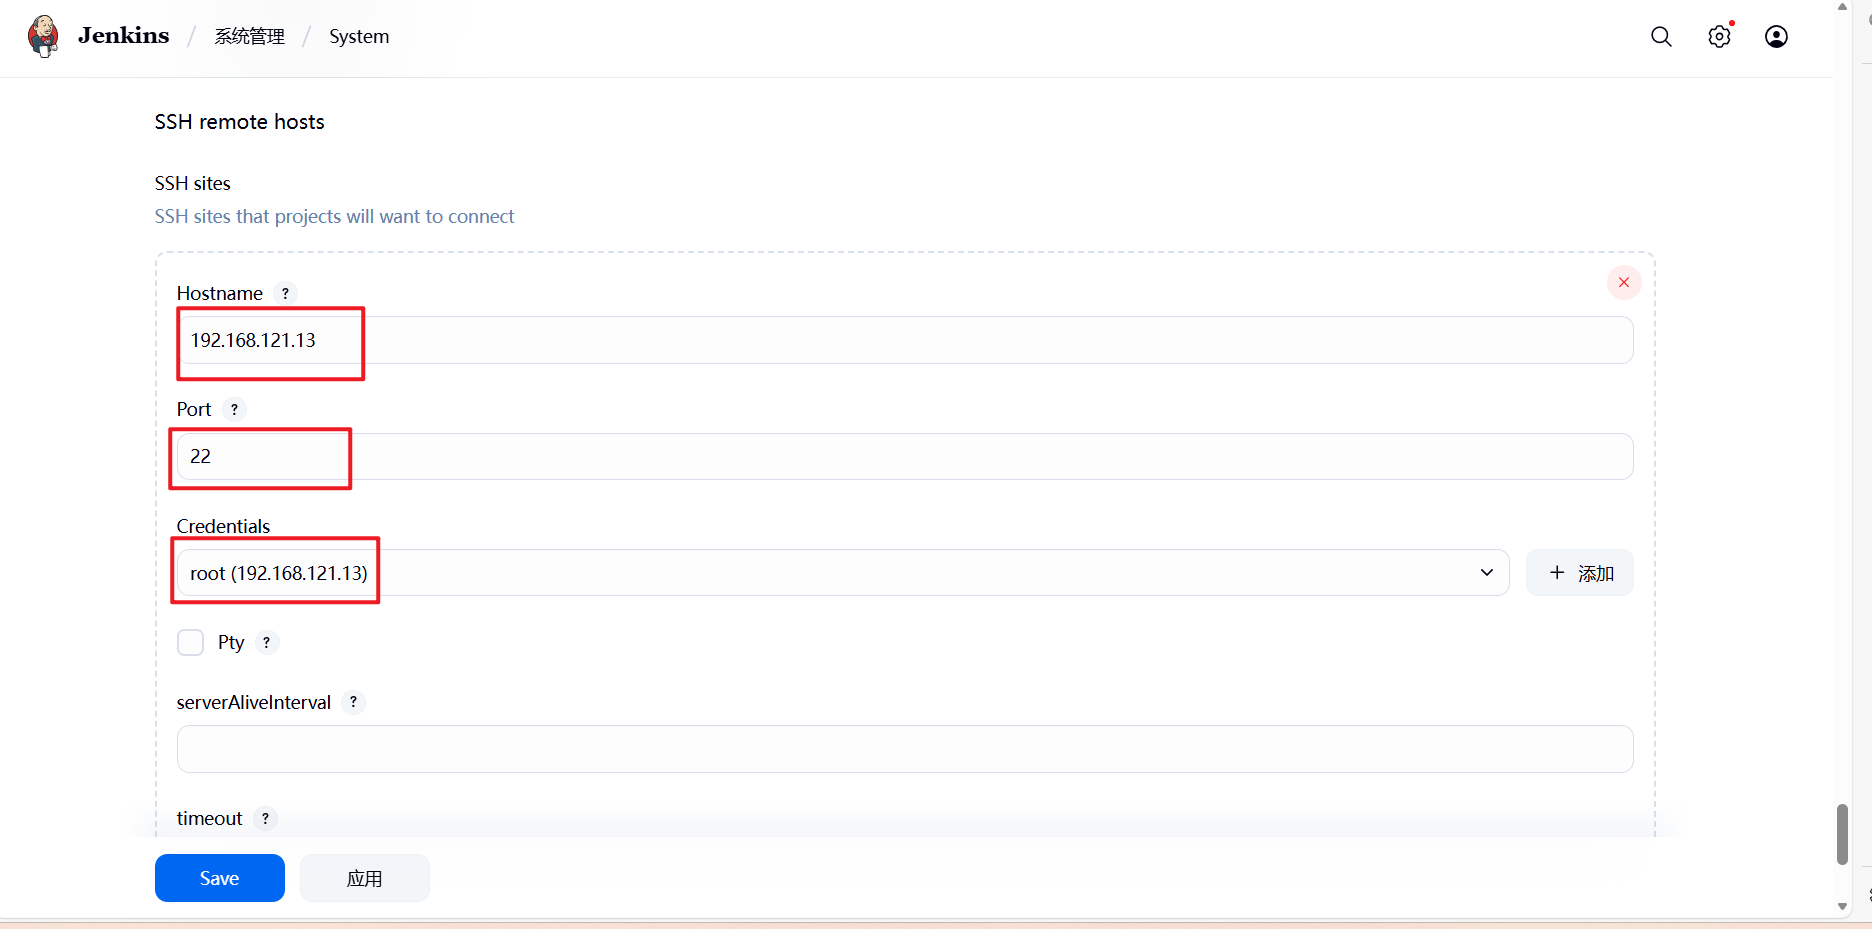
[root@docker-action ~]# systemctl restart docker(2)部署jenkins节点,
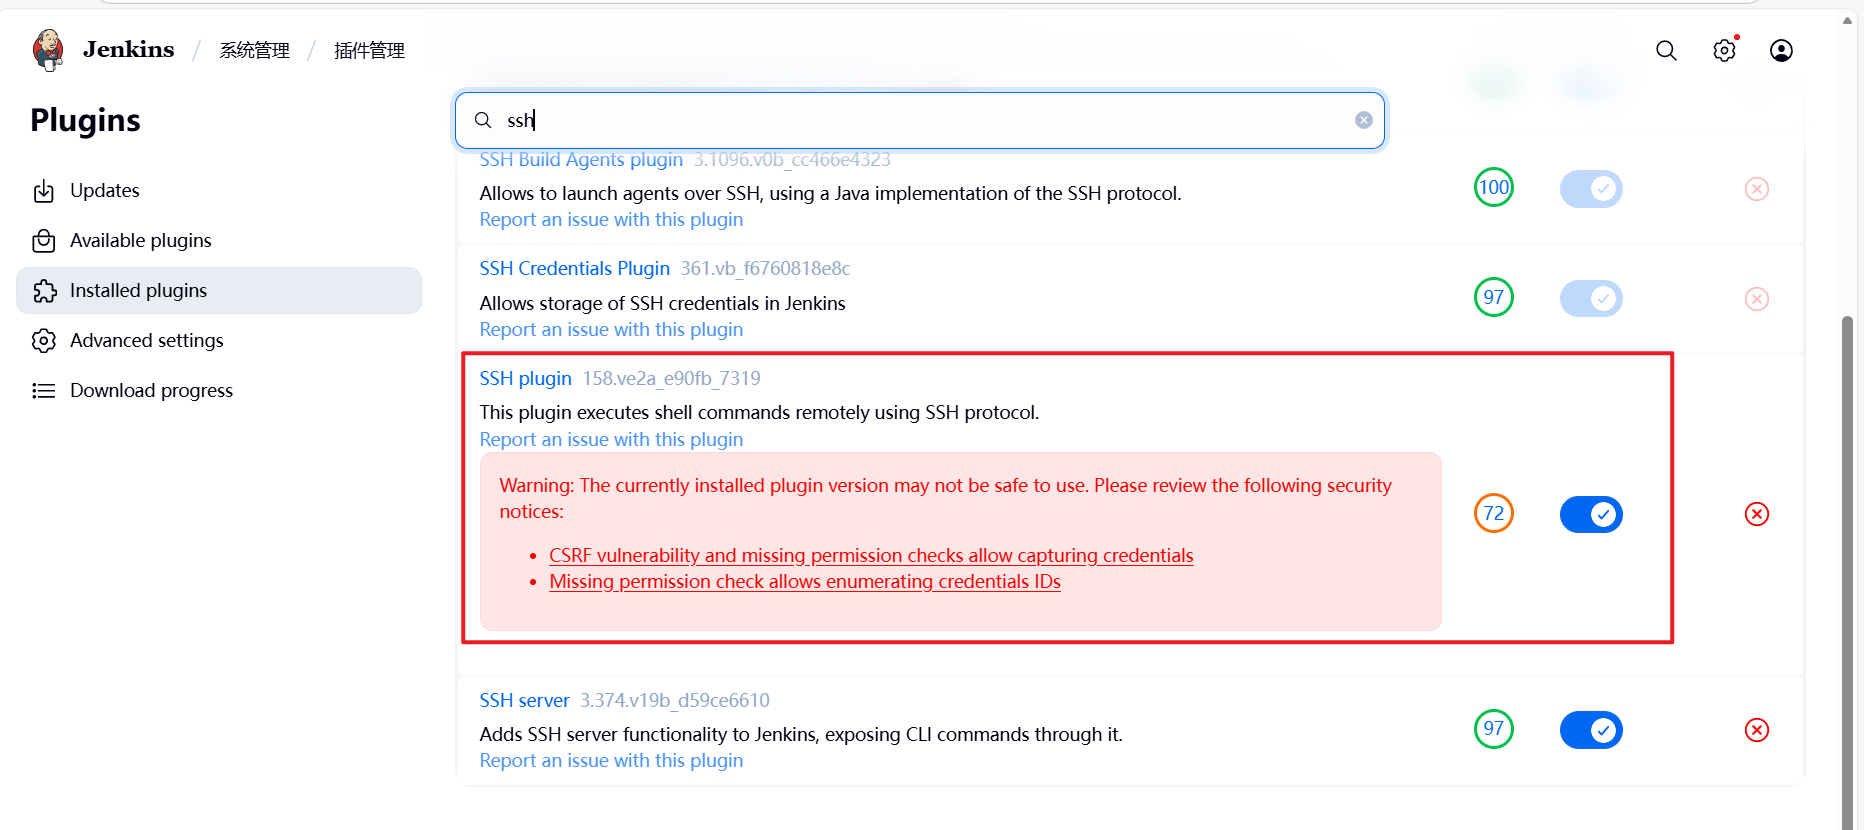
添加ssh账密凭据:
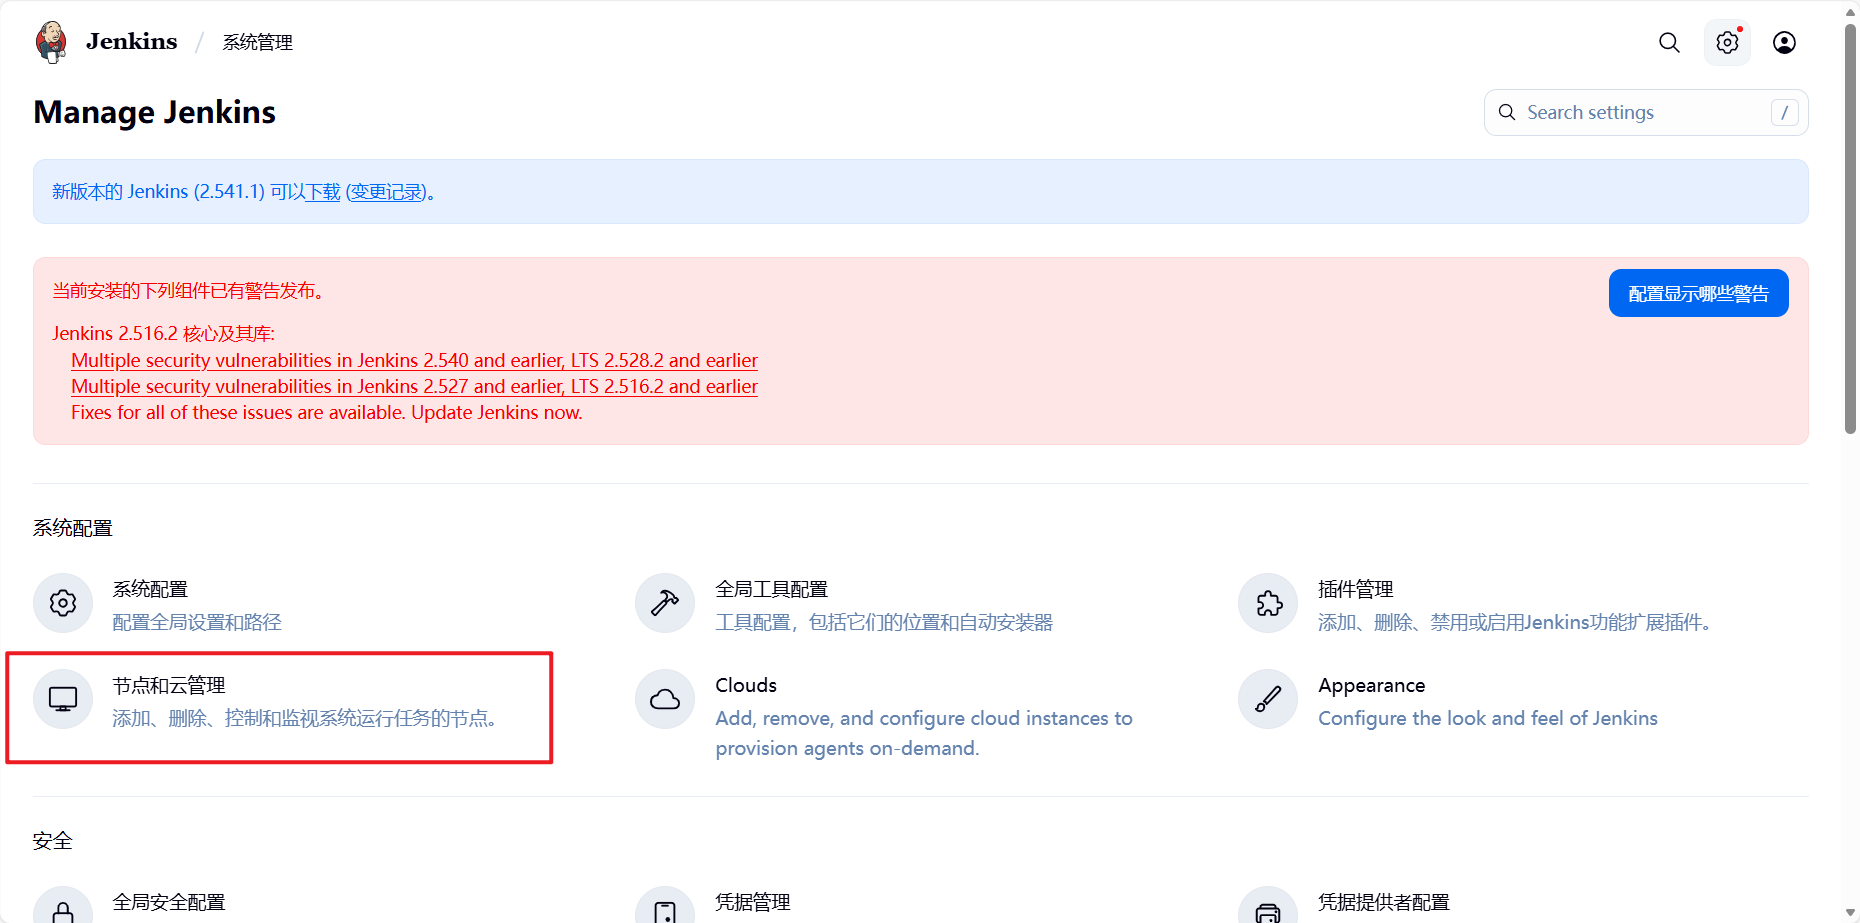
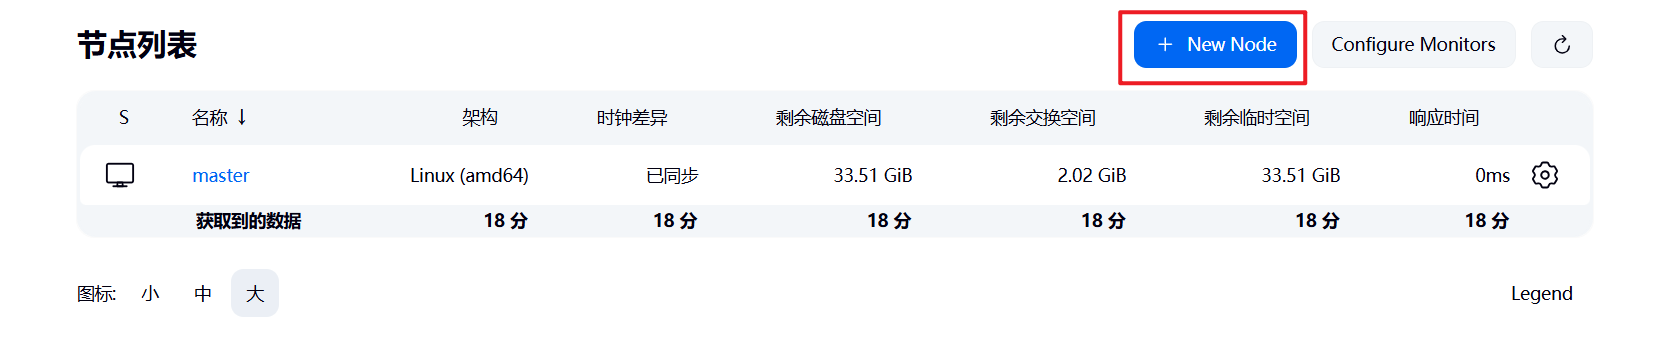
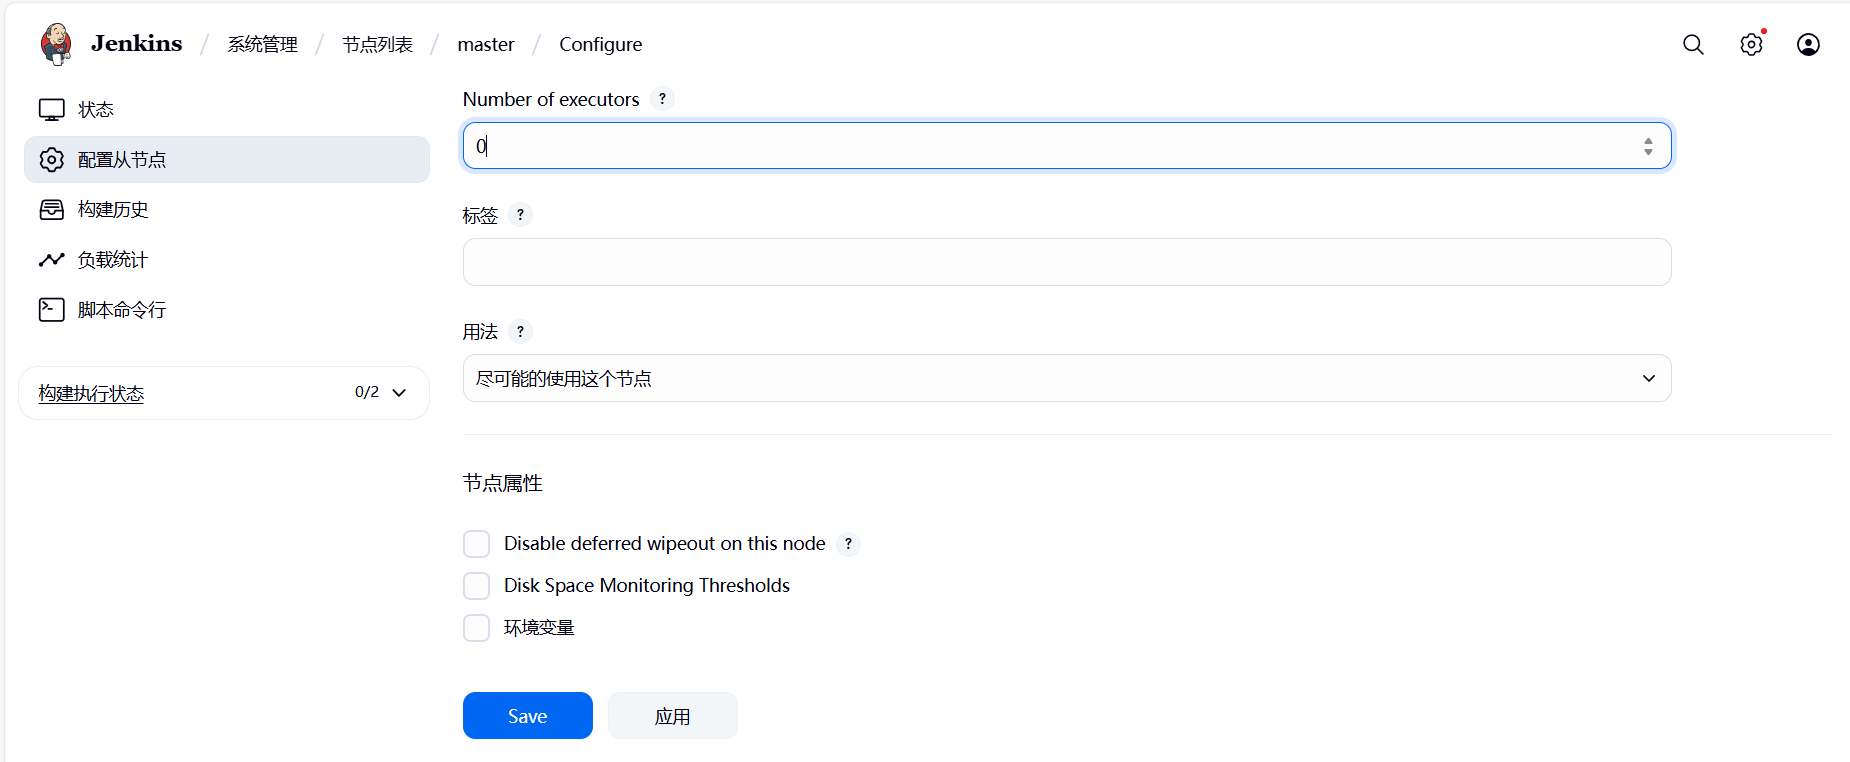
(3)将主节点的执行器数量设置为0,只做管理和调度,不执行任务
7.2 配置容器构建规则
(1)在harbor仓库主机中安装java环境及git
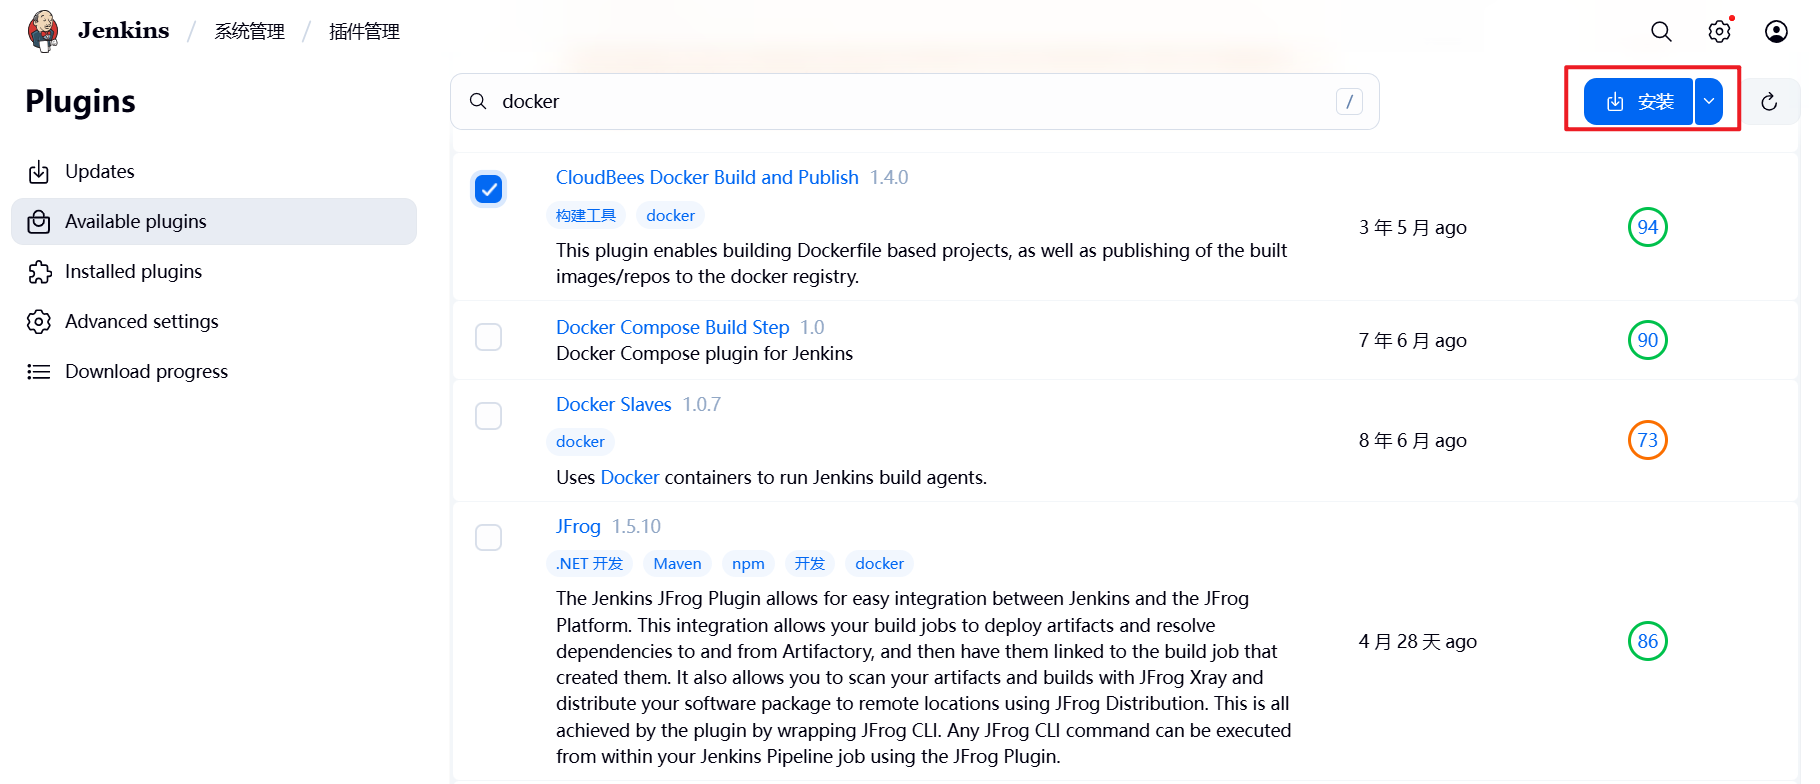
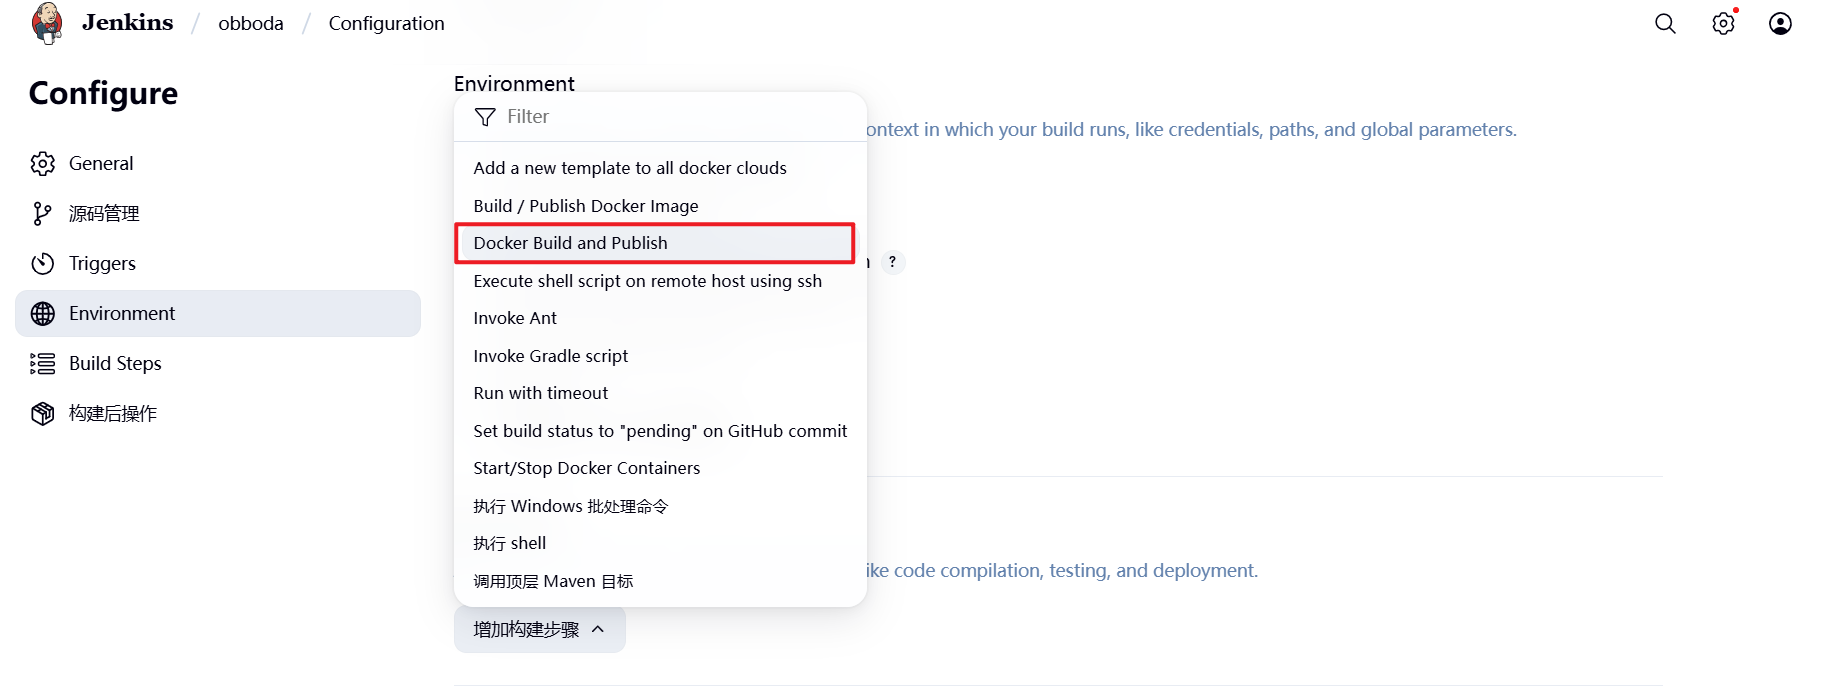
[root@harbor ~]# dnf install fontconfig java-21-openjdk git -y(2)在jenkins中安装构建插件
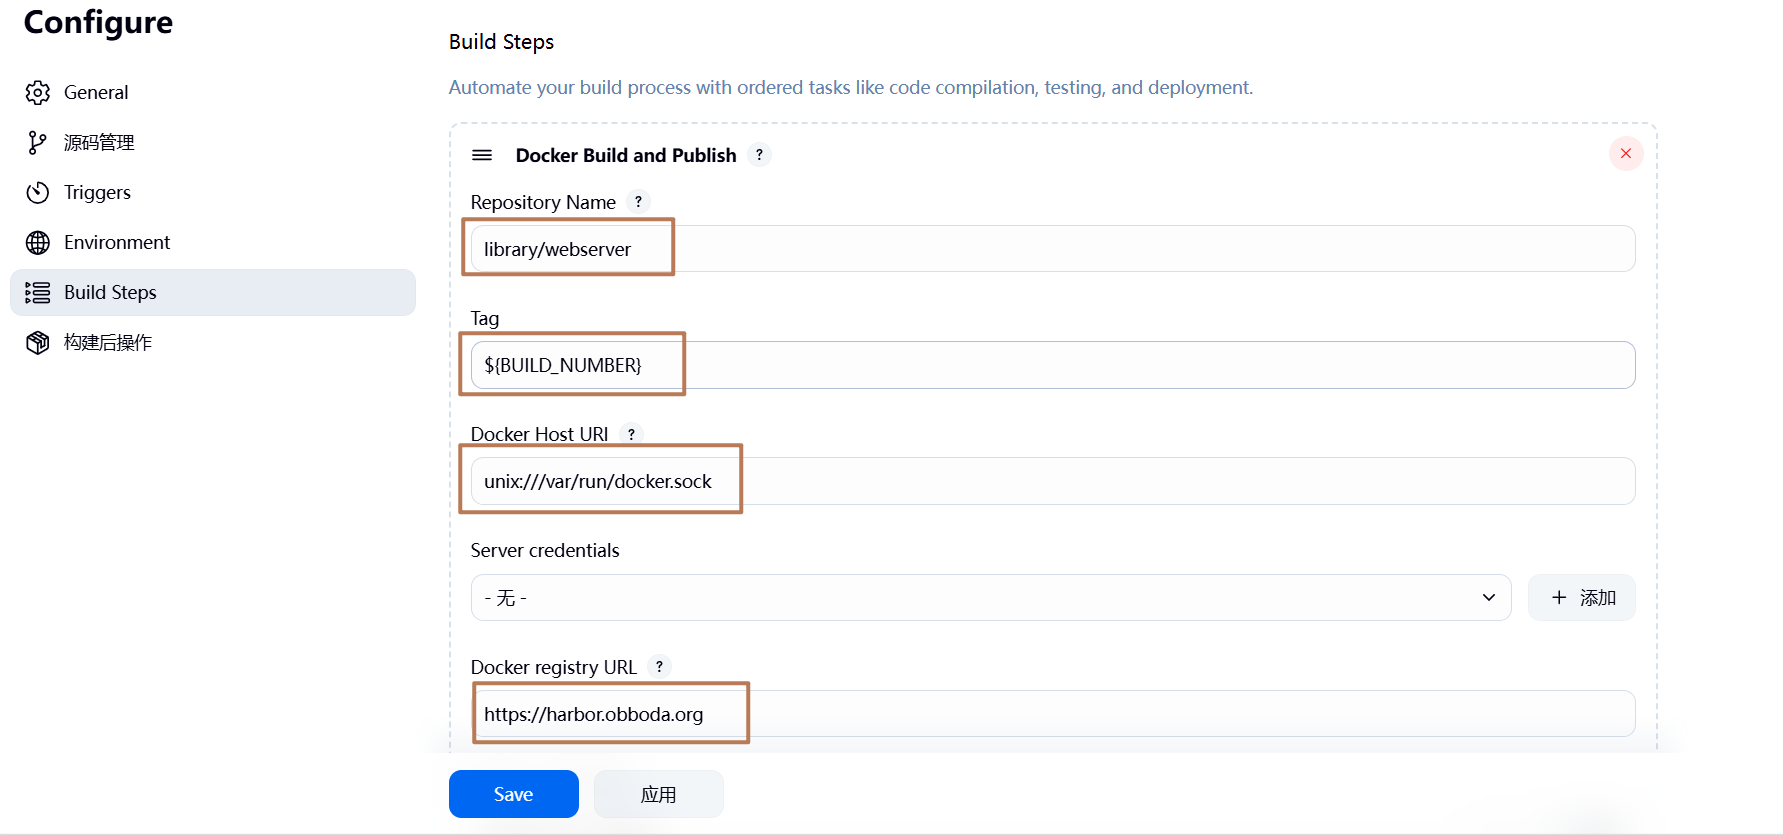
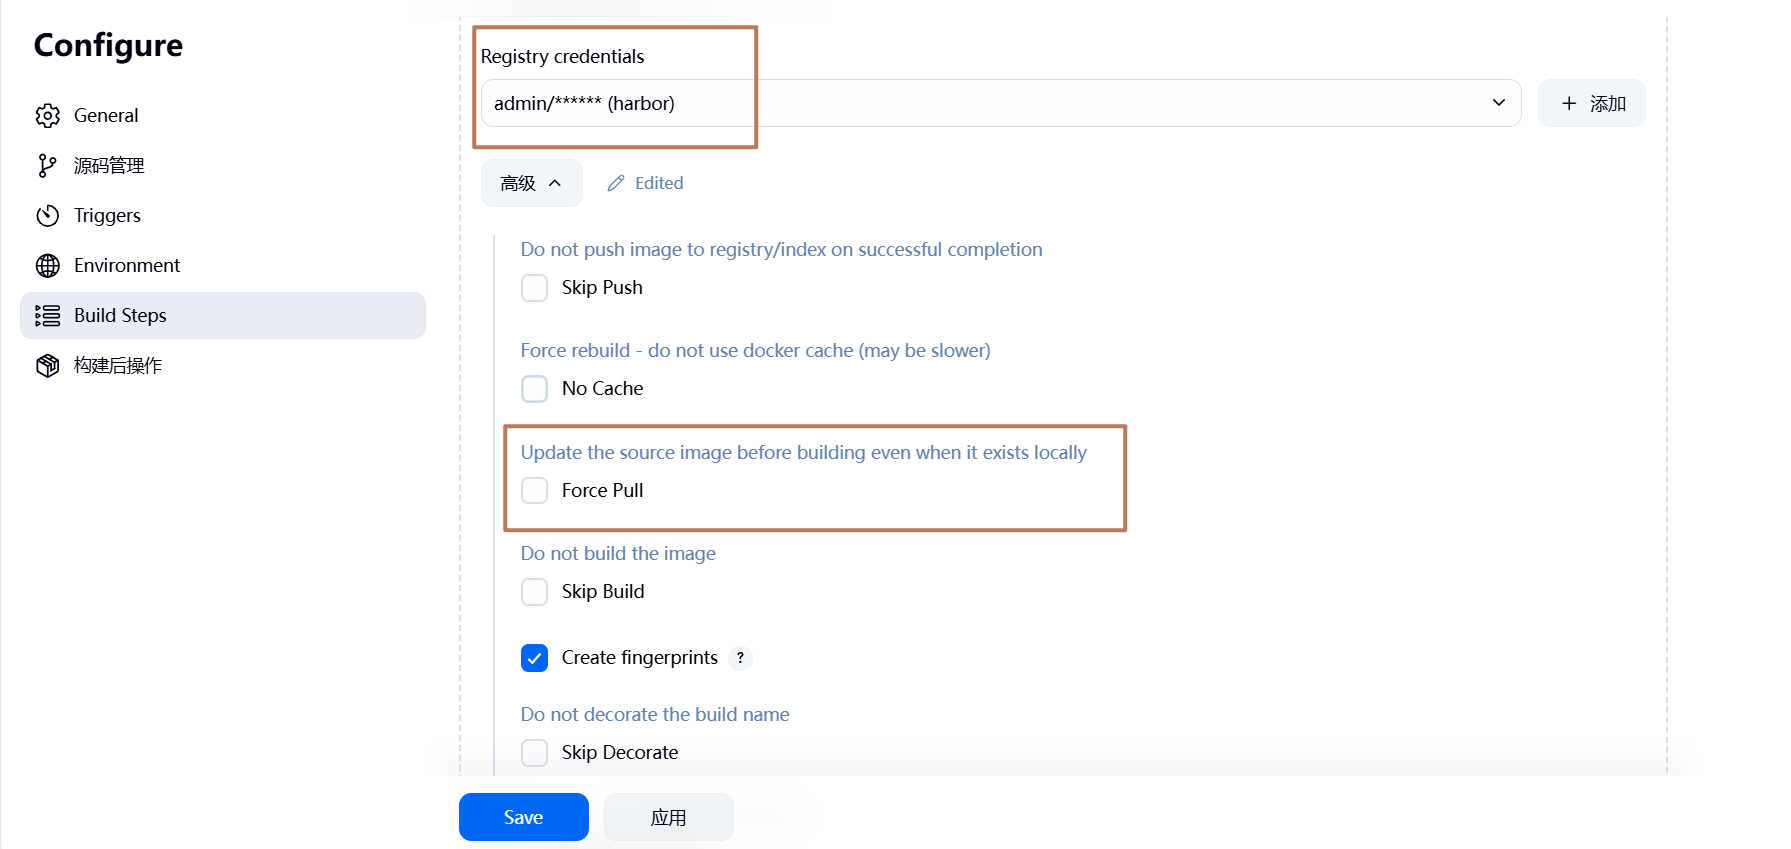
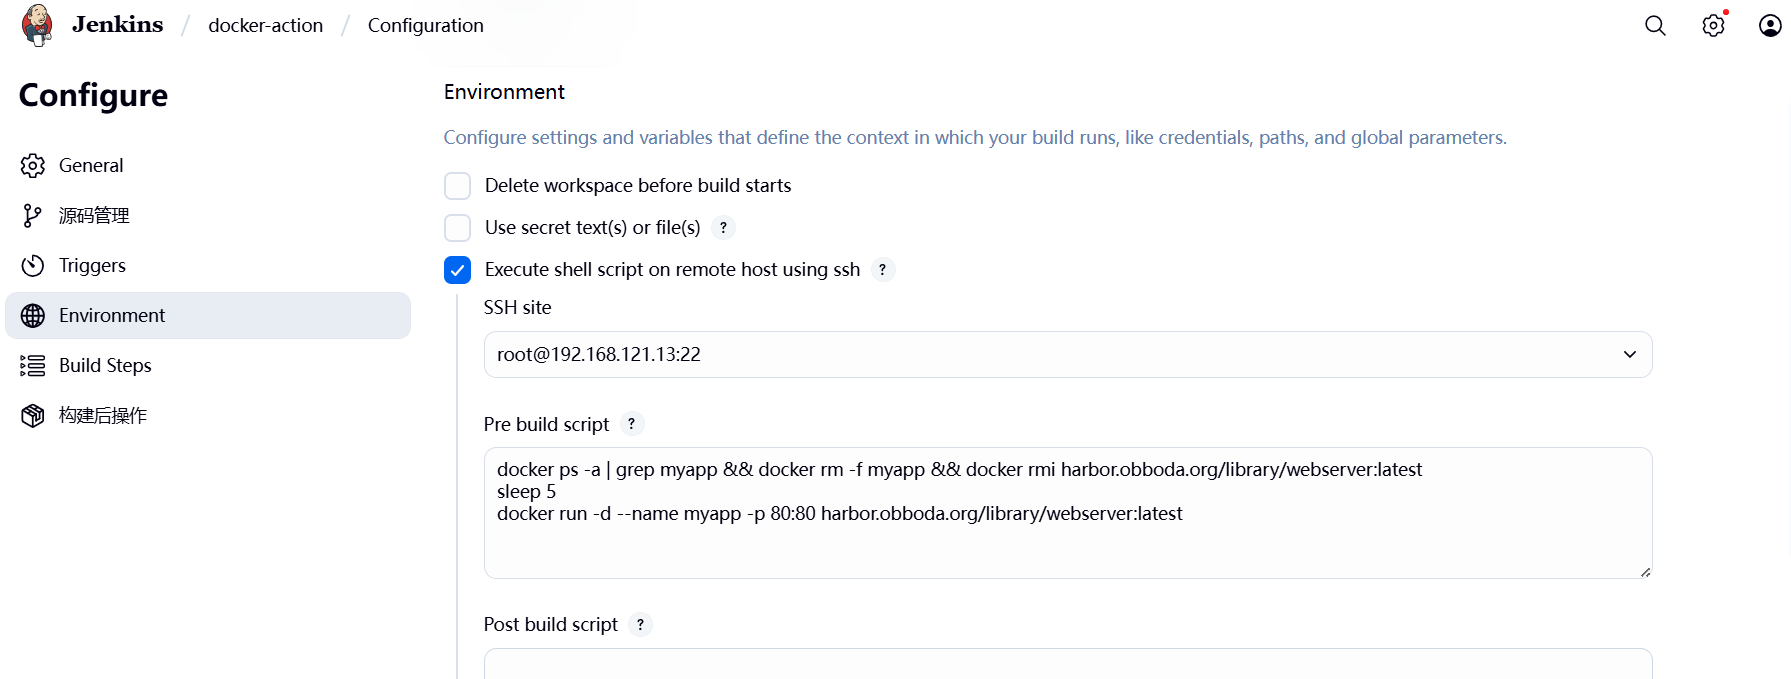
(3)设置jenkins的容器构建规则
7.3 测试镜像构建
在gitlab中建立Dockerfile和index.html
[root@k8s-master obboda]# echo "hello world!" > index.html
[root@k8s-master obboda]# vim Dockerfile
[root@k8s-master obboda]# cat Dockerfile
FROM nginx
COPY index.html /usr/share/nginx/html
[root@k8s-master obboda]# git add .
[root@k8s-master obboda]# git commit -m "web v1"
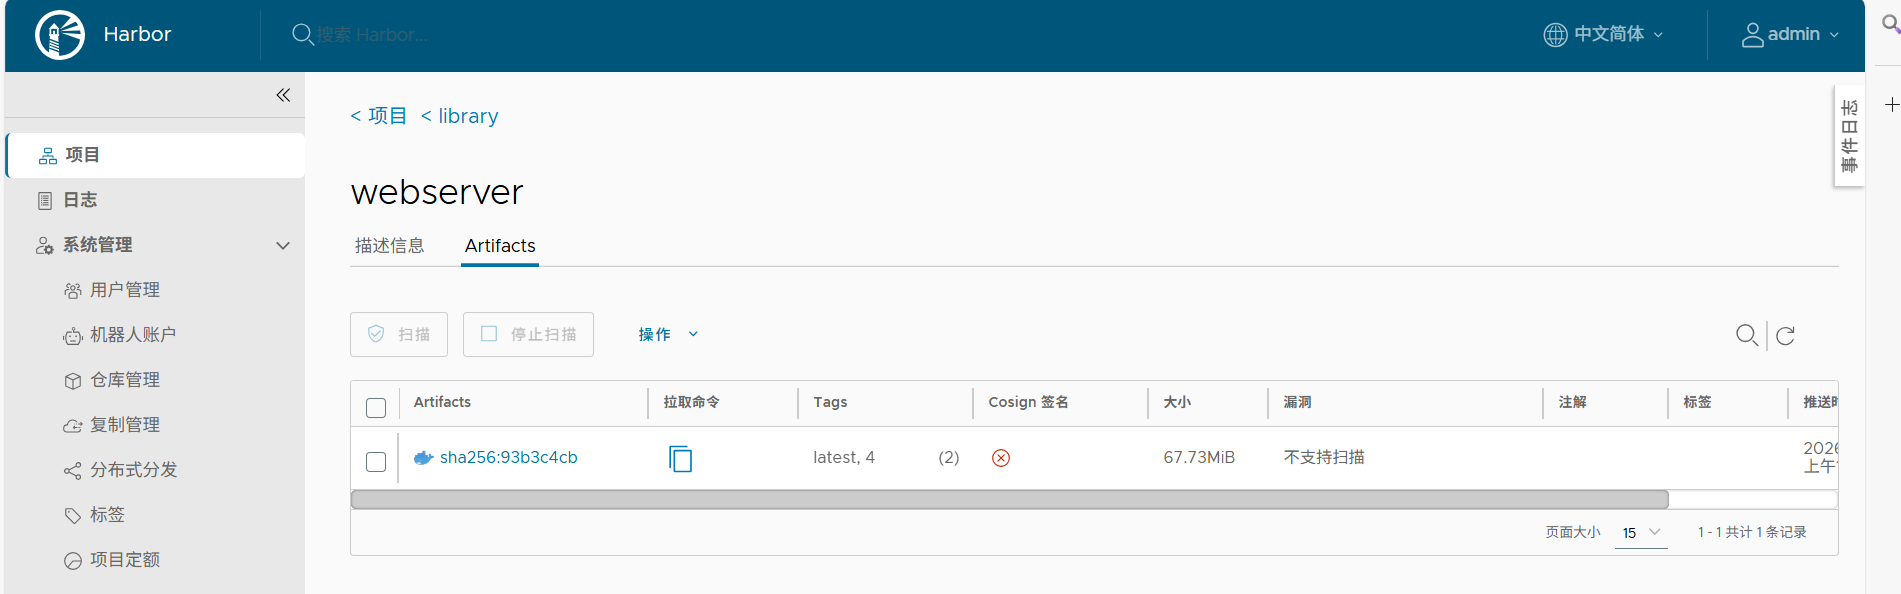
[root@k8s-master obboda]# git push -u origin mainharbor上:
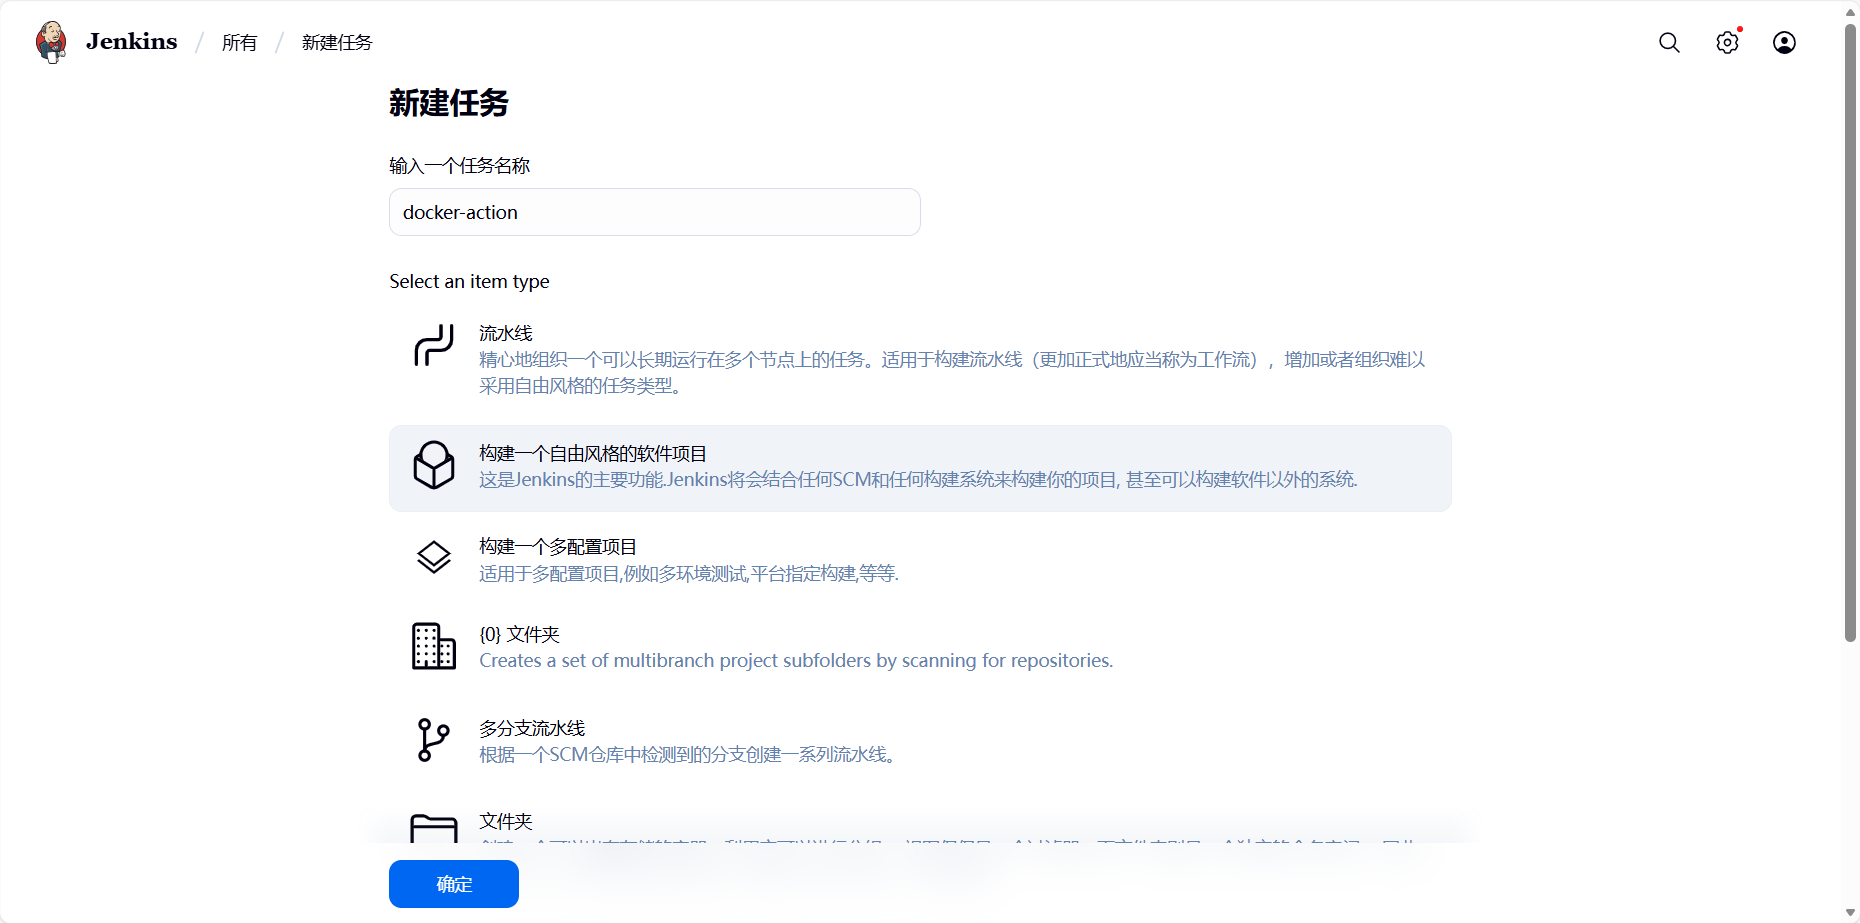
7.4 在业务节点自动运行
新建任务:
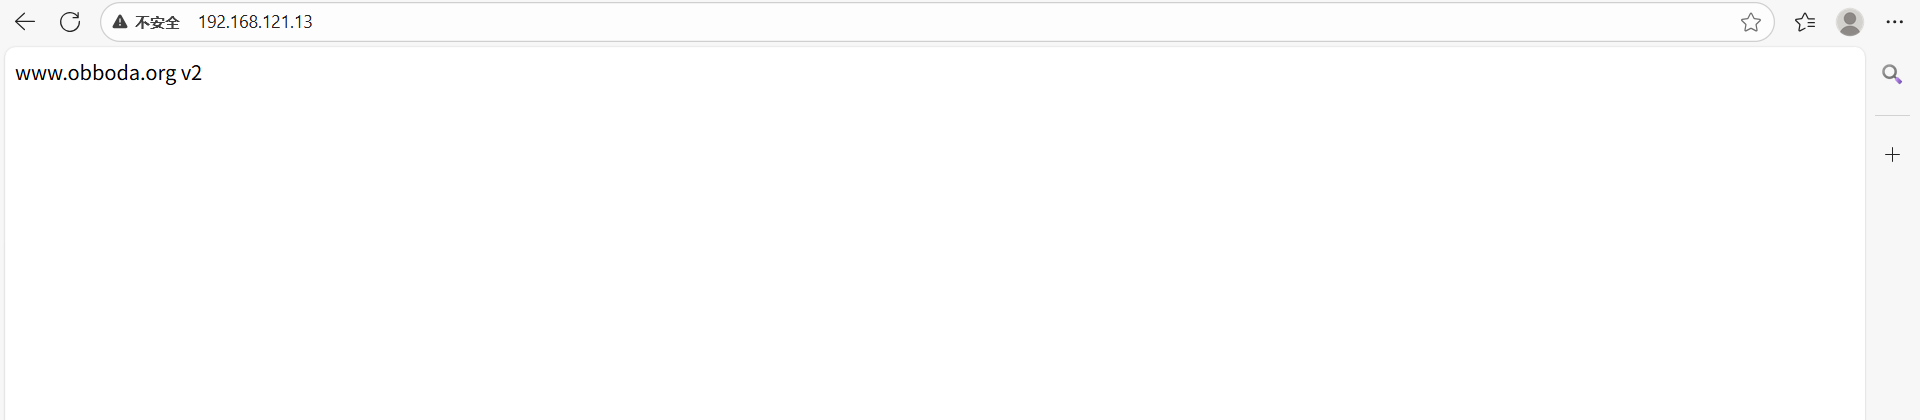
7.5 测试效果
[root@k8s-master obboda]# vim index.html
www.obboda.org v2
[root@k8s-master obboda]# git add .
[root@k8s-master obboda]# git commit -m "web v2"
[root@k8s-master obboda]# git push -u origin main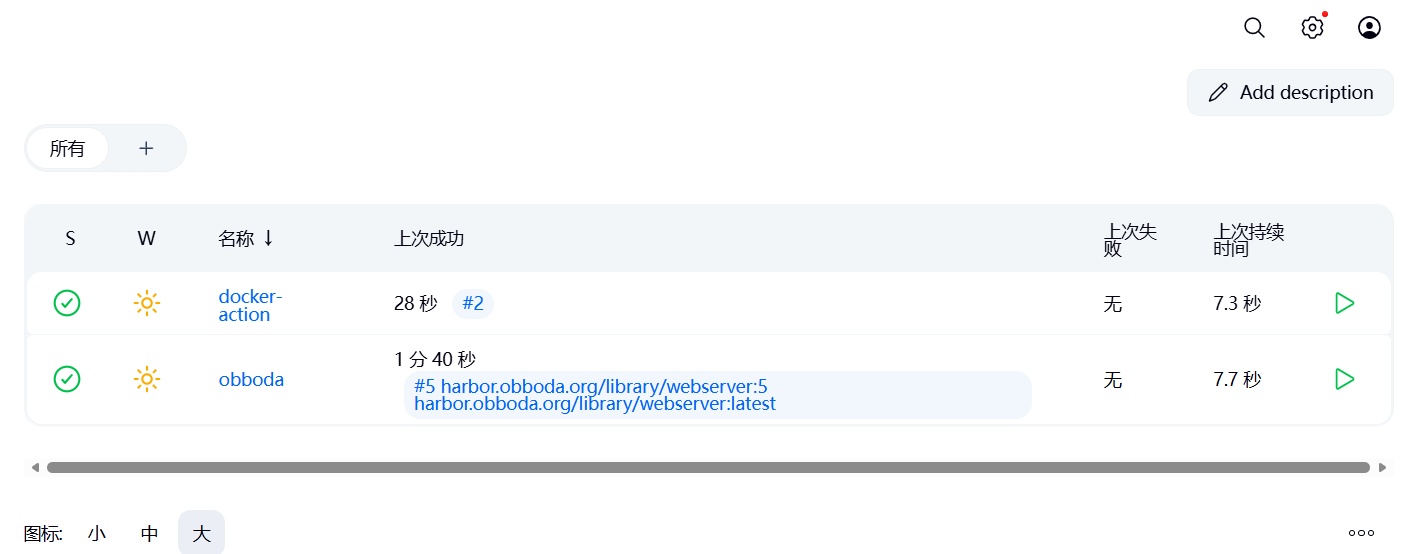
浏览器访问: