三、自定义应用层协议
3.1 Socket原理与使用
3.1.1 TCP建立的基本步骤
- 第一步:
使用Socket::CreateSocket()函数创建客户端和服务器端的TCP Socket对象:clientSocket和serverSocket。
这个函数有以下两个参数:结点和SocketFactory字类的TypeId,分别用于指定套接字的部署结点和使用的下层协议种类。
//在结点1中创建服务器端TCP套接字
Ptr<Socket>serverSocket=
    Socket::CreateSocket(
     nodes.Get(1),
     TcpSocketFactory::GetTypeId());

//在结点0中创建客户端TCP套接字
Ptr<Socket>clientSocket=
    Socket::GreatSocket(
     nodes.Get(0),
TcpSocketFactory::GetTypeId());- 第二步:
使用Socket原语函数创建TCP连接并配置回调函数。这一步服务器端(0.0s调用setServerSocket())和客户端(1.0s调用startFlow())是分开执行的。
//模拟开始后立即设置服务器端套接字
Simulator::ScheduleNow(
    &setServerSocket,serverSocket,port);

//模拟开始后第1s设置客户端套接字
Simulator::Schedule(
    Seconds(1.0),
    &startFlow,clientSocket,
Ipv4Address("10.1.1.2),port);- 第三步:
分别在10.0s和11.0s时关闭客户端和服务器的TCP套接字。
//模拟开始后第10s关闭客户端TCP套接字
Simulator::Schedule(
    Seconds(10.0),&close,clientSocket);
//模拟开始后第11s关闭客户端TCP套接字
Simulator::Schedule(
    Seconds(11.0),&close,serverSocket);
3.1.2 Socket原语和回调函数的使用细节
在服务器端,TCP Socket对象调用Bind()和Listen()原语函数绑定和监听本地套接字端口;
在客户端,TCP Socket对象调用Bind()和Connect()函数指定服务端口和发起TCP三次握手协议
void startFlow(
    Ptr<Socket>clientSocket,
    Ipv4Address dstAddr,
    unit32_t datPort)
{
    //客户端Socket原语函数
    clientSocket->Bind();
    clientSocket->Connect(
      InetSocketAddress(dstAddr,dstPort));

    //设置回调函数(连接建立成功回调函数)
    clientSocket->SetConnectCallback(
      MakeCallback(&connectionSucceeded),
      MakeNullCallback<void,Ptr<Socket>>());
}
void setServerSocket(
    Ptr<Socket>serverSocket,
    uint32_t localPort)
{
    //服务器端Socket原与函数
    serverSocket->Bind(
      InetSocketAddress(
        Ipv4Address::GetAny(),
        localPort));
    serverSocket->Listen();

    //设置回调函数(连接建立成功与分组接收回调函数)
    serverSocket->SetRecvCallback(
      MakeCallback(&receivedData));
    serverSocket->SetAcceptCallback(
      MakeNullCallback<
        bool,Ptr<Socket>,const Address &>(),
      MakeCallback(&handleAccept));
}
这段代码中配置了3个应用层回调函数,当TCP三次握手协议完成后,客户端的connnectionSucceeded()回调函数被执行。这个函数内部使用Socket的Send()原语函数向TCP发送一个512B大小的分组。当服务器端TCP成功接收到一个分组后,reeceivedData()回调函数被触发,这时服务器端应用层使用Socket的Recv()函数接收分组
//客户端连接建立成功回调函数
void connectionSucceeded(
    Ptr<Socket>socket)
{
    //向客户端套接字发送分组
    socket->Send(Create<Packet>(512));
}

//服务器端分组接收成功回调函数
void receivedData(
    Ptr<Socket>socket)
{
    //从服务器端套接字接收分组
    Ptr<Packet>pkt=socket->Recv();
}

//服务器端连接建立成功回调函数
void handleAccept(
    Ptr<Socket>socket,const Address&from)
{
    //因为Socket对象在连接建立好之后更新,因此这里需要使用新Socket对象用来重新设置分组接收
    //成功回调函数(仅TCP需要)
    socket->SetRecvCallback(
      MakeCallback(&receivedData));
}
3.1.3 完整程序
#include "ns3/core-module.h"
#include "ns3/network-module.h"
#include "ns3/internet-module.h"
#include "ns3/point-to-point-module.h"
#include "ns3/applications-module.h"
#include "ns3/socket.h"
#include "ns3/tcp-socket-factory.h"

using namespace ns3;

NS_LOG_COMPONENT_DEFINE ("TwoNodesExample");

int main(int argc,char*argv[])
{
    //启用日志(可选)
    LogComponentEnable("TwoNodesExample", LOG_LEVEL_INFO);
    LogComponentEnable("Socket", LOG_LEVEL_INFO);


    //创建两个结点
    NS_LOG_INFO ("创建节点..."));
    NodeContainer nodes;
    nodes.Create (2);

    //创建点对点链路
    Ns_LOG_INFO("创建点对点链路...")
    PointToPointHelper p2p;
    p2p.SetDeviceAttribute("DataRate",StringValue("5Mbps")):
    p2p.SetChannelAttribute("Delay",StringValue("2ms"));

    //安装网络设备
    NetDeceiveContainer devices;
    devices = p2p.Install(nodes)

    // 安装TCP/IP协议
    NS_LOG_INFO ("安装TCP/IP协议栈...");
    InternetStackHelper stack;
    stack.Install (nodes);

    // 分配IP地址
    NS_LOG_INFO ("分配IP地址...");
    Ipv4AddressHelper address;
    address.SetBase ("10.1.1.0", "255.255.255.0");  // 使用10.1.1.0/24子网
    Ipv4InterfaceContainer interfaces = address.Assign (devices);

    // 输出IP地址信息
    std::cout << "节点0 IP地址: " << interfaces.GetAddress(0) << std::endl;
    std::cout << "节点1 IP地址: " << interfaces.GetAddress(1) << std::endl;

    uint16_t port = 50000;  // 定义端口号

    //第一步

    //在结点1中创建服务器端TCP套接字
    Ptr<Socket>serverSocket=
        Socket::CreateSocket(
         nodes.Get(1),
         TcpSocketFactory::GetTypeId());

    //在结点0中创建客户端TCP套接字
    Ptr<Socket>clientSocket=
        Socket::GreatSocket(
         nodes.Get(0),
         TcpSocketFactory::GetTypeId());


    //第二步

    //模拟开始后立即设置服务器端套接字
    Simulator::ScheduleNow(
        &setServerSocket,serverSocket,port);

    //模拟开始后第1s设置客户端套接字
    Simulator::Schedule(
        Seconds(1.0),
        &startFlow,clientSocket,
        Ipv4Address("10.1.1.2),port);

    //第三步

    //模拟开始后第10s关闭客户端TCP套接字
    Simulator::Schedule(
        Seconds(10.0),&close,clientSocket);
    //模拟开始后第11s关闭客户端TCP套接字
    Simulator::Schedule(
        Seconds(11.0),&close,serverSocket);

    Simulator::Stop(Seconds(12.0));
    Simulator::Run();
    Simulator::Destroy();

    return 0;
}
3.2 Socket原语函数解析
|--------------|---------|---|---|
| 原语函数 | 函数操作 | C | S |
| CreateSocket | 新建套接字对象 | √ | √ |
| Bind | 绑定套接字地址 | √ | √ |
| Close | 关闭连接 | √ | √ |
| Connect | 建立连接 | √ | |
| Send | 发送分组 | √ | |
| Listen | 监听套接字地址 | | √ |
| Recv | 接收分组 | | √ |
[Socket原语函数]
3.2.1Bind:绑定套接字地址
套接字地址是网络中套接字的唯一标识。
1)Bind()函数有以下两种:Bind(void)由系统 自动为套接字分配地址,通常用于客户端 ;Bind(const Addres &)由用户 为套接字分配地址,通常被用于服务器端。
2)地址格式
-
传输层套接字地址:IP地址+端口号,使用InetSocketAddress类(IPv4地址+端口号)或Inet6SocketAddress类(IPv6地址+端口号)表示,后者需要使用Bind6()函数;
-
网络层套接字地址就是IPv4或IPv6地址本身,分别使用Ipv4Address类或Ipv6Address类表示;
-
链路层协议套接字地址格式:协议号+NetDevice标识+MAC地址,使用PacketSocketAddress类表示
3.2.2 Connect:建立连接
Connect()原语函数只在客户端使用,其形参是服务器端套接字地址;对于一个通信连接来说,客户端Connect()函数和服务器端Bind()函数必须使用相同的套接字地址
- UDP和IP等无连接协议Connect()函数的唯一操作就是在客户端设置目标地址
- TCP等面向连接协议Connect()函数还需要发起连接建立流程
3.2.3 Listen:监听Bind(Address&)中绑定的套接字地址
只在服务器端的TCP套接字中使用
3.2.4 Send:发送分组
Send()函数有不同的形参组合,最常见的形参就是Packet指针
Send(Ptr<Packet>)函数把一个分组发送至服务器端套接字
若想把分组发送至一个指定的套接字地址,可以使用SendTo()函数
3.2.5 Recv:从套接字接收分组
Socket提供了多种接收分组函数
- Recv(void):从套接字接收缓存中提取能够得到的最大分组,返回值Packet指针
- RecvFrom(Address&fromAddress):同上,可以返回分组中的套接字源地址(fromAddress)
3.2.6 Close:关闭连接
在Close()函数之后,程序还可以通过执行Socket对象的Bind()、Connect()和Listen()等原语函数来重新建立连接
3.3 Socket设置函数解析
Socket设置函数的作用是在脚本中关联回调函数和指针
一个完整的应用层协议行为一定是原语函数和设置函数相互结合使用的结果。
|---------|---------------------|--------|---|---|
| 原语函数 | 设置函数 | 函数指针事件 | C | S |
| Close | SetCloseCallback | 连接关闭正常 | √ | √ |
| Close | SetCloseCallback | 连接关闭异常 | √ | √ |
| Connect | SetConnectCallback | 连接建立成功 | √ | |
| Connect | SetConnectCallback | 连接建立失败 | √ | |
| Send | SetSendCallback | 可以发送分组 | √ | |
| Send | SetDataSendCallback | 成功发送分组 | √ | |
| Listen | SetAcceptCallback | 连接建立请求 | | √ |
| Listen | SetAcceptCallback | 连接建立成功 | | √ |
| Recv | SetRecvCallback | 成功接收分组 | | √ |
[Socket原语函数与设置函数的对应关系]
3.4 Socket异步I/O工作模式
Socket原语函数在发起相应操作后直接返回应用层,而不必等到操作结果
所有操作执行完毕后,下层协议再通过调用Socket函数指针、触发应用层回调函数的方式将执行结果通知给应用层协议
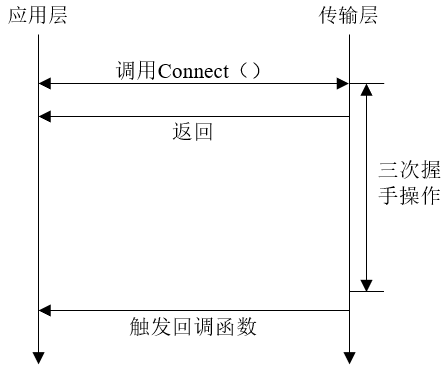
在TCP客户端,应用层协议调用TCP Socket的Connect()原语函数发起TCP连接建立流程(三次握手);Connect()函数在发送第一个SYN信令后直接返回;三次握手完毕后,客户端TCP Socket会触发应用层的connectionSucceeded()回调函数,客户端使用Send()函数发送分组
在从Connect()函数返回到connnectionSucceeded()函数被调用这段时间里,应用层并没有被阻塞,完全可以执行其他操作,这时的应用层协议和TCP间的操作是异步的。
程序可以选择将Send()和Recv()函数分别放在表示发送和接收分组的回调函数中执行。
3.5 Socket中的其他辅助函数
|-----------------|-------------------------------------|
| Socket类辅助函数名 | 说明 |
| ShutdownRecv | 关闭套接字分组接收功能,一般用于客户端 |
| Shutdownend | 关闭套接字分组发送功能,一般用于服务器端 |
| GetTxAailable | 获取套接字发送缓存中空闲空间字节数。一般用于客户端判断是否可以发送分组 |
| GetNode | 获取套接字结点ID |
| BindToNetDevice | 将套接字绑定至某一NetDevice,可用于多模态端的分组发送 |
[Socket类辅助函数]
四、Application类
在不同脚本中使用同一个自定义的应用层协议,可以通过继承Application基类的方法把这些函数的使用代码封装起来,成为一个可以重复使用、具有友好用户接口和助手类的新内置应用。
- StartApplication()函数:在Application类的启动时间到期时被系统自动调用,Socket原语和回调函数的设置函数都是在StartApplication()函数中调用的
- StopApplication()函数:Application类的停止时间到期时被系统自动调用。一般会调用Close()原语函数关闭套接字连接
~examples/tutorial/fifith.cc
/* -*- Mode:C++; c-file-style:"gnu"; indent-tabs-mode:nil; -*- */
/*
 * 程序创建了一个自定义的应用来生成 TCP 流量,并跟踪拥塞窗口的变化,同时模拟了数据包丢失的情况
 *
 * You should have received a copy of the GNU General Public License
 * along with this program; if not, write to the Free Software
 * Foundation, Inc., 59 Temple Place, Suite 330, Boston, MA  02111-1307  USA
 */

#include <fstream>
#include "ns3/core-module.h"
#include "ns3/network-module.h"
#include "ns3/internet-module.h"
#include "ns3/point-to-point-module.h"
#include "ns3/applications-module.h"

using namespace ns3;

NS_LOG_COMPONENT_DEFINE ("FifthScriptExample");

// ===========================================================================
//
//         node 0                 node 1
//   +----------------+    +----------------+
//   |    ns-3 TCP    |    |    ns-3 TCP    |
//   +----------------+    +----------------+
//   |    10.1.1.1    |    |    10.1.1.2    |
//   +----------------+    +----------------+
//   | point-to-point |    | point-to-point |
//   +----------------+    +----------------+
//           |                     |
//           +---------------------+
//                5 Mbps, 2 ms
//
//
// We want to look at changes in the ns-3 TCP congestion window.  We need
// to crank up a flow and hook the CongestionWindow attribute on the socket
// of the sender.  Normally one would use an on-off application to generate a
// flow, but this has a couple of problems.  First, the socket of the on-off
// application is not created until Application Start time, so we wouldn't be
// able to hook the socket (now) at configuration time.  Second, even if we
// could arrange a call after start time, the socket is not public so we
// couldn't get at it.
//
// So, we can cook up a simple version of the on-off application that does what
// we want.  On the plus side we don't need all of the complexity of the on-off
// application.  On the minus side, we don't have a helper, so we have to get
// a little more involved in the details, but this is trivial.
//
// So first, we create a socket and do the trace connect on it; then we pass
// this socket into the constructor of our simple application which we then
// install in the source node.
// ===========================================================================
//

//自定义应用类 MyApp
class MyApp : public Application
{
public:

  MyApp ();
  virtual ~MyApp();

  void Setup (Ptr<Socket> socket, Address address, uint32_t packetSize, uint32_t nPackets, DataRate dataRate);

private:
  virtual void StartApplication (void);
  virtual void StopApplication (void);

  void ScheduleTx (void);
  void SendPacket (void);

  Ptr<Socket>     m_socket;// 套接字指针
  Address         m_peer;// 对端地址
  uint32_t        m_packetSize;// 数据包大小
  uint32_t        m_nPackets;// 数据包总数
  DataRate        m_dataRate;// 数据速率
  EventId         m_sendEvent; // 发送事件ID
  bool            m_running;// 运行状态
  uint32_t        m_packetsSent;// 已发送数据包数
};

MyApp::MyApp ()
  : m_socket (0),
    m_peer (),
    m_packetSize (0),
    m_nPackets (0),
    m_dataRate (0),
    m_sendEvent (),
    m_running (false),
    m_packetsSent (0)
{
}

MyApp::~MyApp()
{
  m_socket = 0;
}

void
MyApp::Setup (Ptr<Socket> socket, Address address, uint32_t packetSize, uint32_t nPackets, DataRate dataRate)
{
  m_socket = socket;
  m_peer = address;
  m_packetSize = packetSize;
  m_nPackets = nPackets;
  m_dataRate = dataRate;
}

void
MyApp::StartApplication (void)
{
  m_running = true;
  m_packetsSent = 0;
  m_socket->Bind ();// 绑定套接字
  m_socket->Connect (m_peer);// 连接到对端
  SendPacket ();// 开始发送数据包
}

void
MyApp::StopApplication (void)
{
  m_running = false;

  if (m_sendEvent.IsRunning ())
    {
      Simulator::Cancel (m_sendEvent);
    }

  if (m_socket)
    {
      m_socket->Close ();
    }
}

void
MyApp::SendPacket (void)
{
  Ptr<Packet> packet = Create<Packet> (m_packetSize);
  m_socket->Send (packet);// 发送数据包

  if (++m_packetsSent < m_nPackets) // 如果还有数据包要发送
    {
      ScheduleTx ();// 安排下一次发送
    }
}

void
MyApp::ScheduleTx (void)
{
  if (m_running)
    {
       // 计算下一个数据包的发送时间
      Time tNext (Seconds (m_packetSize * 8 / static_cast<double> (m_dataRate.GetBitRate ())));
      m_sendEvent = Simulator::Schedule (tNext, &MyApp::SendPacket, this);
    }
}

static void
CwndChange (uint32_t oldCwnd, uint32_t newCwnd)
{
  NS_LOG_UNCOND (Simulator::Now ().GetSeconds () << "\t" << newCwnd);
}
//在每次拥塞窗口变化时被调用,输出时间戳和新的拥塞窗口大小

static void
RxDrop (Ptr<const Packet> p)
{
  NS_LOG_UNCOND ("RxDrop at " << Simulator::Now ().GetSeconds ());
}
//当数据包在物理层被丢弃时调用此函数

int
main (int argc, char *argv[])
{
  CommandLine cmd (__FILE__);
  cmd.Parse (argc, argv);

  NodeContainer nodes;
  nodes.Create (2);

  PointToPointHelper pointToPoint;
  pointToPoint.SetDeviceAttribute ("DataRate", StringValue ("5Mbps"));
  pointToPoint.SetChannelAttribute ("Delay", StringValue ("2ms"));

  NetDeviceContainer devices;
  devices = pointToPoint.Install (nodes);

  Ptr<RateErrorModel> em = CreateObject<RateErrorModel> ();
  em->SetAttribute ("ErrorRate", DoubleValue (0.00001));
  devices.Get (1)->SetAttribute ("ReceiveErrorModel", PointerValue (em));

  InternetStackHelper stack;
  stack.Install (nodes);

  Ipv4AddressHelper address;
  address.SetBase ("10.1.1.0", "255.255.255.252");
  Ipv4InterfaceContainer interfaces = address.Assign (devices);

  uint16_t sinkPort = 8080;
  Address sinkAddress (InetSocketAddress (interfaces.GetAddress (1), sinkPort));
  PacketSinkHelper packetSinkHelper ("ns3::TcpSocketFactory", InetSocketAddress (Ipv4Address::GetAny (), sinkPort));
  ApplicationContainer sinkApps = packetSinkHelper.Install (nodes.Get (1));
  sinkApps.Start (Seconds (0.));
  sinkApps.Stop (Seconds (20.));

  Ptr<Socket> ns3TcpSocket = Socket::CreateSocket (nodes.Get (0), TcpSocketFactory::GetTypeId ());
  ns3TcpSocket->TraceConnectWithoutContext ("CongestionWindow", MakeCallback (&CwndChange));

  Ptr<MyApp> app = CreateObject<MyApp> ();
  app->Setup (ns3TcpSocket, sinkAddress, 1040, 1000, DataRate ("1Mbps"));
  nodes.Get (0)->AddApplication (app);
  app->SetStartTime (Seconds (1.));
  app->SetStopTime (Seconds (20.));

  devices.Get (1)->TraceConnectWithoutContext ("PhyRxDrop", MakeCallback (&RxDrop));

  Simulator::Stop (Seconds (20));
  Simulator::Run ();
  Simulator::Destroy ();

  return 0;
}
程序功能和执行逻辑
1、网络拓扑:
节点0 (发送端) ---------- 5 Mbps, 2ms ---------- 节点1 (接收端)
10.1.1.1                                   10.1.1.2
2、TCP拥塞窗口变化过程:
-
慢启动阶段
初始拥塞窗口:1 MSS (1460字节)
每收到一个ACK,拥塞窗口加倍
指数增长:1, 2, 4, 8, 16, ... -
拥塞避免阶段
当拥塞窗口达到慢启动阈值时
每收到一个ACK,拥塞窗口增加1/MSS
线性增长:cwnd = cwnd + 1/cwnd -
快速重传和快速恢复
当收到3个重复ACK时
将拥塞窗口减半
进入快速恢复阶段
3、执行时间线:
|---------|------------------|
| 时间(秒) | 事件 |
| 0.0 | 数据接收器开始运行 |
| 1.0 | 发送应用启动,TCP连接建立 |
| 1.0+ | TCP慢启动开始 |
| 1.0-2.0 | TCP数据传输,拥塞窗口动态调整 |
| 20.0 | 所有应用停止 |
| 20.0+ | 模拟结束 |
4、数据包发送调度:
数据包大小:1040字节 = 8320位
数据速率:1 Mbps = 1,000,000 bps
发送间隔:8320 / 1,000,000 = 0.00832秒 ≈ 8.32ms