工具介绍
Cloud ProxyPool,基于腾讯云函数 (SCF) 的分布式 IP 代理池.
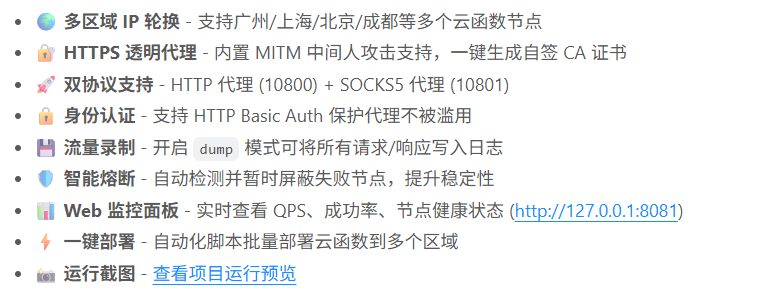
工具功能
🚀 快速开始
1. 部署云函数
bash
cd deploy
pip install -r requirements.txt

# 编辑 deploy.toml,填入腾讯云密钥
python deploy.py
部署成功后会自动输出所有 Function URLs 并写入 ../client/config.toml。
2. 启动客户端
bash
cd ../client
./cloud-proxy.exe
首次启动会自动生成 CA 证书到 certs/ 目录。
3. 配置代理
HTTP 代理 (推荐):
bash
# Windows PowerShell
$env:http_proxy="http://127.0.0.1:10800"
$env:https_proxy="http://127.0.0.1:10800"

# Linux/Mac
export http_proxy=http://127.0.0.1:10800
export https_proxy=http://127.0.0.1:10800
SOCKS5 代理:
bash
curl -x socks5://127.0.0.1:10801 http://myip.ipip.net4. 安装 CA 证书 (HTTPS 必需)
Windows:
- 双击
certs/ca-cert.pem - 点击"安装证书"
- 选择"受信任的根证书颁发机构"
Linux/Mac:
bash
# Ubuntu/Debian
sudo cp certs/ca-cert.pem /usr/local/share/ca-certificates/cloud-proxy-ca.crt
sudo update-ca-certificates

# Mac
sudo security add-trusted-cert -d -r trustRoot -k /Library/Keychains/System.keychain certs/ca-cert.pem
📊 Web 监控面板
启动客户端后访问 http://127.0.0.1:8081:
- 实时统计: 总请求数、成功数、失败数
- 节点状态: 每个云函数 URL 的健康状态和失败计数
- 熔断监控: 显示哪些节点正在冷却
🛡️ 智能熔断机制
当某个云函数节点连续失败 5 次 时,会被自动标记为不健康并暂停使用 2 分钟。
冷却期结束后自动恢复,无需手动干预。
📝 流量录制
开启流量录制后,所有请求/响应详情会写入 traffic.log:
toml
[client]
dump = true
dump_file = "traffic.log"
日志格式示例:
[2026-01-21 14:00:00] REQUEST: GET http://example.com/
> User-Agent: curl/7.68.0
> Host: example.com

--------------------------------------------------
[2026-01-21 14:00:01] RESPONSE: http://example.com/ -> 200 (Size: 1256 bytes)
==================================================
🔐 HTTP Basic Auth
编辑 config.toml 启用认证:
toml
[client]
user = "admin"
password = "your_strong_password"
客户端使用:
bash
curl -x http://admin:your_strong_password@127.0.0.1:10800 http://ipinfo.io🌐 支持的场景
✅ 爬虫 IP 轮换
✅ IP接口测试
✅ 绕过 IP 限制
✅ HTTPS 流量抓包
✅ Burp Suite / Proxifier 联动
✅ 端口扫描 (SOCKS5 模式)
工具下载
https://github.com/25smoking/CloudProxyPool