目录
[PoseC3D 的核心思想](#PoseC3D 的核心思想)
[1. Batch Size 配置不同(最可能)](#1. Batch Size 配置不同(最可能))
[2. 训练时间/版本不同](#2. 训练时间/版本不同)
[3. 可能的实际差异](#3. 可能的实际差异)
[推荐使用 文件2 (8xb16版本)](#推荐使用 文件2 (8xb16版本))
[1. 核心功能架构](#1. 核心功能架构)
[2. 两种模态选择](#2. 两种模态选择)
[3. 关键技术细节](#3. 关键技术细节)
[4. 典型应用场景](#4. 典型应用场景)
一、前言
我们进行了第二次的训练,在第二次训练中我们注意了裁剪视频动作的长度问题,也知道了要加载什么预训练权重,但是却又发现了新的问题。这里提醒读者,我们动作识别专栏包括其他所有专栏都是探索性质的文章,并非完全的教学性质,其中难免会出现各种各样的问题,我们发现问题会尽可能及时纠正。
这个问题就是由于我们观察到ntu60_2d.pkl里面的数据是100帧左右的,由此推测训练的视频样本可能要30fps,于是将10fps的视频转成10fps的mp4格式之后,又转成30fps的图片文件夹,然后使用之前的标注工具进行正负样本动作区间定位,生成正负样本视频,但由于标注工具默认设置的是10fps,导致生成的裁剪视频又变成了10fps,违背了我们最初希望使用30fps裁剪视频进行训练的初衷。这导致裁剪后的是相当于是经过了10fps插帧到30fps,然后又变回了10fps,最终得到的是一个动作变慢之后的10fps视频。
还有个问题就是我们没有对视频姿态估计获得pkl文件的代码进行可视化和检查,这导致有可能当视频里面出现多个人时,提取的骨架序列可能不是属于同一个人的。
在接下里的文章中我们会考虑针对这些问题进行研究,包括对demo_video_structuralize.py代码进行重新构建,以及对ntu_pose_extraction.py这一生成pkl的代码进行重新构建,同时想办法提高标注自动化水平。
二、第二次训练
在上一篇中我们发现数据集仅使用40个视频样本也能让验证集的8个视频取得比较准确的推理结果,得益于我们在上一篇中正确加载了预训练权重。然而,验证集表现虽然好,在其他测试数据中表现却不尽人意(文章里面没说,但是我自己用其他数据偷偷测了一下)。
目前40个视频样本还是太少了,加上我们标注的视频样本中有一些低于48帧长度的视频,这导致我们首先得扩充数据集到一个比较大的量,再去考虑别的事。这一次我们标注了99个正样本和99个负样本,也就是198个样本,其中训练集158个,验证集40个。值得一提的是,此次我们的标注策略是:如果那个动作没有明确的起始和结束,就标100帧,比方说走路这种;如果那个动作有明确的起始和结束,那就那个动作占多少帧就多少帧,但是遵循这样的原则:16帧以下放弃,16帧到48帧左右勉强接受,48帧到100帧比较合适,100帧是最佳,超过100帧问题不大但是最好是刚好100帧,这种策略是我们猜测100帧抽帧成48帧是刚刚好的,因此认为100帧最佳,48帧也是刚刚好但是信息比较少。至于这个策略到底对不对,我们要看训练结果如何。
训练完以后我们在work_dirs这里查看训练日志
D:\zero_track\mmaction2\work_dirs\slowonly_r50_8xb16-u48-240e_ntu60-xsub-keypoint\20260202_173400\20260202_173400.log
第2个epoch就达到了0.95的准确率,这让我们怀疑是不是slowonly_r50_8xb16-u48-240e_ntu60-xsub-keypoint_20220815-38db104b.pth这个预训练权重本身就认识踢这个动作。
Epoch(val) 25/5 acc/top1: 0.9500 acc/top5:1.0000 acc/mean1: 0.9499 data_time: 0.1069 time: 0.9719
随后在第13epoch达到了0.975,后面我们直接关掉了训练。
Epoch(val) 135/5 acc/top1: 0.9750 acc/top5: 1.0000 acc/mean1: 0.9737 data_time: 0.0981 time: 0.9622
随后我们用最佳的epoch进行推理,结果是验证集显示100%的准确率
python tools/test.py ^
configs/skeleton/posec3d/slowonly_r50_8xb16-u48-240e_ntu60-xsub-keypoint.py ^
work_dirs/slowonly_r50_8xb16-u48-240e_ntu60-xsub-keypoint/best_acc_top1_epoch_13.pth ^
--work-dir "D:\zero_track\mmaction2\demo\input_video\train2\val"
02/03 14:25:04 - mmengine - INFO - Epoch(test) 40/40 acc/top1: 1.0000 acc/top5: 1.0000 acc/mean1: 1.0000 data_time: 0.7059 time: 1.2220
随后,我们用动作识别专栏的《动作识别10------基于骨骼点的动作识别PoseC3D》第三节的批量推理命令去推理此次训练的验证集(40个视频)和上次训练的验证集(8个视频),结果发现推理结果大部分是对的。这证明了两件事:
1.在验证集上我们识别全对,说明训练没有问题
2.在非验证集的其他测试数据上我们识别也大部分对,说明了我们此次训练的效果是具有一定的泛化能力的,它并不是说验证集识别全对,换个测试数据就全错这种情况,也就是说,应该不太像是过拟合的问题。
3.我们对裁剪视频用demo的推理代码仍然得到了正确的推理结果,而在上次训练中我们只能用test.py得到正确的结果,用demo的推理代码则会推理错误。目前我们不太清除其中的原因是什么。
4.我们对原视频用demo的推理代码结果推理是错误的,我们意识到这可能是由于标注工具默认设置的是10fps,导致生成的裁剪视频又变成了10fps,违背了我们最初希望使用30fps的裁剪视频进行训练的初衷。
三、PoseC3D预训练模型
https://mmaction2.readthedocs.io/zh-cn/latest/model_zoo/skeleton.html#posec3d
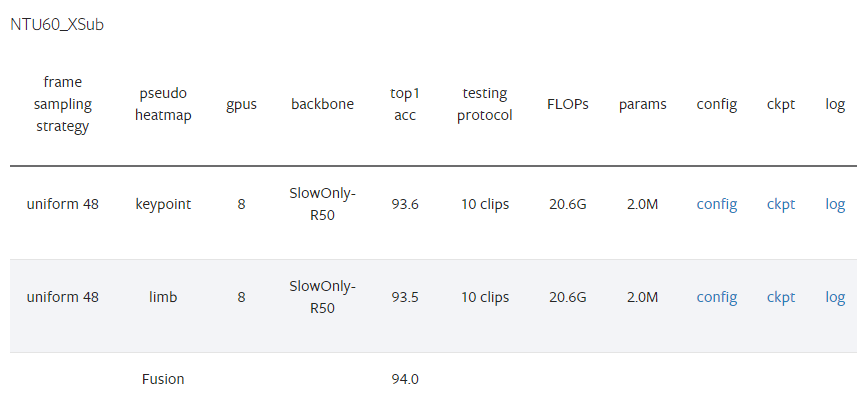
表格结构解析
列名 含义 frame sampling strategy 帧采样策略 uniform 48= 从视频中均匀采样48帧pseudo heatmap 伪热图类型 将骨骼数据转换为热图的方式 gpus 训练使用的GPU数量 = 8张 backbone 主干网络 SlowOnly-R50= SlowOnly 结构 + ResNet-50top1 acc Top-1 准确率(%) testing protocol 测试协议 10 clips= 抽取10个视频片段测试后取平均FLOPs 计算量 = 20.6G(206亿次浮点运算) params 模型参数量 = 2.0M(200万参数) config / ckpt / log 配置文件、模型权重、训练日志的下载链接
各行数据详解
第1行:Keypoint(关键点热图)
伪热图 :
keypoint= 基于人体关节点生成热图准确率 :93.6%
只使用关节点位置信息
第2行:Limb(肢体热图)
伪热图 :
limb= 基于骨骼/肢体生成热图准确率 :93.5%
使用骨头(肢体)的连接信息
第3行:Fusion(融合)
将 keypoint 和 limb 两种热图融合后的结果
融合准确率 :94.0% (比单一流提升0.4-0.5%)
PoseC3D 的核心思想
传统GCN方法:  骨骼图 → 图卷积网络 → 预测
PoseC3D方法:  骨骼点 → 生成2D/3D热图 → 3D CNN → 预测
为什么用热图?
更鲁棒:对姿态估计噪声不敏感
更强:利用成熟的CNN(如ResNet)提取时空特征
更灵活:天然支持多人场景,无需额外计算
总结
对比项 数值 单关节点流 (keypoint) 93.6% 单肢骨流 (limb) 93.5% 融合后 94.0% ✓ 计算复杂度 20.6G FLOPs 模型大小 仅2.0M参数(非常轻量!) 这个表格展示了 PoseC3D 在 NTU60 数据集 跨主体 (XSub) 协议下的优秀性能,融合后达到 94.0% 的准确率,且参数量只有200万,非常高效。
四、带8xb16的模型与不带的有什么区别?
slowonly_r50_u48_240e_ntu60_xsub_keypoint-f3adabf1.pth 和slowonly_r50_8xb16-u48-240e_ntu60-xsub-keypoint_20220815-38db104b.pth 有什么区别?
这两个文件名看起来是同一个模型(PoseC3D with SlowOnly-R50 backbone on NTU60 XSub keypoint),但有一些细微差别。让我分析它们的可能区别:
文件名结构对比
组件 文件1 文件2 backbone slowonly_r50slowonly_r50batch config u488xb16-u48epochs 240e240edataset ntu60_xsub_keypointntu60_xsub_keypointhash/id f3adabf120220815-38db104b
关键区别分析
1. Batch Size 配置不同(最可能)
文件1 (
u48):可能使用默认配置或较旧的命名方式文件2 (
8xb16-u48):明确表示 8 GPUs × Batch size 16 = 总batch size 1288xb16 = 8张GPU × 每GPU 16个样本 = 总batch size 128
u48 = uniform采样48帧2. 训练时间/版本不同
文件1 (
f3adabf1):较短的hash,可能是早期版本文件2 (
20220815-38db104b):
包含日期
20220815= 2022年8月15日训练完成更长的hash,符合MMAction2较新的命名规范
3. 可能的实际差异
方面 推测 训练配置 文件2明确标注了batch size (8xb16),文件1可能使用不同配置 训练日期 文件2是2022年8月版本,文件1可能更早 精度 可能相近,但文件2可能是优化后的版本 兼容性 文件2更新,建议优先使用
建议
# 推荐使用的配置文件对应关系
# 文件2对应的config可能是:
configs/skeleton/posec3d/slowonly_r50_8xb16-u48-240e_ntu60-xsub-keypoint.py

# 而文件1可能是旧版命名:
configs/skeleton/posec3d/slowonly_r50_u48_240e_ntu60_xsub_keypoint.py
✅ 推荐使用 文件2 (
8xb16版本)理由:
命名更规范:符合MMAction2最新的命名约定
信息更完整:包含batch size配置和训练日期
更可能是最终版:2022年8月的版本,bug修复更完善
验证方法
bash
# 查看模型文件的元数据
python -c "import torch; ckpt = torch.load('xxx.pth'); print(ckpt.keys())"
# 通常包含 'meta' 字段,可以看到训练配置
五、demo_video_structuralize.py
https://github.com/open-mmlab/mmaction2/blob/main/demo/demo_video_structuralize.py
python
# Copyright (c) OpenMMLab. All rights reserved.
import argparse # 命令行参数解析
import copy as cp # 深拷贝模块
import tempfile # 临时文件处理
import warnings # 警告处理
import cv2 # OpenCV图像处理库
import mmcv # MMCV计算机视觉基础库
import mmengine # MMEngine深度学习引擎
import numpy as np # NumPy数值计算
import torch # PyTorch深度学习框架
from mmengine import DictAction # 字典类型命令行参数
from mmengine.structures import InstanceData # 实例数据结构
from mmaction.apis import ( # MMAction2 API接口
detection_inference, # 检测推理
inference_recognizer, # 识别器推理
inference_skeleton, # 骨骼推理
init_recognizer, # 初始化识别器
pose_inference # 姿态估计推理
)
from mmaction.registry import VISUALIZERS # 可视化器注册表
from mmaction.structures import ActionDataSample # 动作数据样本
from mmaction.utils import frame_extract # 视频帧提取工具
# 尝试导入MMDetection的检测器初始化函数(可选依赖)
try:
from mmdet.apis import init_detector
except (ImportError, ModuleNotFoundError):
warnings.warn('Failed to import `init_detector` form `mmdet.apis`. '
'These apis are required in skeleton-based applications! ')
# 尝试导入MoviePy用于视频输出(必需依赖)
try:
import moviepy.editor as mpy
except ImportError:
raise ImportError('Please install moviepy to enable output file')
# ==================== 可视化配置常量 ====================
FONTFACE = cv2.FONT_HERSHEY_DUPLEX # 字体样式
FONTSCALE = 0.5 # 字体缩放比例
FONTCOLOR = (255, 255, 255) # 字体颜色(BGR格式,白色)
MSGCOLOR = (128, 128, 128) # 消息颜色(BGR格式,灰色)
THICKNESS = 1 # 线条粗细
LINETYPE = 1 # 线条类型
def hex2color(h):
"""将6位十六进制颜色字符串转换为RGB三元组
例如: 'ff0000' -> (255, 0, 0)
Args:
h (str): 6位十六进制颜色字符串
Returns:
tuple: RGB颜色值元组
"""
return (int(h[:2], 16), int(h[2:4], 16), int(h[4:], 16))
# 定义蓝色和绿色调色板用于可视化
PLATEBLUE = '03045e-023e8a-0077b6-0096c7-00b4d8-48cae4'
PLATEBLUE = PLATEBLUE.split('-')
PLATEBLUE = [hex2color(h) for h in PLATEBLUE] # 蓝色渐变调色板
PLATEGREEN = '004b23-006400-007200-008000-38b000-70e000'
PLATEGREEN = PLATEGREEN.split('-')
PLATEGREEN = [hex2color(h) for h in PLATEGREEN] # 绿色渐变调色板
def visualize(args, frames, annotations, pose_data_samples, action_result,
plate=PLATEBLUE, max_num=5):
"""将预测结果可视化到视频帧上
主要功能:
1. 在视频帧上绘制姿态估计结果(骨骼关键点)
2. 在视频帧上绘制时空动作检测结果(边界框+标签)
3. 添加动作识别结果文本
Args:
args: 命令行参数
frames (list[np.ndarray]): 原始视频帧列表
annotations (list[list[tuple]]): 时空动作检测结果 [边界框, 标签, 分数]
pose_data_samples (list[list[PoseDataSample]]): 姿态估计结果
action_result (str): 动作识别结果文本
plate (str): 可视化调色板,默认蓝色
max_num (int): 每个检测框最多显示的标签数量,默认5个
Returns:
list[np.ndarray]: 添加可视化标记后的帧列表
"""
# 深拷贝帧以避免修改原始数据,并将BGR转换为RGB格式
assert max_num + 1 <= len(plate) # 确保调色板颜色足够
frames_ = cp.deepcopy(frames)
frames_ = [mmcv.imconvert(f, 'bgr', 'rgb') for f in frames_]
# 计算帧数量与标注数量的对应关系
nf, na = len(frames), len(annotations)
assert nf % na == 0 # 确保帧数能被标注数整除
nfpa = len(frames) // len(annotations) # 每个标注对应的帧数
anno = None
h, w, _ = frames[0].shape
scale_ratio = np.array([w, h, w, h]) # 用于将归一化坐标转换为像素坐标
# ==================== 添加姿态估计结果 ====================
if pose_data_samples:
# 从配置文件加载姿态可视化器
pose_config = mmengine.Config.fromfile(args.pose_config)
visualizer = VISUALIZERS.build(pose_config.visualizer)
visualizer.set_dataset_meta(pose_data_samples[0].dataset_meta)
# 遍历每一帧,绘制骨骼关键点
for i, (d, f) in enumerate(zip(pose_data_samples, frames_)):
visualizer.add_datasample(
'result',
f,
data_sample=d,
draw_gt=False, # 不绘制真实标签
draw_heatmap=False, # 不绘制热力图
draw_bbox=True, # 绘制边界框
show=False, # 不显示窗口
wait_time=0,
out_file=None,
kpt_thr=0.3) # 关键点置信度阈值
frames_[i] = visualizer.get_image()
# 在左上角添加动作识别结果
cv2.putText(frames_[i], action_result, (10, 30), FONTFACE,
FONTSCALE, FONTCOLOR, THICKNESS, LINETYPE)
# ==================== 添加时空动作检测结果 ====================
for i in range(na):
anno = annotations[i]
if anno is None:
continue
# 处理该时间戳对应的所有帧
for j in range(nfpa):
ind = i * nfpa + j
frame = frames_[ind]
# 在视频顶部添加整体动作识别结果
cv2.putText(frame, action_result, (10, 30), FONTFACE, FONTSCALE,
FONTCOLOR, THICKNESS, LINETYPE)
# 遍历该时间戳的所有检测实例
for ann in anno:
box = ann[0] # 边界框坐标 [x1, y1, x2, y2](归一化)
label = ann[1] # 动作标签列表
score = ann[2] # 置信度分数列表
if not len(label): # 跳过空标签
continue
# 将归一化坐标转换为像素坐标
box = (box * scale_ratio).astype(np.int64)
st, ed = tuple(box[:2]), tuple(box[2:]) # 左上角和右下角坐标
# 如果没有姿态结果,绘制边界框
if not pose_data_samples:
cv2.rectangle(frame, st, ed, plate[0], 2)
# 为每个检测到的动作绘制标签
for k, lb in enumerate(label):
if k >= max_num: # 限制标签数量
break
# 简化标签文本(去除括号内容)
text = abbrev(lb)
text = ': '.join([text, f'{score[k]:.3f}'])
location = (0 + st[0], 18 + k * 18 + st[1])
# 计算文本大小并绘制背景色块
textsize = cv2.getTextSize(text, FONTFACE, FONTSCALE,
THICKNESS)[0]
textwidth = textsize[0]
diag0 = (location[0] + textwidth, location[1] - 14)
diag1 = (location[0], location[1] + 2)
cv2.rectangle(frame, diag0, diag1, plate[k + 1], -1) # 填充色块
cv2.putText(frame, text, location, FONTFACE, FONTSCALE,
FONTCOLOR, THICKNESS, LINETYPE) # 绘制文本
return frames_
def parse_args():
"""解析命令行参数
配置包括:
- 模型配置文件和预训练权重(检测、姿态、识别、时空检测)
- 输入输出路径
- 推理参数(置信度阈值、步长等)
- 设备选择等
"""
parser = argparse.ArgumentParser(description='MMAction2 demo')
# RGB时空检测模型配置
parser.add_argument('--rgb-stdet-config', default='...')
parser.add_argument('--rgb-stdet-checkpoint', default='...')
# 骨骼时空检测模型配置
parser.add_argument('--skeleton-stdet-checkpoint', default='...')
# 人体检测模型配置(MMDet)
parser.add_argument('--det-config', default='...')
parser.add_argument('--det-checkpoint', default='...')
# 姿态估计模型配置(MMPose)
parser.add_argument('--pose-config', default='...')
parser.add_argument('--pose-checkpoint', default='...')
# 骨骼动作识别模型配置
parser.add_argument('--skeleton-config', default='...')
parser.add_argument('--skeleton-checkpoint', default='...')
# RGB动作识别模型配置
parser.add_argument('--rgb-config', default='...')
parser.add_argument('--rgb-checkpoint', default='...')
# 功能开关
parser.add_argument('--use-skeleton-stdet', action='store_true',
help='使用骨骼方法的时空动作检测')
parser.add_argument('--use-skeleton-recog', action='store_true',
help='使用骨骼方法的动作识别')
# 阈值参数
parser.add_argument('--det-score-thr', type=float, default=0.9,
help='人体检测置信度阈值')
parser.add_argument('--action-score-thr', type=float, default=0.4,
help='动作预测置信度阈值')
# 输入输出
parser.add_argument('--video', default='demo/test_video_structuralize.mp4',
help='输入视频文件/URL')
parser.add_argument('--label-map-stdet', default='tools/data/ava/label_map.txt',
help='时空检测标签映射')
parser.add_argument('--label-map', default='tools/data/kinetics/label_map_k400.txt',
help='动作识别标签映射')
parser.add_argument('--device', type=str, default='cuda:0',
help='CPU/CUDA设备选项')
parser.add_argument('--out-filename', default='demo/test_stdet_recognition_output.mp4',
help='输出文件名')
# 时间步长控制
parser.add_argument('--predict-stepsize', default=8, type=int,
help='每n帧进行一次时空检测预测')
parser.add_argument('--output-stepsize', default=1, type=int,
help='输出视频中每n帧显示一帧')
parser.add_argument('--output-fps', default=24, type=int,
help='输出视频帧率')
# 配置覆盖选项
parser.add_argument('--cfg-options', nargs='+', action=DictAction, default={},
help='覆盖配置文件中的设置,格式为xxx=yyy')
args = parser.parse_args()
return args
def load_label_map(file_path):
"""加载标签映射文件(ID到标签名的映射)
Args:
file_path (str): 标签映射文件路径
Returns:
dict: 标签字典 {int: str}
"""
lines = open(file_path).readlines()
lines = [x.strip().split(': ') for x in lines]
return {int(x[0]): x[1] for x in lines}
def abbrev(name):
"""缩写标签名称,简化显示
例如: 'take (an object) from (a person)' -> 'take ... from ...'
将括号内的内容替换为省略号以节省显示空间
"""
while name.find('(') != -1:
st, ed = name.find('('), name.find(')')
name = name[:st] + '...' + name[ed + 1:]
return name
def pack_result(human_detection, result, img_h, img_w):
"""打包检测结果为统一格式
将检测结果转换为归一化坐标,并按置信度排序
Args:
human_detection (np.ndarray): 人体检测结果 [N, 5] (x1,y1,x2,y2,score)
result: 每个人的动作预测结果列表
img_h (int): 图像高度
img_w (int): 图像宽度
Returns:
list: 打包后的结果 [(边界框, 标签列表, 分数列表), ...]
"""
# 将像素坐标归一化到[0,1]范围
human_detection[:, 0::2] /= img_w # x坐标归一化
human_detection[:, 1::2] /= img_h # y坐标归一化
results = []
if result is None:
return None
# 遍历每个检测实例,按置信度排序并打包
for prop, res in zip(human_detection, result):
res.sort(key=lambda x: -x[1]) # 按置信度降序排序
results.append((
prop.data.cpu().numpy(), # 边界框
[x[0] for x in res], # 标签列表
[x[1] for x in res] # 分数列表
))
return results
def expand_bbox(bbox, h, w, ratio=1.25):
"""扩展边界框为正方形并放大,用于姿态估计的ROI区域
将矩形框扩展为正方形并按比例放大,确保能完整包含人体
Args:
bbox (tuple): 原始边界框 (x1, y1, x2, y2)
h, w (int): 图像高度和宽度
ratio (float): 扩展比例,默认1.25
Returns:
tuple: 扩展后的边界框
"""
x1, y1, x2, y2 = bbox
center_x = (x1 + x2) // 2 # 计算中心点
center_y = (y1 + y2) // 2
width = x2 - x1
height = y2 - y1
# 取最大边长构建正方形
square_l = max(width, height)
new_width = new_height = square_l * ratio
# 计算新的边界框(限制在图像范围内)
new_x1 = max(0, int(center_x - new_width / 2))
new_x2 = min(int(center_x + new_width / 2), w)
new_y1 = max(0, int(center_y - new_height / 2))
new_y2 = min(int(center_y + new_height / 2), h)
return (new_x1, new_y1, new_x2, new_y2)
def cal_iou(box1, box2):
"""计算两个边界框的IoU(交并比)
Args:
box1, box2 (tuple): 边界框坐标 (xmin, ymin, xmax, ymax)
Returns:
float: IoU值 [0, 1]
"""
xmin1, ymin1, xmax1, ymax1 = box1
xmin2, ymin2, xmax2, ymax2 = box2
s1 = (xmax1 - xmin1) * (ymax1 - ymin1) # 框1面积
s2 = (xmax2 - xmin2) * (ymax2 - ymin2) # 框2面积
# 计算交集
xmin = max(xmin1, xmin2)
ymin = max(ymin1, ymin2)
xmax = min(xmax1, xmax2)
ymax = min(ymax1, ymax2)
w = max(0, xmax - xmin)
h = max(0, ymax - ymin)
intersect = w * h # 交集面积
union = s1 + s2 - intersect # 并集面积
iou = intersect / union
return iou
def skeleton_based_action_recognition(args, pose_results, h, w):
"""基于骨骼的动作识别
使用PoseC3D等模型,基于人体关键点序列识别整体动作
Args:
args: 命令行参数
pose_results (list): 每一帧的姿态估计结果
h, w (int): 原始图像尺寸
Returns:
str: 识别出的动作类别名称
"""
label_map = [x.strip() for x in open(args.label_map).readlines()]
num_class = len(label_map)
# 加载配置文件并修改类别数
skeleton_config = mmengine.Config.fromfile(args.skeleton_config)
skeleton_config.model.cls_head.num_classes = num_class
# 初始化模型并进行推理
skeleton_model = init_recognizer(
skeleton_config, args.skeleton_checkpoint, device=args.device)
result = inference_skeleton(skeleton_model, pose_results, (h, w))
action_idx = result.pred_score.argmax().item() # 取最高分的类别
return label_map[action_idx]
def rgb_based_action_recognition(args):
"""基于RGB视频的动作识别
使用TSN/SlowFast等模型,基于原始视频帧识别整体动作
Args:
args: 命令行参数
Returns:
str: 识别出的动作类别名称
"""
rgb_config = mmengine.Config.fromfile(args.rgb_config)
rgb_config.model.backbone.pretrained = None # 不使用预训练权重
rgb_model = init_recognizer(rgb_config, args.rgb_checkpoint, args.device)
action_results = inference_recognizer(rgb_model, args.video)
rgb_action_result = action_results.pred_score.argmax().item()
label_map = [x.strip() for x in open(args.label_map).readlines()]
return label_map[rgb_action_result]
def skeleton_based_stdet(args, label_map, human_detections, pose_results,
num_frame, clip_len, frame_interval, h, w):
"""基于骨骼的时空动作检测(Spatio-Temporal Action Detection)
对视频中每个时间戳的每个人物,预测其在时间窗口内的多个动作类别
流程:
1. 对每个时间戳,提取时间窗口内的姿态序列
2. 将同一人物的姿态序列组织成[M, T, V, C]格式
3. 使用骨骼动作检测模型预测动作类别
4. 对每个人返回多个动作标签及其置信度
Args:
args: 命令行参数
label_map (dict): 动作标签映射
human_detections (list): 每帧的人体检测结果
pose_results (list): 每帧的姿态估计结果
num_frame (int): 视频总帧数
clip_len (int): 输入片段长度(帧数)
frame_interval (int): 采样间隔
h, w (int): 图像尺寸
Returns:
tuple: (时间戳列表, 预测结果列表)
"""
window_size = clip_len * frame_interval # 时间窗口大小
assert clip_len % 2 == 0, 'clip_len必须为偶数'
# 生成预测时间戳(居中采样)
timestamps = np.arange(window_size // 2, num_frame + 1 - window_size // 2,
args.predict_stepsize)
# 加载模型
skeleton_config = mmengine.Config.fromfile(args.skeleton_config)
num_class = max(label_map.keys()) + 1 # AVA数据集81类
skeleton_config.model.cls_head.num_classes = num_class
skeleton_stdet_model = init_recognizer(skeleton_config,
args.skeleton_stdet_checkpoint,
args.device)
skeleton_predictions = []
print('执行基于骨骼的时空动作检测...')
prog_bar = mmengine.ProgressBar(len(timestamps))
for timestamp in timestamps:
# 获取当前时间戳的人体检测框
proposal = human_detections[timestamp - 1]
if proposal.shape[0] == 0: # 无人检测到时
skeleton_predictions.append(None)
continue
# 计算时间窗口的起止帧
start_frame = timestamp - (clip_len // 2 - 1) * frame_interval
frame_inds = start_frame + np.arange(0, window_size, frame_interval)
frame_inds = list(frame_inds - 1) # 转为0-based索引
num_frame = len(frame_inds)
# 获取窗口内的姿态结果
pose_result = [pose_results[ind] for ind in frame_inds]
skeleton_prediction = []
# 遍历每个检测到的人物
for i in range(proposal.shape[0]):
skeleton_prediction.append([])
# 构建伪标注数据(MMAction2数据格式)
fake_anno = dict(
frame_dict='',
label=-1,
img_shape=(h, w),
origin_shape=(h, w),
start_index=0,
modality='Pose',
total_frames=num_frame)
num_person = 1
num_keypoint = 17 # COCO格式17个关键点
# 初始化关键点数组 [M, T, V, 2]
keypoint = np.zeros((num_person, num_frame, num_keypoint, 2))
keypoint_score = np.zeros((num_person, num_frame, num_keypoint))
# 扩展人物边界框用于姿态匹配
person_bbox = proposal[i][:4]
area = expand_bbox(person_bbox, h, w)
# 在时间窗口内匹配同一个人物的姿态
for j, poses in enumerate(pose_result):
max_iou = float('-inf')
index = -1
if len(poses['keypoints']) == 0:
continue
# 通过IoU匹配找到最相似的边界框
for k, bbox in enumerate(poses['bboxes']):
iou = cal_iou(bbox, area)
if max_iou < iou:
index = k
max_iou = iou
# 存储匹配到的关键点
keypoint[0, j] = poses['keypoints'][index]
keypoint_score[0, j] = poses['keypoint_scores'][index]
fake_anno['keypoint'] = keypoint
fake_anno['keypoint_score'] = keypoint_score
# 推理并收集高于阈值的结果
output = inference_recognizer(skeleton_stdet_model, fake_anno)
score = output.pred_score.tolist()
for k in range(len(score)):
if k not in label_map: # 跳过未知类别
continue
if score[k] > args.action_score_thr:
skeleton_prediction[i].append((label_map[k], score[k]))
skeleton_predictions.append(skeleton_prediction)
prog_bar.update()
return timestamps, skeleton_predictions
def rgb_based_stdet(args, frames, label_map, human_detections, w, h, new_w,
new_h, w_ratio, h_ratio):
"""基于RGB的时空动作检测
使用SlowOnly等模型,基于RGB帧和人体边界框预测时空动作
流程:
1. 对每个时间戳,提取时间窗口内的RGB帧
2. 对每个检测到的人物ROI区域进行特征提取
3. 预测每个人物的多个动作类别
Args:
args: 命令行参数
frames (list): 视频帧列表
label_map (dict): 动作标签映射
human_detections (list): 人体检测结果
w, h (int): 原始图像尺寸
new_w, new_h (int): 缩放后的尺寸
w_ratio, h_ratio (float): 宽高缩放比例
Returns:
tuple: (时间戳列表, 预测结果列表)
"""
# 加载配置
rgb_stdet_config = mmengine.Config.fromfile(args.rgb_stdet_config)
rgb_stdet_config.merge_from_dict(args.cfg_options)
# 从数据预处理管道获取采样参数
val_pipeline = rgb_stdet_config.val_pipeline
sampler = [x for x in val_pipeline if x['type'] == 'SampleAVAFrames'][0]
clip_len, frame_interval = sampler['clip_len'], sampler['frame_interval']
assert clip_len % 2 == 0, 'clip_len必须为偶数'
window_size = clip_len * frame_interval
num_frame = len(frames)
timestamps = np.arange(window_size // 2, num_frame + 1 - window_size // 2,
args.predict_stepsize)
# 图像归一化配置
img_norm_cfg = dict(
mean=np.array(rgb_stdet_config.model.data_preprocessor.mean),
std=np.array(rgb_stdet_config.model.data_preprocessor.std),
to_rgb=False)
# 构建时空检测模型
try:
# 在demo中设置action_thr=0以保留所有动作类别
rgb_stdet_config['model']['test_cfg']['rcnn'] = dict(action_thr=0)
except KeyError:
pass
rgb_stdet_config.model.backbone.pretrained = None
rgb_stdet_model = init_detector(
rgb_stdet_config, args.rgb_stdet_checkpoint, device=args.device)
predictions = []
print('执行基于RGB的时空动作检测...')
prog_bar = mmengine.ProgressBar(len(timestamps))
for timestamp in timestamps:
proposal = human_detections[timestamp - 1]
if proposal.shape[0] == 0:
predictions.append(None)
continue
# 计算时间窗口
start_frame = timestamp - (clip_len // 2 - 1) * frame_interval
frame_inds = start_frame + np.arange(0, window_size, frame_interval)
frame_inds = list(frame_inds - 1)
# 加载并预处理帧
imgs = [frames[ind].astype(np.float32) for ind in frame_inds]
_ = [mmcv.imnormalize_(img, **img_norm_cfg) for img in imgs]
# 调整维度: THWC -> CTHW -> 1CTHW (batch维度)
input_array = np.stack(imgs).transpose((3, 0, 1, 2))[np.newaxis]
input_tensor = torch.from_numpy(input_array).to(args.device)
# 构建数据样本并进行推理
datasample = ActionDataSample()
datasample.proposals = InstanceData(bboxes=proposal)
datasample.set_metainfo(dict(img_shape=(new_h, new_w)))
with torch.no_grad():
result = rgb_stdet_model(input_tensor, [datasample], mode='predict')
scores = result[0].pred_instances.scores # [N_proposals, N_classes]
prediction = [[] for _ in range(proposal.shape[0])]
# 过滤低置信度的预测
for i in range(scores.shape[1]): # 遍历类别
if i not in label_map:
continue
for j in range(proposal.shape[0]): # 遍历每个人物
if scores[j, i] > args.action_score_thr:
prediction[j].append((label_map[i], scores[j, i].item()))
predictions.append(prediction)
prog_bar.update()
return timestamps, predictions
def main():
"""主函数:完整的视频动作分析流程
流程步骤:
1. 解析参数并提取视频帧
2. 人体检测(MMDet)
3. 姿态估计(MMPose,可选)
4. 动作识别(全局)
5. 时空动作检测(局部)
6. 结果可视化并输出视频
"""
args = parse_args()
# 创建临时目录存储提取的帧
tmp_dir = tempfile.TemporaryDirectory()
frame_paths, original_frames = frame_extract(
args.video, out_dir=tmp_dir.name)
num_frame = len(frame_paths)
h, w, _ = original_frames[0].shape
# ==================== 步骤1: 人体检测 ====================
print("进行人体检测...")
human_detections, _ = detection_inference(
args.det_config,
args.det_checkpoint,
frame_paths,
args.det_score_thr,
device=args.device)
# ==================== 步骤2: 姿态估计(如需要) ====================
pose_datasample = None
if args.use_skeleton_recog or args.use_skeleton_stdet:
print("进行姿态估计...")
pose_results, pose_datasample = pose_inference(
args.pose_config,
args.pose_checkpoint,
frame_paths,
human_detections,
device=args.device)
# ==================== 步骤3: 图像预处理 ====================
# 将图像缩放到短边256像素(保持宽高比)
new_w, new_h = mmcv.rescale_size((w, h), (256, np.Inf))
frames = [mmcv.imresize(img, (new_w, new_h)) for img in original_frames]
w_ratio, h_ratio = new_w / w, new_h / h # 计算缩放比例
# 加载时空动作检测的标签映射
stdet_label_map = load_label_map(args.label_map_stdet)
rgb_stdet_config = mmengine.Config.fromfile(args.rgb_stdet_config)
rgb_stdet_config.merge_from_dict(args.cfg_options)
# 处理自定义类别
try:
if rgb_stdet_config['data']['train']['custom_classes'] is not None:
stdet_label_map = {
id + 1: stdet_label_map[cls]
for id, cls in enumerate(rgb_stdet_config['data']['train']
['custom_classes'])
}
except KeyError:
pass
# ==================== 步骤4: 全局动作识别 ====================
action_result = None
if args.use_skeleton_recog:
print('使用基于骨骼的动作识别')
action_result = skeleton_based_action_recognition(
args, pose_results, h, w)
else:
print('使用基于RGB的动作识别')
action_result = rgb_based_action_recognition(args)
# ==================== 步骤5: 时空动作检测 ====================
stdet_preds = None
if args.use_skeleton_stdet:
print('使用基于骨骼的时空动作检测')
clip_len, frame_interval = 30, 1
timestamps, stdet_preds = skeleton_based_stdet(
args, stdet_label_map, human_detections, pose_results, num_frame,
clip_len, frame_interval, h, w)
# 将检测框缩放到新尺寸
for i in range(len(human_detections)):
det = human_detections[i]
det[:, 0:4:2] *= w_ratio
det[:, 1:4:2] *= h_ratio
human_detections[i] = torch.from_numpy(det[:, :4]).to(args.device)
else:
print('使用基于RGB的时空动作检测')
# 缩放检测框
for i in range(len(human_detections)):
det = human_detections[i]
det[:, 0:4:2] *= w_ratio
det[:, 1:4:2] *= h_ratio
human_detections[i] = torch.from_numpy(det[:, :4]).to(args.device)
timestamps, stdet_preds = rgb_based_stdet(
args, frames, stdet_label_map, human_detections, w, h,
new_w, new_h, w_ratio, h_ratio)
# 打包时空检测结果
stdet_results = []
for timestamp, prediction in zip(timestamps, stdet_preds):
human_detection = human_detections[timestamp - 1]
stdet_results.append(
pack_result(human_detection, prediction, new_h, new_w))
# ==================== 步骤6: 时间戳插值 ====================
def dense_timestamps(timestamps, n):
"""将时间戳密度增加n倍,用于平滑可视化"""
old_frame_interval = (timestamps[1] - timestamps[0])
start = timestamps[0] - old_frame_interval / n * (n - 1) / 2
new_frame_inds = np.arange(
len(timestamps) * n) * old_frame_interval / n + start
return new_frame_inds.astype(np.int64)
dense_n = int(args.predict_stepsize / args.output_stepsize)
output_timestamps = dense_timestamps(timestamps, dense_n)
# 根据插值后的时间戳加载对应的帧
frames = [
cv2.imread(frame_paths[timestamp - 1])
for timestamp in output_timestamps
]
# 同步姿态数据
if args.use_skeleton_recog or args.use_skeleton_stdet:
pose_datasample = [
pose_datasample[timestamp - 1] for timestamp in output_timestamps
]
# ==================== 步骤7: 可视化与输出 ====================
print("生成可视化结果...")
vis_frames = visualize(args, frames, stdet_results, pose_datasample,
action_result)
# 使用MoviePy写入视频文件
vid = mpy.ImageSequenceClip(vis_frames, fps=args.output_fps)
vid.write_videofile(args.out_filename)
print(f"输出视频已保存至: {args.out_filename}")
# 清理临时目录
tmp_dir.cleanup()
if __name__ == '__main__':
main()这段代码是 MMAction2 框架的时空动作检测演示脚本 ,实现了完整的视频动作分析流程,包括全局动作识别 和局部时空动作检测两大功能。
1. 核心功能架构
两阶段检测流程:
人体检测:使用 MMDetection 的 Faster R-CNN 检测每帧中的人体位置
姿态估计(可选):使用 MMPose 的 HRNet 估计人体关键点
动作识别(全局):识别视频整体的单一动作类别(支持RGB或骨骼方法)
时空动作检测(局部):对每个人物在时序上的多个动作类别进行检测(支持RGB或骨骼方法)
2. 两种模态选择
方法 动作识别 ( --use-skeleton-recog)时空检测 ( --use-skeleton-stdet)RGB TSN/SlowFast(基于视频帧) SlowOnly(基于RGB时序特征) 骨骼 PoseC3D(基于关键点序列) PoseC3D(基于时空关键点轨迹) 3. 关键技术细节
时序采样策略:
使用滑动窗口提取片段(默认8帧步长)
窗口大小 =
clip_len × frame_interval(默认30帧)预测时间戳居中于窗口(处理长视频时减少边界效应)
多人处理:
通过 IoU匹配 跟踪时序上的同一人物
扩展边界框为正方形(
expand_bbox)确保姿态估计完整性每个人独立进行动作预测(支持多标签)
可视化特点:
支持骨骼关键点渲染(使用MMPose可视化器)
边界框配渐变色标签(最多5个动作类别)
动态插值(
dense_timestamps)确保输出视频流畅4. 典型应用场景
智能监控:检测视频中"打架"、"偷窃"等异常行为发生的具体时空位置
体育分析:识别运动员的特定技术动作(投篮、扣杀等)及其发生时段
人机交互:定位视频中人物与物体的交互行为("拿杯子"、"开门"等)
这段代码体现了 OpenMMLab 生态的模块化设计,可以灵活组合 MMDetection、MMPose、MMAction2 的不同模型,构建多模态视频理解系统。