系列文章目录
- 【3DV 进阶-4】VecSet 论文+代码对照理解
- 【3DV 进阶-5】3D生成中 Inductive Bias (归纳偏置)的技术路线图
- 【3DV 进阶-6】为什么3D点云是无序集合?而2D图片是有序的呢?
- 【3DV 进阶-7】Hunyuan3D2.1-ShapeVAE 整体流程
- 【3DV 进阶-10】Trellis 中的表示 SLat 理解
- 【3DV 进阶-11】Trellis.2 数据处理与训练流程图
- 【3DV 进阶-12】Trellis.2 数据处理脚本细节
- 【3D-AICG 系列-1】Trellis v1 和 Trellis v2 的区别和改进
- 【3D-AICG 系列-2】Trellis 2 的O-voxel (上) Shape: Flexible Dual Grid
文章目录
- 系列文章目录
- [Volumetric Surface Attributes:PBR ↔ O-Voxel 材质转换详解](#Volumetric Surface Attributes:PBR ↔ O-Voxel 材质转换详解)
-
- 概述
-
- [支持的 PBR 属性](#支持的 PBR 属性)
- [Part 1: PBR → O-Voxel(编码)](#Part 1: PBR → O-Voxel(编码))
-
- 整体流程
- [Step 1: Voxel from FDG(从 Flexible Dual Grid 获取体素)](#Step 1: Voxel from FDG(从 Flexible Dual Grid 获取体素))
- [Step 2: Project to Surface(投影到表面)](#Step 2: Project to Surface(投影到表面))
- [Step 3: Sample Texture Map(采样纹理贴图)](#Step 3: Sample Texture Map(采样纹理贴图))
-
- [3.1 计算 UV 坐标](#3.1 计算 UV 坐标)
- [3.2 计算 Mipmap Level](#3.2 计算 Mipmap Level)
- [3.3 Mipmap 采样](#3.3 Mipmap 采样)
- [3.4 纹理包装模式](#3.4 纹理包装模式)
- [3.5 采样所有 PBR 属性](#3.5 采样所有 PBR 属性)
- [Step 4: 加权平均](#Step 4: 加权平均)
- [Part 2: O-Voxel → Material(解码)](#Part 2: O-Voxel → Material(解码))
-
- [Step 1: Query from Texel/Vertices](#Step 1: Query from Texel/Vertices)
- [Step 2: Trilinear Interpolation](#Step 2: Trilinear Interpolation)
- 完整数据流
- 关键技术点
-
- [1. Mipmap 构建](#1. Mipmap 构建)
- [2. 法向量变换](#2. 法向量变换)
- [3. Alpha 模式处理](#3. Alpha 模式处理)
- 代码索引
- [与 FDG 的关系](#与 FDG 的关系)
Trellis 2 中的 O-voxel 分为 Shape 和 Material 两个部分,本文聚焦于 Material: Volumetric Surface Attributes 这部分,关于 Shape 的介绍在上一篇文章。
Volumetric Surface Attributes:PBR ↔ O-Voxel 材质转换详解
基于 TRELLIS 2 源码 voxel/src/convert/volumetic_attr.cpp
的 PBR 材质体素化分析
概述
O-Voxel 不仅存储几何信息,还支持 Volumetric Surface Attributes(体积化表面属性),将 PBR 材质"烘焙"到稀疏体素中。
┌──────────────────┐                              ┌──────────────────┐
│  Textured Mesh   │  ═══► 编码 (Encode) ═══►      │    O-Voxel       │
│  (PBR Materials) │                              │ (Volumetric Attr)│
│                  │  ◄═══ 解码 (Decode) ◄═══      │                  │
└──────────────────┘                              └──────────────────┘
支持的 PBR 属性
| 属性 | 通道数 | 说明 |
|---|---|---|
| Base Color | 3 | 基础颜色 (RGB) |
| Metallic | 1 | 金属度 |
| Roughness | 1 | 粗糙度 |
| Emissive | 3 | 自发光颜色 |
| Alpha | 1 | 透明度 |
| Normal | 3 | 法向量 |
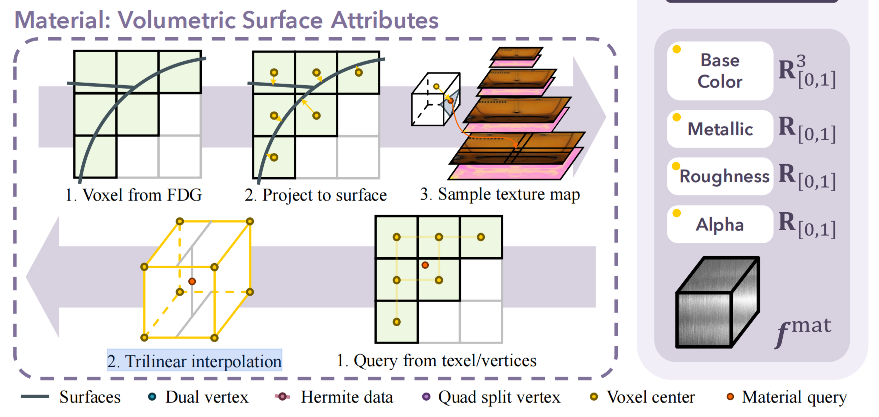
Part 1: PBR → O-Voxel(编码)
整体流程
┌─────────────────┐    ┌─────────────────┐    ┌─────────────────┐
│ 1. Voxel from   │    │ 2. Project to   │    │ 3. Sample       │
│    FDG          │ ─► │    Surface      │ ─► │    Texture      │
└─────────────────┘    └─────────────────┘    └─────────────────┘
Step 1: Voxel from FDG(从 Flexible Dual Grid 获取体素)
目标:复用几何体素化的结果,确定哪些体素需要采样材质
算法 :与 flexible_dual_grid.cpp 相同的扫描线填充
cpp
// volumetic_attr.cpp: 第 421-485 行
// 找出与三角形相交的体素(复用 FDG 的扫描线算法)
std::unordered_set<VoxelCoord> intersected_voxels;

auto scan_line_fill = [&](const int ax2) {
    // 从 x/y/z 三个方向扫描三角形
    for (int y_idx = start; y_idx < end; ++y_idx) {
        for (int x_idx = line_start; x_idx < line_end; ++x_idx) {
            double z = lerp(...);
            // 标记 4 个相邻体素
            for (dx, dy in {0,1} × {0,1}) {
                intersected_voxels.insert(coord);
            }
        }
    }
};
scan_line_fill(0);
scan_line_fill(1);
scan_line_fill(2);关键点:几何和材质使用相同的体素集合,保证对齐。
Step 2: Project to Surface(投影到表面)
目标:将体素中心投影到三角形表面,获取重心坐标用于插值
cpp
// volumetic_attr.cpp: 第 125-151 行
static Eigen::Vector4f project_onto_triangle(
    const Eigen::Vector3f& p,      // 体素中心
    const Eigen::Vector3f& a,      // 三角形顶点
    const Eigen::Vector3f& b,
    const Eigen::Vector3f& c,
    const Eigen::Vector3f& n       // 面法向量
) {
    // 1. 计算点到平面的距离
    float d = (p - a).dot(n);

    // 2. 投影到平面
    Eigen::Vector3f p_proj = p - d * n;

    // 3. 计算重心坐标 (u, v, w)
    // 使用 Cramer 法则求解
    float denom = d00 * d11 - d01 * d01;
    float v = (d11 * d20 - d01 * d21) / denom;
    float w = (d00 * d21 - d01 * d20) / denom;
    float u = 1.0f - v - w;

    return Eigen::Vector4f(u, v, w, d);  // 返回重心坐标 + 距离
}图示:
        体素中心 p
            │
            │ d (距离)
            ↓
    ────────●────────  三角形平面
           /│\
          / │ \
         /  │  \
        a───●───b     投影点 p_proj
             \         重心坐标 (u,v,w)
c用途:
- 重心坐标
(u, v, w)用于插值 UV 和法向量 - 距离
d用作权重(越近权重越大)
Step 3: Sample Texture Map(采样纹理贴图)
3.1 计算 UV 坐标
cpp
// 第 498-501 行
// 使用重心坐标插值 UV
Eigen::Vector2f uv = {
    barycentric.x() * uv0.x() + barycentric.y() * uv1.x() + barycentric.z() * uv2.x(),
    barycentric.x() * uv0.y() + barycentric.y() * uv1.y() + barycentric.z() * uv2.y()
};
3.2 计算 Mipmap Level
问题:体素大小和纹理像素大小不匹配,直接采样会产生走样
解决:使用 Mipmap 采样,根据体素大小选择合适的 mip level
cpp
// 第 78-111 行: compute_TBN()
// 计算 TBN 矩阵和 mip_length

// Tangent 和 Bitangent 的长度反映了 UV → 3D 的缩放比例
Eigen::Vector3f t = (duv2.y() * e1 - duv1.y() * e2);
Eigen::Vector3f b = (duv1.x() * e2 - duv2.x() * e1);
Eigen::Vector2f mip_length(invDet * t.norm(), invDet * b.norm());

// 第 417 行
// mip_length = 体素大小 / UV梯度
float mip_length = delta_p.maxCoeff() / std::sqrt(v_mip_length.x() * v_mip_length.y());
3.3 Mipmap 采样
cpp
// 第 250-288 行: sample_texture_mipmap()
static void sample_texture_mipmap(...) {
    // 计算 mip level
    float mip_level = log2(mip_length * H) + mipLevelOffset;

    if (mip_level <= 0) {
        // 使用原始纹理
        sample_texture(texture, ...);
    } else {
        // 在两个 mip level 之间插值
        int lower = floor(mip_level);
        int upper = lower + 1;
        float frac = mip_level - lower;

        sample_texture(lower_mip, ...);
        sample_texture(upper_mip, ...);
        color = (1 - frac) * lower_sample + frac * upper_sample;
    }
}
3.4 纹理包装模式
cpp
// 第 154-167 行
static inline int wrap_texcoord(const int& x, const int& W, const int& filter) {
    if (filter == 0) {          // REPEAT
        return (x % W + W) % W;
    } else if (filter == 1) {   // CLAMP_TO_EDGE
        return std::max(0, std::min(x, W - 1));
    } else if (filter == 2) {   // MIRROR_REPEAT
        int period = 2 * W;
        int x_mod = (x % period + period) % period;
        return (x_mod < W) ? x_mod : (period - x_mod - 1);
    }
}
3.5 采样所有 PBR 属性
cpp
// 第 509-606 行
// 对每个相交的体素:

// Base Color (RGB)
sample_texture_mipmap(baseColorTexture, uv, mip_length, ...);
baseColor *= baseColorFactor;  // 乘以材质因子

// Metallic
sample_texture_mipmap(metallicTexture, uv, mip_length, ...);
metallic *= metallicFactor;

// Roughness
sample_texture_mipmap(roughnessTexture, uv, mip_length, ...);
roughness *= roughnessFactor;

// Emissive
sample_texture_mipmap(emissiveTexture, uv, mip_length, ...);
emissive *= emissiveFactor;

// Alpha (with mode handling)
if (alphaMode != 0) {
    sample_texture_mipmap(alphaTexture, uv, mip_length, ...);
    alpha *= alphaFactor;
    if (alphaMode == 1) {  // MASK mode
        alpha = alpha < alphaCutoff ? 0.0f : 1.0f;
    }
}

// Normal (需要 TBN 变换)
sample_texture_mipmap(normalTexture, uv, mip_length, ...);
normal = normal * 2 - 1;  // [0,1] → [-1,1]
normal = (normal[0] * t + normal[1] * b + normal[2] * n).normalized();
Step 4: 加权平均
问题:一个体素可能与多个三角形相交,如何融合?
解决:使用距离作为权重进行加权平均
cpp
// 第 507 行
float weight = 1 - barycentric.w();  // weight = 1 - 距离(越近权重越大)

// 第 608-631 行: 累加
if (体素是新的) {
    buf_weights.push_back(weight);
    buf_baseColors.push_back(baseColor * weight);
    // ...
} else {
    buf_weights[i] += weight;
    buf_baseColors[i] += baseColor * weight;
    // ...
}

// 第 637-662 行: 归一化
for (int i = 0; i < coords.size(); i++) {
    out_baseColor[i] = buf_baseColors[i] / buf_weights[i];
    out_metallic[i] = buf_metallics[i] / buf_weights[i];
    // ...
}图示:
         Triangle A              Triangle B
              │                       │
         weight_A                weight_B
              │                       │
              └───────► Voxel ◄───────┘
                          │
                          ▼
              final = (A × w_A + B × w_B) / (w_A + w_B)
Part 2: O-Voxel → Material(解码)
解码在 Python 层实现(flexible_dual_grid.py),主要步骤:
Step 1: Query from Texel/Vertices
从 O-Voxel 查询给定位置的材质属性:
python
# 伪代码
def query_attr(position, coords, attrs):
    # 找到包含 position 的体素
    voxel_idx = find_containing_voxel(position, coords)

    # 返回该体素的属性
    return attrs[voxel_idx]
Step 2: Trilinear Interpolation
对于任意位置,使用三线性插值:
python
# 伪代码
def trilinear_interp(position, coords, attrs):
    # 找到 8 个相邻体素
    neighbors = find_8_neighbors(position, coords)

    # 计算插值权重
    fx, fy, fz = position - floor(position)

    # 8 个角的权重
    weights = [
        (1-fx)*(1-fy)*(1-fz),  # (0,0,0)
        fx*(1-fy)*(1-fz),      # (1,0,0)
        (1-fx)*fy*(1-fz),      # (0,1,0)
        fx*fy*(1-fz),          # (1,1,0)
        (1-fx)*(1-fy)*fz,      # (0,0,1)
        fx*(1-fy)*fz,          # (1,0,1)
        (1-fx)*fy*fz,          # (0,1,1)
        fx*fy*fz,              # (1,1,1)
    ]

    # 加权平均
    result = sum(w * attrs[n] for w, n in zip(weights, neighbors))
return result图示:
三线性插值示意图:

        (0,1,1)────────(1,1,1)
           /│            /│
          / │           / │
     (0,0,1)────────(1,0,1)
         │  │         │  │
         │(0,1,0)─────│─(1,1,0)
         │ /          │ /
         │/           │/
     (0,0,0)────────(1,0,0)

     任意点 P 的属性 = Σ (8个角的属性 × 对应权重)
完整数据流
╔═══════════════════════════════════════════════════════════════════════╗
║                     PBR Textured Mesh → O-Voxel                       ║
╠═══════════════════════════════════════════════════════════════════════╣
║                                                                       ║
║  输入:                                                                ║
║  ├── vertices, normals, uvs (几何)                                   ║
║  ├── baseColorTexture, metallicTexture, ... (纹理)                   ║
║  └── baseColorFactor, metallicFactor, ... (材质参数)                 ║
║                                                                       ║
║  Step 1: Voxel from FDG                                              ║
║  ┌─────────────────────────────────────────────────────────────────┐  ║
║  │  scan_line_fill() → intersected_voxels                          │  ║
║  │  (复用 FDG 的体素化结果)                                         │  ║
║  └─────────────────────────────────────────────────────────────────┘  ║
║                              │                                        ║
║                              ▼                                        ║
║  Step 2: Project to Surface                                          ║
║  ┌─────────────────────────────────────────────────────────────────┐  ║
║  │  project_onto_triangle() → (u, v, w, distance)                  │  ║
║  │  重心坐标用于插值,距离用于权重                                   │  ║
║  └─────────────────────────────────────────────────────────────────┘  ║
║                              │                                        ║
║                              ▼                                        ║
║  Step 3: Sample Texture                                              ║
║  ┌─────────────────────────────────────────────────────────────────┐  ║
║  │  compute_TBN() → mip_length                                     │  ║
║  │  sample_texture_mipmap() → baseColor, metallic, roughness, ...  │  ║
║  │  加权累加 + 归一化                                               │  ║
║  └─────────────────────────────────────────────────────────────────┘  ║
║                                                                       ║
║  输出 O-Voxel:                                                        ║
║  ├── coords (体素坐标)                                               ║
║  ├── baseColor (N, 3)                                                ║
║  ├── metallic (N,)                                                   ║
║  ├── roughness (N,)                                                  ║
║  ├── emissive (N, 3)                                                 ║
║  ├── alpha (N,)                                                      ║
║  └── normal (N, 3)                                                   ║
║                                                                       ║
╚═══════════════════════════════════════════════════════════════════════╝

╔═══════════════════════════════════════════════════════════════════════╗
║                     O-Voxel → Material Query                          ║
╠═══════════════════════════════════════════════════════════════════════╣
║                                                                       ║
║  Step 1: Query from Texel/Vertices                                   ║
║  ┌─────────────────────────────────────────────────────────────────┐  ║
║  │  给定位置 → 找到对应体素 → 返回属性                              │  ║
║  └─────────────────────────────────────────────────────────────────┘  ║
║                              │                                        ║
║                              ▼                                        ║
║  Step 2: Trilinear Interpolation                                     ║
║  ┌─────────────────────────────────────────────────────────────────┐  ║
║  │  找到 8 个相邻体素                                               │  ║
║  │  计算插值权重                                                    │  ║
║  │  加权平均得到最终属性                                            │  ║
║  └─────────────────────────────────────────────────────────────────┘  ║
║                                                                       ║
╚═══════════════════════════════════════════════════════════════════════╝
关键技术点
1. Mipmap 构建
cpp
// 第 170-207 行
static std::vector<std::vector<uint8_t>> build_mipmaps(...) {
    // 要求纹理是 2 的幂次且正方形
    while (next_H > 0 && next_W > 0) {
        // 每个 mip level 是上一级的 1/4 大小
        // 4 个像素平均得到 1 个像素
        for (int y = 0; y < next_H; y++) {
            for (int x = 0; x < next_W; x++) {
                sum = pixel[2x,2y] + pixel[2x+1,2y]
                    + pixel[2x,2y+1] + pixel[2x+1,2y+1];
                next_map[x,y] = sum / 4;
            }
        }
    }
}
2. 法向量变换
法向量纹理存储的是切线空间的法向量,需要用 TBN 矩阵变换到世界空间:
cpp
// 第 599-606 行
normal[0] = normal[0] * 2 - 1;  // [0,1] → [-1,1]
normal[1] = normal[1] * 2 - 1;
normal[2] = normal[2] * 2 - 1;

// TBN 变换: 切线空间 → 世界空间
// n_world = normal.x * T + normal.y * B + normal.z * N
Eigen::Vector3f _n = (normal[0] * t + normal[1] * b + normal[2] * int_n).normalized();
3. Alpha 模式处理
cpp
// 第 569-586 行
if (alphaMode[mid] == 0) {
    // OPAQUE: 忽略 alpha
    alpha = 1.0f;
} else if (alphaMode[mid] == 1) {
    // MASK: 二值化
    alpha = alpha < alphaCutoff ? 0.0f : 1.0f;
} else {
    // BLEND: 保持原始 alpha
}
代码索引
| 功能 | 函数 | 位置 |
|---|---|---|
| TBN 计算 | compute_TBN() |
第 78-111 行 |
| 投影到三角形 | project_onto_triangle() |
第 125-151 行 |
| 纹理坐标包装 | wrap_texcoord() |
第 154-167 行 |
| Mipmap 构建 | build_mipmaps() |
第 170-207 行 |
| 纹理采样 | sample_texture() |
第 210-247 行 |
| Mipmap 采样 | sample_texture_mipmap() |
第 250-288 行 |
| 主体素化函数 | voxelize_trimesh_pbr_impl() |
第 291-675 行 |
| Python 接口 | textured_mesh_to_volumetric_attr_cpu() |
第 678-871 行 |
与 FDG 的关系
| 方面 | Flexible Dual Grid (几何) | Volumetric Attributes (材质) |
|---|---|---|
| 文件 | flexible_dual_grid.cpp |
volumetic_attr.cpp |
| 输入 | vertices, faces | vertices, normals, uvs, textures |
| 输出 | coords, dual_vertices, intersected | coords, baseColor, metallic, ... |
| 体素化 | 扫描线 + QEF 优化 | 扫描线 + 纹理采样 |
| 核心算法 | QEF 最小化 | Mipmap 采样 + 加权平均 |
体素集合对齐:两者使用相同的扫描线算法,确保几何体素和材质体素完全对应。