自己写的程序。效果如图:
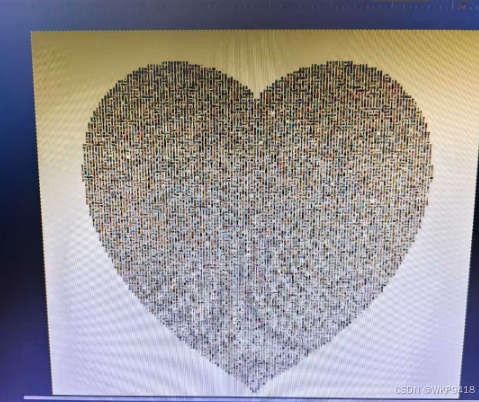
用了1w张图片,生成了40分钟。小图片是250*250像素的,放大也不会失真。心形图片大小700M。需要用专门的软件打开,否则会慢。我是用的是gimp来查看。
程序页面:
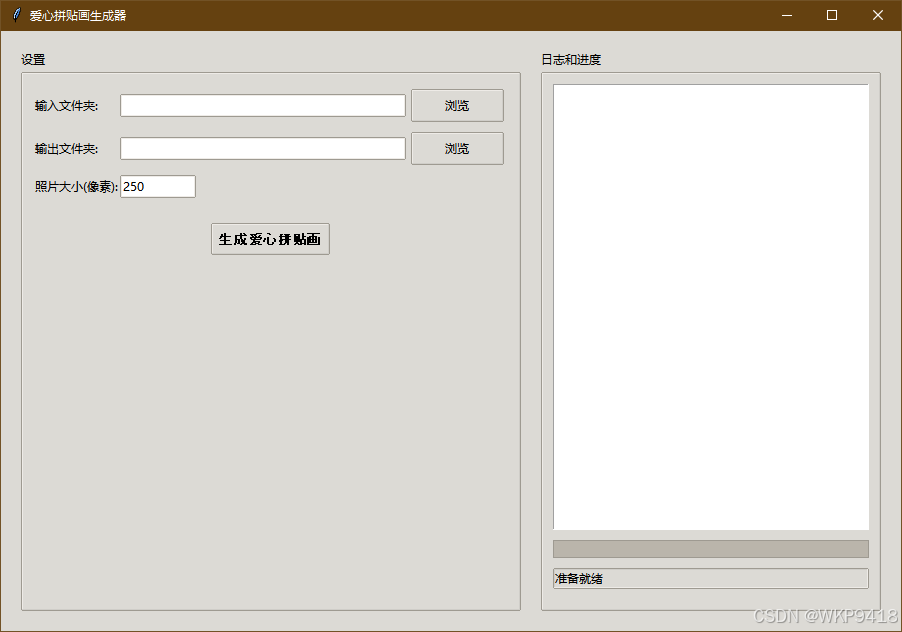
可执行程序:
通过网盘分享的文件:爱心拼贴画生成器.exe
链接: https://pan.baidu.com/s/1lP_CmtUHbc2JOeDCxJQsjQ 提取码: 1234
通过网盘分享的文件:gimp-3.0.8-setup-1.exe
链接: https://pan.baidu.com/s/1LRYaBToMi3AVnXJsBhj5JA 提取码: 1234
代码:
cpp
import os
import argparse
from PIL import Image, ImageDraw
import math
import random
from concurrent.futures import ThreadPoolExecutor, as_completed

def create_heart_mask(width, height):
    """创建爱心形状的掩码"""
    mask = Image.new('L', (width, height), 0)
    draw = ImageDraw.Draw(mask)

    # 调整心形大小和位置
    # 心形宽度设为画布宽度的70%,高度设为画布高度的70%
    heart_width = width * 0.7
    heart_height = height * 0.7

    # 计算心形中心偏移
    offset_x = width // 2
    offset_y = height // 2

    # 爱心形状的数学公式
    for x in range(width):
        for y in range(height):
            # 计算相对坐标(以心形中心为原点)
            rel_x = (x - offset_x) / (heart_width / 2)
            rel_y = (offset_y - y) / (heart_height / 2)  # 反转y轴

            # 标准心形方程
            equation = (rel_x**2 + rel_y**2 - 1)**3 - (rel_x**2) * (rel_y**3)
            if equation <= 0:
                draw.point((x, y), fill=255)

    return mask

def process_image(img, size):
    """处理图片,调整大小并保持比例"""
    # 调整图片大小,保持比例
    img.thumbnail((size, size), Image.LANCZOS)

    # 创建正方形画布
    square_img = Image.new('RGB', (size, size), (240, 240, 240))

    # 计算居中位置
    paste_x = (size - img.width) // 2
    paste_y = (size - img.height) // 2

    # 粘贴图片到正方形画布
    square_img.paste(img, (paste_x, paste_y))

    return square_img

def generate_test_images(count, output_dir):
    """生成测试用的示例图片"""
    if not os.path.exists(output_dir):
        os.makedirs(output_dir)

    colors = [(255, 0, 0), (0, 255, 0), (0, 0, 255), (255, 255, 0), (255, 0, 255), (0, 255, 255)]

    for i in range(count):
        # 创建100x100的测试图片
        img = Image.new('RGB', (100, 100), colors[i % len(colors)])
        draw = ImageDraw.Draw(img)

        # 在图片上添加数字
        draw.text((40, 40), str(i+1), fill=(255, 255, 255))

        # 保存测试图片
        img.save(os.path.join(output_dir, f'test_{i+1}.png'))

    print(f"生成了{count}张测试图片到{output_dir}")

def create_heart_collage(input_dir, output_path, photo_size=250, output_format='png', quality=100, log_queue=None):
    """创建爱心形状的照片拼贴画"""
    def log(message):
        """记录日志"""
        if log_queue:
            log_queue.put(message)
        print(message)

    # 获取输入图片列表(直接读取目录,不递归)
    image_files = []

    try:
        log(f"开始读取目录: {input_dir}")
        for item in os.listdir(input_dir):
            item_path = os.path.join(input_dir, item)
            if os.path.isfile(item_path):
                # 检查是否为图片文件
                if item.lower().endswith(('.png', '.jpg', '.jpeg', '.bmp', '.gif')):
                    image_files.append(item_path)
    except Exception as e:
        log(f"读取目录{input_dir}时出错: {e}")
        return

    if not image_files:
        log("错误:输入目录中没有找到图片文件")
        return

    log(f"成功找到{len(image_files)}张图片")

    # 获取图片数量
    img_count = len(image_files)
    required_positions = img_count

    # 固定照片大小
    log(f"使用照片大小: {photo_size}×{photo_size}像素")
    log(f"需要至少{required_positions}个位置")

    # 计算初始心形大小
    # 估算每个心形大小能容纳的位置数量(心形面积约为正方形的一半)
    heart_size = 2000
    estimated_positions = 0

    # 循环扩大心形大小,直到能容纳所有图片
    while estimated_positions < required_positions:
        # 计算当前大小能容纳的位置数量
        positions_per_side = heart_size // photo_size
        estimated_positions = (positions_per_side * positions_per_side) // 2

        if estimated_positions < required_positions:
            # 扩大心形大小
            heart_size += 2000
            log(f"当前心形大小({heart_size-2000}像素)无法容纳所有图片,扩大到{heart_size}像素")

    log(f"最终心形大小: {heart_size}×{heart_size}像素")
    log(f"预计可容纳{estimated_positions}个位置")

    # 创建爱心掩码
    log("创建爱心掩码...")
    mask = create_heart_mask(heart_size, heart_size)

    # 创建输出图片
    log("创建输出图片...")
    output = Image.new('RGB', (heart_size, heart_size), (240, 240, 240))

    # 收集所有符合条件的位置
    log("收集有效位置...")
    valid_positions = []
    for y in range(0, heart_size, photo_size):
        for x in range(0, heart_size, photo_size):
            # 检查边界,避免索引越界
            check_x = x + photo_size//2
            check_y = y + photo_size//2
            if check_x < heart_size and check_y < heart_size:
                if mask.getpixel((check_x, check_y)) > 128:
                    valid_positions.append((x, y))

    log(f"找到{len(valid_positions)}个有效位置")

    # 随机打乱位置顺序
    random.shuffle(valid_positions)

    # 计算照片排列
    photo_count = 0
    img_index = 0

    # 确保所有图片至少使用一次
    used_images = set()

    # 定义图片处理函数(用于多线程)
    def process_image_task(img_path, size):
        try:
            img = Image.open(img_path)
            processed_img = process_image(img, size)
            return processed_img
        except Exception as e:
            log(f"处理图片{img_path}时出错: {e}")
            return None

    # 使用多线程并行处理所有图片
    log("开始并行处理图片...")

    # 首先处理所有需要至少使用一次的图片
    processed_images = []
    total_tasks = min(len(image_files), len(valid_positions))
    completed_tasks = 0

    with ThreadPoolExecutor(max_workers=8) as executor:
        # 提交所有任务
        future_to_img = {executor.submit(process_image_task, img_path, photo_size): img_path
                       for img_path in image_files[:len(valid_positions)]}

        # 收集处理结果
        for future in as_completed(future_to_img):
            img_path = future_to_img[future]
            try:
                processed_img = future.result()
                if processed_img:
                    processed_images.append((img_path, processed_img))
                completed_tasks += 1
                # 更新进度
                if log_queue:
                    progress = int((completed_tasks / total_tasks) * 70)  # 70% 进度用于图片处理
                    log_queue.put({"progress": progress, "log": f"处理中... {completed_tasks}/{total_tasks}"})
            except Exception as e:
                log(f"获取结果时出错: {e}")
                completed_tasks += 1

    log(f"并行处理完成,成功处理{len(processed_images)}张图片")

    # 粘贴处理好的图片到输出
    log("开始粘贴图片到画布...")
    total_paste = len(valid_positions)
    pasted = 0

    # 首先使用所有图片至少一次
    for i, (x, y) in enumerate(valid_positions[:len(image_files)]):
        if i < len(processed_images):
            img_path, processed_img = processed_images[i]
            try:
                # 粘贴到输出图片
                output.paste(processed_img, (x, y))
                photo_count += 1
                pasted += 1
                # 记录使用的图片索引
                if i < len(image_files):
                    used_images.add(i)
                # 更新进度
                if log_queue:
                    progress = 70 + int((pasted / total_paste) * 30)  # 剩余30% 进度用于粘贴
                    log_queue.put({"progress": progress})
            except Exception as e:
                log(f"粘贴图片时出错: {e}")

    # 然后用剩余的位置循环使用所有图片
    for i, (x, y) in enumerate(valid_positions[len(image_files):]):
        img_idx = (i + len(image_files)) % len(image_files)
        if img_idx < len(processed_images):
            img_path, processed_img = processed_images[img_idx]
            try:
                # 粘贴到输出图片
                output.paste(processed_img, (x, y))
                photo_count += 1
                pasted += 1
                # 更新进度
                if log_queue:
                    progress = 70 + int((pasted / total_paste) * 30)
                    log_queue.put({"progress": progress})
            except Exception as e:
                log(f"粘贴图片时出错: {e}")

    # 验证所有图片都被使用
    if len(used_images) == len(image_files):
        log(f"成功使用了所有{len(image_files)}张图片")
    else:
        log(f"警告:只使用了{len(used_images)}张图片,还有{len(image_files) - len(used_images)}张未使用")

    # 保存输出图片
    log("保存输出图片...")
    # 根据格式和质量参数保存
    if output_format.lower() == 'jpg' or output_format.lower() == 'jpeg':
        # 保存为JPEG格式,使用指定质量
        output.save(output_path, 'JPEG', quality=quality, optimize=True)
    else:
        # 保存为PNG格式(无损)
        output.save(output_path, 'PNG', optimize=True)

    log(f"爱心拼贴画已保存到{output_path}")
    log(f"输出格式: {output_format.upper()}, 质量: {quality}")
    log(f"共使用了{photo_count}张照片")

def main():
    """主函数"""
    parser = argparse.ArgumentParser(description='创建爱心形状的照片拼贴画')
    parser.add_argument('--input', type=str, default=r'C:\Users\EDY\Downloads\QQ空间备份_905544506\Albums\生活\凯and娇', help='输入图片目录')
    parser.add_argument('--output', type=str, default='output/heart_collage.png', help='输出图片路径')
    parser.add_argument('--generate-test', type=int, default=0, help='生成测试图片的数量')
    parser.add_argument('--format', type=str, default='png', help='输出图片格式(png/jpg)')
    parser.add_argument('--quality', type=int, default=100, help='输出图片质量(1-100)')

    args = parser.parse_args()

    # 生成测试图片(如果需要)
    if args.generate_test > 0:
        generate_test_images(args.generate_test, 'test_images')

    # 创建爱心拼贴画(无上限分辨率,固定250×250像素照片大小)
    create_heart_collage(args.input, args.output, output_format=args.format, quality=args.quality)

def gui_main():
    """图形界面主函数"""
    import tkinter as tk
    from tkinter import filedialog, ttk
    import queue

    # 创建队列用于线程通信
    log_queue = queue.Queue()

    def browse_input():
        """浏览输入文件夹"""
        folder = filedialog.askdirectory()
        if folder:
            input_var.set(folder)

    def browse_output():
        """浏览输出文件夹"""
        folder = filedialog.askdirectory()
        if folder:
            output_var.set(folder)

    def update_log():
        """更新日志和进度条"""
        while not log_queue.empty():
            message = log_queue.get_nowait()
            if isinstance(message, dict):
                if 'progress' in message:
                    progress_var.set(message['progress'])
                if 'log' in message:
                    log_text.insert(tk.END, message['log'] + '\n')
                    log_text.see(tk.END)
            else:
                log_text.insert(tk.END, message + '\n')
                log_text.see(tk.END)
        root.after(100, update_log)

    def generate():
        """生成爱心拼贴画"""
        input_dir = input_var.get().strip()
        output_dir = output_var.get().strip()

        # 验证输入
        if not input_dir:
            log_queue.put("错误: 请选择输入文件夹")
            return

        if not output_dir:
            log_queue.put("错误: 请选择输出文件夹")
            return

        try:
            photo_size = int(photo_size_var.get())
        except ValueError:
            log_queue.put("错误: 照片大小必须是数字")
            return

        # 构建输出文件路径
        output_path = os.path.join(output_dir, "heart_collage.png")

        # 禁用生成按钮
        generate_button.config(state=tk.DISABLED)
        log_queue.put("开始生成爱心拼贴画...")

        def generate_thread():
            """在后台线程中生成拼贴画"""
            try:
                # 调用核心函数,并传入日志队列
                create_heart_collage(input_dir, output_path, photo_size=photo_size, log_queue=log_queue)

                log_queue.put(f"生成完成!输出到: {output_path}")
                log_queue.put({"progress": 100})
            except Exception as e:
                log_queue.put(f"错误: {str(e)}")
            finally:
                # 重新启用生成按钮
                generate_button.config(state=tk.NORMAL)
                log_queue.put("准备就绪")

        # 在后台线程中执行,避免阻塞GUI
        import threading
        thread = threading.Thread(target=generate_thread)
        thread.daemon = True
        thread.start()

    # 创建主窗口
    root = tk.Tk()
    root.title("爱心拼贴画生成器")
    root.geometry("900x600")
    root.resizable(True, True)

    # 创建样式
    style = ttk.Style()
    style.theme_use('clam')

    # 创建主框架
    main_frame = ttk.Frame(root, padding="20")
    main_frame.pack(fill=tk.BOTH, expand=True)

    # 左侧设置区
    left_frame = ttk.LabelFrame(main_frame, text="设置", padding="10")
    left_frame.pack(side=tk.LEFT, fill=tk.BOTH, expand=True, padx=(0, 10))

    # 右侧日志区
    right_frame = ttk.LabelFrame(main_frame, text="日志和进度", padding="10")
    right_frame.pack(side=tk.RIGHT, fill=tk.BOTH, expand=True, padx=(10, 0))

    # 输入文件夹
    ttk.Label(left_frame, text="输入文件夹:").grid(row=0, column=0, sticky=tk.W, pady=5)
    input_var = tk.StringVar(value="")  # 初始值置空
    ttk.Entry(left_frame, textvariable=input_var, width=40).grid(row=0, column=1, pady=5)
    ttk.Button(left_frame, text="浏览", command=browse_input).grid(row=0, column=2, padx=5, pady=5)

    # 输出文件夹
    ttk.Label(left_frame, text="输出文件夹:").grid(row=1, column=0, sticky=tk.W, pady=5)
    output_var = tk.StringVar(value="")  # 初始值置空
    ttk.Entry(left_frame, textvariable=output_var, width=40).grid(row=1, column=1, pady=5)
    ttk.Button(left_frame, text="浏览", command=browse_output).grid(row=1, column=2, padx=5, pady=5)

    # 照片大小
    ttk.Label(left_frame, text="照片大小(像素):").grid(row=2, column=0, sticky=tk.W, pady=5)
    photo_size_var = tk.StringVar(value="250")
    ttk.Entry(left_frame, textvariable=photo_size_var, width=10).grid(row=2, column=1, sticky=tk.W, pady=5)

    # 生成按钮
    generate_button = ttk.Button(left_frame, text="生成爱心拼贴画", command=generate, style='Accent.TButton')
    generate_button.grid(row=3, column=0, columnspan=3, pady=20)

    # 日志文本框
    log_text = tk.Text(right_frame, wrap=tk.WORD, height=20)
    log_text.pack(fill=tk.BOTH, expand=True, pady=(0, 10))

    # 进度条
    progress_var = tk.DoubleVar(value=0)
    progress_bar = ttk.Progressbar(right_frame, variable=progress_var, maximum=100)
    progress_bar.pack(fill=tk.X, pady=(0, 10))

    # 状态标签
    status_var = tk.StringVar(value="准备就绪")
    status_label = ttk.Label(right_frame, textvariable=status_var, relief=tk.SUNKEN, anchor=tk.W)
    status_label.pack(fill=tk.X, pady=(0, 10))

    # 添加样式
    style.configure('Accent.TButton', font=('Arial', 10, 'bold'))

    # 启动日志更新
    update_log()

    # 运行主循环
    root.mainloop()

if __name__ == '__main__':
    # 检测是否有命令行参数
    import sys
    if len(sys.argv) > 1:
        # 有命令行参数,使用命令行模式
        main()
    else:
        # 无命令行参数,使用图形界面
gui_main()欢迎转载,原文博主:https://blog.csdn.net/qq_43179428