前言
本篇文章使用的版本是 SpringBoot 3.4.1。实际上在熟悉 SpringBoot 之后,我们会发现它并不能算是一个框架,更准确的说,它是一个 Spring 项目的快速集成脚手架。提前配置了一系列可以和 Spring 整合的第三方组件。它基于 Spring 框架做了一系列的扩展。
所以如果已经熟悉 Spring 核心组件源码的话,学习 SpringBoot 将会非常非常简单!如果完全没有 Spring 的源码经验,直接看 SpringBoot 源码 ,可能会很吃力,因为涉及到太多 Spring 的知识,会无法理解。包括但不限于 后置处理器、IOC 容器、Spring 事件、资源加载器 等,不过问题倒也不是太大,只要时间足够,只要看的次数够多,终究都能够掌握。
SpringBoot & Spring 架构图示概览
这里我以 SpringBoot 源码入口为起点,画了一个相关的流程图,包含了 SpringBoot、Spring 事务、Spring AOP、Spring 事件、BeanFactoryPostProcessor、BeanPostProcessor 等所有 Spring 知识,以及相关模块之间的交互联系,后续也会持续更新此图(因为我自己还没有学完),我试了下作者侧这边更新后,分享的协作链接也会实时变更,希望对大家有帮助
SpringBoot & Spring 架构图 持续更新 对于即将需要面试的同学应该会比较有帮助!
源码误区
我们学习源码绝不是为了一开始就抱着搞懂每一行代码的目的。而是先看主脉络,这个流程大概干了哪几件大事儿,

就像这棵树一样,先摸清楚主树干,然后再结合我们工作中的使用经验,找到一个案例,debug 看它属于哪个分支流程,再去细看分支流程,
应该按照以下步骤
- 了解一个框架的主流程
- 了解某个分支流程
- 在这个分支流程中可以自定义扩展
- 揣摩作者这样实现的好处,有没有替代方式
主流程图
我们阅读 SpringApplication#run() 方法可以发现它的外层代码很简单。有以下几个大流程。
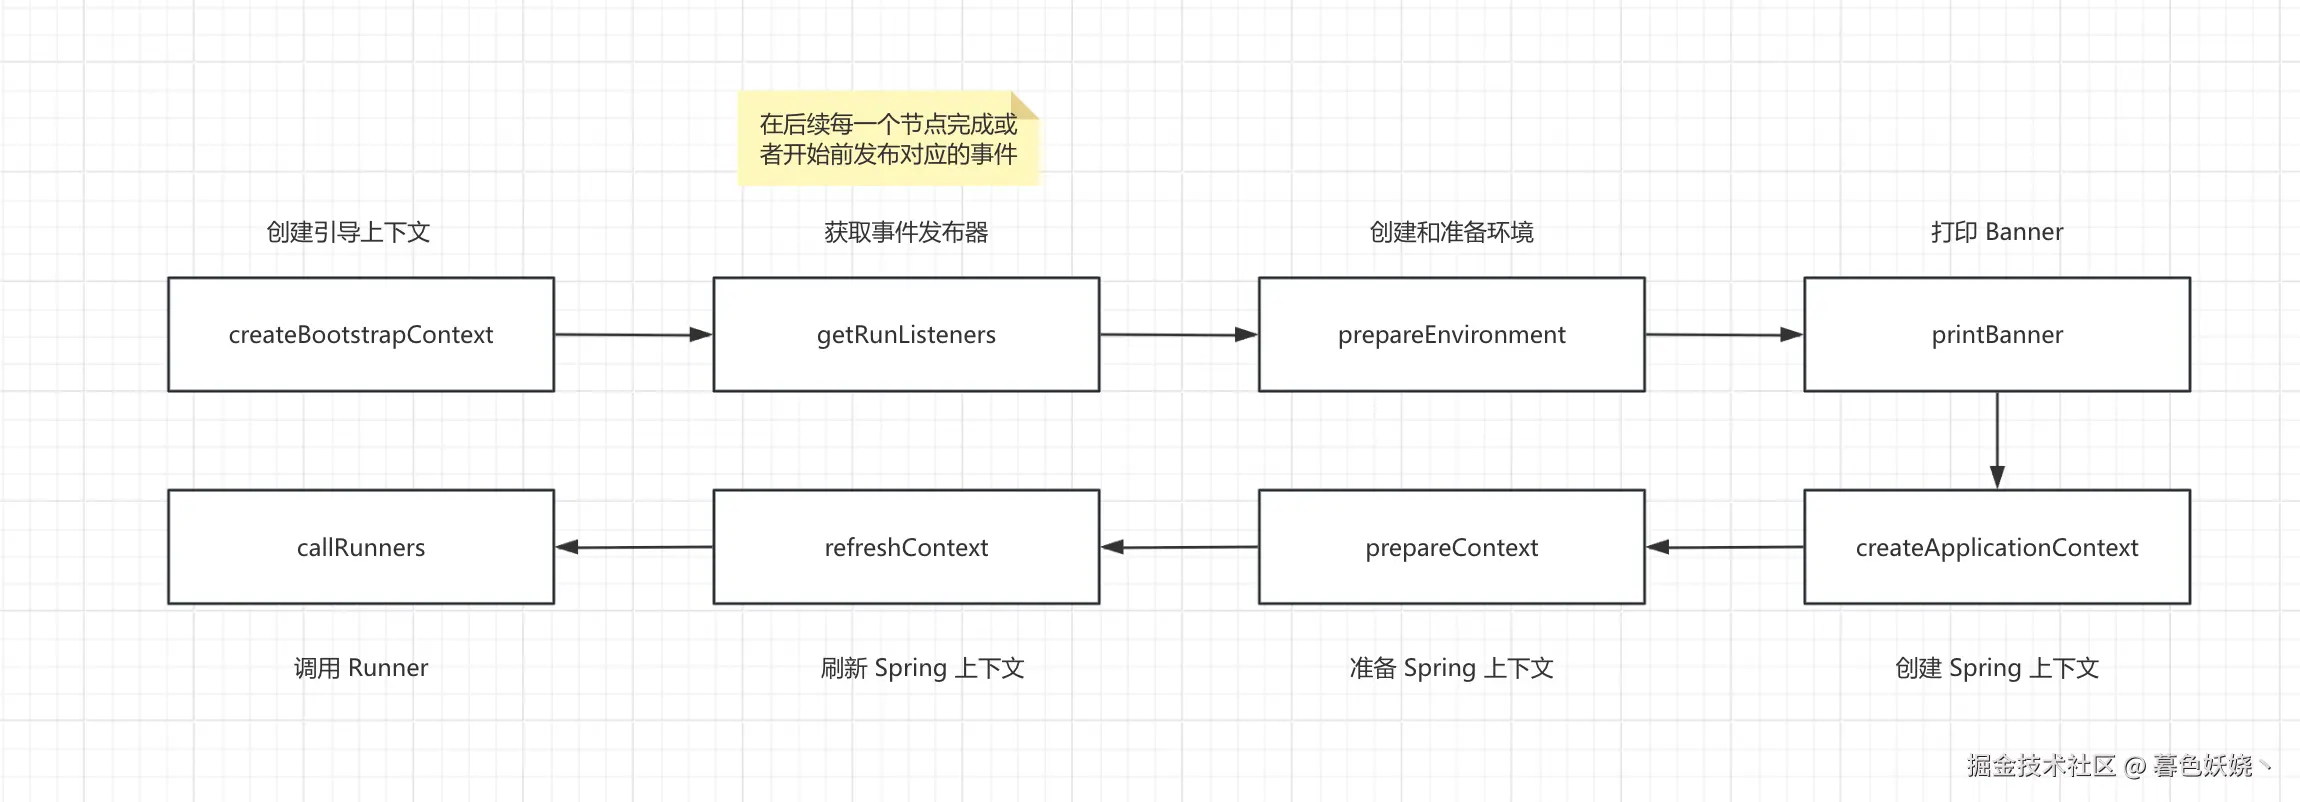
当然,这些大流程里面还有很多分支。下面的章节,我们一一说明这些阶段。
创建 BootStrapContext
介绍
可以查看这个类的注释或者 官网介绍 ,说它是一个早于 Spring 上下文 ApplicationContext 创建前创建的临时容器,叫做 引导上下文 ,它的可用时机是从 SpringBoot 项目启动开始到 Spring 容器 ApplicationContext 创建之后,准备好之前
我们可以看下源码,结合注释来看,确实类似于一个 Spring 容器上下文 ApplicationContext,
java
/**
 * A simple bootstrap context that is available during startup and {@link Environment}
 * post-processing up to the point that the {@link ApplicationContext} is prepared.
 * <p>
 * Provides lazy access to singletons that may be expensive to create, or need to be
 * shared before the {@link ApplicationContext} is available.
 *
 * @author Phillip Webb
 * @since 2.4.0
 */
public interface BootstrapContext {
    <T> T get(Class<T> type) throws IllegalStateException;
    <T> T getOrElse(Class<T> type, T other);
    <T> T getOrElseSupply(Class<T> type, Supplier<T> other);
    <T, X extends Throwable> T getOrElseThrow(Class<T> type, Supplier<? extends X> exceptionSupplier) throws X;
    <T> boolean isRegistered(Class<T> type);
}
可以从这个容器中获取对象,当然我们要提前通过注册器 BootStrapResitry 向其中注册对象,就像 BeanDefinitionRegistry 一样
java
public interface BootstrapRegistry {
    <T> void register(Class<T> type, InstanceSupplier<T> instanceSupplier);
    <T> void registerIfAbsent(Class<T> type, InstanceSupplier<T> instanceSupplier);
    void addCloseListener(ApplicationListener<BootstrapContextClosedEvent> listener);
}
它的创建很简单,就是 new 了一个实例
java
private DefaultBootstrapContext createBootstrapContext() {
    DefaultBootstrapContext bootstrapContext = new DefaultBootstrapContext();
    this.bootstrapRegistryInitializers.forEach((initializer) -> initializer.initialize(bootstrapContext));
    return bootstrapContext;
}
从 createBootstrapContext() 的第二行代码我们发现,创建完 DefaultBootstrapContext 之后会调用一个初始化器列表,因此我们可以实现 BootstrapRegistryInitializer 创建自定义初始化器。比如,在 SpringBoot 启动后,Spring 容器创建前,向 BootStrapContext 里面存放一些自定义的对象。
引导上下文 创建成功后会通过 EventPublishingRunListener(下一段会介绍) 发布一个 ApplicationStartingEvent 事件
使用场景
目前还没发现有什么实际使用场景,评论区知道的可以分享一下......
使用方式
- 使用
SpringApplication添加
java
SpringApplicationBuilder builder = new SpringApplicationBuilder(SpringAiDemoApplication.class);
SpringApplication application = builder.application();
application.addBootstrapRegistryInitializer(new MyBootstrapRegistryInitializer());
application.run(args);- 配置
spring.factories
在 resources 文件夹下新建 META-INF/spring.factories ,然后文件配置如下
ini
org.springframework.boot.BootstrapRegistryInitializer=\
com.syc.springaidemo.config.MyBootstrapRegistryInitializer
项目启动就会执行 MyBootstrapRegistryInitializer.initialize 。具体原理下一章节会解释
获取 SpringApplicationRunListeners
SpringApplicationRunListeners 是 SpringBoot 运行流程阶段的监听器集合包装类
java
class SpringApplicationRunListeners {
    private final List<SpringApplicationRunListener> listeners;
    //...
}
使用集合包装类是为了扩展,这意味着我们可以额外自定义多个
SpringApplicationRunListener在SpringBoot启动的不同阶段来做我们自定义的逻辑
原始类/接口是 SpringApplicationRunListener。当 SpringBoot 流程启动进行到不同的阶段,都会调用对应的阶段方法。
java
public interface SpringApplicationRunListener {

    /**
     * SpringBoot 启动 创建 BootstrapContext 之后立即调用
     */
    default void starting(ConfigurableBootstrapContext bootstrapContext) {}

    /**
     * SpringBoot 环境准备好之后立即调用
     */
    default void environmentPrepared(ConfigurableBootstrapContext bootstrapContext,
          ConfigurableEnvironment environment) {}

    /**
     * SpringBoot 上下文准备好之后立即调用
     */
    default void contextPrepared(ConfigurableApplicationContext context) {}

    /**
     * SpringBoot 上下文被加载后立即调用
     */
    default void contextLoaded(ConfigurableApplicationContext context) {}

    /**
     * Spring 上下文被刷新后立即调用
     */
    default void started(ConfigurableApplicationContext context, Duration timeTaken) {}

    /**
     * Runner 调用完后立即调用
     */
    default void ready(ConfigurableApplicationContext context, Duration timeTaken) {}

    /**
     * 发生异常立即调用
     */
    default void failed(ConfigurableApplicationContext context, Throwable exception) {}

}
可以参考官网介绍 Application Events and Listeners
其默认实现类是系统内置的 EventPublishingRunListener 。我们可以看一下它的源码,发现在这些阶段 SpringBoot 发出了对应的事件
-
ApplicationStartingEvent -
ApplicationEnvironmentPreparedEvent -
ApplicationContextInitializedEvent -
ApplicationPreparedEvent -
ApplicationStartedEvent -
ApplicationReadyEvent -
ApplicationFailedEvent
然后有内置的监听器会监听,做一些对应的逻辑处理
SpringBoot 内置的事件监听器
正如上面介绍的一样,有一个监听器集合去监听 SpringBoot 启动流程不同阶段发布的事件,我们继续观察 spring.factories 文件,发现了下面一系列的监听器,注意看它们的包名,是属于 SpringBoot 的
factories
# Application Listeners
org.springframework.context.ApplicationListener=\
org.springframework.boot.ClearCachesApplicationListener,\
org.springframework.boot.builder.ParentContextCloserApplicationListener,\
org.springframework.boot.context.FileEncodingApplicationListener,\
org.springframework.boot.context.config.AnsiOutputApplicationListener,\
org.springframework.boot.context.logging.LoggingApplicationListener,\
org.springframework.boot.env.EnvironmentPostProcessorApplicationListener
比如一个很重要的阶段就是环境创建并且准备好,此时会调用 SpringApplicationRunListener.environmentPrepared() 发布 ApplicationEnvironmentPreparedEvent 事件。EnvironmentPostProcessorApplicationListener 会对此事件监听,对 Environment 做一些处理。下一部分环境章节会详细介绍它到底干了什么
那么我们的扩展点就来了,我们可以自定义一个监听器类 MyTestListener,然后自己在项目类路径下也创建一个 META-INF/spring.factories 文件,按照和它一样的规则配置,这样我们自己定义的监听器也会生效
spring.factories 介绍
一个值得思考的问题是 EventPublishingRunListener 是怎样在 SpringBoot 流程中发挥作用的?包括我们上面配置自定义 MyBootstrapRegistryInitializer 。 为什么配置在 spring.factories 就能生效?我们没有显示的使用 @Bean、@Configuration 去标注它作为一个 Spring Bean,更何况此时 SpringBoot 连环境都还没有创建,更别说 Spring 容器了,所以即使用了 @Bean 、@Configuration 此时也不会生效。
跟踪源码我们会发现 getRunListeners 内部调用了这样一个方法
java
SpringFactoriesLoader.forDefaultResourceLocation(getClassLoader()).load(type, argumentResolver)继续追踪我们会发现它读取了一个固定位置的文件 FACTORIES_RESOURCE_LOCATION = META-INF/spring.factories。
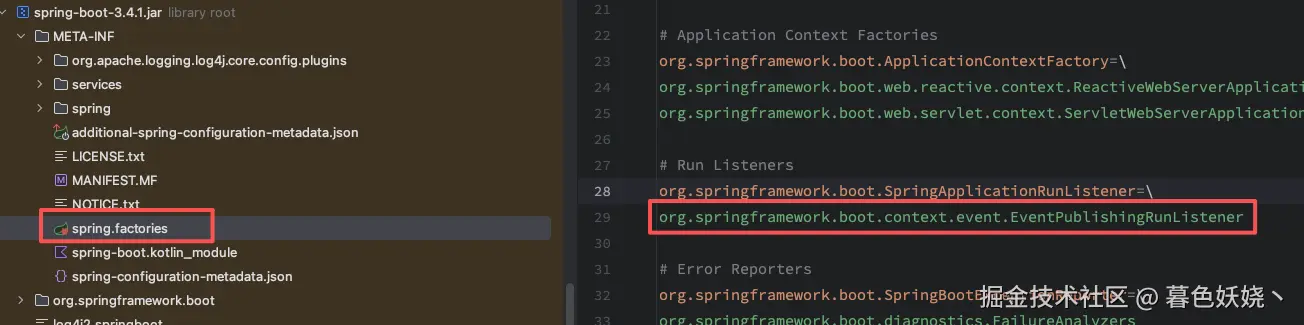
这部分其实是 Spring 的内容,SpringFactoriesLoader 就是读取类路径下所有 META-INF/spring.factories 的配置,它并不会被注册为一个 Bean 放入 Spring 容器。而是为了解决在 Spring 容器 启动前,用户想要额外执行一些自定义的逻辑。所以 Spring 提供了这样的一个入口,系统内部会使用 SpringFactoriesLoader 读取放到类路径下 spring.factories 文件里面的配置类,来实现在 Spring 容器准备好之前的一些需要扩展的功能 。
BootstrapRegistryInitializer 和 SpringApplicationRunListeners 都是这个原理,源码中去执行这些可扩展组件的时候,都是使用 SpringFactoriesLoader 从配置文件额外读取,允许我们自己扩展。
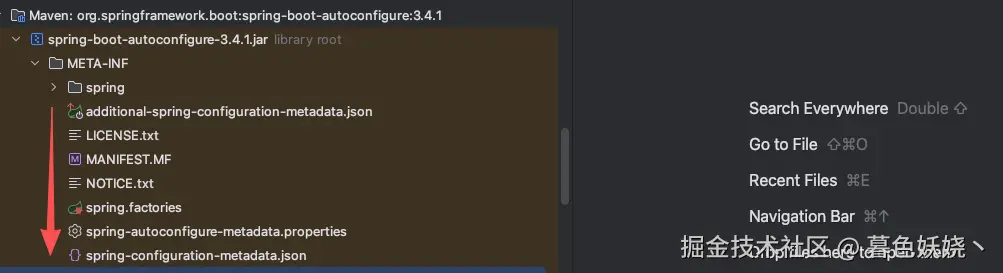
spring.factories 同级的其他文件
相比于 spring.factories,spring-boot-autoconfigure 下有一些其他文件也有不同的作用
additional-spring-configuration-metadata.json
这个文件的作用是为了让我们在 application.yml 里面配置的属性可以被定位到,假如我们要在配置文件里面配置一些非 @ConfigurationPropeties 绑定的属性,那么在配置文件里面就会有告警,而且点击配置无法定位。
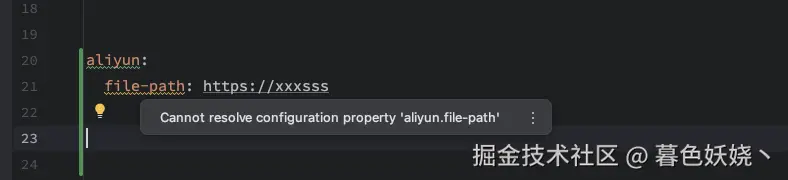
但是我们在 META-INF 文件夹下新建 additional-spring-configuration-metadata.json 文件,配置下面这段内容
json
{
  "properties": [
    {
      "name": "aliyun.filePath",
      "type": "java.lang.String",
      "description": "第三方服务的 API 文件路径"
    }
  ]
}
然后再去看 application.yml 配置文件就没有这个告警了,并且点击左键也能跳转到我们定义的 json 文件内
spring-autoconfigure-metadata.properties
这个文件是比较有实际意义的,点进去我们会发现这里面配置了 SpringBoot 所有支持的第三方组件的自动配置类。我们以 Redis 为例

可以看到这里有一个条件配置,这个文件的作用就是在 SpringBoot 启动的时候根据目前的实际状态判定一个自动配置类是否需要被 JVM 加载,如果不需要就跳过去。比如我们现在这个应用没有引入 redis ,根本用不着,那 SpringBoot 还去让 JVM 加载 RedisAutoConfiguration 这个类,是不是就是浪费资源?
在获取所有自动配置类的过程中会读取这个文件,然后过滤掉当前不需要加载的自动配置类,只返回实际需要加载的
java
//org.springframework.boot.autoconfigure.AutoConfigurationImportSelector#getAutoConfigurationEntry
protected AutoConfigurationEntry getAutoConfigurationEntry(AnnotationMetadata annotationMetadata) {
    if (!isEnabled(annotationMetadata)) {
       return EMPTY_ENTRY;
    }
    AnnotationAttributes attributes = getAttributes(annotationMetadata);
    //扫描 imports 文件(后面的章节会详细介绍)
    List<String> configurations = getCandidateConfigurations(annotationMetadata, attributes);
    configurations = removeDuplicates(configurations);
    Set<String> exclusions = getExclusions(annotationMetadata, attributes);
    checkExcludedClasses(configurations, exclusions);
    configurations.removeAll(exclusions);
    //读取 spring-autoconfigure-metadata.properties 过滤当前不需要加载的自动配置类
    configurations = getConfigurationClassFilter().filter(configurations);
    fireAutoConfigurationImportEvents(configurations, exclusions);
    return new AutoConfigurationEntry(configurations, exclusions);
}
spring-configuration-metadata.json
这个文件里面配置了所有 SpringBoot 自动配置组件的属性字段,仅仅是一个提示文档,例如其中对于 AOP 的配置
json
{
  "name": "spring.aop.proxy-target-class",
  "type": "java.lang.Boolean",
  "description": "Whether subclass-based (CGLIB) proxies are to be created (true), as opposed to standard Java interface-based proxies (false).",
  "defaultValue": true
}
就是告诉我们开发者这个字段默认值是 true,这个字段的作用是 description 的内容。
创建和准备环境 Environment
创建一个 SpringBoot Web 环境下的特定环境对象 ApplicationServletEnvironment。其中有两个重要的成员变量
- 资源列表 : 存储当前环境中有哪些资源
- 资源解析器 : 从当前环境中获取资源时提供解析方式
这里 debug 去查看创建 Environment 的调用链会有一点复杂,因为走了一系列的父类构造方法。顺序如下
java
new ApplicationServletEnvironment()
↓
new StandardServletEnvironment()
↓
new StandardEnvironment()
↓
new AbstractEnvironment()
↓
new AbstractEnvironment(MutablePropertySources propertySources)
AbstractEnvironment 的构造方法中会给资源列表中添加一些初始资源、创建属性资源解析器
java
protected AbstractEnvironment(MutablePropertySources propertySources) {
    this.propertySources = propertySources;
    this.propertyResolver = createPropertyResolver(propertySources);
    customizePropertySources(propertySources);
}
属性资源列表
环境创建之后会初始化一个属性资源列表包含以下两个内容,省略 StubPropertySource 这是一个占位的抽象资源类,后续会被替换为实际资源
PropertiesPropertySource从System.getProperties()获取JVM级别的系统属性SystemEnvironmentPropertySource从System.getEnv()获取操作系统级别的环境变量
完全启动之后,环境中有以下资源
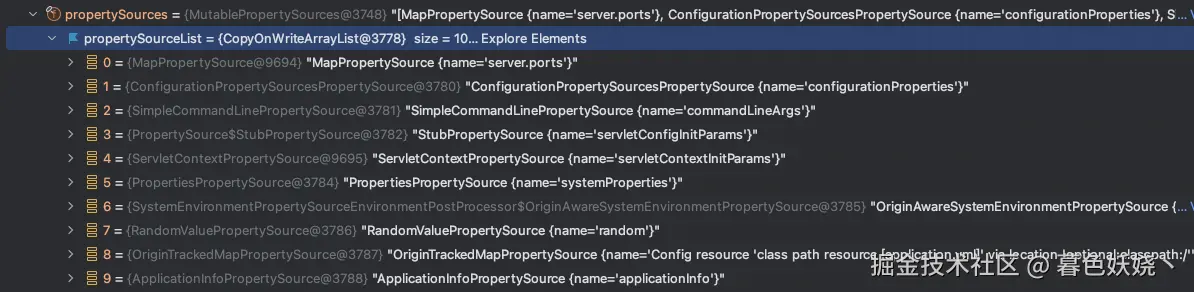
根据这个 debug 面板我们几乎全部能猜出他们的资源类型。
属性资源解析器
为什么需要资源解析器?比如有时候我们在配置文件中配置的是 ${spring.cloud.client.ip-address} 这种格式,资源解析器就可以解析这种格式的配置,找到正确的值。又或者我们从环境里面获取资源的时候获取的不是 String 类型,需要智能转换成实体对象或者其他类型。
java
//org.springframework.core.env.AbstractEnvironment#getProperty()

@Override
public <T> T getProperty(String key, Class<T> targetType, T defaultValue) {
    return this.propertyResolver.getProperty(key, targetType, defaultValue);
}
属性解析器 this.propertyResolver
java
//ConfigurationPropertySourcesPropertyResolver#getProperty() 这个名字真是长!

private <T> T getProperty(String key, Class<T> targetValueType, boolean resolveNestedPlaceholders) {
    Object value = findPropertyValue(key);//遍历资源列表
    if (value == null) {
       return null;
    }
    if (resolveNestedPlaceholders && value instanceof String string) {
       value = resolveNestedPlaceholders(string);//解析占位符 {}、[]、()
    }
    try {
       return convertValueIfNecessary(value, targetValueType);、//类型转换
    }
    catch (ConversionFailedException ex) {
       Exception wrappedCause = new InvalidConfigurationPropertyValueException(key, value,
             "Failed to convert to type " + ex.getTargetType(), ex.getCause());
       throw new ConversionFailedException(ex.getSourceType(), ex.getTargetType(), ex.getValue(), wrappedCause);
    }
}
解析占位符的原理就是从已经存在的属性资源列表中,去查询占位符里给定的 key 。比如,假如我们配置一个 special-key:${spring.cloud.client.ip-address:192.168.1.1} 。那 special-key 最终的值怎么来呢,先去当前环境 Environment 的所有属性资源列表中查询字段名是 spring.cloud.client.ip-address 的变量的值,如果找到了,就取这个值,找不到就取冒号后面的作为默认值。
类型转换服务 ApplicationConversionService
用于类型转换。最典型的用法就是我们使用 @ConfigurationProperties 来映射配置文件和配置对象绑定
java
@ConfigurationProperties(prefix = "syc")
@Component
@Data
public class TestBindProperty {
    private Duration expireTime;
}
配置文件配置
yaml
syc:
  expireTime: 7d
就能正确映射到 TestBindProperty Bean 对象中,赋值给 Duration 类型的字段,它的转换是通过 ApplicationConversionService 内部的转换器实现的,org.springframework.core.convert.support 包下定义了各种类型转换器,而 SpringBoot 包下又额外扩展了一些转换器,例如 org.springframework.boot.convert.StringToDurationConverter。
SpringMVC中,我们@Contoller标注的控制器中,从客户端传递的参数也能自动转换成对象或者,String转Long、Integer,原理是通过各种参数解析器HandlerMethodArgumentResolver,而参数解析器内部也是通过类型转换服务,进而通过各种Converter来实现的。
环境后置处理器
环境后置处理器 EnvironmentPostProcessor,通过监听环境准备好事件,在这里会执行一些后置处理器,往当前 Environment 里面添加更多的属性资源,比如解析我们的配置文件 application.yml,此时多了一个配置文件资源。比如向环境中添加随机数资源,便于我们在 application.yml 配置文件中需要给某个值配置随机数。具体可以查看 spring.factories 文件
ini
# Environment Post Processors
org.springframework.boot.env.EnvironmentPostProcessor=\
org.springframework.boot.cloud.CloudFoundryVcapEnvironmentPostProcessor,\
org.springframework.boot.context.config.ConfigDataEnvironmentPostProcessor,\
org.springframework.boot.env.RandomValuePropertySourceEnvironmentPostProcessor,\
org.springframework.boot.env.SpringApplicationJsonEnvironmentPostProcessor,\
org.springframework.boot.env.SystemEnvironmentPropertySourceEnvironmentPostProcessor,\
org.springframework.boot.reactor.ReactorEnvironmentPostProcessor
通过这些后置处理器的名字我们大致能猜到作用,也可以直接 debug 调试源码。例如 ConfigDataEnvironmentPostProcessor 就是读取 application.yml 配置内容的环境后置处理器
打印 Banner
在控制台或者日志文件里面打印一个横幅。
markdown
  .   ____          _            __ _ _
 /\\ / ___'_ __ _ _(_)_ __  __ _ \ \ \ \
( ( )\___ | '_ | '_| | '_ \/ _` | \ \ \ \
 \\/  ___)| |_)| | | | | || (_| |  ) ) ) )
  '  |____| .__|_| |_|_| |_\__, | / / / /
 =========|_|==============|___/=/_/_/_/

 :: Spring Boot ::                (v3.4.1)
逻辑很简单,观察源码,
java
private Banner getTextBanner(Environment environment) {
    String location = environment.getProperty(BANNER_LOCATION_PROPERTY, DEFAULT_BANNER_LOCATION);
    Resource resource = this.resourceLoader.getResource(location);
    if (resource.exists()){...}
    return null;
}
如果这个位置 DEFAULT_BANNER_LOCATION = banner.txt 存在指定文件,就打印这个文件里面的内容,如果没有就用系统内置的,也就是上面的文本图案。观察到 location 是从环境变量里面获取的,我们可以在 application.yml 中配置 spring.banner.location 来任意指定 banner 文件的资源位置。
创建和准备 Spring 上下文
环境准备好之后就开始创建 Spring 上下文 ApplicationContext 了。这里在 Web 环境中创建的是AnnotationConfigServletWebServerApplicationContext,它是 SpringBoot 扩展的一个 ApplicationContext 的实现类。
注册 BeanFactoryBostProcessor、BeanBostProcessor
上下文的构造方法中会实例化 AnnotatedBeanDefinitionReader
java
public AnnotationConfigServletWebServerApplicationContext() {
    this.reader = new AnnotatedBeanDefinitionReader(this);
    this.scanner = new ClassPathBeanDefinitionScanner(this);
}
而 AnnotatedBeanDefinitionReader 的构造方法中会注册一些内置的注解后置处理器
java
public AnnotatedBeanDefinitionReader(BeanDefinitionRegistry registry, Environment environment) {
    //...
    AnnotationConfigUtils.registerAnnotationConfigProcessors(this.registry);
}
这些处理器会在 Spring 容器刷新过程中调用,通过名称我们基本上能猜到它的作用,这部分属于 Spring 的内容,后面 Spring 源码文章会详细介绍。
java
ConfigurationClassPostProcessor  处理所有配置注解 @Componentscan、@Import、@Bean、@Component 等
AutowiredAnnotationBeanPostProcessor  处理 @Autowired
CommonAnnotationBeanPostProcessor     处理 @PostConstruct、@Resource 等
PersistenceAnnotationBeanPostProcessor(如果用了 JPA)
EventListenerMethodProcessor    处理 @EventListener
DefaultEventListenerFactory
创建完毕后会执行一个准备方法 org.springframework.boot.SpringApplication#prepareContext,就是给 AnnotationConfigServletWebServerApplicationContext 的成员变量做一些初始化赋值。
- 设置
environment - 执行
ApplicationContextInitializer - 发布上下文 准备、加载事件
- 等等
执行 ApplicationContextInitializer
java
@FunctionalInterface
public interface ApplicationContextInitializer<C extends ConfigurableApplicationContext> {
    void initialize(C applicationContext);
}
这个初始化器被调用的时机是 Spring 上下文被刷新之前,对容器上下文进行一些处理操作,比如,添加 BeanFactoryPostProcessor、BeanPostProcessor 等等。我们以 SpringBoot 内置的一个初始化器 SharedMetadataReaderFactoryContextInitializer 为例。
在这个初始化器的回调方法 initialize() 中,向 ApplicationContext 中添加了一个 BeanFactoryPostProcessor
java
@Override
public void initialize(ConfigurableApplicationContext applicationContext) {
    //...
    BeanFactoryPostProcessor postProcessor = new CachingMetadataReaderFactoryPostProcessor(applicationContext);
    applicationContext.addBeanFactoryPostProcessor(postProcessor);
}
这个后置处理器的作用是向 Spring 容器注册一个 MetadataReaderFactory 的 BeanDefinition。它是一个类资源加载的缓存,Spring 容器启动和刷新过程中,可能会有多个地方需要根据 className 加载类路径下的资源,为了提高整体性能,已加载的资源将会被缓存。具体实现类是 ConcurrentReferenceCachingMetadataReaderFactory
刷新 Spring 容器
这部分是 Spring 流程的核心方法。
- 调用
BeanFactoryBostProcessor - 注册
BeanPostProcessor - 提前注册一些系统内置单例
Bean - 创建
Web服务器 - 实例化所有非延迟加载的单例
Bean - 调用
BeanPostProcessor - 调用
LifecycleProcessor
这里属于 Spring 内容,不过多介绍,每一步里面都有一系列复杂的逻辑,这里只提两个重点 SpringBoot 自动配置的核心 和 内嵌 Web 服务器
SpringBoot 自动配置的核心
这是 SpringBoot 的高频面试题,很多人会回答说因为有很多定制好的 starter,也有回答说 @EnableAutoConfiguration 启用的所有自动配置,其实并没有说到核心点上。其核心原理就是 @SpringBootApplication 内部的组合注解 @Import(AutoConfigurationImportSelector.class)。
这需要用到 Spring 的配置类解析原理,上一段创建上下文 ApplicationContext 的时候,注册了一个 BeanFactoryPostProcessor → ConfigurationClassPostProcessor 。在执行其中一个后置处理方法 postProcessBeanDefinitionRegistry() 时,会根据 SpringBoot 提供的主类为起点,循环递归的解析各种配置注解。
@ComponentScan@Component、@Service @Configuration等@Import
这个 @Import 注解解析就是重点。如果发现值是一个 ImportSelector 类型,解析的时候会执行 selectImports 方法获取需要导入的配置类,AutoConfigurationImportSelector 是一个延迟导入器,获取导入类的方式是执行内部 Group 的两个方法
java
interface Group {

    /**
     * 获取导入类逻辑
     */
    void process(AnnotationMetadata metadata, DeferredImportSelector selector);

    /**
     * 返回导入类列表
     */
    Iterable<Entry> selectImports();
我们一路定位下去看看导入的配置类列表到底是怎么来的。
java
public static ImportCandidates load(Class<?> annotation, ClassLoader classLoader) {
    Assert.notNull(annotation, "'annotation' must not be null");
    ClassLoader classLoaderToUse = decideClassloader(classLoader);
    String location = String.format(LOCATION, annotation.getName());
    Enumeration<URL> urls = findUrlsInClasspath(classLoaderToUse, location);
    List<String> importCandidates = new ArrayList<>();
    while (urls.hasMoreElements()) {
       URL url = urls.nextElement();
       importCandidates.addAll(readCandidateConfigurations(url));
    }
    return new ImportCandidates(importCandidates);
}
LOCATION = "META-INF/spring/%s.imports" 我们发现它加载了这个路径下的文件,%s 是占位符,然后我们去观察 mybatisplus、redisTemplate 等组件的 starter 依赖库就会明白了
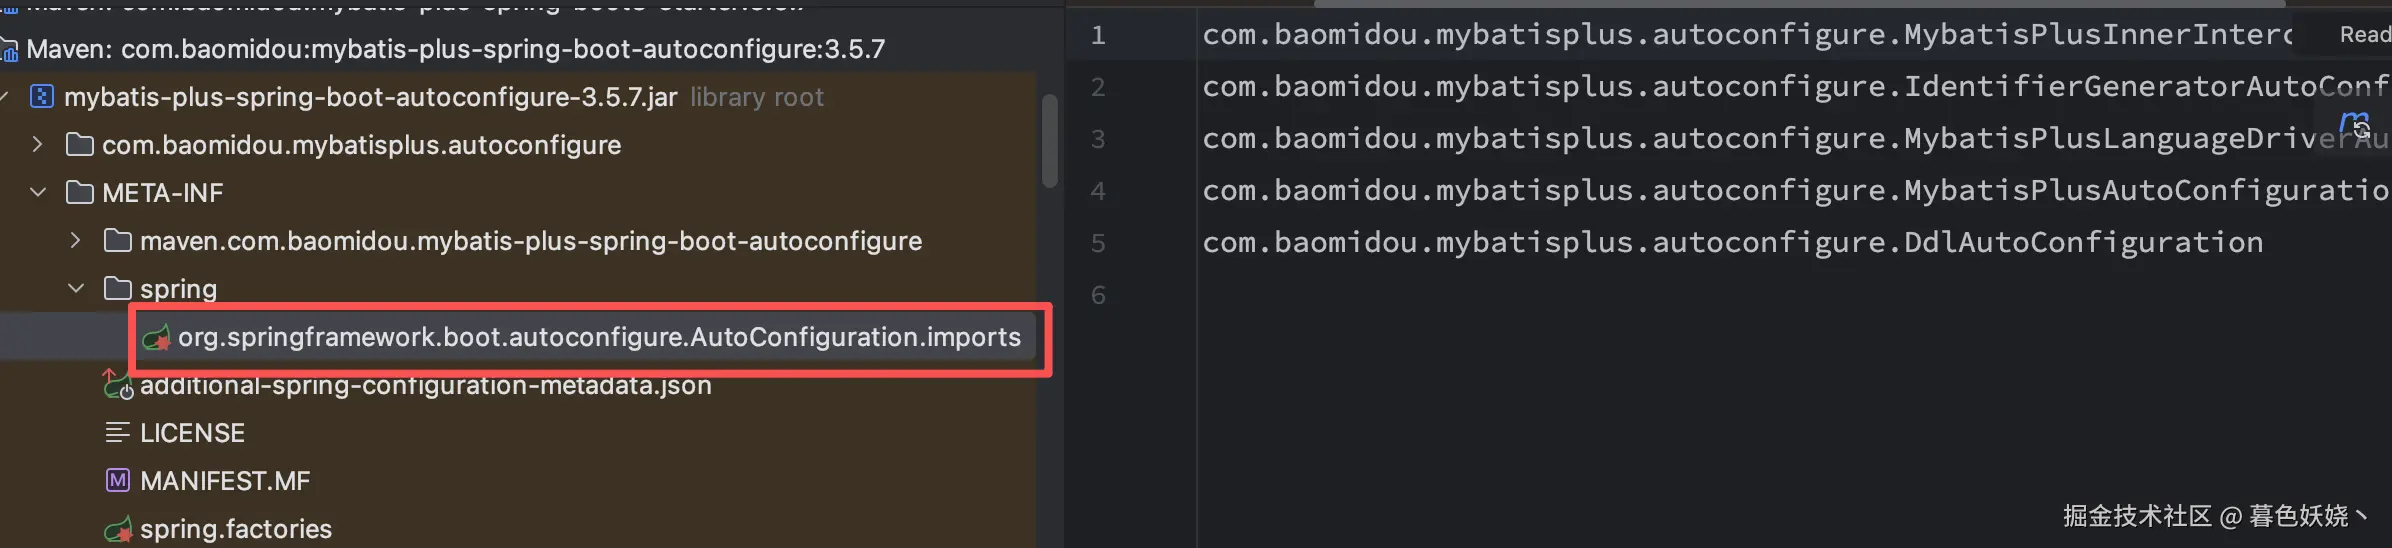
这个配置文件里面配置的类上都使用了 @Configuration 。Spring 先把 META-INF/spring/%s.imports 文件里面的类加载为配置类,然后再递归解析这些配置类内部的配置注解 @Import、@ComponentScan、@Bean 等等
关于 Spring 递归解析配置类的逻辑后续 Spring 系列文章会详细说明
内嵌 Web 服务器
这也是一个曾经高频面试题,为什么我们传统的方式要单独起一个 Tomcat 服务,而 SpringBoot 通过一个 main 方法就能提供 Web 服务?其实很简单,就是内部创建了一个 Web 服务器,我们自己定义一个 main 方法,如果内部创建了 Web 服务器,那我们这个程序也可以提供 Web 服务。
SpringBoot3 提供了三种支持的 Web 服务器
TomcatUndertowJetty
默认是使用 Tomcat,可以查看自动配置类
java
@Configuration(proxyBeanMethods = false)
@ConditionalOnClass({ Servlet.class, Tomcat.class, UpgradeProtocol.class })
@ConditionalOnMissingBean(value = ServletWebServerFactory.class, search = SearchStrategy.CURRENT)
static class EmbeddedTomcat {

    @Bean
    TomcatServletWebServerFactory tomcatServletWebServerFactory(
          ObjectProvider<TomcatConnectorCustomizer> connectorCustomizers,
          ObjectProvider<TomcatContextCustomizer> contextCustomizers,
          ObjectProvider<TomcatProtocolHandlerCustomizer<?>> protocolHandlerCustomizers) {
       TomcatServletWebServerFactory factory = new TomcatServletWebServerFactory();
       factory.getTomcatConnectorCustomizers().addAll(connectorCustomizers.orderedStream().toList());
       factory.getTomcatContextCustomizers().addAll(contextCustomizers.orderedStream().toList());
       factory.getTomcatProtocolHandlerCustomizers().addAll(protocolHandlerCustomizers.orderedStream().toList());
       return factory;
    }

}
创建 Web 服务器的代码在 org.springframework.boot.web.servlet.context.ServletWebServerApplicationContext#onRefresh 方法中
java
@Override
protected void onRefresh() {
    super.onRefresh();
    try {
       createWebServer();
    }
    catch (Throwable ex) {
       throw new ApplicationContextException("Unable to start web server", ex);
    }
}
这里执行完毕之后还不能对外提供服务,还需要调用 org.springframework.boot.web.server.WebServer#start,这一步调用是在刷新 Spring 容器的最后一步,执行 Lifecycle#start。后续 Spring 系列会详细说明。
调用 Runner
SpringBoot 提供了一个 Runner 接口,让我们可以在项目完全启动后,也就是 Spring 容器已经刷新完成,万事就绪之后做一些事情。它有两个子接口
CommandLineRunnerApplicationRunner
两者功能很像,都是应用对外提供流量之前(理论上)做一些事情。区别点是方法入参不同
java
@Component
public class TestRunner implements ApplicationRunner {
    @Override
    public void run(ApplicationArguments args) throws Exception {
        System.out.println(args);
    }
}
java
@Component
public class TestRunner2 implements CommandLineRunner {

    @Override
    public void run(String... args) throws Exception {
        System.out.println("TestRunner2 running...");
    }
}
ApplicationRunner 的入参是被 SpringBoot 处理过的,提供了一些 API 来分别获取选项参数和非选项参数。
关于选项参数和非选项参数可以参考这个类
org.springframework.core.env.SimpleCommandLineArgsParser的注释,规范写的很清楚
AvailabilityChangeEvent
我们可以看到 Runner 调用完毕之后会执行 EventPublishingRunListener#ready ,在此之前容器刷新完毕还会调用 EventPublishingRunListener#started
java
@Override
public void started(ConfigurableApplicationContext context, Duration timeTaken) {
    context.publishEvent(new ApplicationStartedEvent(this.application, this.args, context, timeTaken));
    AvailabilityChangeEvent.publish(context, LivenessState.CORRECT);
}

@Override
public void ready(ConfigurableApplicationContext context, Duration timeTaken) {
    context.publishEvent(new ApplicationReadyEvent(this.application, this.args, context, timeTaken));
    AvailabilityChangeEvent.publish(context, ReadinessState.ACCEPTING_TRAFFIC);
}
先发布了一个 ready 事件,然后下一步我们点击进去发现又发布了一个事件,找到对应的监听器 org.springframework.boot.availability.ApplicationAvailabilityBean ,
java
@Override
public void onApplicationEvent(AvailabilityChangeEvent<?> event) {
    Class<? extends AvailabilityState> type = getStateType(event.getState());
    if (this.logger.isDebugEnabled()) {
       this.logger.debug(getLogMessage(type, event));
    }
    this.events.put(type, event);
}
其监听方法很简单,就是向一个 Map 中设置了存活标记和就绪标记。我们查看就绪标记 org.springframework.boot.availability.ReadinessState
java
public enum ReadinessState implements AvailabilityState {

    /**
     * The application is ready to receive traffic.
     */
    ACCEPTING_TRAFFIC,

    /**
     * The application is not willing to receive traffic.
     */
    REFUSING_TRAFFIC

}
ACCEPTING_TRAFFIC 的注释是应用程序准备接受流量,第一次看到的时候我还以为 SpringBoot 内部用了什么神秘机制,控制了必须执行完毕 Runner 接口后才会让内嵌的 Tomcat 对外提供 web 服务。而我测试之后发现并不是
调用完 org.springframework.boot.web.embedded.tomcat.TomcatWebServer#start 方法时候,程序就可以对外提供服务了。
后来查了官网之后发现,这个标记是给类似 K8S 这种运维工具用的。它推荐我们在就绪标记为 ACCEPTING_TRAFFIC 之后,再对外提供服务,处理流量。
再谈 SpringBoot
现在我们再回头思考,SpringBoot 所有的功能都是基于 Spring 核心原理进行扩展
- 自动配置
XxxAutoConfiguration基于Spring的@Import注解 ConditionalOnMissingBean等一系列条件注解,基于Spring的@Conditional@ConfigurationProperties配置属性绑定,基于Spring的类型转换器org.springframework.core.convert.converter.Converter- 内嵌
Web容器,基于重写AbstractApplicationContext.onRefresh() - 等等
所以我们才会说,它不能算是一个框架,而是一个 Spring 项目的快速集成脚手架
结语
由于篇幅问题,很多东西没法细节的去展开说,毕竟 Spring 相关知识太多了,而且环环相扣,这里博主也是在准备面试所以最近会把 Spring 系列的文章全部写完,包括但不限于
- BeanFactoryPostProcessor
- BeanPostProcessor
- Bean 的生命周期
- Spring AOP 原理
- Spring 事务原理
- 等等