前情提要
需求背景:需要构建一个读卡的客户端应用,需要使用electronc框架+dll动态链接库。因为eletronc本身不能和硬件进行交互,需要通过dll文件完成和硬件的交互操作。
前提:需要确认你用到的dll文件信息
- 语言(C/C++、C#)---对应使用FFI相关库、electron-edge-js 库
- 位数(X32、X64)---运行的electronc框架以及最终打包架构必须与该位数相同
- 具体函数信息(名称、作用、入参、出参)---决定你如何调用
本文将基于X64的dll文件及ffi相关库出一期调用dll文件的教程,主要说明下载依赖到最终打包的过程中可能出现的一些问题。
正文开始--------------
创建项目
首先快速创建一个electron-vite 项目,electron-vite构建工具类似于vue的脚手架,已经把主流程需要的东西配置好了,只需要根据具体业务需求往上边加东西即可。
具体的项目创建流程跟着官网即可快速开始 | electron-vite
注意:electron-vite 需要 Node.js 版本 20.19+, 22.12+ 和 Vite 版本 5.0+
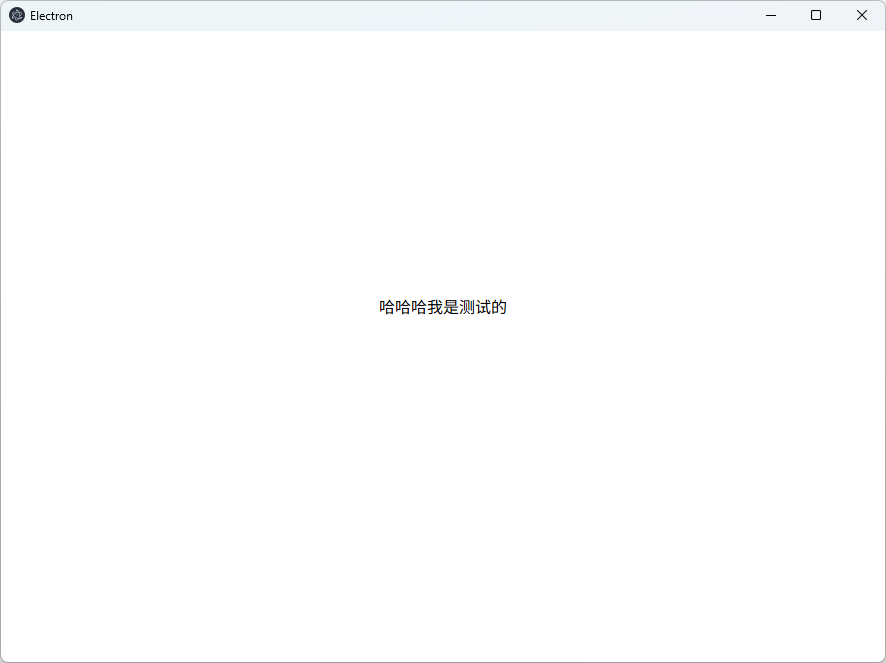
项目创建好了,运行npm run dev 成功即可,这个页面被我改过了哟。
配置依赖所需环境
查询ffi相关库,发现ffi-napi已经长期未维护,适用于版本较低的旧项目,且容易出现兼容性问题,所以我们采用@napi-ffi/ffi-napi依赖,这个是基于前者新拉的分支,支持前者的api并且对node版本20+的兼容性更好。在下载依赖之前,需要进行前置的环境配置。
GitHub - napi-ffi/node-ffi-napi: A foreign function interface (FFI) for Node.js, N-API style

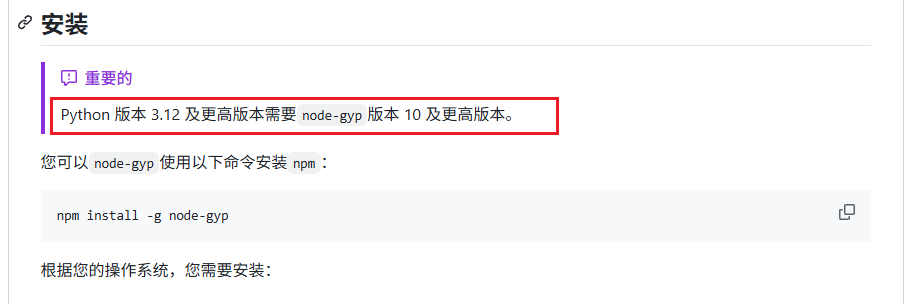
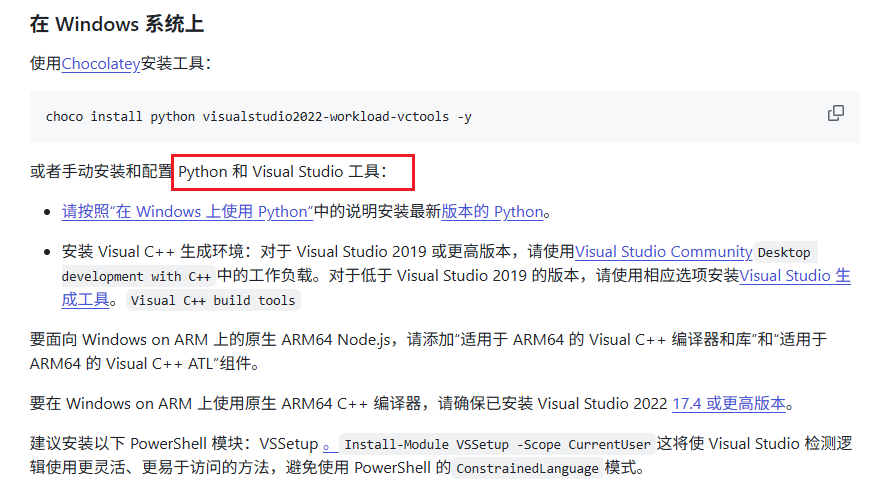
点击如图链接来到需要配置的环境(一定要注意版本的兼容),你需要准备好(以下是我的版本参考):
- Python 3.12.6 (记得勾选配置环境变量)
- Visual Studio 2022 (推荐直接在官网下载)
- node-gyp 版本10及以上
GitHub - nodejs/node-gyp: Node.js native addon build tool
将环境安装好下载依赖即可
npm install @napi-ffi/ffi-napi
调用dll文件
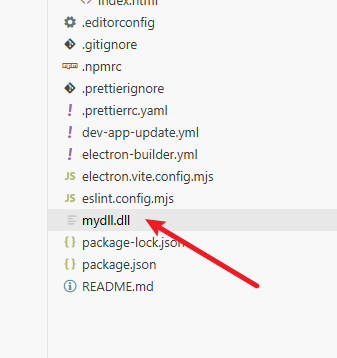
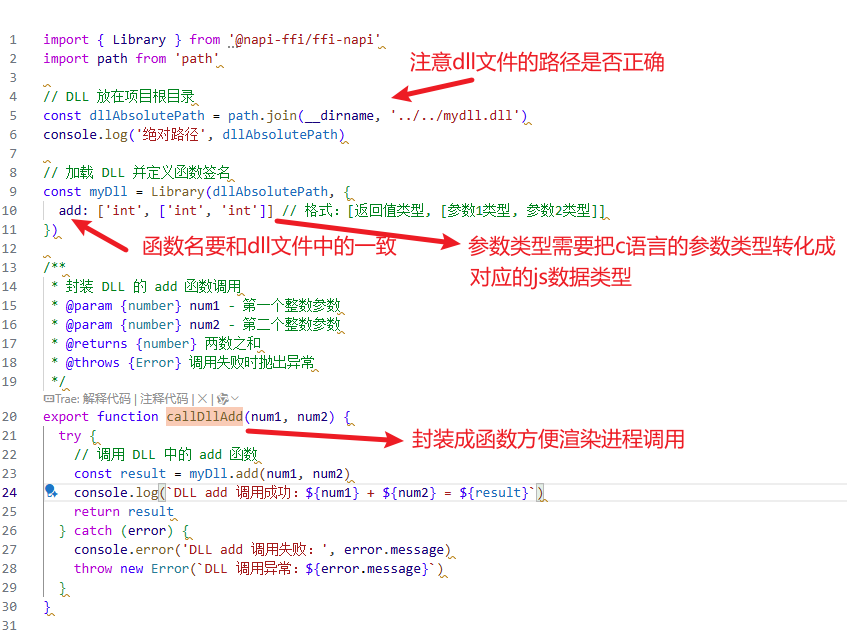
- 首先准备好dll文件,放进项目的根目录中,该文件内包含一个示例函数:
add: [ 'int', [ 'int', 'int' ] ]。
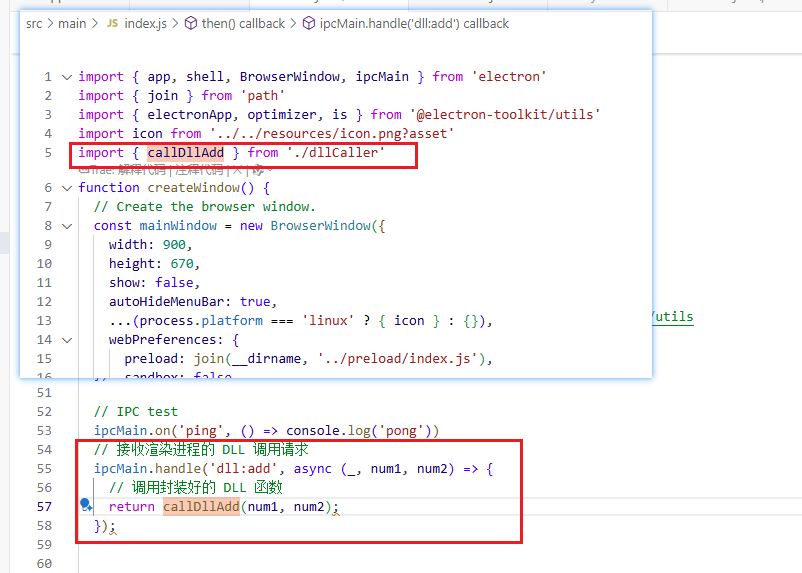
- 创建一个dll调用js文件,写调用函数,引入到主进程(直接写在主进程也是可以的)
引入dll文件函数时,要注意函数名和数据类型的映射,要把c语言的数据类型转化成js的数据类型,具体的数据类型映射可以去ffi官网查找,也可以直接让ai帮忙转化,如果出现指针数据类型的情况,需要注意内存空间是否正确。
javascript
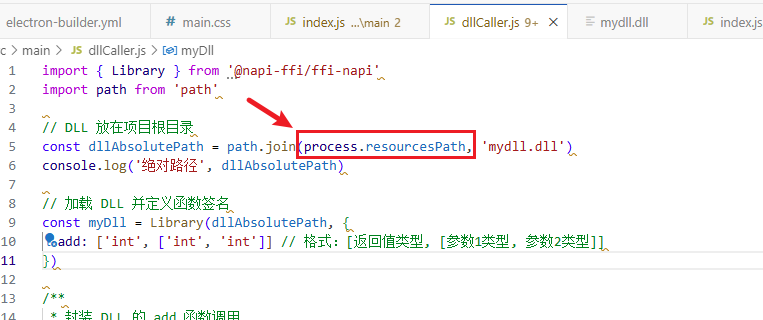
import { Library } from '@napi-ffi/ffi-napi'
import path from 'path'

// DLL 放在项目根目录
const dllAbsolutePath = path.join(__dirname, '../../mydll.dll')
console.log('绝对路径', dllAbsolutePath)

// 加载 DLL 并定义函数签名
const myDll = Library(dllAbsolutePath, {
  add: ['int', ['int', 'int']] // 格式:[返回值类型, [参数1类型, 参数2类型]]
})

/**
 * 封装 DLL 的 add 函数调用
 * @param {number} num1 - 第一个整数参数
 * @param {number} num2 - 第二个整数参数
 * @returns {number} 两数之和
 * @throws {Error} 调用失败时抛出异常
 */
export function callDllAdd(num1, num2) {
  try {
    // 调用 DLL 中的 add 函数
    const result = myDll.add(num1, num2)
    console.log(`DLL add 调用成功:${num1} + ${num2} = ${result}`)
    return result
  } catch (error) {
    console.error('DLL add 调用失败:', error.message)
    throw new Error(`DLL 调用异常:${error.message}`)
  }
}
javascript
import { app, shell, BrowserWindow, ipcMain } from 'electron'
import { join } from 'path'
import { electronApp, optimizer, is } from '@electron-toolkit/utils'
import icon from '../../resources/icon.png?asset'
import { callDllAdd } from './dllCaller'
function createWindow() {
  // Create the browser window.
  const mainWindow = new BrowserWindow({
    width: 900,
    height: 670,
    show: false,
    autoHideMenuBar: true,
    ...(process.platform === 'linux' ? { icon } : {}),
    webPreferences: {
      preload: join(__dirname, '../preload/index.js'),
      sandbox: false
    }
  })

  mainWindow.on('ready-to-show', () => {
    mainWindow.show()
  })

  mainWindow.webContents.setWindowOpenHandler((details) => {
    shell.openExternal(details.url)
    return { action: 'deny' }
  })

  // HMR for renderer base on electron-vite cli.
  // Load the remote URL for development or the local html file for production.
  if (is.dev && process.env['ELECTRON_RENDERER_URL']) {
    mainWindow.loadURL(process.env['ELECTRON_RENDERER_URL'])
  } else {
    mainWindow.loadFile(join(__dirname, '../renderer/index.html'))
  }
}

// This method will be called when Electron has finished
// initialization and is ready to create browser windows.
// Some APIs can only be used after this event occurs.
app.whenReady().then(() => {
  // Set app user model id for windows
  electronApp.setAppUserModelId('com.electron')

  // Default open or close DevTools by F12 in development
  // and ignore CommandOrControl + R in production.
  // see https://github.com/alex8088/electron-toolkit/tree/master/packages/utils
  app.on('browser-window-created', (_, window) => {
    optimizer.watchWindowShortcuts(window)
  })

  // IPC test
  ipcMain.on('ping', () => console.log('pong'))
  // 接收渲染进程的 DLL 调用请求
  ipcMain.handle('dll:add', async (_, num1, num2) => {
    // 调用封装好的 DLL 函数
    return callDllAdd(num1, num2);
  });


  createWindow()

  app.on('activate', function () {
    // On macOS it's common to re-create a window in the app when the
    // dock icon is clicked and there are no other windows open.
    if (BrowserWindow.getAllWindows().length === 0) createWindow()
  })
})

// Quit when all windows are closed, except on macOS. There, it's common
// for applications and their menu bar to stay active until the user quits
// explicitly with Cmd + Q.
app.on('window-all-closed', () => {
  if (process.platform !== 'darwin') {
    app.quit()
  }
})

// In this file you can include the rest of your app's specific main process
// code. You can also put them in separate files and require them here.<script setup>
import { ref } from 'vue';
const { ipcRenderer } = window.electron || {}
const result = ref('');
async function testDllAdd() {
try {
const sum = await ipcRenderer.invoke('dll:add', 10, 20);
result.value = sum;
} catch (error) {
console.error('渲染进程调用 DLL 失败:', error.message);
result.value = `调用失败:${error.message}`;
}
}
testDllAdd()
</script>
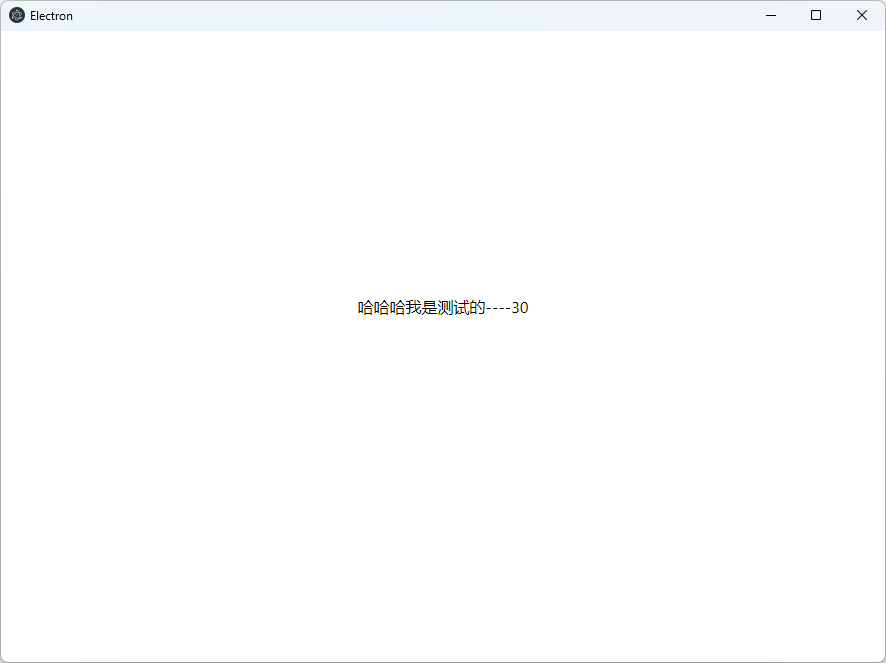
<template>
<div style="color: black;">哈哈哈我是测试的----{{ result }}</div>
</template>将代码写好再次运行npm run dev
出现报错Error: External buffers are not allowed
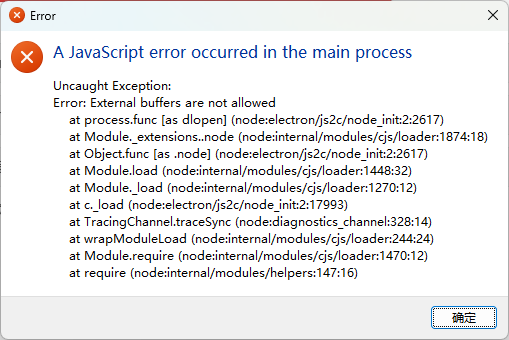
解决buffers报错
这里博主也是被卡了很久,找了很多资料(抓狂流泪...)
经查阅,这个是由于高版本electronc出于安全策略考虑,已不支持外部缓冲区(External buffers),但是ffi库需要依赖buffers才能运行,所以需要降低版本至20.3.8。
资料参考Electron 和 V8 内存笼 | Electron 框架
- 卸载当前 Electron 版本
npm uninstall electron --save-dev
- 安装 20.3.8 版本
npm install electron@20.3.8 --save-dev
- 重建原生模块(适配新的 Electron 版本)
npx electron-rebuild
- 重新运行
npm run dev
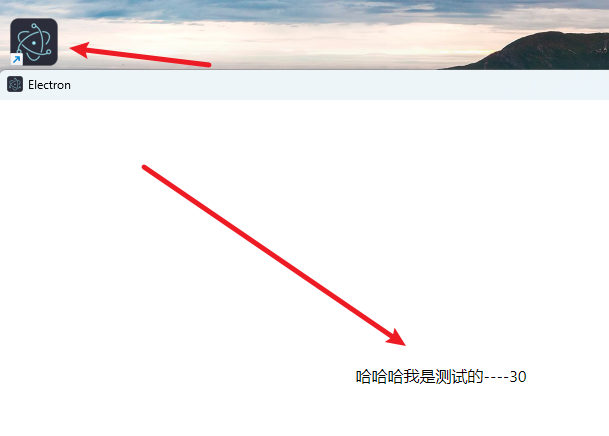
此时已可以成功调用dll函数了!!
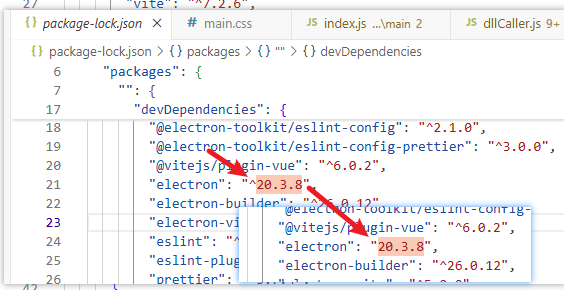
提醒:可以在package.lock文件锁定版本,下次下载依赖时就不会自动更新了
打包
到这里如果直接打包运行exe文件,会出现报错说找不到dll文件资源,因为前面我们把dll文件放在根目录下,打包时没有自动复制到包里,导致报错,所以我们需要新增以下配置,让dll文件打包时能自动复制到安装包中。
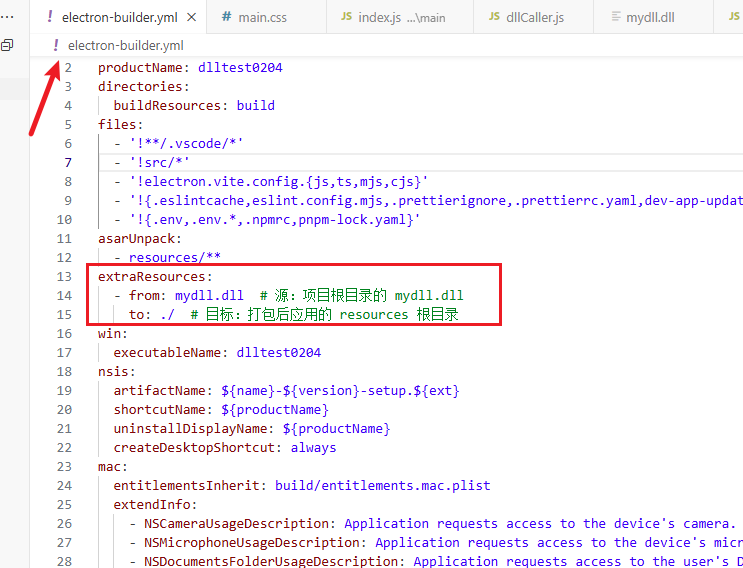
dll文件路径指向使用electronc提供的通用变量,避免打包前/后的路径不同。
配置完后执行命令编译--打包--安装,运行应用即可得到一个调用了dll文件的客户端应用。(撒花!)
npm run build
npx electron-builder
以上是全部内容,欢迎指正!