下载链接:
「2026图片生成高斯3d(前后端项目-已打包)」
链接:https://pan.quark.cn/s/06b9bc0a081b
SHARP 3D 生成器 - 项目配置与运行指南
项目简介
SHARP (Sharp Monocular View Synthesis in Less Than a Second) 是 Apple 开发的一个先进的单目视图合成模型。本项目提供了一个 Web 界面,可以从单张图片快速生成 3D 高斯溅射(3D Gaussian Splatting)模型。
核心特性:
单张图片生成 3D 模型,推理时间 < 1 秒
实时 3D 渲染能力
支持度量尺度保留
零样本跨数据集泛化能力
项目结构
ml-sharp-main/
├── src/                     # SHARP 模型源代码
│   └── sharp/
│       ├── models/          # 模型核心代码
│       │   ├── predictor.py          # 主预测器
│       │   ├── gaussian_decoder.py   # 高斯解码器
│       │   ├── encoders/             # 编码器(ViT, UNet, SPN)
│       │   ├── decoders/             # 解码器
│       │   └── heads.py              # 预测头
│       ├── cli/             # 命令行接口
│       │   ├── predict.py            # 预测命令
│       │   └── render.py             # 渲染命令
│       └── utils/           # 工具函数
├── templates/               # 前端 HTML 模板
│   └── index.html           # Web 界面
├── web_app.py              # Flask 后端服务器
├── requirements.txt        # Python 依赖
├── uploads/                # 临时上传文件目录
├── outputs/                # 生成的 PLY 模型文件
└── data/                   # 数据目录
环境配置
1. 系统要求
操作系统: Windows / Linux / macOS
Python: 3.13
GPU(推荐): NVIDIA CUDA GPU(用于加速推理和渲染)
内存: 至少 8GB RAM
2. 创建 Python 环境
# 使用 Conda 创建环境(推荐)
conda create -n sharp python=3.13
conda activate sharp
3. 安装依赖
# 安装所有依赖包
pip install -r requirements.txt
主要依赖:
torch- PyTorch 深度学习框架
gsplat- 高斯溅射操作库
torchvision- 计算机视觉工具
timm- 图像模型库
Flask- Web 后端框架4. 安装 SHARP 模型
# 以可编辑模式安装 sharp 包
pip install -e .
5. 验证安装
sharp --help如果显示帮助信息,说明安装成功。
运行项目
方式一:Web 界面运行(推荐)
- 启动 Web 服务器:
python web_app.py
- 访问 Web 界面:
打开浏览器访问:
http://127.0.0.1:5000
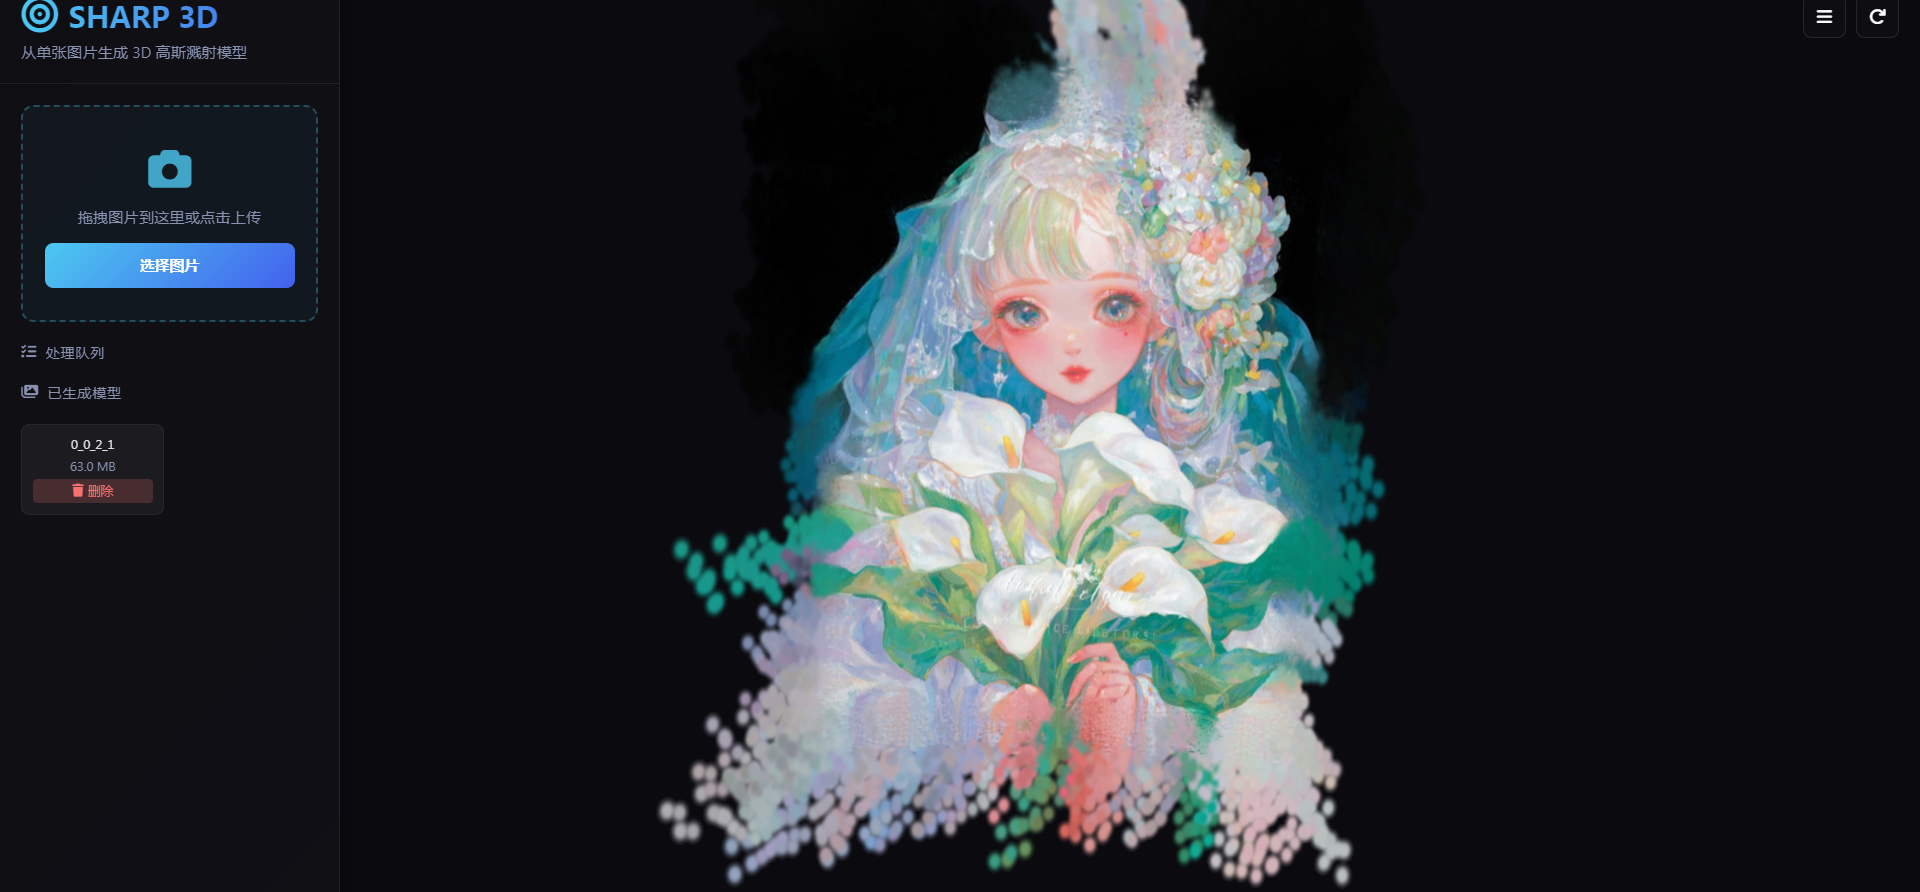
使用流程:
拖拽或点击上传单张图片
等待处理完成(自动显示进度)
在右侧 3D 查看器中查看生成的模型
可在左侧图库中查看历史模型
方式二:命令行运行
# 基础预测 sharp predict -i /path/to/input/images -o /path/to/output/gaussians # 指定模型文件 sharp predict -i /path/to/input/images -o /path/to/output/gaussians -c sharp_2572gikvuh.pt # 预测并渲染视频轨迹(需要 CUDA GPU) sharp predict -i /path/to/input/images -o /path/to/output/gaussians --render首次运行时,模型会自动下载并缓存到
~/.cache/torch/hub/checkpoints/
预测模型详解
模型位置
SHARP 预测模型位于
src/sharp/models/目录:
src/sharp/models/
├── predictor.py              # RGBGaussianPredictor - 主预测模型
├── gaussian_decoder.py       # GaussianComposer - 高斯参数组合器
├── monodepth.py              # MonodepthWithEncodingAdaptor - 深度估计
├── heads.py                  # DirectPredictionHead - 特征预测头
├── encoders/                 # 图像编码器
│   ├── vit_encoder.py       # Vision Transformer 编码器
│   ├── unet_encoder.py      # UNet 编码器
│   └── spn_encoder.py       # SPN 编码器
└── decoders/                 # 特征解码器
    ├── monodepth_decoder.py # 单目深度解码器
    ├── multires_conv_decoder.py
    └── unet_decoder.py
模型架构
输入图片 (RGB)
    ↓
┌───────────────────────┐
│   图像编码器 (Encoder)  │  ← ViT/UNet/SPN
│   提取多尺度特征        │
└───────────────────────┘
    ↓
┌───────────────────────┐
│   深度估计模块         │  ← MonoDepth
│   预测场景深度          │
└───────────────────────┘
    ↓
┌───────────────────────┐
│   高斯预测头 (Head)    │  ← DirectPredictionHead
│   预测 3D 高斯参数      │
└───────────────────────┘
    ↓
┌───────────────────────┐
│   高斯组合器 (Composer)│  ← GaussianComposer
│   组合基础值和残差      │
└───────────────────────┘
    ↓
输出: 3D 高斯参数 (.ply)
  - 位置 (x, y, z)
  - 协方差 (3x3)
  - 不透明度
  - 球谐系数 (颜色)
关键类说明
类名 文件 功能 RGBGaussianPredictorpredictor.py主预测模型,从 RGB 图像预测 3D 高斯 MonodepthWithEncodingAdaptormonodepth.py深度估计模型,提供场景几何先验 GaussianComposercomposer.py组合基础高斯参数和预测残差 DirectPredictionHeadheads.py神经网络预测头,输出高斯特征
前端与后端架构
前端 (templates/index.html)
技术栈:
框架: 原生 HTML/CSS/JavaScript (ES6 模块)
3D 渲染 :
@mkkellogg/gaussian-splats-3d(基于 Three.js)UI 设计: 现代深色主题,渐变背景,玻璃拟态效果
核心功能:
// 1. 3D 查看器初始化 viewer = new GaussianSplats3D.Viewer({ rootElement: container, cameraUp: [0, -1, -0.6], initialCameraPosition: [0, 5, 15] }); // 2. 加载 PLY 模型 await viewer.addSplatScene(plyUrl, { format: 2, // PLY 格式 position: [0, 0, 0], rotation: [0, 1, 0, 0], scale: [2.0, 2.0, 2.0] }); // 3. 文件上传 async function uploadFile(file) { formData.append('file', file); await fetch('/api/upload', { method: 'POST', body: formData }); } // 4. 任务状态轮询 async function pollTask(taskId) { const task = await fetch(`/api/task/${taskId}`); // 更新进度条 }UI 组件:
上传区域(支持拖拽)
处理队列(实时进度)
3D 预览窗口
模型图库(可加载/删除)
后端 (web_app.py)
技术栈:
框架: Flask (Python Web 框架)
多线程: 异步任务队列 + 后台工作线程
子进程 : 调用
sharp predictCLI 命令API 端点:
端点 方法 功能 /GET 主页面 /api/uploadPOST 上传图片并创建处理任务 /api/task/<task_id>GET 查询任务状态和进度 /api/galleryGET 获取已生成的模型列表 /outputs/<filename>GET 下载 PLY 文件 /api/delete/<item_id>DELETE 删除模型文件 工作流程:
# 1. 文件上传 @app.route('/api/upload', methods=['POST']) def upload(): file.save(input_path) task_id = str(uuid.uuid4()) task_queue.put(task_id) return jsonify({'task_id': task_id}) # 2. 后台处理线程 def worker(): while True: task_id = task_queue.get() # 调用 sharp CLI subprocess.Popen(["sharp", "predict", "-i", input_path, "-o", output_folder]) # 3. 进度解析(通过解析 CLI 输出) if 'loading' in line_lower: task_status[task_id]['progress'] = 20 elif 'preprocessing' in line_lower: task_status[task_id]['progress'] = 30 elif 'inference' in line_lower: task_status[task_id]['progress'] = 60
目录说明
目录 用途 uploads/临时存储用户上传的图片 outputs/存储生成的 .ply3D 模型文件output_gaussians/中间高斯参数存储 my_result/自定义结果存储目录 templates/HTML 前端模板
常见问题
1. 模型下载失败
解决方案: 手动下载模型文件
wget https://ml-site.cdn-apple.com/models/sharp/sharp_2572gikvuh.pt
sharp predict -i input.jpg -o output/ -c sharp_2572gikvuh.pt
2. CUDA 相关错误
确保安装了支持 CUDA 的 PyTorch 版本:
pip install torch torchvision --index-url https://download.pytorch.org/whl/cu1183. 渲染视频需要 CUDA
--render选项目前只支持 CUDA GPU,CPU/MPS 不支持。4. 端口被占用
修改
web_app.py最后一行的端口号:
app.run(debug=True, port=5001, host='0.0.0.0') # 改为 5001
技术支持
原项目 : Apple ml-sharp
项目主页 : Apple ML-SHARP
许可证
代码: Apache 2.0 License
模型 : 请参阅 <LICENSE_MODEL>
PyInstaller 打包问题完全解决指南
项目概述
项目名称 : SHARP 3D Generator 打包工具 : PyInstaller 6.18.0 Python 环境 : Conda (sharp-gui) Python 3.10.19 目标平台 : Windows 10/11 64位 最终包大小: 约 6GB
打包配置文件
spec 文件核心配置
# build_app.spec 关键配置 # 1. 数据文件 - 打包运行时资源 datas = [ (os.path.join(BASE_DIR, 'templates'), 'templates'), (os.path.join(BASE_DIR, 'src'), 'src'), (os.path.join(BASE_DIR, 'static'), 'static'), # 静态资源 (os.path.join(BASE_DIR, 'models'), 'models'), # 模型文件 (2.7GB) ] # 2. 隐藏导入 - 确保所有模块被打包 hiddenimports = [ 'sharp', 'sharp.models', 'torch', 'torchvision', 'imageio', # 图像IO库 'imageio.v2', 'imageio.v3', 'imageio.plugins', 'pillow_heif', 'matplotlib', # 绘图库 'matplotlib.pyplot', 'matplotlib.backends.backend_agg', # ... 其他依赖 ] # 3. 排除模块 - 移除不需要的库 excludes = [ 'pytest', 'tkinter', 'test', 'tests', 'torchaudio', # 注意: 不要排除 matplotlib! ] # 4. 打包模式 exe = EXE( # ... exclude_binaries=True, # 目录模式 console=True, # 显示控制台 upx=False, # 禁用UPX压缩 ) coll = COLLECT( exe, a.binaries, a.zipfiles, a.datas, name='SHARP3D_Final', # 最终目录名 )
问题与解决方案
问题 1: 路径配置混乱
症状:
开发环境和打包环境路径不一致
找不到模板文件、静态资源
模型文件路径错误
原因:
PyInstaller 打包后,文件分布在
exe和_internal两个目录需要区分打包的只读文件和运行时可写文件
解决方案:
# web_app.py def get_resource_path(relative_path): """获取资源路径,兼容开发和打包环境""" if getattr(sys, 'frozen', False): # 打包后的环境 exe_dir = os.path.dirname(sys.executable) internal_dir = getattr(sys, '_MEIPASS', exe_dir) # 运行时文件从 exe 目录获取 runtime_files = ['uploads', 'outputs', 'models', 'static'] if any(part in relative_path for part in runtime_files): return os.path.join(exe_dir, relative_path) # 打包的文件从 _MEIPASS 获取 else: return os.path.join(internal_dir, relative_path) else: # 开发环境 base_dir = os.path.dirname(os.path.abspath(__file__)) return os.path.join(base_dir, relative_path)最佳实践:
templates,src,static,models→ 打包到_internal
uploads,outputs→ 运行时在 exe 同级目录创建通过后处理脚本将
static和models复制到 exe 同级目录
问题 2: imageio 元数据错误
错误信息:
importlib.metadata.PackageNotFoundError: No package metadata was found for imageio原因:
imageio在__init__.py中调用importlib.metadata.version('imageio')获取版本号PyInstaller 默认不包含
dist-info元数据目录解决方案:
方法 1: Monkey patch (推荐)
# web_app.py - 在所有导入之前执行 if getattr(sys, 'frozen', False): try: import importlib.metadata as importlib_metadata # 定义已知包的版本映射 FAKE_VERSIONS = { 'imageio': '2.37.2', 'imageio-ffmpeg': '0.6.0', 'pillow-heif': '1.2.0', } _original_version = importlib_metadata.version def _patched_version(distribution_name): try: return _original_version(distribution_name) except importlib_metadata.PackageNotFoundError: normalized_name = distribution_name.lower().replace('_', '-').replace('-', '_') for key, value in FAKE_VERSIONS.items(): if normalized_name in key or key in normalized_name: print(f"[INFO] Using fake version for {distribution_name}: {value}") return value raise importlib_metadata.version = _patched_version print("[INFO] Patched importlib.metadata.version for missing package metadata") except Exception as e: print(f"[WARNING] Failed to patch importlib.metadata: {e}")方法 2: 打包元数据 (补充)
# build_app.spec # 添加关键包的元数据 if site_packages: metadata_packages = ['imageio', 'pillow', 'pillow_heif', 'numpy', 'scipy', 'torch'] for item in os.listdir(site_packages): if 'dist-info' in item.lower() or 'egg-info' in item.lower(): for pkg in metadata_packages: pkg_prefix = pkg.replace('_', '-').replace('_', '').lower() item_lower = item.lower().replace('_', '').replace('-', '') if item_lower.startswith(pkg_prefix) or pkg_prefix in item_lower: src = os.path.join(site_packages, item) if os.path.isdir(src): datas.append((src, '.')) # 复制到 _internal 根目录 print(f"[INFO] Adding metadata: {item}") break
问题 3: imageio 模块不完整
错误信息:
ModuleNotFoundError: No module named 'imageio.v2'原因:
PyInstaller 的自动分析无法正确收集
imageio的所有子模块
imageio.v2是动态导入的子模块解决方案:
# build_app.spec # 1. 添加隐藏导入 hiddenimports = [ 'imageio', 'imageio.v2', # 关键! 'imageio.v3', 'imageio.plugins', 'imageio.plugins.pillow', 'imageio.plugins.ffmpeg', ] # 2. 完整打包 imageio 包 if site_packages: imageio_src = os.path.join(site_packages, 'imageio') if os.path.exists(imageio_src): datas.append((imageio_src, 'imageio')) # 复制整个包 print(f"[INFO] Adding complete imageio package: {imageio_src}")
问题 4: matplotlib 缺失
错误信息:
No module named 'matplotlib'原因:
matplotlib在excludes列表中被错误排除某些深度学习可视化代码需要它
解决方案:
# build_app.spec # 1. 从 excludes 列表中移除 matplotlib excludes = [ # 'matplotlib', # ❌ 不要排除! 'pytest', 'tkinter', # ... ] # 2. 添加到 hiddenimports hiddenimports = [ 'matplotlib', 'matplotlib.pyplot', 'matplotlib.backends.backend_agg', # ... ]
问题 5: Path 对象类型错误
错误信息:
'str' object has no attribute 'suffix'原因:
Flask 上传的文件路径是字符串
sharp.utils.io.load_rgb()期望Path对象代码中使用了
path.suffix等 Path 方法解决方案:
方法 1: 修改调用方
# web_app.py - run_prediction 函数 def run_prediction(input_path, output_folder, checkpoint_path, progress_callback=None): # 加载图像 - 确保传递 Path 对象 input_path_obj = Path(input_path) if isinstance(input_path, str) else input_path image, _, f_px = io.load_rgb(input_path_obj) height, width = image.shape[:2] name_without_ext = input_path_obj.stem # 使用 Path 对象方法 2: 修改被调用方
# src/sharp/utils/io.py from pathlib import Path from typing import Union def load_rgb( path: Union[Path, str], # 接受 Path 或 str auto_rotate: bool = True, remove_alpha: bool = True ) -> tuple[np.ndarray, list[bytes] | None, float]: """Load an RGB image.""" # 确保是 Path 对象 if isinstance(path, str): path = Path(path) # 现在可以安全使用 Path 方法 if path.suffix.lower() in [".heic"]: # ...
问题 6: 运行时复制文件
问题:
static 和 models 在第一次运行时才复制
用户希望打包时就放到正确位置
解决方案: 使用后处理脚本
# post_build_script.py import os import shutil def post_build(): dist_dir = 'dist/SHARP3D_Final' internal_dir = os.path.join(dist_dir, '_internal') # 复制 static static_src = os.path.join(internal_dir, 'static') static_dst = os.path.join(dist_dir, 'static') if os.path.exists(static_src): if os.path.exists(static_dst): shutil.rmtree(static_dst) shutil.copytree(static_src, static_dst) # 复制 models models_src = os.path.join(internal_dir, 'models') models_dst = os.path.join(dist_dir, 'models') if os.path.exists(models_src): if os.path.exists(models_dst): shutil.rmtree(models_dst) shutil.copytree(models_src, models_dst) if __name__ == '__main__': post_build()集成到批处理脚本:
# build_final.bat REM 1. 运行 PyInstaller "D:\ProgramData\Anaconda3\envs\sharp-gui\Scripts\pyinstaller.exe" -y build_app.spec REM 2. 复制运行时文件 python -c "import os,shutil;dist='dist\SHARP3D_Final';int='_internal';src_static=os.path.join(dist,int,'static');dst_static=os.path.join(dist,'static');src_models=os.path.join(dist,int,'models');dst_models=os.path.join(dist,'models');[shutil.rmtree(dst_dst) if os.path.exists(dst_dst) else None for dst_dst in [dst_static,dst_models]];shutil.copytree(src_static,dst_static) if os.path.exists(src_static) else None;shutil.copytree(src_models,dst_models) if os.path.exists(src_models) else None;print('OK')"
问题 7: 模型下载问题
问题:
用户不希望软件自动下载模型
需要打包时包含模型文件
解决方案:
# build_app.spec # 打包 models 目录 datas = [ (os.path.join(BASE_DIR, 'models'), 'models'), # 包含 2.7GB 模型文件 ] # web_app.py - 简化模型加载 MODEL_PATH = os.path.join(MODEL_FOLDER, 'sharp_model.pt') # 在 run_prediction 中直接使用,不自动下载 if checkpoint_path is None or not os.path.exists(checkpoint_path): raise Exception(f"Model file not found: {checkpoint_path}") state_dict = torch.load(checkpoint_path, weights_only=True, map_location='cpu')
问题 8: torch DLL 加载问题
错误信息:
ImportError: DLL load failed解决方案: 使用 runtime hook
# runtime_hooks/pyi_rth_torch_dll.py

import os
import sys

if getattr(sys, 'frozen', False):
    import ctypes

    internal_dir = getattr(sys, '_MEIPASS', os.path.dirname(sys.executable))

    if os.name == 'nt':  # Windows
        torch_lib = os.path.join(internal_dir, '_internal', 'torch', 'lib')
        if os.path.exists(torch_lib):
            if hasattr(ctypes, 'windll'):
                kernel32 = ctypes.windll.kernel32
                if hasattr(kernel32, 'AddDllDirectory'):
                    kernel32.AddDllDirectory(torch_lib.encode('utf-8'))
                os.environ['PATH'] = torch_lib + os.pathsep + os.environ.get('PATH', '')
# build_app.spec

runtime_hooks = [
    os.path.join(runtime_hooks_dir, 'pyi_rth_torch_dll.py'),
]
完整的打包流程
步骤 1: 准备环境
# 创建 conda 环境
conda create -n sharp-gui python=3.10
conda activate sharp-gui

# 安装依赖
pip install torch==2.8.0+cpu torchvision --index-url https://download.pytorch.org/whl/cpu
pip install pyinstaller flask pillow pillow-heif imageio matplotlib scipy
pip install transformers timm gsplat plyfile rich

# 安装项目
pip install -e .
步骤 2: 配置 spec 文件
参考上面的
build_app.spec核心配置。步骤 3: 运行打包
build_final.bat或手动执行:
# 清理
rm -rf dist/SHARP3D_Final build/build_app

# 打包
pyinstaller -y build_app.spec

# 后处理 - 复制运行时文件
python post_build_script.py
步骤 4: 验证打包
# 检查目录结构
ls dist/SHARP3D_Final/

# 应该包含:
# - SHARP3D.exe
# - static/
# - models/
# - _internal/

# 测试运行
cd dist/SHARP3D_Final
./SHARP3D.exe
目录结构说明
最终打包结构
dist/SHARP3D_Final/
├── SHARP3D.exe              # 主程序 (约50KB)
├── static/                  # 静态资源 (运行时使用)
│   ├── css/
│   ├── lib/
│   └── webfonts/
├── models/                  # 模型文件 (运行时使用)
│   └── sharp_model.pt       # 2.7GB
├── _internal/               # 内部依赖 (约3.3GB)
│   ├── matplotlib/
│   ├── imageio/
│   ├── torch/
│   ├── src/
│   ├── templates/
│   ├── static/              # 静态资源备份
│   └── models/              # 模型文件备份
├── uploads/                 # 运行时创建
└── outputs/                 # 运行时创建
文件大小分布
_internal/: 约 3.3GB (包含所有依赖)
models/sharp_model.pt: 2.7GB (模型文件)
static/: 约 1MB (前端资源)总计: 约 6GB
常见错误与调试
错误 1: 找不到模块
ModuleNotFoundError: No module named 'xxx'解决:
检查是否在
hiddenimports中检查是否在
excludes中被错误排除使用
--log-level DEBUG查看打包日志错误 2: 找不到文件
FileNotFoundError: [Errno 2] No such file or directory: 'xxx'解决:
检查
datas配置检查运行时路径是否正确
使用
get_resource_path()包装路径错误 3: DLL 加载失败
ImportError: DLL load failed: The specified module could not be found解决:
检查 runtime hook 是否正确配置
添加 DLL 目录到
PATH环境变量使用 VC_redist.x64.exe
错误 4: 内存不足
MemoryError: Unable to allocate array解决:
在 64 位系统上运行
增加系统虚拟内存
使用 CPU 版本的 PyTorch (更小)
最佳实践总结
DO (推荐)
✅ 使用目录模式 (
COLLECT) 而不是单文件模式 ✅ 明确指定所有hiddenimports✅ 打包所有运行时资源到_internal✅ 使用后处理脚本复制文件到 exe 同级目录 ✅ 在代码中使用get_resource_path()兼容开发和打包环境 ✅ 使用 runtime hook 解决 DLL 加载问题 ✅ 禁用 UPX 压缩 (upx=False) ✅ 打包前测试所有功能DON'T (避免)
❌ 不要使用单文件模式 (
--onefile) - 会很慢且容易出错 ❌ 不要排除matplotlib等可能被依赖的库 ❌ 不要让程序运行时下载大文件 ❌ 不要在 spec 中硬编码路径 ❌ 不要忘记打包dist-info元数据 ❌ 不要过度打包 (排除不需要的库)
工具和脚本
完整打包脚本
@echo off
REM build_final.bat

echo [1/3] Cleaning...
if exist dist\SHARP3D_Final rd /s /q dist\SHARP3D_Final
if exist build\build_app rd /s /q build\build_app

echo [2/3] Building...
"D:\ProgramData\Anaconda3\envs\sharp-gui\Scripts\pyinstaller.exe" -y build_app.spec

echo [3/3] Post-processing...
python post_build_script.py

echo Done!
pause
后处理脚本
# post_build_script.py

import os
import shutil
import sys

def copy_runtime_files(dist_dir='dist/SHARP3D_Final'):
    """复制运行时文件到 exe 同级目录"""
    internal_dir = os.path.join(dist_dir, '_internal')

    # 复制 static
    src = os.path.join(internal_dir, 'static')
    dst = os.path.join(dist_dir, 'static')
    if os.path.exists(src):
        if os.path.exists(dst):
            shutil.rmtree(dst)
        shutil.copytree(src, dst)

    # 复制 models
    src = os.path.join(internal_dir, 'models')
    dst = os.path.join(dist_dir, 'models')
    if os.path.exists(src):
        if os.path.exists(dst):
            shutil.rmtree(dst)
        shutil.copytree(src, dst)

if __name__ == '__main__':
    copy_runtime_files()
参考资料
PyInstaller 官方文档
Runtime Hooks: https://pyinstaller.org/en/stable/runtime-hooks.html
相关项目
- PyInstaller-hooks-contrib: https://github.com/pyinstaller/pyinstaller-hooks-contrib
常用命令
# 查看打包依赖
pyinstaller --onefile --log-level DEBUG your_script.py

# 分析导入
pyi-archive_viewer your_app.exe

# 提取打包内容
pyinstaller --clean your_app.spec
更新日志
v1.0 Final (2026-02-08)
✅ 修复 imageio 模块打包问题
✅ 修复 imageio 元数据错误
✅ 添加 matplotlib 支持
✅ 修复 Path 对象类型错误
✅ static 和 models 目录在打包时复制
✅ 包含完整的模型文件 (2.7GB)
✅ 完全离线运行,无需下载
贡献
如有问题或改进建议,请提交 Issue 或 Pull Request。