Vue3 + Element Plus项目和C# .Net 7.0 Core后端API项目发布部署到服务器,这是前后端分离的,中间遇到了很多问题,终于弄好了,特此记录
目录
[C# 后端发布到测试服务器和部署](# 后端发布到测试服务器和部署)
[HTTP 404错误](#HTTP 404错误)
[安装ASP .NET Core 7.0 runtime运行时 Hosting Bundle](#安装ASP .NET Core 7.0 runtime运行时 Hosting Bundle)
[安装ASP .NET Core 7.0 runtime hosting-bundle-runtime-aspnetcore-7.0.9-windows-hosting-bundle-installer](#安装ASP .NET Core 7.0 runtime hosting-bundle-runtime-aspnetcore-7.0.9-windows-hosting-bundle-installer)
Vue前端在测试服务器部署
测试一下发布到测试服务器
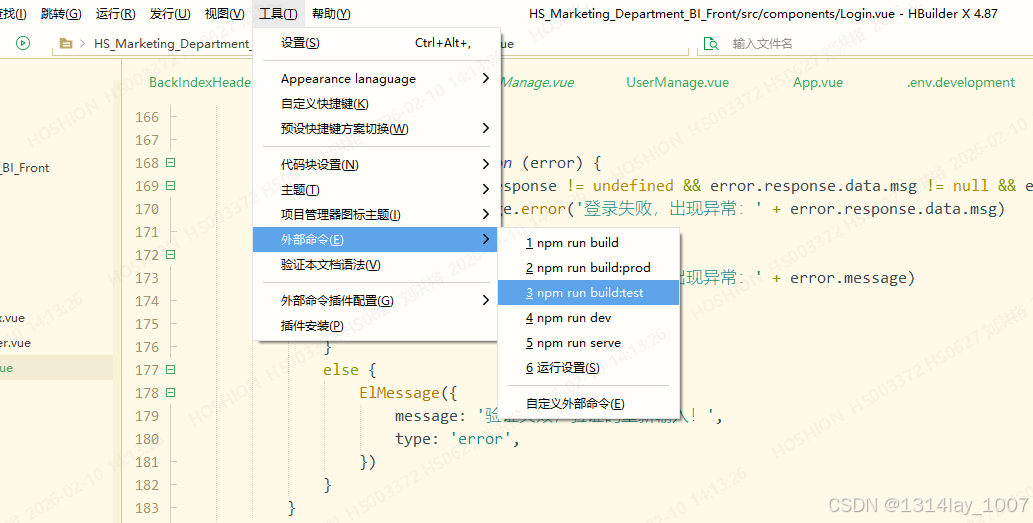
第一种
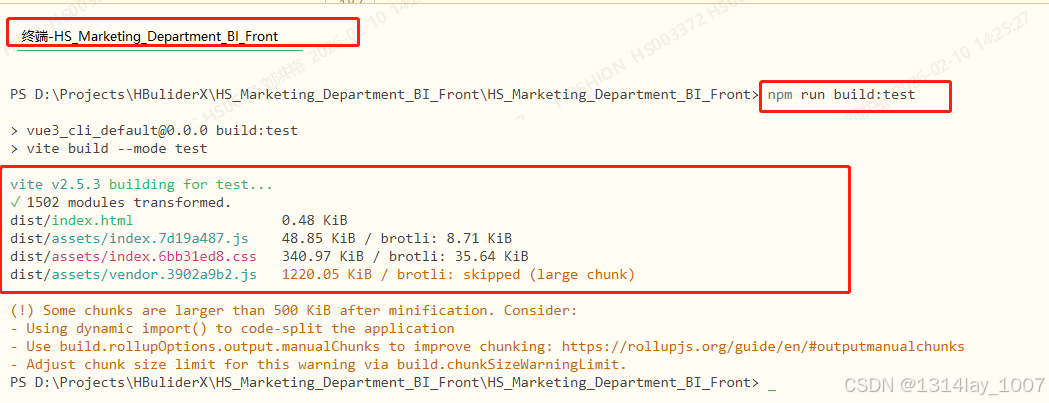
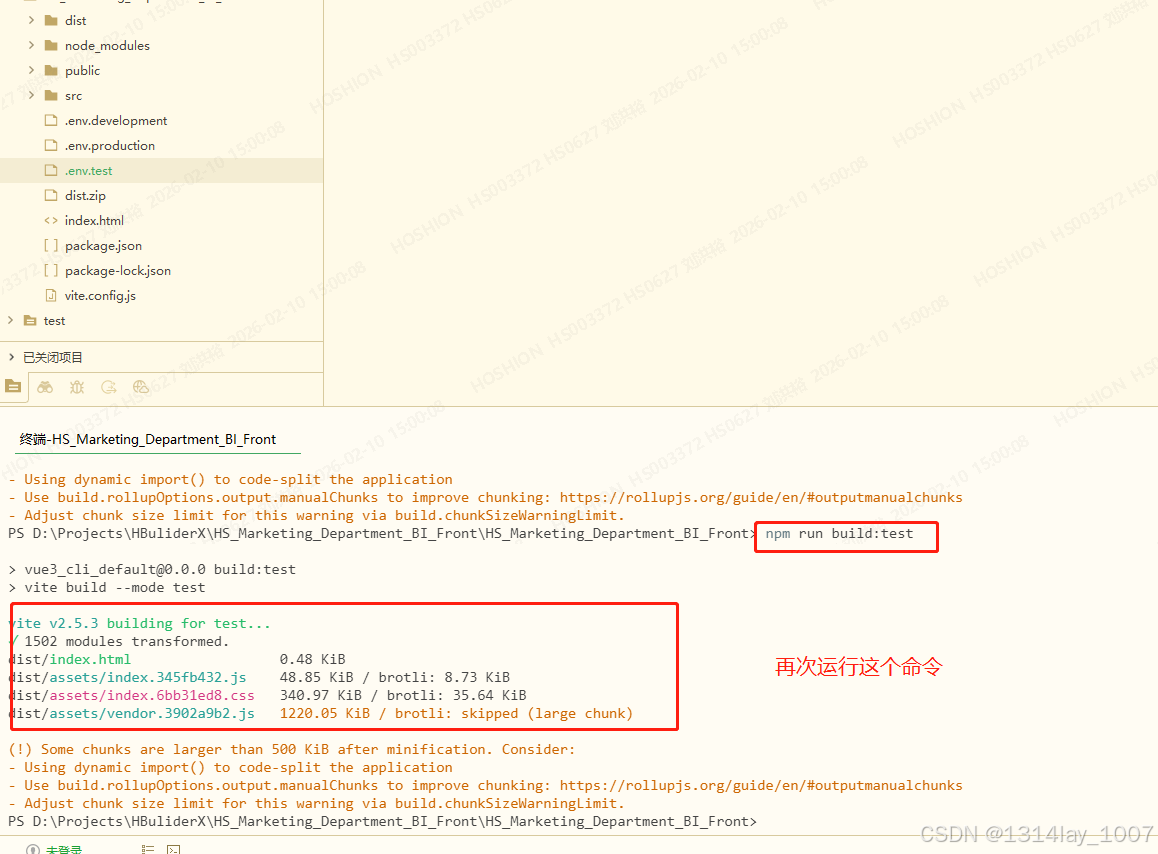
点击"工具",点击"外部命令",点击"npm run build:test":
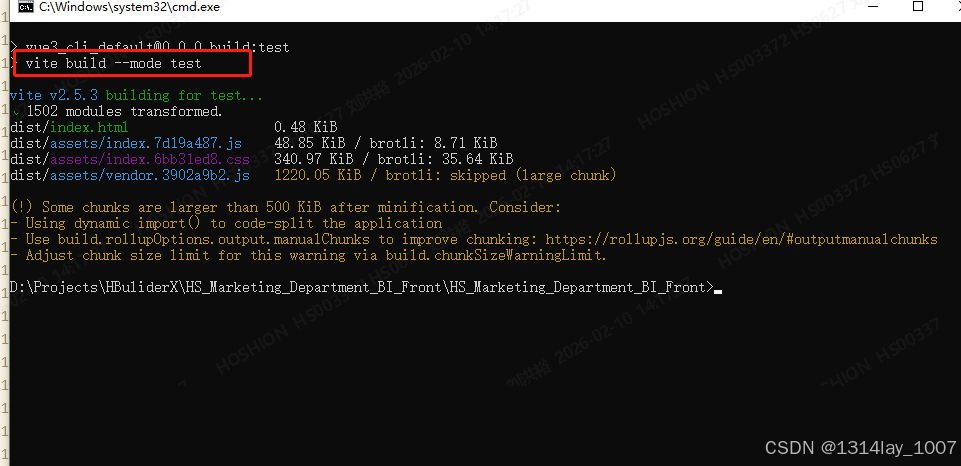
第二种
直接在终端输入命令:"npm run build:test":
服务器前端部署
npm run build:test
C# 后端发布到测试服务器和部署
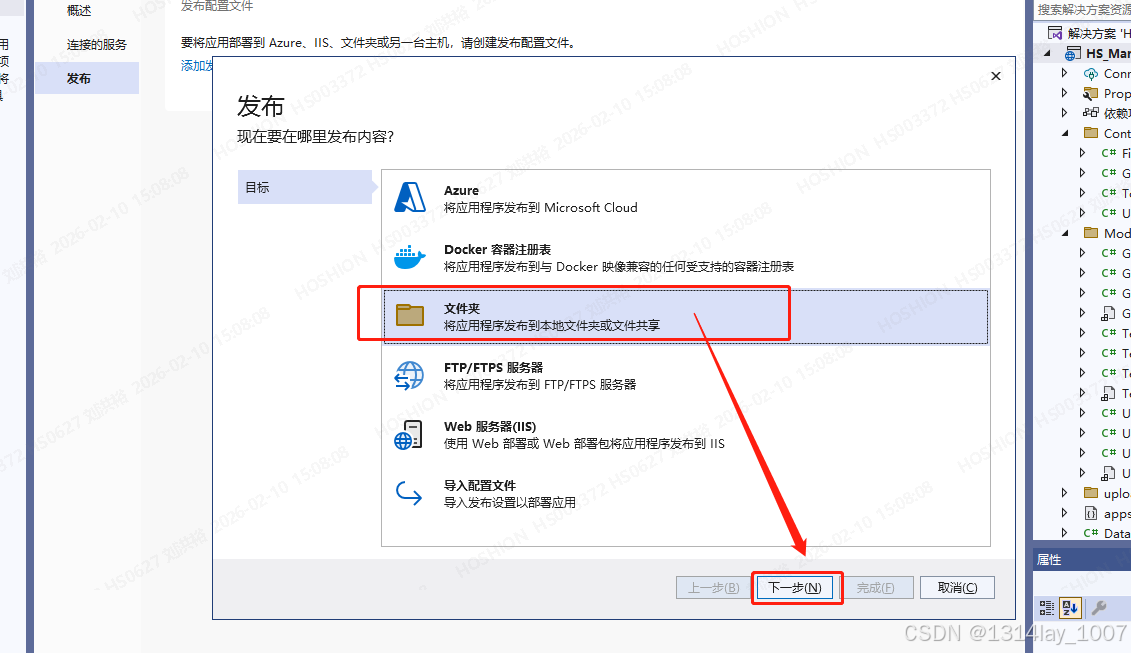
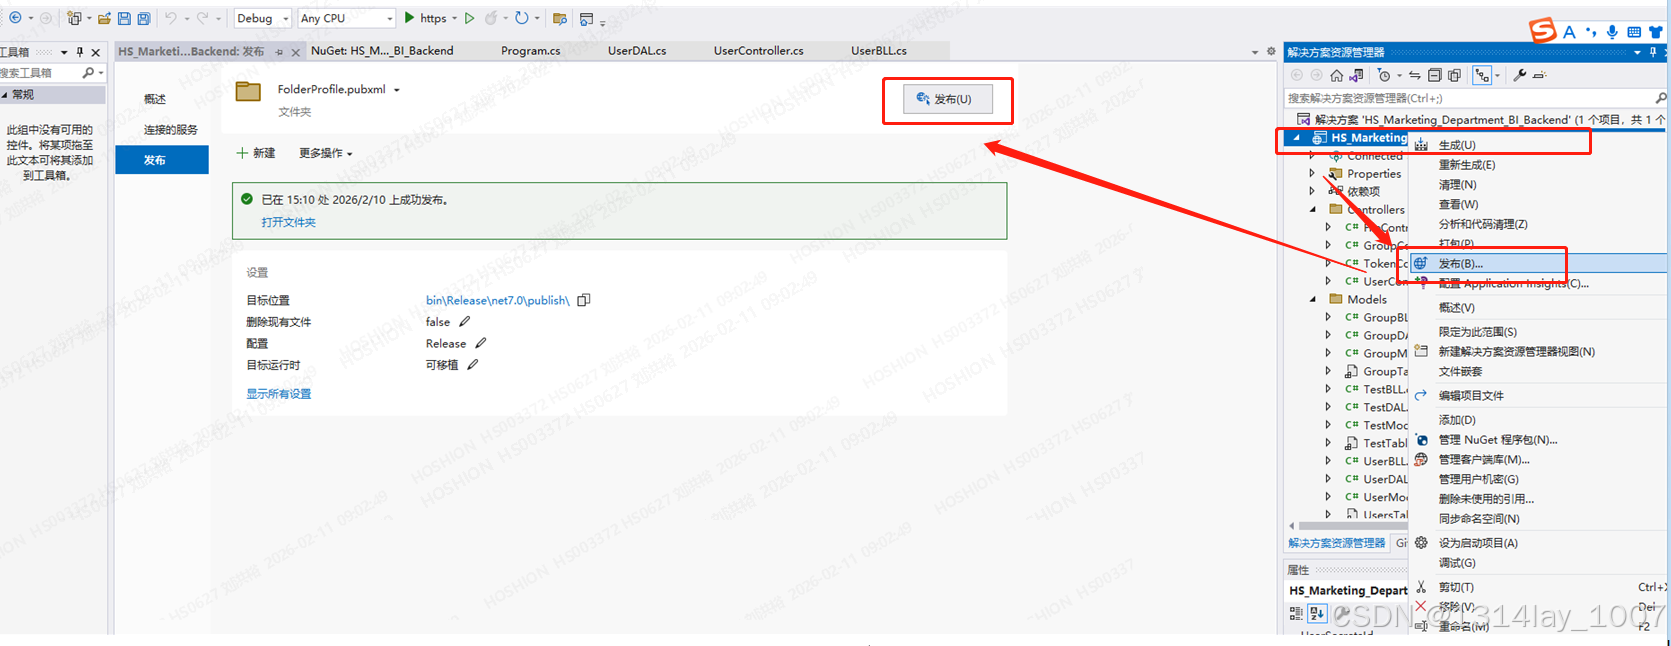
发布项目
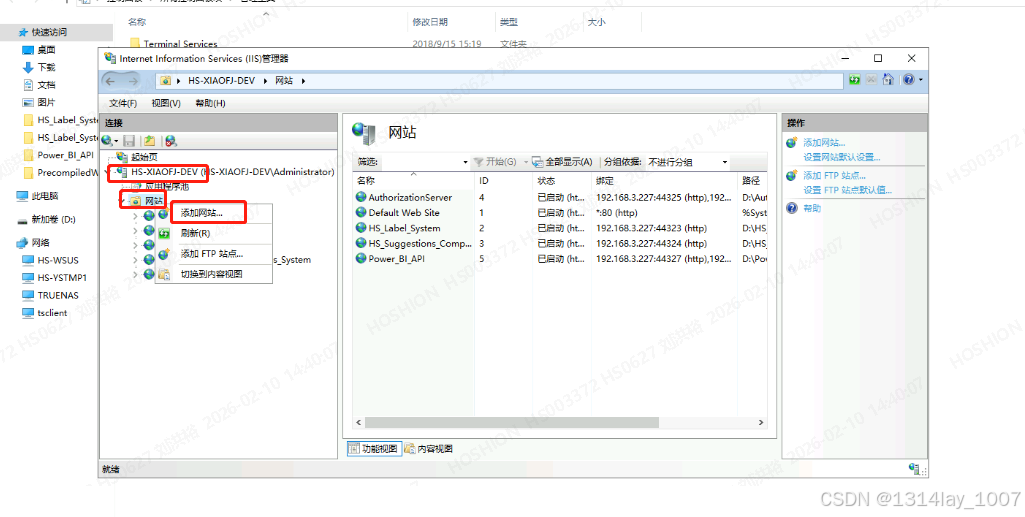
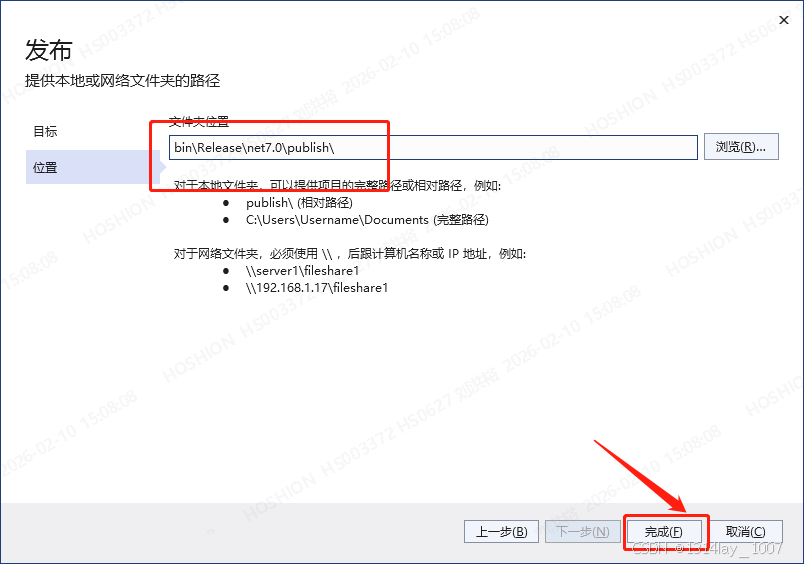
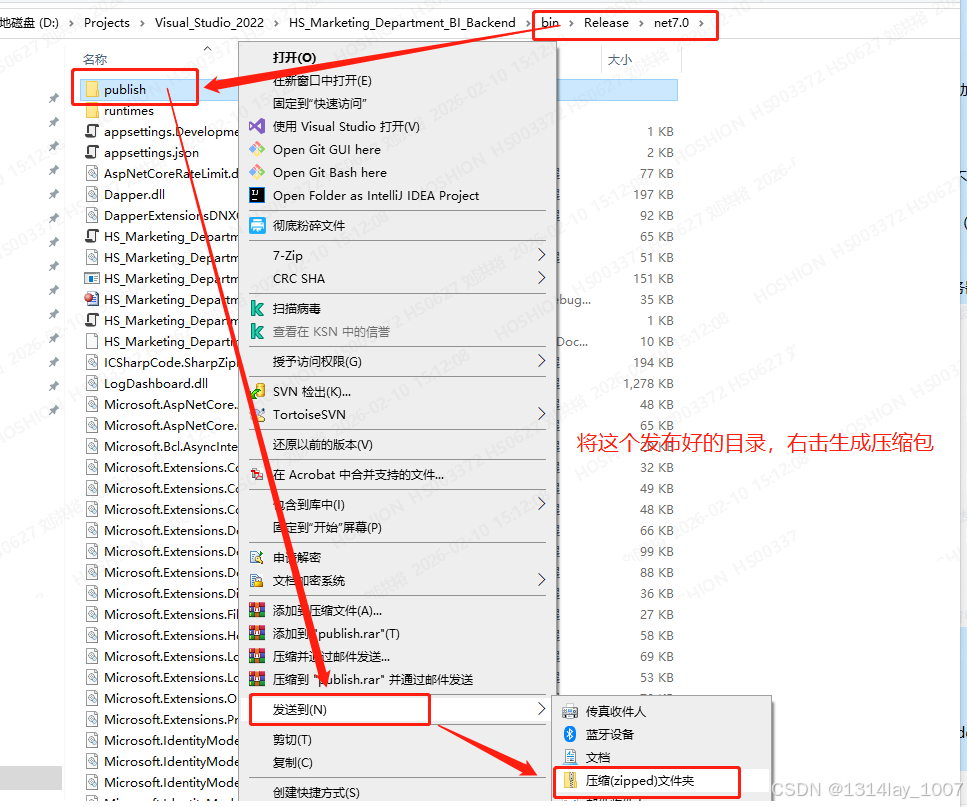
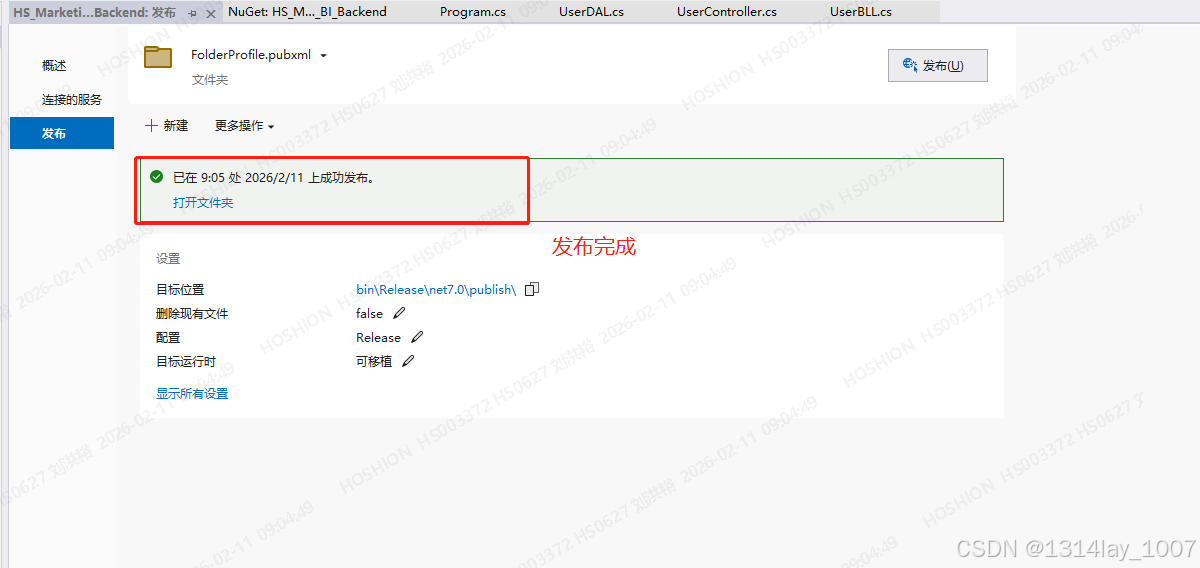
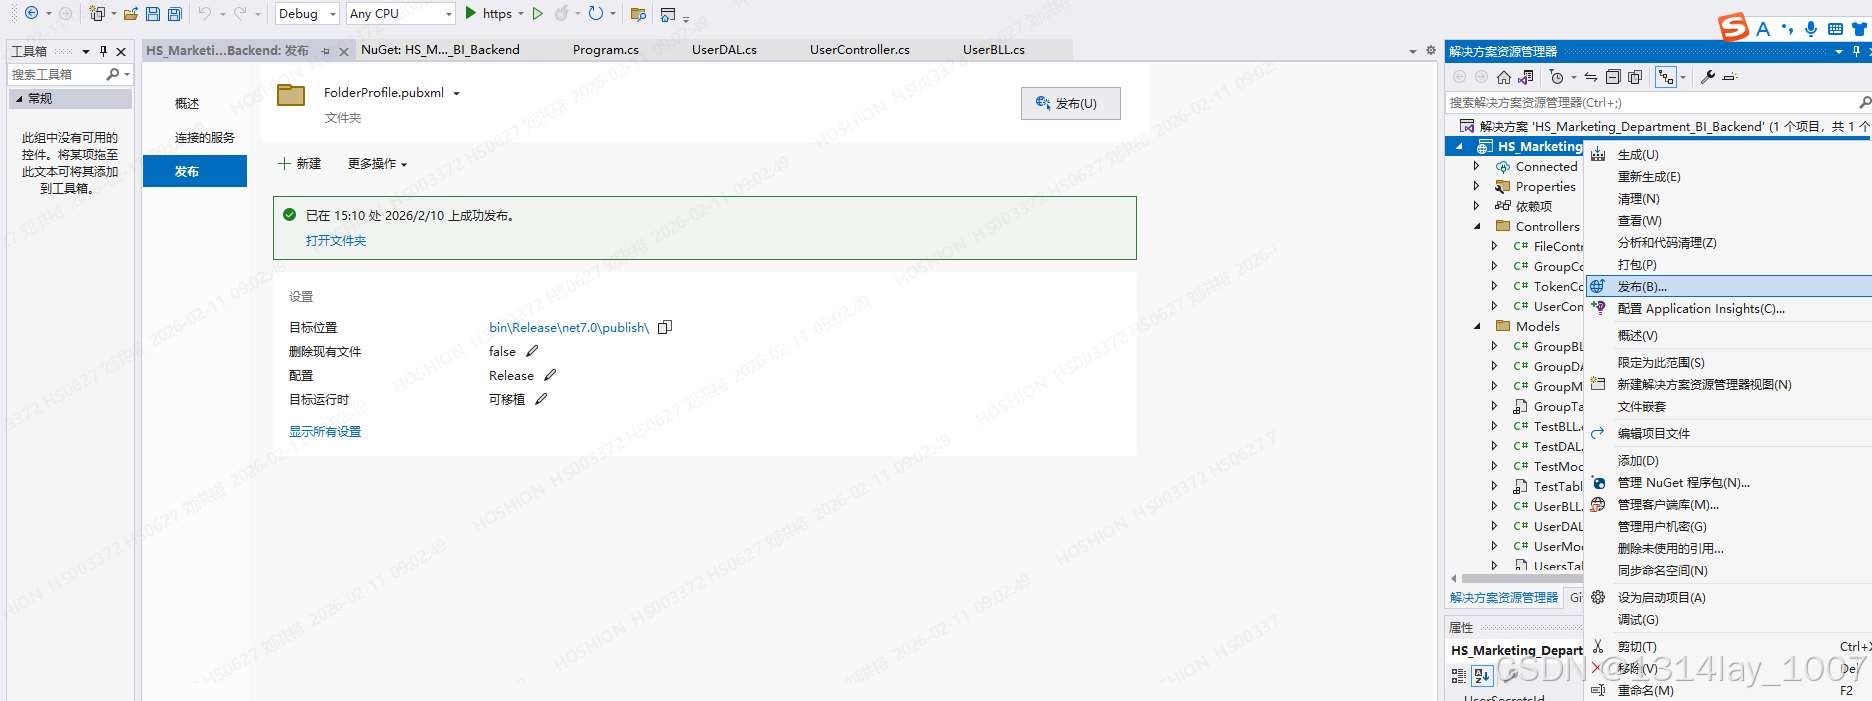
右击选择项目,点击"发布":
选择"文件夹",点击"下一步":
点击"完成":
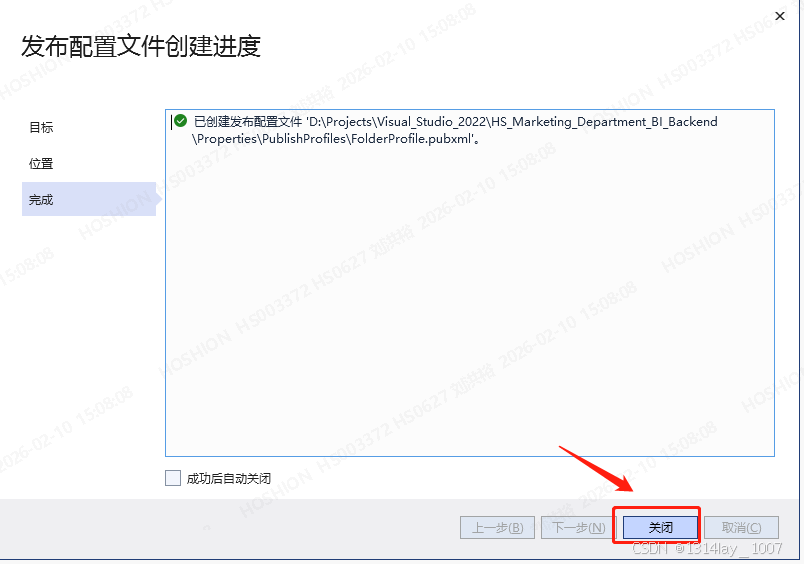
点击"关闭":
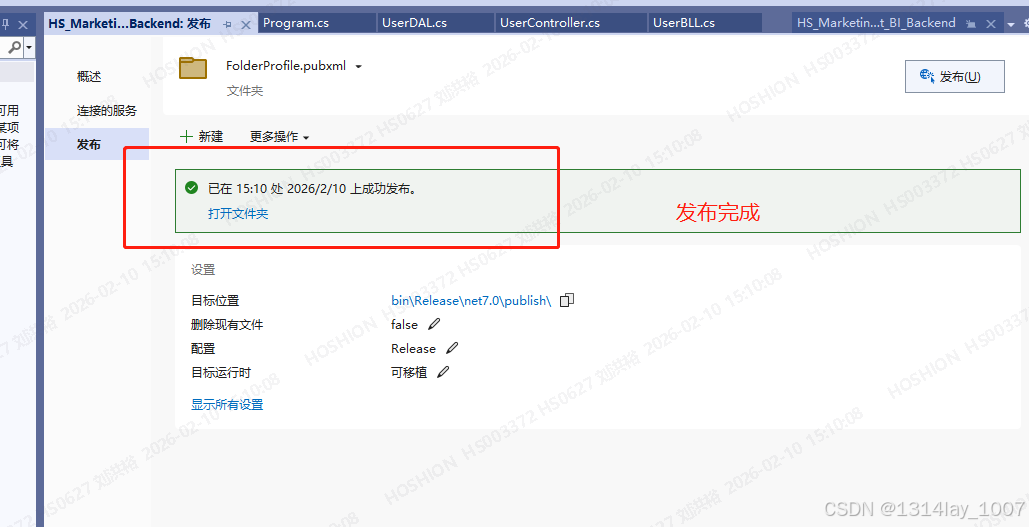
点击"发布":

发布完成:
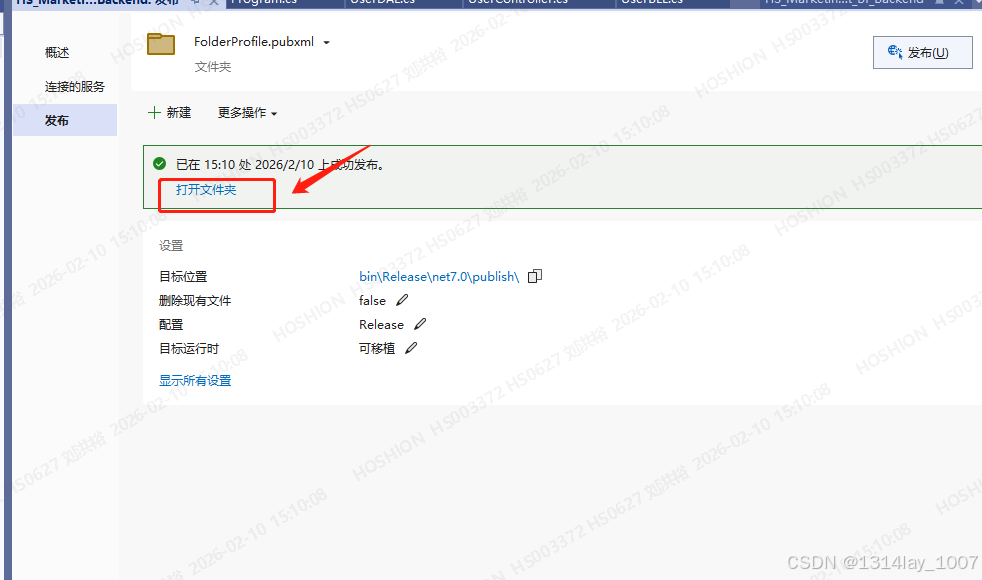
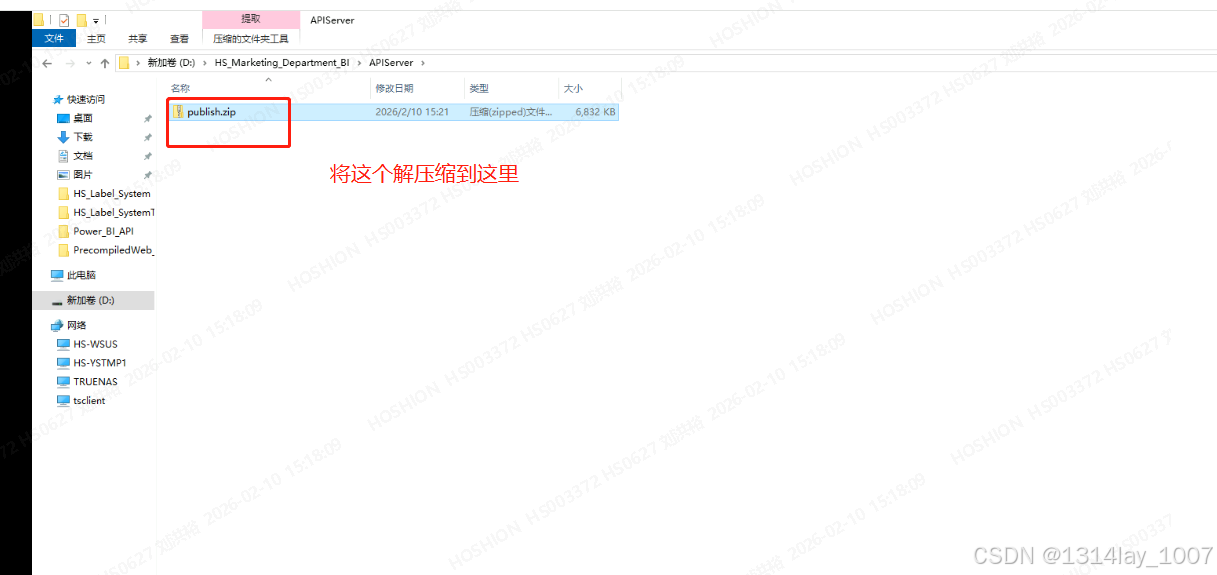
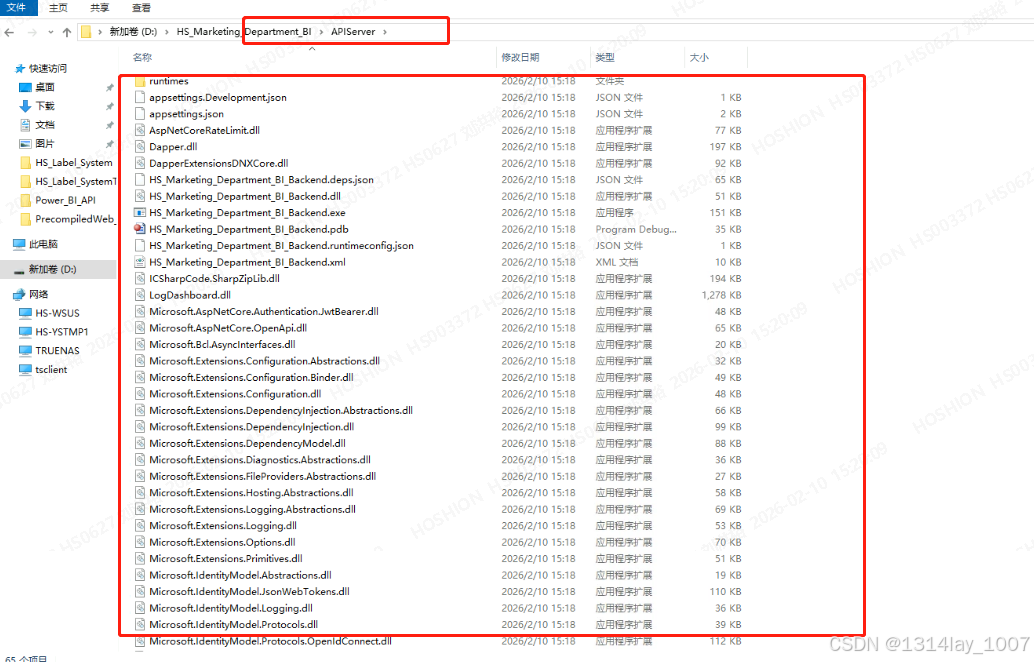
点击"打开文件夹":
HTTP 404错误
但是 我404错误了:
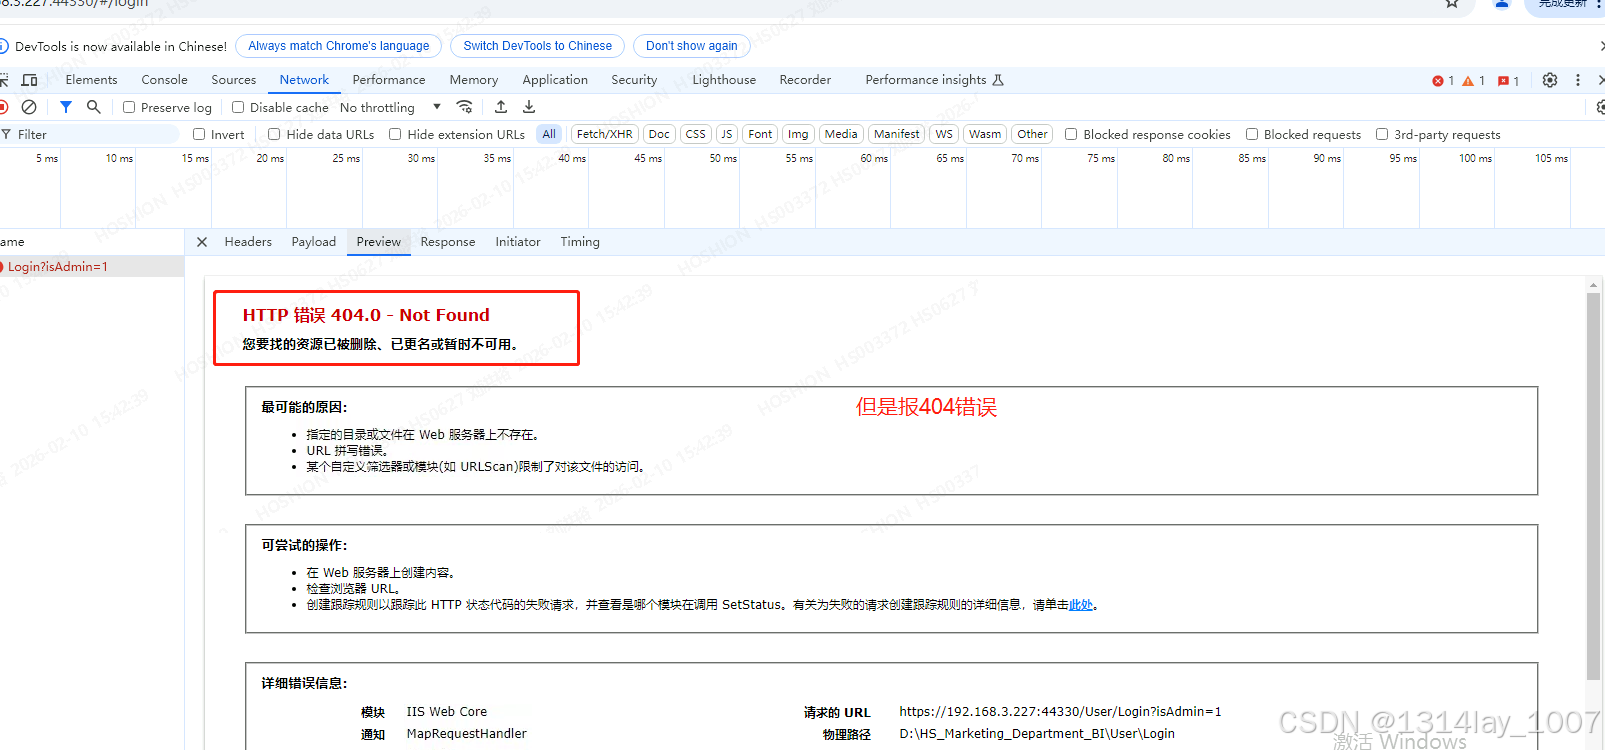
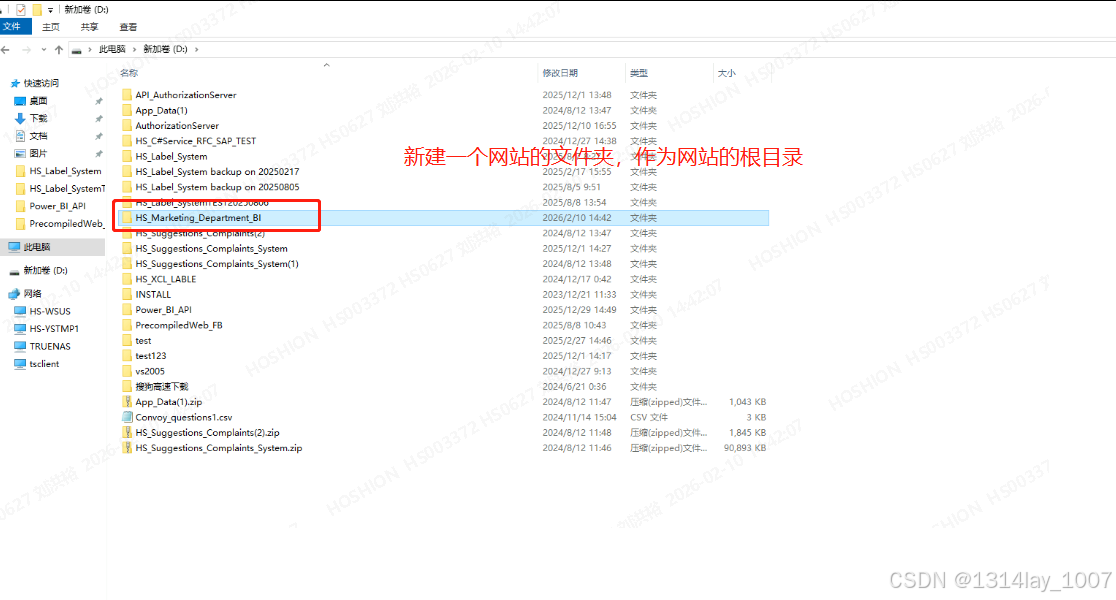
这下没头绪了,去网上搜了一堆资料,很多都推荐在这个C#的发布目录里面,加上wwwroot文件夹,我现在就新建一个:


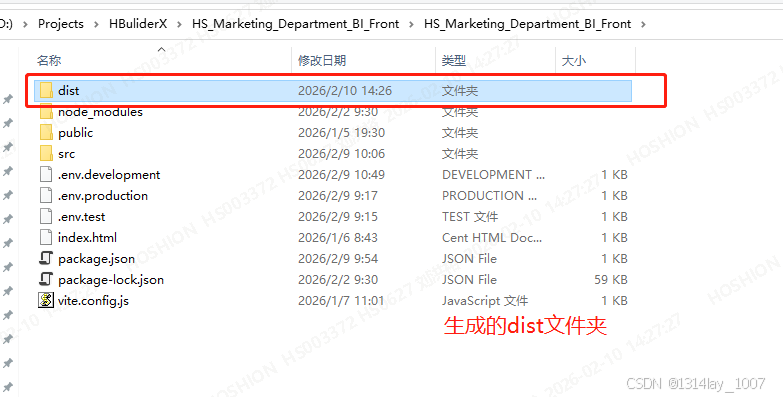
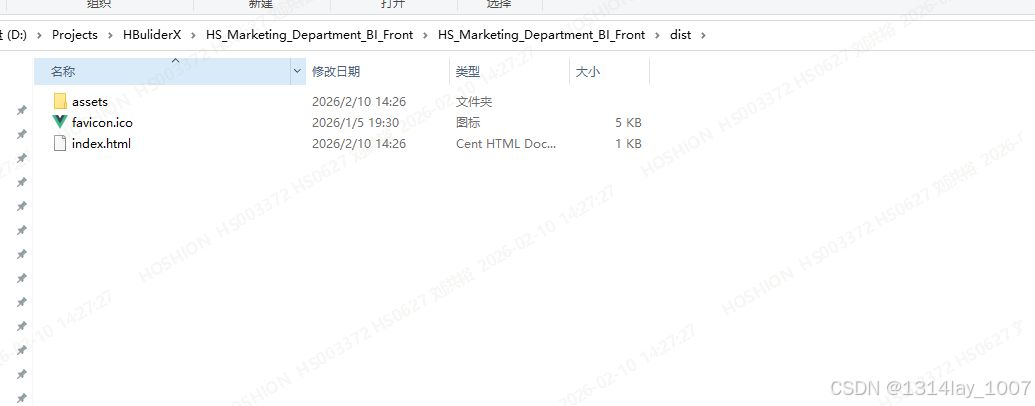
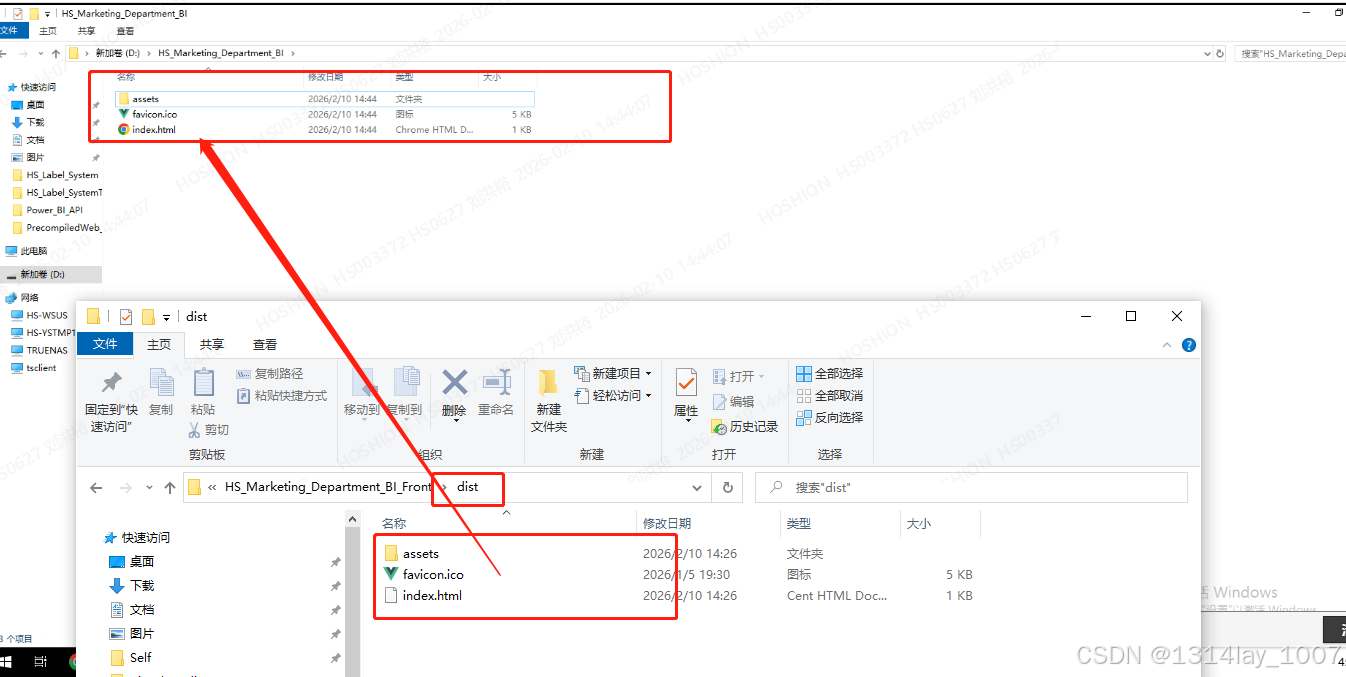
然后把前端Vue发布的dist文件夹里面的东西拷贝到这里:
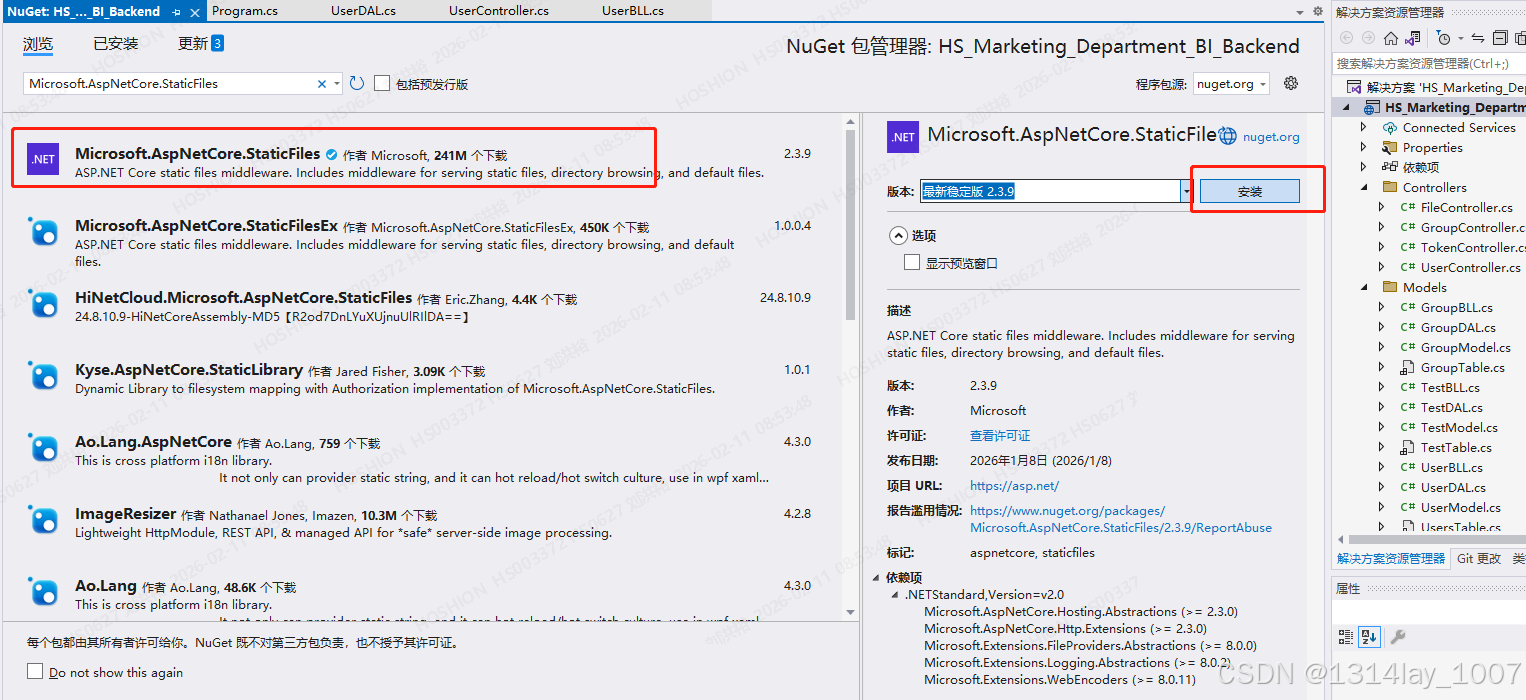
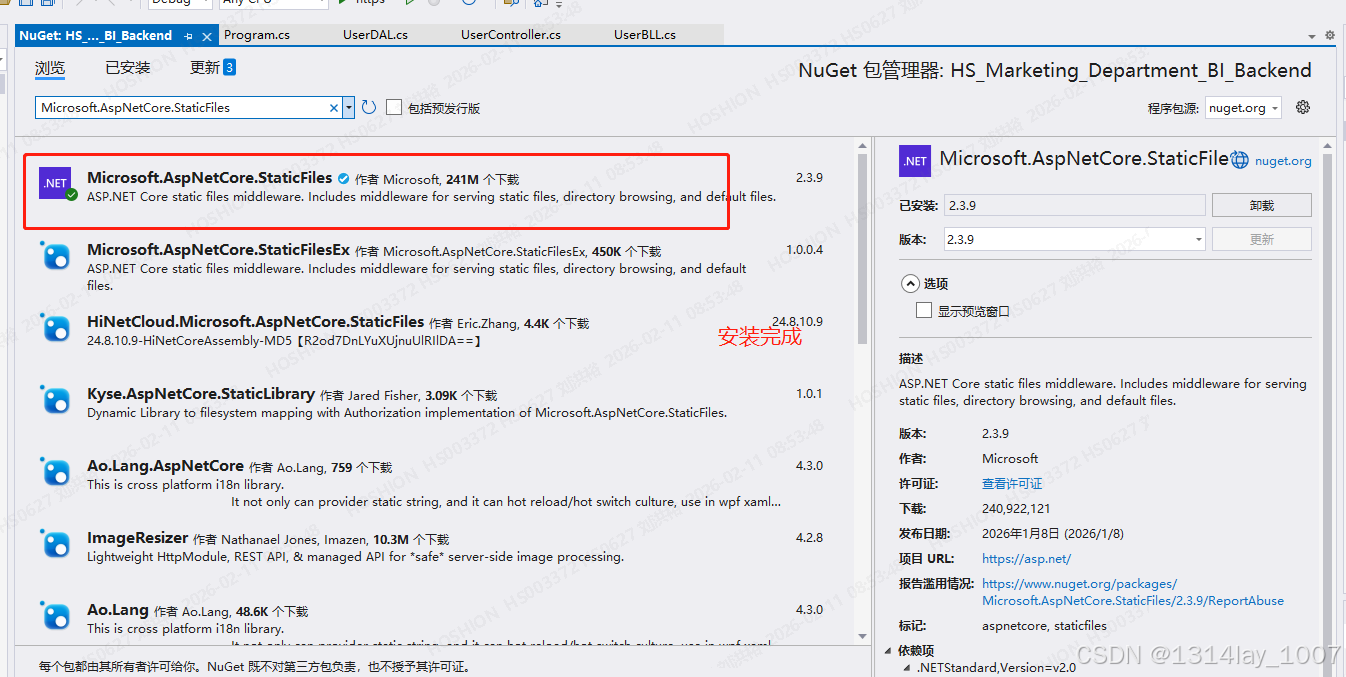
然后安装一下Microsoft.AspNetCore.StaticFiles包,因为我是没有的:
修改Program.cs文件
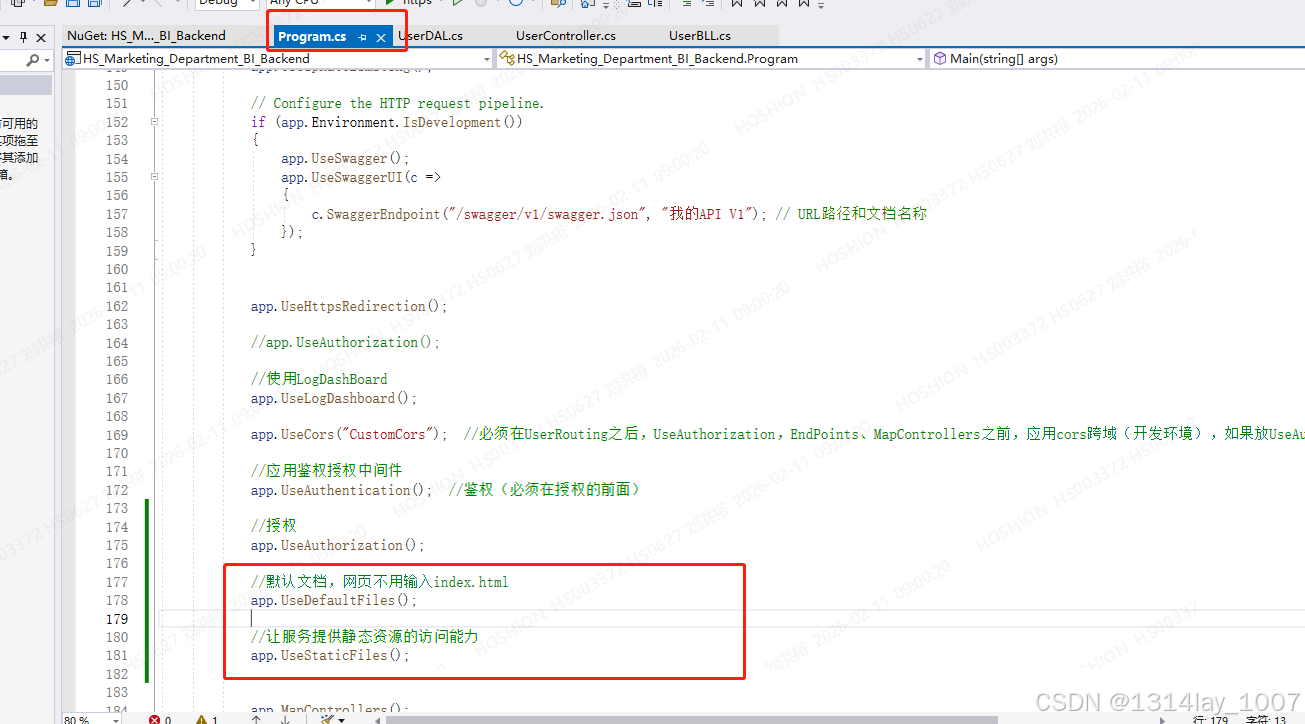
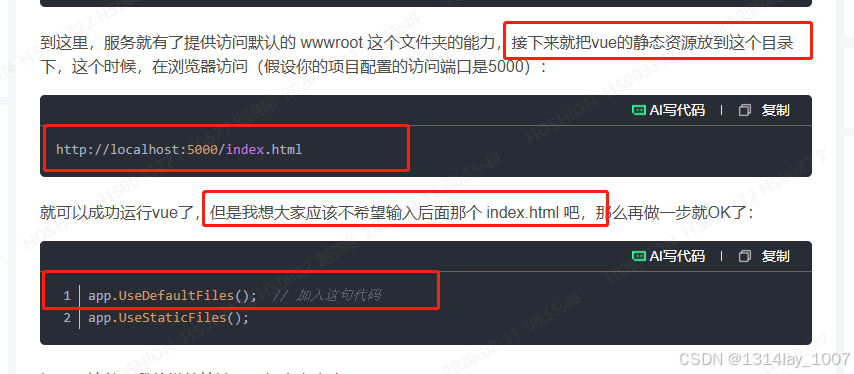
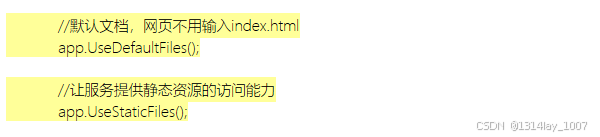
//默认文档,网页不用输入index.html
app.UseDefaultFiles();
//让服务提供静态资源的访问能力
app.UseStaticFiles();
我重新发布一个试一下:
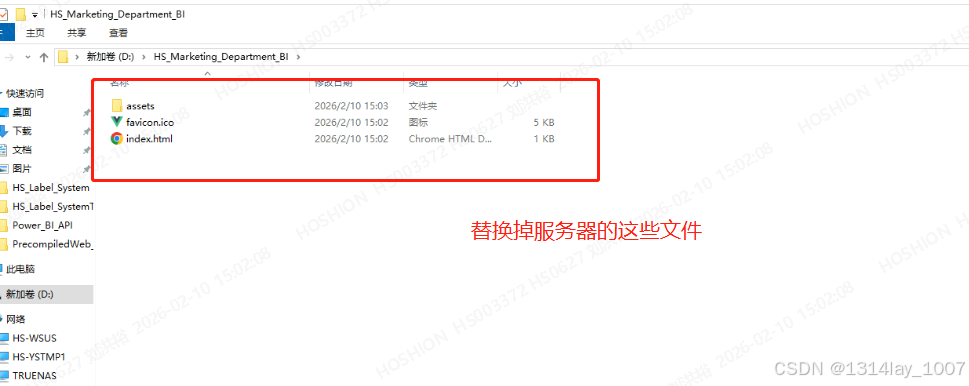
清空之前的文件,然后把这些替换到这里:
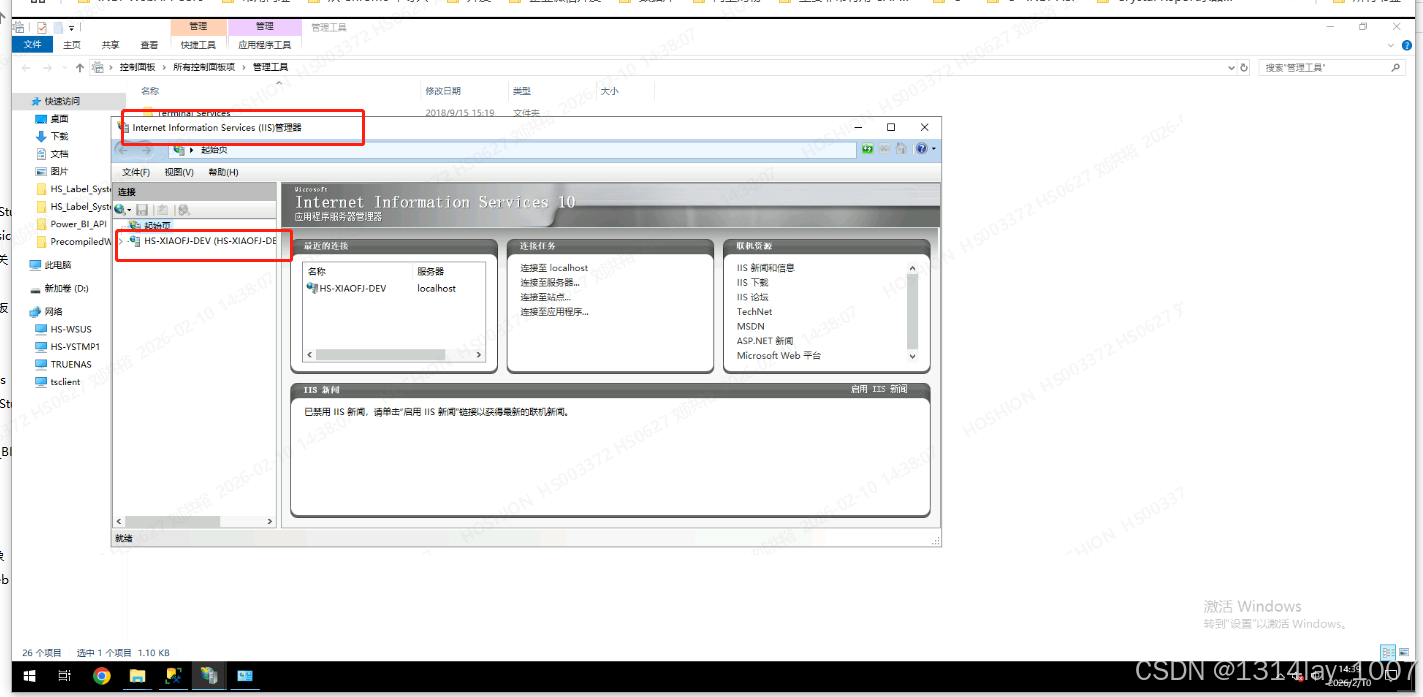
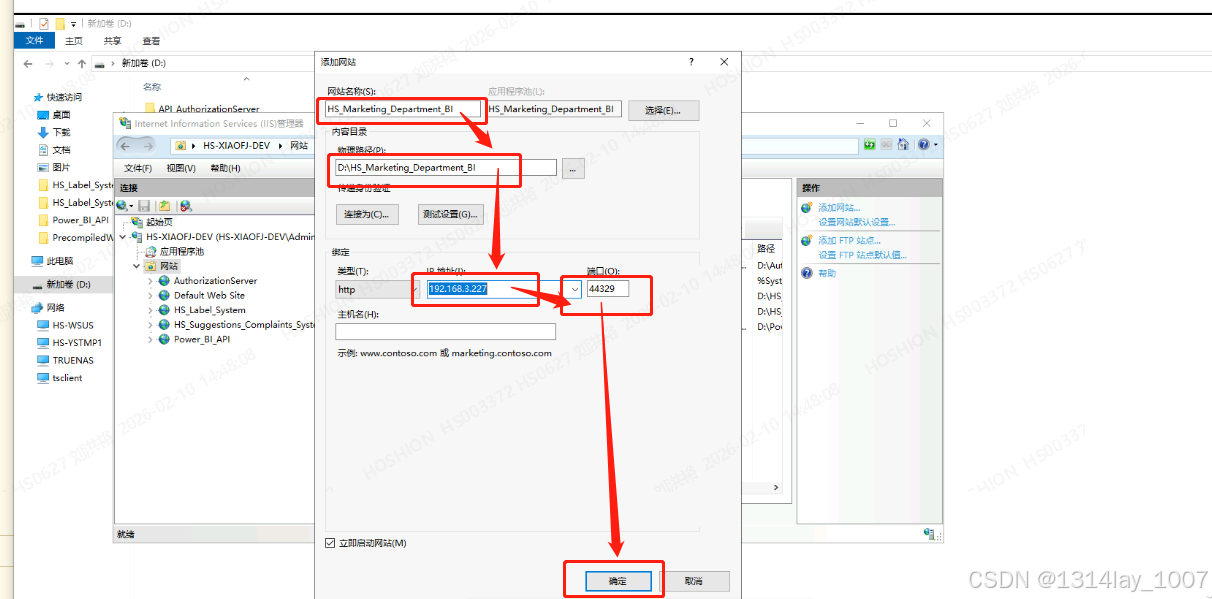
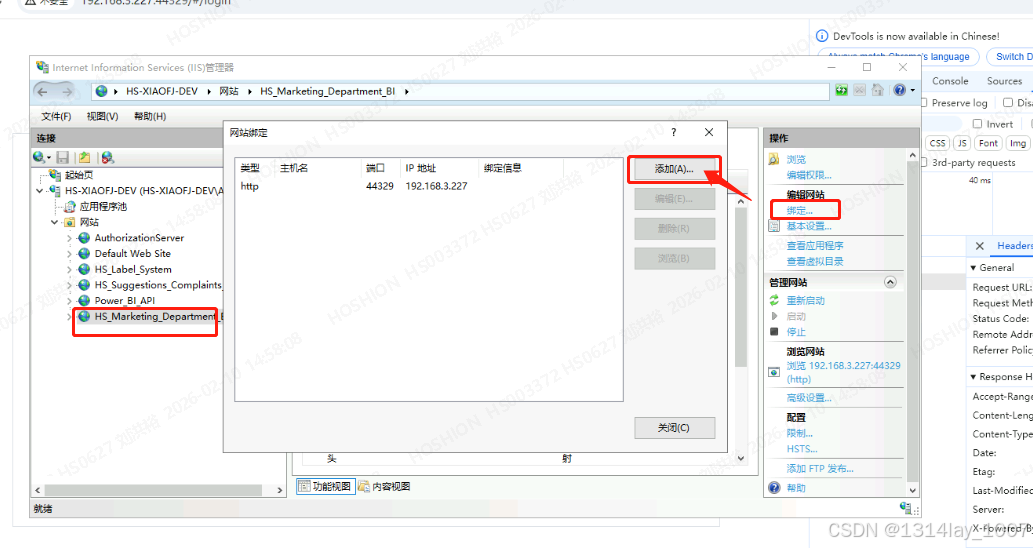
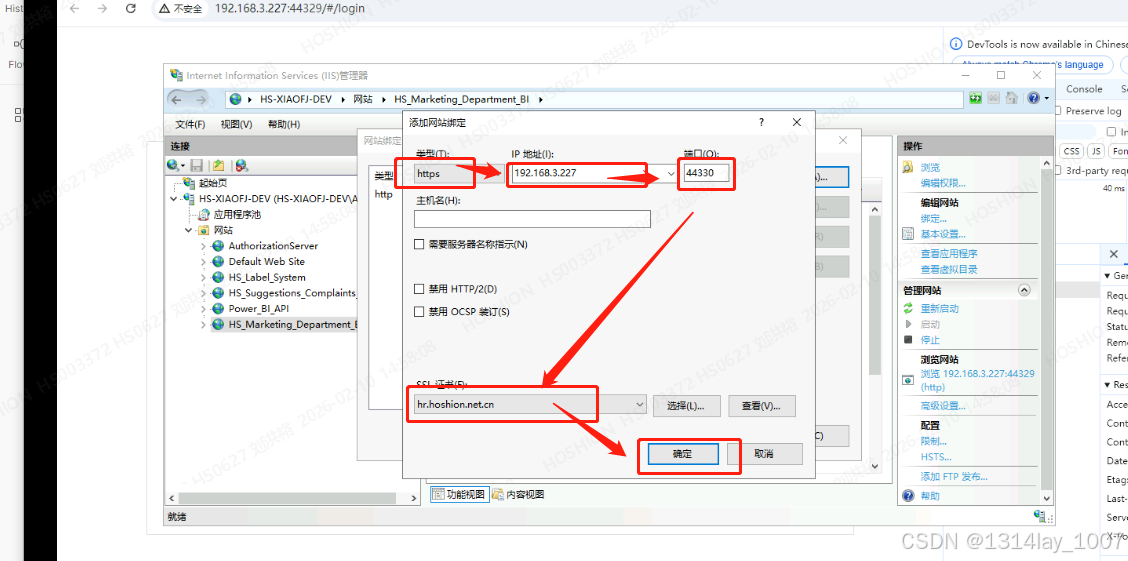
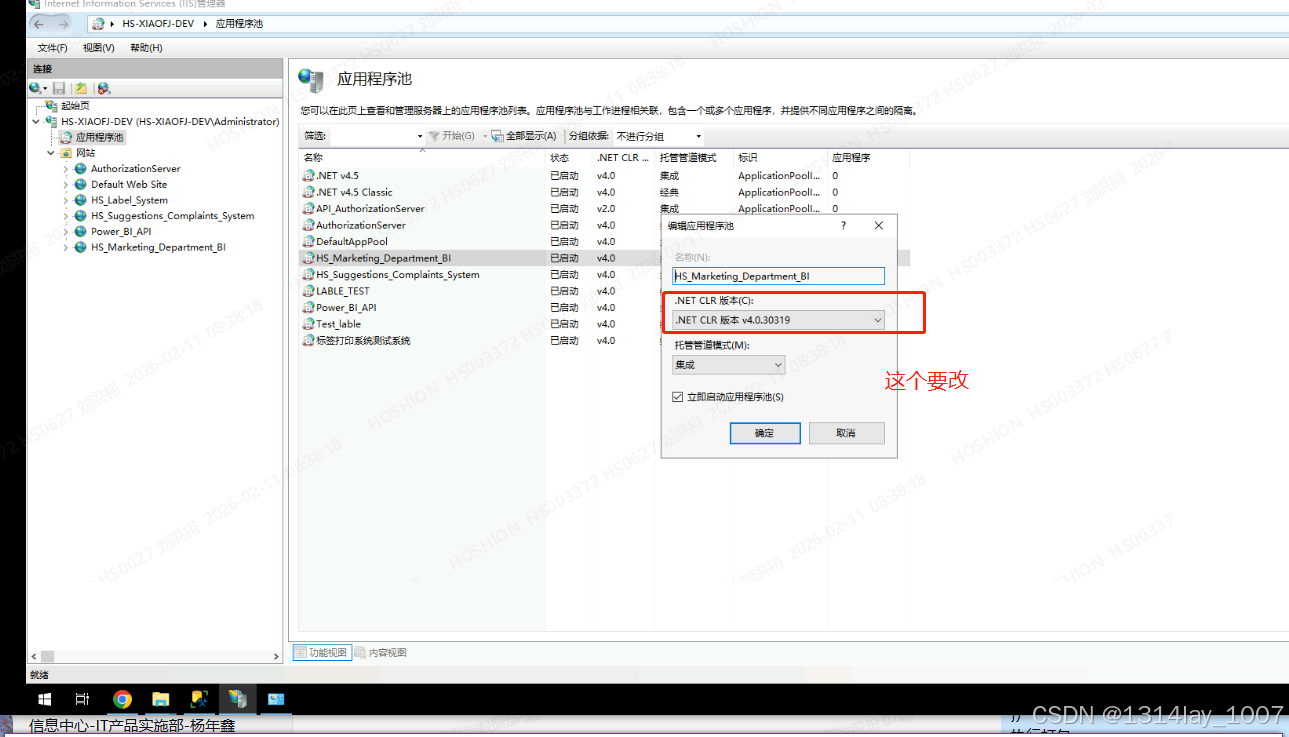
配置IIS的应用程序池
iis 在应用程序池右键,添加应用程序池,选择无托管代码,但是我新建网站的时候,给我自动创建了应用程序池,所以我就直接修改就可以:

但是报这个错误了:
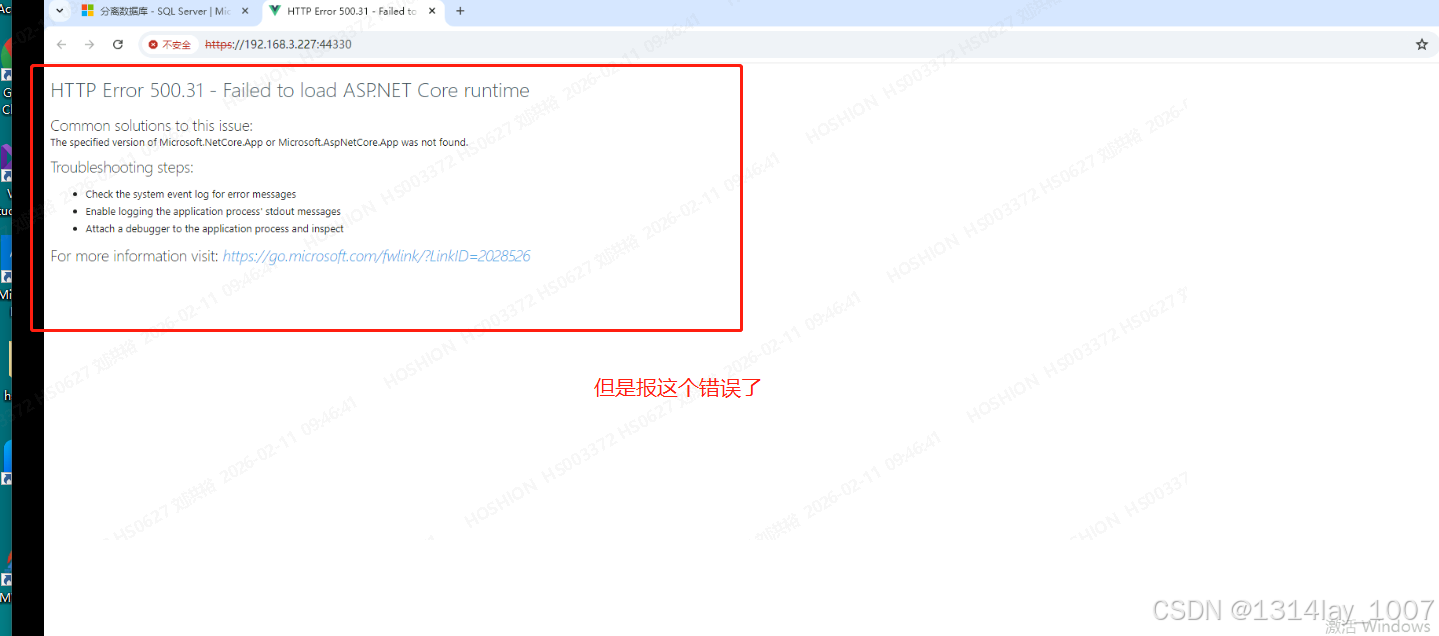
HTTP Error 500.31 - Failed to load ASP.NET Core runtime
Common solutions to this issue:
The specified version of Microsoft.NetCore.App or Microsoft.AspNetCore.App was not found.
Troubleshooting steps:
- Check the system event log for error messages
- Enable logging the application process' stdout messages
- Attach a debugger to the application process and inspect
For more information visit: https://go.microsoft.com/fwlink/?LinkID=2028526
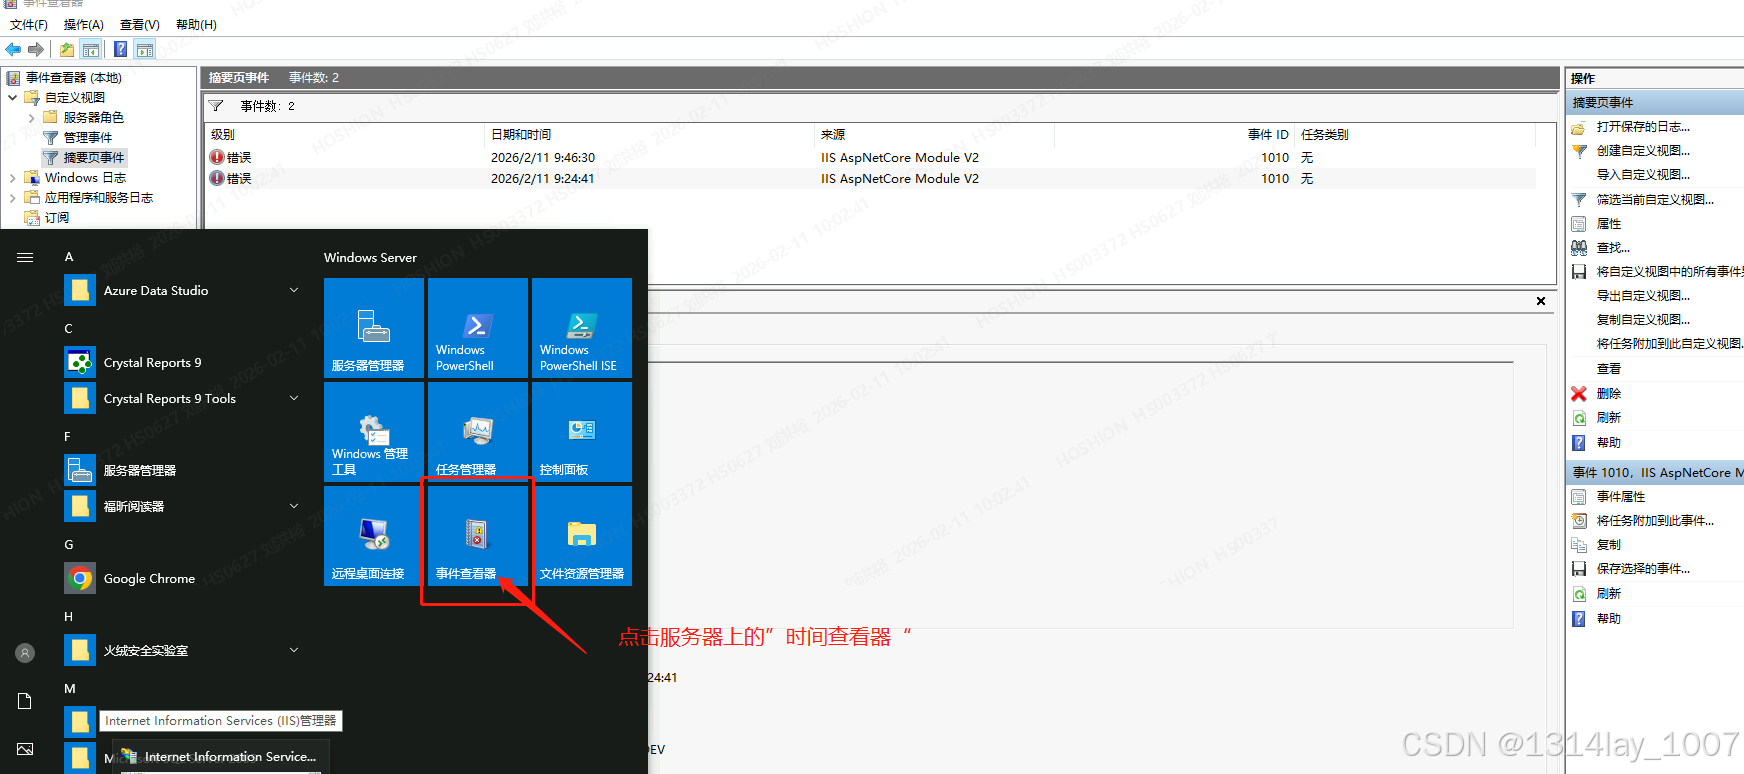
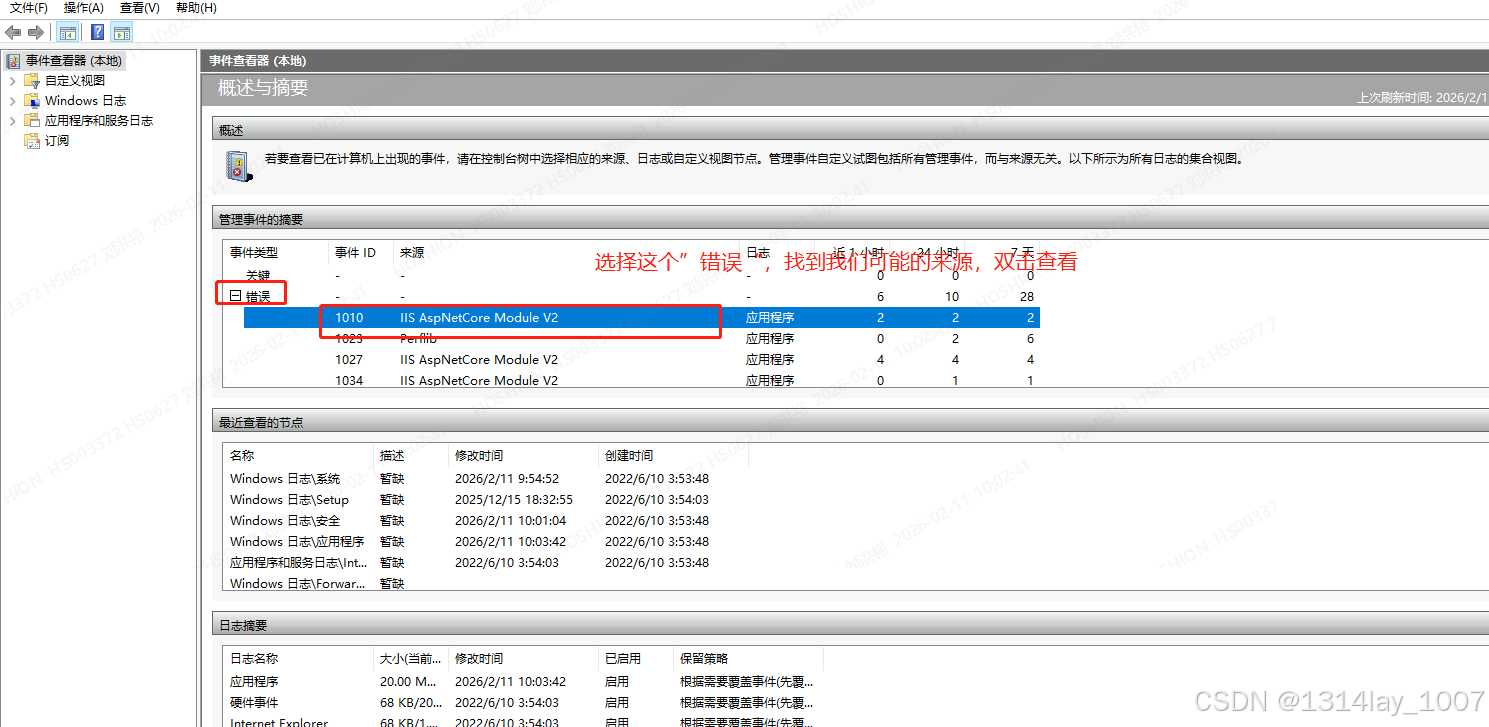
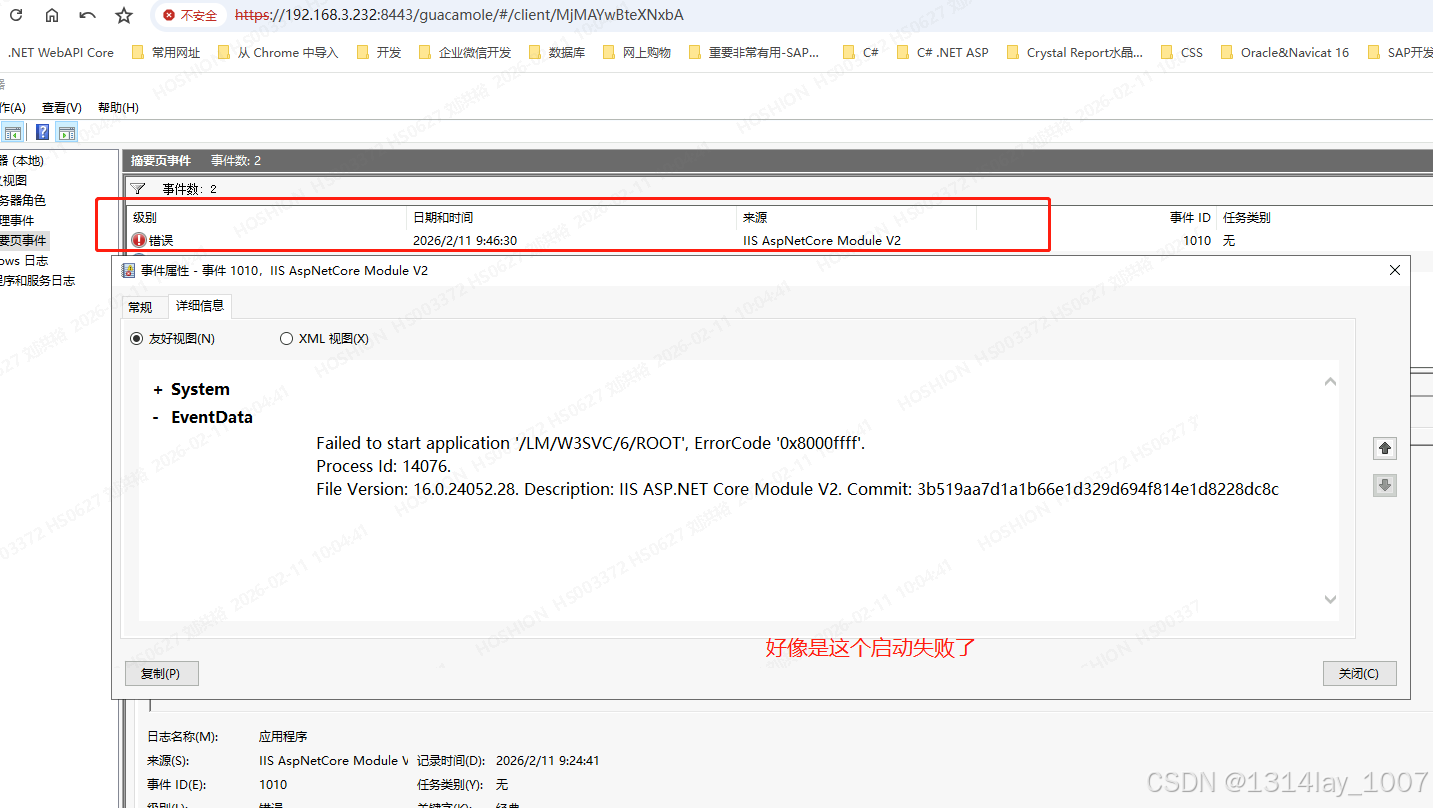
点击链接,跳到到了这里:

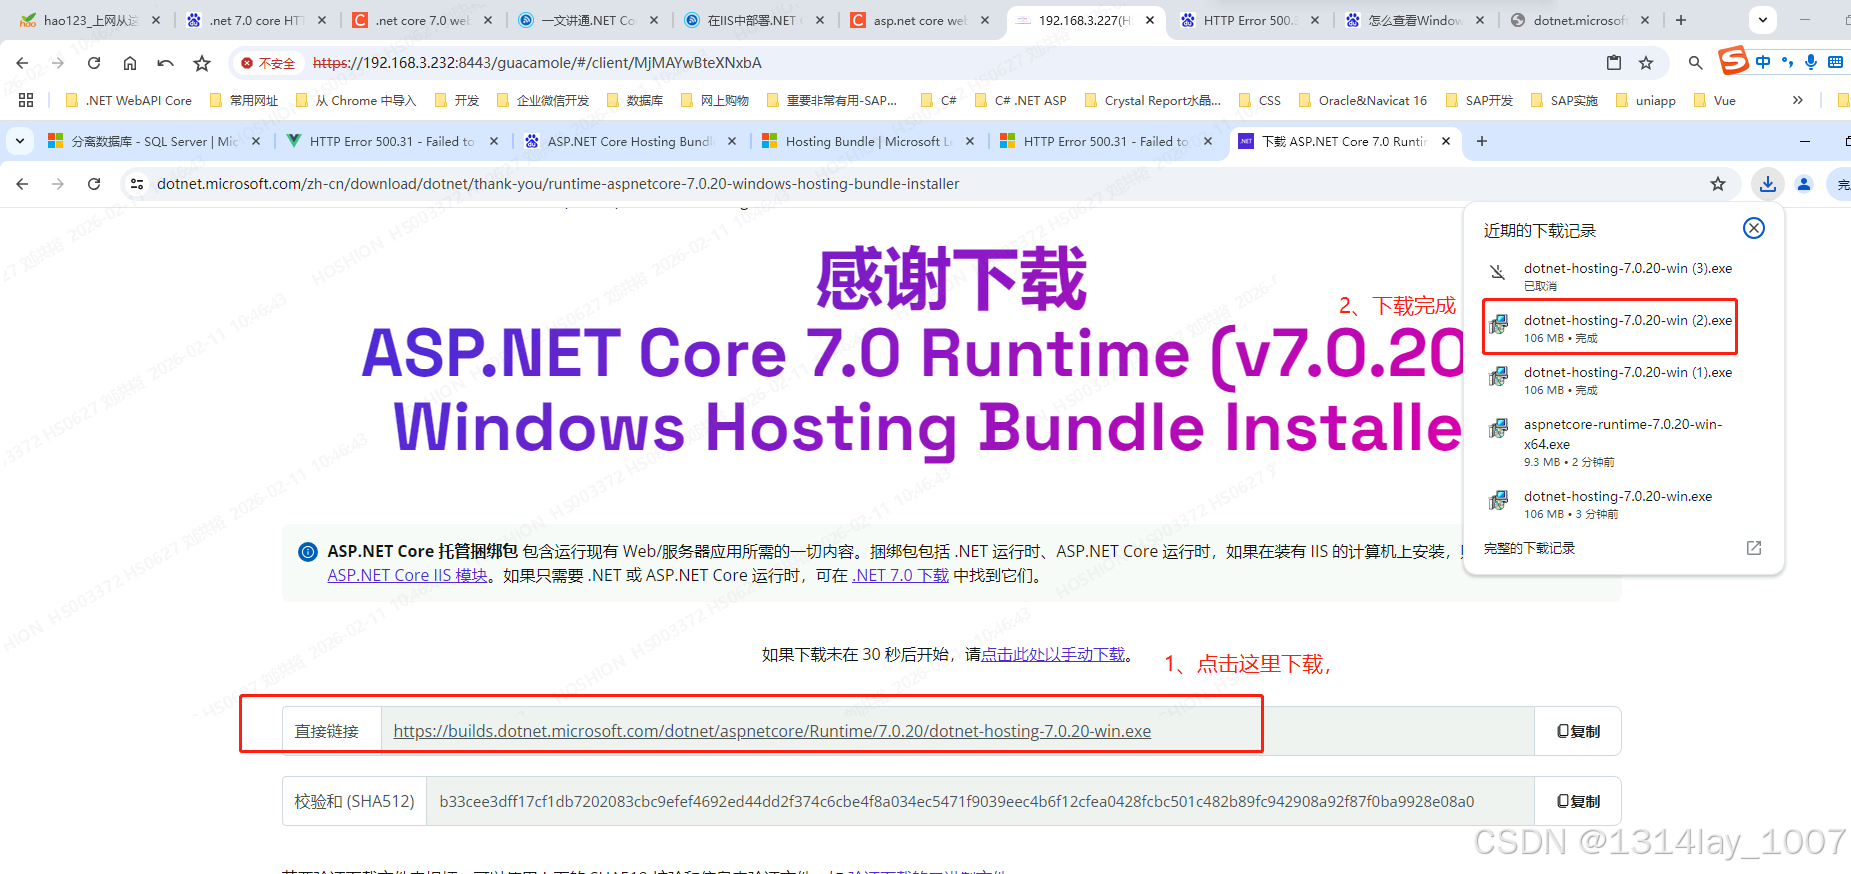
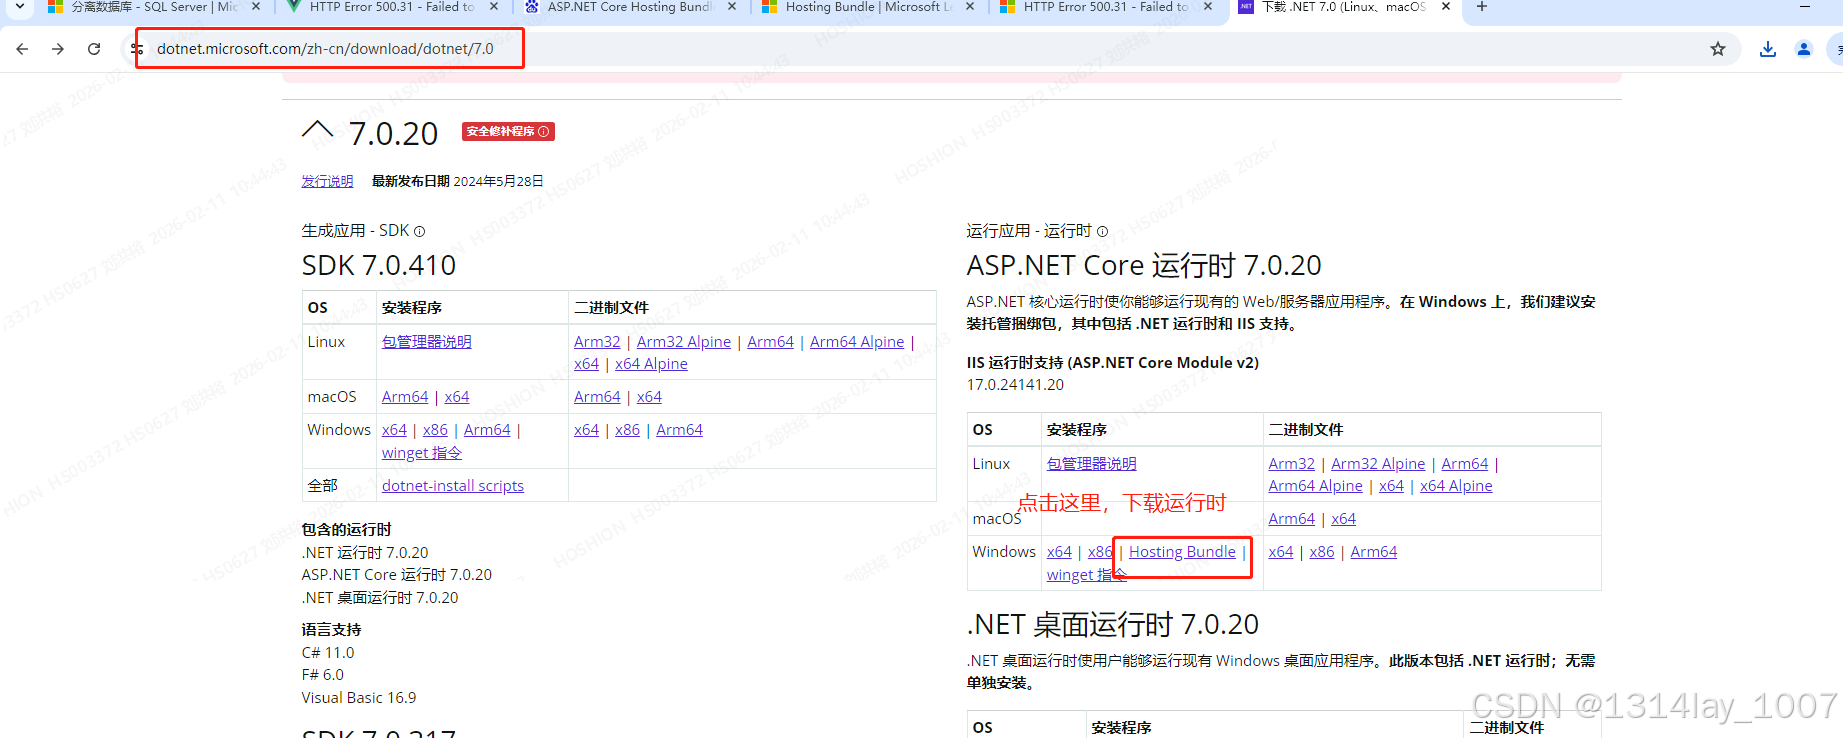
安装ASP .NET Core 7.0 runtime运行时 Hosting Bundle
点击下面网站,下载这个:
https://dotnet.microsoft.com/zh-cn/download/dotnet/7.0


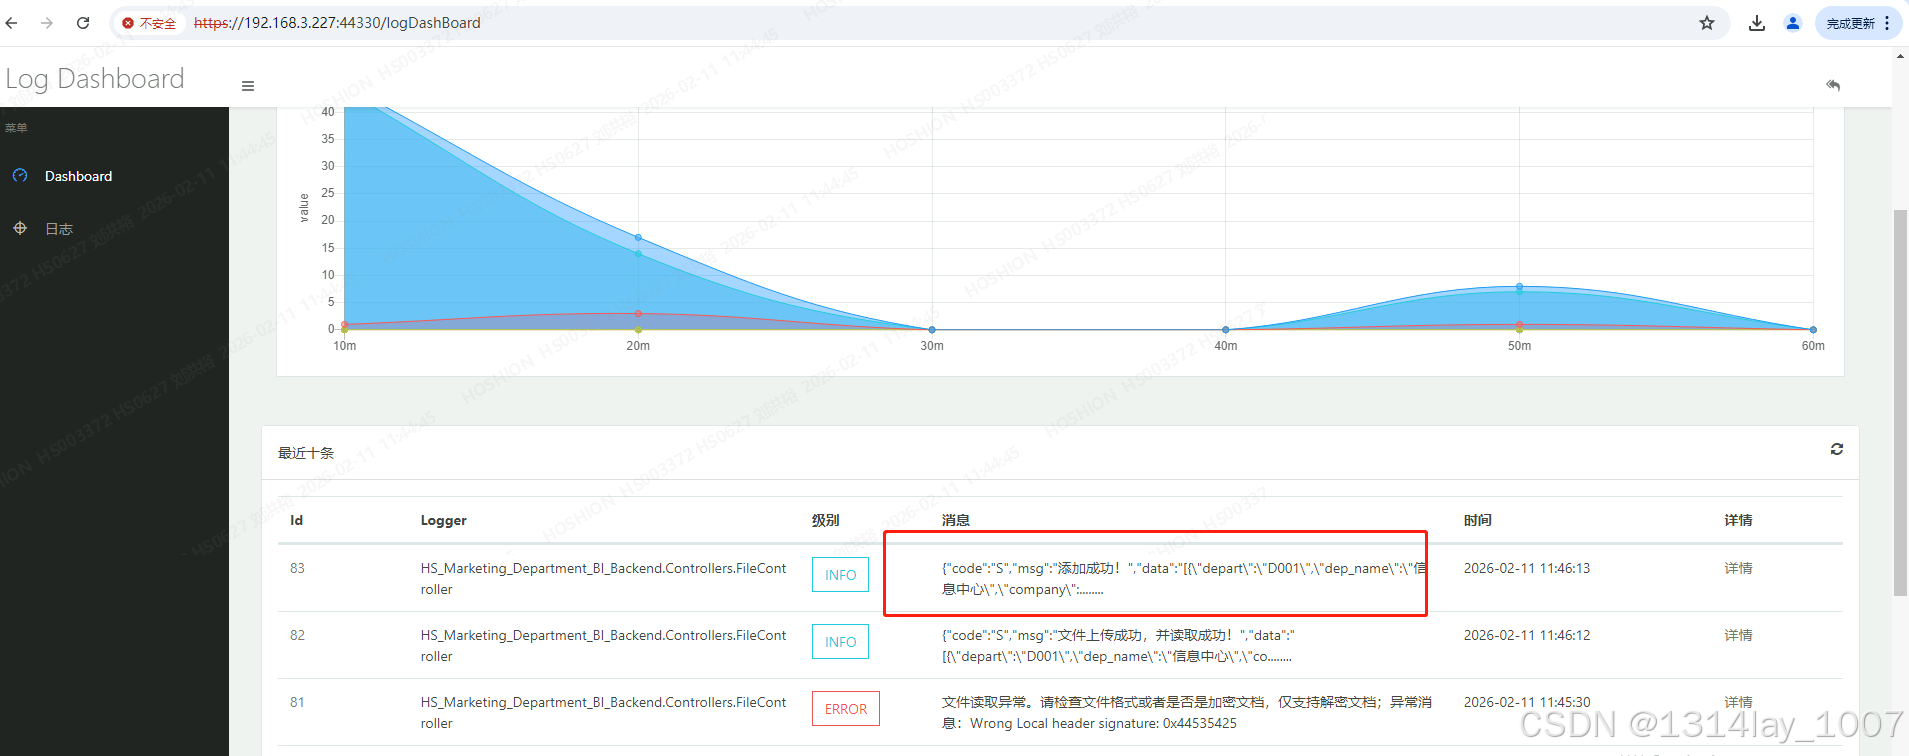
服务器的浏览器本地测试
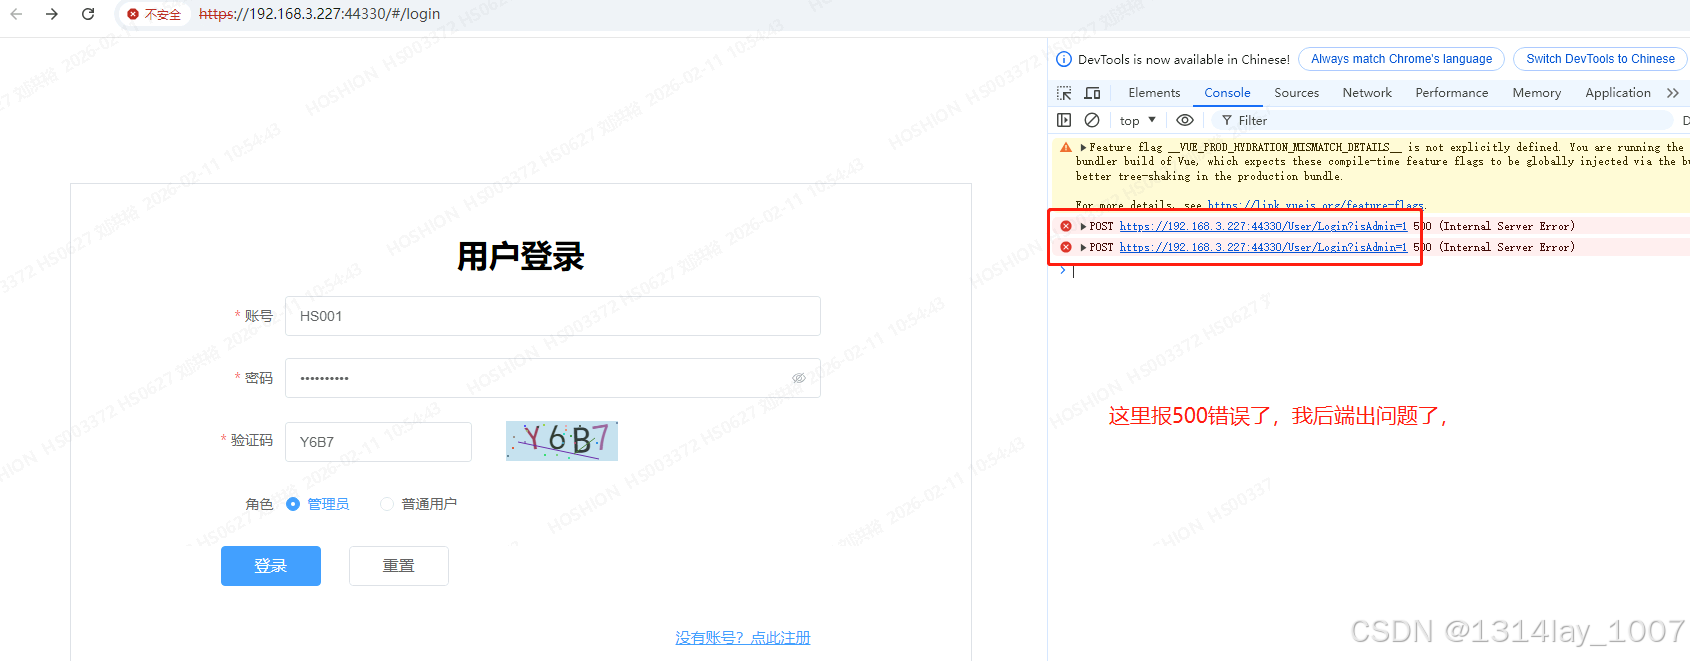
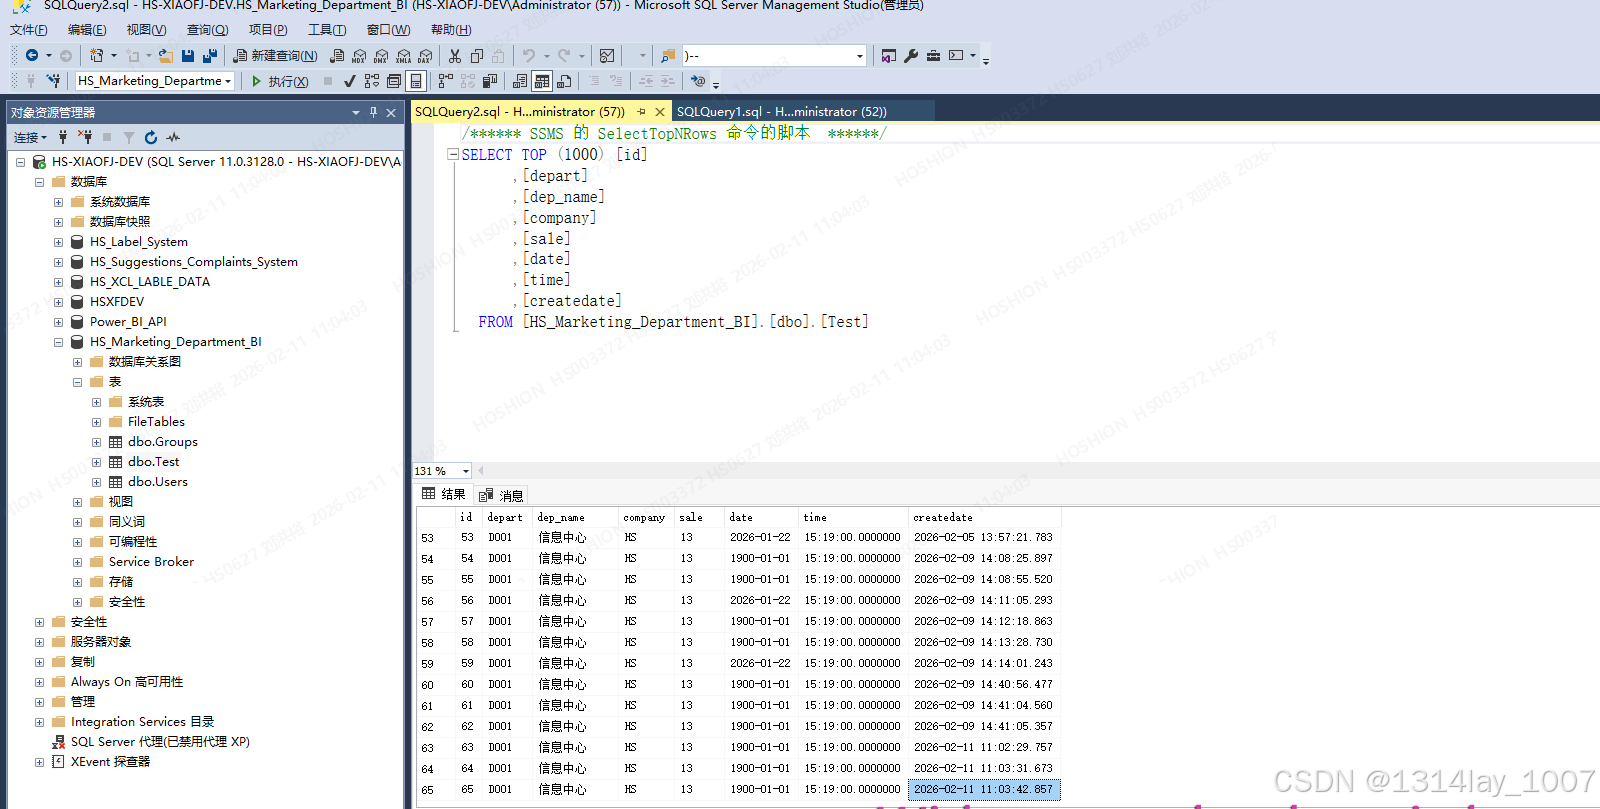
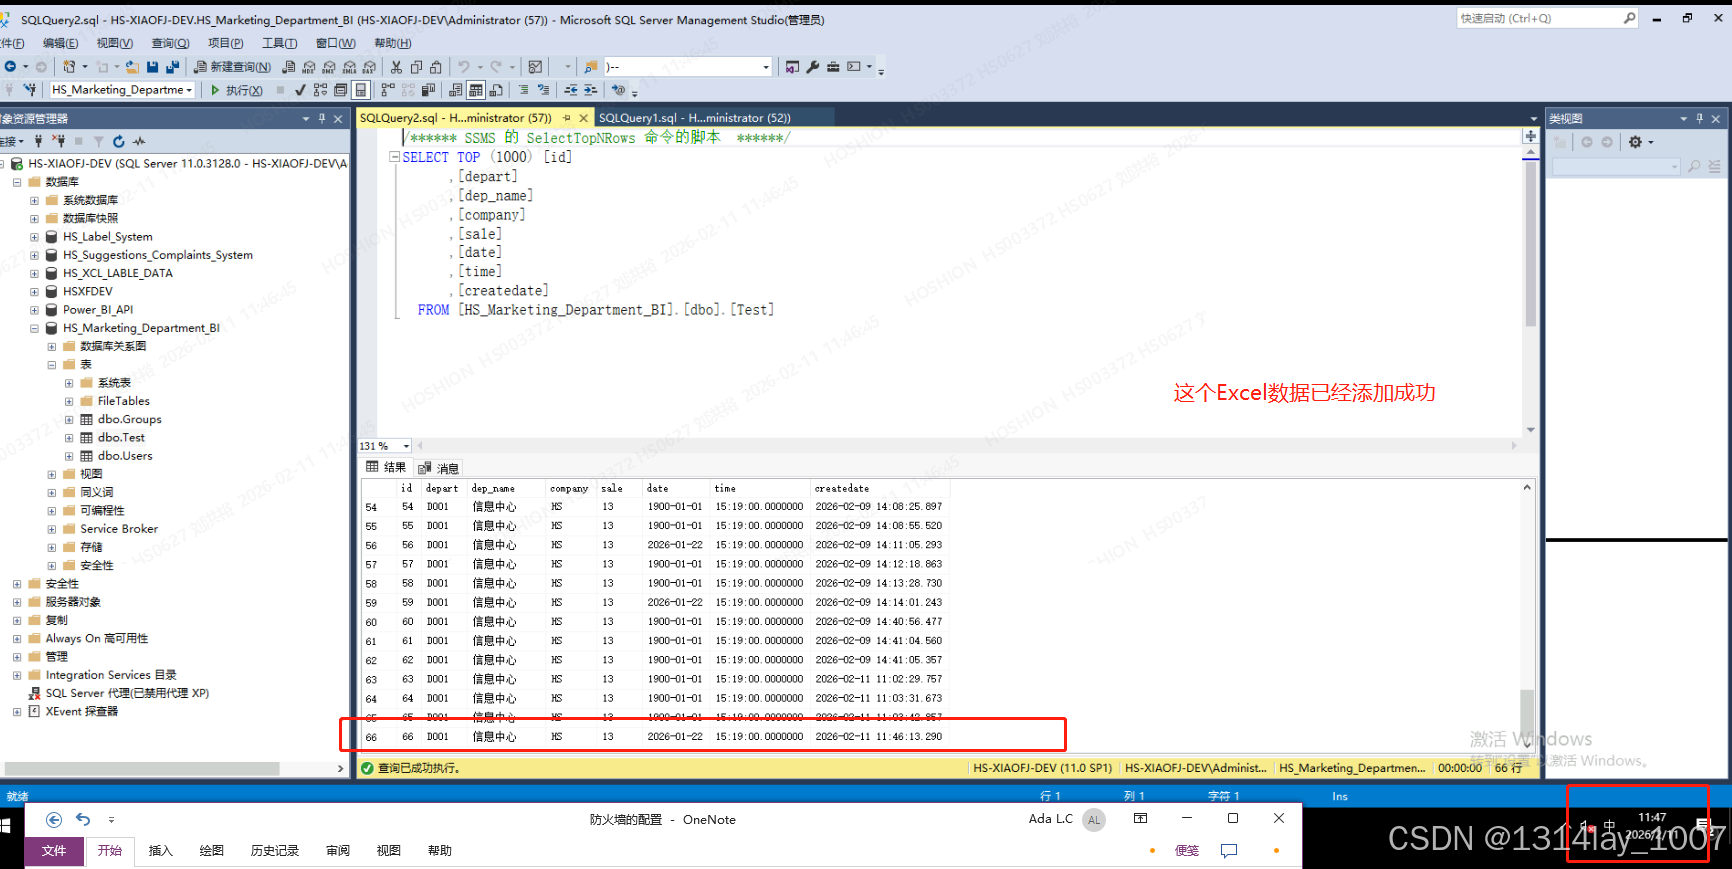
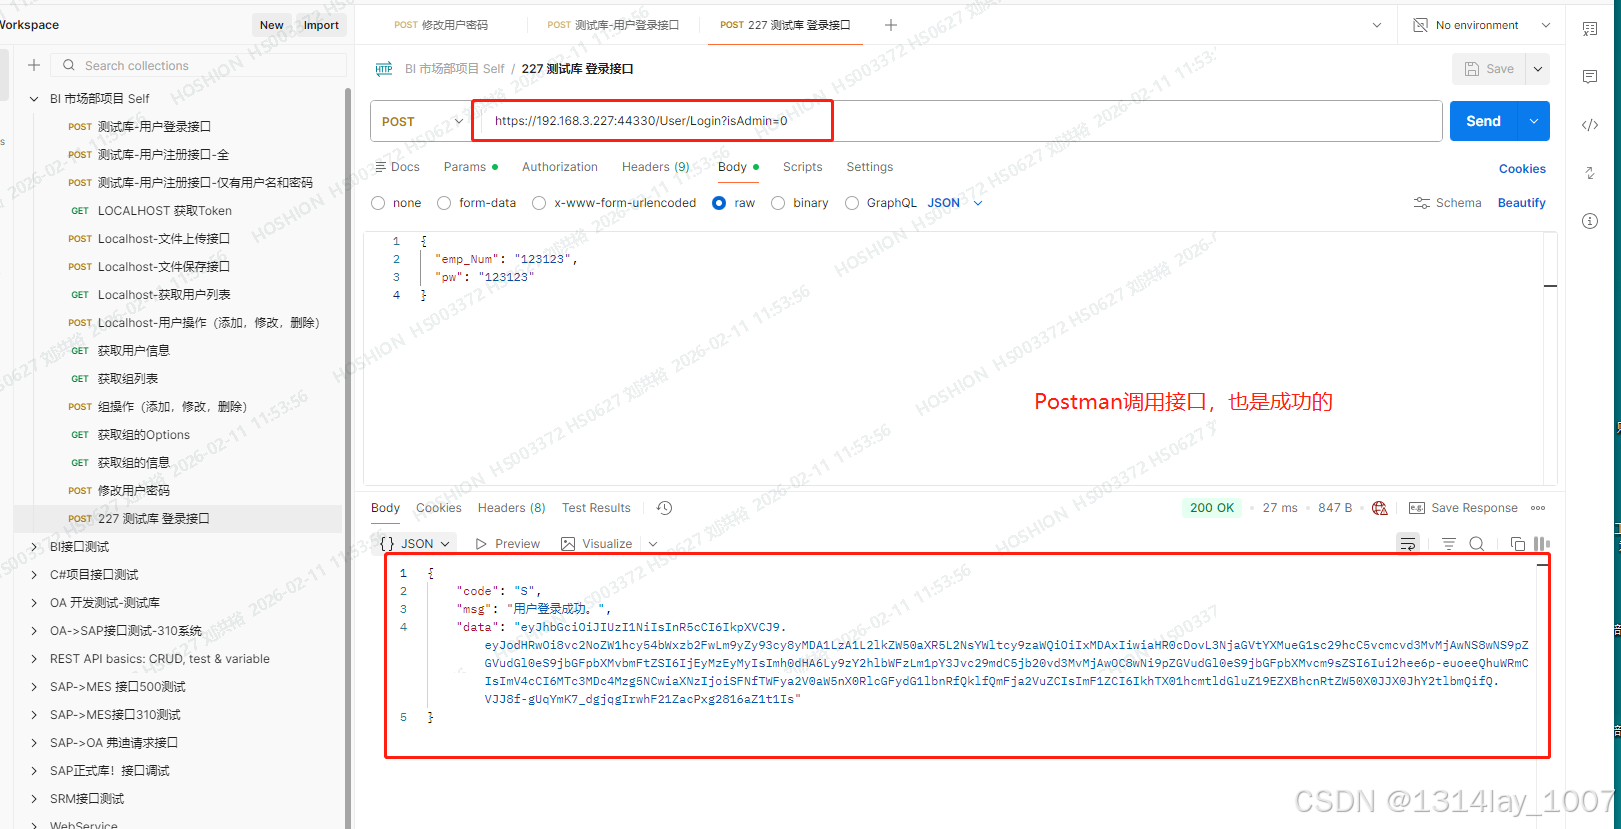
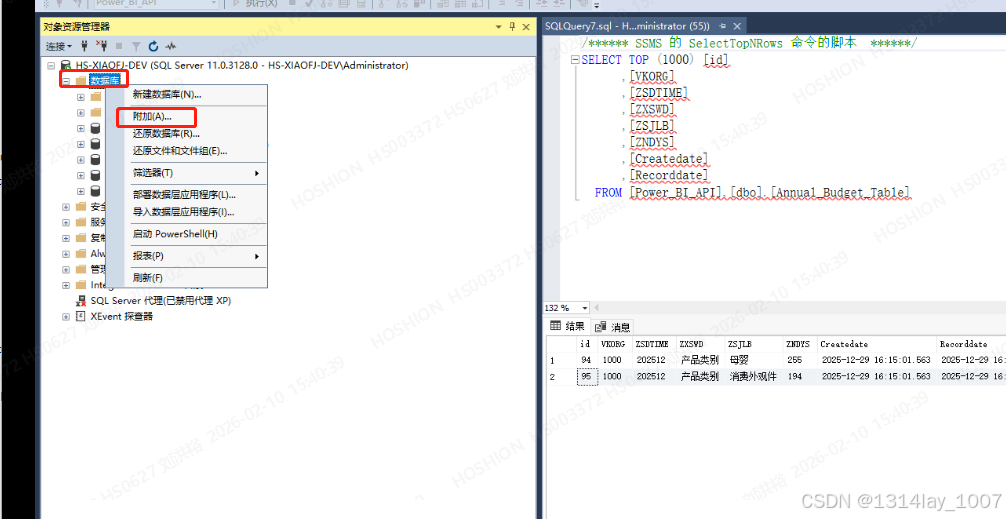
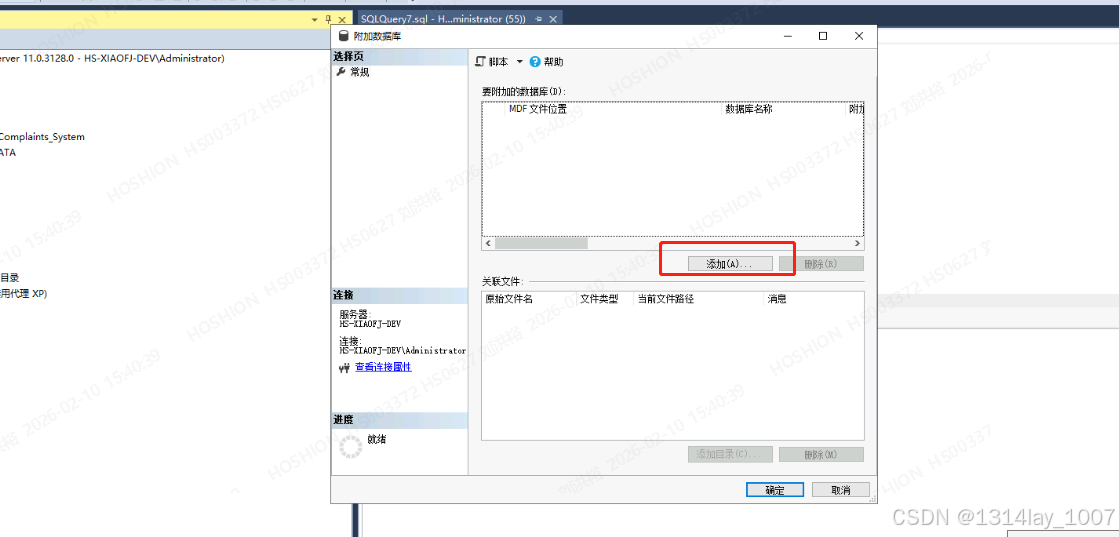
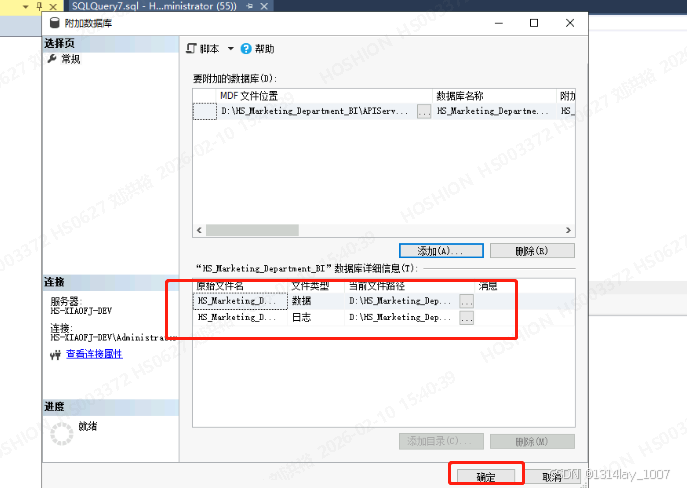
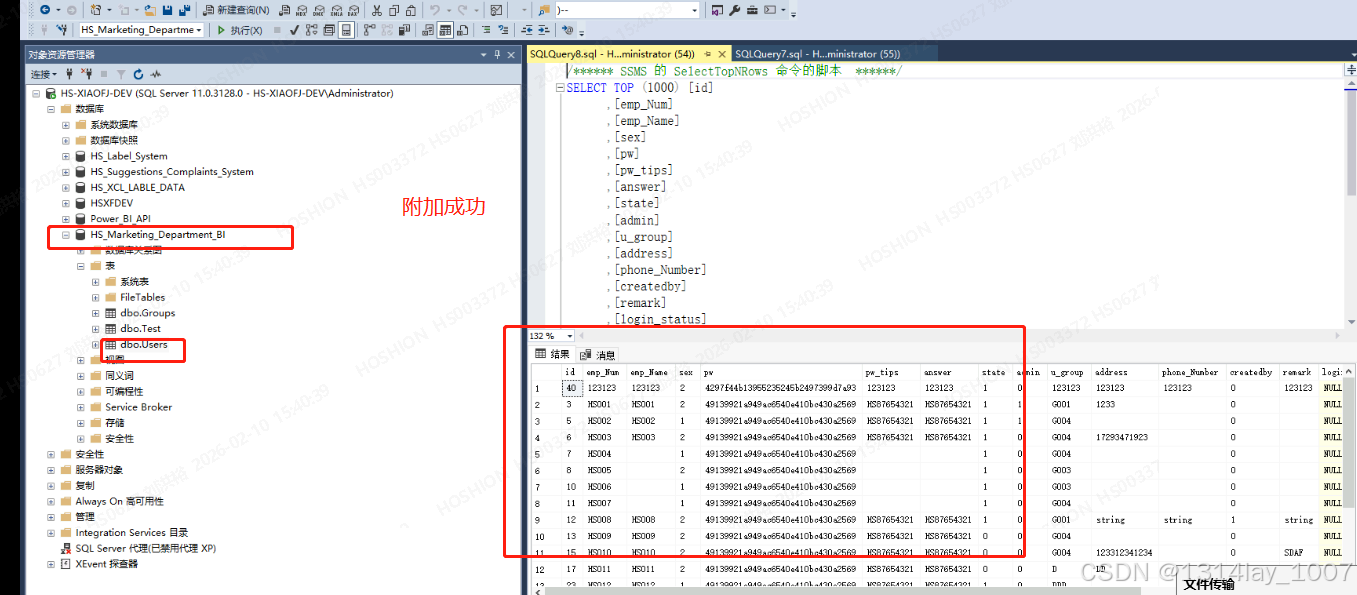
后面发现我没有把数据库附加上去。。。。。。附加一下看看:


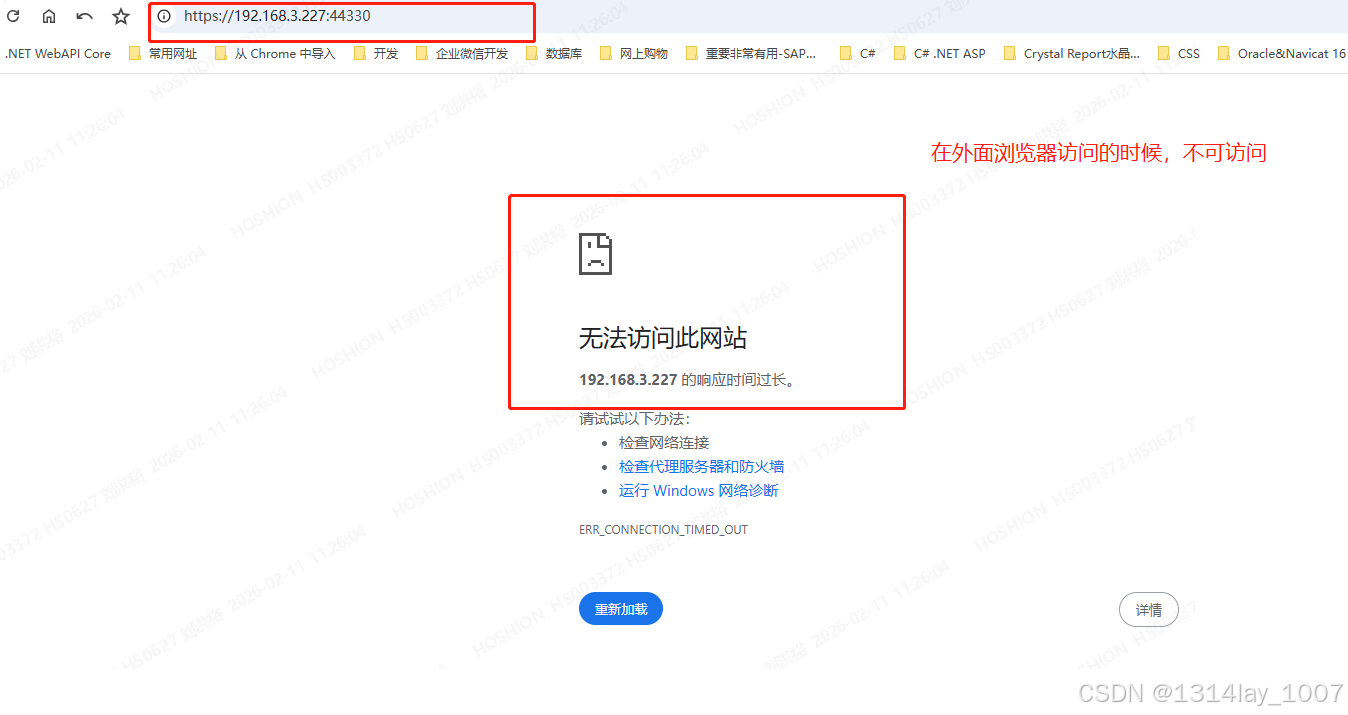
在外面的浏览器访问,失败了

具体步骤见:防火墙的配置
防火墙的配置
外面浏览器测试
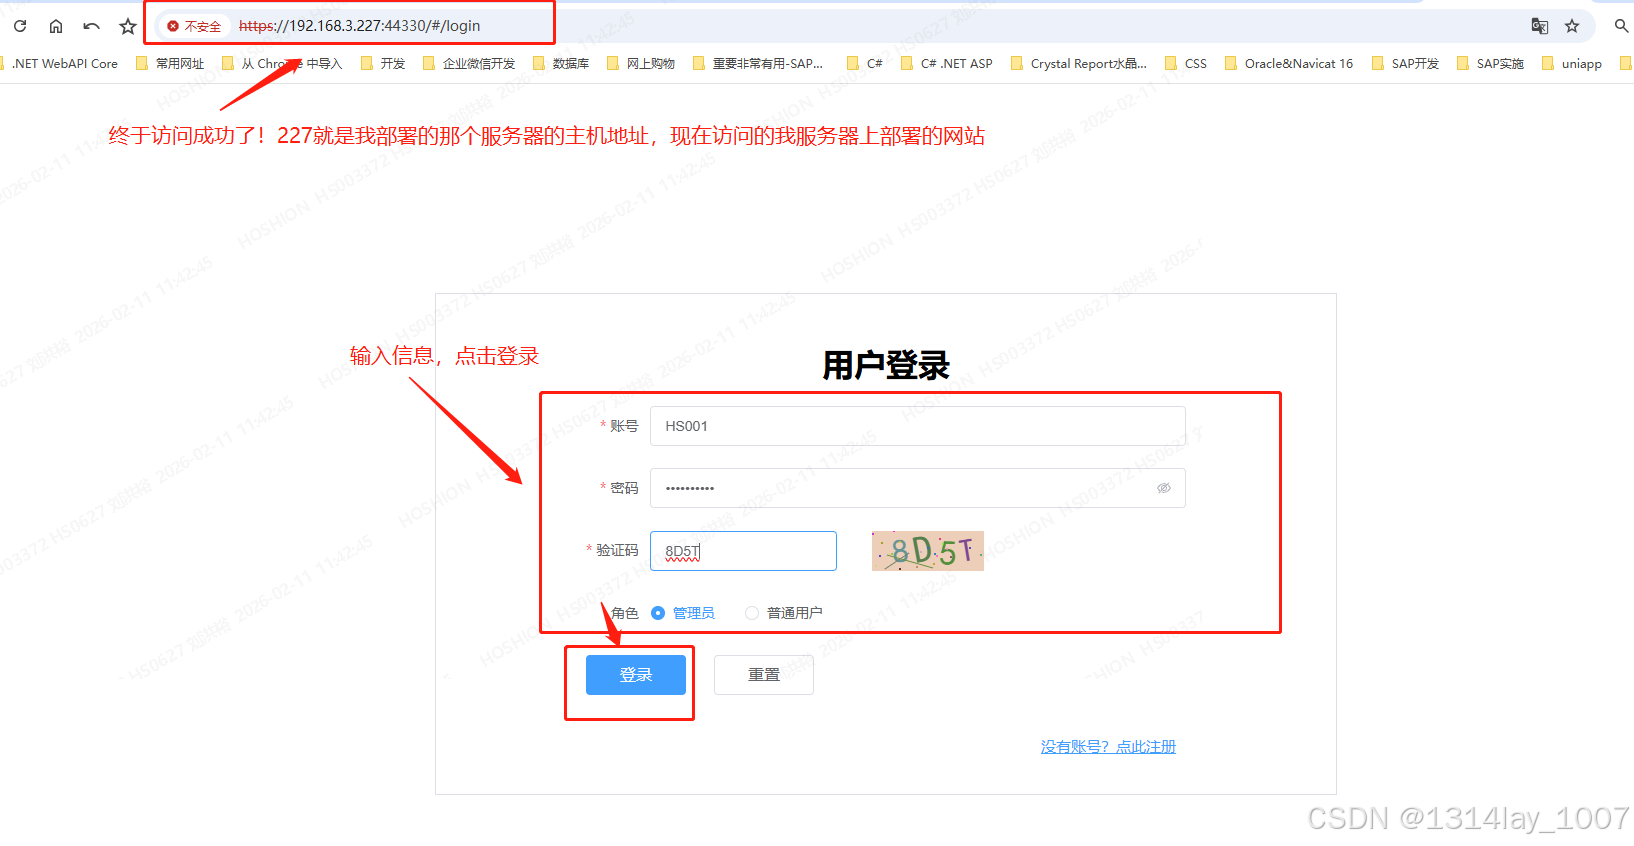
在外面的浏览器访问不成功,要配置一下防火墙
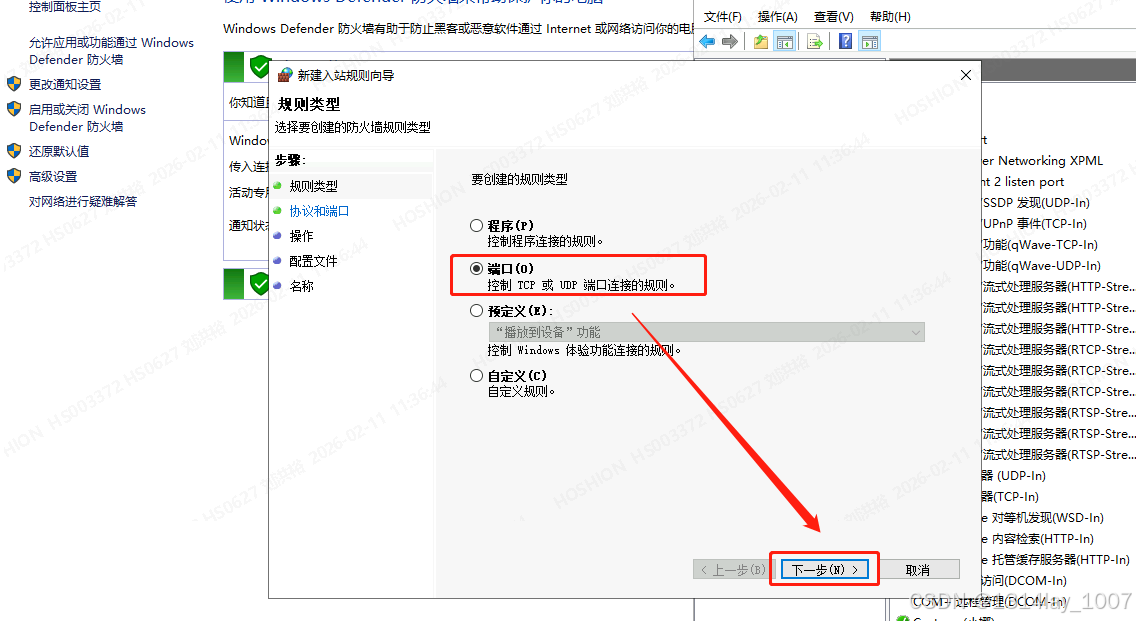
打开"控制面板",点击"Windows Defender 防火墙",点击"高级设置",点击"入站规则":

选择"端口",点击"下一步":
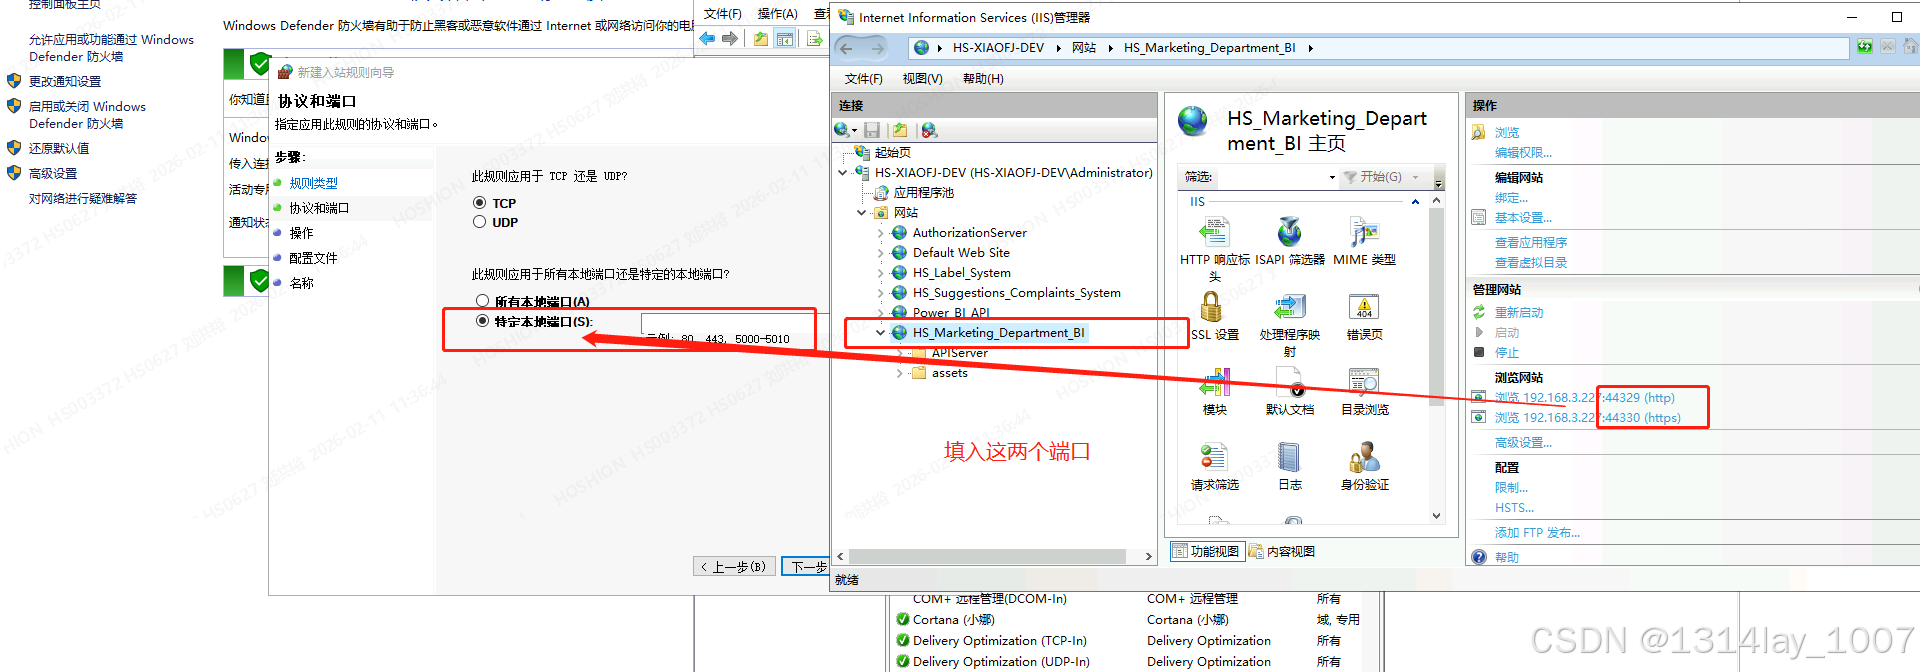
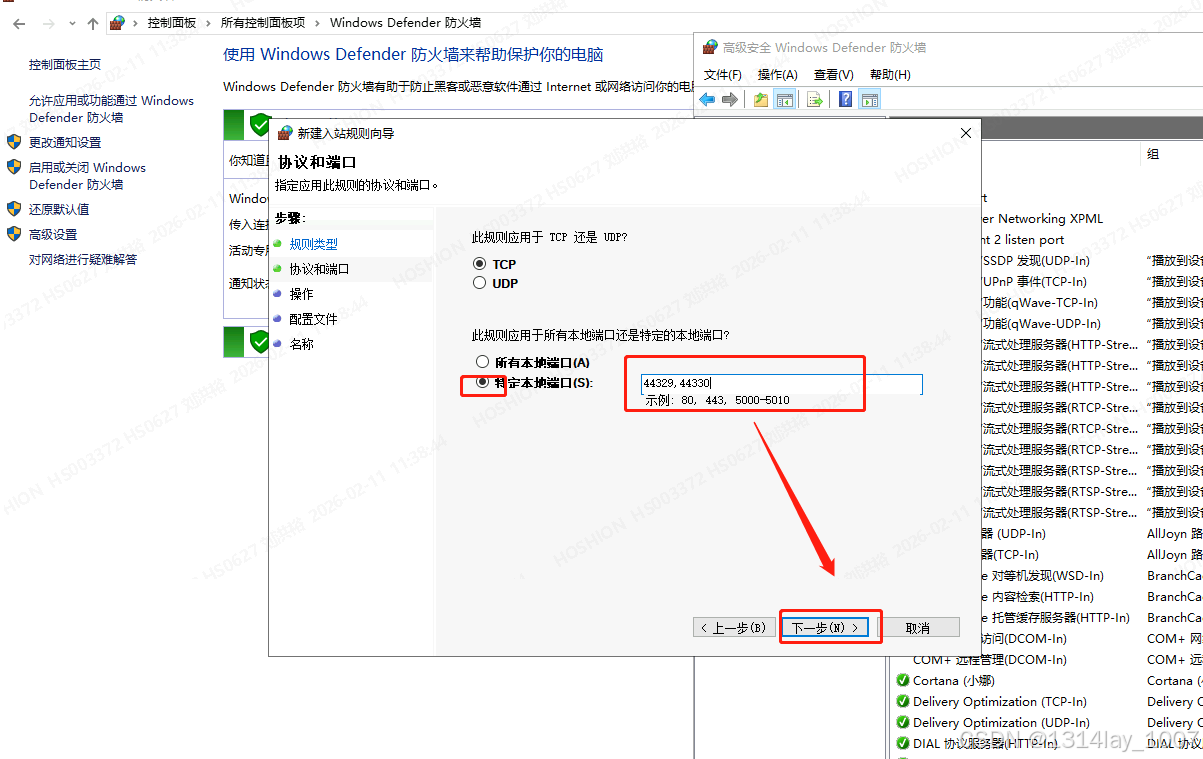
选择"特定本地端口",输入我们的网站的两个端口:
输入端口,点击"下一步":
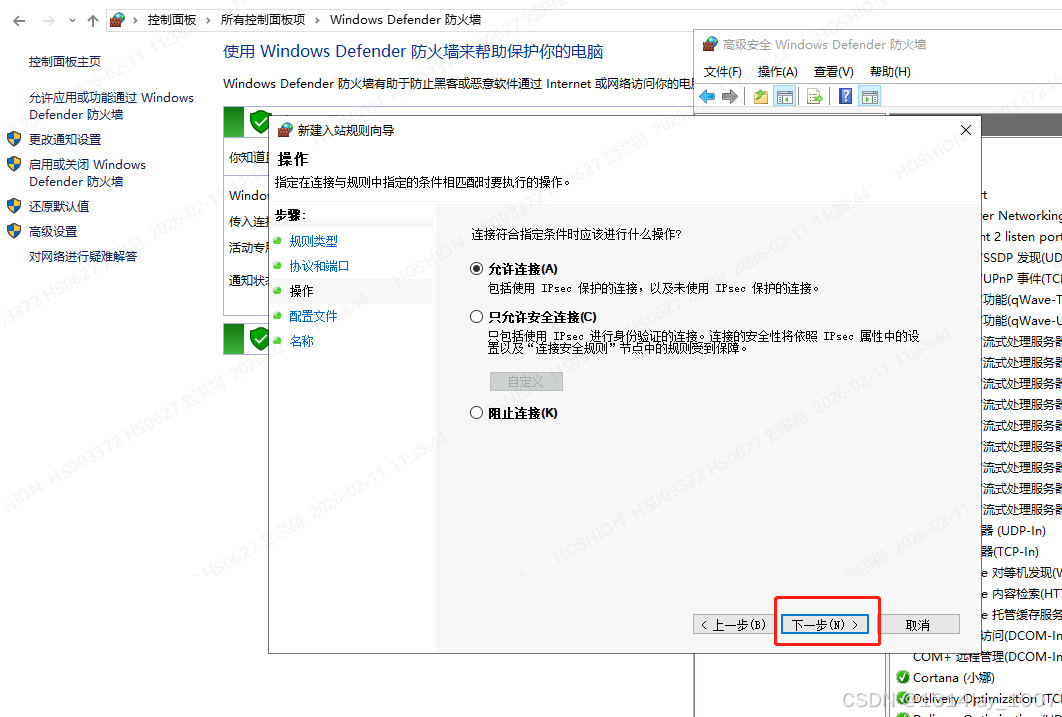
点击"下一步":
点击"下一步":
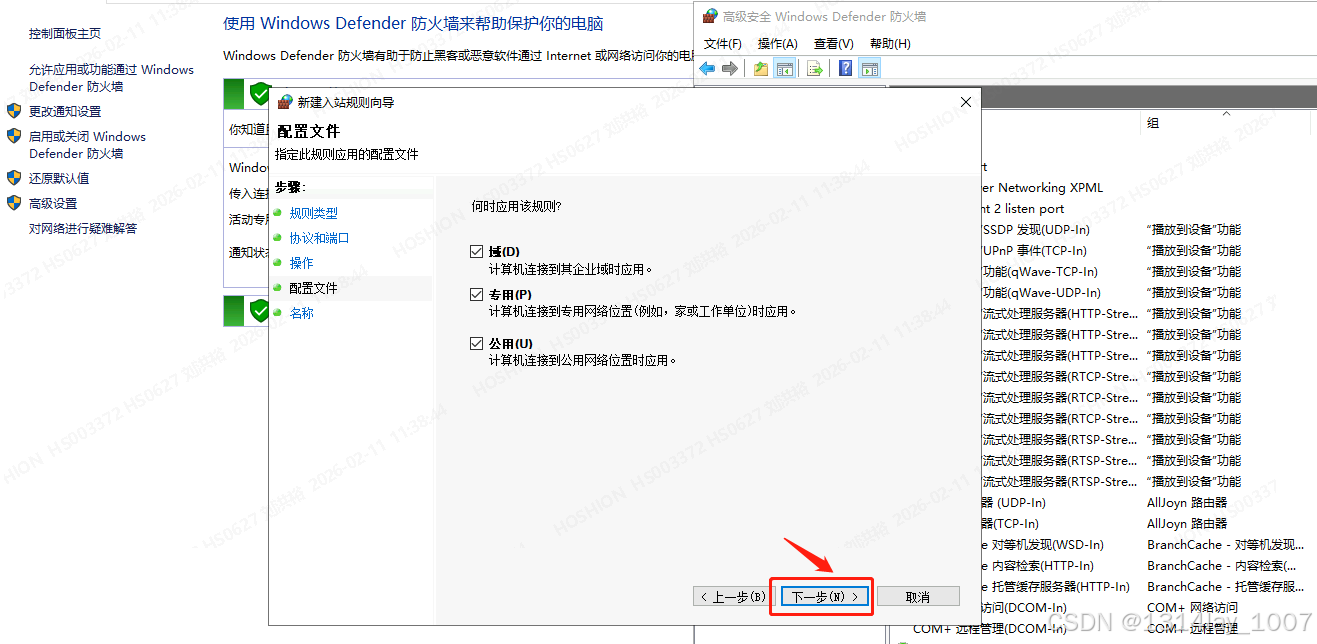
输入名称,点击完成,现在就是设置完成了:

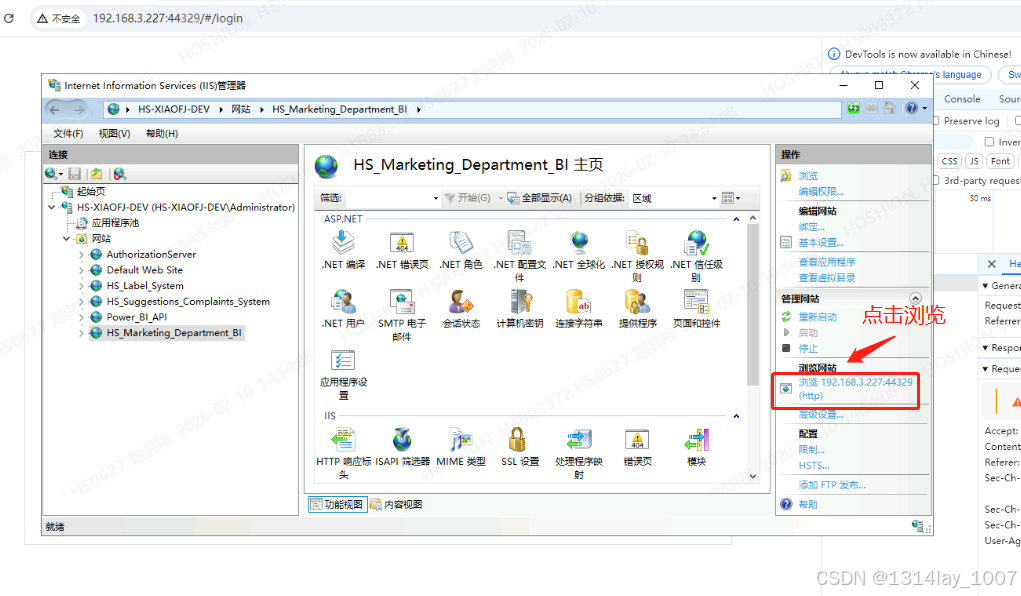
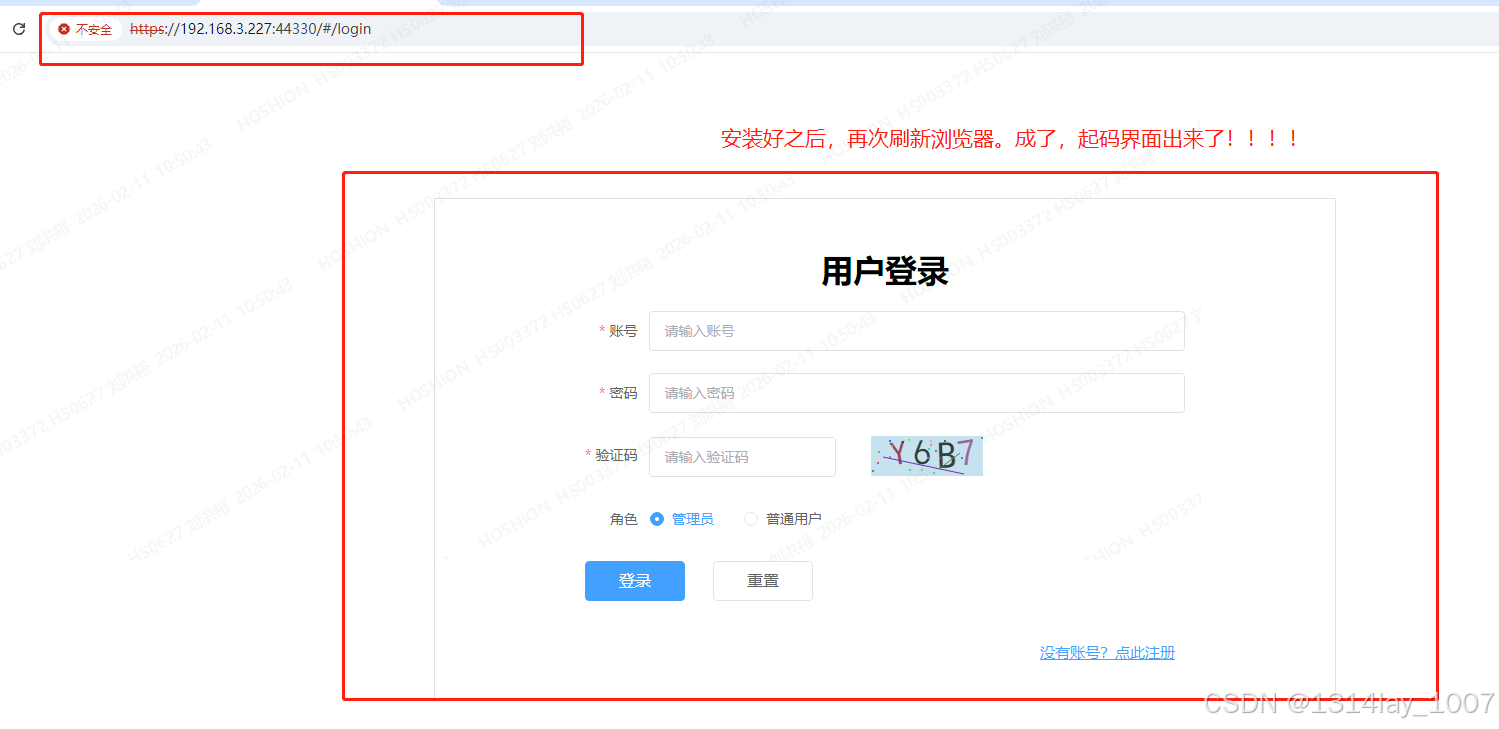
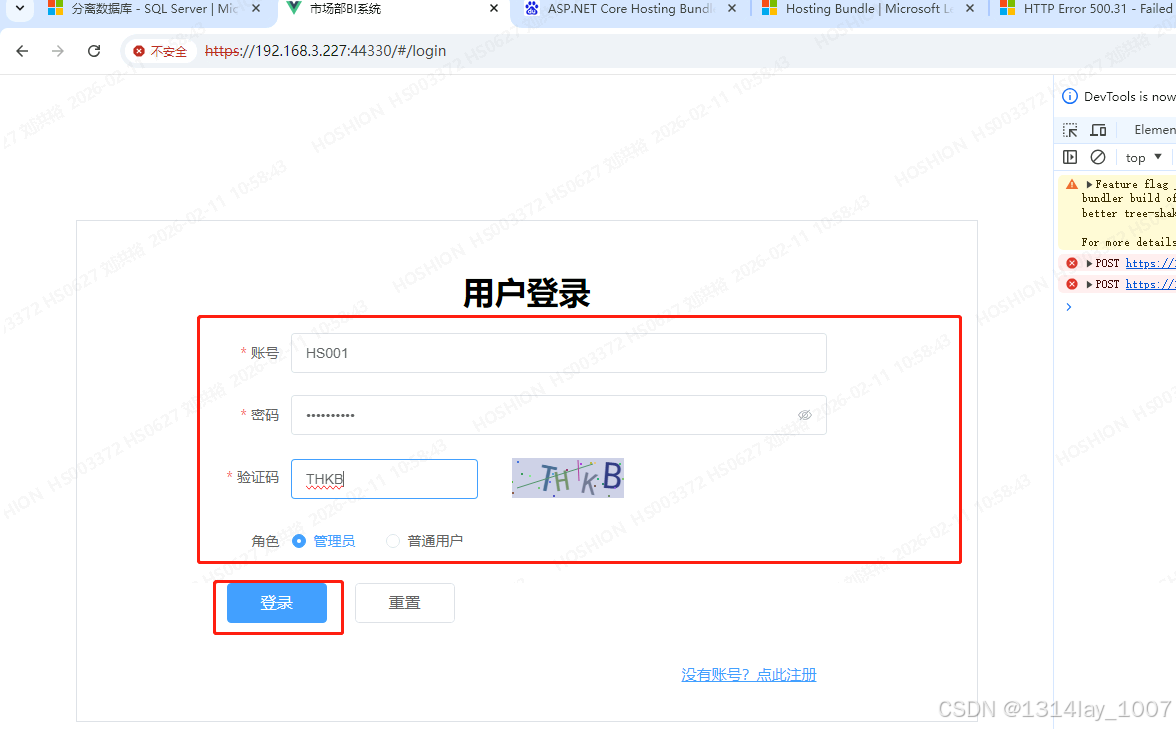
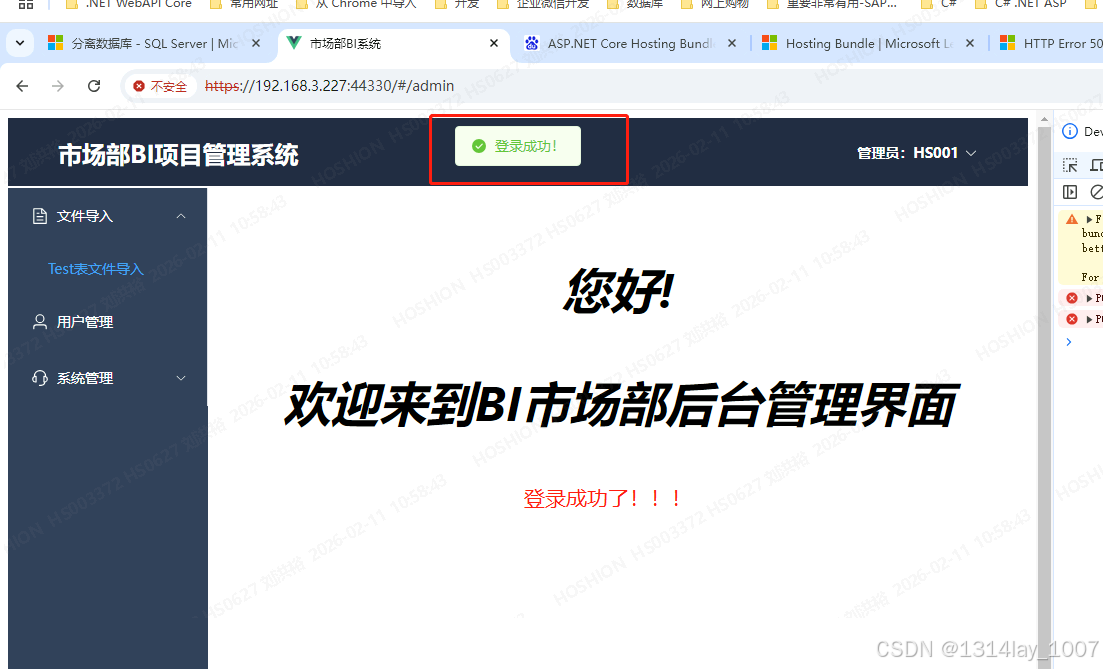
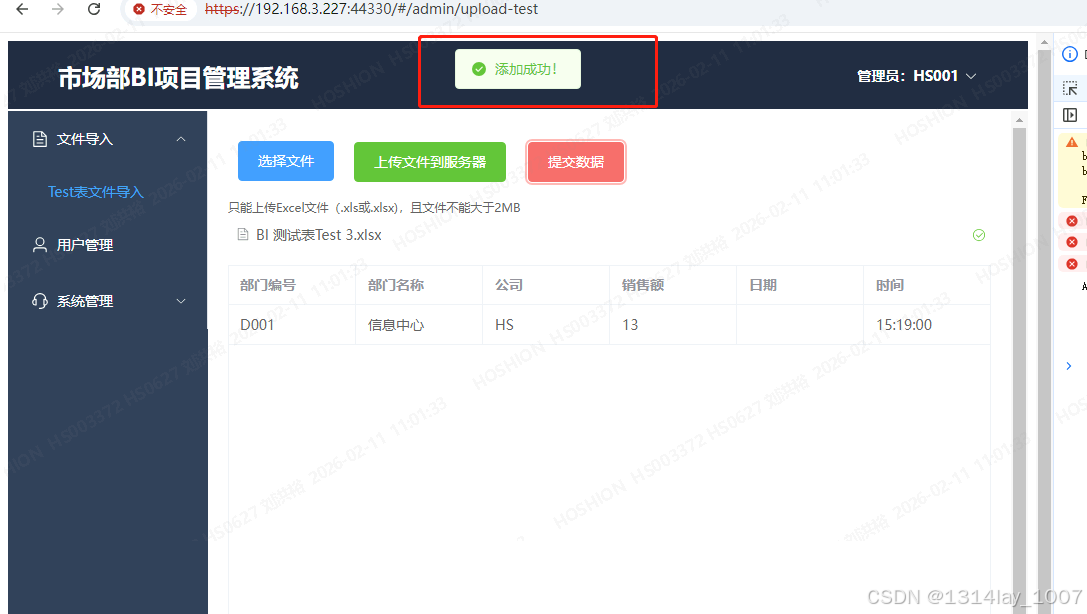
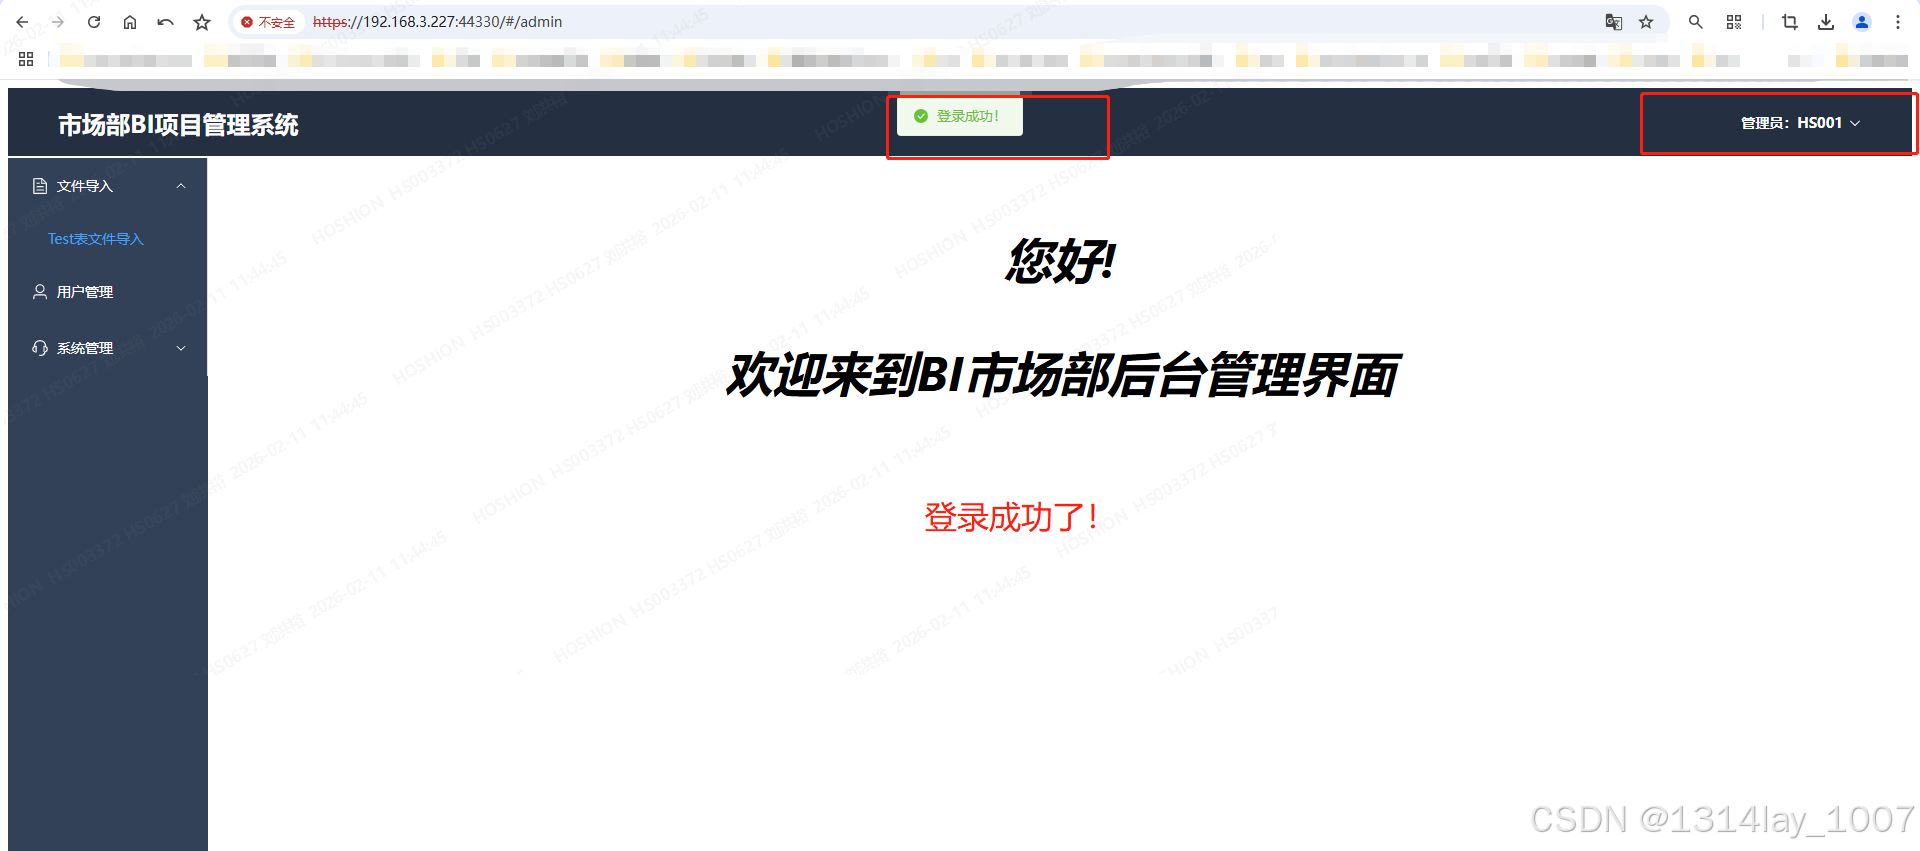
在外面的浏览器访问我部署的网站:
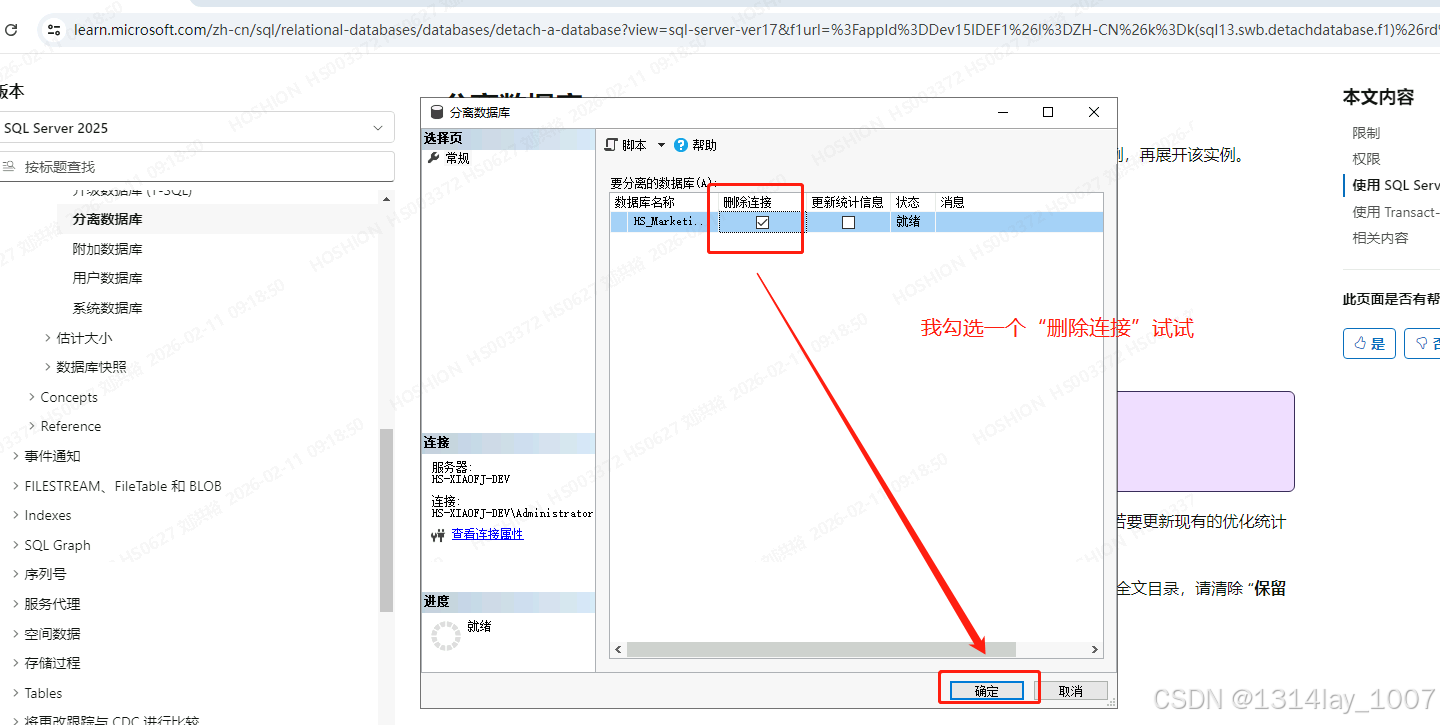
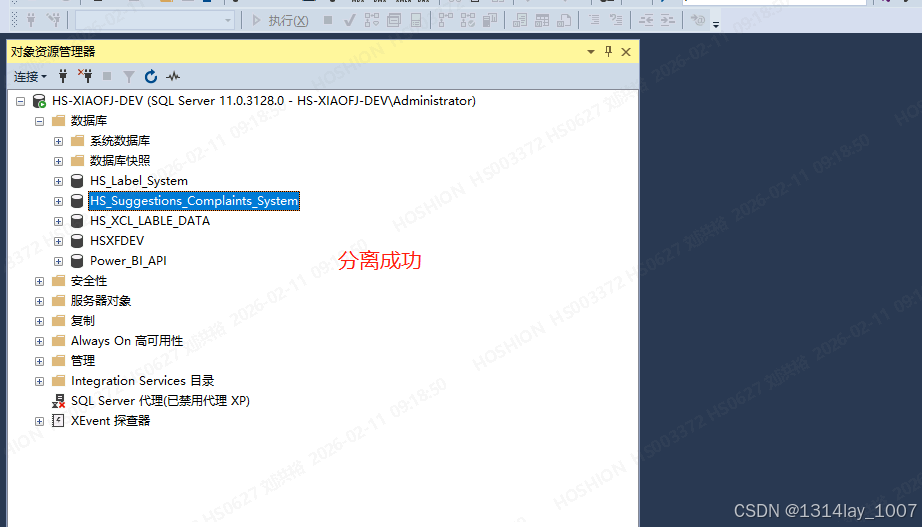
数据库分离的问题
服务器 "HS-XIAOFJ-DEV" 的 分离数据库 失败。 (Microsoft.SqlServer.Smo)
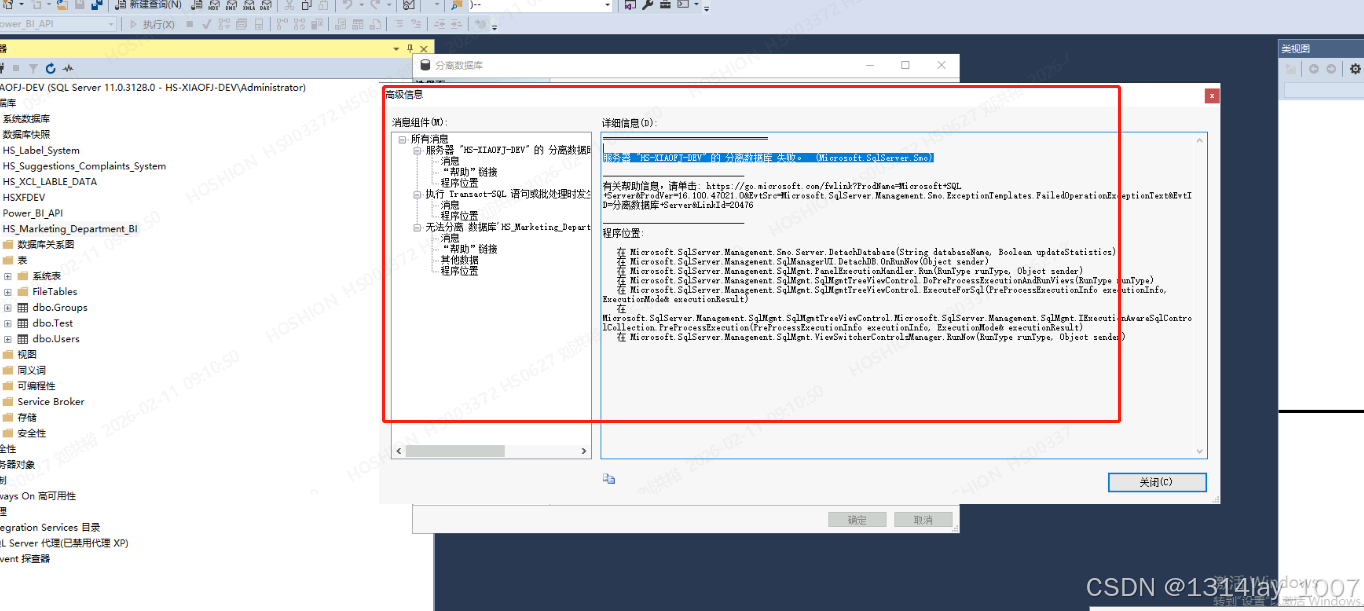
后面我直接分离的时候,勾选"断开连接",就可以了。
分离成功:
文章参考-.net core 7.0 webapi+vue3 前后端分离 iis部署
关键代码和步骤
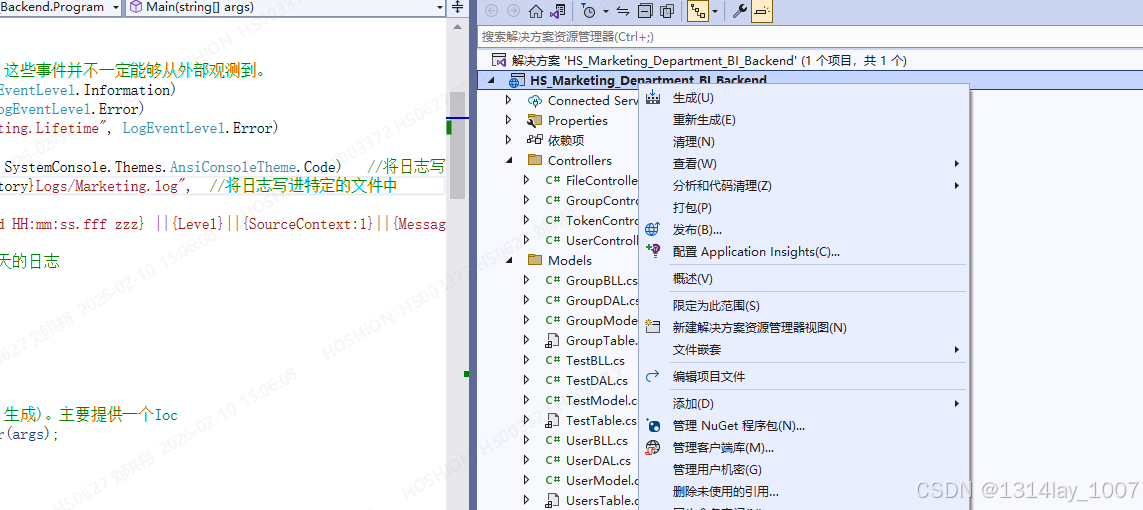
C#的Program.cs文件
cs
using AspNetCoreRateLimit;
using LogDashboard;
using Microsoft.AspNetCore.Authentication.JwtBearer;
using Microsoft.Extensions.Configuration;
using Microsoft.IdentityModel.Tokens;
using Microsoft.OpenApi.Models;
using Serilog;
using Serilog.Events;
using System.Reflection;
using System.Text;
namespace HS_Marketing_Department_BI_Backend
{
public class Program
{
public static void Main(string[] args)
{
#region 配置SeriLog
Log.Logger = new LoggerConfiguration()
.MinimumLevel.Debug() //内部系统事件,这些事件并不一定能够从外部观测到。
.MinimumLevel.Override("Default", LogEventLevel.Information)
.MinimumLevel.Override("Microsoft", LogEventLevel.Error)
.MinimumLevel.Override("Microsoft.Hosting.Lifetime", LogEventLevel.Error)
.Enrich.FromLogContext()
.WriteTo.Console(theme: Serilog.Sinks.SystemConsole.Themes.AnsiConsoleTheme.Code) //将日志写进控制台
.WriteTo.File($"{AppContext.BaseDirectory}Logs/Marketing.log", //将日志写进特定的文件中
rollingInterval: RollingInterval.Day,
outputTemplate: "{Timestamp:yyyy-MM-dd HH:mm:ss.fff zzz} ||{Level}||{SourceContext:1}||{Message}||{Exception}||end {NewLine}")
.CreateLogger();
//yyyy-MM-dd 需加上,否则永远都是显示是当天的日志
#endregion
//Log.Information("今天天气很好");
//Log.Error("今天好糟糕");
//Log.Warning("警告消息");
//// 创建构建器,把当前应用程序构建(编译,生成)。主要提供一个Ioc
var builder = WebApplication.CreateBuilder(args);
//解决跨域问题(开发环境)
builder.Services.AddCors(options =>
{
options.AddPolicy("CustomCors", policy =>
{
// 允许的跨域源(前端域名,多个用逗号分隔)
policy.WithOrigins("http://localhost:3000")
.AllowAnyHeader() // 允许所有请求头,也可WithHeaders("Content-Type", "Authorization")指定
.AllowAnyMethod() // 允许所有方法,也可WithMethods("GET", "POST", "PUT")指定
.AllowCredentials(); // 允许携带Cookie/Token(前端需配合withCredentials: true)
});
});
//创建一个IConfiguration对象
IConfiguration configuration = new ConfigurationBuilder()
.AddJsonFile("appsettings.json").Build();
// Add services to the container.
builder.Services.AddControllers();
// Learn more about configuring Swagger/OpenAPI at https://aka.ms/aspnetcore/swashbuckle
builder.Services.AddEndpointsApiExplorer();
//添加Swagger
//builder.Services.AddSwaggerGen();
builder.Services.AddSwaggerGen(c =>
{
c.SwaggerDoc("v1", new OpenApiInfo { Title = "SwaggerApi", Version = "1.0.0.0" });
// 设置XML注释文件的路径,以便Swagger可以从中读取注释
var xmlFile = $"{Assembly.GetExecutingAssembly().GetName().Name}.xml";
var xmlPath = Path.Combine(AppContext.BaseDirectory, xmlFile);
c.IncludeXmlComments(xmlPath, true); // true : 显示控制器层注释
}
);
#region 注册AspNetCoreRateLimit限流组件
builder.Services.AddMemoryCache();
//下面的IpRateLimiting为限流策略的配置文件结点名称,可以配置多个策略
builder.Services.Configure<IpRateLimitOptions>(builder.Configuration.GetSection("IpRateLimiting"));
//添加对内存中的 IP 策略存储的支持
builder.Services.AddSingleton<IIpPolicyStore, MemoryCacheIpPolicyStore>();
builder.Services.AddSingleton<IRateLimitCounterStore, MemoryCacheRateLimitCounterStore>();
builder.Services.AddSingleton<IRateLimitConfiguration, RateLimitConfiguration>();
builder.Services.AddInMemoryRateLimiting();
#endregion
//把添加的IConfiguration对象传入Myconfig并创建加入启动
builder.Services.AddSingleton(new Myconfig(configuration));
//添加SeriLog
builder.Host.UseSerilog();
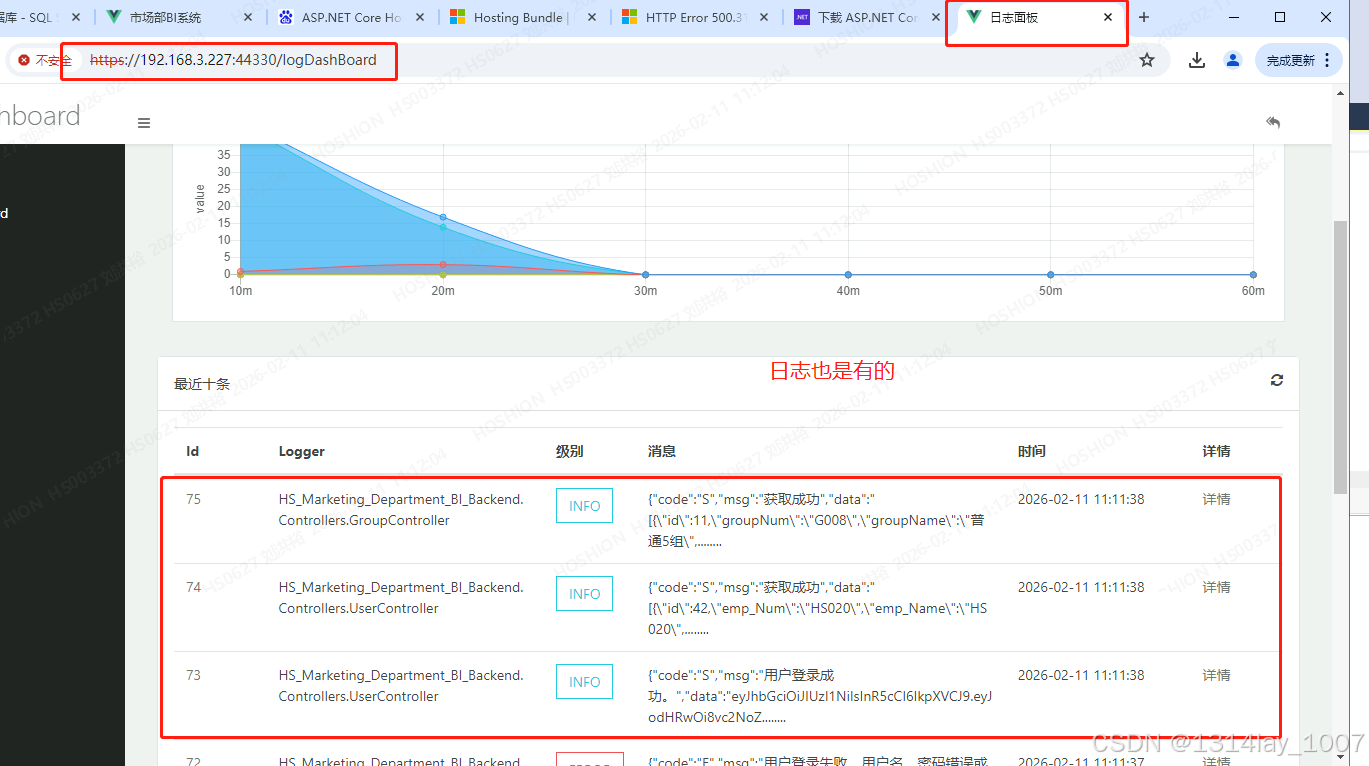
//添加LogDashBoard
builder.Services.AddLogDashboard();
//添加JWT身份验证服务
builder.Services.AddAuthentication(JwtBearerDefaults.AuthenticationScheme)
.AddJwtBearer(options =>
{
options.TokenValidationParameters = new TokenValidationParameters
{
ValidateIssuer = true,
ValidateAudience = true,
ValidateLifetime = true,//是否验证失效时间
ValidateIssuerSigningKey = true,//是否效验SigningKey
ValidIssuer = configuration.GetSection("JWTTokenOptions:Issuer").Value,//颁发者
ValidAudience = configuration.GetSection("JWTTokenOptions:Audience").Value,//接收者
IssuerSigningKey = new SymmetricSecurityKey(Encoding.UTF8.GetBytes(configuration.GetSection("JWTTokenOptions:Secret").Value))
};
});
//配置Swagger身份验证输入(可选)
builder.Services.AddSwaggerGen(options =>
{
options.AddSecurityDefinition("Bearer", new OpenApiSecurityScheme
{
Description = "请输入token,格式为 Bearer xxxxxxxx(注意中间必须有空格)",
Name = "Authorization",
In = ParameterLocation.Header,
Type = SecuritySchemeType.ApiKey,
BearerFormat = "JWT",
Scheme = "Bearer"
});
//添加安全要求
options.AddSecurityRequirement(new OpenApiSecurityRequirement {
{
new OpenApiSecurityScheme{
Reference =new OpenApiReference{
Type = ReferenceType.SecurityScheme,
Id ="Bearer"
}
},new string[]{ }
}
});
});
var app = builder.Build();
//使用IP速率限制中间件
app.UseIpRateLimiting();
// Configure the HTTP request pipeline.
if (app.Environment.IsDevelopment())
{
app.UseSwagger();
app.UseSwaggerUI(c =>
{
c.SwaggerEndpoint("/swagger/v1/swagger.json", "我的API V1"); // URL路径和文档名称
});
}
app.UseHttpsRedirection();
//app.UseAuthorization();
//使用LogDashBoard
app.UseLogDashboard();
app.UseCors("CustomCors"); //必须在UserRouting之后,UseAuthorization,EndPoints、MapControllers之前,应用cors跨域(开发环境),如果放UseAuthorization将有时无法生效
//应用鉴权授权中间件
app.UseAuthentication(); //鉴权(必须在授权的前面)
//授权
app.UseAuthorization();
//默认文档,网页不用输入index.html
app.UseDefaultFiles();
//让服务提供静态资源的访问能力
app.UseStaticFiles();
app.MapControllers();
app.Run();
}
}
}
C#的Web.config
XML
<?xml version="1.0" encoding="utf-8"?>
<configuration>
<location path="." inheritInChildApplications="false">
<system.webServer>
<handlers>
<add name="aspNetCore" path="*" verb="*" modules="AspNetCoreModuleV2" resourceType="Unspecified" />
</handlers>
<aspNetCore processPath="dotnet" arguments=".\HS_Marketing_Department_BI_Backend.dll" stdoutLogEnabled="false" stdoutLogFile=".\logs\stdout" hostingModel="inprocess" />
</system.webServer>
</location>
</configuration>
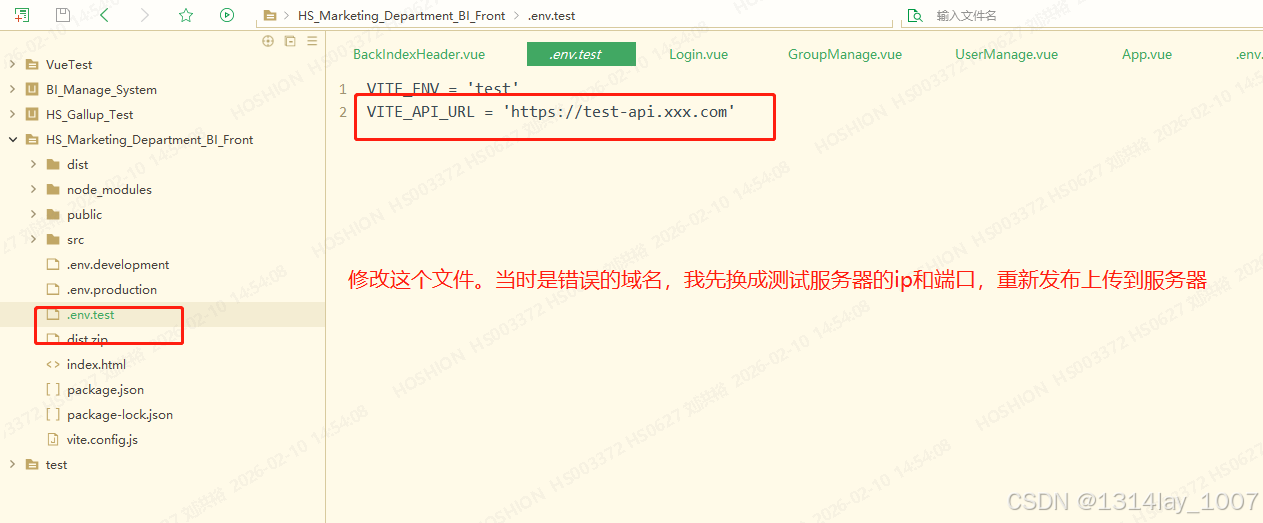
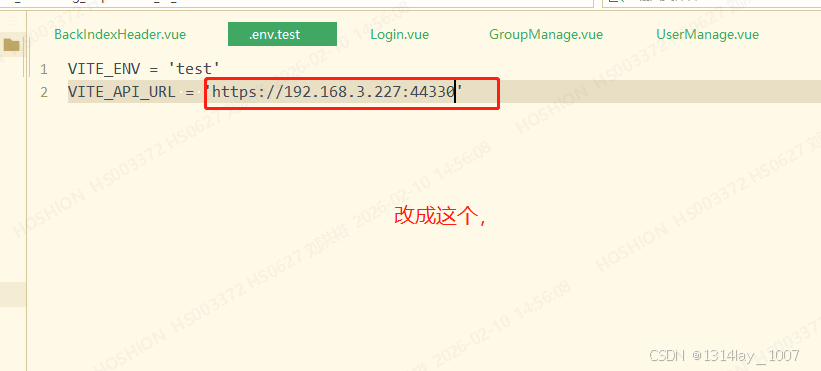
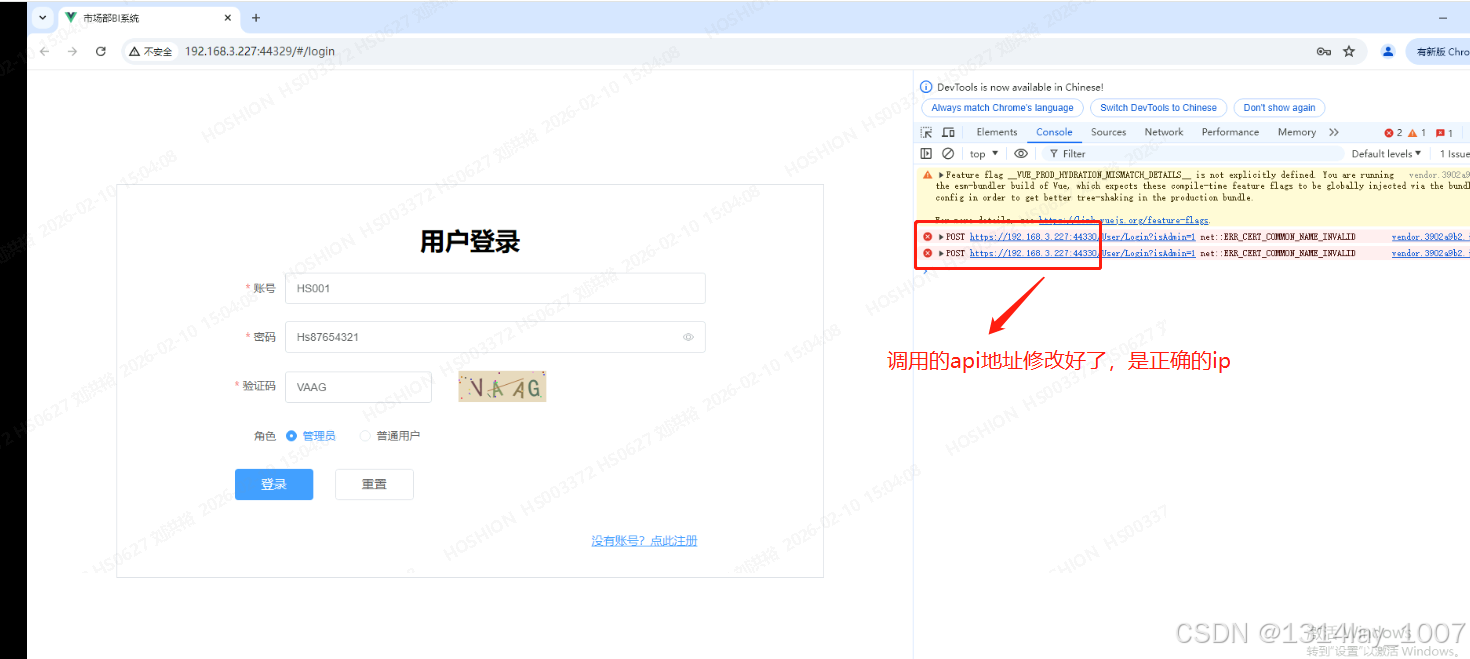
<!--ProjectGuid: EABA2DEB-3475-44FB-AAE4-5653F03EC421-->Vue的环境变量文件配置
.env.test
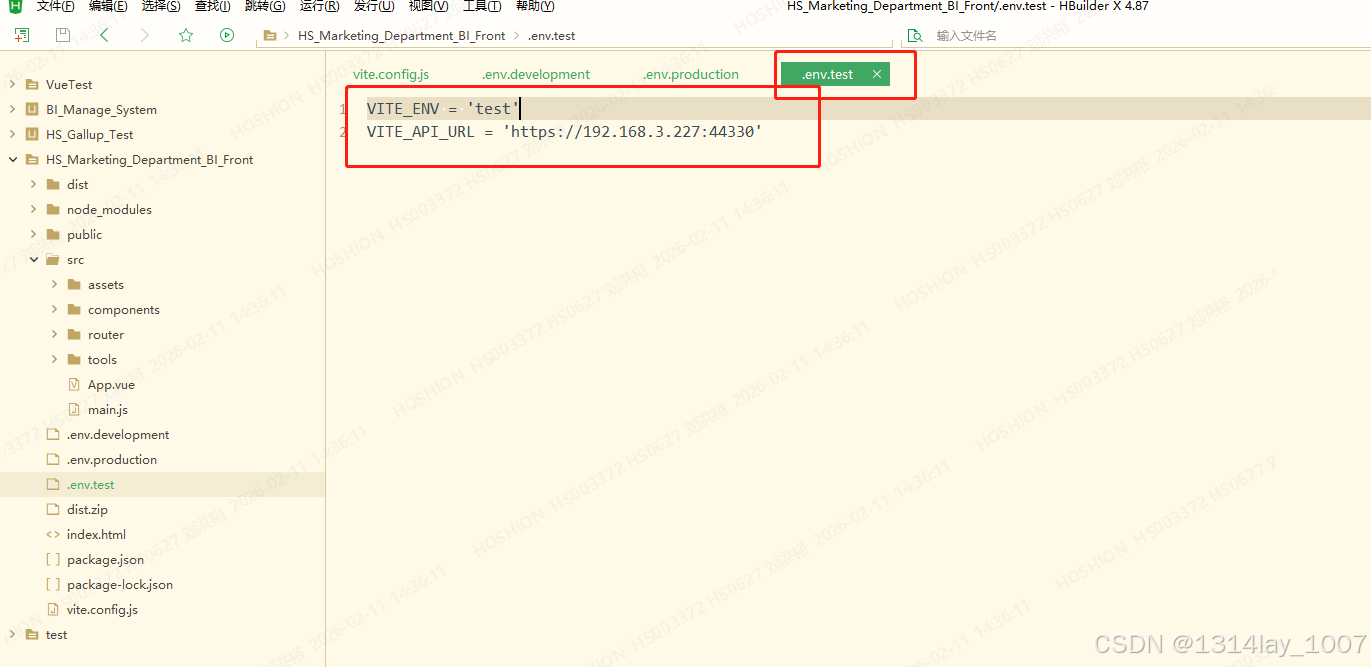
VITE_ENV = 'test'
VITE_API_URL = 'https://192.168.3.227:44330'
javascript
VITE_ENV = 'test'
VITE_API_URL = 'https://192.168.3.227:44330'
package.json
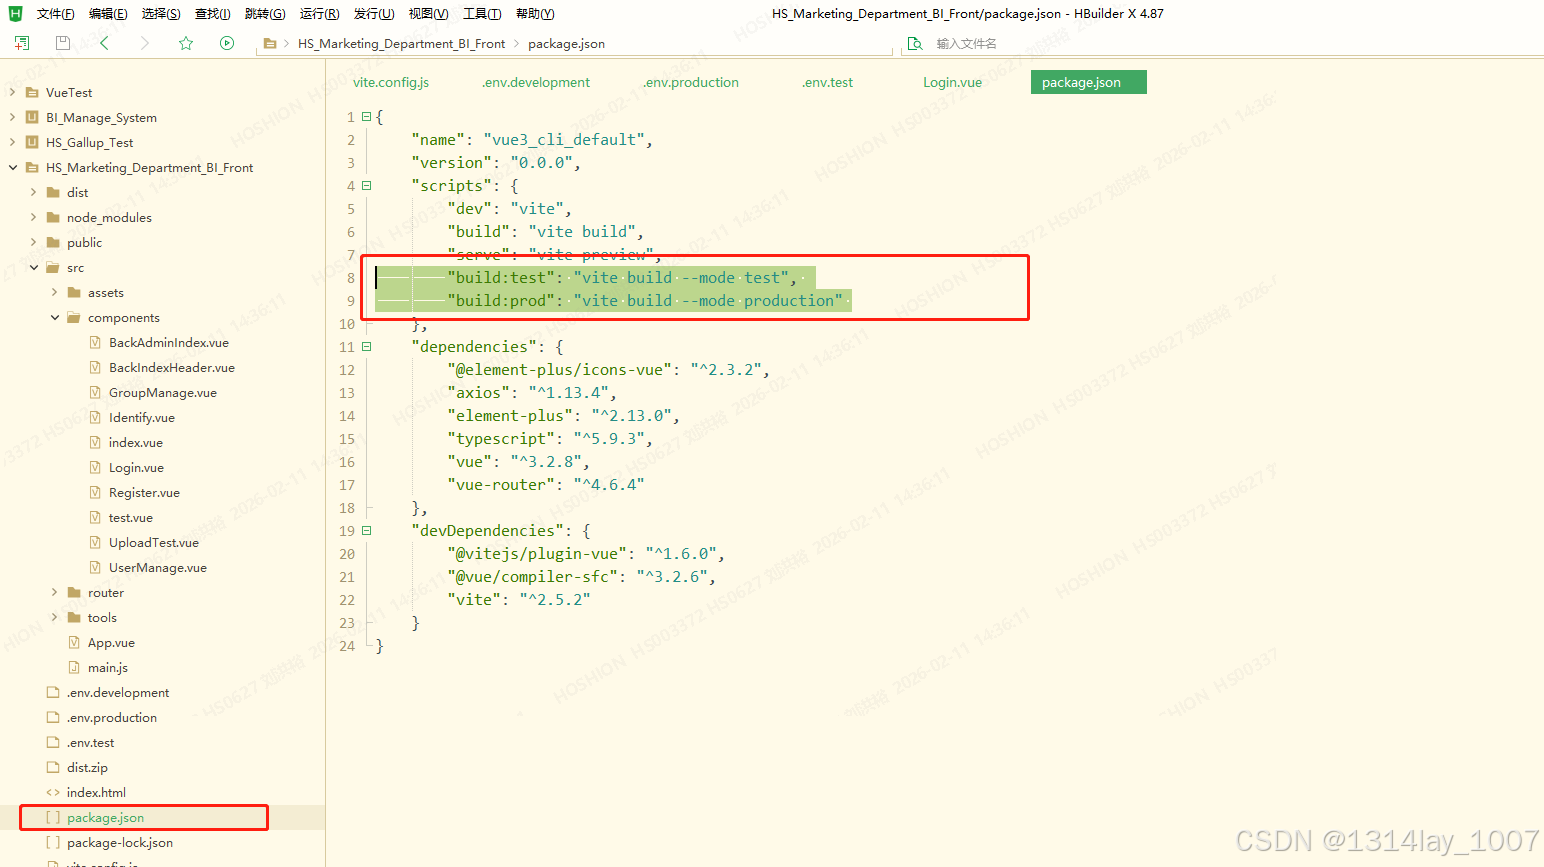
{
"name": "vue3_cli_default",
"version": "0.0.0",
"scripts": {
"dev": "vite",
"build": "vite build",
"serve": "vite preview",
"build:test": "vite build --mode test",
"build:prod": "vite build --mode production"
},
"dependencies": {
"@element-plus/icons-vue": "^2.3.2",
"axios": "^1.13.4",
"element-plus": "^2.13.0",
"typescript": "^5.9.3",
"vue": "^3.2.8",
"vue-router": "^4.6.4"
},
"devDependencies": {
"@vitejs/plugin-vue": "^1.6.0",
"@vue/compiler-sfc": "^3.2.6",
"vite": "^2.5.2"
}
}
```json
{
"name": "vue3_cli_default",
"version": "0.0.0",
"scripts": {
"dev": "vite",
"build": "vite build",
"serve": "vite preview",
"build:test": "vite build --mode test",
"build:prod": "vite build --mode production"
},
"dependencies": {
"@element-plus/icons-vue": "^2.3.2",
"axios": "^1.13.4",
"element-plus": "^2.13.0",
"typescript": "^5.9.3",
"vue": "^3.2.8",
"vue-router": "^4.6.4"
},
"devDependencies": {
"@vitejs/plugin-vue": "^1.6.0",
"@vue/compiler-sfc": "^3.2.6",
"vite": "^2.5.2"
}
}
```
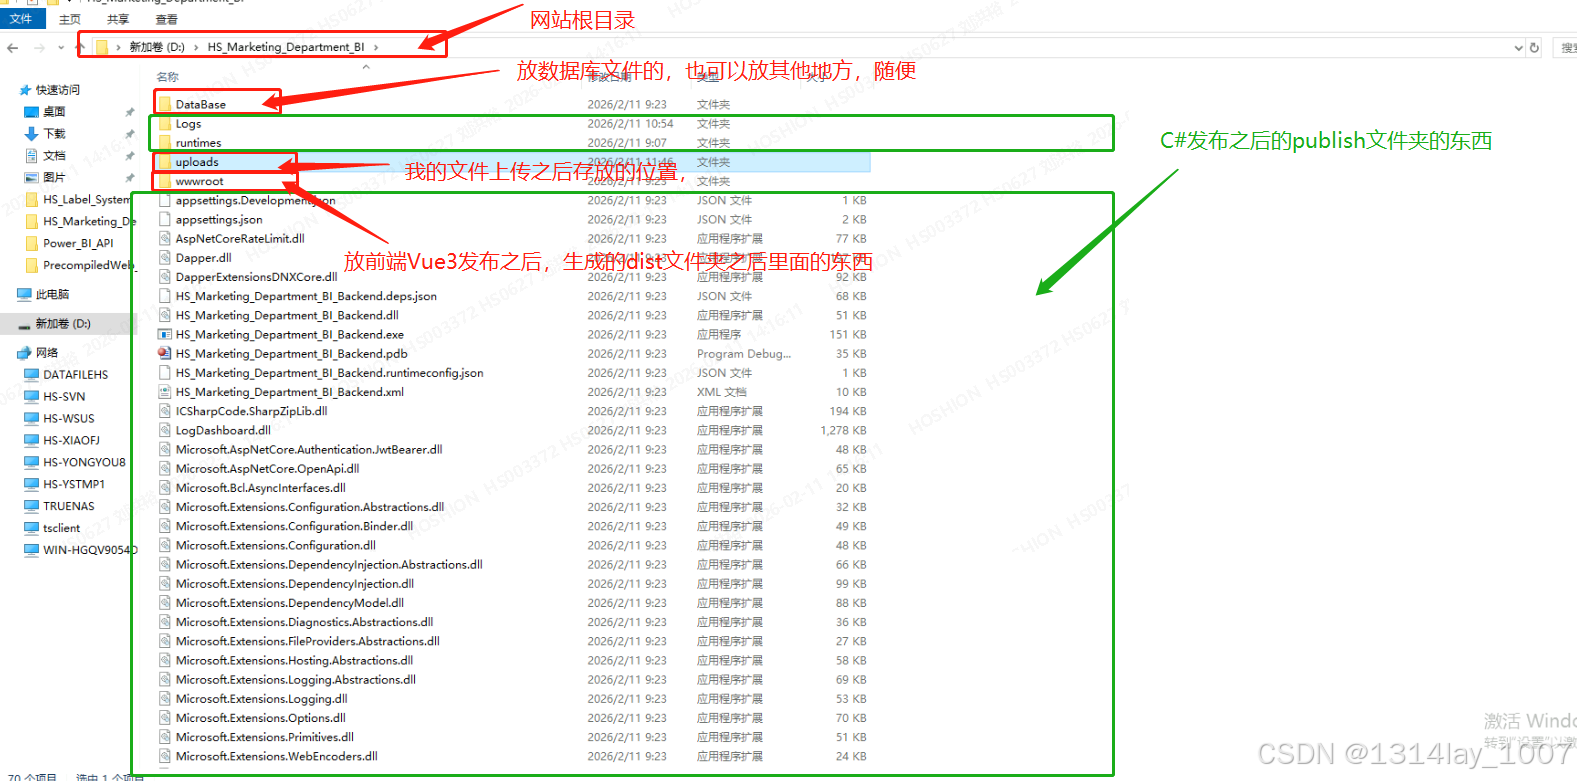
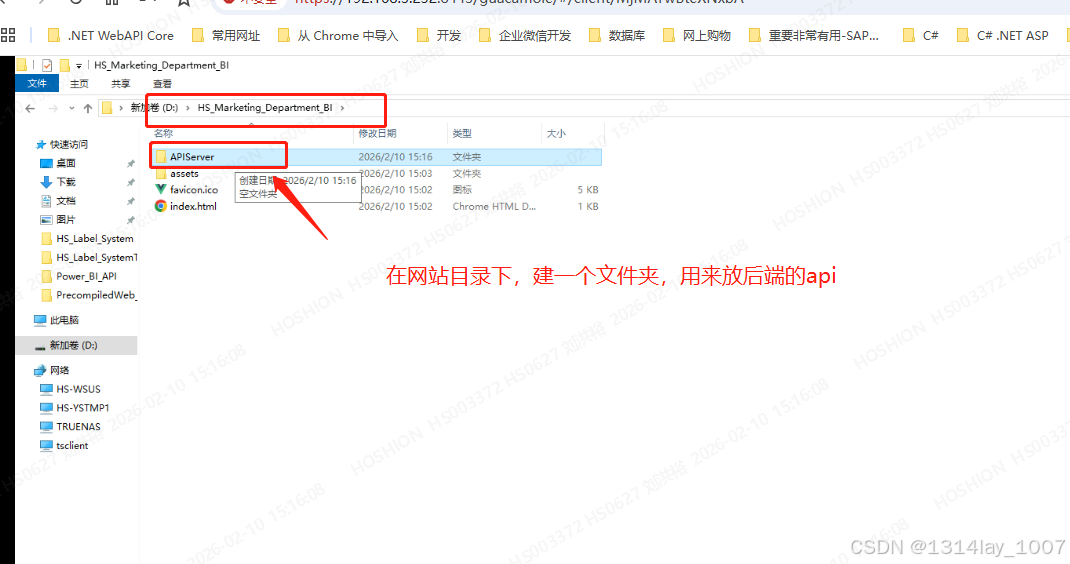
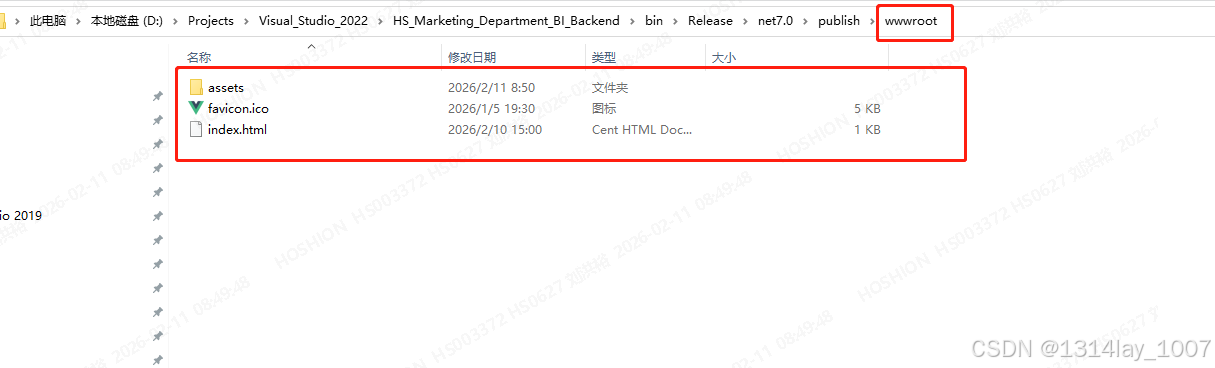
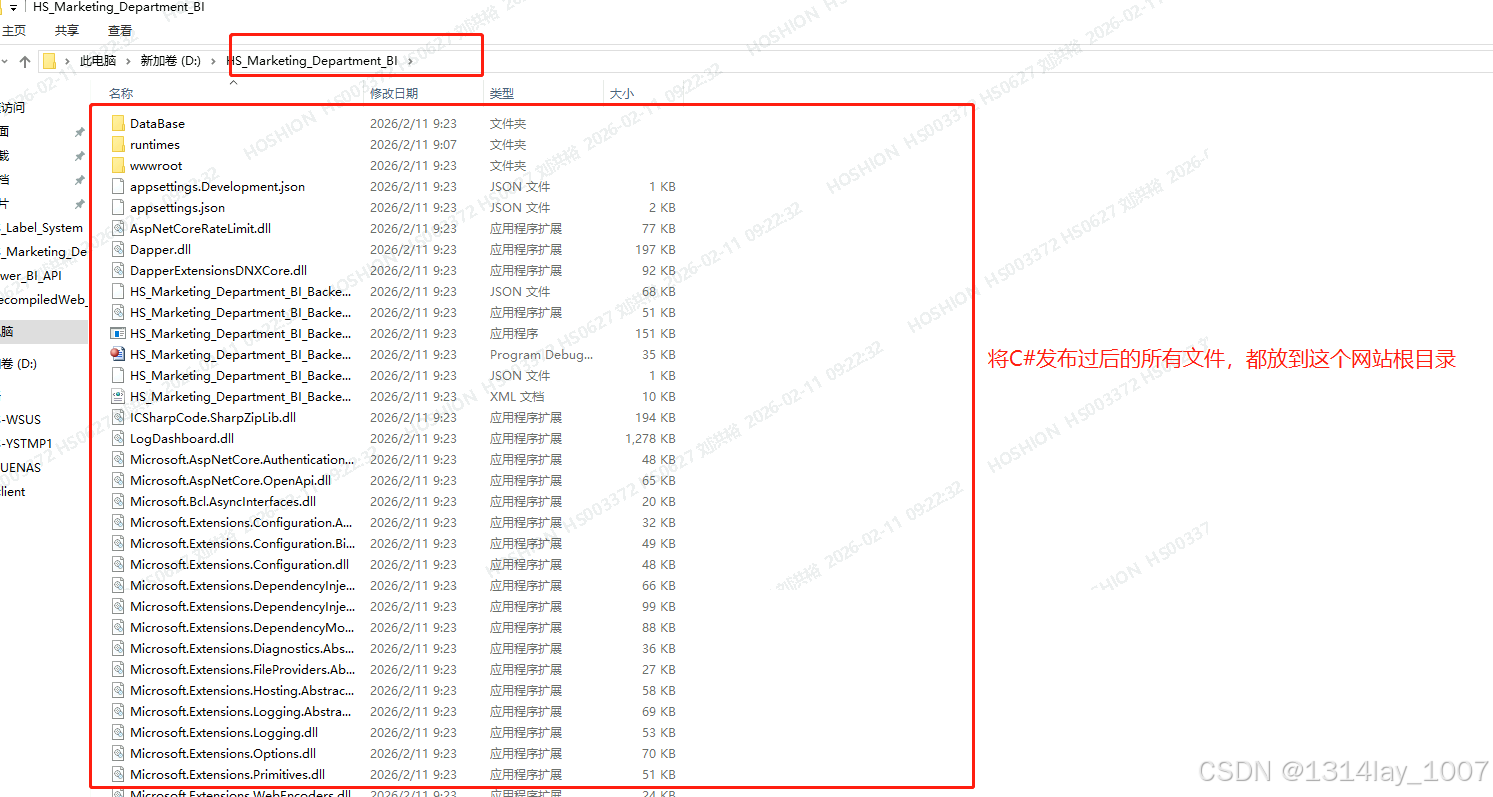
wwwroot文件夹
这个wwwroot文件夹一定要有,是放那些前端Vue发布之后的静态文件的:
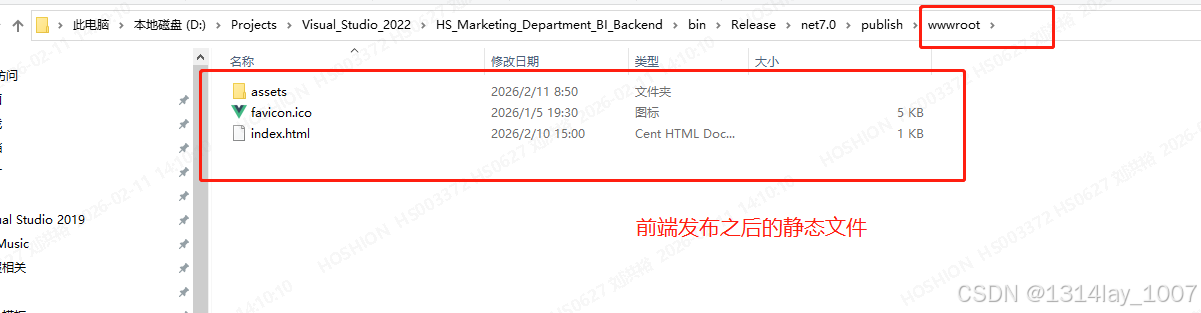
到时候这个文件夹要放到网站的根目录上
数据库的附加
服务器IIS的应用程序池的配置
iis 在应用程序池右键,添加应用程序池,选择无托管代码,但是我新建网站的时候,给我自动创建了应用程序池,所以我就直接修改就可以:


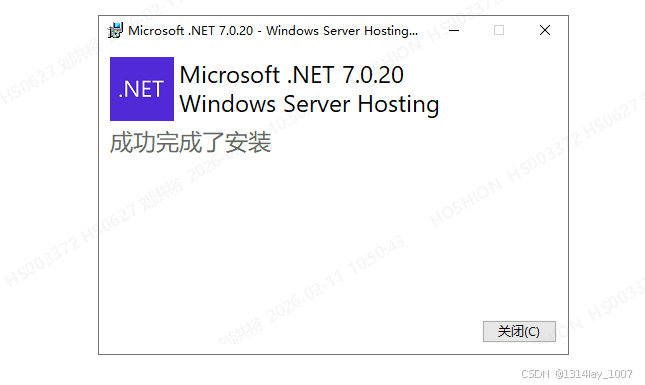
安装ASP .NET Core 7.0 runtime hosting-bundle-runtime-aspnetcore-7.0.9-windows-hosting-bundle-installer
下载安装包
点击下面网站,下载这个:
https://dotnet.microsoft.com/zh-cn/download/dotnet/7.0
点击这个,下载文件:

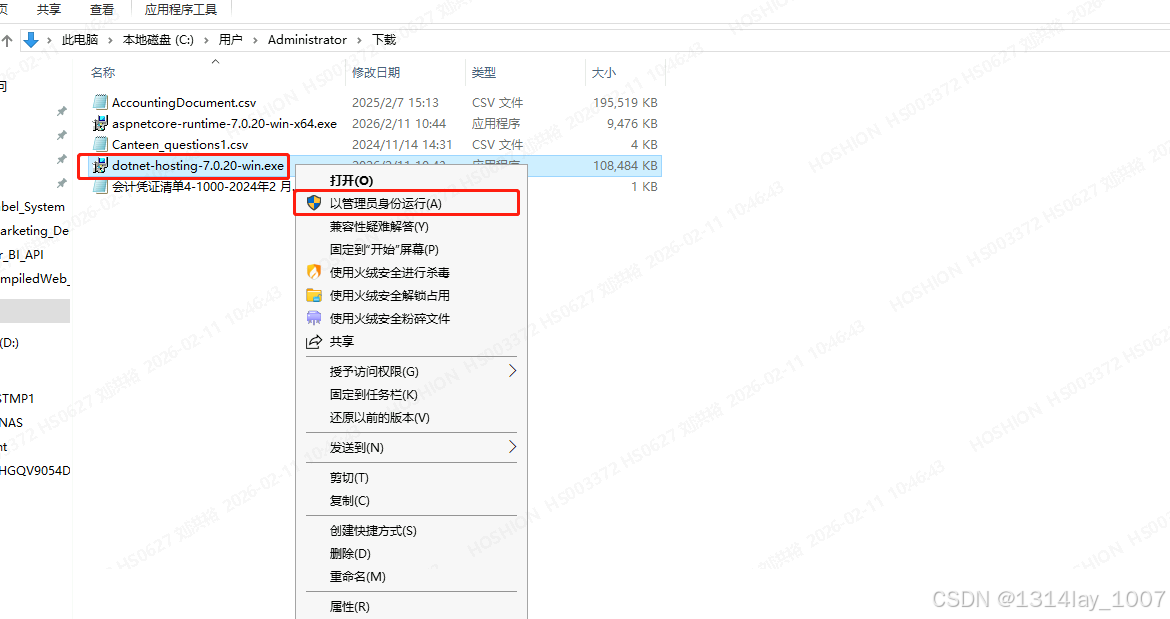
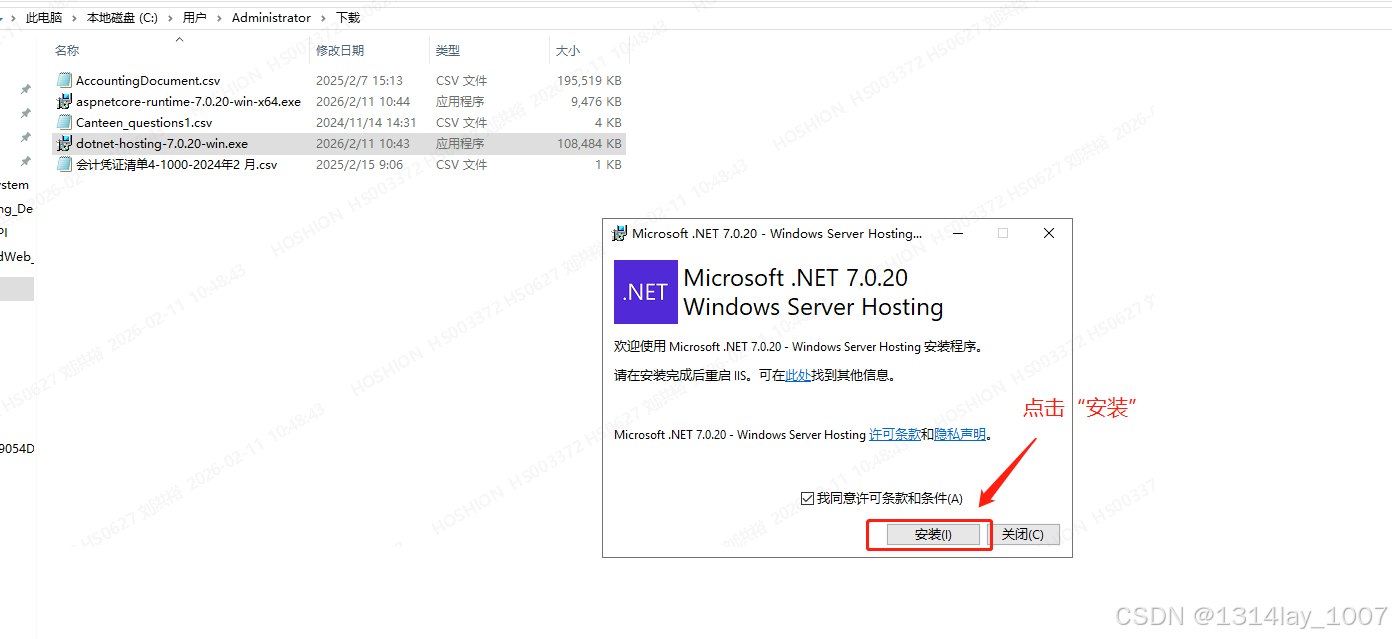
右击这个程序,点击"以管理员身份运行":

点击"安装":
网站根目录结构