目录
- [1. HC-SR04超声波测距代码](#1. HC-SR04超声波测距代码)
-
- [1.1 通过 USART1 打印超声波测距结果](#1.1 通过 USART1 打印超声波测距结果)
- [2. 控制SG90舵机代码](#2. 控制SG90舵机代码)
- [3. main.c 文件代码](#3. main.c 文件代码)
1. HC-SR04超声波测距代码
控制超声波测距步骤
- 初始化超声波时钟 和定时器时钟
- 初始化超声波引脚 和定时器中断配置
- 编写定时器中断函数测距
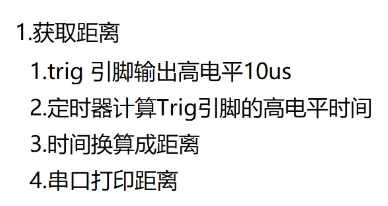
高电平的时间 = 中断次数 + 不足一个中断的次数
c
// tim.h
#ifndef TIM_H
#define	TIM_H
void Base_TIM_Init(void);
void HC04_Init(void);
float Get_Length(void);
#endif
c
// tim.c
#include "stm32f10x.h"
#include "tim.h"
uint16_t mscount = 0;
void delay_us(uint32_t us){
us *= 8;
while(us--);
}
void delay_ms(uint32_t ms){
while(ms--){
delay_us(1000);
}
}
// 定时器函数
void Base_TIM_Init(void)
{
TIM_TimeBaseInitTypeDef TIM_TimeInitStruct;
NVIC_InitTypeDef NVIC_InitStruct;
// 优先级分组配置
NVIC_PriorityGroupConfig(NVIC_PriorityGroup_2);
RCC_APB1PeriphClockCmd(RCC_APB1Periph_TIM2, ENABLE);
TIM_TimeInitStruct.TIM_Prescaler = 72-1; // 分频因子 不能超过65535
TIM_TimeInitStruct.TIM_CounterMode = TIM_CounterMode_Up; // 向上计数模式
TIM_TimeInitStruct.TIM_Period = 1000-1; // 自动重装载值 不能超过65535
TIM_TimeInitStruct.TIM_ClockDivision = TIM_CKD_DIV1; // 外部输入时钟分频因子
TIM_TimeInitStruct.TIM_RepetitionCounter = 0; // 重复计数值 高级定时器专用
TIM_TimeBaseInit(TIM2, &TIM_TimeInitStruct);
TIM_ITConfig(TIM2, TIM_IT_Update, ENABLE); // 配置定时器的中断使能
TIM_Cmd(TIM2, DISABLE); // 定时器先关着 用的时候再打开
NVIC_InitStruct.NVIC_IRQChannel = TIM2_IRQn;
NVIC_InitStruct.NVIC_IRQChannelPreemptionPriority = 0;
NVIC_InitStruct.NVIC_IRQChannelSubPriority = 0;
NVIC_InitStruct.NVIC_IRQChannelCmd = ENABLE;
NVIC_Init(&NVIC_InitStruct);
}
// HC-SR04 超声波初始化函数
void HC04_Init(void)
{
GPIO_InitTypeDef GPIO_InitStruction;
RCC_APB2PeriphClockCmd(RCC_APB2Periph_GPIOB, ENABLE);
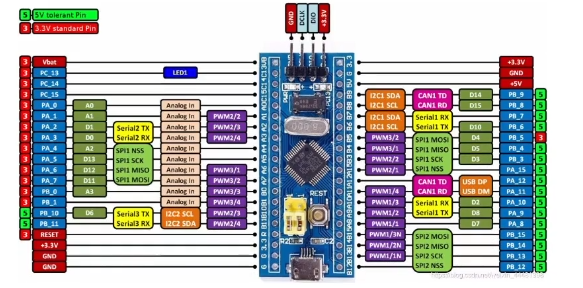
// Trig引脚 B11 输出
GPIO_InitStruction.GPIO_Pin = GPIO_Pin_11;
GPIO_InitStruction.GPIO_Speed = GPIO_Speed_10MHz;
GPIO_InitStruction.GPIO_Mode = GPIO_Mode_Out_PP;
GPIO_Init(GPIOB, &GPIO_InitStruction);
// Echo引脚 B10 输入
GPIO_InitStruction.GPIO_Pin = GPIO_Pin_10;
GPIO_InitStruction.GPIO_Mode = GPIO_Mode_IN_FLOATING;
GPIO_Init(GPIOB, &GPIO_InitStruction);
}
// 开启定时器
void Open_Tim(void)
{
TIM_SetCounter(TIM2, 0); // 计数器 CNT 设置为0
mscount = 0; // 中断次数为 0
TIM_Cmd(TIM2, ENABLE);
}
// 关闭定时器
void Close_Tim(void)
{
TIM_Cmd(TIM2, DISABLE);
}
// 获取定时器中断的次数, 定时器中断函数
void TIM2_IRQHandler(void)
{
if(TIM_GetITStatus(TIM2, TIM_IT_Update) != RESET)
{
mscount++;
TIM_ClearITPendingBit(TIM2, TIM_IT_Update);
}
}
// 获取高电平的总时间
int Get_Echo_Time(void)
{
uint16_t t=0;
t = mscount * 1000;
t += TIM_GetCounter(TIM2); // 获取 CNT 计数器的值
TIM_SetCounter(TIM2, 0); // 计数器 CNT 设置为 0
delay_ms(50);
return t;
}
float Get_Length(void)
{
uint16_t t=0;
float length=0;
int i=0;
float sum=0;
while(i != 5)
{
// 1.HC04 工作
GPIO_SetBits(GPIOB, GPIO_Pin_11);
delay_us(20);
GPIO_ResetBits(GPIOB, GPIO_Pin_11);
// 2.定时器计算高电平时间
while(GPIO_ReadInputDataBit(GPIOB, GPIO_Pin_10) == 0); // 等待 Echo 引脚低电平到高电平 跳变
Open_Tim();
i++;
while(GPIO_ReadInputDataBit(GPIOB, GPIO_Pin_10) == 1); // 等待 Echo 引脚高电平到低电平
Close_Tim();
t = Get_Echo_Time();
// 3.时间换算成距离
// 声速 ≈ 340 m/s → 往返 1cm 需要 ≈ 58.8 μs
// 所以 距离(cm) = 时间(μs) / 58 是行业惯例
length = ((float)t/58.0);
sum += length;
}
length = sum/5.0;
return length;
}1.1 通过 USART1 打印超声波测距结果
- 初始化GPIO、串口时钟
- 初始化GPIO、串口引脚
- 初始化串口中断接收外设、NVIC嵌套中断控制器
c
// USART.h
#ifndef USART_H
#define USART_H
void My_Usart1_Init(void);
#endif
c
// USART.c
#include "stm32f10x.h"
#include "USART.h"
#include "stdio.h"

// 定义 USART1 串口函数
void My_Usart1_Init(void){
	GPIO_InitTypeDef GPIO_InitStruct;	// 定义 GPIO 结构体
	USART_InitTypeDef USART_InitStruct;	// 定义 USART 结构体
	NVIC_InitTypeDef NVIC_InitStruct;	// 定义 NVIC 结构体

	RCC_APB2PeriphClockCmd(RCC_APB2Periph_GPIOA | RCC_APB2Periph_USART1, ENABLE);

	NVIC_PriorityGroupConfig(NVIC_PriorityGroup_2); // 优先级分组配置

	// GPIOA9 TX 输出 数据发送
	GPIO_InitStruct.GPIO_Pin = GPIO_Pin_9;
	GPIO_InitStruct.GPIO_Speed = GPIO_Speed_10MHz;
	GPIO_InitStruct.GPIO_Mode = GPIO_Mode_AF_PP;
	GPIO_Init(GPIOA, &GPIO_InitStruct);

	// GPIOA10 RX 输入 数据接收
	GPIO_InitStruct.GPIO_Pin = GPIO_Pin_10;
	GPIO_InitStruct.GPIO_Mode = GPIO_Mode_IPU;
	GPIO_Init(GPIOA, &GPIO_InitStruct);

	// 串口 USART1 初始化
	USART_InitStruct.USART_BaudRate = 115200;	// 波特率
	USART_InitStruct.USART_WordLength = USART_WordLength_8b; // 串口数据的字节长度
	USART_InitStruct.USART_StopBits = USART_StopBits_1;	// 停止位
	USART_InitStruct.USART_Parity = USART_Parity_No;	// 奇偶校验位
	USART_InitStruct.USART_Mode = USART_Mode_Tx | USART_Mode_Rx; // 发送 接收模式
	USART_InitStruct.USART_HardwareFlowControl = USART_HardwareFlowControl_None; // 硬件流控制
	USART_Init(USART1, &USART_InitStruct);	// 初始化 USART1 结构体
	USART_Cmd(USART1, ENABLE);	// 串口时钟使能
	// 串行通信中断配置
	USART_ITConfig(USART1, USART_IT_RXNE, ENABLE);	// 接收数据寄存器不为空发生中断

	// NVIC 初始化
	NVIC_InitStruct.NVIC_IRQChannel = USART1_IRQn;	// 初始化串口中断线1
	NVIC_InitStruct.NVIC_IRQChannelPreemptionPriority = 0;
	NVIC_InitStruct.NVIC_IRQChannelSubPriority = 0;
	NVIC_InitStruct.NVIC_IRQChannelCmd = ENABLE;
	NVIC_Init(&NVIC_InitStruct);
}

// printf 重定向
int fputc(int ch, FILE *p){
	USART_SendData(USART1, (u8)ch);
	// 等待整个帧发送完成 (包括停止位)
	while(USART_GetFlagStatus(USART1, USART_FLAG_TC) == RESET);

	return ch;
}
2. 控制SG90舵机代码
- 使能定时器和相关IO时钟
- 初始化IO为复用模式
- 初始化定时器
- 初始化输出比较参数
- 使能预装载寄存器
- 使能定时器
- 改变比较值CCR x,达到不同的占空比效果
c
// sg90.h
#ifndef SG90_H
#define SG90_H
#include "stm32f10x.h"
void SG90_Init(void);
void SG90_Angle(uint16_t angle);
#endif
c
// sg90.c
#include "sg90.h"
#include "stm32f10x.h"
void SG90_Init(void)
{
GPIO_InitTypeDef GPIO_InitStruct;
TIM_TimeBaseInitTypeDef TIM_InitStruct;
TIM_OCInitTypeDef TIMOC_InitStruct;
RCC_APB2PeriphClockCmd(RCC_APB2Periph_GPIOB, ENABLE);
RCC_APB2PeriphClockCmd(RCC_APB2Periph_AFIO, ENABLE); // 使能复用功能的时钟
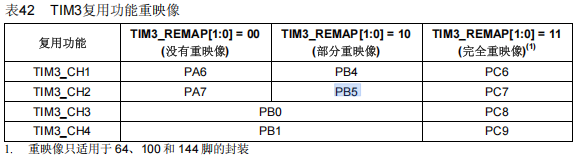
RCC_APB1PeriphClockCmd(RCC_APB1Periph_TIM3, ENABLE); // 使能TIM3定时器的时钟
// 配置TIM3定时器的通道从默认引脚切换到手册中定义的"部分重映射引脚"上
GPIO_PinRemapConfig(GPIO_PartialRemap_TIM3, ENABLE);
GPIO_InitStruct.GPIO_Pin = GPIO_Pin_5;
GPIO_InitStruct.GPIO_Speed = GPIO_Speed_10MHz;
GPIO_InitStruct.GPIO_Mode = GPIO_Mode_AF_PP;
GPIO_Init(GPIOB, &GPIO_InitStruct);
TIM_InitStruct.TIM_Prescaler = 7200-1;
TIM_InitStruct.TIM_CounterMode = TIM_CounterMode_Up; // 向上计数模式,从0开始,逐次递增
TIM_InitStruct.TIM_Period = 200-1;
TIM_InitStruct.TIM_ClockDivision = TIM_CKD_DIV1;
TIM_TimeBaseInit(TIM3, &TIM_InitStruct);
TIMOC_InitStruct.TIM_OCMode = TIM_OCMode_PWM1; // 比比较值低为有效电平
TIMOC_InitStruct.TIM_OutputState = TIM_OutputState_Enable; // 定时器输出使能
TIMOC_InitStruct.TIM_OCPolarity = TIM_OCPolarity_Low; // 低电平有效
TIM_OC2Init(TIM3, &TIMOC_InitStruct);
TIM_OC2PreloadConfig(TIM3, TIM_OCPreload_Enable); // 使能定时器通道2的输出比较预装载寄存器
TIM_Cmd(TIM3, ENABLE); // 启动定时器
}
void SG90_Angle(uint16_t angle)
{
switch(angle)
{
case 180: TIM_SetCompare2(TIM3, 175); break; // 设置比较值
case 135: TIM_SetCompare2(TIM3, 180); break;
case 90: TIM_SetCompare2(TIM3, 185); break;
case 45: TIM_SetCompare2(TIM3, 190); break;
case 0: TIM_SetCompare2(TIM3, 195); break;
}
}3. main.c 文件代码
c
// main.c
#include "stm32f10x.h"
#include "main.h"
#include "sg90.h"
#include "tim.h"
#include "USART.h"
#include "stdio.h"

int  main()
{
	float length = 0;

	Base_TIM_Init();
	My_Usart1_Init();
	HC04_Init();

	SG90_Init();
	while(1)
	{
			length = Get_Length();
			printf("%lf\r\n", length);
			if(length<=8)
			{
				SG90_Angle(135);
			}
			else
			{
				SG90_Angle(0);
			}
		}
}