前言
在时间管理类应用中,如何直观地展示一天的时间使用情况是一个重要的设计挑战。本文将详细讲解如何在 HarmonyOS 应用中实现一个交互式的热力图时间块展示页面,用户可以通过点击和拖动来快速记录时间,同时以网格形式直观地查看时间分布。
本教程适合 HarmonyOS 初学者阅读,你将学习到:
- 如何使用 Grid 组件实现网格布局
- 如何实现复杂的手势交互(长按、拖动、点击)
- 如何动态计算和渲染时间单元格
- 如何处理时间块的冲突和拆分
- 如何实现数据驱动的 UI 更新
应用场景
在我最近开发的某款应用中,热力图页面是核心功能之一。用户可以:
- 以网格形式查看一天的时间分布(每个格子代表 30 分钟)
- 点击空白格子快速记录单个时间段
- 长按并拖动选择多个连续时间段
- 点击已记录的格子编辑或拆分时间块
- 通过颜色区分不同的活动类型
- 金色边框标识高质量时间(专注度≥4 且 价值感≥4)
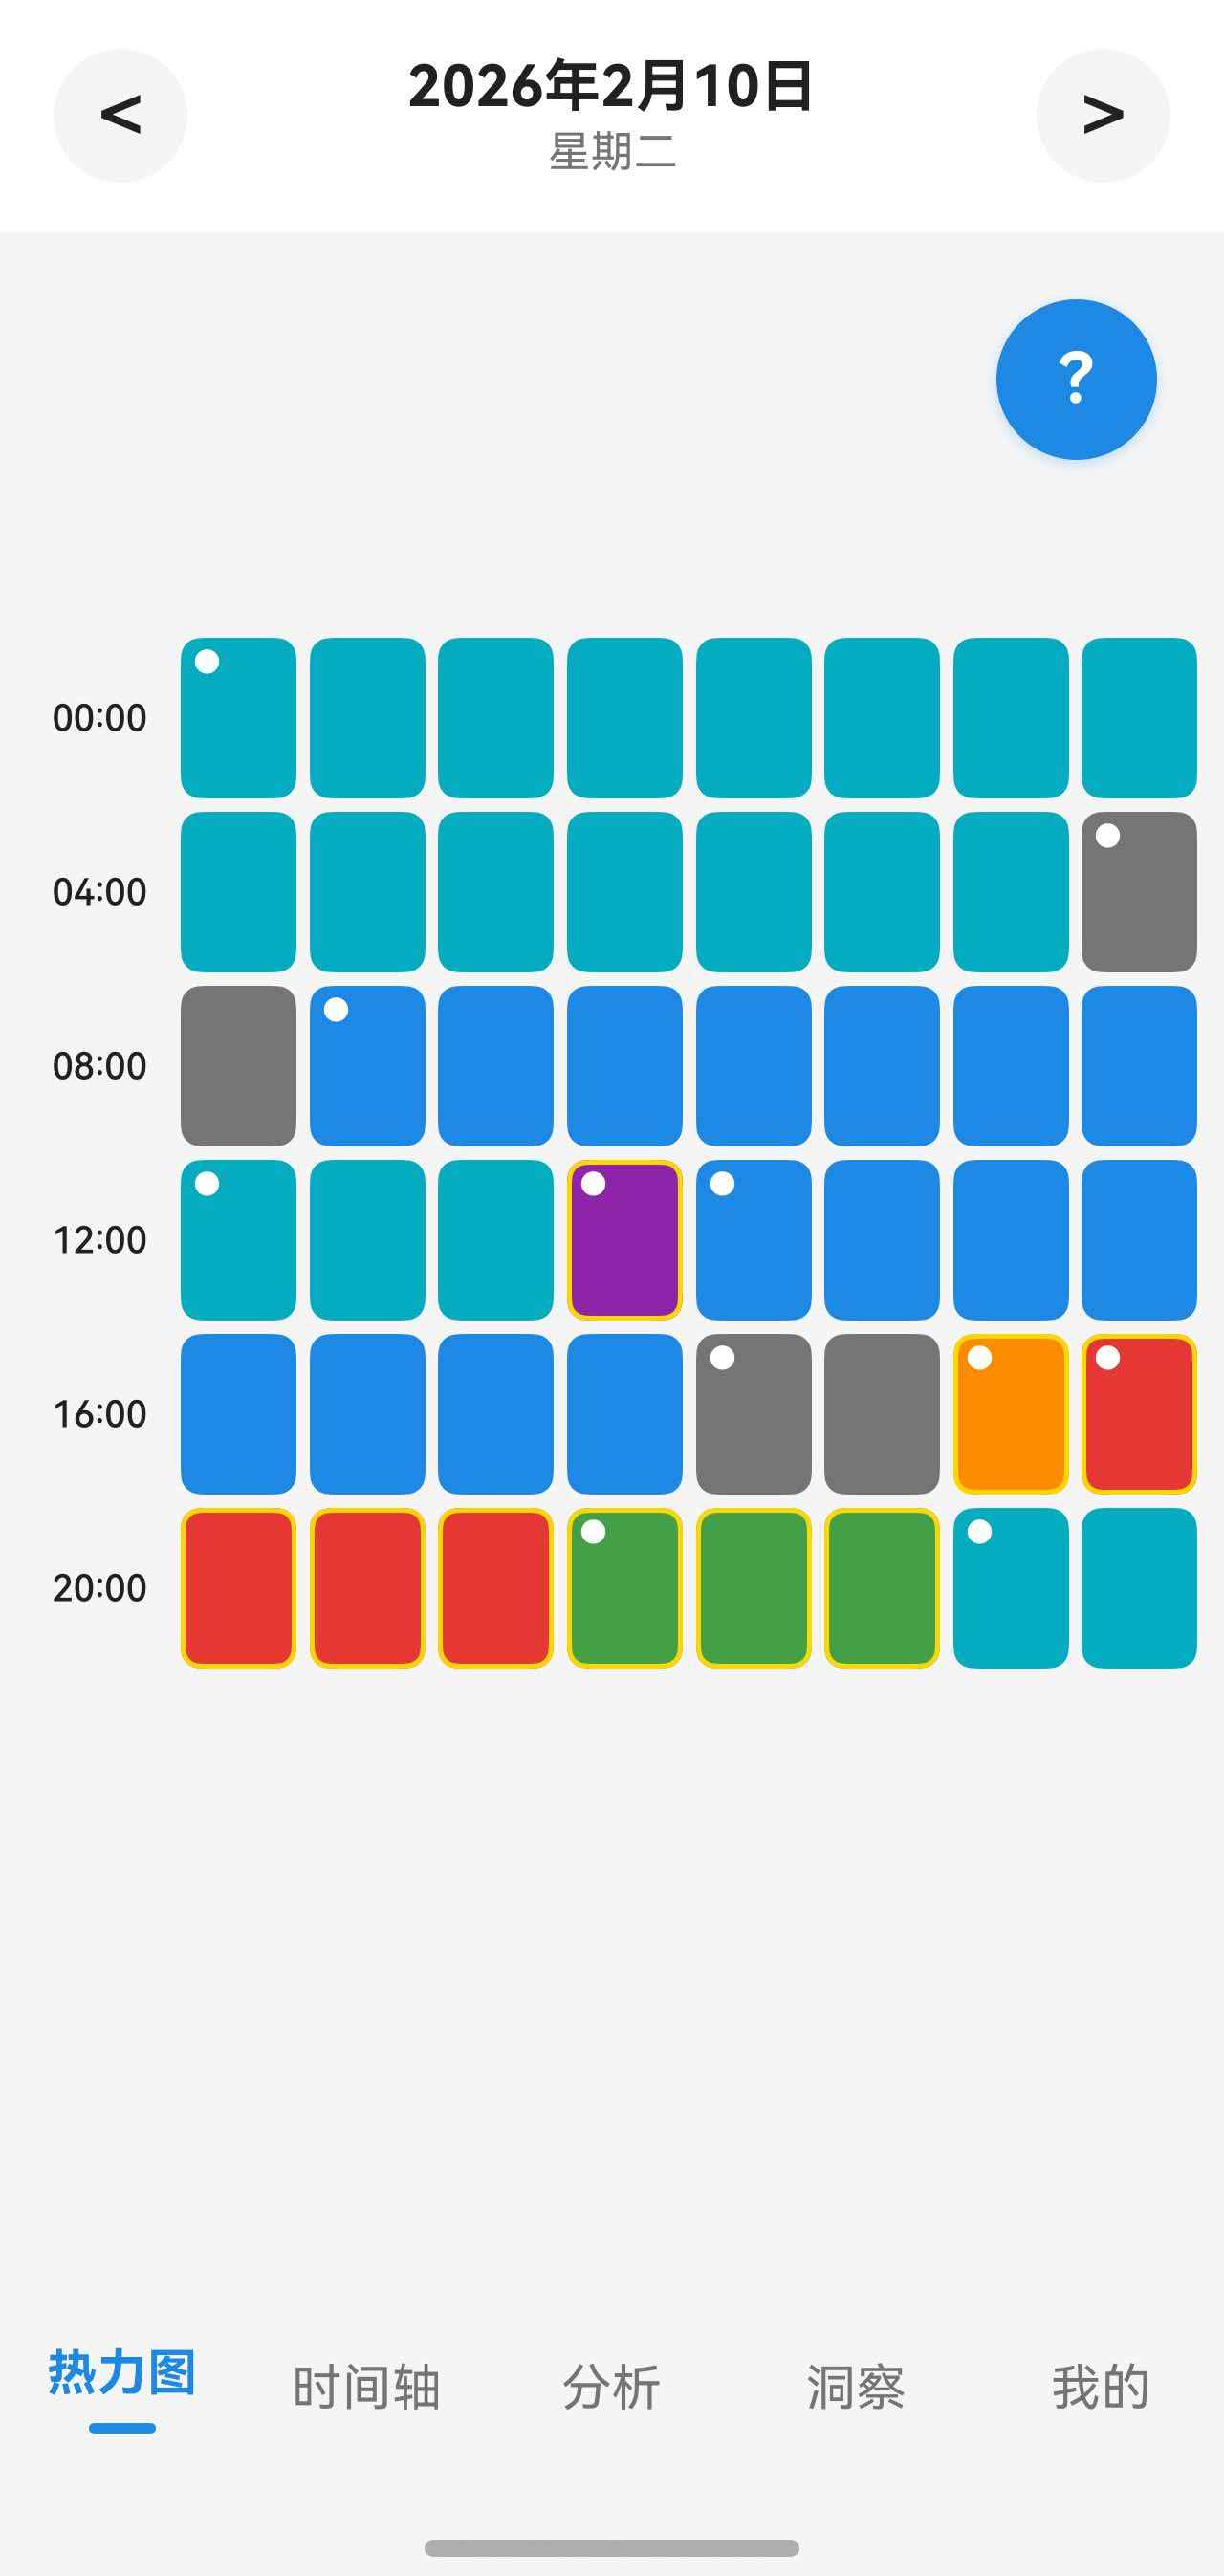
注:热力图页面以 8×N 网格展示时间块,每个格子代表 30 分钟
核心知识点
1. Grid 组件与网格布局
Grid 是 HarmonyOS 提供的网格容器组件,支持灵活的行列配置。
typescript
Grid() {
  ForEach(this.timeCells, (cell: TimeCell, index: number) => {
    GridItem() {
      this.TimeGridCell(cell, index)
    }
  })
}
.columnsTemplate('1fr 1fr 1fr 1fr 1fr 1fr 1fr 1fr')  // 8列,每列等宽
.rowsGap(4)      // 行间距 4vp
.columnsGap(4)   // 列间距 4vp
参考文档:
2. 手势识别与交互
HarmonyOS 支持多种手势,可以组合使用:
typescript
.gesture(
  GestureGroup(GestureMode.Parallel,
    // 长按手势
    LongPressGesture({ repeat: false, duration: 400 })
      .onAction((event: GestureEvent) => {
        // 处理长按
      }),
    // 拖动手势
    PanGesture({ fingers: 1, direction: PanDirection.All, distance: 1 })
      .onActionUpdate((event: GestureEvent) => {
        // 处理拖动
      })
  )
)
基础手势参考文档:
- HarmonyOS 官方文档 - TapGesture
- HarmonyOS 官方文档 - LongPressGesture
- HarmonyOS 官方文档 - PanGesture
- HarmonyOS 官方文档 - PinchGesture
- HarmonyOS 官方文档 - RotationGesture
- HarmonyOS 官方文档 - SwipeGesture
3. 状态管理与数据驱动
使用 @State 装饰器管理组件状态,当状态变化时 UI 自动更新:
typescript
@State timeCells: TimeCell[] = []           // 时间单元格数组
@State selectedCells: number[] = []         // 选中的格子索引
@State isDragging: boolean = false          // 是否正在拖动
数据模型设计
时间单元格(TimeCell)
首先定义时间单元格的数据结构,每个格子代表 30 分钟:
typescript
class TimeCell {
  hour: number              // 小时 0-23
  halfHour: number          // 分钟 0 或 30
  block: TimeBlock | null   // 关联的时间块(如果有)
  isSelected: boolean       // 是否被选中

  constructor(hour: number, halfHour: number, block: TimeBlock | null, isSelected: boolean) {
    this.hour = hour
    this.halfHour = halfHour
    this.block = block
    this.isSelected = isSelected
  }

  // 获取格子的开始时间
  getStartTime(date: Date): Date {
    return new Date(date.getFullYear(), date.getMonth(), date.getDate(), this.hour, this.halfHour, 0, 0)
  }

  // 获取格子的结束时间
  getEndTime(date: Date): Date {
    // 特殊处理:最后一个格子(23:30)的结束时间是 23:59:59
    if (this.hour === 23 && this.halfHour === 30) {
      return new Date(date.getFullYear(), date.getMonth(), date.getDate(), 23, 59, 59, 999)
    }

    // 其他格子:正常加 30 分钟
    const result = new Date(date.getFullYear(), date.getMonth(), date.getDate(), this.hour, this.halfHour, 0, 0)
    result.setMinutes(result.getMinutes() + 30)
    return result
  }
}
代码说明:
hour和halfHour确定格子的时间位置block关联实际的时间块数据,如果为null表示空白格子getStartTime()和getEndTime()方法用于获取格子对应的时间范围- 特殊处理最后一个格子,确保覆盖到 23:59:59
时间块(TimeBlock)
时间块是用户记录的实际数据:
typescript
export class TimeBlock {
  id: string
  startTime: Date
  endTime: Date
  activityTagId: string    // 活动类型ID
  focusLevel: number       // 专注度 1-5
  valueLevel: number       // 价值感 1-5
  energyCost: number       // 能量消耗 1-5
  note: string | null      // 备注
  createdAt: Date
  updatedAt: Date
}
代码说明:
- 一个时间块可能跨越多个格子(例如 9:00-11:00 跨越 4 个格子)
- 三维质量评分(专注度、价值感、能量消耗)用于后续的数据分析
activityTagId关联活动标签,用于显示颜色和名称
组件状态定义
接下来定义组件的状态变量:
typescript
@Component
export struct HeatmapPage {
  // 基础数据
  @State currentDate: Date = new Date()              // 当前查看的日期
  @State timeBlocks: TimeBlock[] = []                // 时间块数据
  @State activityTags: ActivityTag[] = []            // 活动标签数据
  @State isLoading: boolean = true                   // 加载状态

  // 网格数据
  @State timeCells: TimeCell[] = []                  // 时间单元格数组
  @State gridWidth: number = 0                       // 网格宽度(用于坐标计算)

  // 交互状态
  @State selectedCells: number[] = []                // 选中的格子索引
  @State isDragging: boolean = false                 // 是否正在拖动
  @State dragStartIndex: number = -1                 // 拖动起始索引
  @State lastTouchedIndex: number = -1               // 最后触摸的格子索引
  @State selectionDuration: number = 0               // 选中的时长(分钟)

  // UI控制
  @State showGuide: boolean = false                  // 是否显示使用说明
  @State showGuideAlways: boolean = false            // 是否常驻显示使用说明

  // 跨组件状态(用于页面刷新)
  @StorageLink('needRefreshTimeline') @Watch('onNeedRefresh') needRefreshTimeline: number = 0
  @StorageLink('fontScale') fontScale: number = 1.0  // 字体缩放比例

  // 服务和控制器
  private timeBlockManager: TimeBlockManager = new TimeBlockManager()
  private activityTagRepository: ActivityTagRepository = new ActivityTagRepository()
  private preferencesManager: PreferencesManager = PreferencesManager.getInstance()
  private dialogController: CustomDialogController | null = null
  private scroller: Scroller = new Scroller()

  // ... 后续代码
}
代码说明:
-
基础数据状态:
currentDate:用户当前查看的日期,切换日期时会更新timeBlocks:从数据库加载的时间块数据activityTags:活动标签数据,用于显示颜色和名称
-
网格数据状态:
timeCells:处理后的时间单元格数组,每个格子代表 30 分钟gridWidth:网格的实际宽度,用于坐标到索引的转换
-
交互状态:
selectedCells:用户选中的格子索引数组isDragging:标识是否正在拖动选择dragStartIndex:拖动的起始格子索引lastTouchedIndex:最后触摸的格子,用于优化拖动性能
-
@StorageLink 跨组件状态:
needRefreshTimeline:其他页面可以通过修改这个值来触发刷新@Watch('onNeedRefresh'):监听变化,自动调用onNeedRefresh()方法
数据加载与生成
初始化加载
组件显示前需要加载数据并生成时间单元格:
typescript
async aboutToAppear(): Promise<void> {
  await this.loadData()
  await this.loadGuidePreferences()
}

private async loadData(): Promise<void> {
  this.isLoading = true

  // 1. 加载活动标签
  this.activityTags = await this.activityTagRepository.findAll()

  // 2. 加载当前日期的时间块
  this.timeBlocks = await this.timeBlockManager.getTimeBlocksByDate(this.currentDate)

  // 3. 生成时间单元格
  this.generateTimeCells()

  this.isLoading = false

  // 4. 滚动到顶部
  setTimeout(() => {
    this.scroller.scrollTo({ xOffset: 0, yOffset: 0, animation: false })
  }, 100)
}
代码说明:
aboutToAppear()是组件生命周期方法,在组件即将显示时调用- 使用
async/await确保数据加载完成后再显示 UI setTimeout延迟滚动,确保 UI 渲染完成
生成时间单元格
这是核心方法,将一天的时间划分为 30 分钟的格子:
typescript
private generateTimeCells(): void {
  const cells: TimeCell[] = []
  const now = new Date()
  const isToday = this.isToday()

  // 计算当前时间对应的半小时格子数
  let maxCells = 48  // 非今天显示全天 48 个格子(24小时 × 2)

  if (isToday) {
    const currentHour = now.getHours()
    const currentMinute = now.getMinutes()

    // 计算已经完整过去的半小时格子数
    maxCells = currentHour * 2
    if (currentMinute >= 30) {
      maxCells += 1  // 如果超过 30 分钟,包含当前小时的第一个半小时
    }
    // 注意:不包含当前正在进行的半小时
  }

  // 生成格子
  for (let i = 0; i < maxCells; i++) {
    const hour = Math.floor(i / 2)
    const halfHour = (i % 2) * 30
    const block = this.findBlockForCell(hour, halfHour)
    cells.push(new TimeCell(hour, halfHour, block, false))
  }

  this.timeCells = cells
}
代码说明:
-
动态格子数量:
- 非今天:显示全天 48 个格子(0:00-23:59)
- 今天:只显示到当前时间的格子
- 例如现在是 10:38,显示 0:00-10:30 共 21 个格子
-
格子索引计算:
- 索引 0 → 0:00-0:30
- 索引 1 → 0:30-1:00
- 索引 2 → 1:00-1:30
- ...
- 索引 47 → 23:30-23:59:59
-
关联时间块:
- 调用
findBlockForCell()查找格子对应的时间块 - 如果格子时间范围内有时间块,关联到格子
- 调用
查找格子对应的时间块
typescript
private findBlockForCell(hour: number, halfHour: number): TimeBlock | null {
  const cellStart = new Date(this.currentDate)
  cellStart.setHours(hour, halfHour, 0, 0)
  const cellEnd = new Date(cellStart)
  cellEnd.setMinutes(cellEnd.getMinutes() + 30)

  for (const block of this.timeBlocks) {
    // 如果时间块的开始时间 <= 格子开始时间 < 时间块的结束时间
    if (block.startTime <= cellStart && block.endTime > cellStart) {
      return block
    }
  }
  return null
}
代码说明:
- 判断格子的开始时间是否在时间块的时间范围内
- 一个时间块可能跨越多个格子,每个格子都会关联到同一个时间块
- 例如 9:00-11:00 的时间块会关联到 4 个格子(9:00、9:30、10:00、10:30)
判断是否是今天
typescript
private isToday(): boolean {
  const today = new Date()
  return this.currentDate.toDateString() === today.toDateString()
}
代码说明:
toDateString()返回日期部分的字符串,例如 "Sat Feb 14 2026"- 比较字符串可以忽略时间部分,只比较日期
网格布局实现
网格容器
使用 Grid 组件实现 8 列的网格布局:
typescript
@Builder
GridTimeline() {
Column() {
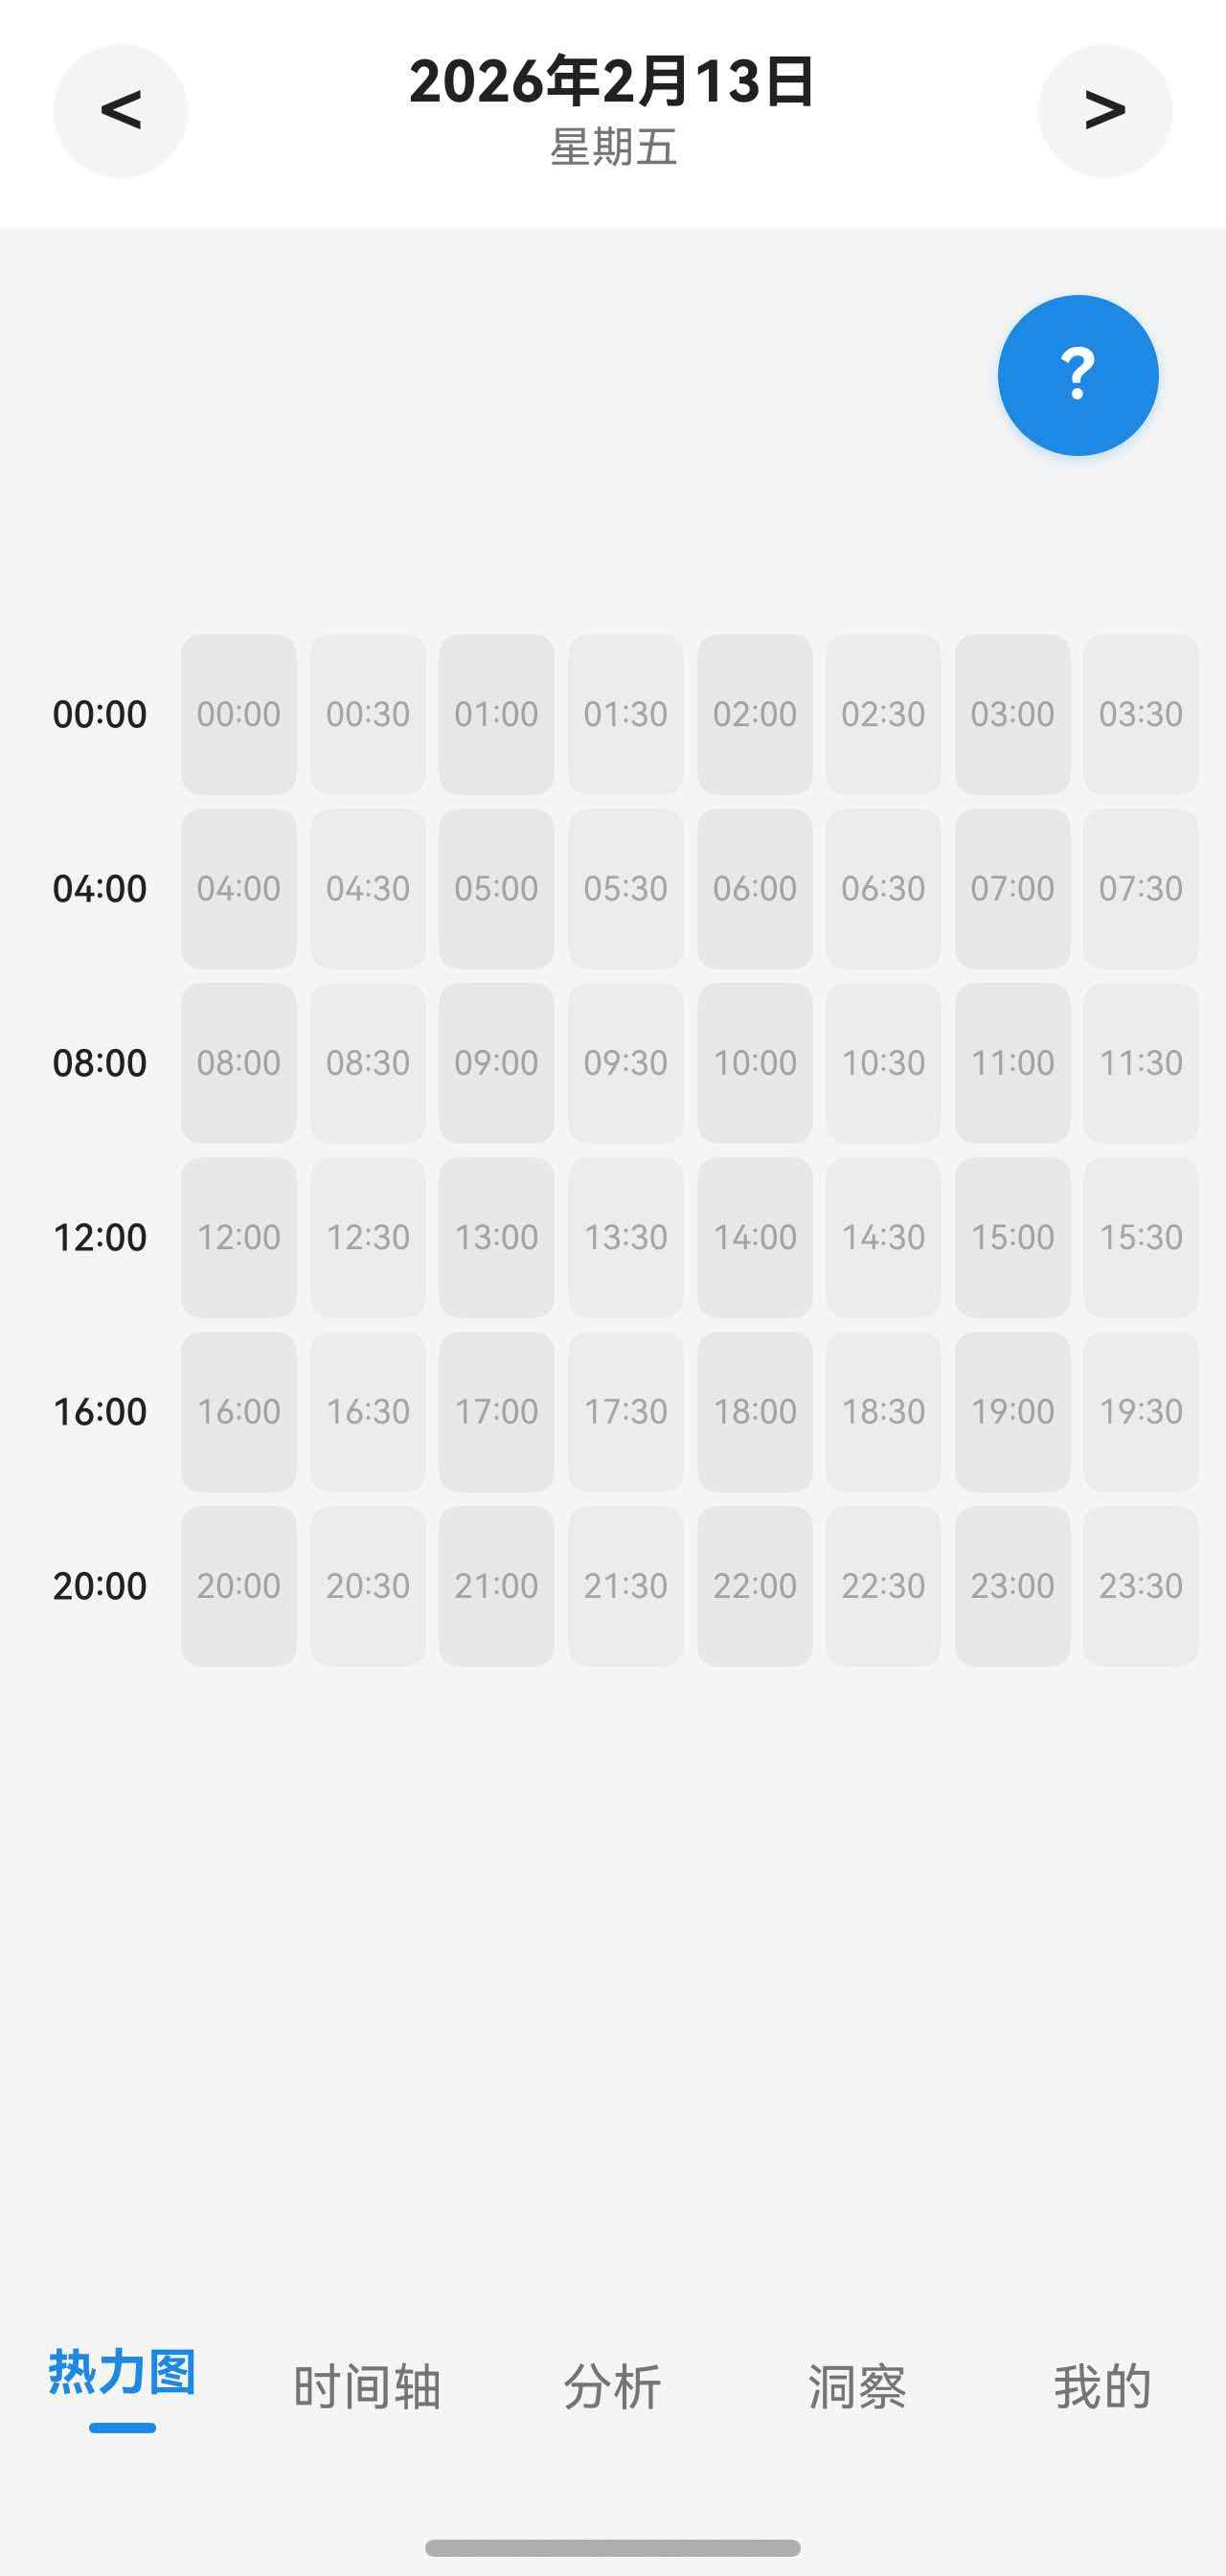
// 空状态提示(凌晨时段没有格子)
if (this.timeCells.length === 0) {
Column() {
Text('🌙')
.fontSize(this.fs(48))
.margin({ bottom: 16 })
Text('新的一天刚刚开始')
.fontSize(this.fs(16))
.fontWeight(FontWeight.Medium)
.fontColor($r('app.color.text_primary'))
.margin({ bottom: 8 })
Text('随着时间推移,格子会逐渐出现')
.fontSize(this.fs(14))
.fontColor($r('app.color.text_secondary'))
}
.width('100%')
.layoutWeight(1)
.justifyContent(FlexAlign.Center)
} else {
// 网格容器(可滚动)
Scroll(this.scroller) {
Row() {
// 左侧时间标签列
Column() {
ForEach(this.getTimeLabels(), (label: string, index: number) => {
Text(label)
.fontSize(this.fs(11))
.fontColor(this.isFullHour(label) ? $r('app.color.text_primary') : $r('app.color.text_secondary'))
.fontWeight(this.isFullHour(label) ? FontWeight.Medium : FontWeight.Normal)
.height(52) // 48 (格子高度) + 4 (gap)
.width(50)
.textAlign(TextAlign.End)
.padding({ right: 6 })
})
}
.justifyContent(FlexAlign.Start)
// 右侧网格区域
Stack() {
// 网格
Grid() {
ForEach(this.timeCells, (cell: TimeCell, index: number) => {
GridItem() {
this.TimeGridCell(cell, index)
}
})
}
.columnsTemplate('1fr 1fr 1fr 1fr 1fr 1fr 1fr 1fr') // 8列等宽
.rowsGap(4)
.columnsGap(4)
.width('100%')
.padding({ left: 4, right: 8 })
.height(this.calculateGridHeight())
.onAreaChange((oldValue: Area, newValue: Area) => {
this.gridWidth = Number(newValue.width) // 记录网格宽度
})
// 全局触摸检测层(用于拖动选择)
Column()
.width('100%')
.height(this.calculateGridHeight())
.backgroundColor(Color.Transparent)
.gesture(/* 手势处理,后续详解 */)
.hitTestBehavior(HitTestMode.Transparent)
}
.layoutWeight(1)
}
.width('100%')
}
.scrollBar(BarState.Auto)
.edgeEffect(EdgeEffect.Spring)
.width('100%')
.layoutWeight(1)
}
}
.width('100%')
.height('100%')
.padding({ top: 12, bottom: 80 })
}代码说明:
-
空状态处理:
- 如果是今天凌晨(还没有格子),显示友好的提示信息
- 使用 emoji 让界面更生动
-
左侧时间标签:
- 固定宽度 50vp,显示每行的开始时间
- 整点时间加粗显示,半点时间正常显示
-
Grid 组件配置:
columnsTemplate('1fr 1fr 1fr 1fr 1fr 1fr 1fr 1fr'):8 列等宽rowsGap(4)和columnsGap(4):格子间距 4vponAreaChange:监听网格尺寸变化,记录宽度用于坐标计算
-
Stack 布局:
- 底层是 Grid 网格
- 顶层是透明的触摸检测层,用于实现拖动选择
hitTestBehavior(HitTestMode.Transparent):让触摸事件穿透到下层
获取时间标签
每行显示对应的时间标签:
typescript
private getTimeLabels(): string[] {
  const labels: string[] = []
  const rows = Math.ceil(this.timeCells.length / 8)  // 计算行数

  for (let row = 0; row < rows; row++) {
    const cellIndex = row * 8  // 每行第一个格子的索引
    if (cellIndex < this.timeCells.length) {
      const cell = this.timeCells[cellIndex]
      // 格式化为 HH:mm
      const hour = cell.hour.toString().padStart(2, '0')
      const minute = cell.halfHour.toString().padStart(2, '0')
      labels.push(`${hour}:${minute}`)
    }
  }

  return labels
}

// 判断时间标签是否为整点(用于加粗显示)
private isFullHour(label: string): boolean {
  return label.endsWith(':00')
}
代码说明:
- 每行显示该行第一个格子的开始时间
- 整点时间(例如 "09:00")加粗显示,更醒目
- 半点时间(例如 "09:30")正常显示
计算网格高度
动态计算网格的总高度:
typescript
private calculateGridHeight(): number {
  const cellsPerRow = 8
  const rows = Math.ceil(this.timeCells.length / cellsPerRow)
  const cellHeight = 48
  const gap = 4
  return rows * cellHeight + (rows - 1) * gap
}
代码说明:
- 每个格子高度 48vp
- 行间距 4vp
- 总高度 = 行数 × 格子高度 + (行数 - 1) × 间距
时间格子渲染
格子视图
每个格子的渲染逻辑:
typescript
@Builder
TimeGridCell(cell: TimeCell, index: number) {
  Stack() {
    // 1. 背景层(通过颜色区分整点和半点)
    Column()
      .width('100%')
      .height('100%')
      .backgroundColor(
        cell.block !== null
          ? (this.getTag(cell.block.activityTagId) !== null
            ? this.getTag(cell.block.activityTagId)!.color
            : '#E0E0E0')
          : (cell.halfHour === 0 ? '#E8E8E8' : '#ECECEC')  // 整点较深,半点较浅
      )
      .borderRadius(6)
      .border({
        width: this.selectedCells.indexOf(index) !== -1
          ? 2  // 选中状态:2vp 蓝色边框
          : (cell.block !== null && this.isHighQualityBlock(cell.block)
            ? 1.5  // 高质量时间:1.5vp 金色边框
            : 0),  // 其他:无边框
        color: this.selectedCells.indexOf(index) !== -1
          ? $r('app.color.primary_color')
          : '#FFD700'
      })

    // 2. 选中覆盖层(半透明蓝色)
    if (this.selectedCells.indexOf(index) !== -1) {
      Column()
        .width('100%')
        .height('100%')
        .backgroundColor('rgba(100, 181, 246, 0.5)')
        .borderRadius(6)
    }

    // 3. 未填充格子显示时间
    if (cell.block === null) {
      Text(this.formatCellTime(cell))
        .fontSize(this.fs(10))
        .fontColor($r('app.color.text_secondary'))
        .opacity(0.6)
    }

    // 4. 时间块标识:在每个时间块的第一个格子左上角显示小圆点
    if (cell.block !== null && this.isFirstCellOfBlock(index)) {
      Column() {
        Row() {
          Text('●')
            .fontSize(this.fs(10))
            .fontColor('#FFFFFF')
            .fontWeight(FontWeight.Bold)
        }
        .width('100%')
        .justifyContent(FlexAlign.Start)
        .padding({ top: 2, left: 3 })
      }
      .width('100%')
      .height('100%')
    }
  }
  .width('100%')
  .height(48)
  .gesture(
    TapGesture({ count: 1 })
      .onAction(() => {
        if (!this.isDragging) {
          this.handleCellClick(index)
        }
      })
  )
}
代码说明:
-
背景颜色逻辑:
- 有时间块:使用活动标签的颜色
- 空白格子:整点格子
#E8E8E8(较深),半点格子#ECECEC(较浅) - 这样可以让用户快速识别整点和半点
-
边框逻辑:
- 选中状态:2vp 蓝色边框
- 高质量时间(专注度≥4 且 价值感≥4):1.5vp 金色边框
- 其他:无边框
-
选中覆盖层:
- 半透明蓝色
rgba(100, 181, 246, 0.5) - 让用户清楚看到选中的格子
- 半透明蓝色
-
时间块标识:
- 在每个时间块的第一个格子左上角显示白色小圆点
● - 帮助用户识别时间块的起始位置
- 特别是跨越多个格子的时间块
- 在每个时间块的第一个格子左上角显示白色小圆点
-
点击手势:
- 使用
TapGesture处理单击 - 拖动过程中忽略点击事件
- 使用
辅助方法
typescript
// 格式化格子时间(显示开始时间)
private formatCellTime(cell: TimeCell): string {
  const hour = cell.hour.toString().padStart(2, '0')
  const minute = cell.halfHour.toString().padStart(2, '0')
  return `${hour}:${minute}`
}

// 判断当前格子是否是时间块的第一个格子
private isFirstCellOfBlock(index: number): boolean {
  const cell = this.timeCells[index]
  if (cell.block === null) {
    return false
  }

  // 检查前一个格子
  if (index > 0) {
    const prevCell = this.timeCells[index - 1]
    // 如果前一个格子属于同一个时间块,说明当前不是第一个
    if (prevCell.block !== null && prevCell.block.id === cell.block.id) {
      return false
    }
  }

  return true
}

// 判断是否是高质量时间块
private isHighQualityBlock(block: TimeBlock): boolean {
  return block.focusLevel >= 4 && block.valueLevel >= 4
}

// 获取活动标签
private getTag(tagId: string): ActivityTag | null {
  const tag = this.activityTags.find((t: ActivityTag) => t.id === tagId)
  return tag !== undefined ? tag : null
}
代码说明:
padStart(2, '0'):在字符串前面补零,确保是两位数isFirstCellOfBlock():通过比较前一个格子的时间块 ID 来判断isHighQualityBlock():判断是否是高质量时间块:专注度和价值感都达到 4 分以上
手势交互实现
这是本文的核心部分,实现复杂的手势交互。
手势组合
使用 GestureGroup 组合长按和拖动手势:
typescript
Column()
  .width('100%')
  .height(this.calculateGridHeight())
  .backgroundColor(Color.Transparent)
  .gesture(
    // 使用 Parallel 模式,让长按和拖动可以同时进行
    GestureGroup(GestureMode.Parallel,
      // 长按手势启动拖动模式
      LongPressGesture({ repeat: false, duration: 400 })
        .onAction((event: GestureEvent) => {
          const x = event.fingerList[0].localX
          const y = event.fingerList[0].localY
          const index = this.getIndexFromCoordinate(x, y)

          // 允许从任何格子开始拖动(包括已填充的格子)
          if (index >= 0 && index < this.timeCells.length) {
            this.handleDragStart(index)
          }
        })
        .onActionEnd(() => {
          // 长按结束时,如果用户没有拖动(只选中一个格子),立即结束拖动
          if (this.isDragging && this.selectedCells.length === 1) {
            this.handleDragEnd()
          }
        }),

      // 拖动手势(与长按并行)
      PanGesture({ fingers: 1, direction: PanDirection.All, distance: 1 })
        .onActionUpdate((event: GestureEvent) => {
          if (this.isDragging) {
            const x = event.fingerList[0].localX
            const y = event.fingerList[0].localY
            const index = this.getIndexFromCoordinate(x, y)

            if (index >= 0 && index < this.timeCells.length && index !== this.lastTouchedIndex) {
              this.lastTouchedIndex = index
              this.handleDragUpdate(index)
            }
          }
        })
        .onActionEnd(() => {
          if (this.isDragging) {
            this.handleDragEnd()
          }
        })
    )
  )
  .hitTestBehavior(HitTestMode.Transparent)
代码说明:
-
GestureMode.Parallel:
- 让长按和拖动手势可以同时进行
- 用户长按后不抬起手指,可以直接拖动
-
LongPressGesture:
duration: 400:长按 400ms 触发repeat: false:不重复触发- 触发后调用
handleDragStart()开始拖动模式
-
PanGesture:
fingers: 1:单指拖动direction: PanDirection.All:允许任意方向distance: 1:移动 1vp 就触发更新- 只有在
isDragging为 true 时才处理拖动
-
性能优化:
- 使用
lastTouchedIndex记录最后触摸的格子 - 只有当触摸到新格子时才更新选择
- 避免重复计算和渲染
- 使用
坐标转换
将触摸坐标转换为格子索引:
typescript
private getIndexFromCoordinate(x: number, y: number): number {
  const paddingLeft = 4
  const paddingRight = 8
  const cellHeight = 48
  const gap = 4

  // 调整坐标(减去左侧 padding)
  const adjustedX = x - paddingLeft
  const adjustedY = y

  if (adjustedX < 0 || adjustedY < 0 || this.gridWidth === 0) {
    return -1
  }

  // 计算可用宽度(减去左右 padding)
  const availableWidth = this.gridWidth - paddingLeft - paddingRight
  const cellWidth = (availableWidth - gap * 7) / 8  // 8列,7个gap

  // 计算列:考虑格子和gap
  let col = -1
  let currentX = 0
  for (let c = 0; c < 8; c++) {
    const cellStart = currentX
    const cellEnd = currentX + cellWidth

    if (adjustedX >= cellStart && adjustedX < cellEnd + gap / 2) {
      col = c
      break
    }

    currentX = cellEnd + gap
  }

  // 如果超出最后一列,选择最后一列
  if (col === -1 && adjustedX >= currentX - gap / 2) {
    col = 7
  }

  // 计算行:考虑格子和gap
  let row = -1
  let currentY = 0
  let r = 0
  while (currentY < adjustedY) {
    const cellStart = currentY
    const cellEnd = currentY + cellHeight

    if (adjustedY >= cellStart && adjustedY < cellEnd + gap / 2) {
      row = r
      break
    }

    currentY = cellEnd + gap
    r++
  }

  // 如果没有找到行,可能是在最后一行之后
  if (row === -1 && r > 0) {
    row = r - 1
  }

  // 检查是否在有效范围内
  if (col < 0 || col >= 8 || row < 0) {
    return -1
  }

  const index = row * 8 + col

  // 确保索引在有效范围内
  if (index < 0 || index >= this.timeCells.length) {
    return -1
  }

  return index
}
代码说明:
-
坐标调整:
- 减去左侧 padding,得到相对于网格的坐标
- 考虑网格的实际宽度
-
列计算:
- 遍历每一列,计算格子的起止位置
- 考虑格子宽度和间距
- 触摸点在格子或间距的一半范围内,都算作该列
-
行计算:
- 类似列计算,遍历每一行
- 考虑格子高度和间距
-
边界处理:
- 如果坐标超出范围,返回 -1
- 如果索引超出格子数量,返回 -1
处理单元格点击
单击格子的处理逻辑:
typescript
private handleCellClick(index: number): void {
  if (this.isDragging) {
    return  // 拖动过程中忽略点击
  }

  if (this.timeCells[index].block !== null) {
    // 如果单元格已有时间块,检查是否跨越多个格子
    const block = this.timeCells[index].block!
    const blockCellCount = this.countBlockCells(block)

    if (blockCellCount > 1) {
      // 多格子时间块:弹出选择对话框
      this.showEditOptionsDialog(block, index)
    } else {
      // 单格子时间块:直接编辑
      this.openEditDialog(block)
    }
    return
  }

  // 空白格子:直接打开对话框,不显示选中状态
  const startTime = this.timeCells[index].getStartTime(this.currentDate)
  const endTime = this.timeCells[index].getEndTime(this.currentDate)

  this.dialogController = new CustomDialogController({
    builder: AddTimeBlockDialog({
      presetStartTime: startTime,
      presetEndTime: endTime,
      onSuccess: () => {
        this.refreshData()
      }
    }),
    autoCancel: true,
    alignment: DialogAlignment.Bottom,
    customStyle: true
  })
  this.dialogController.open()
}

// 计算时间块占用的格子数量
private countBlockCells(block: TimeBlock): number {
  let count = 0
  for (const cell of this.timeCells) {
    if (cell.block !== null && cell.block.id === block.id) {
      count++
    }
  }
  return count
}
代码说明:
-
点击已记录格子:
- 单格子时间块:直接打开编辑对话框
- 多格子时间块:弹出选择对话框(编辑整块 or 仅编辑此格)
-
点击空白格子:
- 选中该格子
- 直接打开添加对话框,预填充时间范围
-
拖动过程中忽略点击:
- 避免拖动结束时误触发点击事件
处理拖动选择
拖动选择的核心逻辑:
typescript
// 处理拖动开始
private handleDragStart(index: number): void {
  // 允许在任何格子上开始拖动(包括已有时间块的格子)
  this.selectedCells = [index]
  this.dragStartIndex = index
  this.isDragging = true
  this.lastTouchedIndex = index
  this.updateSelectionDuration()
}

// 处理拖动中
private handleDragUpdate(index: number): void {
  if (!this.isDragging || this.dragStartIndex === -1) {
    return
  }

  // 计算选中范围(允许选择任何格子)
  const start = Math.min(this.dragStartIndex, index)
  const end = Math.max(this.dragStartIndex, index)

  this.selectedCells = []
  for (let i = start; i <= end; i++) {
    if (i >= 0 && i < this.timeCells.length) {
      this.selectedCells.push(i)
    }
  }
  this.updateSelectionDuration()
}

// 处理拖动结束
private handleDragEnd(): void {
  if (this.isDragging && this.selectedCells.length > 0) {
    // 检查选中的格子是否都属于同一个时间块
    const firstCell = this.timeCells[this.selectedCells[0]]

    if (firstCell.block !== null) {
      // 第一个格子有时间块,检查是否所有选中格子都属于同一个时间块
      let allSameBlock = true
      const blockId = firstCell.block.id

      for (const index of this.selectedCells) {
        const cell = this.timeCells[index]
        if (cell.block === null || cell.block.id !== blockId) {
          allSameBlock = false
          break
        }
      }

      if (allSameBlock) {
        // 所有格子都属于同一个时间块
        const block = firstCell.block
        const blockCellCount = this.countBlockCells(block)

        // 检查是否选中了整个时间块
        if (this.selectedCells.length === blockCellCount) {
          // 选中了整个时间块,直接编辑整块
          this.openEditDialog(block)
        } else {
          // 只选中了部分格子,用户意图明确,直接用选中的时间范围打开编辑对话框
          const firstIndex = Math.min(...this.selectedCells)
          const lastIndex = Math.max(...this.selectedCells)
          const startTime = this.timeCells[firstIndex].getStartTime(this.currentDate)
          const endTime = this.timeCells[lastIndex].getEndTime(this.currentDate)
          this.openEditDialogForSplit(block, startTime, endTime)
        }

        this.selectedCells = []
        this.selectionDuration = 0
        this.isDragging = false
        this.dragStartIndex = -1
        return
      }
    }

    // 否则,打开添加/拆分对话框
    this.openAddDialogWithSelection()
  }

  this.isDragging = false
  this.dragStartIndex = -1
}

// 更新选中时长
private updateSelectionDuration(): void {
  this.selectionDuration = this.selectedCells.length * 30
}
代码说明:
-
拖动开始:
- 记录起始格子索引
- 设置
isDragging为 true - 初始化选中格子数组
-
拖动更新:
- 计算起始格子和当前格子之间的所有格子
- 更新选中格子数组
- 实时更新选中时长
-
拖动结束:
- 检查选中的格子是否都属于同一个时间块
- 如果是,判断是编辑整块还是拆分
- 如果不是,打开添加对话框
-
智能判断:
- 选中整个时间块 → 编辑整块
- 选中部分时间块 → 拆分编辑
- 选中空白格子 → 添加新时间块
- 选中混合格子 → 添加新时间块(会自动处理冲突)
打开对话框
typescript
// 打开添加对话框(带预选时间)
private openAddDialogWithSelection(): void {
  if (this.selectedCells.length === 0) {
    return
  }

  const firstIndex = Math.min(...this.selectedCells)
  const lastIndex = Math.max(...this.selectedCells)
  const startTime = this.timeCells[firstIndex].getStartTime(this.currentDate)
  const endTime = this.timeCells[lastIndex].getEndTime(this.currentDate)

  this.dialogController = new CustomDialogController({
    builder: AddTimeBlockDialog({
      presetStartTime: startTime,
      presetEndTime: endTime,
      onSuccess: () => {
        this.selectedCells = []
        this.selectionDuration = 0
        this.refreshData()
      },
      onCancel: () => {
        this.selectedCells = []
        this.selectionDuration = 0
      }
    }),
    autoCancel: true,
    alignment: DialogAlignment.Bottom,
    customStyle: true
  })
  this.dialogController.open()
}

// 打开编辑对话框
private openEditDialog(block: TimeBlock): void {
  this.dialogController = new CustomDialogController({
    builder: AddTimeBlockDialog({
      editingBlock: block,
      onSuccess: () => {
        this.refreshData()
      },
      onDelete: () => {
        this.refreshData()
      }
    }),
    autoCancel: true,
    alignment: DialogAlignment.Bottom,
    customStyle: true
  })
  this.dialogController.open()
}

// 打开拆分编辑对话框
private openEditDialogForSplit(originalBlock: TimeBlock, newStartTime: Date, newEndTime: Date): void {
  this.dialogController = new CustomDialogController({
    builder: AddTimeBlockDialog({
      presetStartTime: newStartTime,
      presetEndTime: newEndTime,
      onSuccess: () => {
        this.selectedCells = []
        this.selectionDuration = 0
        this.refreshData()
      },
      onCancel: () => {
        this.selectedCells = []
        this.selectionDuration = 0
      }
    }),
    autoCancel: true,
    alignment: DialogAlignment.Bottom,
    customStyle: true
  })
  this.dialogController.open()
}
代码说明:
- 添加对话框:预填充选中的时间范围
- 编辑对话框:传入要编辑的时间块
- 拆分对话框:预填充选中的时间范围,保存后会自动处理冲突
- 所有对话框都从底部弹出,使用自定义样式
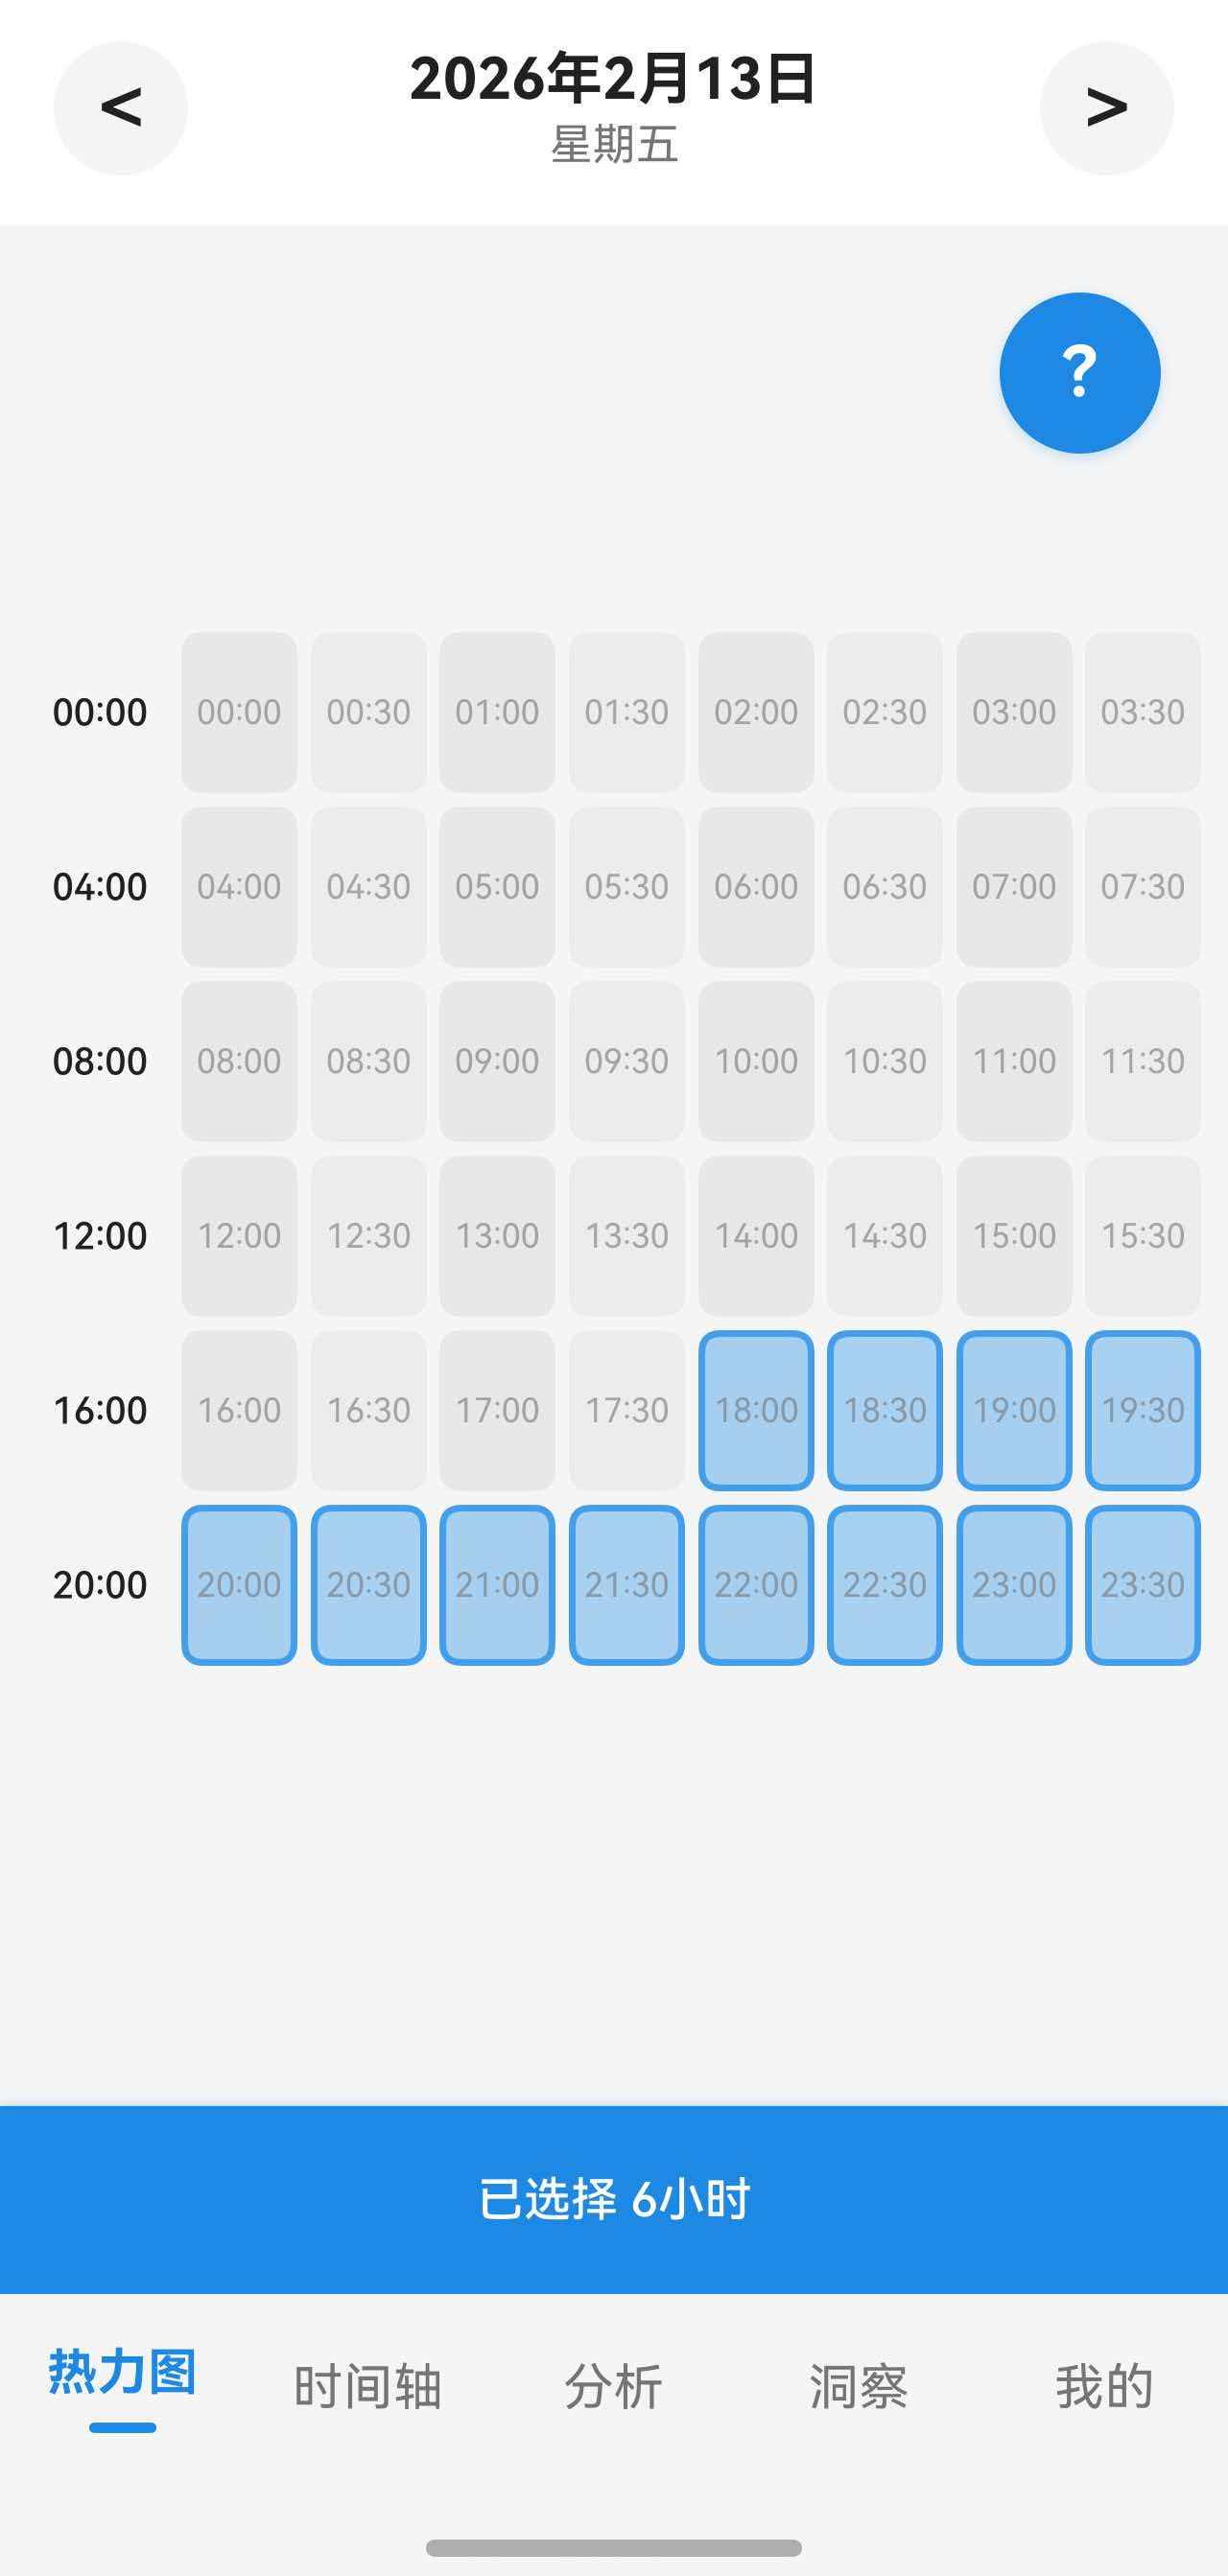
选中提示条
在底部显示选中状态:
typescript
@Builder
SelectionHint() {
  if (this.selectedCells.length > 0) {
    Row() {
      Text(`已选择 ${this.formatDuration(this.selectionDuration)}`)
        .fontSize(this.fs(14))
        .fontColor(Color.White)
        .fontWeight(FontWeight.Medium)
    }
    .width('100%')
    .height(56)
    .padding({ left: 16, right: 16 })
    .justifyContent(FlexAlign.Center)  // 文字居中
    .backgroundColor($r('app.color.primary_color'))
    .shadow({
      radius: 8,
      color: $r('app.color.primary_shadow'),
      offsetX: 0,
      offsetY: -2
    })
    .onClick(() => {
      // 点击整个提示条打开对话框
      this.openAddDialogWithSelection()
    })
  } else if (this.isDragging) {
    // 拖动模式提示
    Row() {
      Text('拖动中:继续滑动选择更多时间段')
        .fontSize(this.fs(14))
        .fontColor(Color.White)
        .fontWeight(FontWeight.Medium)
    }
    .width('100%')
    .height(56)
    .padding({ left: 16, right: 16 })
    .justifyContent(FlexAlign.Center)  // 文字居中
    .backgroundColor($r('app.color.accent_color'))
    .shadow({
      radius: 8,
      color: $r('app.color.primary_shadow'),
      offsetX: 0,
      offsetY: -2
    })
    .onClick(() => {
      // 点击取消拖动
      this.selectedCells = []
      this.selectionDuration = 0
      this.isDragging = false
      this.dragStartIndex = -1
    })
  }
}

// 格式化时长
private formatDuration(minutes: number): string {
  const hours = Math.floor(minutes / 60)
  const mins = minutes % 60
  if (hours > 0 && mins > 0) {
    return `${hours}小时${mins}分钟`
  } else if (hours > 0) {
    return `${hours}小时`
  } else {
    return `${mins}分钟`
  }
}
实现效果
日期导航实现
日期导航栏
typescript
@Builder
DateNavigator() {
  Row() {
    // 上一天按钮
    Button() {
      Row() {
        Text('<')
          .fontSize(this.fs(24))
          .fontColor($r('app.color.text_primary'))
          .fontWeight(FontWeight.Medium)
      }
      .width(40)
      .height(40)
      .justifyContent(FlexAlign.Center)
    }
    .backgroundColor($r('app.color.background_color'))
    .borderRadius(20)
    .padding(0)
    .onClick(() => {
      const newDate = new Date(this.currentDate)
      newDate.setDate(newDate.getDate() - 1)
      this.currentDate = newDate
      this.selectedCells = []
      this.selectionDuration = 0
      this.refreshData()
    })

    // 中间日期显示(可点击打开日期选择器)
    Column() {
      Text(DateUtils.formatDate(this.currentDate))
        .fontSize(this.fs(17))
        .fontWeight(FontWeight.Bold)
        .fontColor($r('app.color.text_primary'))

      Text(DateUtils.getWeekdayName(this.currentDate))
        .fontSize(this.fs(13))
        .fontColor($r('app.color.text_secondary'))
        .margin({ top: 2 })
    }
    .layoutWeight(1)
    .onClick(() => {
      this.openDatePicker()
    })

    // 下一天按钮
    Button() {
      Row() {
        Text('>')
          .fontSize(this.fs(24))
          .fontColor(this.isToday() ? $r('app.color.text_secondary') : $r('app.color.text_primary'))
          .fontWeight(FontWeight.Medium)
      }
      .width(40)
      .height(40)
      .justifyContent(FlexAlign.Center)
    }
    .backgroundColor($r('app.color.background_color'))
    .borderRadius(20)
    .padding(0)
    .enabled(!this.isToday())  // 如果是今天,禁用右箭头
    .opacity(this.isToday() ? 0.4 : 1.0)
    .onClick(() => {
      if (!this.isToday()) {
        const newDate = new Date(this.currentDate)
        newDate.setDate(newDate.getDate() + 1)
        this.currentDate = newDate
        this.selectedCells = []
        this.selectionDuration = 0
        this.refreshData()
      }
    })
  }
  .width('100%')
  .height(70)
  .padding({ left: 16, right: 16 })
  .justifyContent(FlexAlign.SpaceBetween)
  .backgroundColor($r('app.color.card_background'))
}
代码说明:
- 左右箭头切换日期
- 中间显示日期和星期,点击可以打开日期选择器
- 如果是今天,右箭头禁用(不能查看未来)
- 切换日期时清空选中状态
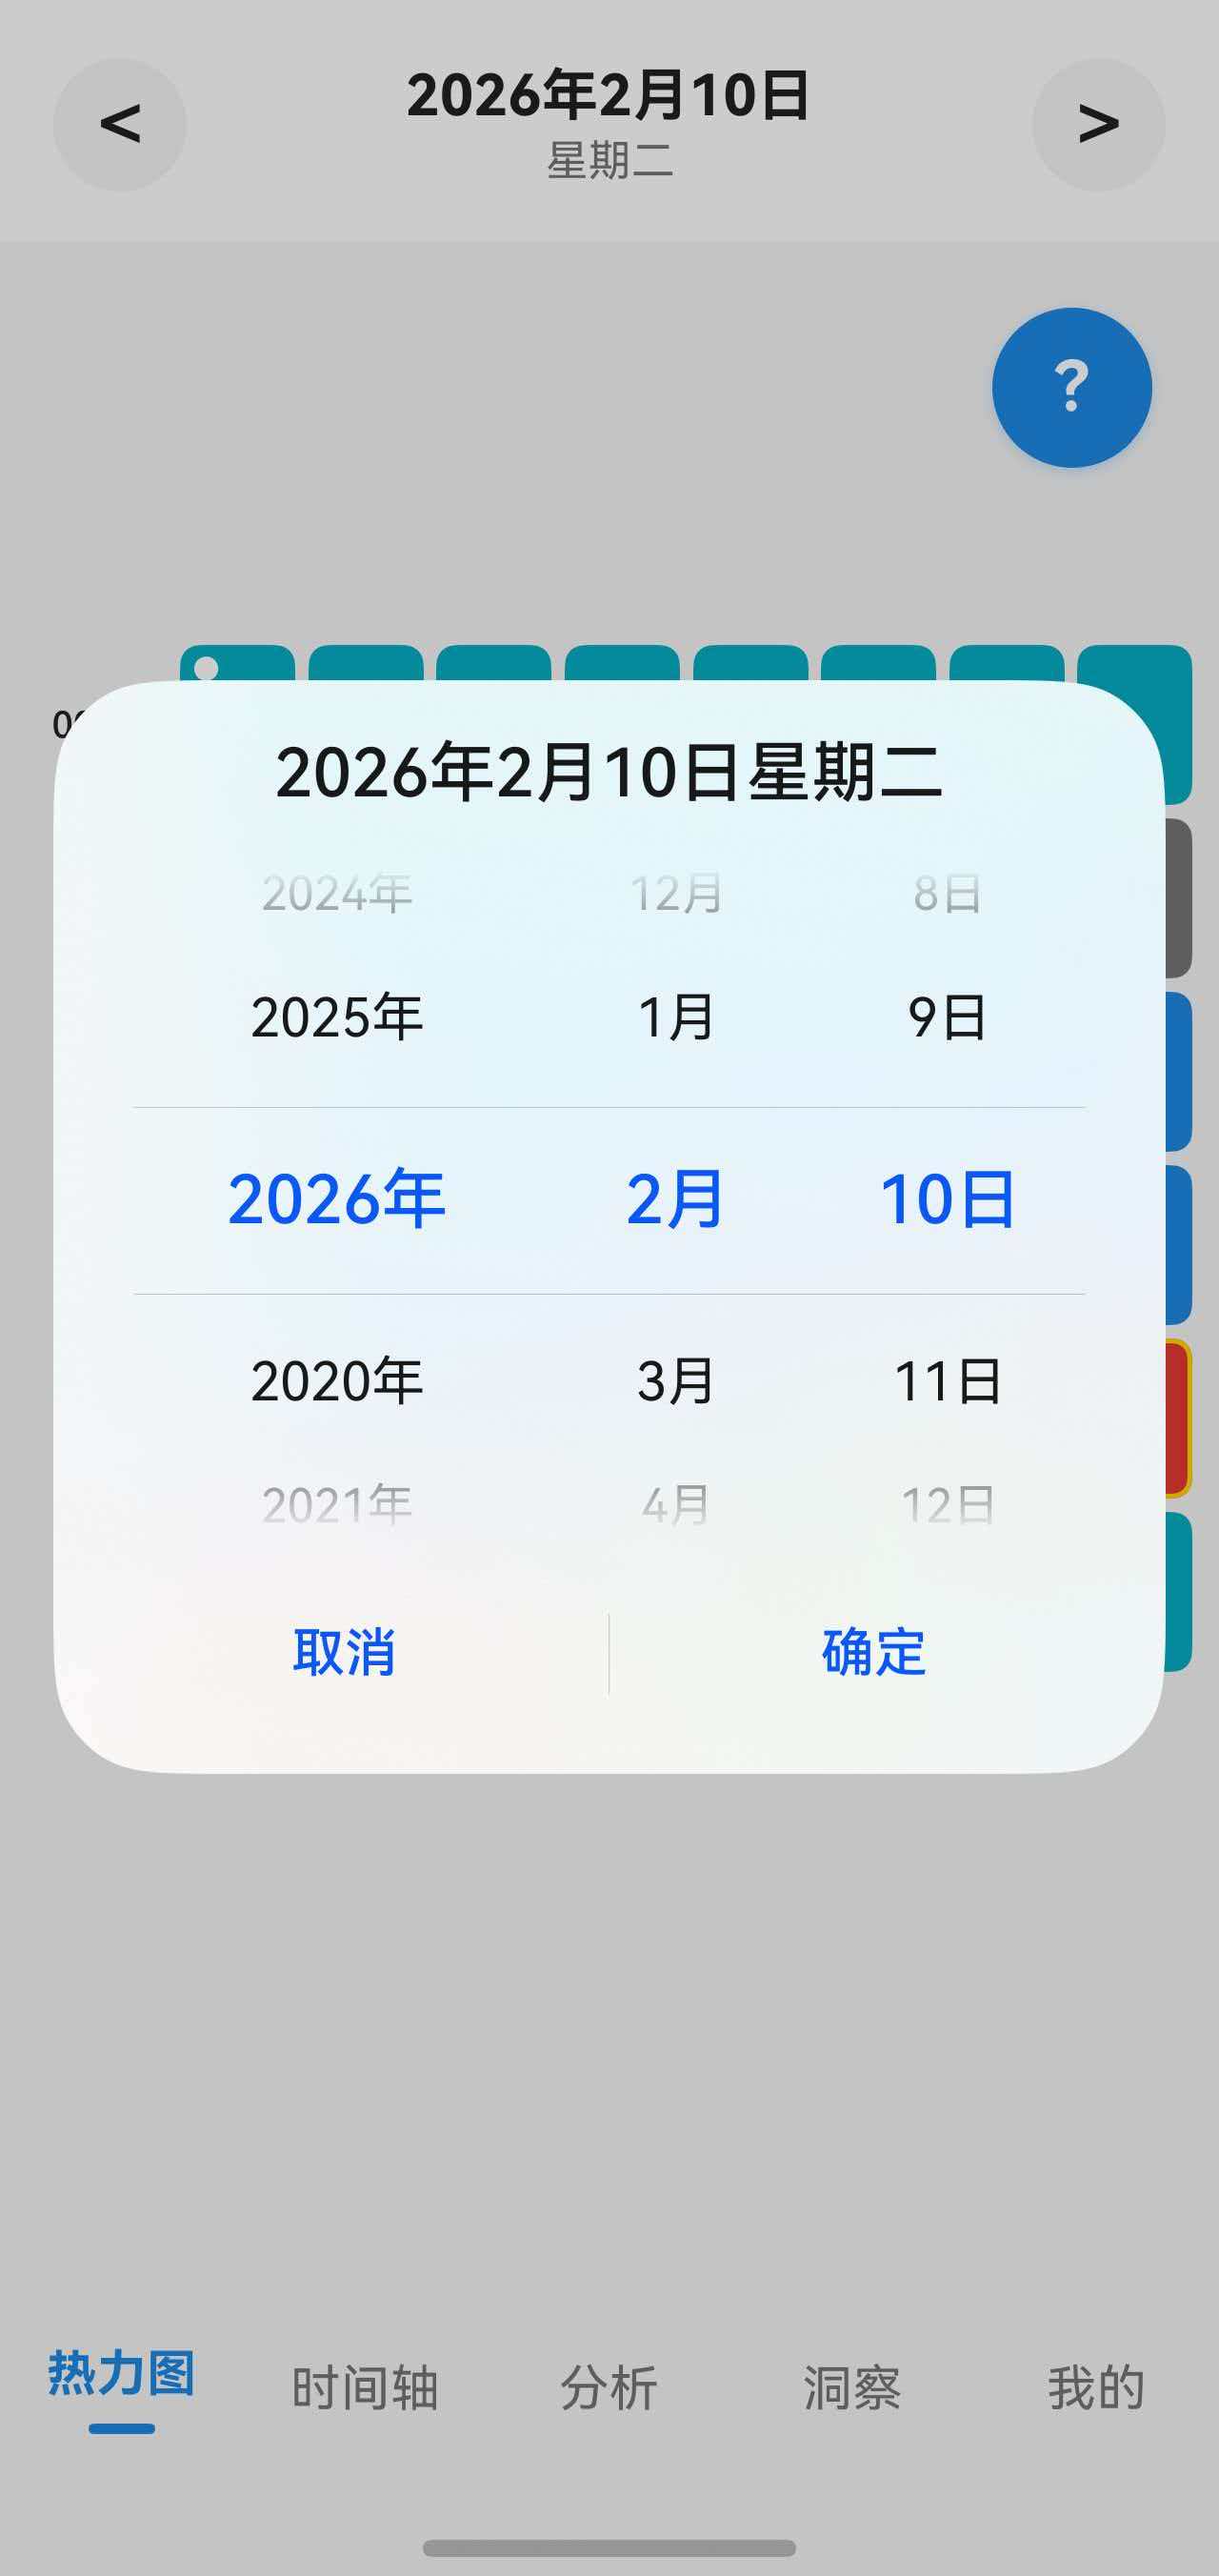
打开日期选择器
typescript
private openDatePicker(): void {
  const today = new Date()

  DatePickerDialog.show({
    start: new Date('2020-01-01'),  // 最早可选日期
    end: today,                      // 最晚可选日期(今天)
    selected: this.currentDate,      // 当前选中的日期
    lunar: false,                    // 不显示农历
    onAccept: (value: DatePickerResult) => {
      // 类型检查:确保 year、month、day 都存在
      if (value.year === undefined || value.month === undefined || value.day === undefined) {
        return
      }

      // DatePickerResult 的 month 已经是 0-11,直接使用即可
      const selectedDate = new Date(value.year, value.month, value.day)
      selectedDate.setHours(0, 0, 0, 0)

      // 双重检查:不允许选择未来日期
      const todayEnd = new Date(today)
      todayEnd.setHours(23, 59, 59, 999)

      if (selectedDate > todayEnd) {
        promptAction.showToast({
          message: '不能选择未来的日期哦 📅',
          duration: 2000
        })
        return
      }

      this.currentDate = selectedDate
      this.selectedCells = []
      this.selectionDuration = 0
      this.refreshData()
    }
  })
}
代码说明:
- 使用系统提供的
DatePickerDialog - 限制日期范围:2020-01-01 到今天
- 双重检查防止选择未来日期
- 选择日期后清空选中状态并刷新数据
实现效果
数据刷新机制
刷新数据
typescript
private async refreshData(): Promise<void> {
  // 重新加载活动标签(可能有新增的自定义标签)
  this.activityTags = await this.activityTagRepository.findAll()

  // 重新加载时间块
  this.timeBlocks = await this.timeBlockManager.getTimeBlocksByDate(this.currentDate)

  // 重新生成时间单元格
  this.generateTimeCells()

  // 确保数据库更新完全完成后再通知其他页面刷新数据
  setTimeout(() => {
    AppStorage.setOrCreate('needRefreshAnalysis', Date.now())
    AppStorage.setOrCreate('needRefreshProfile', Date.now())
  }, 50)

  // 滚动到顶部
  setTimeout(() => {
    this.scroller.scrollTo({ xOffset: 0, yOffset: 0, animation: false })
  }, 100)
}
代码说明:
- 重新加载活动标签和时间块数据
- 重新生成时间单元格
- 通知其他页面刷新(使用 AppStorage)
- 滚动到顶部
监听刷新信号
typescript
// 监听刷新标志
onNeedRefresh(): void {
  if (this.needRefreshTimeline > 0) {
    this.refreshData()
  }
}

// 页面显示时刷新数据(从其他页面返回时会触发)
onPageShow(): void {
  this.refreshData()
}
代码说明:
onNeedRefresh():当needRefreshTimeline变化时自动调用onPageShow():页面显示时调用,确保数据是最新的
完整的 build 方法
typescript
build() {
  Stack() {
    // 主内容
    Column() {
      // 日期导航栏
      this.DateNavigator()

      // 加载状态或内容
      if (this.isLoading) {
        Column() {
          LoadingProgress()
            .width(40)
            .height(40)
            .color($r('app.color.primary_color'))

          Text('加载中...')
            .fontSize(this.fs(14))
            .fontColor($r('app.color.text_secondary'))
            .margin({ top: 12 })
        }
        .width('100%')
        .layoutWeight(1)
        .justifyContent(FlexAlign.Center)
      } else {
        this.GridTimeline()
      }
    }
    .width('100%')
    .height('100%')
    .backgroundColor($r('app.color.background_color'))

    // 选中提示条(固定在底部)
    Column() {
      this.SelectionHint()
    }
    .width('100%')
    .position({ x: 0, y: '100%' })
    .translate({ x: 0, y: -56 })  // 向上偏移 56vp(SelectionHint 的高度)

    // 浮动帮助按钮(右上角,使用说明隐藏时显示)
    if (!this.showGuide) {
      Button() {
        Text('?')
          .fontSize(this.fs(20))
          .fontWeight(FontWeight.Bold)
          .fontColor(Color.White)
      }
      .width(48)
      .height(48)
      .borderRadius(24)
      .backgroundColor($r('app.color.primary_color'))
      .position({ x: '100%', y: 70 })  // y: 70 是 DateNavigator 的高度
      .translate({ x: -68, y: 20 })    // 距离右边 20vp,距离 DateNavigator 底部 20vp
      .shadow({
        radius: 12,
        color: $r('app.color.primary_shadow'),
        offsetX: 0,
        offsetY: 4
      })
      .onClick(() => {
        this.showGuideDialog()
      })
    }
  }
  .width('100%')
  .height('100%')
}
代码说明:
-
Stack 布局:
- 使用 Stack 实现多层布局
- 底层是主内容(Column)
- 中层是选中提示条(固定在底部)
- 顶层是浮动帮助按钮(固定在右上角)
-
主内容 Column:
- 顶部固定显示日期导航栏
- 根据
isLoading状态显示加载动画或网格内容 - 占据整个屏幕高度
-
选中提示条的固定定位:
typescriptColumn() { this.SelectionHint() } .width('100%') .position({ x: 0, y: '100%' }) // 定位到父容器底部 .translate({ x: 0, y: -56 }) // 向上偏移 56vpposition({ x: 0, y: '100%' }):将元素定位到父容器的底部边缘translate({ x: 0, y: -56 }):向上偏移 56vp(SelectionHint 的高度),让它完全显示在屏幕内- 这样 SelectionHint 就固定在屏幕底部,不会被内容遮挡
-
浮动帮助按钮:
- 使用
position和translate固定在右上角 - 只有当使用说明隐藏时才显示
- 使用
参考资料
- HarmonyOS 官方文档 - Grid
- HarmonyOS 官方文档 - TapGesture
- HarmonyOS 官方文档 - LongPressGesture
- HarmonyOS 官方文档 - PanGesture
- HarmonyOS 官方文档 - PinchGesture
- HarmonyOS 官方文档 - RotationGesture
- HarmonyOS 官方文档 - SwipeGesture
感谢阅读! 如果您发现本文有任何问题,欢迎在下方指正!欢迎大家在下方留言!