文章目录
- 1.脚本
-
- [1.1 脚本功能简介](#1.1 脚本功能简介)
-
- [1.1.1 脚本编辑界面介绍](#1.1.1 脚本编辑界面介绍)
- [1.1.2 脚本中方法的执行顺序](#1.1.2 脚本中方法的执行顺序)
- [1.2 脚本基础接口介绍](#1.2 脚本基础接口介绍)
-
- [1.2.1 脚本接口-数据输入输出支持类型介绍](#1.2.1 脚本接口-数据输入输出支持类型介绍)
- [1.2.2 脚本接口-数据输入输出接口(int、float、string)](#1.2.2 脚本接口-数据输入输出接口(int、float、string))
- [1.2.3 脚本接口-数据输入输出接口(byte、Imagedata)](#1.2.3 脚本接口-数据输入输出接口(byte、Imagedata))
- [1.2.4 420新增接口](#1.2.4 420新增接口)
- [1.3 脚本接口-全局变量、模块控制接口](#1.3 脚本接口-全局变量、模块控制接口)
- [1.4 脚本接口-通信发送数据接口](#1.4 脚本接口-通信发送数据接口)
- 2.全局脚本
-
- [2.1 全局脚本功能简介](#2.1 全局脚本功能简介)
-
- [2.1.1 全局脚本界面介绍](#2.1.1 全局脚本界面介绍)
- [2.1.2 全局脚本中方法执行顺序](#2.1.2 全局脚本中方法执行顺序)
- [2.1.3 全局脚本中方法-Process()](#2.1.3 全局脚本中方法-Process())
- [2.2 全局脚本接口-全局变量相关接口](#2.2 全局脚本接口-全局变量相关接口)
- [2.3 全局脚本接口-全局脚本连续运行时间获取/设置接口](#2.3 全局脚本接口-全局脚本连续运行时间获取/设置接口)
- [2.4 全局脚本接口-通信相关接口(通信接收事件)](#2.4 全局脚本接口-通信相关接口(通信接收事件))
- [2.5 全局脚本接口-通信相关接口(发送数据)](#2.5 全局脚本接口-通信相关接口(发送数据))
- [2.6 全局脚本接口-3.X二次开发SDK回调](#2.6 全局脚本接口-3.X二次开发SDK回调)
-
- [2.6.1 全局脚本接口-3.X二次开发SDK其他接口](#2.6.1 全局脚本接口-3.X二次开发SDK其他接口)
- 3.使用VS调试代码
-
- [3.1 使用VS调试脚本或全局脚代码](#3.1 使用VS调试脚本或全局脚代码)
-
- [3.1.1 脚本调试](#3.1.1 脚本调试)
- [3.1.2 全局脚本调试](#3.1.2 全局脚本调试)
- [3.1.3 使用VS调试脚本或全局脚代码](#3.1.3 使用VS调试脚本或全局脚代码)
- [3.2 第三方库调用方法](#3.2 第三方库调用方法)
-
- [3.2.1 脚本和全局脚本调用第三方库](#3.2.1 脚本和全局脚本调用第三方库)
- 3.2.2 脚本和全局脚本中直接引用C#库的方法
- [3.3 脚本全局脚本问题排查方法](#3.3 脚本全局脚本问题排查方法)
-
- [3.3.1 try catch+VS断点调试。](#3.3.1 try catch+VS断点调试。)
- [3.3.2 try catch+MessageBox弹窗](#3.3.2 try catch+MessageBox弹窗)
- [3.3.3 try catch+DebugView](#3.3.3 try catch+DebugView)
- 4.脚本/全局脚本案例
-
- [4.1 脚本案例](#4.1 脚本案例)
- [4.2 全局脚本案例](#4.2 全局脚本案例)
-
- [4.2.1 模块参数配置](#4.2.1 模块参数配置)
- [4.2.2 模块输入参数](#4.2.2 模块输入参数)
- [4.2.3 通信接收](#4.2.3 通信接收)
- [4.3 顺序执行流程---功能实现演示](#4.3 顺序执行流程---功能实现演示)
-
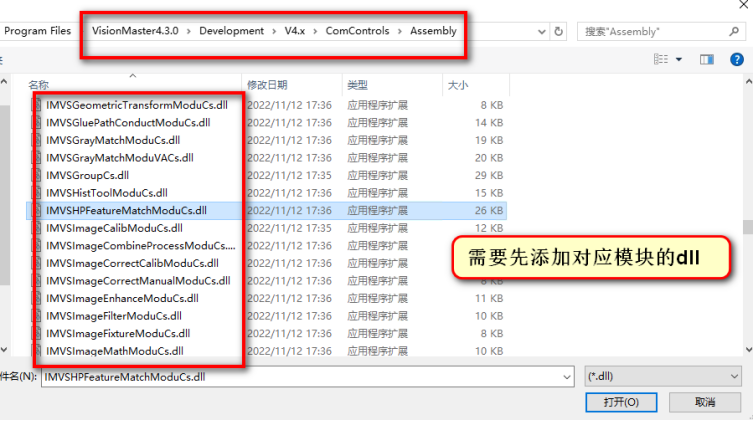
- [4.3.1 添加流程和引用](#4.3.1 添加流程和引用)
- [4.3.2 代码说明](#4.3.2 代码说明)
- [4.4 常用接口代码](#4.4 常用接口代码)
-
- [4.4.1 流程执行](#4.4.1 流程执行)
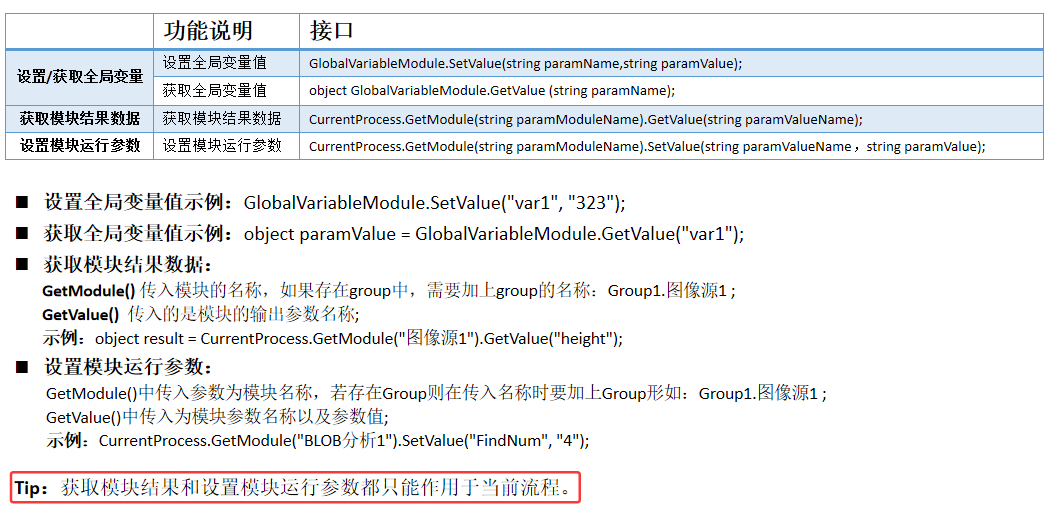
- [4.4.2 获取模块结果](#4.4.2 获取模块结果)
- [4.4.3 获取流程状态](#4.4.3 获取流程状态)
- [4.4.4 设置模块参数](#4.4.4 设置模块参数)
- [4.4.5 操作方案](#4.4.5 操作方案)
- [4.4.6 操作全局变量](#4.4.6 操作全局变量)
- 5.脚本和全局脚本使用注意事项
- 6.补充资料
1.脚本
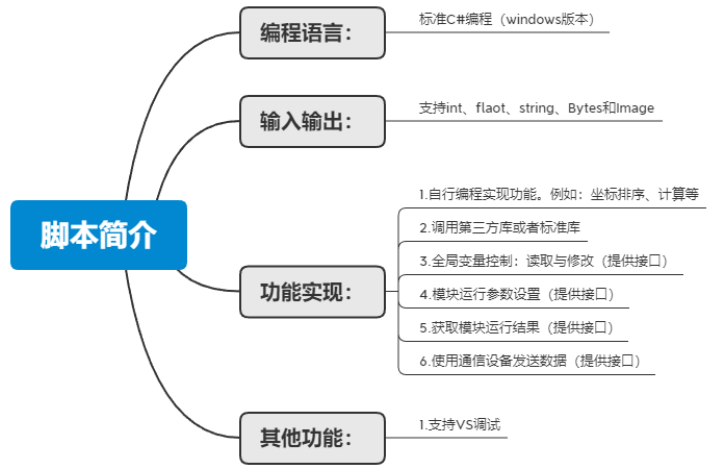
1.1 脚本功能简介
1.在VM中,脚本作为一个模块在VM流程中存在,使用C#编程,可在VS进行代码的编写、调试。
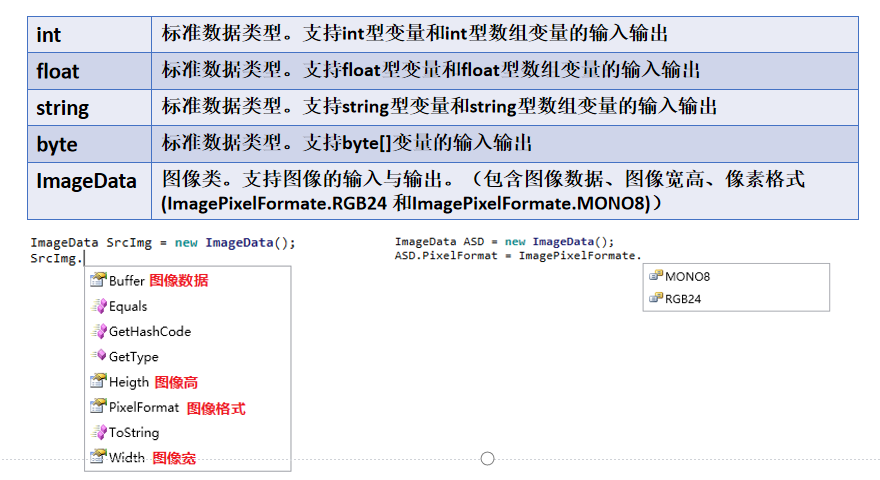
2.支持int 、 flaot 、 string 、 Bytes 和Image 五种数据类型的输入输出。
3.在脚本中,可自行实现功能,也可调用第三方库。除了对数据的处理外,还可在脚本中对VM全局变量获取和设置、模块的运行参数设置,也可在脚本中调用通信设备发送数据等。
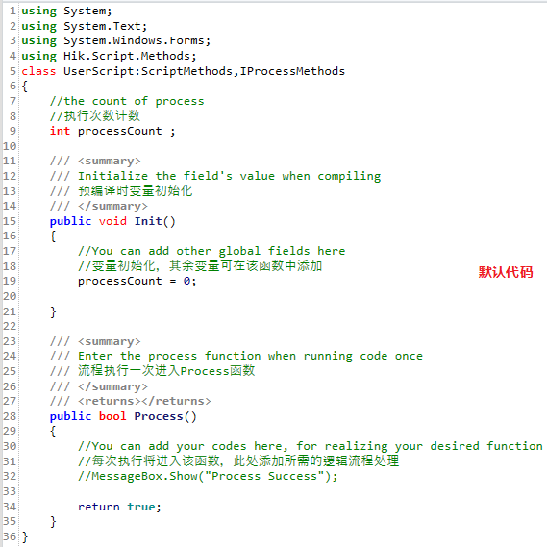
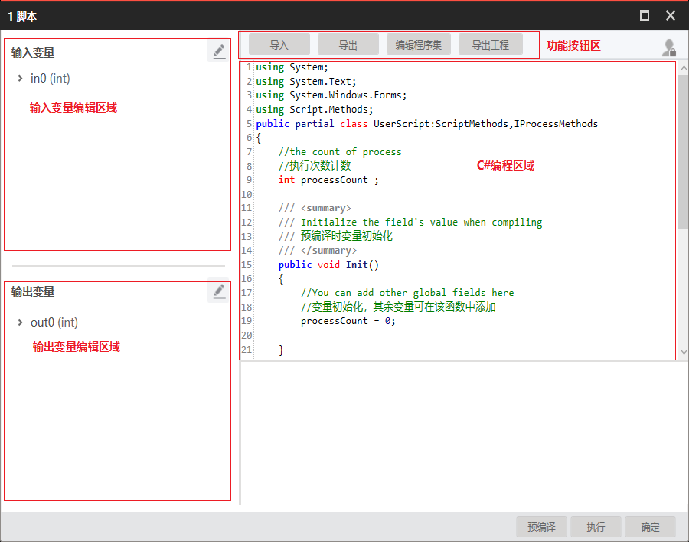
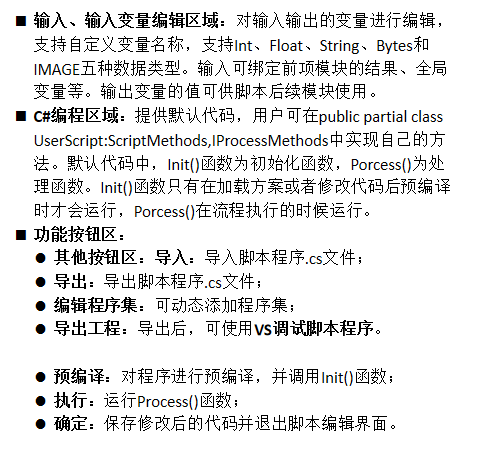
1.1.1 脚本编辑界面介绍
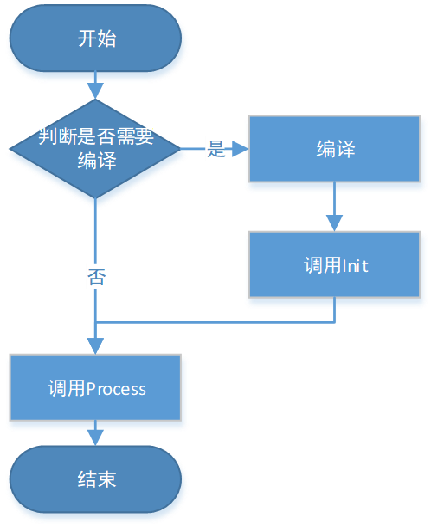
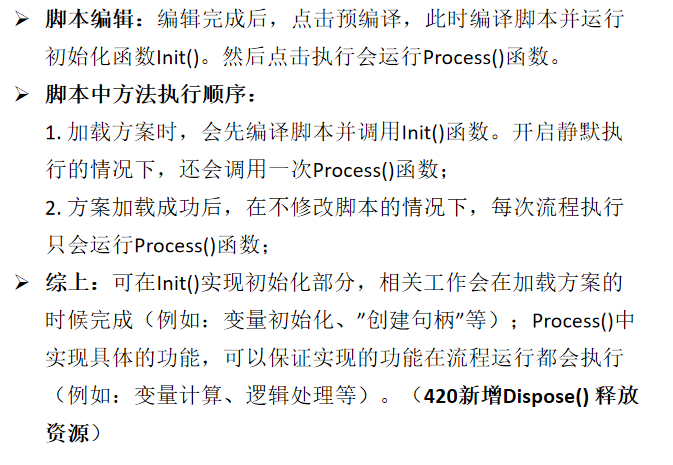
1.1.2 脚本中方法的执行顺序
1.2 脚本基础接口介绍
1.2.1 脚本接口-数据输入输出支持类型介绍
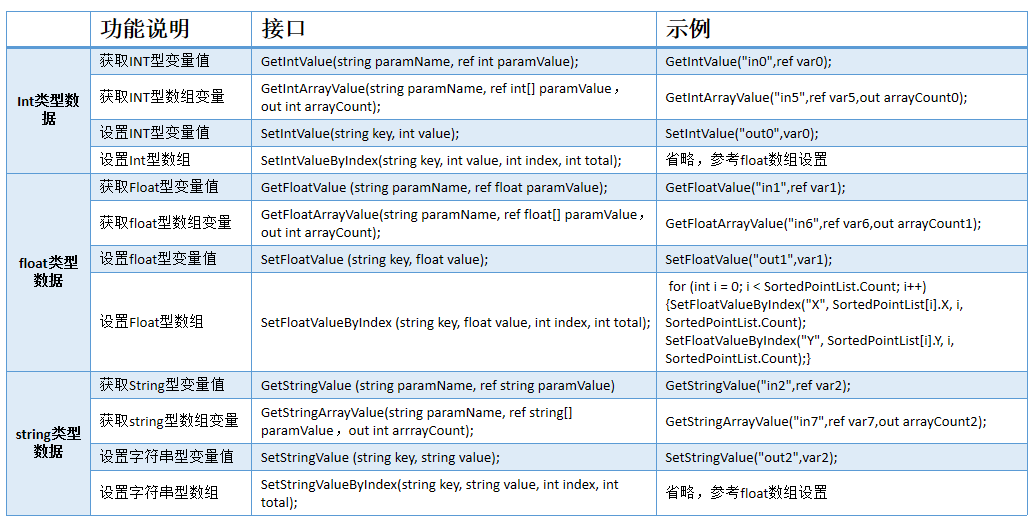
1.2.2 脚本接口-数据输入输出接口(int、float、string)
1.2.3 脚本接口-数据输入输出接口(byte、Imagedata)

1.2.4 420新增接口
输出int、float、string数组,优化之前接口需要使用循环的方式。


1.3 脚本接口-全局变量、模块控制接口
1.4 脚本接口-通信发送数据接口

2.全局脚本
2.1 全局脚本功能简介
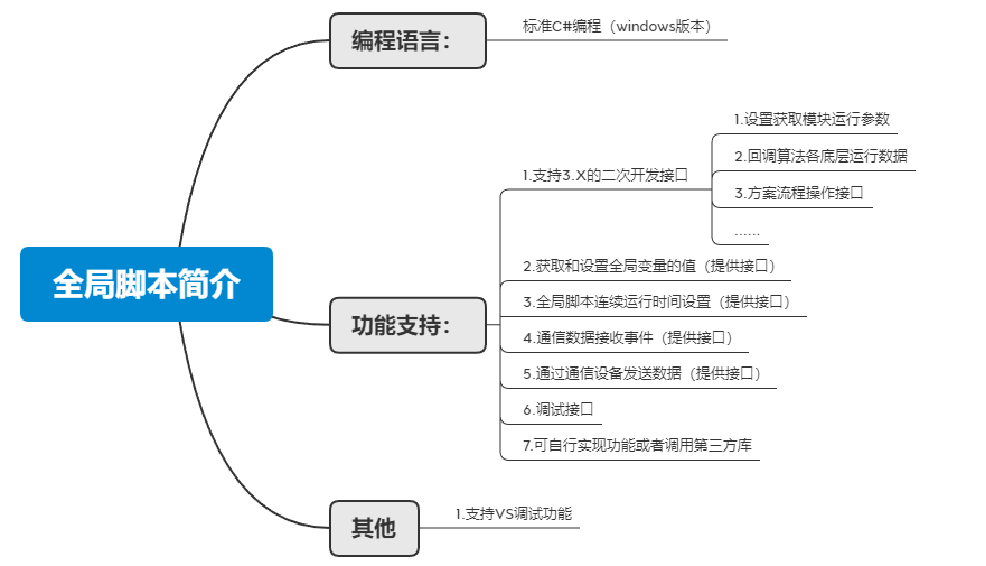
在VM中,全局脚本作为VM的全局资源,使用C#编程,支持调用3.X版本的C#接口,可用于多流程的逻辑控制。
支持全局变量参数的获取与修改,支持接收通信数据,支持获取或修改模块参数,支持获取流程或模块运行状态和结果等。
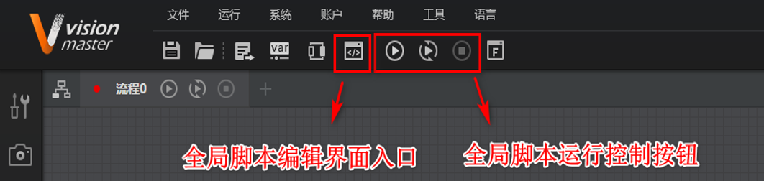
2.1.1 全局脚本界面介绍
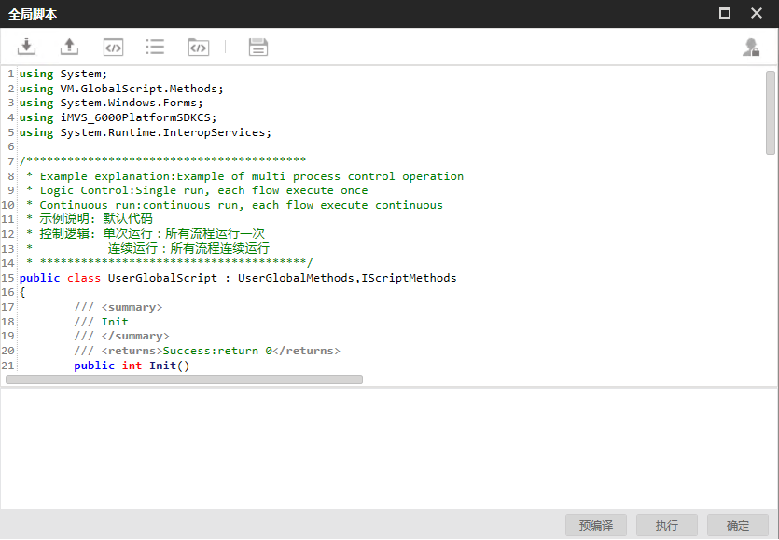
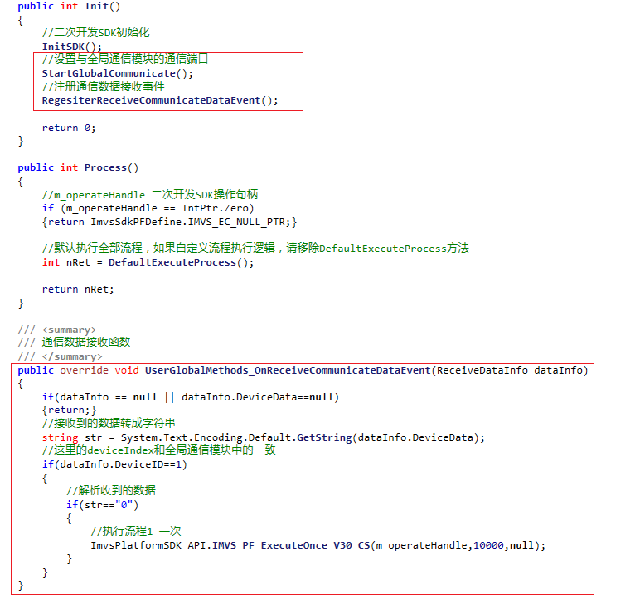
预编译 :编译程序,执行Init()函数;
执行 :运行Process()函数;
确定:保存修改后的代码并退出脚本编辑界面。
2.1.2 全局脚本中方法执行顺序
| 方法 | 功能及执行顺序描述 |
|---|---|
| public int Init(){} | 初始化函数,会在加载方案或者编译时执行。可在此方法中实现初始化相关操作。 |
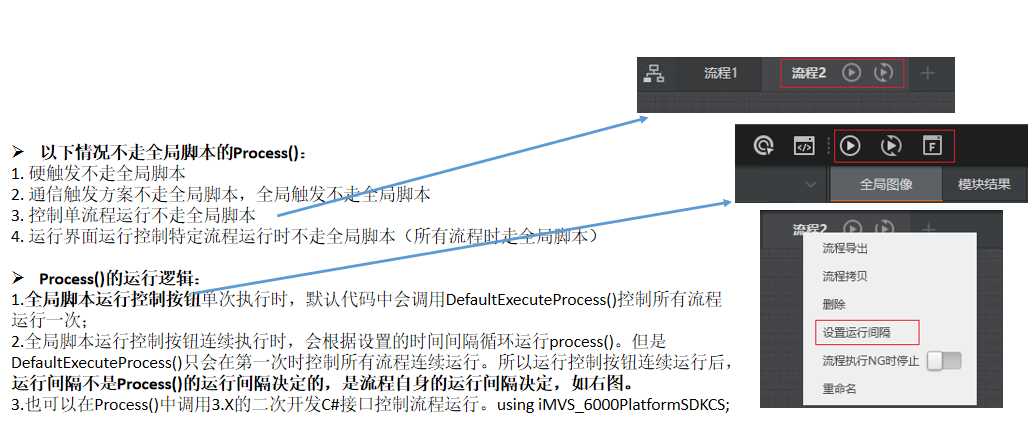
| public int Process(){} | 运行函数为主界面上运行控制按钮执行的函数,单次执行则执行一次Process()函数,连续运行则以一定时间间隔重复执行Process()函数 |
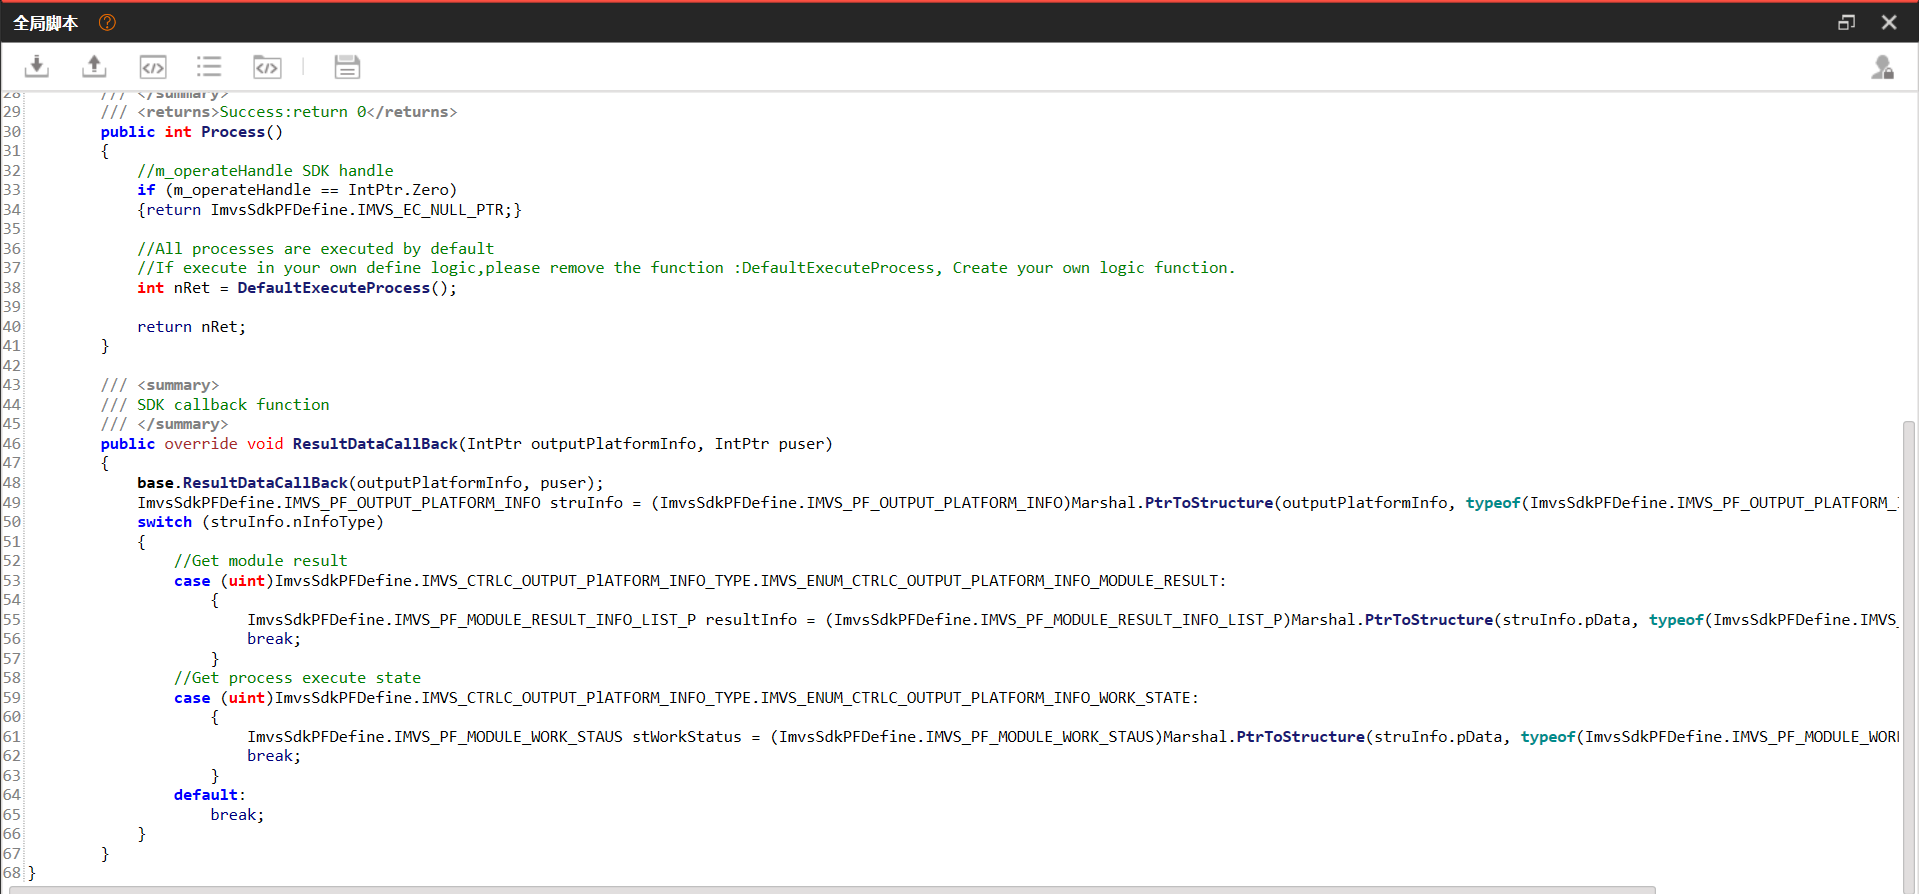
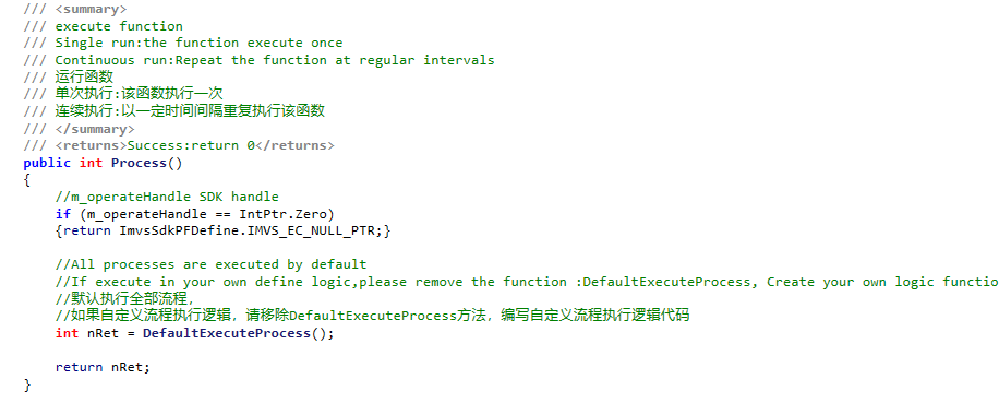
2.1.3 全局脚本中方法-Process()

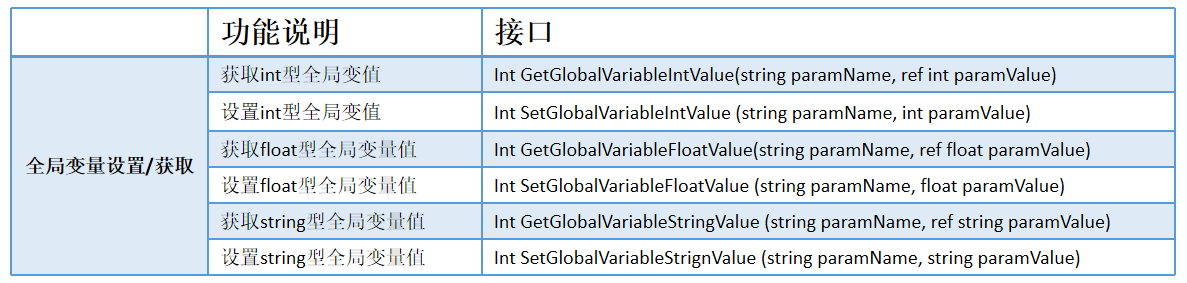
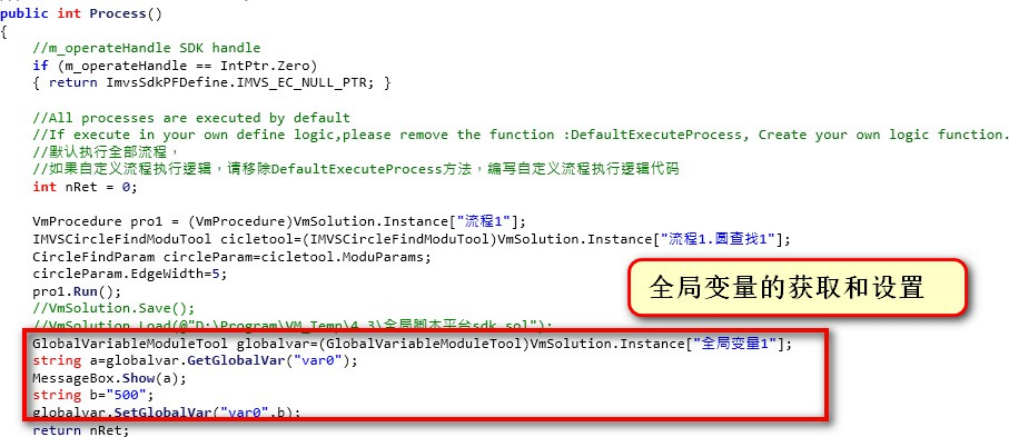
2.2 全局脚本接口-全局变量相关接口
在全局脚本中,设置全局全量和获取全局变量的值,接口都很简单,不再赘述。
2.3 全局脚本接口-全局脚本连续运行时间获取/设置接口
用于设置连续运行时,Process的运行时间间隔。直接调用即可使用。

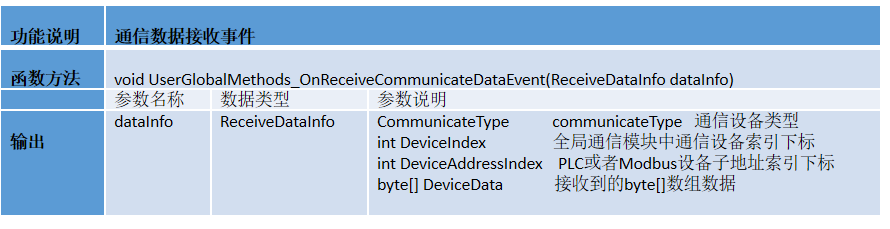
2.4 全局脚本接口-通信相关接口(通信接收事件)
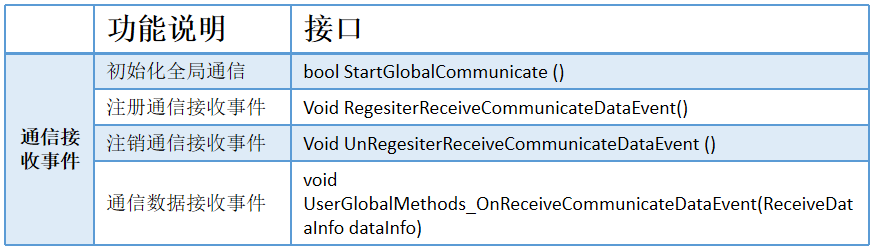
用于接收通信设备收到的通信数据,并自动进入回调函数。可以实现的功能如下:
1).全局脚本中接收到通信回调数据后对通信数据进行分析处理,并控制实现执行指定的动作;(如右图示例,接收到字符串等于"0",控制流程运行一次)
2).未其他功能的实现提供了灵活的方式。
2.5 全局脚本接口-通信相关接口(发送数据)
具体使用可参考脚本使用通信发送数据接口。

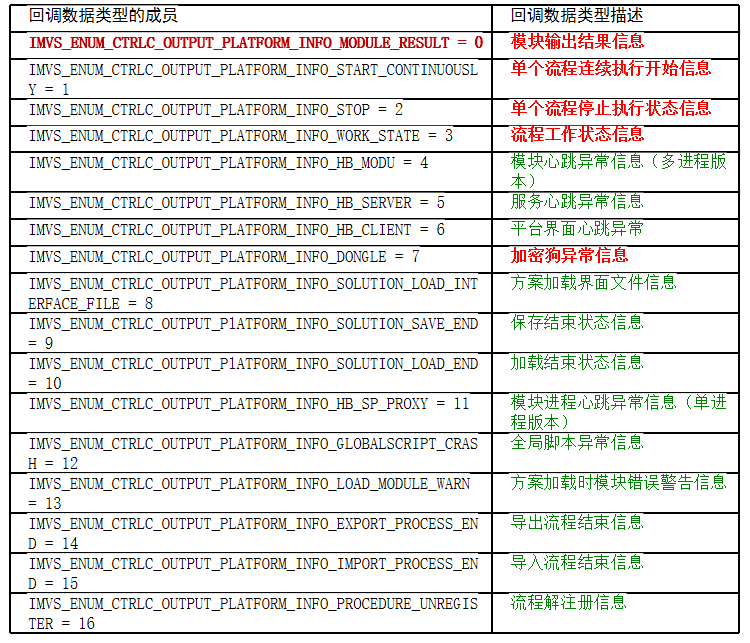
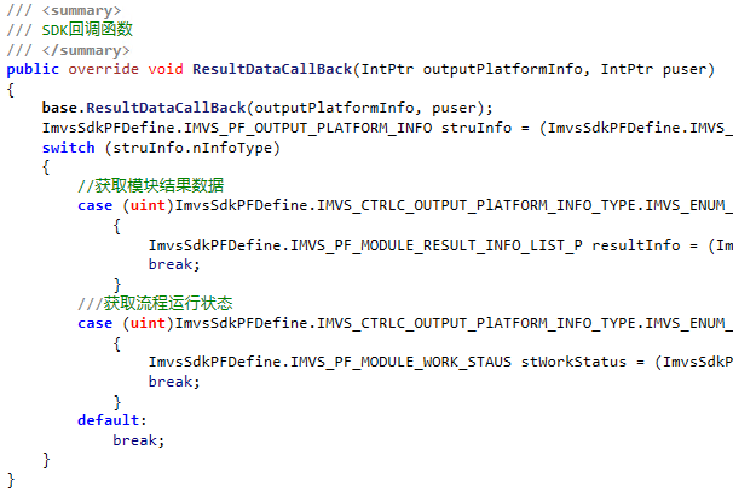
2.6 全局脚本接口-3.X二次开发SDK回调
采用的是IMVS_PF_RegisterResultCallBack_P_CS()回调,详细内容见3.X二次开发手册。回调的相关信息如下:
2.6.1 全局脚本接口-3.X二次开发SDK其他接口
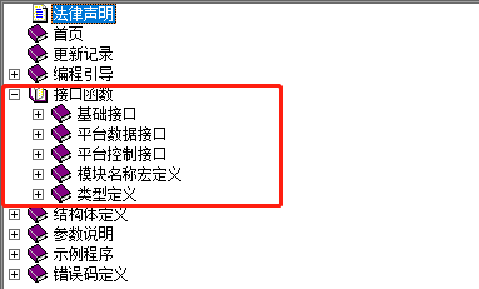
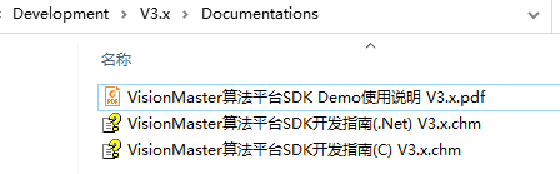
3.X版本SDK开发手册路径:D:\software\VisionMaster4.0.0\Development\V3.x\Documentations
VisionMaster4.3及其以上版本没有此文件。
3.使用VS调试代码
脚本和全局脚本支持使用VS调试,VS支持VS2013及以上版本。下面讲述使用VS调试的详细步骤,部分步骤区分脚本和全局脚本。
3.1 使用VS调试脚本或全局脚代码
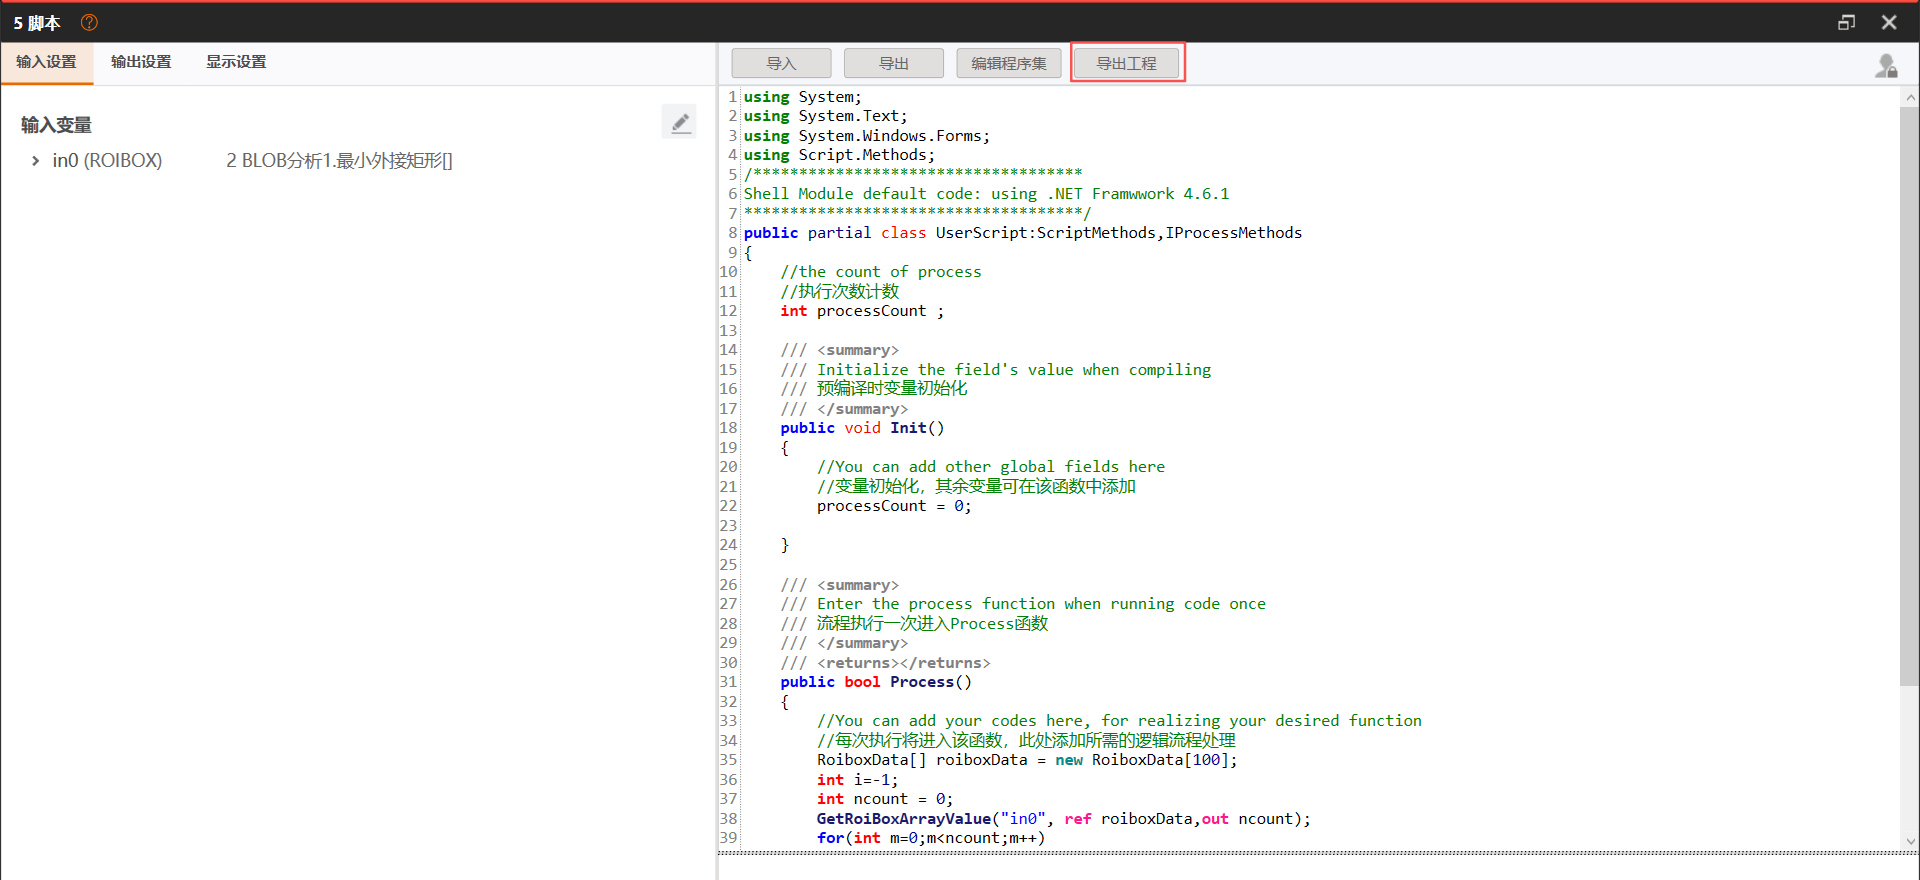
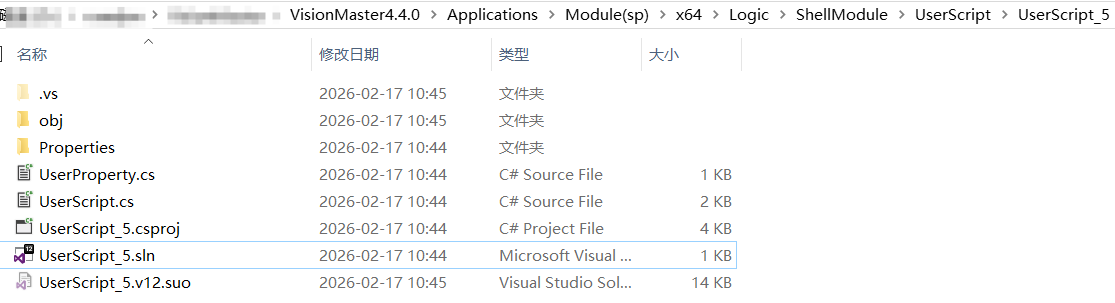
步骤一 :使用VS2013以上的版本打开脚本或者全局脚本工程;
脚本 :在界面的"导出工程"导出脚本程序,然后.sln文件右键使用VisualStudio打开。
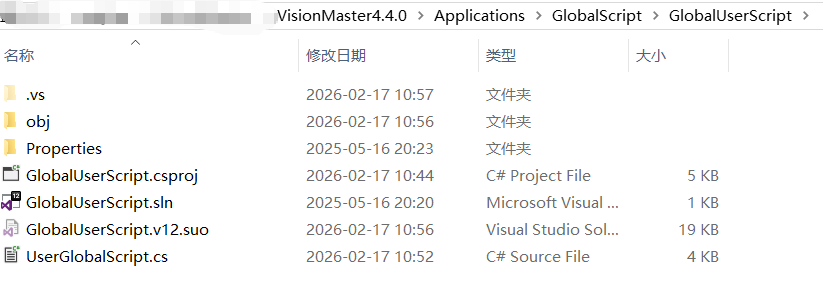
全局脚本 :点击工程目录按钮,选择.sln文件右键使用VisualStudio打开
步骤二:使用VS2013以上的版本打开脚本或者全局脚本工程;
步骤三:调试选项中左键点击附加到进程,即可进行VS修改和调试;
3.1.1 脚本调试
脚本:在VS界面上方调试选项中左键点击附加到进程,在可用进程选项中寻找ShellModuleManager.exe 附加到程序中。由于方案中可能存在多个脚本模块因此需使用任务管理器确定脚本模块的PID,找到对应的进程附加到程序中,如下图所示为任务管理器命令行中模块序号以及其对应PID;

根据模块序号以及其PID找到对应的进程,点击附加按钮,如下图所示:

3.1.2 全局脚本调试
全局脚本 :调试选项中左键点击附加到进程,在可用进程选项中寻找GlobalScript.exe点击右下角附加按钮,如下图所示;

3.1.3 使用VS调试脚本或全局脚代码
在打开的VS工程中,设置断点。点击VM上方的单次运行并查看VS中是否运行进入断点,如下图所示:

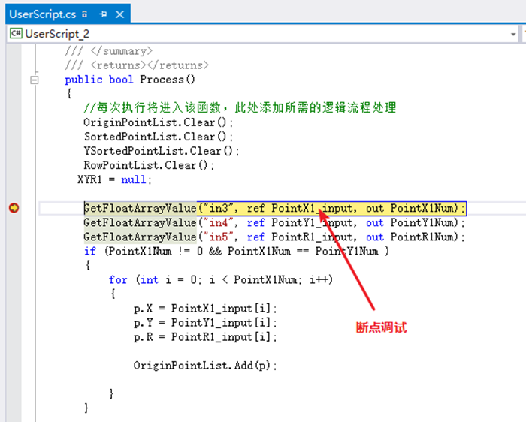
在VS中对脚本的代码进行修改和调试 。
1).点击停止调试,在VS中修改代码后,重新生成即可将修改后的代码同步到VM中。
2).需要继续进行调试时,需要在VS中重新选择附加到进程。不能直接点击启动。
3.2 第三方库调用方法
3.2.1 脚本和全局脚本调用第三方库
1.调用非托管库,C++库示例 :
调用非托管库跟C#调用非托管库一样,脚本代码就是标准的C#程序。
C#不能直接调用C++库,因此C/C++动态库一律通过导出C接口的方式,让C#调用。下面是C#调用时候声明的代码,需要引用System.Runtime.InteropServices程序集。
csharp
using System.Runtime.InteropServices;
class UserScript:ScriptMethods,IProcessMethods
{
    [DllImport("ShellRTestAPI.dll", EntryPoint = "fnShellRTestAPI_GetValue")]
    public static extern int fnShellRTestAPI_GetValue();
    [DllImport("ShellRTestAPI.dll", EntryPoint = "fnShellRTestAPI_Add")]
    public static extern int fnShellRTestAPI_Add(int nValueFirst, int nValueSecond);
    public void Init()
    {  processCount = 0;}
    public bool Process()
    {  int nTemp = fnShellRTestAPI_Add(111, 888);
       SetIntValue("var1_Output", nTemp);
       return true;}
}
3.2.2 脚本和全局脚本中直接引用C#库的方法
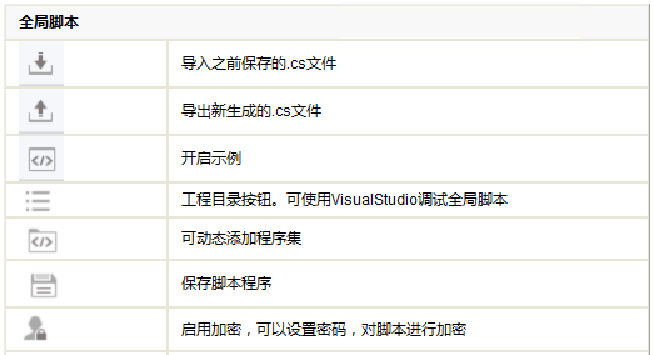
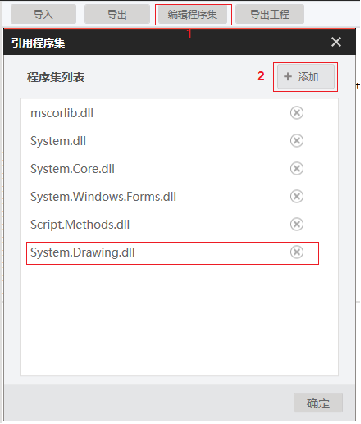
1.点击程序集按钮进入引用程序集界面,如下图所示。
2.点击下角添加按钮根据需求进行程序集动态添加,仅支持C#程序集添加,到需要的第三方程序集路径下找到想要添加的.dll,点击打开即可添加,添加完成后在脚本或者全局脚本中调用即可。
3.3 脚本全局脚本问题排查方法
在现场实际使用的过程中,经常会反馈脚本模块状态为0的情况,这一般是脚本中调用的函数执行异常导致。

3.3.1 try catch+VS断点调试。
如下图,可以在Exception e中看到详细的异常信息

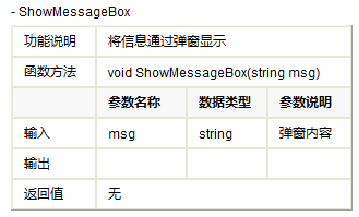
3.3.2 try catch+MessageBox弹窗
将错误信息通过弹窗显示
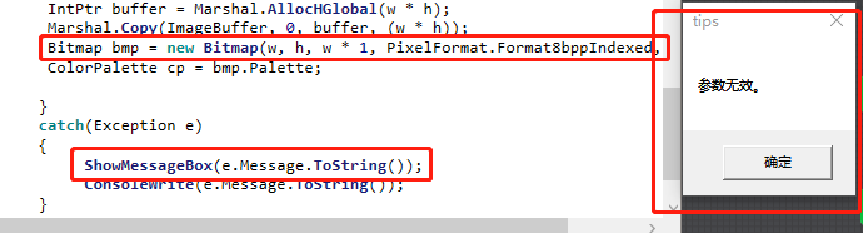
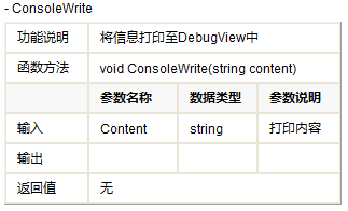
3.3.3 try catch+DebugView
将错误信息打印至DebugView中

4.脚本/全局脚本案例
4.1 脚本案例
4.2 全局脚本案例
全局脚本应用案例:
1.VM430版本是兼容3.x版本的二次开发接口,
2.也兼容4.x版本的二次开发接口。示例代码存在路径为:
...\VisionMaster4.3.0\Applications\GlobalScript\Samples\CH
4.2.1 模块参数配置
csharp
using System;
using System.Windows.Forms;
using System.Runtime.InteropServices;
using System.Collections;
using VM.GlobalScript.Methods;
using iMVS_6000PlatformSDKCS;
using VM.Core;
using VM.PlatformSDKCS;
using ImageSourceModuleCs;
using IMVSFastFeatureMatchModuCs;
using System.Collections.Generic;


/*****************************************
 * Example explanation:Example of multi process control operation
 * Logic Control:Single run, each flow execute once
 * Continuous run:continuous run, each flow execute continuous
 * 示例说明: 获取流程对象,模块对象,设置参数,运行,获取结果
 * ***************************************/
public class UserGlobalScript : UserGlobalMethods, IScriptMethods
{
    /// <summary>
    /// Init
    /// </summary>
    /// <returns>Success:return 0</returns>
    public int Init()
    {
        //SDK init
        return InitSDK();
    }

    /// <summary>
    /// execute function
    /// Single run:the function execute once
    /// Continuous run:Repeat the function at regular intervals
    /// 运行函数
    /// 单次执行:该函数执行一次
    /// 连续执行:以一定时间间隔重复执行该函数
    /// </summary>
    /// <returns>Success:return 0</returns>
    public int Process()
    {
        //m_operateHandle SDK handle
        if (m_operateHandle == IntPtr.Zero)
        { return ImvsSdkPFDefine.IMVS_EC_NULL_PTR; }

        //All processes are executed by default
        //If execute in your own define logic,please remove the function :DefaultExecuteProcess, Create your own logic function.
        //默认执行全部流程,
        //如果自定义流程执行逻辑,请移除DefaultExecuteProcess方法,编写自定义流程执行逻辑代码
        int nRet = 0;

        IMVSFastFeatureMatchModuTool fastFeatureTool = (IMVSFastFeatureMatchModuTool)VmSolution.Instance["流程1.快速匹配1"];
        VmProcedure pro1 = (VmProcedure)VmSolution.Instance["流程1"];
        if (fastFeatureTool != null)
        {
            FastFeatureMatchParam matchParam = fastFeatureTool.ModuParams;
            if (matchParam != null)
            {
                //设置特征匹配模块运行参数-最大匹配个数
                matchParam.MaxMatchNum = 10;
            }
        }
        if (pro1 != null)
        {
            pro1.Run();
            //获取特征匹配模块的运行结果
            FastFeatureMatchResult matchResult = fastFeatureTool.ModuResult;
            if (matchResult != null)
            {
                //获取匹配个数
                int matchnum = matchResult.MatchNum;
                //获取匹配点
                List<PointF> matchpoint = matchResult.MatchPoint;
            }
        }
        //获取/设置流程1的局部变量数据
       var localModule = pro1.LocalVariable;
       localModule.SetVarInt("var0",new int[]{1,2});
       int[] nArray = localModule.GetVarInt("var0").pIntVal;
       return nRet;
    }
}
①初始化了两个对象"fastFeatureTool"和"pro1"
②初始化了参数对象,设置了最大匹配个数参数
③执行一次流程,获取模块运行结果
4.2.2 模块输入参数
csharp
using System;
using System.Windows.Forms;
using System.Runtime.InteropServices;
using System.Collections;
using VM.GlobalScript.Methods;
using iMVS_6000PlatformSDKCS;
using VM.Core;
using VM.PlatformSDKCS;
using ImageSourceModuleCs;
using IMVSFastFeatureMatchModuCs;
using System.Collections.Generic;
using System.Drawing;
using System.Drawing.Imaging;


/*****************************************
 * Example explanation:Example of multi process control operation
 * Logic Control:Single run, each flow execute once
 * Continuous run:continuous run, each flow execute continuous
 * 示例说明: 设置流程输入参数,执行流程
 * ***************************************/
public class UserGlobalScript : UserGlobalMethods, IScriptMethods
{
    /// <summary>
    /// Init
    /// </summary>
    /// <returns>Success:return 0</returns>
    public int Init()
    {
        //SDK init
        return InitSDK();
    }

    /// <summary>
    /// execute function
    /// Single run:the function execute once
    /// Continuous run:Repeat the function at regular intervals
    /// 运行函数
    /// 单次执行:该函数执行一次
    /// 连续执行:以一定时间间隔重复执行该函数
    /// </summary>
    /// <returns>Success:return 0</returns>
    public int Process()
    {
        //m_operateHandle SDK handle
        if (m_operateHandle == IntPtr.Zero)
        { return ImvsSdkPFDefine.IMVS_EC_NULL_PTR; }

        //All processes are executed by default
        //If execute in your own define logic,please remove the function :DefaultExecuteProcess, Create your own logic function.
        //默认执行全部流程,
        //如果自定义流程执行逻辑,请移除DefaultExecuteProcess方法,编写自定义流程执行逻辑代码
        int nRet = 0;

        VmProcedure pro1 = (VmProcedure)VmSolution.Instance["流程1"];
        if (pro1 != null)
        {
            ProcedureParam proParam = pro1.ModuParams;
            if (proParam != null)
            {
                //设置流程输入图像
                Bitmap bitmap = new Bitmap(@"D:\Program\VM_Temp\0257800-IMG_2.jpg");
                proParam.SetInputImage_V2("ImageData", new ImageBaseData(bitmap));
                //设置流程输入int
                proParam.SetInputInt("intX", new int[] { 10 });
                //设置流程输入float
                proParam.SetInputFloat("floatY", new float[] { 2.345f });
                //设置流程输入string
                proParam.SetInputString("stringZ", new InputStringData[] { new InputStringData() { strValue = "abc" } });
                //流程执行
                pro1.Run();
                //释放dispose
                bitmap.Dispose();
            }
        }
        return nRet;
    }

}
该段代码主要实现了加载本地图片给流程的输入,并且也赋值了三个数据类型的参数给流程输入。
4.2.3 通信接收
csharp
using System;
using VM.GlobalScript.Methods;
using System.Windows.Forms;
using iMVS_6000PlatformSDKCS;
using System.Runtime.InteropServices;
using VM.Core;
using VM.PlatformSDKCS;
using VMControls.Interface;
using System.Threading.Tasks;
/*****************************************
 * Example explanation:Example of multi process control operation
 * Logic Control:Single run, each flow execute once
 * Continuous run:continuous run, each flow execute continuous
 * 示例说明: 通信接收
 * ***************************************/
public class UserGlobalScript : UserGlobalMethods, IScriptMethods
{
    /// <summary>
    /// Init
    /// </summary>
    /// <returns>Success:return 0</returns>
    public int Init()
    {
        //SDK init
        int ret = InitSDK();
        //设置与全局通信模块的通信端口
        StartGlobalCommunicate();
        //注册通信数据接收事件
        RegesiterReceiveCommunicateDataEvent();
        return ret;
    }


    /// <summary>
    /// 通信数据接收函数
    /// </summary>
    public override void UserGlobalMethods_OnReceiveCommunicateDataEvent(ReceiveDataInfo dataInfo)
    {
        if (dataInfo == null || dataInfo.DeviceData == null)
        { return; }
        //接收到的数据转成字符串
        string str = System.Text.Encoding.Default.GetString(dataInfo.DeviceData);
        //这里的deviceIndex和全局通信模块中的一致
        if (dataInfo.DeviceID == 1)
        {
            //解析收到的数据
            if (str == "0")
            {
                //异步执行流程1 一次
                VmProcedure pro1 = (VmProcedure)VmSolution.Instance["流程1"];
                if(pro1!=null)
                {pro1.Run("", false);}
            }
            else if(str == "1")
            {
				//保存方案
            	Task.Run(()=>{VmSolution.Save();});
            }
            else if(str == "2")
            {
				//加载方案
            	Task.Run(()=>{VmSolution.Load(@"D:\Program\VM_Temp\4.3\全局脚本\sdk.sol");});
            }
        }
    }


    /// <summary>
    /// execute function
    /// Single run:the function execute once
    /// Continuous run:Repeat the function at regular intervals
    /// 运行函数
    /// 单次执行:该函数执行一次
    /// 连续执行:以一定时间间隔重复执行该函数
    /// </summary>
    /// <returns>Success:return 0</returns>
    public int Process()
    {
        //m_operateHandle SDK handle
        if (m_operateHandle == IntPtr.Zero)
        { return ImvsSdkPFDefine.IMVS_EC_NULL_PTR; }

        //All processes are executed by default
        //If execute in your own define logic,please remove the function :DefaultExecuteProcess, Create your own logic function.
        //默认执行全部流程,
        //如果自定义流程执行逻辑,请移除DefaultExecuteProcess方法,编写自定义流程执行逻辑代码
        int nRet = DefaultExecuteProcess();
        return nRet;
    }

}该段代码主要实现了对对应通讯地址的数据解析成字符串,并且根据对解析出来的结果的判断来实现执行流程,保存方案和加载方案的操作。
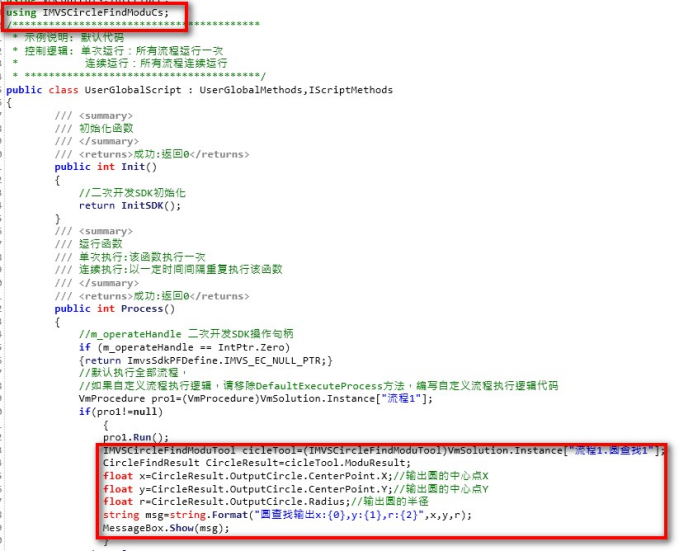
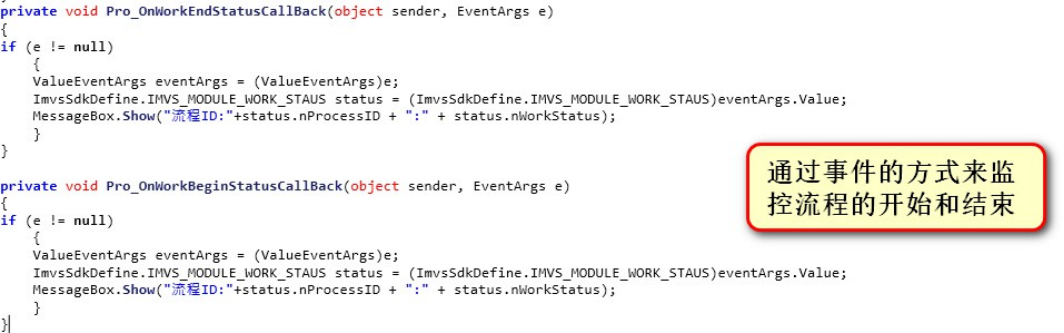
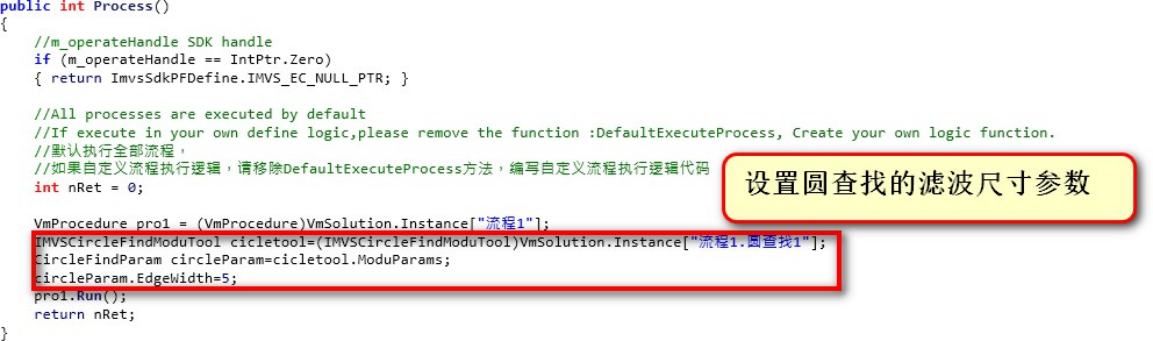
4.3 顺序执行流程---功能实现演示
4.3.1 添加流程和引用
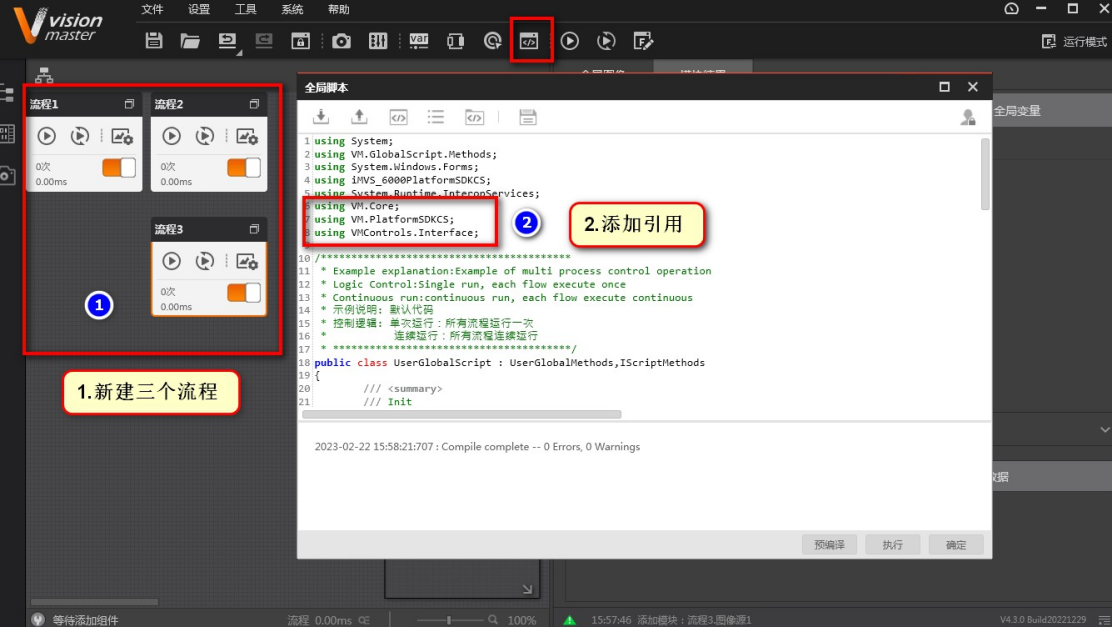
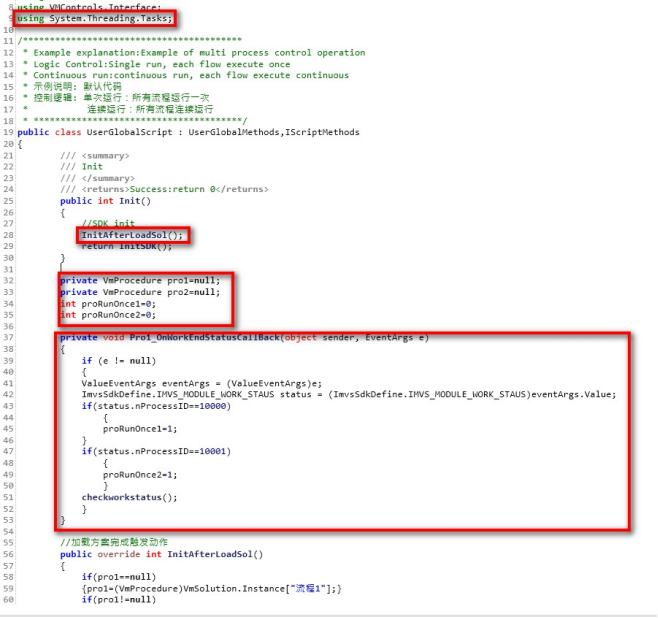
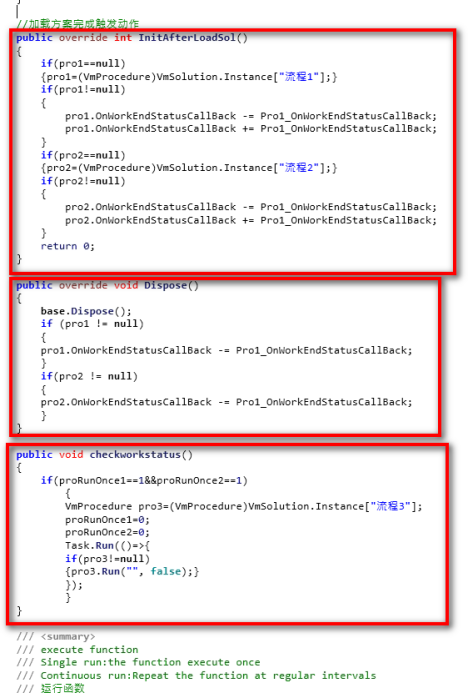
4.3.2 代码说明
4.4 常用接口代码
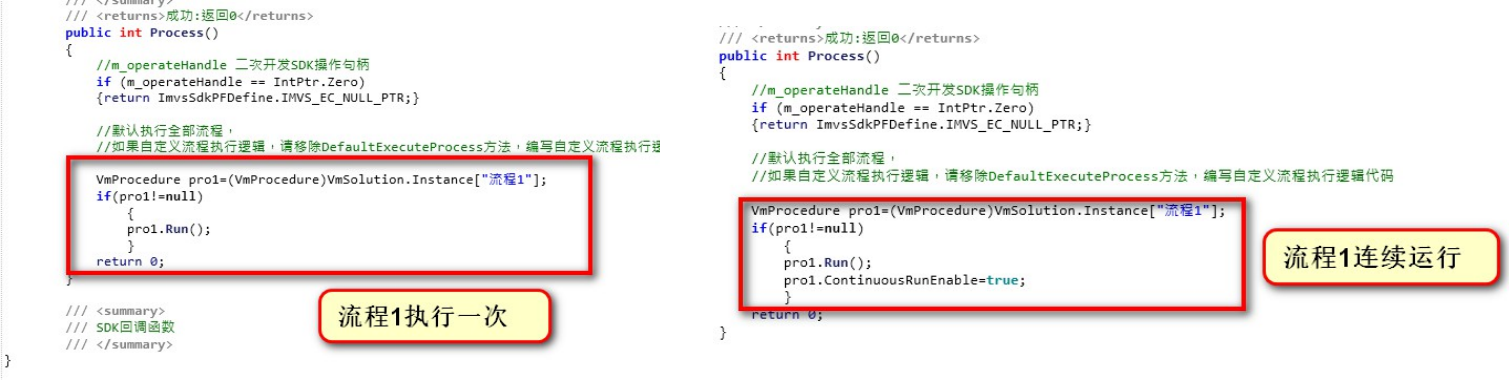
4.4.1 流程执行
4.4.2 获取模块结果
4.4.3 获取流程状态
4.4.4 设置模块参数
4.4.5 操作方案

4.4.6 操作全局变量
5.脚本和全局脚本使用注意事项
脚本使用注意事项
1.脚本中不支持调用控制器管理里面的设备发送IO数据;
2.脚本模块尽量减少关于系统资源的操作,因为可能会导致重编译时候资源泄漏导致的异常,包括线程、串口端口、文件等;
3.尽量只做后台业务,不涉及界面层;
4.尽量不在脚本中操作非托管资源,如果要操作非托管资源,则需要在process定义并且释放;
5.脚本中的异常可以通过messagebox.show(弹框,慎用,流程运行到弹框会停止,确定后继续)来定位具体出错的位置,然后通过try catch语法进行捕获,并输出异常信息;
6.补充资料
3.【大话视觉】:在CSDN平台推出的博客,涉及VM应用、开发和案例等专栏。
【VM应用帮助文档路径 】:\VisionMaster4.4.0\Applications\Help
【VM SDK开帮助文档路径 】:\VisionMaster4.4.0\Development\V4.x\Documentations
【自定义算法模块开发帮助文档路径 】:\VisionMaster4.4.0\Applications\Tools\AlgorithmXMLGenerator\doc
【算子SDK开发帮助文档路径 】:VisionMaster4.4.0\MVDAlgorithmSDK\Documentations
【VM服务管家 】:为微信小程序,可以直接用手机搜索小程序"VM服务管家"并进行使用。