视频讲解:https://www.bilibili.com/video/BV1FgZyBqEpS/?vd_source=5ba34935b7845cd15c65ef62c64ba82f
代码仓库:https://github.com/LitchiCheng/mujoco-learning
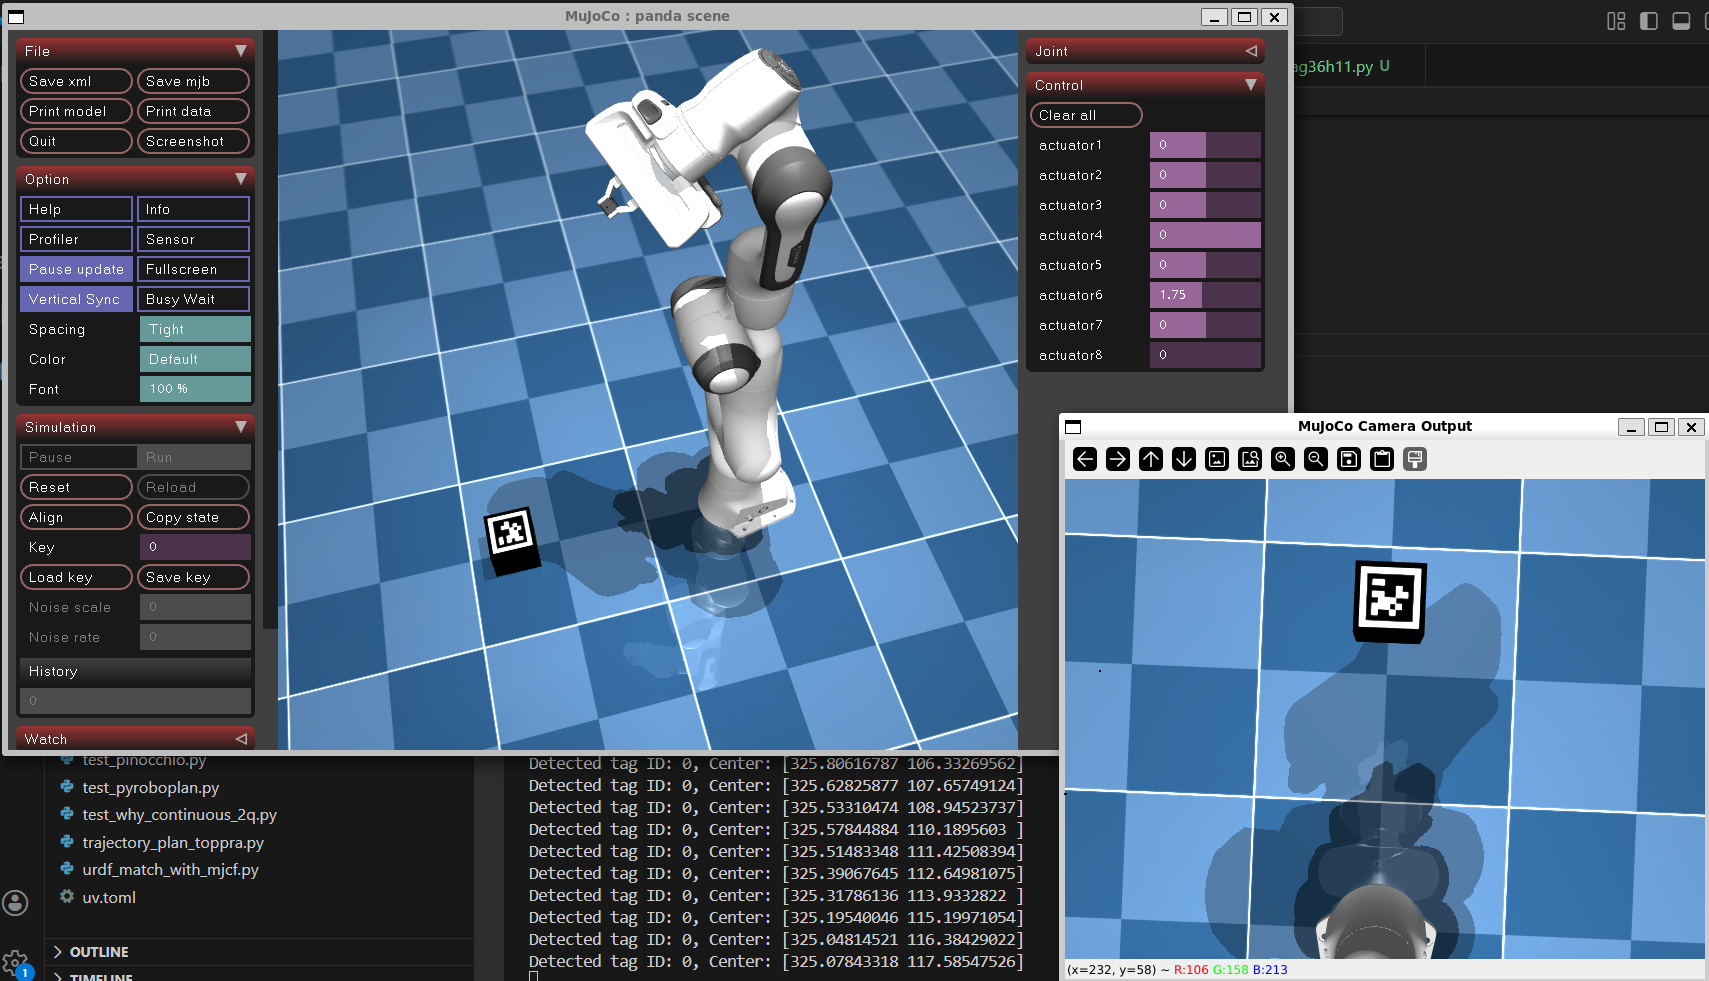
在视觉应用中 Apriltag 作为一种常见的标签,极为方便且容易识别并得到位置及标签信息,常用于视觉定位或者标定使用。今天我们就如何添加该标签以及如何在 mujoco 中获得相机视野也就是可以看到 Apriltag 标签的"照片"。
在 scene.xml 中添加 assets 以及 worldbody 添加一个带有标签的小方块:
  <asset>
    <texture type="skybox" builtin="gradient" rgb1="0.3 0.5 0.7" rgb2="0 0 0" width="512" height="3072"/>
    <texture type="2d" name="groundplane" builtin="checker" mark="edge" rgb1="0.2 0.3 0.4" rgb2="0.1 0.2 0.3"
      markrgb="0.8 0.8 0.8" width="300" height="300"/>
    <!-- 导入AprilTag纹理 -->
    <texture name="tag_0" type="2d" file="../misc/textures/tag36h11_0.png" width="100" height="100">

    </texture>
    <!-- 创建AprilTag材质 -->
    <material name="mat_tag_0" texture="tag_0" rgba="1 1 1 1"/>  <!-- rgba=白不透明 -->
    <material name="groundplane" texture="groundplane" texuniform="true" texrepeat="5 5" reflectance="0.2"/>
  </asset>

  <worldbody>
    <light pos="0 0 1.5" dir="0 0 -1" directional="true"/>
    <geom name="floor" size="0 0 0.05" type="plane" material="groundplane"/>
    <camera name="rgb_camera" pos="0 0 1.5" euler="0 0 0" fovy="60"/>

    <!-- 单AprilTag -->
    <body name="apriltag_0" pos="0.5 0 0.05" euler="0 0 0">
      <geom name="tag_geom_0" type="box" size="0.05 0.05 0.05" material="mat_tag_0"/>
    </body>

  </worldbody>
我们使用tag36h11类型,这个可以在很多地方下载或者直接生成你想要的标签,这里放到可以找到的相对路径即可

大小为 0.1*0.1*0.1 的小方块,标签ID为 0
获得相机视野的代码可以参考很早前介绍的视频《MuJoCo 相机图片怎么拿?视角调整获取物体图片及实时显示(附代码)》,这里不同的是封装进了mujoco_viewer中方便调用以及"拿图",只需要一行即可,固定相机视野朝下(方便看到物体)
image = self.getTrackingCameraImage(fix_elevation=-90)apriltag 检测使用 pupil_apriltags,安装可以用 uv pip install pupil_apriltags
from pupil_apriltags import Detector
self.detector = Detector(families="tag36h11",
                            nthreads=1,
                            quad_decimate=1.0,
                            refine_edges=1)
gray_image = cv2.cvtColor(image, cv2.COLOR_BGR2GRAY)
tags = self.detector.detect(gray_image)
for tag in tags:
    print(f"Detected tag ID: {tag.tag_id}, Center: {tag.center}")
将mujoco中获得的图转成灰度图后使用detect即可,主要指定类型为tag36h11,完整代码如下:
import src.mujoco_viewer as mujoco_viewer
import time
import mujoco
import cv2
from pupil_apriltags import Detector

class PandaEnv(mujoco_viewer.CustomViewer):
    def __init__(self, path):
        super().__init__(path, 3, azimuth=-45, elevation=-30)
        self.path = path

    def runBefore(self):
        self.initial_pos = self.model.qpos0.copy()
        # 初始化 AprilTag 检测器
        self.detector = Detector(families="tag36h11",
                            nthreads=1,
                            quad_decimate=1.0,
                            refine_edges=1)

    def runFunc(self):
        image = self.getTrackingCameraImage(fix_elevation=-90)
        gray_image = cv2.cvtColor(image, cv2.COLOR_BGR2GRAY)
        tags = self.detector.detect(gray_image)
        for tag in tags:
            print(f"Detected tag ID: {tag.tag_id}, Center: {tag.center}")

if __name__ == "__main__":
    env = PandaEnv("./model/franka_emika_panda/scene_with_apriltag.xml")
    env.run_loop()