之前有一段时间想搞一搞电子吧唧这东西,后来想来想去也就是个电子相册,这里拿杜邦线接一接,写一写程序,当个DEMO验证没有什么问题
平台:ESP32S3R8N8 ST7789 PIO+Arduino
一、显示图片
这里使用最为广泛使用的TFT_eSPI库进行配置,直接在PIO HOME搜索装上完事
然后打开资源管理器的User_Setup.h
选驱动

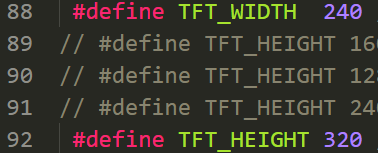
选分辨率
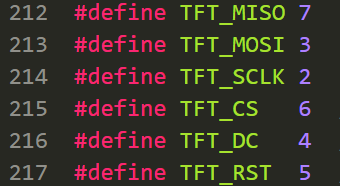
改引脚
在main.c开启背光,进行初始化烧录程序,
cpp
#include <SPI.h>
#include <TFT_eSPI.h>
#define BACKLIGHT_PIN 1  // 根据你的接线修改!
TFT_eSPI tft = TFT_eSPI();  // 创建TFT对象

void setup() {
  // 初始化屏幕
  pinMode(BACKLIGHT_PIN, OUTPUT);
  digitalWrite(BACKLIGHT_PIN, HIGH);  // 点亮背光
  tft.init();
  tft.setRotation(1);  // 设置屏幕的方向 0, 1, 2 or 3
  tft.fillScreen(TFT_BROWN);  // 填充背景
}然后你就会发现,屏幕怎么还是黑的???
这是因为arduino驱动库和tft_espi库有冲突。
我最终在这位大佬的帖子中找到了解决办法esp32c3使用tft-espi屏幕不断重启原因及解决方法 -- 爱上生活
对于ESP32S3 而言,直接在User_Setup.h把这个开了就没问题了
如果你的颜色还有问题,那就把RGB顺序调一下,应该就没问题了
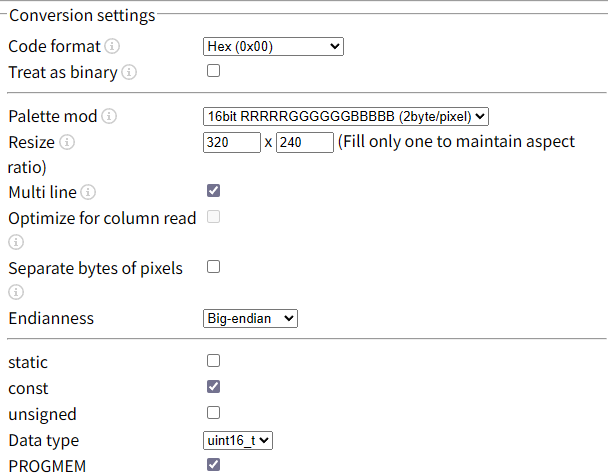
然后选择一个图片进行显示测试,可以通过下方网页生成C代码
File to C style array converter
最后调用这一个函数进行显示tft.pushImage(0, 0, 320, 240, pic);
测试没问题后进行下一步
二、图片压缩
在上面我们生成了一个320*240的数组,array size is 153600也就是153KB资源,如果你的屏幕分辨率更高,后续如果想放动图,或者更多图片,FLASH是不够用的,这时候就需要考虑压缩算法。
这里选择JPG算法,同时也方便后续的图片上传,在PIO搜索TJPG_decoder并导入到工程中,复制pandas数组并测试,这里给出的解码时间是70ms左右
cpp
#include <SPI.h>
#include <TFT_eSPI.h>
#include <TJpg_Decoder.h>

#define BACKLIGHT_PIN 1  // 根据你的背光接线修改!

TFT_eSPI tft = TFT_eSPI();

// ========== 解码回调函数==========
bool tft_output(int16_t x, int16_t y, uint16_t w, uint16_t h, uint16_t* bitmap) {
  // 边界检查,防止画到屏幕外
  if (y >= tft.height()) return 0;

  // 将解码后的像素块推送到屏幕
  tft.pushImage(x, y, w, h, bitmap);

  // 返回 1 继续解码,返回 0 停止解码
  return 1;
}

void setup() {

  Serial.begin(9600);
  delay(1000);
  // ========== 初始化屏幕==========
  pinMode(BACKLIGHT_PIN, OUTPUT);
  digitalWrite(BACKLIGHT_PIN, HIGH);  // 点亮背光
  tft.init();
  tft.setRotation(1);  // 设置屏幕的方向 0, 1, 2 or 3
  tft.fillScreen(TFT_BROWN);  // 填充背景

  // ========== 初始化解码器==========
  TJpgDec.setJpgScale(1);        // 缩放:1=原图, 2=1/2, 4=1/4, 8=1/8
  TJpgDec.setSwapBytes(true);    // ESP32 需要颜色字节交换(关键!)
  TJpgDec.setCallback(tft_output); // 设置绘制回调
}


void loop(){
  tft.fillScreen(TFT_RED);  // 红底清屏(观察覆盖情况)

  uint32_t t = millis();    // 开始计时

  // 【预检】不解码,只读取JPG头信息获取尺寸
  uint16_t w = 0, h = 0;
  TJpgDec.getJpgSize(&w, &h, panda, sizeof(panda));
  Serial.print("Width = "); Serial.print(w);
  Serial.print(", height = "); Serial.println(h);

  // 【核心】解码并显示
  // 参数:x坐标, y坐标, 数据指针, 数据长度
  TJpgDec.drawJpg(0, 0, panda, sizeof(panda));

  // 输出耗时(性能测试)
  t = millis() - t;
  Serial.print(t); Serial.println(" ms");

  delay(5000);  // 暂停5秒再看
}
三、空间分配设置
ESP32S3N8 的默认分区表是这样的,但由于我们需要存储大量图片文件并且不需要OTA升级,那么可以稍微改一改;
cpp
TEXT:=== 分区表信息 ===
Flash 总大小: 8 MB (8388608 bytes)
分区: nvs          类型: 0x01 子类型: 0x02 地址: 0x009000 大小: 0x005000 (20 KB)
分区: otadata      类型: 0x01 子类型: 0x00 地址: 0x00e000 大小: 0x002000 (8 KB)
分区: app0         类型: 0x00 子类型: 0x10 地址: 0x010000 大小: 0x330000 (3264 KB)
分区: app1         类型: 0x00 子类型: 0x11 地址: 0x340000 大小: 0x330000 (3264 KB)
分区: spiffs       类型: 0x01 子类型: 0x82 地址: 0x670000 大小: 0x180000 (1536 KB)
分区: coredump 类型: 0x01 子类型: 0x03 地址: 0x7f0000 大小: 0x010000 (64 KB)在INI文件同级目录创建partitions_custom.csv
cpp
nvs,        data, nvs,      0x9000,   0x6000,
phy_init,   data, phy,      0xf000,   0x1000,
factory,    app,  factory,  0x10000,  0x400000,
storage,    data, spiffs,   0x410000, 0x3D0000,
coredump,   data, coredump, 0x7E0000, 0x10000,
并在INI文件修改
cpp
[env:esp32-s3-devkitc-1]
platform = espressif32
board = esp32-s3-devkitc-1
framework = arduino
lib_deps =
	bodmer/TFT_eSPI@^2.5.43
	bodmer/TJpg_Decoder@^1.1.0
board_build.arduino.partitions = partitions_custom.csv
board_build.arduino.memory_type = qio_opi
build_flags = -DBOARD_HAS_PSRAM
board_upload.flash_size = 8MB
四、WIFI上传图片
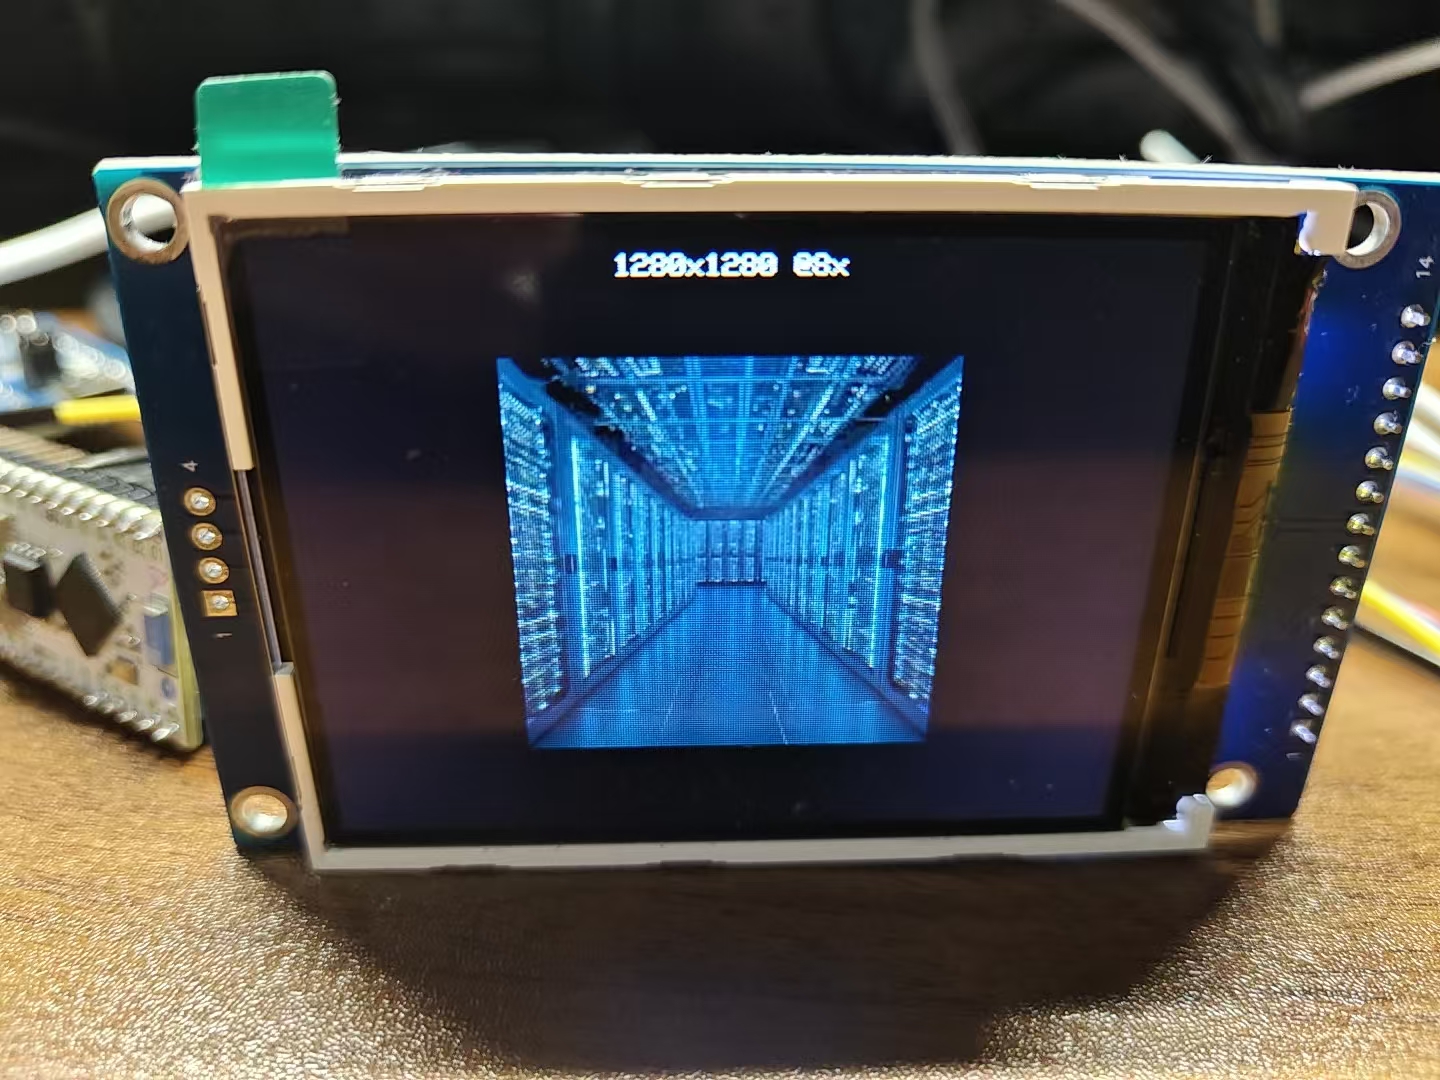
添加WIFI账号密码后,路由器会自动分配IP地址,然后通过网页上传JPG,ESP32存储解码并显示
目前想到几个问题:
①图片上传前或者在网页端应该剪切,小于分辨率的照常发送,大于屏幕分辨率的自适应到屏幕分辨率,或许可以用微信小程序来做
②上传一般断网了怎么办,还需要一个垃圾空间的回收机制
总的来说,目前的demo达到了验证标准,距离实用还差了些距离
cpp
#include <SPI.h>
#include <TFT_eSPI.h>
#include <TJpg_Decoder.h>
#include "SPIFFS.h"
#include <WiFi.h>
#include <WebServer.h>
#define BACKLIGHT_PIN 1 // 根据你的背光接线修改!
const char* ssid = "";
const char* password = "";
const char* currentFile = "/upload.jpg";
WebServer server(80); // HTTP端口
TFT_eSPI tft = TFT_eSPI();
// ========== 解码回调函数==========
bool tft_output(int16_t x, int16_t y, uint16_t w, uint16_t h, uint16_t* bitmap) {
// 边界检查,防止画到屏幕外
if (y >= tft.height()) return 0;
// 将解码后的像素块推送到屏幕
tft.pushImage(x, y, w, h, bitmap);
// 返回 1 继续解码,返回 0 停止解码
return 1;
}
// ========== 智能显示(PSRAM 优化版)==========
void displayImageSmart(const char* filename) {
tft.fillScreen(TFT_BLACK);
if (!SPIFFS.exists(filename)) {
tft.setTextColor(TFT_RED);
tft.setTextDatum(MC_DATUM);
tft.drawString("No Image", tft.width()/2, tft.height()/2);
return;
}
File file = SPIFFS.open(filename, "r");
size_t size = file.size();
Serial.printf("文件大小: %d bytes (%.2f KB)\n", size, size/1024.0);
uint8_t* buffer = NULL;
// 尝试 PSRAM 分配
if (psramFound() && size > 0) {
buffer = (uint8_t*)ps_malloc(size);
if (buffer) {
Serial.println("使用 PSRAM");
} else {
Serial.println("PSRAM 分配失败");
}
}
// 内存分配成功,读到内存处理
if (buffer) {
size_t read = file.read(buffer, size);
file.close();
if (read != size) {
Serial.println("❌ 文件读取不完整");
free(buffer);
// 回退到直接文件解码
TJpgDec.setJpgScale(1);
TJpgDec.drawFsJpg(0, 0, filename, SPIFFS);
return;
}
// 获取尺寸
uint16_t w = 0, h = 0;
JRESULT res = TJpgDec.getJpgSize(&w, &h, buffer, size);
if (res == JDR_OK) {
Serial.printf("图片尺寸: %dx%d\n", w, h);
// 计算合适的缩放
uint8_t scale = 1;
while ((w/scale > tft.width() || h/scale > tft.height()) && scale < 8) {
scale *= 2;
}
TJpgDec.setJpgScale(scale);
// 居中显示
int x = (tft.width() - w/scale) / 2;
int y = (tft.height() - h/scale) / 2;
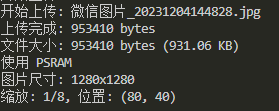
Serial.printf("缩放: 1/%d, 位置: (%d, %d)\n", scale, x, y);
// 使用内存方式显示
TJpgDec.drawJpg(x, y, buffer, size);
// 显示信息
tft.setTextColor(TFT_WHITE, TFT_BLACK);
tft.setTextDatum(TC_DATUM);
String info = String(w) + "x" + String(h) + " @" + String(scale) + "x";
tft.drawString(info, tft.width()/2, 5);
} else {
Serial.printf("❌ 无法获取尺寸: %d\n", res);
// 尝试直接解码
TJpgDec.setJpgScale(1);
TJpgDec.drawJpg(0, 0, buffer, size);
}
free(buffer); // PSRAM 和普通内存都用 free 释放
} else {
// 内存不足,使用流式解码
file.close();
Serial.println("内存不足,使用流式解码");
TJpgDec.setJpgScale(1);
TJpgDec.drawFsJpg(0, 0, filename, SPIFFS);
}
}
// ========== 处理上传 ==========
void handleUpload() {
HTTPUpload& upload = server.upload();
if (upload.status == UPLOAD_FILE_START) {
Serial.printf("开始上传: %s\n", upload.filename.c_str());
// 删除旧文件
if (SPIFFS.exists(currentFile)) {
SPIFFS.remove(currentFile);
}
File file = SPIFFS.open(currentFile, "w");
if (!file) {
server.send(500, "text/plain", "无法创建文件");
return;
}
file.close();
} else if (upload.status == UPLOAD_FILE_WRITE) {
File file = SPIFFS.open(currentFile, "a");
if (file) {
file.write(upload.buf, upload.currentSize);
file.close();
}
} else if (upload.status == UPLOAD_FILE_END) {
Serial.printf("上传完成: %d bytes\n", upload.totalSize);
// 显示图片
displayImageSmart(currentFile);
// 返回成功页面
String html = R"(
<!DOCTYPE html>
<html>
<head>
<meta charset="UTF-8">
<title>上传成功</title>
<style>
body { font-family: Arial; text-align: center; padding: 50px; background: #f0f0f0; }
.success { color: #4CAF50; font-size: 48px; margin: 20px; }
.info { color: #666; margin: 20px; }
.btn { display: inline-block; padding: 15px 30px; background: #2196F3; color: white;
text-decoration: none; border-radius: 5px; margin-top: 20px; }
</style>
</head>
<body>
<div class="success">✓</div>
<h1>上传成功!</h1>
<div class="info">文件大小: )" + String(upload.totalSize) + R"( bytes</div>
<div class="info">已显示在 ESP32 屏幕上</div>
<a href="/" class="btn">继续上传</a>
</body>
</html>
)";
server.send(200, "text/html", html);
}
}
// ========== 主页 ==========
void handleRoot() {
String html = R"(
<!DOCTYPE html>
<html>
<head>
<meta charset="UTF-8">
<meta name="viewport" content="width=device-width, initial-scale=1.0">
<title>ESP32 图片上传</title>
<style>
* { margin: 0; padding: 0; box-sizing: border-box; }
body {
font-family: -apple-system, BlinkMacSystemFont, 'Segoe UI', Roboto, sans-serif;
background: linear-gradient(135deg, #667eea 0%, #764ba2 100%);
min-height: 100vh;
display: flex;
justify-content: center;
align-items: center;
padding: 20px;
}
.container {
background: white;
border-radius: 20px;
padding: 40px;
box-shadow: 0 20px 60px rgba(0,0,0,0.3);
max-width: 500px;
width: 100%;
text-align: center;
}
h1 { color: #333; margin-bottom: 10px; }
.subtitle { color: #666; margin-bottom: 30px; font-size: 14px; }
.upload-area {
border: 3px dashed #ddd;
border-radius: 15px;
padding: 40px;
margin-bottom: 20px;
transition: all 0.3s;
position: relative;
}
.upload-area:hover { border-color: #667eea; background: #f8f9ff; }
input[type="file"] {
position: absolute; top: 0; left: 0; right: 0; bottom: 0;
opacity: 0; cursor: pointer; width: 100%;
}
.upload-icon { font-size: 48px; margin-bottom: 10px; }
.btn {
background: linear-gradient(135deg, #667eea 0%, #764ba2 100%);
color: white; border: none; padding: 15px 40px;
border-radius: 25px; font-size: 16px; cursor: pointer;
width: 100%;
}
.info { margin-top: 30px; color: #666; font-size: 12px; }
</style>
</head>
<body>
<div class="container">
<h1>📷 图片上传</h1>
<div class="subtitle">发送到 ESP32 显示屏</div>
<form action="/upload" method="POST" enctype="multipart/form-data">
<div class="upload-area">
<input type="file" name="image" accept=".jpg,.jpeg" required>
<div class="upload-icon">📁</div>
<div>点击选择 JPG 图片</div>
</div>
<button type="submit" class="btn">上传并显示</button>
</form>
<div class="info">
IP: )" + WiFi.localIP().toString() + R"(<br>
建议尺寸: 240x320 像素
</div>
</div>
</body>
</html>
)";
server.send(200, "text/html", html);
}
void setup() {
// ========== 初始化串口==========
Serial.begin(9600);
delay(1000);
// ========== 初始化文件系统==========
if (!SPIFFS.begin(true)) {
Serial.println("SPIFFS.begin(true) 失败,尝试强制格式化...");
Serial.println("正在格式化 SPIFFS...");
if (SPIFFS.format()) {
Serial.println("格式化成功,重新挂载...");
if (!SPIFFS.begin()) {
Serial.println("格式化后仍然挂载失败!");
while(1) delay(1000);
}
} else {
Serial.println("格式化失败!");
while(1) delay(1000);
}
}
Serial.println("SPIFFS 挂载成功!");
Serial.printf("总空间: %d bytes (%.2f MB)\n",
SPIFFS.totalBytes(), SPIFFS.totalBytes() / 1024.0 / 1024.0);
Serial.printf("已用空间: %d bytes\n", SPIFFS.usedBytes());
Serial.printf("可用空间: %d bytes\n",
SPIFFS.totalBytes() - SPIFFS.usedBytes());
// ========== 初始化屏幕==========
pinMode(BACKLIGHT_PIN, OUTPUT);
digitalWrite(BACKLIGHT_PIN, HIGH); // 点亮背光
tft.init();
tft.setRotation(1); // 设置屏幕的方向 0, 1, 2 or 3
tft.fillScreen(TFT_BLACK); // 填充背景
// ========== 初始化解码器==========
TJpgDec.setJpgScale(1); // 缩放:1=原图, 2=1/2, 4=1/4, 8=1/8
TJpgDec.setSwapBytes(true); // ESP32 需要颜色字节交换(关键!)
TJpgDec.setCallback(tft_output); // 设置绘制回调
// ========== 显示启动画面==========
tft.setTextColor(TFT_WHITE, TFT_BLACK);
tft.setTextDatum(MC_DATUM);
tft.drawString("Connecting...", tft.width()/2, tft.height()/2);
// ========== 连接WIFI=========
WiFi.begin(ssid, password);
while (WiFi.status() != WL_CONNECTED) {
delay(500);
Serial.print(".");
}
Serial.println();
Serial.print("IP: ");
Serial.println(WiFi.localIP());
tft.fillScreen(TFT_BLACK);
tft.drawString(WiFi.localIP().toString(), tft.width()/2, tft.height()/2 - 20);
tft.drawString("Waiting for upload...", tft.width()/2, tft.height()/2 + 20);
// ========== 设置路由========
server.on("/", handleRoot);
server.on("/upload", HTTP_POST, [](){}, handleUpload);
server.begin();
Serial.println("HTTP server started");
}
void loop(){
server.handleClient();
}