🚀 在 HarmonyOS 上跑 Electron?手把手教你搞定桌面欢迎页!
欢迎加入开源鸿蒙PC社区:https://harmonypc.csdn.net/
项目地址:https://atomgit.com/VON-/electron-oh-pc/tree/project01
一句话总结:Electron 不只能做 Windows/macOS 应用!在华为 HarmonyOS PC 端也能运行。本文带你从零拉取官方仓库、解决白屏问题、配置签名,并成功运行一个炫酷的欢迎界面!
大家好,我是 VON。最近在研究 HarmonyOS 的桌面端能力,发现华为居然提供了 Electron 定制版!这意味着我们可以用熟悉的 HTML/CSS/JS 技术,在 HarmonyOS PC 上开发桌面应用了!
但过程并不完全顺利------白屏、报错、签名缺失......踩了一堆坑后,终于跑通了!今天就把完整流程分享出来,帮你少走弯路!
🔧 一、准备工作:环境 & 项目拉取
1. 环境要求
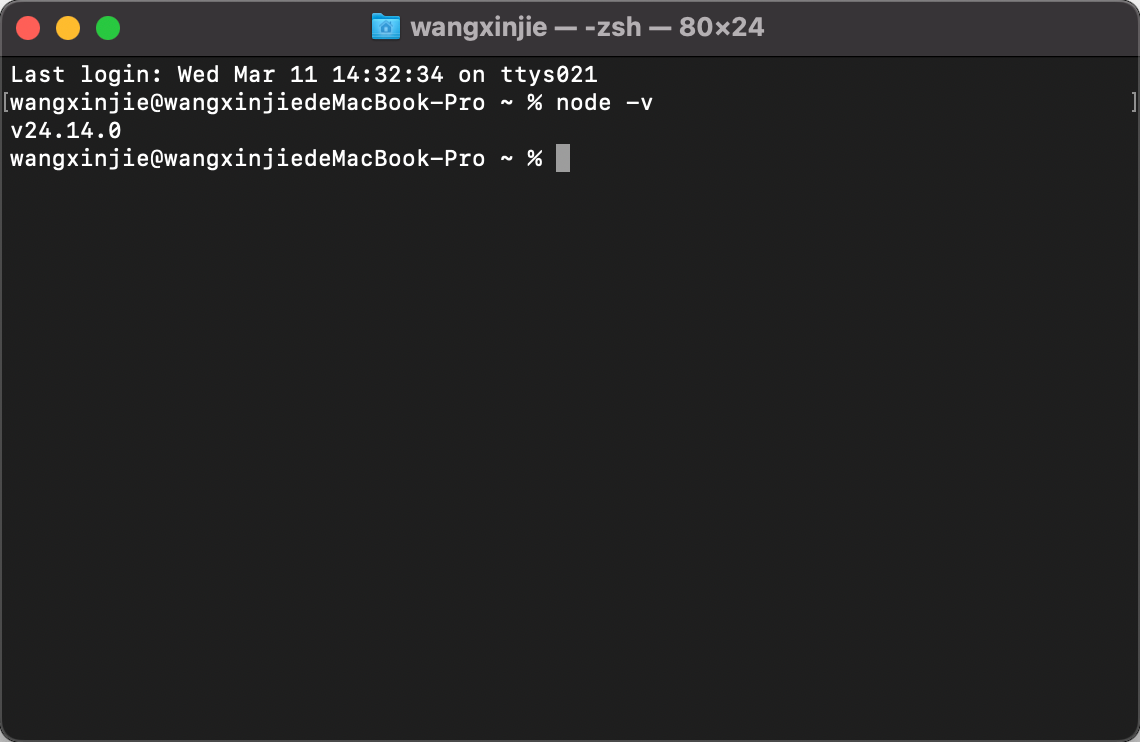
- DevEco Studio :6.0.2(建议使用最新版)
- Node.js :24.14.0(必须 ≥ 18)
2. 拉取官方 Electron 项目
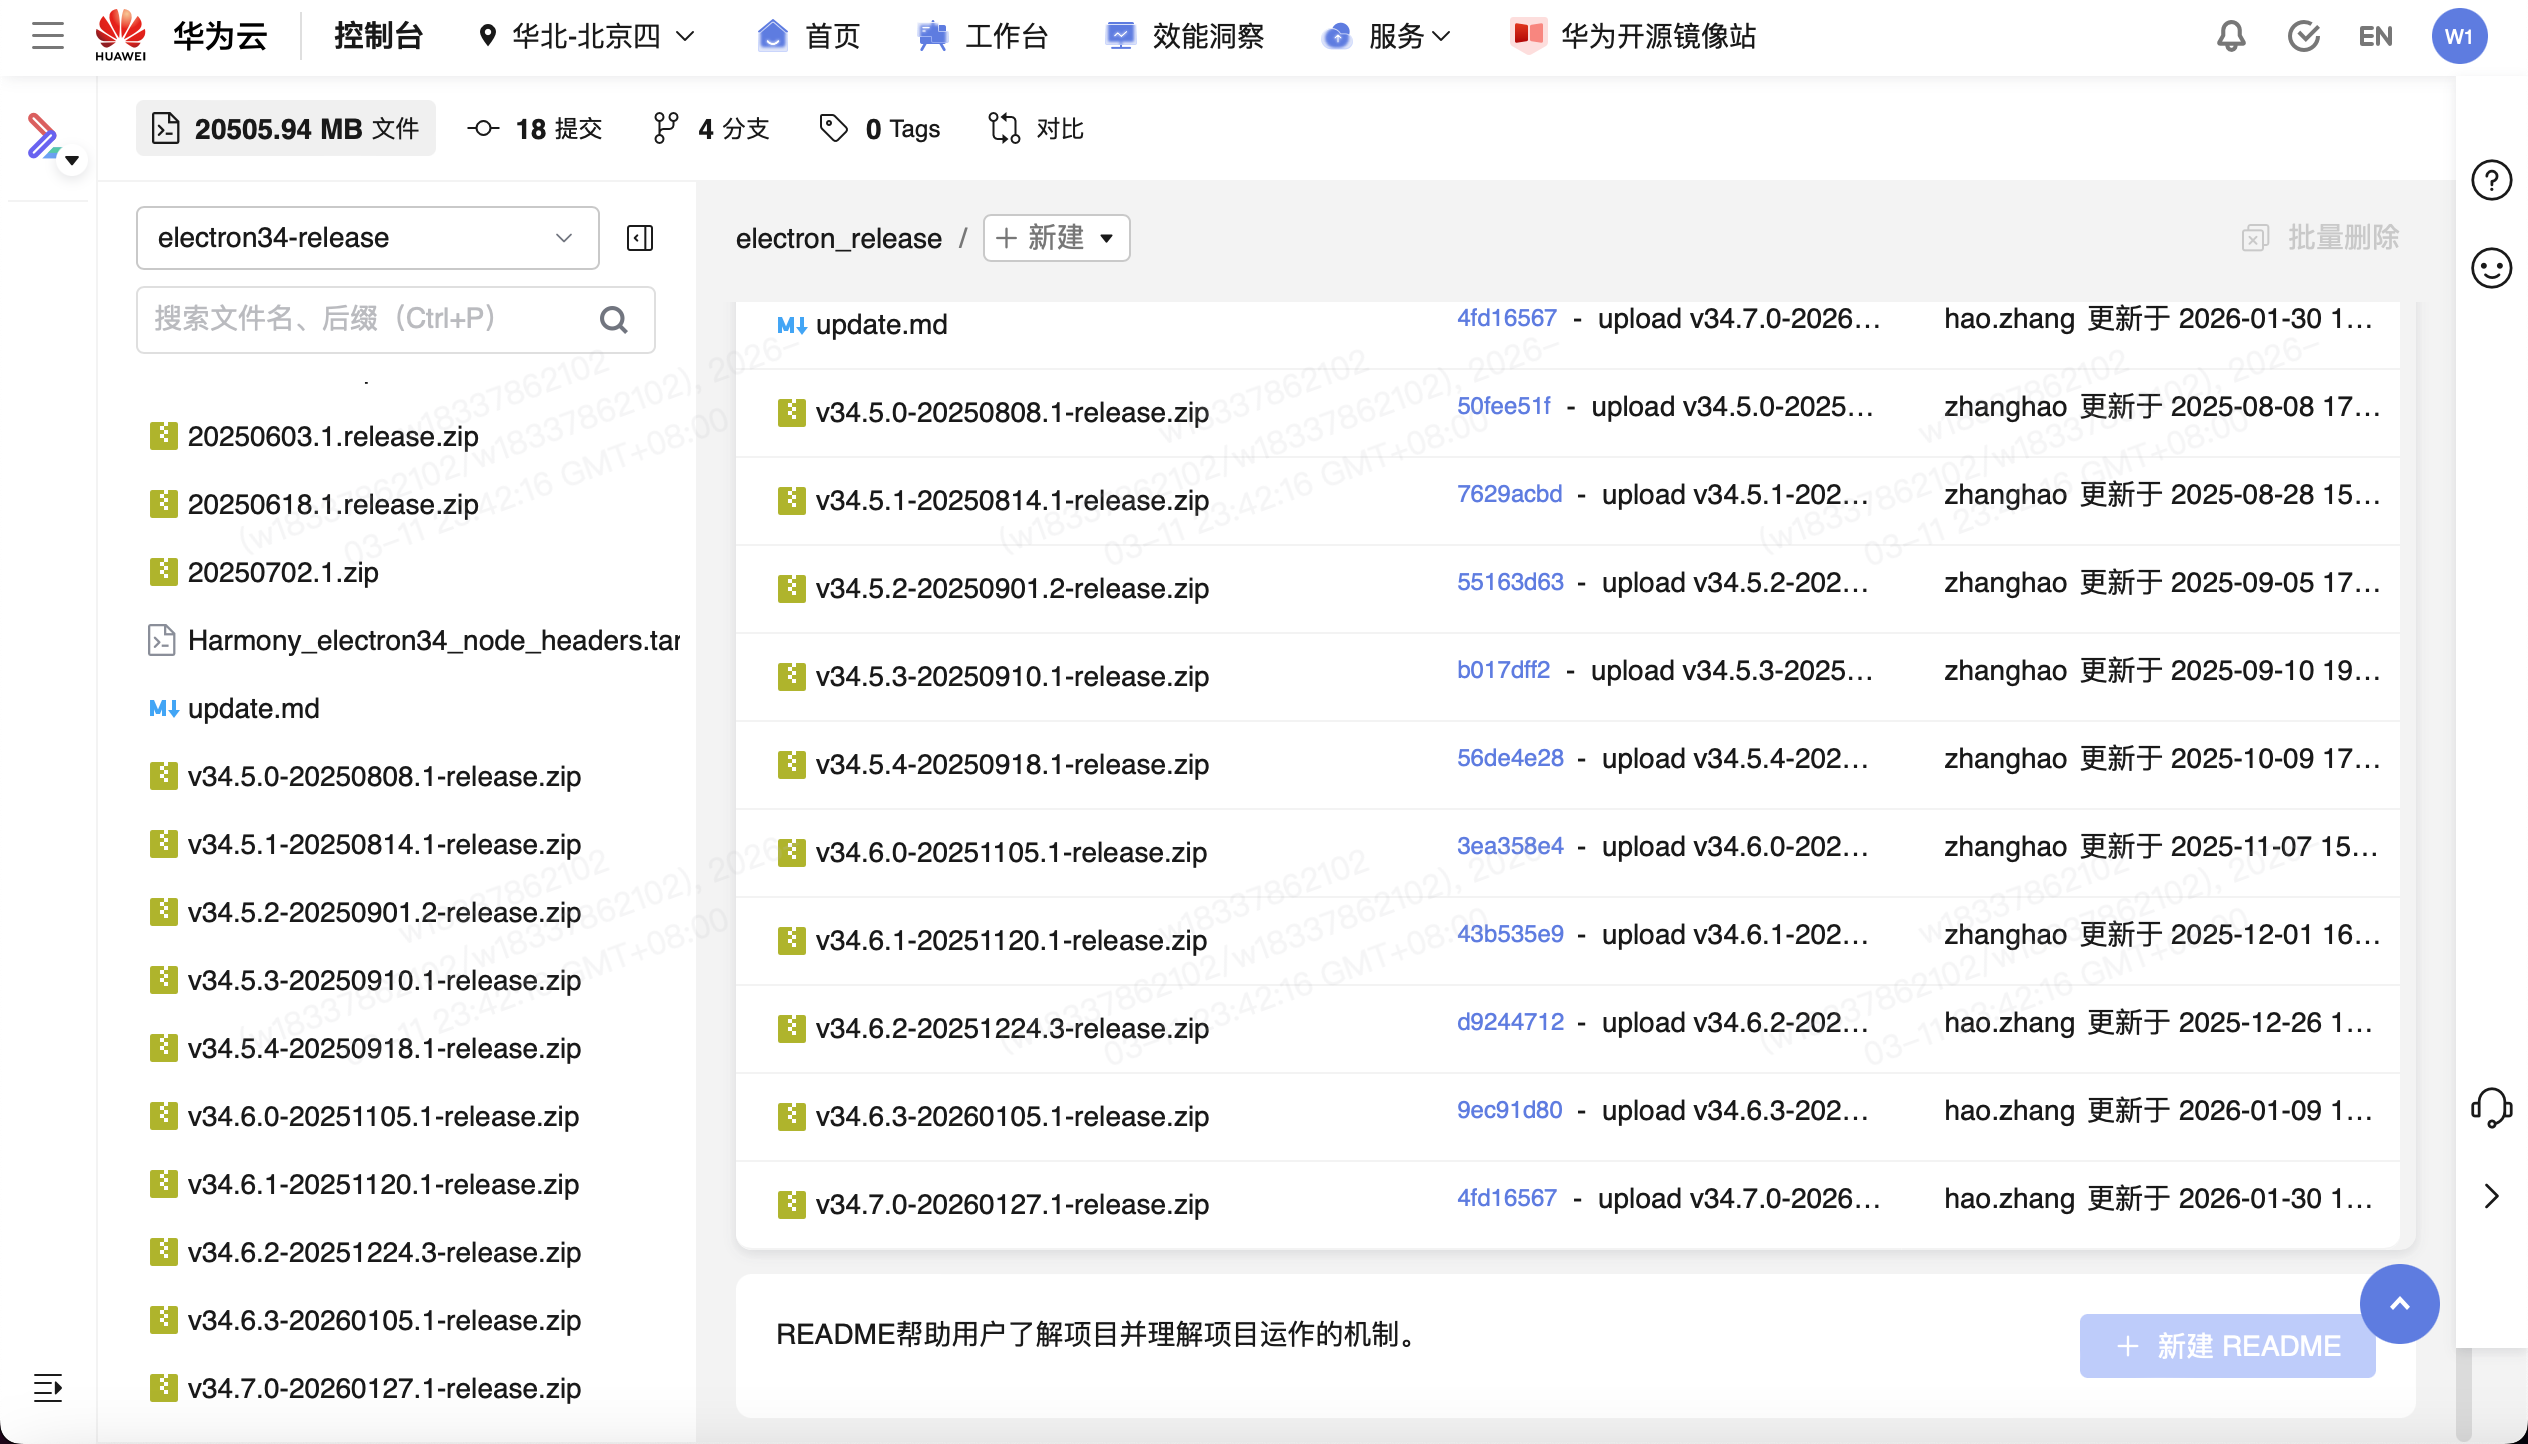
华为已将适配后的 Electron 托管在 CodeHub:
✅ 建议选择 最新 release 分支 (我用的是
electron34-release,对应 Electron 34.8.0)
点击"克隆/下载"即可:
⚙️ 二、项目配置与签名
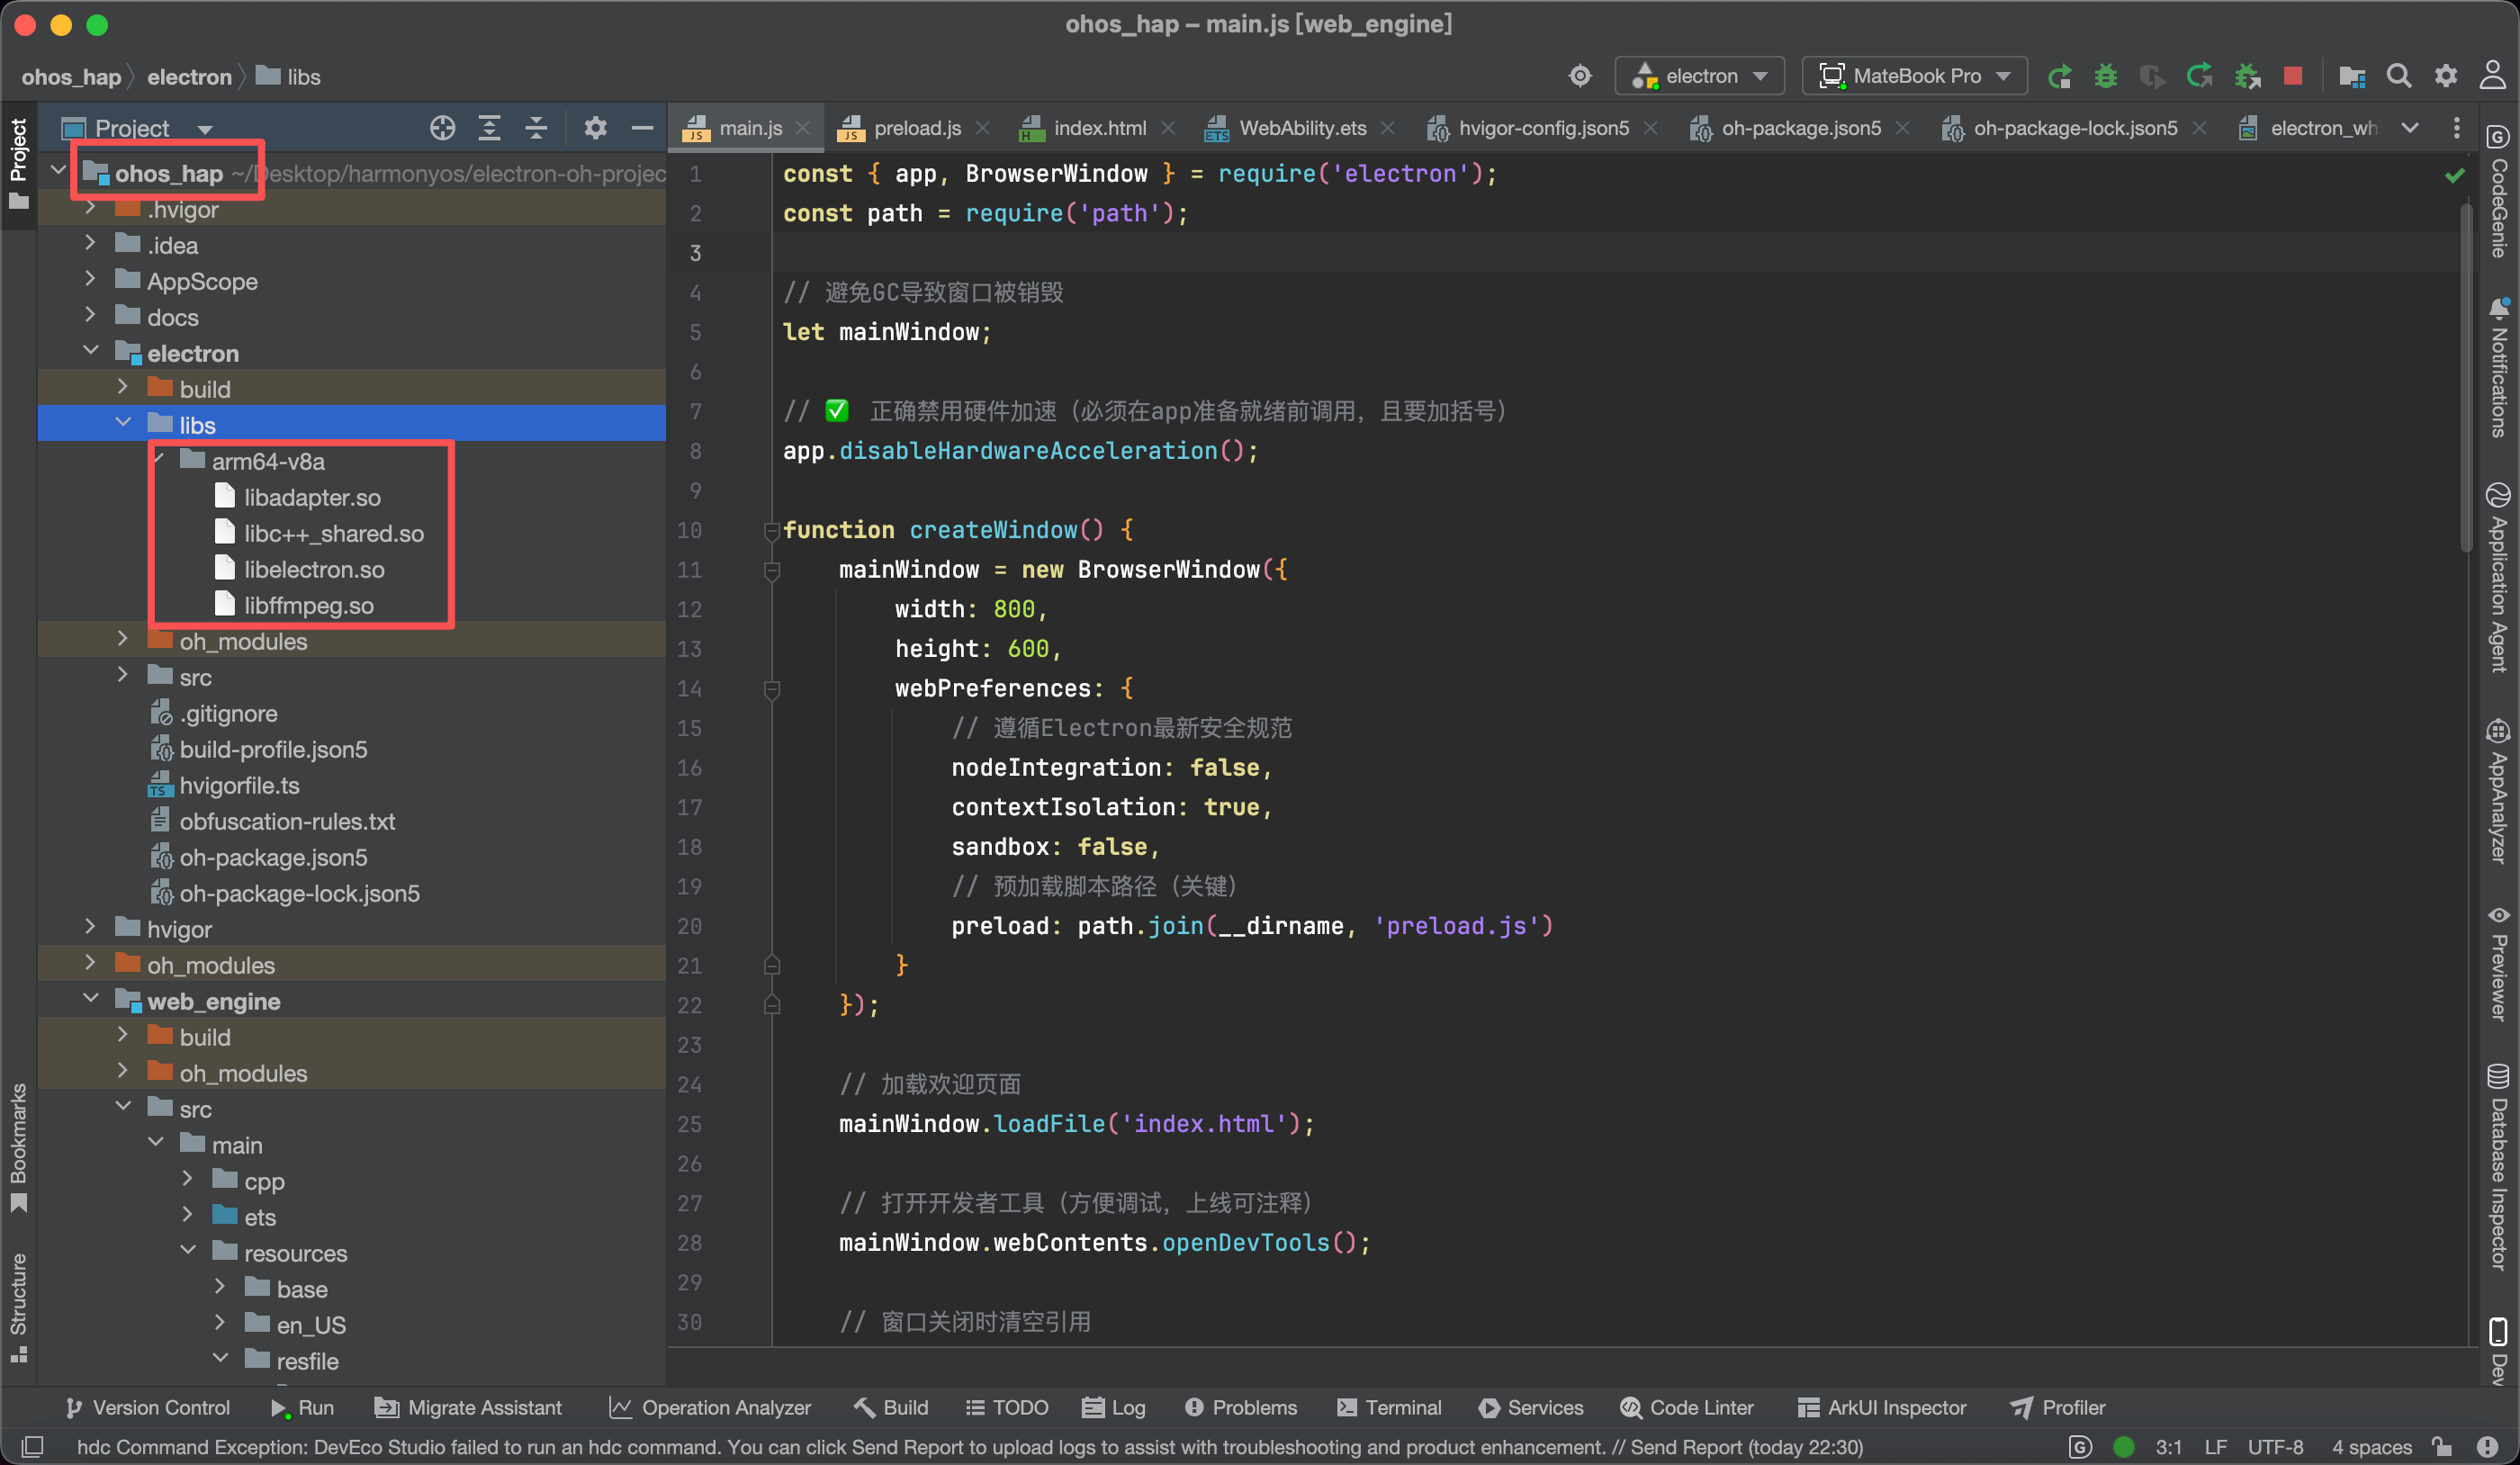
- 用 DevEco Studio 打开项目中的
ohos_hap文件夹; - 检查是否生成了
arm架构的编译产物(路径通常为build/default/outputs/default/);
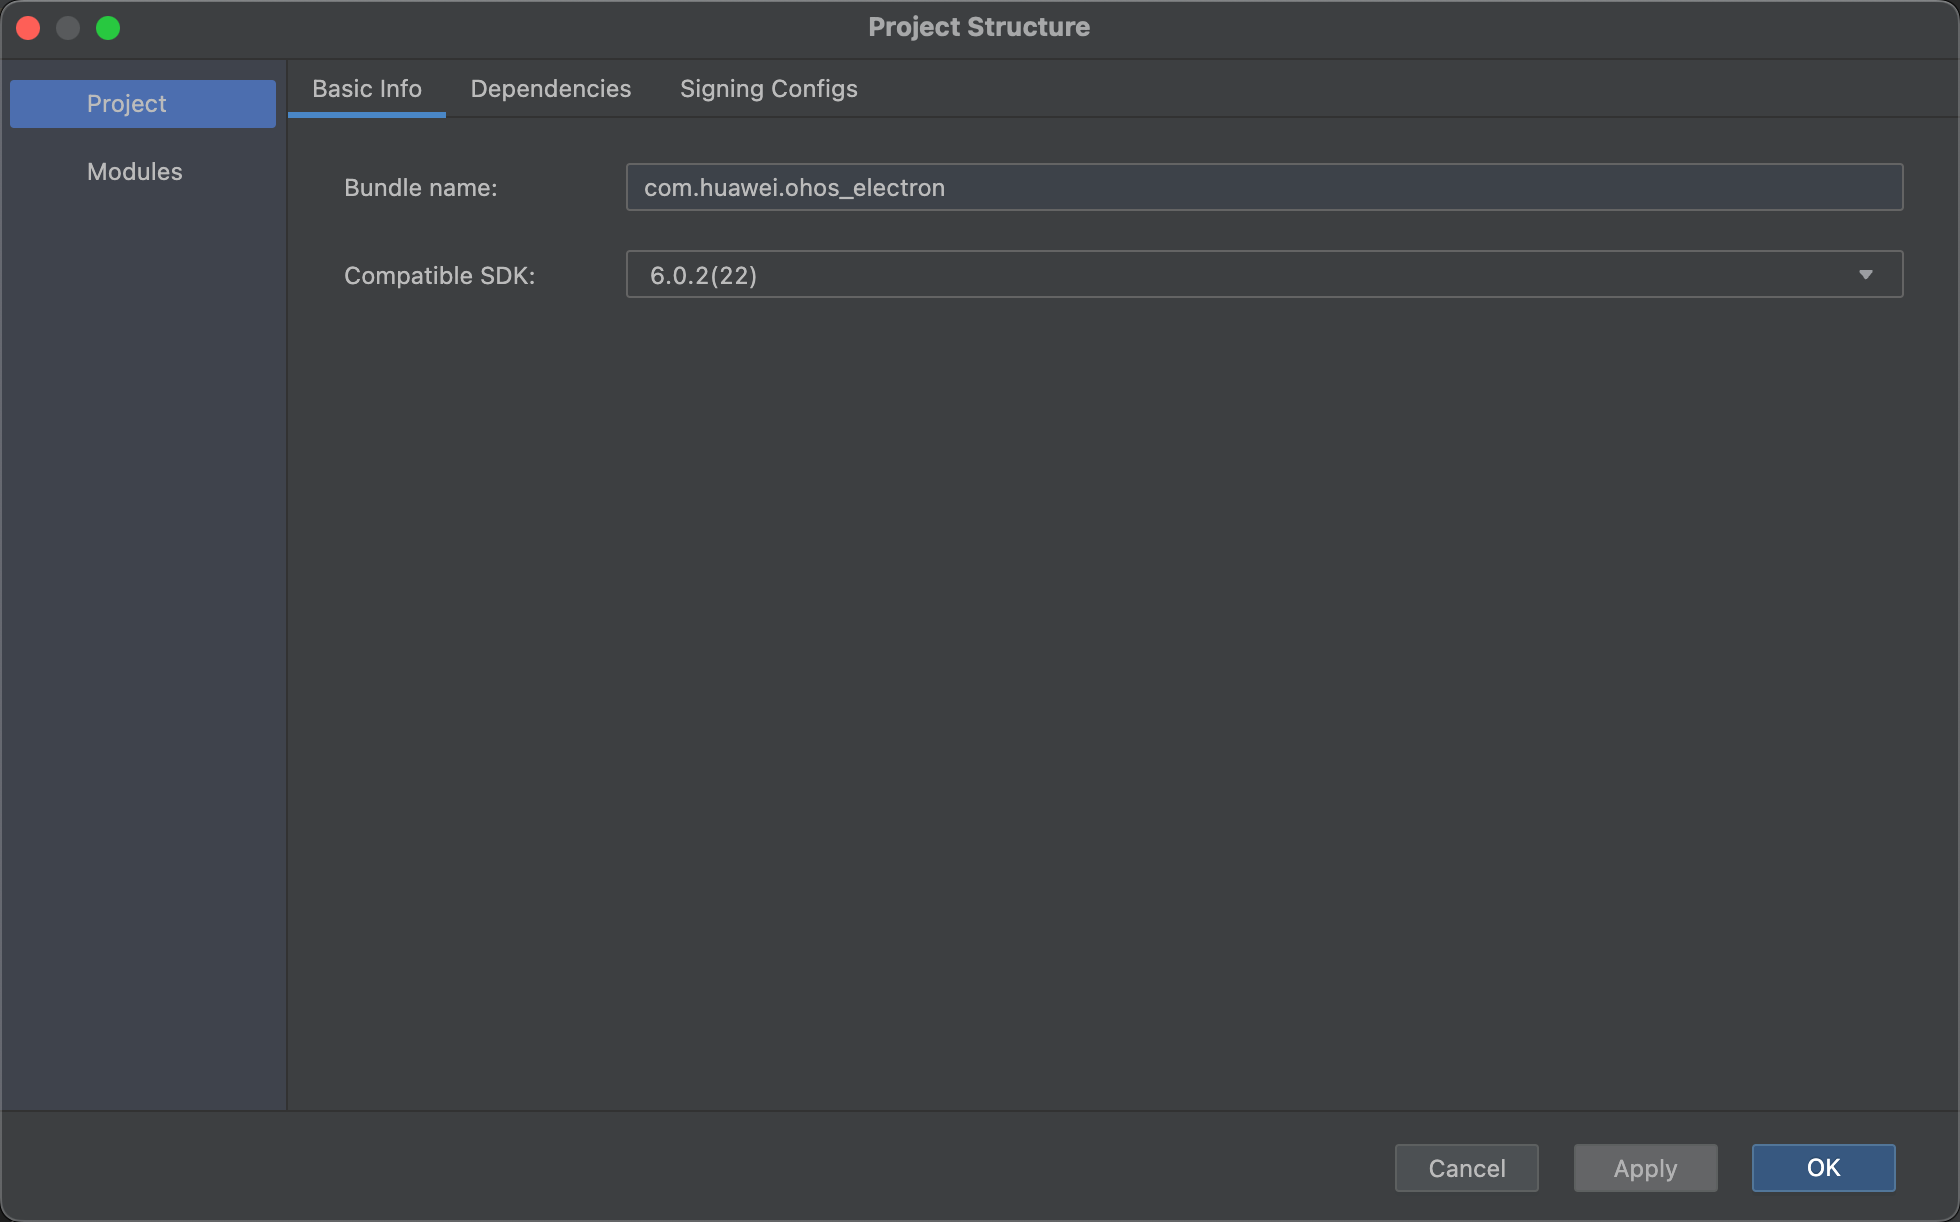
- 必须配置签名文件! 否则无法安装运行。
在Project Structure → Signing Configs中添加你的调试证书或正式证书:
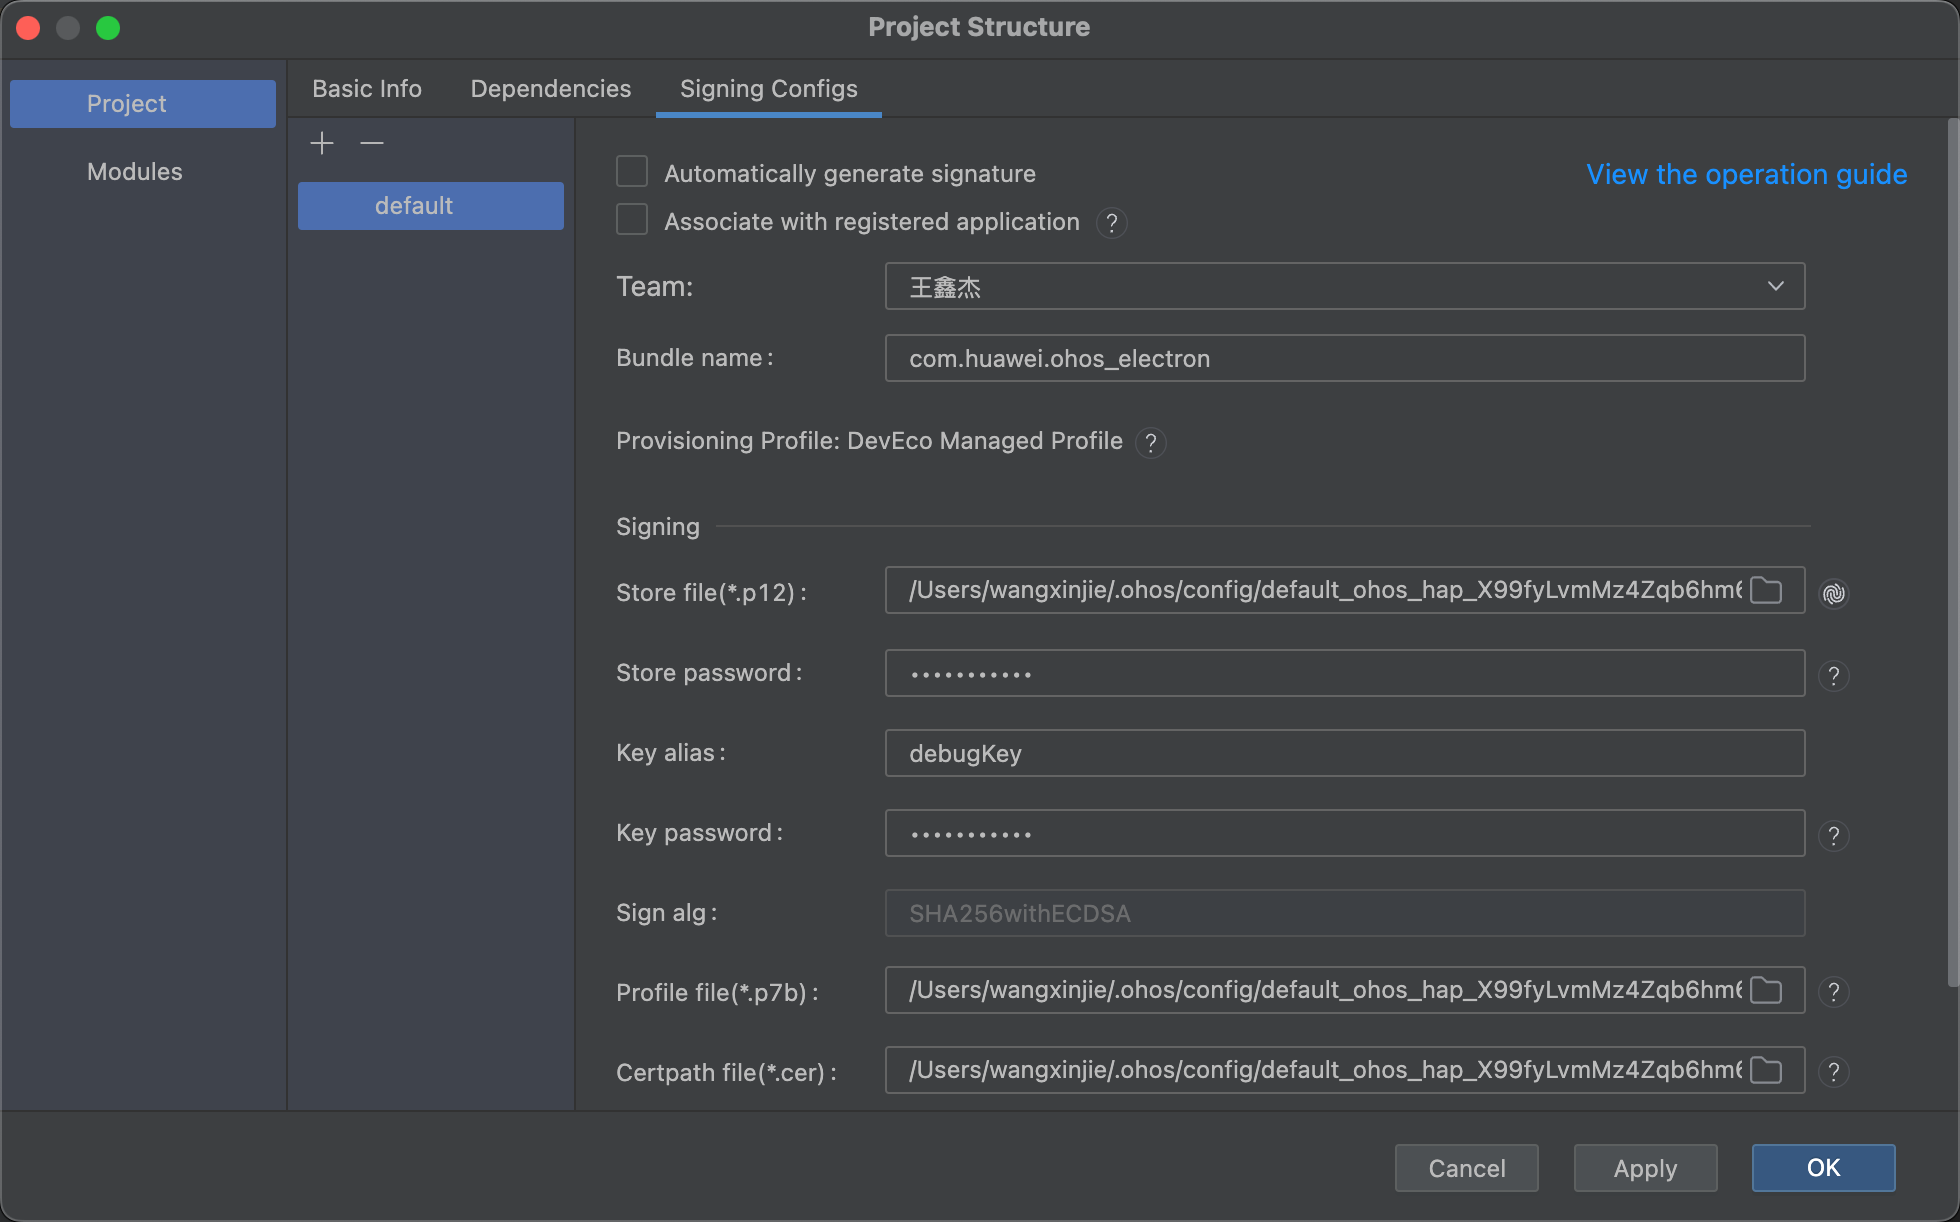
💡 小贴士:可使用 DevEco 自动生成的调试证书,仅用于本地测试。
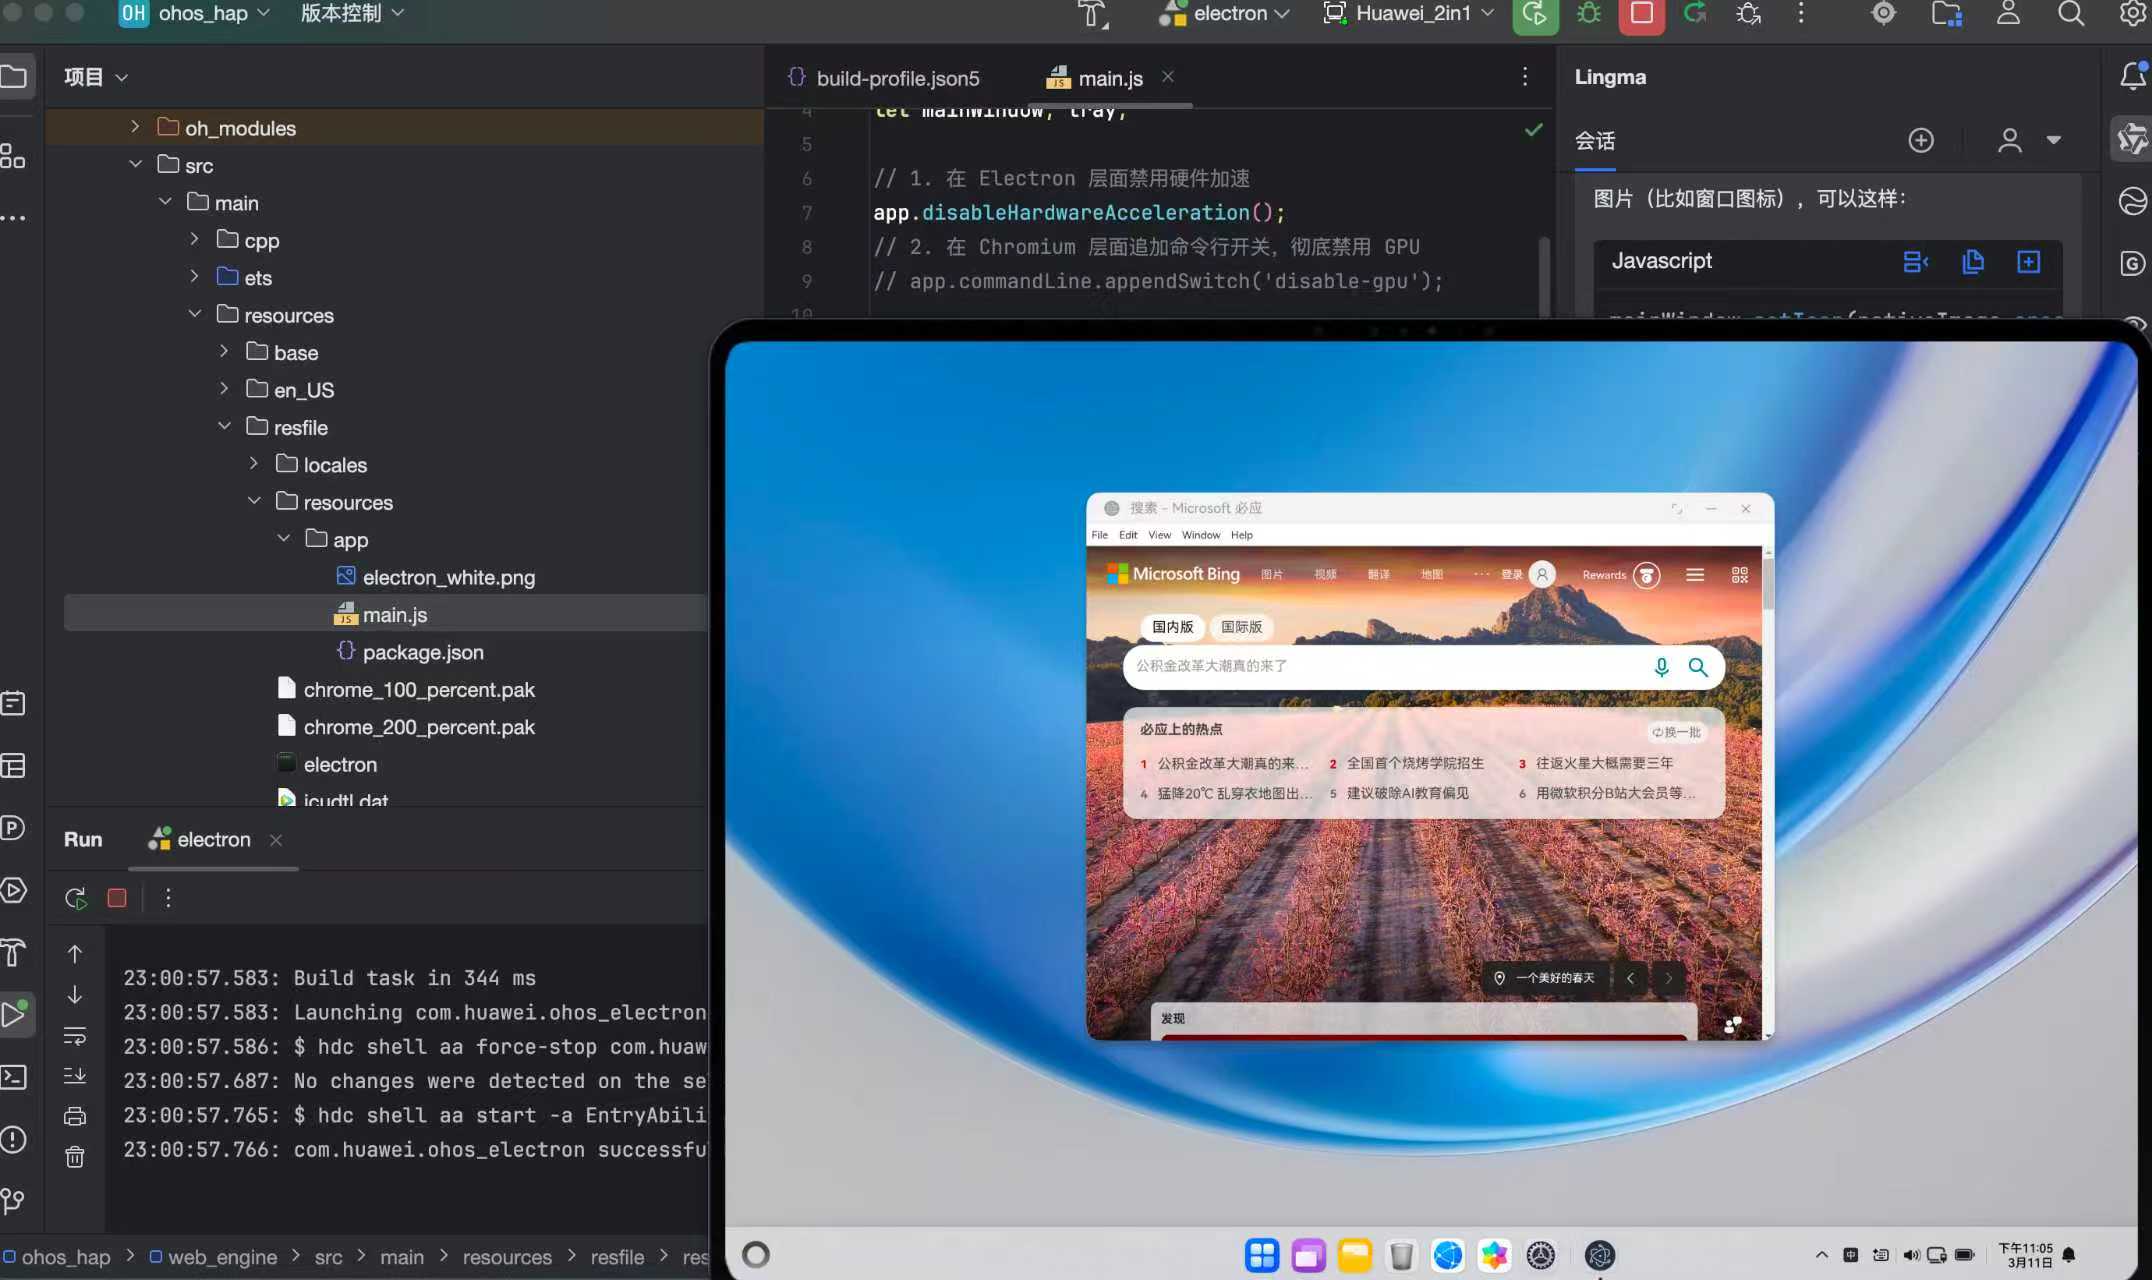
🖥️ 三、首次运行:白屏?别慌!
第一次点击运行,大概率会看到一个纯白窗口👇

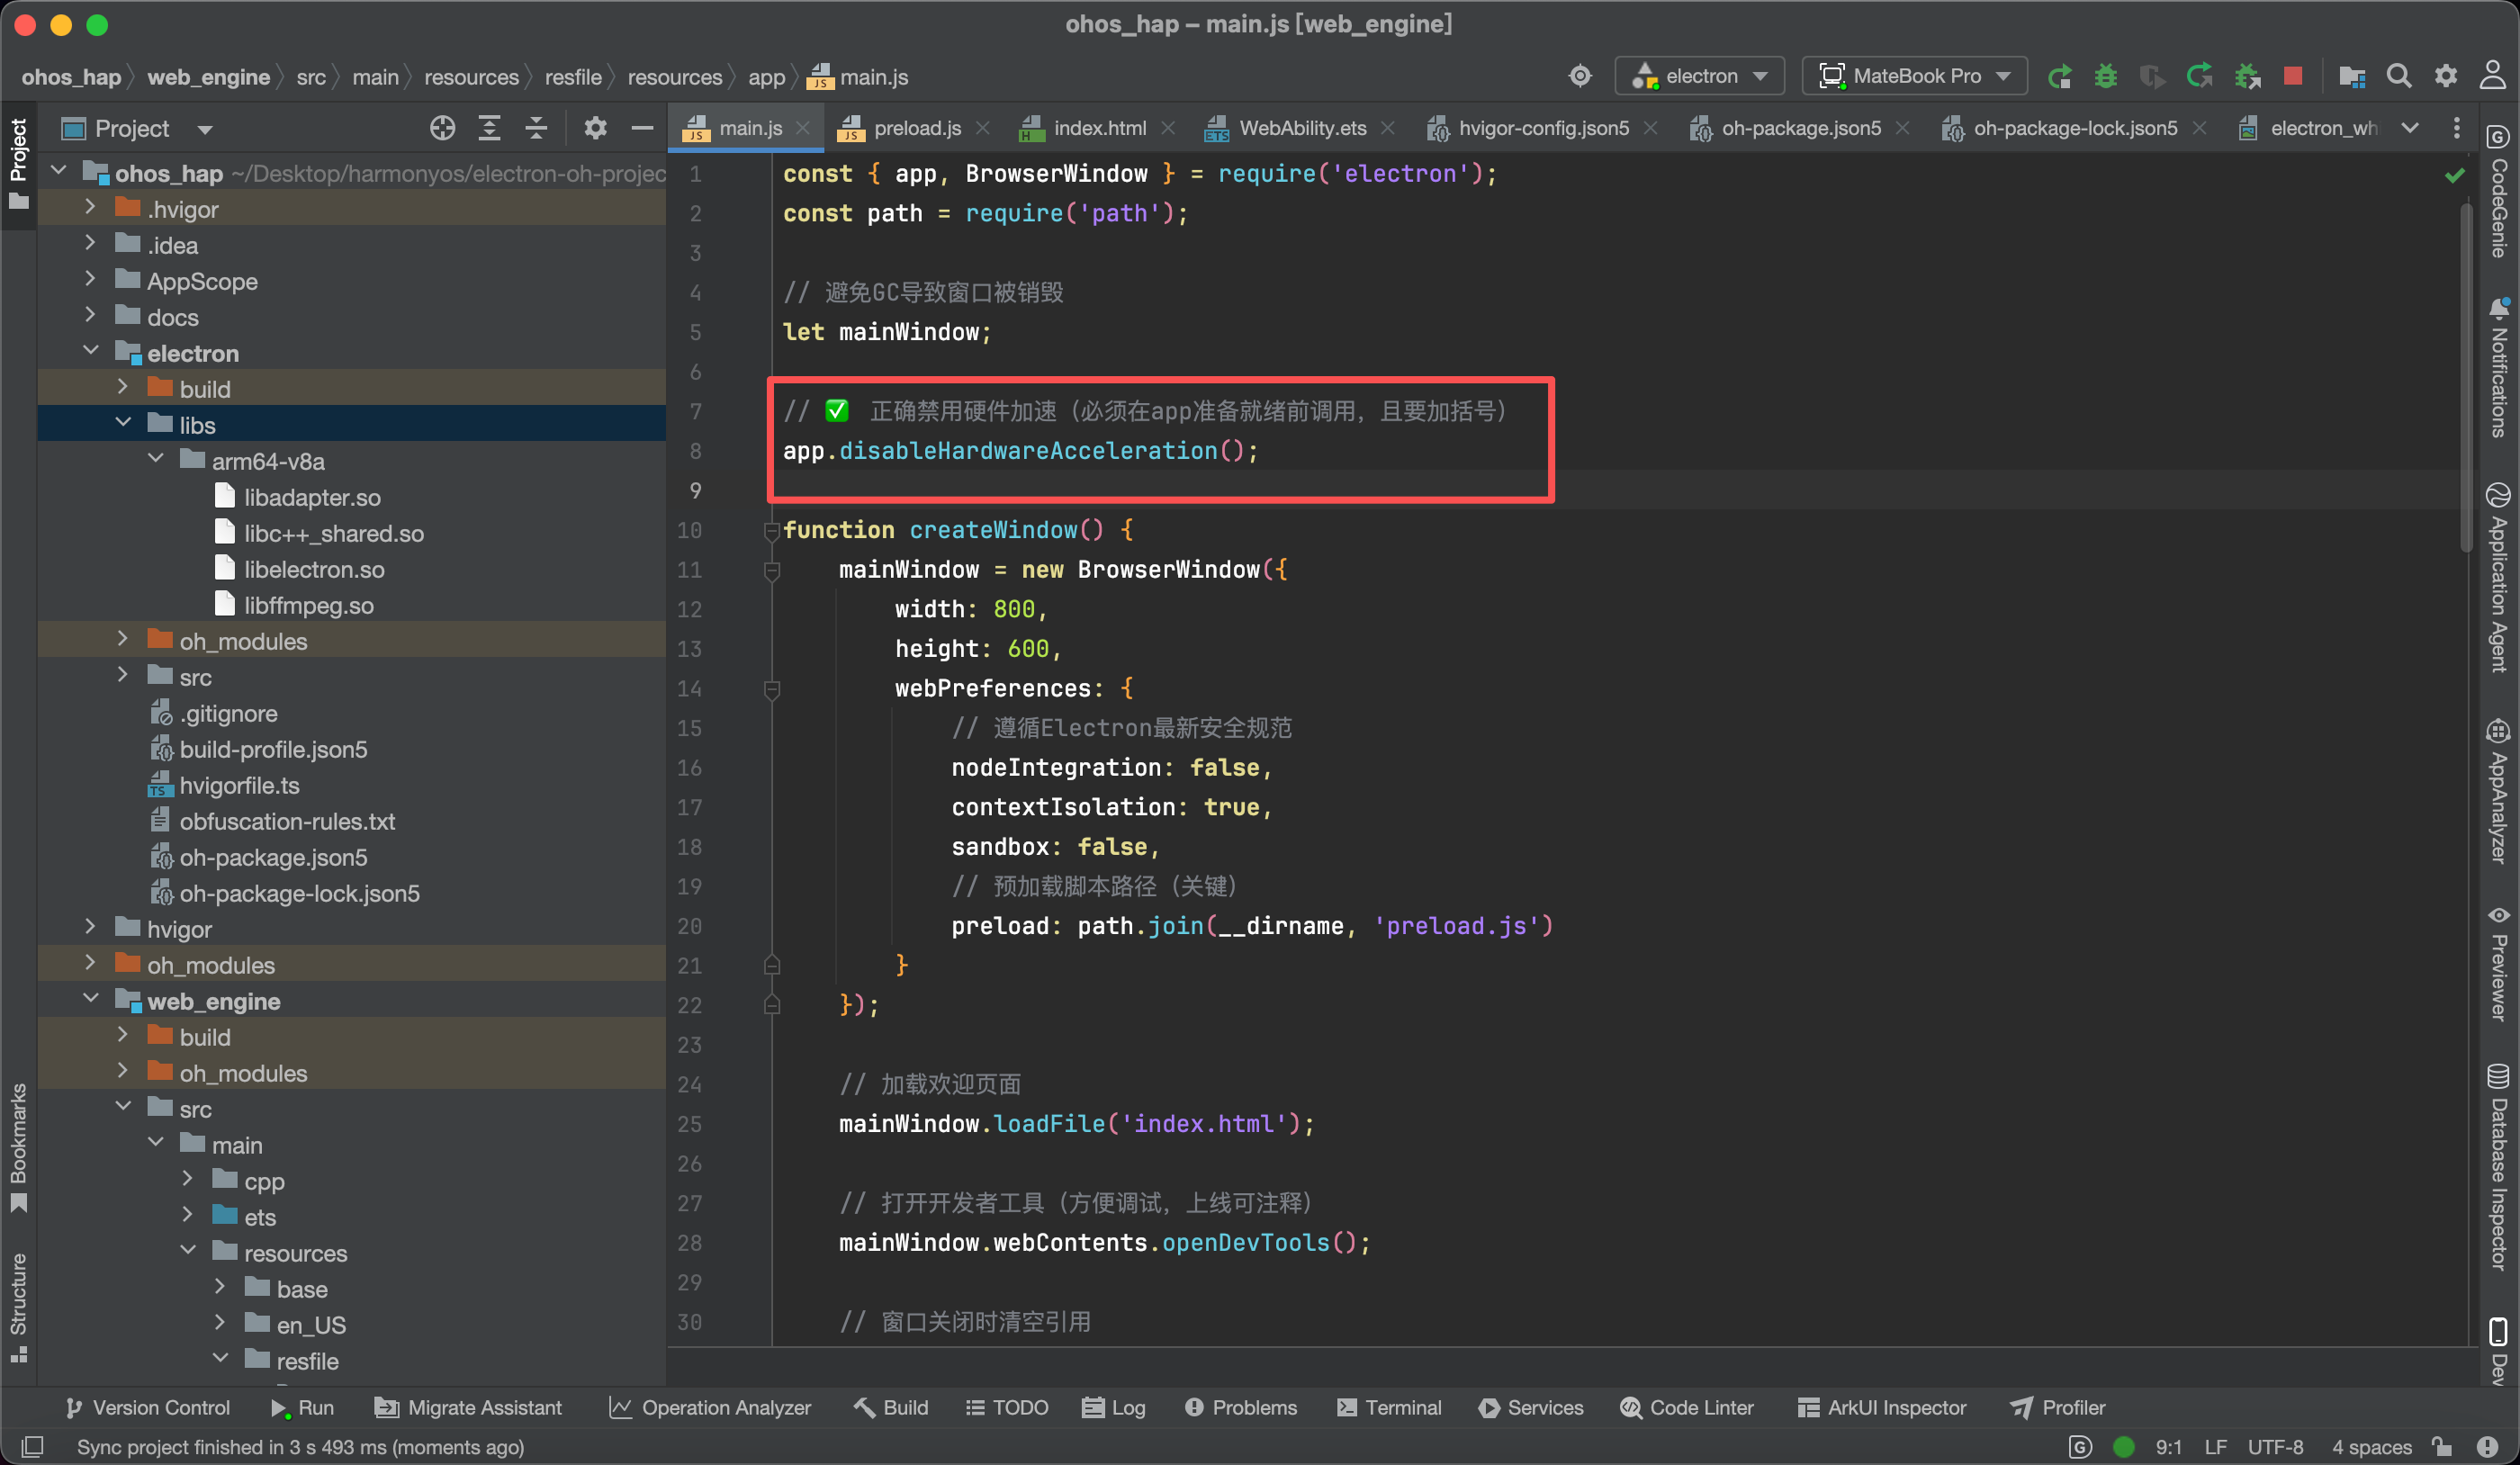
这是因为在某些 HarmonyOS PC 设备上,硬件加速与 Chromium 渲染存在兼容性问题。
✅ 解决方案:禁用硬件加速!
在 main.js 的最顶部(必须在 app.whenReady() 之前)添加:
js
const { app } = require('electron');

// ✅ 关键修复:禁用硬件加速
app.disableHardwareAcceleration();

// ...后续创建窗口逻辑
📌 注意:一定要加括号调用
(),否则无效!
保存后重新运行,恭喜你!页面终于显示出来了👇
📂 四、代码存放位置(重要!)
所有你的 Electron 应用代码(HTML/CSS/JS)必须放在以下目录:
src/main/resources/resfile/resources/app/
在这个 app 文件夹里,你可以像开发普通 Electron 应用一样,放置 index.html、main.js、preload.js 等文件。
例如我的项目结构:
app/
├── index.html
├── main.js
└── preload.js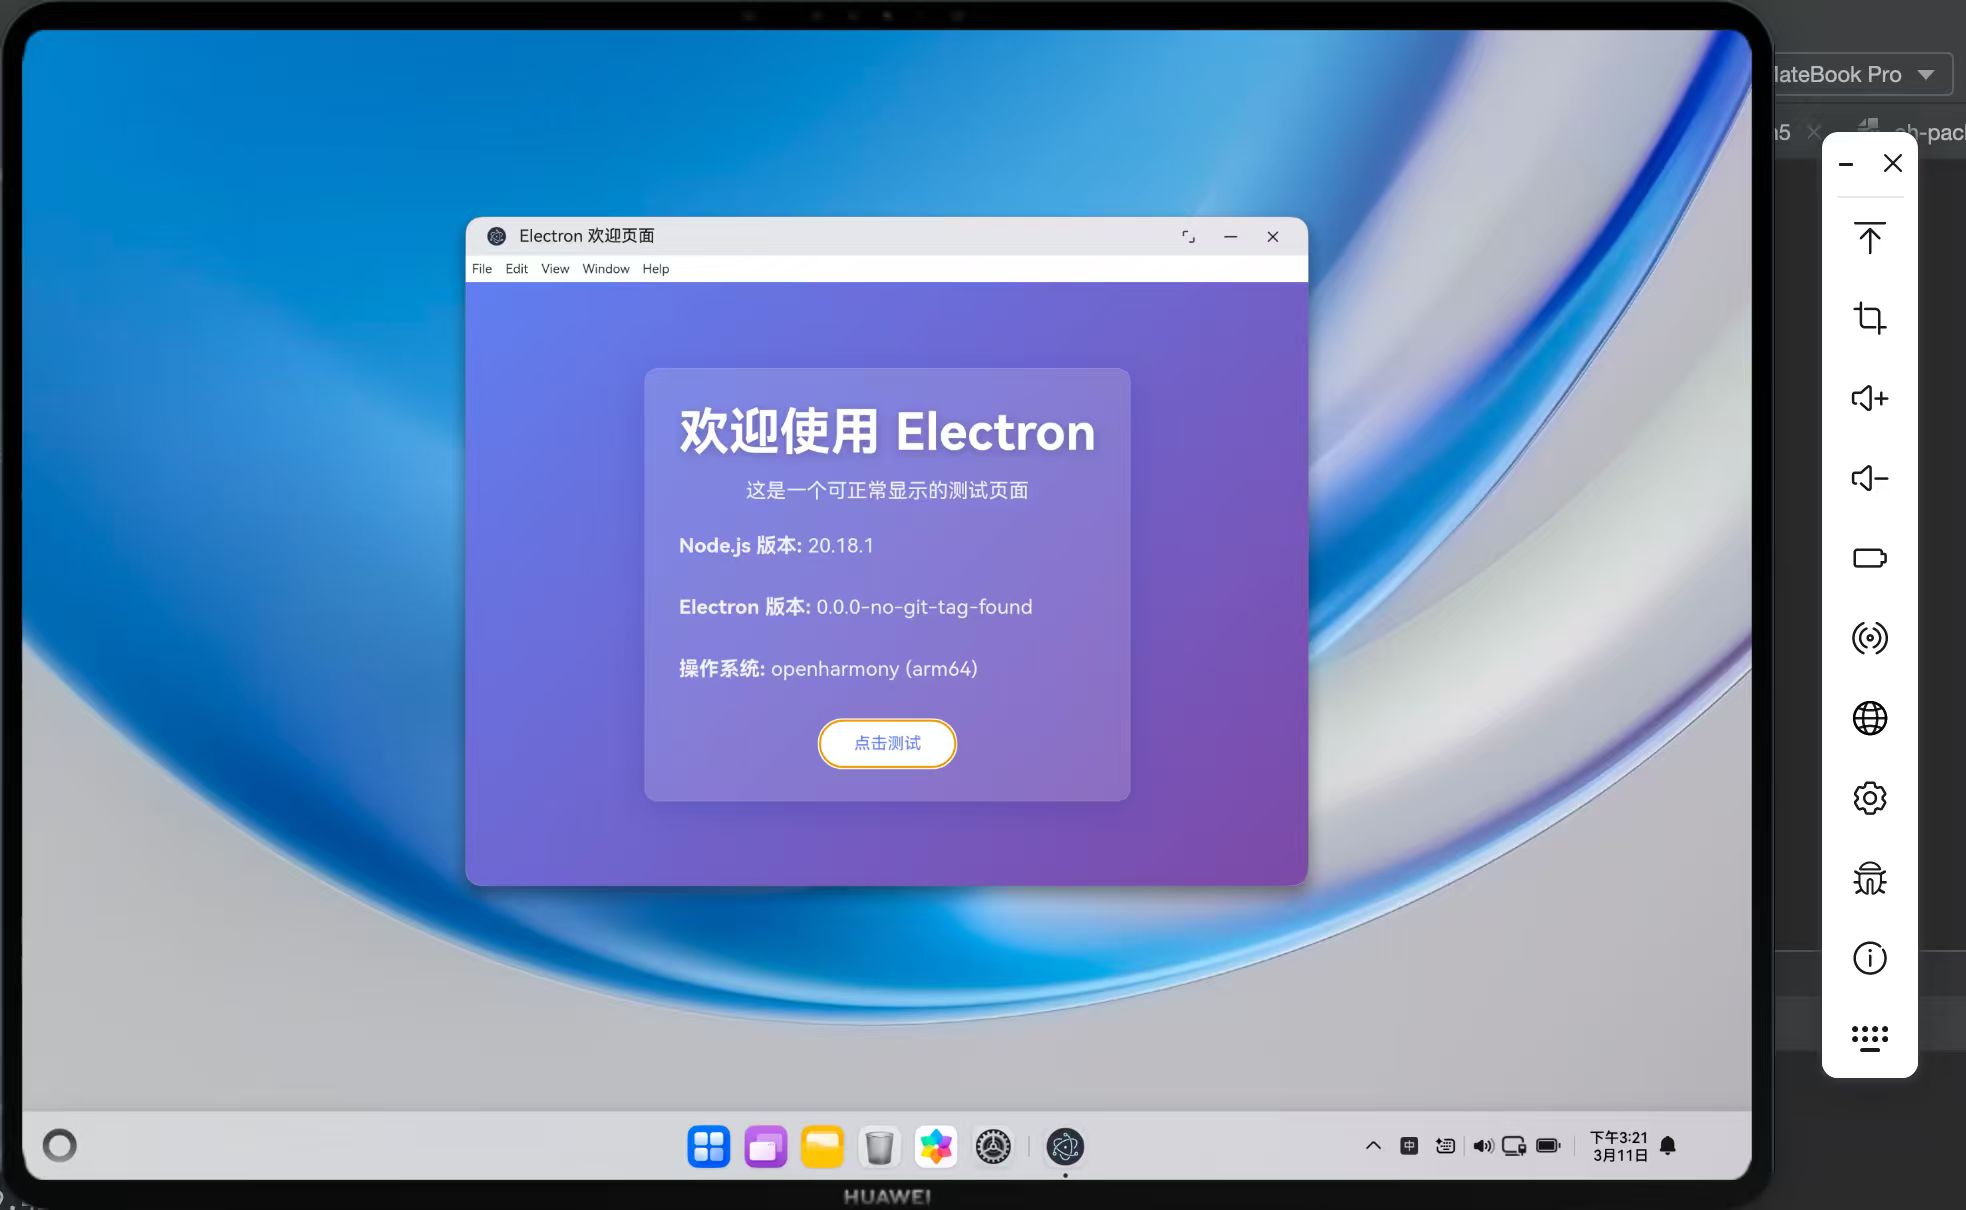
🛑 五、踩坑指南:这些雷千万别踩!
❌ 坑 1:试图在手机上运行 Electron
Electron 是桌面框架!不支持手机!
如果你在真机(手机/平板)上运行,会直接报错:
Error code: 801
Error message: Capability not supported. Failed to call the API due to limited device capabilities.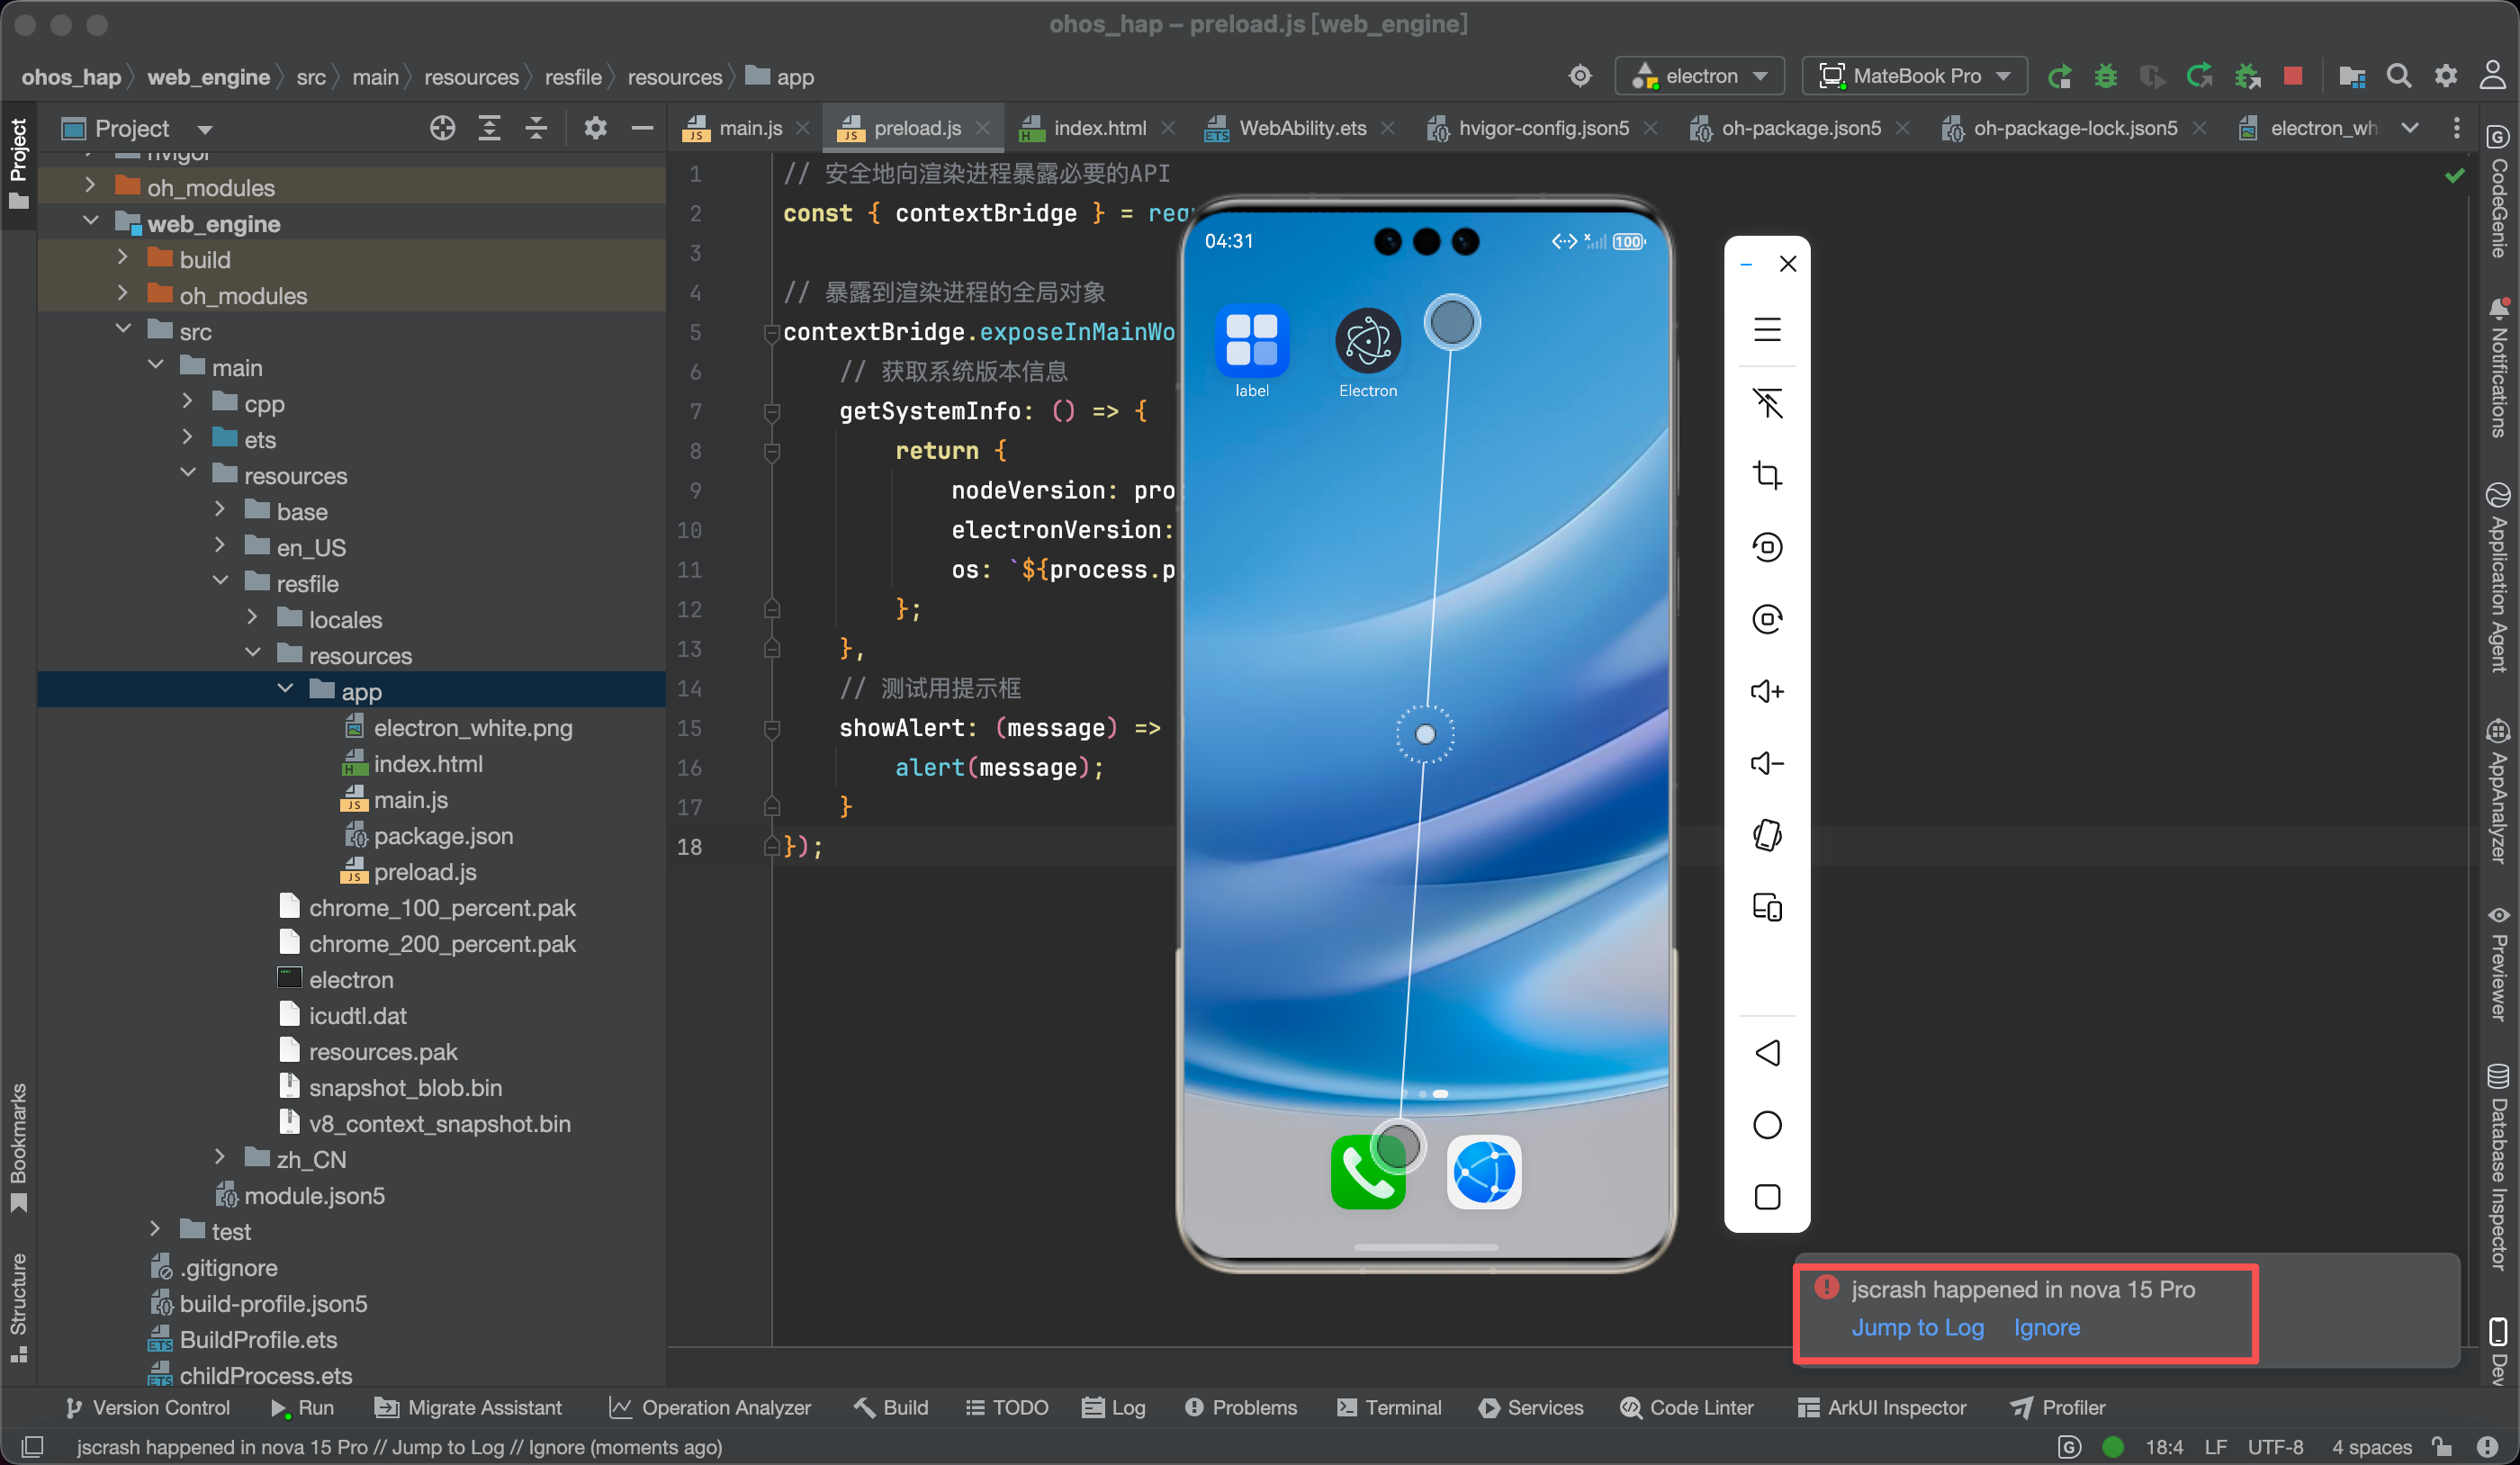
✅ 正确做法 :仅在 HarmonyOS PC 模拟器或真机 上运行。
❌ 坑 2:忘记禁用硬件加速
后果就是------白屏!永远白屏!
✅ 记住口诀 :app.disableHardwareAcceleration(); 放最前,加括号,保平安!
💻 六、源码展示:一个炫酷的欢迎页
最后附上我实现的欢迎界面核心代码,带系统信息显示和交互反馈:
index.html
html
<!DOCTYPE html>
<html lang="zh-CN">
<head>
  <meta charset="UTF-8" />
  <title>Electron 欢迎页面</title>
  <style>
    body {
      background: linear-gradient(135deg, #667eea 0%, #764ba2 100%);
      height: 100vh;
      display: flex;
      justify-content: center;
      align-items: center;
      color: white;
      font-family: 'Segoe UI', sans-serif;
    }
    .card {
      background: rgba(255,255,255,0.15);
      padding: 2rem;
      border-radius: 12px;
      backdrop-filter: blur(10px);
      text-align: center;
    }
    button {
      background: white;
      color: #667eea;
      border: none;
      padding: 0.8rem 2rem;
      border-radius: 50px;
      cursor: pointer;
      margin-top: 1rem;
    }
  </style>
</head>
<body>
  <div class="card">
    <h1>欢迎使用 Electron</h1>
    <p>Node: <span id="node"></span></p>
    <p>Electron: <span id="electron"></span></p>
    <button onclick="test()">点击测试</button>
  </div>

  <script>
    window.addEventListener('DOMContentLoaded', () => {
      const info = window.electronAPI.getSystemInfo();
      document.getElementById('node').textContent = info.nodeVersion;
      document.getElementById('electron').textContent = info.electronVersion;
    });

    function test() {
      window.electronAPI.showAlert('🎉 运行成功!');
    }
  </script>
</body>
</html>main.js(关键部分)
js
const { app, BrowserWindow } = require('electron');
const path = require('path');

// ✅ 必须放最前面!
app.disableHardwareAcceleration();

function createWindow() {
  const win = new BrowserWindow({
    width: 800,
    height: 600,
    webPreferences: {
      nodeIntegration: false,
      contextIsolation: true,
      preload: path.join(__dirname, 'preload.js')
    }
  });
  win.loadFile('index.html');
  win.webContents.openDevTools(); // 方便调试
}
// ...其余生命周期代码
preload.js
js
const { contextBridge } = require('electron');

contextBridge.exposeInMainWorld('electronAPI', {
  getSystemInfo: () => ({
    nodeVersion: process.versions.node,
    electronVersion: process.versions.electron,
    os: `${process.platform} (${process.arch})`
  }),
  showAlert: (msg) => alert(msg)
});
✅ 总结
- ✅ Electron 可在 HarmonyOS PC 端运行;
- ✅ 必须 禁用硬件加速,否则白屏;
- ✅ 代码放在
resources/app/目录下; - ✅ 不能在手机上运行,会报错 801;
- ✅ 需要正确配置 签名文件。
虽然目前生态还在早期,但能用 Web 技术开发 HarmonyOS 桌面应用,对前端开发者来说是个巨大利好!