
🎬 渡水无言 :个人主页渡水无言
❄专栏传送门 : 《linux专栏》《嵌入式linux驱动开发》《linux系统移植专栏》
❄专栏传送门 : 《freertos专栏》 《STM32 HAL库专栏》
⭐️流水不争先,争的是滔滔不绝
📚博主简介:第二十届中国研究生电子设计竞赛全国二等奖 |国家奖学金 | 省级三好学生
| 省级优秀毕业生获得者 | csdn新星杯TOP18 | 半导纵横专栏博主 | 211在读研究生
在这里主要分享自己学习的linux嵌入式领域知识;有分享错误或者不足的地方欢迎大佬指导,也欢迎各位大佬互相三连

目录
[1.2 本次实验设计思路](#1.2 本次实验设计思路)
[3.1 互斥体 LED 驱动代码(mutex.c)](#3.1 互斥体 LED 驱动代码(mutex.c))
[3.2.1、设备结构体定义(28-39 行)](#3.2.1、设备结构体定义(28-39 行))
[3.2.2、设备打开函数(50-63 行)](#3.2.2、设备打开函数(50-63 行))
[3.2.3、设备写操作函数(86-107 行)](#3.2.3、设备写操作函数(86-107 行))
[3.2.4、设备释放函数(114-122 行)](#3.2.4、设备释放函数(114-122 行))
[3.2.5驱动入口函数(138-201 行)](#3.2.5驱动入口函数(138-201 行))
[3.2.6、驱动出口函数(208-216 行)](#3.2.6、驱动出口函数(208-216 行))
[4.1、编译驱动程序和测试 APP](#4.1、编译驱动程序和测试 APP)
前言
前几期博客我们分别用原子操作、自旋锁、信号量实现了 LED 设备的互斥访问,但信号量本质是 "同步原语",仅靠二值信号量实现互斥略显 "大材小用"。Linux 内核专门提供了互斥体为 "互斥访问" 量身定制的同步机制,语法更简洁、语义更明确,是进程上下文互斥的首选方案。
一、实验基础说明
1.1、互斥体简介
前面讲信号量的时候提到,把信号量值设为1,就能实现互斥访问(一次只能一个线程访问资源)。但Linux内核专门提供了一个更专业的互斥机制------互斥体。
简单说:互斥体就是"专门用来做互斥"的工具,比二值信号量更轻量、更规范,是驱动开发中实现互斥访问的首选。
学过FreeRTOS的小伙伴肯定清楚,互斥体的核心就是"一次只能一个持有者",和二值信号量类似,但有几个关键区别:
互斥体不能递归上锁/解锁:线程已经持有互斥体,再去申请同一个,直接死锁(自己等自己释放)。
互斥体的持有者必须释放:谁上锁,谁解锁,不能由其他线程释放(信号量可以)。
互斥体只能用于线程上下文:和信号量一样,会导致线程休眠,不能用于中断。
💡 生活类比:卫生间的门锁(互斥体),一次只能一个人用,必须自己开门、自己关门,不能替别人关门,也不能自己锁门后再锁一次。
Linux内核用 struct mutex 结构体表示互斥体(定义在 <include/linux/mutex.h>),省略条件编译后结构如下:
struct mutex {
    /* 1: 未上锁, 0: 已上锁, 负数: 已上锁且有等待线程 */
    atomic_t count;
    spinlock_t wait_lock; // 自旋锁,保护等待队列
};
👉 互斥体使用注意事项(必看!避免踩坑):
不能用于中断上下文:会导致休眠,中断无法休眠,只能用自旋锁。
临界区可以调用休眠函数:和信号量一样,因为线程可以休眠,所以允许调用copy_from_user、msleep等函数。
不能递归操作:同一线程不能多次上锁,否则死锁。
严格互斥:一次只能一个线程持有,适合需要"独占资源"的场景(比如设备的打开/关闭操作)。
1.2 本次实验设计思路
互斥体的使用逻辑与二值信号量高度相似,但 API 更简洁:
初始化互斥体,代表 LED 设备初始为空闲状态;
open函数调用mutex_lock_interruptible获取互斥体:
成功:独占 LED 设备;
失败:进程休眠,等待其他进程释放;
release函数调用mutex_unlock释放互斥体,唤醒休眠进程;
设备树、硬件、测试 APP 完全复用信号量实验代码,仅替换同步机制为互斥体。
实验在此次博客基础上实现:
ARM Linux 驱动开发篇--- Linux 并发与竞争实验(信号量实现 LED 设备互斥访问)--- Ubuntu20.04信号量实验-CSDN博客
二、硬件原理分析(看过之前博客的可以忽略)
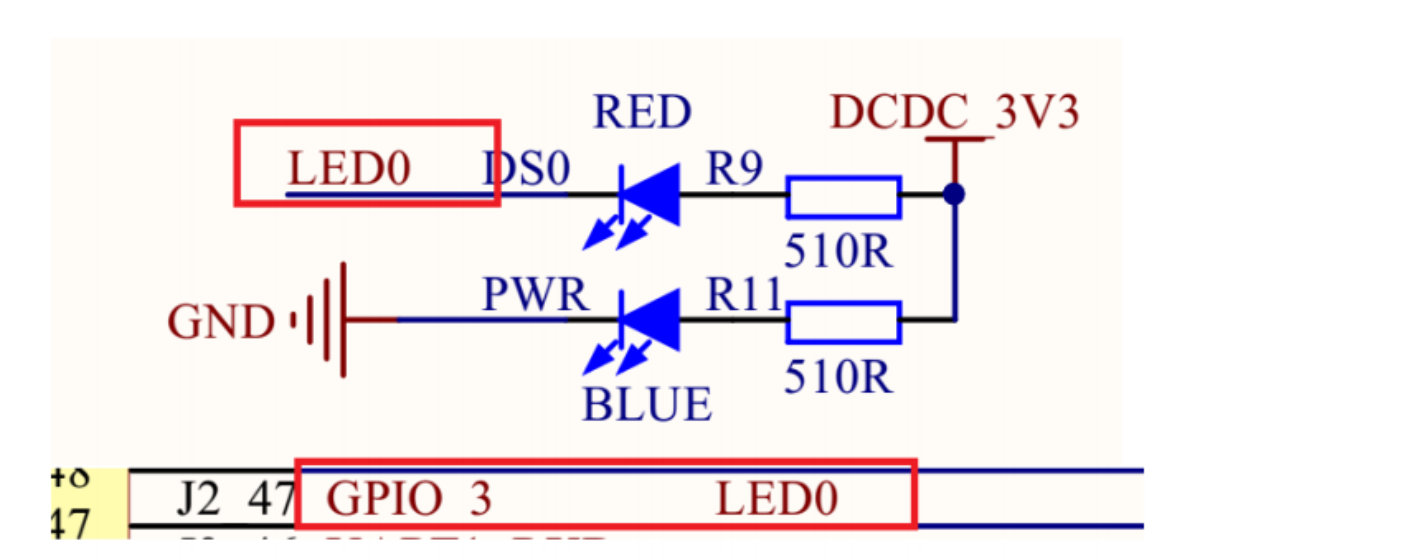
从图中可以看出,LED0 接到了 GPIO_3 上,GPIO_3 就是 GPIO1_IO03,当 GPIO1_IO03 输出低电平 (0) 的时候发光二极管 LED0 就会导通点亮,当 GPIO1_IO03 输出高电平 (1) 的时候发光二极管 LED0 不会导通,因此 LED0 也就不会点亮。所以 LED0 的亮灭取决于 GPIO1_IO03 的输出电平,输出 0 就亮,输出 1 就灭。
三、实验程序编写
本次实验基于上一节自旋锁的 LED 驱动修改,仅替换同步机制为信号量,硬件和设备树无需修改。把 semaphore.c改成mutex.c文件。
3.1 互斥体 LED 驱动代码(mutex.c)
  1 #include <linux/types.h>
  2 #include <linux/kernel.h>
  3 #include <linux/delay.h>
  4 #include <linux/ide.h>
  5 #include <linux/init.h>
  6 #include <linux/module.h>
  7 #include <linux/errno.h>
  8 #include <linux/gpio.h>
  9 #include <linux/cdev.h>
 10 #include <linux/device.h>
 11 #include <linux/of.h>
 12 #include <linux/of_address.h>
 13 #include <linux/of_gpio.h>
 14 #include <linux/semaphore.h>
 15 #include <asm/mach/map.h>
 16 #include <asm/uaccess.h>
 17 #include <asm/io.h>
 18 /***************************************************************
 19 描述	   	: 互斥体实验,使用互斥体来实现对实现设备的互斥访问
 20 其他	   	: 无
 21 ***************************************************************/
 22 #define GPIOLED_CNT			1		  	/* 设备号个数 */
 23 #define GPIOLED_NAME		"gpioled"	/* 名字 */
 24 #define LEDOFF 				0			/* 关灯 */
 25 #define LEDON 				1			/* 开灯 */
 26
 27
 28 /* gpioled设备结构体 */
 29 struct gpioled_dev{
 30 	dev_t devid;			/* 设备号 	 */
 31 	struct cdev cdev;		/* cdev 	*/
 32 	struct class *class;	/* 类 		*/
 33 	struct device *device;	/* 设备 	 */
 34 	int major;				/* 主设备号	  */
 35 	int minor;				/* 次设备号   */
 36 	struct device_node	*nd; /* 设备节点 */
 37 	int led_gpio;			/* led所使用的GPIO编号		*/
 38 	struct mutex lock;		/* 互斥体:核心同步成员 */
 39 };
 40
 41 struct gpioled_dev gpioled;	/* led设备 */
 42
 43 /*
 44  * @description		: 打开设备
 45  * @param - inode 	: 传递给驱动的inode
 46  * @param - filp 	: 设备文件,file结构体有个叫做private_data的成员变量
 47  * 					  一般在open的时候将private_data指向设备结构体。
 48  * @return 			: 0 成功;其他 失败
 49  */
 50 static int led_open(struct inode *inode, struct file *filp)
 51 {
 52 	filp->private_data = &gpioled; /* 设置私有数据 */
 53
 54 	/* 获取互斥体,可以被信号打断 */
 55 	if (mutex_lock_interruptible(&gpioled.lock)) {
 56 		return -ERESTARTSYS;
 57 	}
 58 #if 0
 59 	mutex_lock(&gpioled.lock);	/* 不能被信号打断 */
 60 #endif
 61
 62 	return 0;
 63 }
 64
 65 /*
 66  * @description		: 从设备读取数据
 67  * @param - filp 	: 要打开的设备文件(文件描述符)
 68  * @param - buf 	: 返回给用户空间的数据缓冲区
 69  * @param - cnt 	: 要读取的数据长度
 70  * @param - offt 	: 相对于文件首地址的偏移
 71  * @return 			: 读取的字节数,如果为负值,表示读取失败
 72  */
 73 static ssize_t led_read(struct file *filp, char __user *buf, size_t cnt, loff_t *offt)
 74 {
 75 	return 0;
 76 }
 77
 78 /*
 79  * @description		: 向设备写数据
 80  * @param - filp 	: 设备文件,表示打开的文件描述符
 81  * @param - buf 	: 要写给设备写入的数据
 82  * @param - cnt 	: 要写入的数据长度
 83  * @param - offt 	: 相对于文件首地址的偏移
 84  * @return 			: 写入的字节数,如果为负值,表示写入失败
 85  */
 86 static ssize_t led_write(struct file *filp, const char __user *buf, size_t cnt, loff_t *offt)
 87 {
 88 	int retvalue;
 89 	unsigned char databuf[1];
 90 	unsigned char ledstat;
 91 	struct gpioled_dev *dev = filp->private_data;
 92
 93 	retvalue = copy_from_user(databuf, buf, cnt);
 94 	if(retvalue < 0) {
 95 		printk("kernel write failed!\r\n");
 96 		return -EFAULT;
 97 	}
 98
 99 	ledstat = databuf[0];		/* 获取状态值 */
100
101 	if(ledstat == LEDON) {
102 		gpio_set_value(dev->led_gpio, 0);	/* 打开LED灯 */
103 	} else if(ledstat == LEDOFF) {
104 		gpio_set_value(dev->led_gpio, 1);	/* 关闭LED灯 */
105 	}
106 	return 0;
107 }
108
109 /*
110  * @description		: 关闭/释放设备
111  * @param - filp 	: 要关闭的设备文件(文件描述符)
112  * @return 			: 0 成功;其他 失败
113  */
114 static int led_release(struct inode *inode, struct file *filp)
115 {
116 	struct gpioled_dev *dev = filp->private_data;
117
118 	/* 释放互斥锁 */
119 	mutex_unlock(&dev->lock);
120
121 	return 0;
122 }
123
124 /* 设备操作函数 */
125 static struct file_operations gpioled_fops = {
126 	.owner = THIS_MODULE,
127 	.open = led_open,
128 	.read = led_read,
129 	.write = led_write,
130 	.release = 	led_release,
131 };
132
133 /*
134  * @description	: 驱动入口函数
135  * @param 		: 无
136  * @return 		: 无
137  */
138 static int __init led_init(void)
139 {
140 	int ret = 0;
141
142 	/* 初始化互斥体 */
143 	mutex_init(&gpioled.lock);
144
145 	/* 设置LED所使用的GPIO */
146 	/* 1、获取设备节点:gpioled */
147 	gpioled.nd = of_find_node_by_path("/gpioled");
148 	if(gpioled.nd == NULL) {
149 		printk("gpioled node not find!\r\n");
150 		return -EINVAL;
151 	} else {
152 		printk("gpioled node find!\r\n");
153 	}
154
155 	/* 2、 获取设备树中的gpio属性,得到LED所使用的LED编号 */
156 	gpioled.led_gpio = of_get_named_gpio(gpioled.nd, "led-gpio", 0);
157 	if(gpioled.led_gpio < 0) {
158 		printk("can't get led-gpio");
159 		return -EINVAL;
160 	}
161 	printk("led-gpio num = %d\r\n", gpioled.led_gpio);
162
163 	/* 3、设置GPIO1_IO03为输出,并且输出高电平,默认关闭LED灯 */
164 	ret = gpio_direction_output(gpioled.led_gpio, 1);
165 	if(ret < 0) {
166 		printk("can't set gpio!\r\n");
167 	}
168
169 	/* 注册字符设备驱动 */
170 	/* 1、创建设备号 */
171 	if (gpioled.major) {		/*  定义了设备号 */
172 		gpioled.devid = MKDEV(gpioled.major, 0);
173 		register_chrdev_region(gpioled.devid, GPIOLED_CNT, GPIOLED_NAME);
174 	} else {						/* 没有定义设备号 */
175 		alloc_chrdev_region(&gpioled.devid, 0, GPIOLED_CNT, GPIOLED_NAME);	/* 申请设备号 */
176 		gpioled.major = MAJOR(gpioled.devid);	/* 获取分配号的主设备号 */
177 		gpioled.minor = MINOR(gpioled.devid);	/* 获取分配号的次设备号 */
178 	}
179 	printk("gpioled major=%d,minor=%d\r\n",gpioled.major, gpioled.minor);
180
181 	/* 2、初始化cdev */
182 	gpioled.cdev.owner = THIS_MODULE;
183 	cdev_init(&gpioled.cdev, &gpioled_fops);
184
185 	/* 3、添加一个cdev */
186 	cdev_add(&gpioled.cdev, gpioled.devid, GPIOLED_CNT);
187
188 	/* 4、创建类 */
189 	gpioled.class = class_create(THIS_MODULE, GPIOLED_NAME);
190 	if (IS_ERR(gpioled.class)) {
191 		return PTR_ERR(gpioled.class);
192 	}
193
194 	/* 5、创建设备 */
195 	gpioled.device = device_create(gpioled.class, NULL, gpioled.devid, NULL, GPIOLED_NAME);
196 	if (IS_ERR(gpioled.device)) {
197 		return PTR_ERR(gpioled.device);
198 	}
199
200 	return 0;
201 }
202
203 /*
204  * @description	: 驱动出口函数
205  * @param 		: 无
206  * @return 		: 无
207  */
208 static void __exit led_exit(void)
209 {
210 	/* 注销字符设备驱动 */
211 	cdev_del(&gpioled.cdev);/*  删除cdev */
212 	unregister_chrdev_region(gpioled.devid, GPIOLED_CNT); /* 注销设备号 */
213
214 	device_destroy(gpioled.class, gpioled.devid);
215 	class_destroy(gpioled.class);
216 }
217
218 module_init(led_init);
219 module_exit(led_exit);
220 MODULE_LICENSE("GPL");
221 MODULE_AUTHOR("duan");
3.2、驱动代码分段解析
3.2.1、设备结构体定义(28-39 行)
28 /* gpioled设备结构体 */
29 struct gpioled_dev{
30 	dev_t devid;			/* 设备号 	 */
31 	struct cdev cdev;		/* cdev 	*/
32 	struct class *class;	/* 类 		*/
33 	struct device *device;	/* 设备 	 */
34 	int major;				/* 主设备号	  */
35 	int minor;				/* 次设备号   */
36 	struct device_node	*nd; /* 设备节点 */
37 	int led_gpio;			/* led所使用的GPIO编号		*/
38 	struct mutex lock;		/* 互斥体:核心同步成员 */
39 };
核心修改点(38 行):
用struct mutex lock替代原信号量成员,是实现互斥访问的核心载体;
其余成员为字符设备驱动标准成员:负责设备号管理、GPIO 解析、设备节点创建等基础功能;
互斥体无需计数值:天然为 "二值" 设计,初始状态为 "可用",无需像信号量那样设置sema_init(&sem, 1)
3.2.2、设备打开函数(50-63 行)
50 static int led_open(struct inode *inode, struct file *filp)
51 {
52 	filp->private_data = &gpioled; /* 设置私有数据 */
53
54 	/* 获取互斥体,可以被信号打断 */
55 	if (mutex_lock_interruptible(&gpioled.lock)) {
56 		return -ERESTARTSYS;
57 	}
58 #if 0
59 	mutex_lock(&gpioled.lock);	/* 不能被信号打断 */
60 #endif
61
62 	return 0;
63 }
52 行:将设备结构体指针赋值给filp->private_data,后续write/release函数可通过该指针访问设备结构体;
55-57 行(核心):调用mutex_lock_interruptible获取互斥体:
成功:互斥体被当前进程持有,其他进程无法获取,实现 LED 独占访问;
失败:进程进入可中断休眠状态(可被kill、Ctrl+C等信号打断),返回-ERESTARTSYS,避免进程僵死;
59 行(注释):mutex_lock为 "不可中断获取",进程休眠时无法被信号唤醒,易导致死锁,实际开发中严禁使用;
3.2.3、设备写操作函数(86-107 行)
86 static ssize_t led_write(struct file *filp, const char __user *buf, size_t cnt, loff_t *offt)
87 {
88 	int retvalue;
89 	unsigned char databuf[1];
90 	unsigned char ledstat;
91 	struct gpioled_dev *dev = filp->private_data;
92
93 	retvalue = copy_from_user(databuf, buf, cnt);
94 	if(retvalue < 0) {
95 		printk("kernel write failed!\r\n");
96 		return -EFAULT;
97 	}
98
99 	ledstat = databuf[0];		/* 获取状态值 */
100
101 	if(ledstat == LEDON) {
102 		gpio_set_value(dev->led_gpio, 0);	/* 打开LED灯 */
103 	} else if(ledstat == LEDOFF) {
104 		gpio_set_value(dev->led_gpio, 1);	/* 关闭LED灯 */
105 	}
106 	return 0;
107 }
91 行:从filp->private_data取出设备结构体指针;
93 行:copy_from_user将用户空间的控制指令(LED 亮 / 灭)拷贝到内核空间,是内核与用户空间数据交互的标准函数;
101-105 行:根据用户指令控制 GPIO 电平,实现 LED 亮灭;
无需额外同步:因open函数已通过互斥体保证只有一个进程能进入,天然实现互斥访问。
3.2.4、设备释放函数(114-122 行)
114 static int led_release(struct inode *inode, struct file *filp)
115 {
116 	struct gpioled_dev *dev = filp->private_data;
117
118 	/* 释放互斥锁 */
119 	mutex_unlock(&dev->lock);
120
121 	return 0;
122 }
119 行(核心):调用mutex_unlock释放互斥体:
互斥体计数值恢复为 "可用";
内核自动唤醒等待该互斥体的休眠进程,使其获取互斥体并继续执行;
对比信号量:mutex_unlock ≈ up,但互斥体禁止 "跨进程释放"(必须由持有者释放),降低死锁风险。
3.2.5驱动入口函数(138-201 行)
138 static int __init led_init(void)
139 {
140 	int ret = 0;
141
142 	/* 初始化互斥体 */
143 	mutex_init(&gpioled.lock);
144
145 	/* 设置LED所使用的GPIO */
146 	/* 1、获取设备节点:gpioled */
147 	gpioled.nd = of_find_node_by_path("/gpioled");
148 	if(gpioled.nd == NULL) {
149 		printk("gpioled node not find!\r\n");
150 		return -EINVAL;
151 	} else {
152 		printk("gpioled node find!\r\n");
153 	}
154
155 	/* 2、 获取设备树中的gpio属性,得到LED所使用的LED编号 */
156 	gpioled.led_gpio = of_get_named_gpio(gpioled.nd, "led-gpio", 0);
157 	if(gpioled.led_gpio < 0) {
158 		printk("can't get led-gpio");
159 		return -EINVAL;
160 	}
161 	printk("led-gpio num = %d\r\n", gpioled.led_gpio);
162
163 	/* 3、设置GPIO1_IO03为输出,并且输出高电平,默认关闭LED灯 */
164 	ret = gpio_direction_output(gpioled.led_gpio, 1);
165 	if(ret < 0) {
166 		printk("can't set gpio!\r\n");
167 	}
168
169 	/* 注册字符设备驱动 */
170 	/* 1、创建设备号 */
171 	if (gpioled.major) {		/*  定义了设备号 */
172 		gpioled.devid = MKDEV(gpioled.major, 0);
173 		register_chrdev_region(gpioled.devid, GPIOLED_CNT, GPIOLED_NAME);
174 	} else {						/* 没有定义设备号 */
175 		alloc_chrdev_region(&gpioled.devid, 0, GPIOLED_CNT, GPIOLED_NAME);	/* 申请设备号 */
176 		gpioled.major = MAJOR(gpioled.devid);	/* 获取分配号的主设备号 */
177 		gpioled.minor = MINOR(gpioled.devid);	/* 获取分配号的次设备号 */
178 	}
179 	printk("gpioled major=%d,minor=%d\r\n",gpioled.major, gpioled.minor);
180
181 	/* 2、初始化cdev */
182 	gpioled.cdev.owner = THIS_MODULE;
183 	cdev_init(&gpioled.cdev, &gpioled_fops);
184
185 	/* 3、添加一个cdev */
186 	cdev_add(&gpioled.cdev, gpioled.devid, GPIOLED_CNT);
187
188 	/* 4、创建类 */
189 	gpioled.class = class_create(THIS_MODULE, GPIOLED_NAME);
190 	if (IS_ERR(gpioled.class)) {
191 		return PTR_ERR(gpioled.class);
192 	}
193
194 	/* 5、创建设备 */
195 	gpioled.device = device_create(gpioled.class, NULL, gpioled.devid, NULL, GPIOLED_NAME);
196 	if (IS_ERR(gpioled.device)) {
197 		return PTR_ERR(gpioled.device);
198 	}
199
200 	return 0;
201 }
143 行(核心):
mutex_init(&gpioled.lock)初始化互斥体,无参数(互斥体天然为互斥设计,无需设置计数值);
147-167 行:设备树解析流程:
of_find_node_by_path获取 LED 设备节点;
of_get_named_gpio解析设备树中led-gpio属性,得到 GPIO 编号;
gpio_direction_output配置 GPIO 为输出模式,默认高电平(LED 熄灭);
169-198 行:字符设备驱动标准注册流程:
创建设备号(静态注册 / 动态申请);
初始化cdev并添加到内核;
创建类和设备节点,最终在/dev目录生成gpioled设备文件。
3.2.6、驱动出口函数(208-216 行)
208 static void __exit led_exit(void)
209 {
210 	/* 注销字符设备驱动 */
211 	cdev_del(&gpioled.cdev);/*  删除cdev */
212 	unregister_chrdev_region(gpioled.devid, GPIOLED_CNT); /* 注销设备号 */
213
214 	device_destroy(gpioled.class, gpioled.devid);
215 	class_destroy(gpioled.class);
216 }
驱动卸载时的资源释放流程,与入口函数注册流程反向;
互斥体无需手动释放:模块卸载时内核会自动清理互斥体资源。
3.3、测试APP编写
直接复用原子操作实验的atomicApp.c,仅重命名为mutexApp.c,核心逻辑不变:
#include "stdio.h"
#include "unistd.h"
#include "sys/types.h"
#include "sys/stat.h"
#include "fcntl.h"
#include "stdlib.h"
#include "string.h"
/***************************************************************
Copyright © ALIENTEK Co., Ltd. 1998-2029. All rights reserved.
文件名		: mutexApp.c
作者	  	: 左忠凯
版本	   	: V1.0
描述	   	: 互斥体测试APP,测试信号量能不能实现一次
			只允许一个应用程序使用LED。
其他	   	: 无
使用方法	 :./mutexApp /dev/gpioled  0 关闭LED灯
		 	 ./mutexApp /dev/gpioled  1 打开LED灯
论坛 	   	: www.openedv.com
日志	   	: 初版V1.0 2019/1/30 左忠凯创建
***************************************************************/

#define LEDOFF 	0
#define LEDON 	1

/*
 * @description		: main主程序
 * @param - argc 	: argv数组元素个数
 * @param - argv 	: 具体参数
 * @return 			: 0 成功;其他 失败
 */
int main(int argc, char *argv[])
{
	int fd, retvalue;
	char *filename;
	unsigned char cnt = 0;
	unsigned char databuf[1];

	if(argc != 3){
		printf("Error Usage!\r\n");
		return -1;
	}

	filename = argv[1];

	/* 打开beep驱动 */
	fd = open(filename, O_RDWR);
	if(fd < 0){
		printf("file %s open failed!\r\n", argv[1]);
		return -1;
	}

	databuf[0] = atoi(argv[2]);	/* 要执行的操作:打开或关闭 */

	/* 向/dev/gpioled文件写入数据 */
	retvalue = write(fd, databuf, sizeof(databuf));
	if(retvalue < 0){
		printf("LED Control Failed!\r\n");
		close(fd);
		return -1;
	}

	/* 模拟占用25S LED */
	while(1) {
		sleep(5);
		cnt++;
		printf("App running times:%d\r\n", cnt);
		if(cnt >= 5) break;
	}

	printf("App running finished!\r\n");
	retvalue = close(fd); /* 关闭文件 */
	if(retvalue < 0){
		printf("file %s close failed!\r\n", argv[1]);
		return -1;
	}
	return 0;
}
- 向 LED 驱动发送亮 / 灭控制指令;
- 模拟对 LED 设备的长时间占用(25 秒),验证在占用期间其他应用无法打开设备;
- 占用结束后释放设备,验证其他应用可正常访问。
| 代码段 | 功能说明 |
|---|---|
if(argc != 3) |
参数校验:必须传入设备路径+控制指令(如./mutexApp /dev/gpioled 1),否则提示用法错误 |
fd = open(filename, O_RDWR) |
打开/dev/gpioled设备文件:- 若当前无其他进程占用,驱动open函数获取互斥体成功,返回文件描述符;- 若已有进程占用,当前进程会休眠,直到前一个进程释放互斥体 |
databuf[0] = atoi(argv[2]) |
将用户传入的字符串指令("0"/"1")转为数字,作为控制 LED 的参数 |
write(fd, databuf, sizeof(databuf)) |
向驱动写入控制指令,驱动write函数接收后控制 GPIO 电平 |
while(1) { sleep(5); cnt++; ... } |
核心测试逻辑:- 每 5 秒打印一次运行次数,总共运行 25 秒;- 这段时间内,当前进程一直持有互斥体,其他进程无法打开 LED 设备;- 模拟 "长时间占用硬件资源" 的真实场景 |
close(fd) |
关闭设备文件:触发驱动release函数,释放互斥体,其他进程可获取并访问 LED |
四、运行测试
4.1、编译驱动程序和测试 APP
编写 Makefile 文件,本次实验的 Makefile 文件和之前的led实验基本一样,只是将 obj-m 变量的值改为mutex.o,Makefile 内容如下所示:
KERNELDIR := /home/duan/linux/linux-imx-rel_imx_4.1.15_2.1.1_ga_alientek_v2.2
CURRENT_PATH := $(shell pwd)

obj-m := mutex.o

build: kernel_modules

kernel_modules:
	$(MAKE) -C $(KERNELDIR) M=$(CURRENT_PATH) modules
clean:
	$(MAKE) -C $(KERNELDIR) M=$(CURRENT_PATH) clean
第 4 行,设置 obj-m 变量的值为mutex.o。
输入如下命令编译出驱动模块文件:
make -j32编译成功以后就会生成一个名为"mutex.ko"的驱动模块文件。
编译测试 APP
输入如下命令编译测试试mutexApp.c这个测试程序:
arm-linux-gnueabihf-gcc mutexApp.c-o mutexApp4.2、运行测试
将上一小节编译出来的mutex.ko 和 mutexApp这两个文件拷贝到 rootfs/lib/modules/4.1.15 目录中。
sudo cp mutex.ko/home/duan/linux/nfs/rootfs/lib/modules/4.1.15/ -f

sudo cp  mutexApp /home/duan/linux/nfs/rootfs/lib/modules/4.1.15/ -f
进入到目录 lib/modules/4.1.15 中,输入如下命令加载mutex.ko驱动模块:
depmod //第一次加载驱动的时候需要运行此命令
modprobe mutex.ko//加载驱动
驱动加载成功以后会在终端中输出一些信息,如下图所示:

驱动加载成功以后就可以使用mutexApp 软件测试驱动是否工作正常。方便和上一期博客信号量实验是一样的。
如果要卸载驱动的话输入如下命令即可:
rmmod mutex.ko总结
互斥体是 Linux 驱动中处理进程间互斥的 "最优解",本期博客完成了驱动 + APP 实战。