1. 下载与安装 Mysqlrouter
# 下载安装包
[root@mysqlrouter ~]# wget https://downloads.mysql.com/archives/get/p/41/file/mysql-router-community-8.4.7-1.el9.x86_64.rpm

# 安装 RPM 包
[root@mysqlrouter ~]# dnf install mysql-router-community-8.4.7-1.el9.x86_64.rpm -y
2. 配置 Mysqlrouter
# 编辑主配置文件,配置读写分离端口
[root@mysqlrouter ~]# vim /etc/mysqlrouter/mysqlrouter.conf
# 配置只读路由 (端口 7001)
[routing:ro]
bind_address = 0.0.0.0
bind_port = 7001
destinations = 172.25.254.10:3306,172.25.254.20:3306,172.25.254.30:3306
routing_strategy = round-robin

# 配置读写路由 (端口 7002)
[routing:rw]
bind_address = 0.0.0.0
bind_port = 7002
destinations = 172.25.254.30:3306,172.25.254.20:3306,172.25.254.10:3306
routing_strategy = first-available

# 启动服务并设置开机自启
[root@mysqlrouter ~]# systemctl enable --now mysqlrouter.service

# 验证端口监听状态
[root@mysqlrouter ~]# netstat -antlupe | grep mysql
3. 测试路由效果
# 在 MySQL 节点开启 root 远程登录权限
[root@mysql-node1 ~]# mysql -uroot -plee
mysql> CREATE USER root@'%' identified by 'lee';
mysql> GRANT ALL ON *.* TO root@'%';
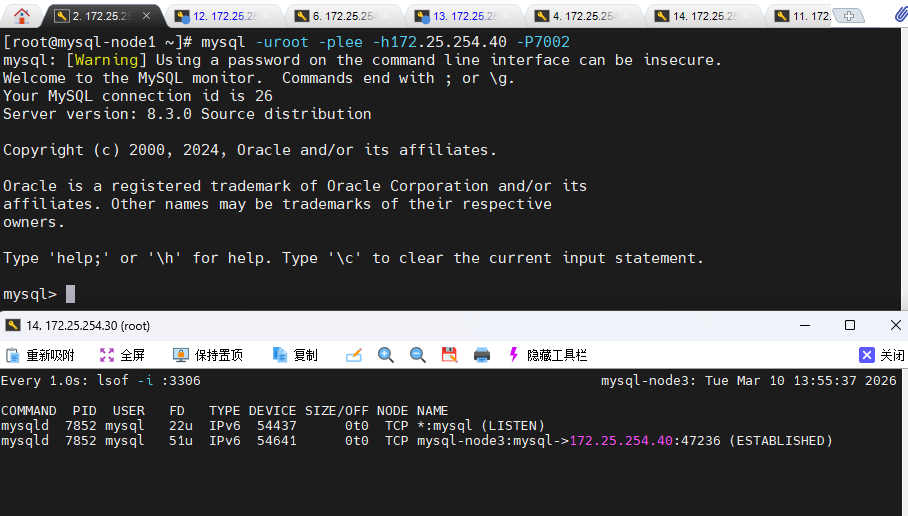
# 通过 Mysqlrouter 的读写端口 (7002) 连接测试
[root@mysql-node1 ~]# mysql -uroot -plee -h172.25.254.40 -P7002
# 注:172.25.254.40 为 Mysqlrouter 所在主机 IP