# 如何实现一个网页版的剪映(三)使用fabric.js绘制时间轴
# 如何实现一个网页版的剪映(四)使用插件化思维创建pixi绘制画布(转场/滤镜)
Canvas 画布编辑器技术实现详解
1. 五分钟快速上手
1.1 最简单的示例
typescript
import { CanvasStudio } from './core/canvas';
const studio = new CanvasStudio({
width: 720,
height: 420,
bgColor: '#0b0b0b',
duration: 5000, // 总时长 5 秒
interactivity: true, // 启用交互
canvas: document.getElementById('my-canvas')
});
await studio.ready;
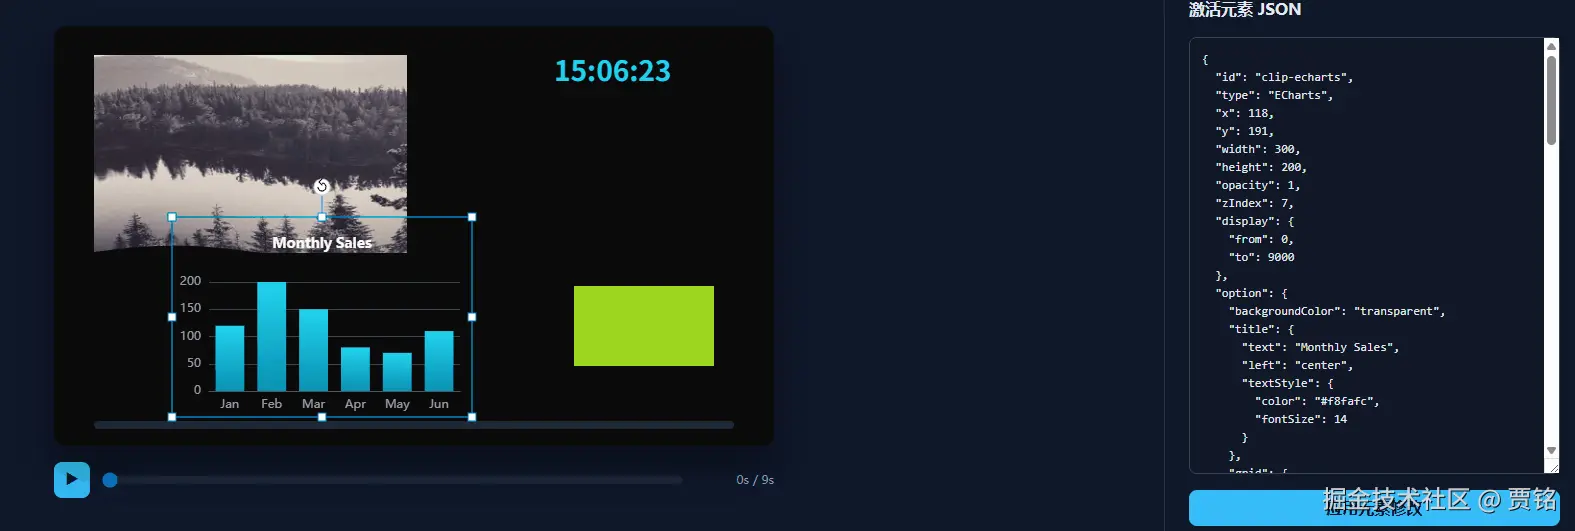
await studio.loadFromJSON({
settings: {
width: 720,
height: 420,
bgColor: '#0b0b0b',
duration: 9000
},
clips: [
{
id: 'clip-image',
type: 'Image',
src: 'https://fastly.picsum.photos/id/412/300/400.jpg?hmac=Jp8t1t_EY-xBFqGGF78aJs9FuNbbjBHUl2iGTjm7jZs',
x: 40,
y: 60,
width: 420,
height: 260,
opacity: 1,
zIndex: 1,
display: { from: 0, to: 5200 },
effect: {
name: 'wave',
params: { amplitude: 0.025, frequency: 10.0 }
},
transition: {
type: 'fade',
duration: 1000,
toId: 'clip-text'
}
},
{
id: 'clip-text',
type: 'Text',
text: 'Drag Me',
x: 220,
y: 140,
width: 320,
height: 120,
opacity: 1,
zIndex: 2,
display: { from: 5000, to: 9000 },
style: {
fontSize: 12,
fontFamily: 'Inter',
fontWeight: 'bold',
fill: '#f8fafc'
},
animation: {
duration: 2000,
loop: true,
from: { x: 120, y: 80, opacity: 0.2, rotation: -8 },
to: { x: 260, y: 160, opacity: 1, rotation: 8 }
},
effect: {
name: 'chromatic',
params: { offset: 0.012 }
}
},
{
id: 'clip-rect1',
type: 'Rect',
x: 520,
y: 260,
width: 140,
height: 80,
opacity: 0.9,
zIndex: 3,
display: { from: 0, to: 1000 },
fill: '#adee22',
transition: {
type: 'directionalWipe',
duration: 700,
toId: 'clip-rect2'
}
},
{
id: 'clip-rect2',
type: 'Rect',
x: 520,
y: 260,
width: 140,
height: 80,
opacity: 0.9,
zIndex: 3,
display: { from: 1000, to: 2000 },
fill: '#22d3ee'
},
{
id: 'clip-time',
type: 'time',
x: 500,
y: 26,
width: 180,
height: 48,
opacity: 1,
zIndex: 6,
display: { from: 0, to: 9000 },
format: 'HH:mm:ss',
style: {
fontSize: 28,
fontFamily: 'Inter',
fontWeight: 'bold',
fill: '#22d3ee'
}
},
{
id: 'clip-echarts',
type: 'ECharts',
x: 40,
y: 340,
width: 300,
height: 200,
opacity: 1,
zIndex: 7,
display: { from: 0, to: 9000 },
option: {
backgroundColor: 'transparent',
title: {
text: 'Monthly Sales',
left: 'center',
textStyle: { color: '#f8fafc', fontSize: 14 }
},
grid: {
left: '3%',
right: '4%',
bottom: '3%',
containLabel: true
},
tooltip: { trigger: 'axis' },
xAxis: {
type: 'category',
data: ['Jan', 'Feb', 'Mar', 'Apr', 'May', 'Jun'],
axisLabel: { color: '#94a3b8' },
axisLine: { lineStyle: { color: '#475569' } }
},
yAxis: {
type: 'value',
axisLabel: { color: '#94a3b8' },
axisLine: { lineStyle: { color: '#475569' } },
splitLine: { lineStyle: { color: '#334155' } }
},
series: [
{
name: 'Sales',
type: 'bar',
data: [120, 200, 150, 80, 70, 110],
itemStyle: {
color: {
type: 'linear',
x: 0,
y: 0,
x2: 0,
y2: 1,
colorStops: [
{ offset: 0, color: '#22d3ee' },
{ offset: 1, color: '#0891b2' }
]
}
}
}
]
}
},
{
id: 'clip-progress',
type: 'progress',
x: 40,
y: 395,
width: 640,
height: 8,
opacity: 1,
zIndex: 8,
display: { from: 0, to: 9000 },
barColor: '#22d3ee',
backgroundColor: '#1f2937',
borderRadius: 4
}
]
});2.2 核心概念速览
- Clip(元素):画布上的一个可视化对象,如文本、图片、矩形
- Display(显示时间):元素在时间轴上的可见区间
- Animation(动画):元素属性随时间变化的定义
- Effect(效果):应用于元素的视觉滤镜
- Transition(过渡):两个元素之间的切换效果
2. 数据模型设计
2.1 什么是 Clip?
Clip 是画布上所有可视化元素的统称。每个 Clip 都有基础属性和特定类型的扩展属性。
typescript
// 所有元素的共同属性
interface CanvasClipBase {
  id: string; // 唯一标识符
  type: string; // 元素类型:'Text' | 'Image' | 'Rect' | ...
  x: number; // X 坐标
  y: number; // Y 坐标
  width: number; // 宽度
  height: number; // 高度
  rotation?: number; // 旋转角度(度)
  opacity?: number; // 不透明度 (0-1)
  zIndex?: number; // 层级顺序
  display?: {
    // 显示时间区间
    from: number; // 开始时间(毫秒)
    to: number; // 结束时间(毫秒)
  };
  animation?: CanvasClipAnimation; // 动画配置
  effect?: CanvasClipEffect; // 效果配置
  transition?: CanvasClipTransition; // 过渡配置
}
2.2 内置元素类型
typescript
// 文本元素
interface CanvasTextClip extends CanvasClipBase {
  type: 'Text';
  text: string;
  style?: {
    fontSize?: number;
    fontFamily?: string;
    fontWeight?: 'normal' | 'bold' | 'bolder' | 'lighter';
    fill?: string;
  };
}

// 图片元素
interface CanvasImageClip extends CanvasClipBase {
  type: 'Image';
  src: string; // 图片 URL
}

// 矩形元素
interface CanvasRectClip extends CanvasClipBase {
  type: 'Rect';
  fill?: string; // 填充颜色
}

// 时间显示元素
interface CanvasTimeClip extends CanvasClipBase {
  type: 'time';
  format?: 'HH:mm:ss' | 'HH:mm' | 'locale';
  locale?: string;
  style?: CanvasTextClip['style'];
}

// ECharts 图表元素
interface CanvasEChartsClip extends CanvasClipBase {
  type: 'ECharts';
  option: Record<string, unknown>; // ECharts 配置
}
3. 插件化架构
3.1 插件化的本质思考
插件化思维是一种架构哲学。当我们审视那些成功的框架------webpack、koa、egg------它们无一例外地选择了插件化作为核心扩展机制。这并非巧合,而是因为插件化解决了一个根本性的矛盾:核心稳定与功能扩展之间的矛盾。
没有插件化的系统,核心代码会随着功能增加而不断膨胀,模块间耦合日益严重,最终陷入维护困境。插件化的本质是将不断扩张的功能分散到插件中,核心只负责维护逻辑骨架。这就像数据库的横向扩容------结构不变,拆分数据。
一个优秀的插件化系统应该实现三个目标:
- 社区可贡献:第三方代码即使存在问题,也不会影响核心稳定性
- 二次开发友好:满足不同业务场景的特定需求
- 功能聚合:代码以功能为维度组织,而非物理文件结构
理解插件系统:和 Vue 组件的类比
如果你用过 Vue,可以把插件系统和 Vue 组件做个类比,这样更容易理解:
Vue 组件:
- 有自己的生命周期钩子(
mounted、updated、beforeUnmount等) - 这些钩子是 Vue 框架在特定时机调用的函数
- 组件负责渲染 UI 和管理自己的状态
画布插件:
- 提供功能方法(
createElement、applyElementProps等) - 这些方法是画布系统在需要时调用的函数
- 插件负责创建和管理特定类型的元素
| Vue 组件 | 画布插件 |
|---|---|
mounted() 生命周期 |
插件的 createElement() 方法 |
updated() 生命周期 |
插件的 applyElementProps() 方法 |
| 组件的 props | 插件的 clip 参数 |
| 组件的 template | 插件创建的显示对象 |
本质上都是回调机制:
typescript
// Vue 组件
export default {
  mounted() {
    // Vue 在组件挂载时调用这个函数
    console.log('组件已挂载');
  }
}

// 画布插件
export const textPlugin: CanvasElementPlugin<CanvasTextClip> = {
  type: 'Text',
  name: '文本',
  version: '1.0.0',
  createElement(clip, helpers) {
    // 画布系统需要创建文本元素时调用这个函数
    console.log('创建文本元素');
    return new Text({ text: clip.text, style: ... });
  },
  applyElementProps(element, clip, helpers) {
    // 画布系统需要更新元素属性时调用这个函数
    console.log('更新文本属性');
    element.text = clip.text;
  }
};
所以,理解插件系统的关键在于:它提供了一套约定好的"接口",让插件在系统需要时提供相应的功能,就像 Vue 组件在特定时机执行自己的逻辑一样。
3.2 插件化形式
3.2.1 约定/注入插件化
按照某个约定来设计插件,只要返回的对象符合约定结构,就会被自动加载并获得上下文。这是 Canvas Studio 采用的主要形式:
typescript
// 约定:导出一个符合 CanvasElementPlugin 接口的对象
export const textPlugin: CanvasElementPlugin<CanvasTextClip> = {
  type: 'Text',
  name: '文本',
  version: '1.0.0',
  createElement(clip, helpers) {
    /* ... */
  },
  applyElementProps(element, clip, helpers) {
    /* ... */
  }
};

// 框架自动识别并注册
CanvasStudio.registerPlugin(textPlugin);约定的核心在于接口契约。框架定义契约,插件遵循契约,双方各司其职。这种方式的优点是简单直观,缺点是灵活性受限于契约设计。
3.2.2 事件插件化
Canvas Studio 通过 CanvasEmitter 提供事件机制,用于框架与外部之间的通信:
typescript
export class CanvasEmitter {
  private listeners = new Map<
    keyof CanvasEvents,
    Set<(payload: unknown) => void>
  >();

  on<K extends keyof CanvasEvents>(event: K, cb: Listener<K>) {
    if (!this.listeners.has(event)) {
      this.listeners.set(event, new Set());
    }
    this.listeners.get(event)!.add(cb);
  }

  off<K extends keyof CanvasEvents>(event: K, cb: Listener<K>) {
    this.listeners.get(event)?.delete(cb);
  }

  emit<K extends keyof CanvasEvents>(event: K, payload: CanvasEvents[K]) {
    this.listeners.get(event)?.forEach(listener => listener(payload));
  }
}
当前支持的事件类型:
typescript
export type CanvasEvents = {
  'selection:changed': CanvasClip | null;
};事件机制的本质是生命周期扩展 。外部代码可以监听 selection:changed 事件来响应选择变化。
3.3 插件接口设计
Canvas Studio 的核心接口定义如下:
typescript
import * as PIXI from 'pixi.js';
import { Graphics, Sprite, Text } from 'pixi.js';

export type CanvasDisplayObject = Sprite | Text | Graphics;

export type CanvasPluginHelpers = {
  getSDKConfig: () => ReturnType<typeof getSDKConfig>;
  getCurrentTime: () => number;
  getDuration: () => number;
};

export interface CanvasElementPlugin<TClip extends CanvasClip = CanvasClip> {
  type: string;
  name: string;
  version: string;
  createElement: (
    clip: TClip,
    helpers: CanvasPluginHelpers
  ) => Promise<CanvasDisplayObject> | CanvasDisplayObject;
  applyElementProps?: (
    element: CanvasDisplayObject,
    clip: TClip,
    helpers: CanvasPluginHelpers
  ) => void;
}接口设计的核心原则:必需方法最小化,可选方法最大化 。只有 type、name、version、createElement 是必需的,这降低了插件开发门槛。
CanvasPluginHelpers 提供了插件运行时所需的上下文:
getSDKConfig()- 获取 SDK 配置(包含默认字体、颜色等)getCurrentTime()- 获取当前播放时间getDuration()- 获取画布总时长
3.4 插件注册表实现
typescript
export class PluginRegistry {
  private plugins = new Map<string, CanvasElementPlugin>();

  register<TClip extends CanvasClip>(plugin: CanvasElementPlugin<TClip>) {
    this.plugins.set(plugin.type, plugin as unknown as CanvasElementPlugin);
  }

  get(type: string) {
    return this.plugins.get(type);
  }

  has(type: string) {
    return this.plugins.has(type);
  }

  list() {
    return [...this.plugins.values()];
  }

  clear() {
    this.plugins.clear();
  }

  registerMany(plugins: CanvasElementPlugin[]) {
    for (const plugin of plugins) {
      this.register(plugin);
    }
  }

  async installPlugin(pkg: PluginPackage) {
    const existingPlugin = this.get(pkg.manifest.id);
    if (existingPlugin) {
      console.log(
        `Plugin ${pkg.manifest.id} already registered, skipping install`
      );
      return existingPlugin;
    }

    const plugin = await loadFromPackage(pkg);
    this.register(plugin);
    return plugin;
  }
}

export const globalPluginRegistry = new PluginRegistry();
注册表提供了简洁的 API:
register()- 注册单个插件registerMany()- 批量注册插件get()/has()/list()- 查询插件installPlugin()- 从插件包动态安装clear()- 清空所有插件
3.5 内置插件
Canvas Studio 内置了四个基础插件,覆盖常见的元素类型:
typescript
export function registerBuiltinPlugins(): void {
  registerCanvasElementPlugin(textPlugin);
  registerCanvasElementPlugin(imagePlugin);
  registerCanvasElementPlugin(rectPlugin);
  registerCanvasElementPlugin(echartsPlugin);
}
3.5.1 文本插件
typescript
import { Text, TextStyle } from 'pixi.js';
import { CanvasTextClip } from '../core/types';
import { getSDKConfig } from '../config';
import { CanvasElementPlugin } from './base';

export const textPlugin: CanvasElementPlugin<CanvasTextClip> = {
  type: 'Text',
  name: '文本',
  version: '1.0.0',
  createElement(clip) {
    const config = getSDKConfig();
    const style = new TextStyle({
      fontSize: clip.style?.fontSize ?? config.defaults.fontSize,
      fontFamily: clip.style?.fontFamily ?? config.defaults.fontFamily,
      fontWeight: clip.style?.fontWeight ?? config.defaults.fontWeight,
      fill: clip.style?.fill ?? config.defaults.fill
    });
    return new Text({ text: clip.text ?? 'Text', style });
  },
  applyElementProps(element, clip) {
    if (!(element instanceof Text)) return;
    const config = getSDKConfig();
    element.text = clip.text ?? '';
    element.style = new TextStyle({
      fontSize: clip.style?.fontSize ?? config.defaults.fontSize,
      fontFamily: clip.style?.fontFamily ?? config.defaults.fontFamily,
      fontWeight: clip.style?.fontWeight ?? config.defaults.fontWeight,
      fill: clip.style?.fill ?? config.defaults.fill
    });
  }
};
3.5.2 图片插件
图片插件展示了异步加载资源的模式:
typescript
import { Assets, Graphics, Sprite } from 'pixi.js';
import { CanvasImageClip } from '../core/types';
import { COLORS } from '../constants';
import { CanvasError } from '../errors';
import { CanvasElementPlugin } from './base';

export const imagePlugin: CanvasElementPlugin<CanvasImageClip> = {
  type: 'Image',
  name: '图片',
  version: '1.0.0',
  async createElement(clip) {
    try {
      const texture = await Assets.load(clip.src);
      if (!texture) {
        throw CanvasError.assetLoadFailed(clip.id, clip.src);
      }
      return new Sprite(texture);
    } catch (error) {
      console.error(`Failed to load image asset "${clip.id}"`, error);
      const fallback = new Graphics();
      fallback.rect(0, 0, clip.width, clip.height);
      fallback.fill({ color: COLORS.FALLBACK_DARK });
      return fallback;
    }
  },
  applyElementProps(element, clip) {
    if (element instanceof Sprite) {
      element.width = clip.width;
      element.height = clip.height;
      return;
    }
    if (element instanceof Graphics) {
      element.clear();
      element.rect(0, 0, clip.width, clip.height);
      element.fill({ color: COLORS.FALLBACK_DARK });
    }
  }
};
关键设计点:
- 异步加载 :
createElement返回Promise,支持异步资源加载 - 降级处理:加载失败时返回占位图形,保证画布正常渲染
- 类型判断 :
applyElementProps中使用instanceof判断元素类型
3.5.3 ECharts 图表插件
展示了复杂插件的实现模式:
typescript
import { Assets, Graphics, Sprite } from 'pixi.js';
import { COLORS } from '../constants';
import { CanvasEChartsClip } from '../core/types';
import { CanvasElementPlugin } from './base';

let echartsLib: typeof import('echarts') | null = null;

async function getECharts() {
  if (!echartsLib) {
    echartsLib = await import('echarts');
  }
  return echartsLib;
}

export const echartsPlugin: CanvasElementPlugin<CanvasEChartsClip> = {
  type: 'ECharts',
  name: '图表',
  version: '1.0.0',
  async createElement(clip) {
    try {
      const echarts = await getECharts();
      const offscreen = document.createElement('canvas');
      offscreen.width = clip.width;
      offscreen.height = clip.height;
      const chart = echarts.init(offscreen, undefined, {
        renderer: 'canvas',
        width: clip.width,
        height: clip.height
      });
      const option = {
        animation: false,
        ...clip.option
      } as echarts.EChartsOption;
      chart.setOption(option);
      const texture = await Assets.load(offscreen.toDataURL());
      chart.dispose();
      return new Sprite(texture);
    } catch (error) {
      console.error(`Failed to create ECharts "${clip.id}"`, error);
      const fallback = new Graphics();
      fallback.rect(0, 0, clip.width, clip.height);
      fallback.fill({ color: COLORS.FALLBACK_CHART });
      return fallback;
    }
  },
  async applyElementProps(element, clip) {
    if (element instanceof Sprite) {
      const echarts = await getECharts();
      const offscreen = document.createElement('canvas');
      offscreen.width = clip.width;
      offscreen.height = clip.height;
      const chart = echarts.init(offscreen, undefined, {
        renderer: 'canvas',
        width: clip.width,
        height: clip.height
      });
      const option = {
        animation: false,
        ...clip.option
      } as echarts.EChartsOption;
      chart.setOption(option);
      const texture = await Assets.load(offscreen.toDataURL());
      element.texture = texture;
      chart.dispose();
    }
  }
};
关键设计点:
- 懒加载:ECharts 库按需加载,减少初始包体积
- 离屏渲染:使用离屏 Canvas 渲染图表,再转为纹理
- 资源清理 :每次渲染后调用
chart.dispose()释放资源
3.6 动态插件加载
支持从外部加载插件代码,实现真正的可扩展性:
typescript
export interface PluginManifest {
  id: string;
  name: string;
  version: string;
  author: string;
  description: string;
  main?: string;
  dependencies?: string[];
  permissions?: string[];
  minSDKVersion?: string;
}

export interface PluginPackage {
  manifest: PluginManifest;
  code: string;
}

export interface PluginSandbox {
  PIXI: typeof PIXI;
  helpers: {
    getSDKConfig: () => ReturnType<typeof getSDKConfig>;
  };
}

function createSandbox(): PluginSandbox {
  return {
    PIXI,
    helpers: {
      getSDKConfig: () => getSDKConfig()
    }
  };
}

function validateManifest(manifest: PluginManifest) {
  if (!manifest.id) {
    throw new Error('Plugin manifest missing required field: id');
  }
  if (!manifest.name) {
    throw new Error('Plugin manifest missing required field: name');
  }
  if (!manifest.version) {
    throw new Error('Plugin manifest missing required field: version');
  }

  const versionRegex = /^\d+\.\d+\.\d+(-[\w.]+)?$/;
  if (!versionRegex.test(manifest.version)) {
    throw new Error(`Invalid version format: ${manifest.version}`);
  }
}

function isValidPlugin(
  plugin: unknown,
  manifest: PluginManifest
): plugin is CanvasElementPlugin {
  if (!plugin || typeof plugin !== 'object') {
    throw new Error(`Plugin ${manifest.id} must export an object`);
  }

  const p = plugin as Record<string, unknown>;

  if (typeof p.type !== 'string') {
    throw new Error(`Plugin ${manifest.id} missing required property: type`);
  }
  if (typeof p.name !== 'string') {
    throw new Error(`Plugin ${manifest.id} missing required property: name`);
  }
  if (typeof p.version !== 'string') {
    throw new Error(`Plugin ${manifest.id} missing required property: version`);
  }
  if (typeof p.createElement !== 'function') {
    throw new Error(
      `Plugin ${manifest.id} missing required function: createElement`
    );
  }

  return true;
}

async function loadPluginCode(
  code: string,
  manifest: PluginManifest
): Promise<CanvasElementPlugin> {
  const sandbox = createSandbox();

  try {
    const factory = new Function(
      'PIXI',
      'helpers',
      `
        ${code}
        if (typeof plugin !== 'undefined') {
          return plugin;
        }
        if (typeof module !== 'undefined' && module.exports) {
          return module.exports;
        }
        throw new Error('Plugin must export a "plugin" variable or module.exports');
      `
    );

    const plugin = factory(sandbox.PIXI, sandbox.helpers);
    return plugin;
  } catch (error) {
    throw new Error(
      `Failed to load plugin ${manifest.id}: ${error instanceof Error ? error.message : String(error)}`
    );
  }
}

async function loadFromPackage(
  pkg: PluginPackage
): Promise<CanvasElementPlugin> {
  const { manifest, code } = pkg;

  validateManifest(manifest);

  const plugin = await loadPluginCode(code, manifest);

  if (isValidPlugin(plugin, manifest)) {
    return plugin;
  }

  throw new Error(`Plugin ${manifest.id} validation failed`);
}

export const PluginLoader = {
  loadFromPackage,
  validateManifest,
  loadPluginCode
};
安全考量:
- 沙箱隔离 :插件代码在受限环境中执行,只能访问
PIXI和helpers - 元信息校验 :
validateManifest确保必要字段存在且格式正确 - 插件验证 :
isValidPlugin确保导出对象符合接口契约
3.6.1 远程插件示例
在实际项目中,我们可以把插件部署到远程服务器,然后通过网络动态加载。下面是有两个远程插件示例:
进度条插件 - 显示视频播放进度的进度条:
javascript
// plugin-manifest.json
{
  "id": "progress",
  "name": "进度条",
  "version": "1.0.0",
  "author": "Canvas SDK",
  "description": "显示视频播放进度的进度条组件",
  "main": "index.js",
  "minSDKVersion": "1.0.0"
}

// index.js
const plugin = {
  type: 'progress',
  name: '进度条',
  version: '1.0.0',

  createElement(clip, helpers) {
    const { Graphics } = PIXI;
    const { getCurrentTime, getDuration } = helpers;

    const barColor = clip.barColor ?? '#3b82f6';
    const backgroundColor = clip.backgroundColor ?? '#1f2937';
    const borderRadius = clip.borderRadius ?? 4;

    const progress = getCurrentTime() / getDuration();

    const container = new Graphics();

    const hexToNumber = hex => {
      return parseInt(hex.replace('#', ''), 16);
    };

    const drawRoundedRect = (g, x, y, width, height, radius) => {
      if (radius <= 0) {
        g.rect(x, y, width, height);
        return;
      }
      const r = Math.min(radius, height / 2, width / 2);
      g.roundRect(x, y, width, height, r);
    };

    drawRoundedRect(container, 0, 0, clip.width, clip.height, borderRadius);
    container.fill({ color: hexToNumber(backgroundColor) });

    const barWidth = Math.max(0, clip.width * progress);
    if (barWidth > 0) {
      drawRoundedRect(container, 0, 0, barWidth, clip.height, borderRadius);
      container.fill({ color: hexToNumber(barColor) });
    }

    container._progressData = {
      barColor,
      backgroundColor,
      borderRadius,
      hexToNumber,
      drawRoundedRect
    };

    return container;
  },

  applyElementProps(element, clip, helpers) {
    const { getCurrentTime, getDuration } = helpers;

    if (!(element instanceof PIXI.Graphics)) return;

    const progress = getCurrentTime() / getDuration();
    const {
      barColor,
      backgroundColor,
      borderRadius,
      hexToNumber,
      drawRoundedRect
    } = element._progressData;

    element.clear();

    drawRoundedRect(element, 0, 0, clip.width, clip.height, borderRadius);
    element.fill({ color: hexToNumber(backgroundColor) });

    const barWidth = Math.max(0, clip.width * progress);
    if (barWidth > 0) {
      drawRoundedRect(element, 0, 0, barWidth, clip.height, borderRadius);
      element.fill({ color: hexToNumber(barColor) });
    }
  }
};
关键设计点:
- 使用
helpers.getCurrentTime()和helpers.getDuration()获取播放进度 - 通过
element._progressData存储绘制参数,避免重复计算 - 支持自定义颜色和圆角半径
时间插件 - 显示实时时间:
javascript
// plugin-manifest.json
{
  "id": "time",
  "name": "时间",
  "version": "1.0.0",
  "author": "Canvas SDK",
  "description": "显示实时时间的插件,支持多种时间格式和本地化设置",
  "main": "index.js",
  "minSDKVersion": "1.0.0"
}

// index.js
function formatTimeText(clip) {
  const now = new Date();
  if (clip.format === 'locale') {
    return now.toLocaleTimeString(clip.locale);
  }
  const hh = now.getHours().toString().padStart(2, '0');
  const mm = now.getMinutes().toString().padStart(2, '0');
  if (clip.format === 'HH:mm') {
    return `${hh}:${mm}`;
  }
  const ss = now.getSeconds().toString().padStart(2, '0');
  return `${hh}:${mm}:${ss}`;
}

const plugin = {
  type: 'time',
  name: '时间',
  version: '1.0.0',
  createElement(clip, helpers) {
    const config = helpers.getSDKConfig();
    const TextStyle = PIXI.TextStyle;
    const style = new TextStyle({
      fontSize: clip.style?.fontSize ?? 36,
      fontFamily: clip.style?.fontFamily ?? config.defaults.fontFamily,
      fontWeight: clip.style?.fontWeight ?? config.defaults.fontWeight,
      fill: clip.style?.fill ?? config.defaults.fill
    });
    return new PIXI.Text({ text: formatTimeText(clip), style });
  },
  applyElementProps(element, clip, helpers) {
    if (!(element instanceof PIXI.Text)) return;
    element.text = formatTimeText(clip);
  }
};
关键设计点:
- 支持多种时间格式(
HH:mm:ss、HH:mm、locale) - 支持本地化设置(通过
toLocaleTimeString) - 每次更新时重新计算当前时间
- 样式只在创建时设置一次,更新时只修改文本内容,避免重复创建
TextStyle
远程插件的优势:
- 独立部署:插件可以独立更新,无需重新发布整个应用
- 按需加载:只在需要时加载插件代码,减少初始包体积
- 社区贡献:第三方开发者可以贡献插件,扩展平台功能
- 版本管理 :通过
minSDKVersion等字段管理兼容性
3.7 CanvasStudio 中的插件集成
typescript
export class CanvasStudio extends CanvasEmitter {
  pluginRegistry = globalPluginRegistry;

  static registerPlugin(plugin: CanvasElementPlugin) {
    globalPluginRegistry.register(plugin);
  }

  static async installPlugin(pkg: PluginPackage) {
    return globalPluginRegistry.installPlugin(pkg);
  }

  static hasPlugin(type: string): boolean {
    return globalPluginRegistry.has(type);
  }

  static getPlugin(type: string) {
    return globalPluginRegistry.get(type);
  }

  static listPlugins() {
    return globalPluginRegistry.list();
  }

  private initElementPlugins(plugins: CanvasElementPlugin[]) {
    registerBuiltinPlugins();
    registerBuiltinEffects();
    this.pluginRegistry.registerMany(plugins);
  }

  private async createSprite(clip: CanvasClip) {
    const plugin = this.pluginRegistry.get(clip.type);

    if (!plugin) {
      console.error(`Plugin not found for type "${clip.type}"`);
      console.error(
        'Available plugins:',
        this.pluginRegistry.list().map(p => p.type)
      );
      throw CanvasError.pluginNotFound(clip.type);
    }

    return plugin.createElement(clip, {
      getSDKConfig,
      getCurrentTime: () => this.currentTime,
      getDuration: () => this.opts.duration
    });
  }

  private applyClipProps = (instance: ClipInstance) => {
    const sprite = instance.sprite;
    const clip = instance.data;

    sprite.x = clip.x;
    sprite.y = clip.y;
    sprite.zIndex = clip.zIndex ?? 0;
    sprite.alpha = clip.opacity ?? 1;
    sprite.rotation = ((clip.rotation ?? 0) * Math.PI) / 180;

    if (!(sprite instanceof Text)) {
      sprite.width = clip.width;
      sprite.height = clip.height;
    }

    const plugin = this.pluginRegistry.get(clip.type);
    if (plugin?.applyElementProps) {
      plugin.applyElementProps(instance.sprite, instance.data, {
        getSDKConfig,
        getCurrentTime: () => this.currentTime,
        getDuration: () => this.opts.duration
      });
    }
  };
}
3.8 使用插件
typescript
// 方式一:静态注册
CanvasStudio.registerPlugin(textPlugin);
CanvasStudio.registerPlugin(imagePlugin);

// 方式二:动态安装(用于第三方插件)
const pluginPackage = await fetchPluginPackage('custom-element');
await CanvasStudio.installPlugin(pluginPackage);

// 检查插件状态
if (CanvasStudio.hasPlugin('Text')) {
  const plugin = CanvasStudio.getPlugin('Text');
  console.log(`已加载: ${plugin.name} v${plugin.version}`);
}

// 获取插件列表
const plugins = CanvasStudio.listPlugins();
console.log('已注册插件:', plugins.map(p => p.name).join(', '));
3.9 插件系统的潜在问题与挑战
虽然我们实现的插件系统已经具备了基本的功能,但在实际应用中还会面临一些复杂的问题。参考插件化思维的最佳实践,我们需要考虑以下几个方面的挑战:
3.9.1 插件依赖管理
问题场景:某些插件可能依赖其他插件的功能。
例如,一个"富文本"插件可能依赖"文本"插件的基础功能,或者一个"图表"插件可能依赖"图片"插件来导出图表为图片。
当前实现的局限:
- 插件注册是平级的,没有依赖关系的声明
- 无法保证依赖插件先于依赖者加载
- 缺少版本兼容性检查
可能的解决方案:
typescript
// 扩展 PluginManifest,增加依赖声明
export interface PluginManifest {
  id: string;
  name: string;
  version: string;
  author: string;
  description: string;
  main?: string;
  dependencies?: string[]; // 新增:依赖的插件列表
  minSDKVersion?: string;
}

// 扩展 PluginPackage,增加依赖解析
async function resolveDependencies(
  pkg: PluginPackage,
  registry: PluginRegistry
): Promise<void> {
  const { manifest, code } = pkg;

  if (!manifest.dependencies) {
    return;
  }

  for (const depId of manifest.dependencies) {
    if (!registry.has(depId)) {
      throw new Error(
        `Plugin "${manifest.id}" requires plugin "${depId}" which is not installed`
      );
    }
  }
}

// 在安装插件前检查依赖
async function loadFromPackage(
  pkg: PluginPackage,
  registry: PluginRegistry
): Promise<CanvasElementPlugin> {
  await resolveDependencies(pkg, registry);
  // ... 原有逻辑
}
3.9.2 插件扩展能力
问题场景:插件可能需要扩展或修改其他插件的行为。
例如,一个"文本特效"插件可能需要扩展"文本"插件,为其添加阴影、描边等效果,而不需要修改原始的文本插件代码。
当前实现的局限:
- 插件之间是隔离的,无法相互访问
- 缺少插件间通信机制
- 无法对已有插件进行功能增强
可能的解决方案:
typescript
// 扩展插件接口,增加扩展能力
export interface CanvasElementPlugin<TClip extends CanvasClip = CanvasClip> {
  type: string;
  name: string;
  version: string;
  extends?: string; // 新增:声明要扩展的插件类型
  createElement: (
    clip: TClip,
    helpers: CanvasPluginHelpers
  ) => Promise<CanvasDisplayObject> | CanvasDisplayObject;
  applyElementProps?: (
    element: CanvasDisplayObject,
    clip: TClip,
    helpers: CanvasPluginHelpers
  ) => void;

  // 新增:扩展钩子
  extendCreateElement?: (
    baseElement: CanvasDisplayObject,
    clip: TClip,
    helpers: CanvasPluginHelpers
  ) => CanvasDisplayObject;

  extendApplyProps?: (
    element: CanvasDisplayObject,
    clip: TClip,
    helpers: CanvasPluginHelpers
  ) => void;
}

// 修改插件注册逻辑,支持插件扩展
export class PluginRegistry {
  private plugins = new Map<string, CanvasElementPlugin>();
  private extensions = new Map<string, CanvasElementPlugin[]>(); // 存储扩展插件

  register<TClip extends CanvasClip>(plugin: CanvasElementPlugin<TClip>) {
    this.plugins.set(plugin.type, plugin as unknown as CanvasElementPlugin);

    // 如果是扩展插件,记录到扩展映射中
    if (plugin.extends) {
      if (!this.extensions.has(plugin.extends)) {
        this.extensions.set(plugin.extends, []);
      }
      this.extensions.get(plugin.extends)!.push(plugin);
    }
  }

  // 获取插件及其所有扩展
  getWithExtensions(type: string): CanvasElementPlugin[] {
    const plugins: CanvasElementPlugin[] = [];

    const basePlugin = this.get(type);
    if (basePlugin) {
      plugins.push(basePlugin);
    }

    const extPlugins = this.extensions.get(type) ?? [];
    plugins.push(...extPlugins);

    return plugins;
  }
}使用示例:
javascript
// 原始文本插件
const textPlugin = {
  type: 'Text',
  name: '文本',
  version: '1.0.0',
  createElement(clip, helpers) {
    const { Text, TextStyle } = PIXI;
    const style = new TextStyle({ ... });
    return new Text({ text: clip.text, style });
  }
};

// 文本特效插件,扩展文本插件
const textEffectPlugin = {
  type: 'TextEffect',
  name: '文本特效',
  version: '1.0.0',
  extends: 'Text',  // 声明扩展 Text 插件
  extendCreateElement(baseElement, clip, helpers) {
    // 在基础元素上添加特效
    if (clip.effect === 'shadow') {
      baseElement.dropShadow = {
        alpha: 0.5,
        blur: 5,
        color: 0x000000
      };
    }
    return baseElement;
  }
};
3.9.3 插件通信机制
问题场景:插件之间可能需要相互通信,共享状态或触发事件。
例如,一个"时间轴"插件可能需要通知所有元素插件当前时间变化,或者一个"选择工具"插件需要通知元素插件元素被选中。
当前实现的局限:
- 缺少事件总线或消息传递机制
- 插件之间无法共享状态
- 无法实现插件间的协作
可能的解决方案:
typescript
// 扩展 PluginHelpers,增加事件总线
export type CanvasPluginHelpers = {
  getSDKConfig: () => ReturnType<typeof getSDKConfig>;
  getCurrentTime: () => number;
  getDuration: () => number;
  eventBus: EventEmitter; // 新增:事件总线
};

// 创建全局事件总线
export const pluginEventBus = new EventEmitter();

// 在创建插件上下文时注入事件总线
function createSandbox(): PluginSandbox {
  return {
    PIXI,
    helpers: {
      getSDKConfig: () => getSDKConfig(),
      eventBus: pluginEventBus // 注入事件总线
    }
  };
}

// 插件使用事件总线
const timePlugin = {
  type: 'time',
  name: '时间',
  version: '1.0.0',
  createElement(clip, helpers) {
    const element = new PIXI.Text({ text: formatTimeText(clip) });

    // 监听时间变化事件
    helpers.eventBus.on('time:changed', currentTime => {
      element.text = formatTimeText({ ...clip, currentTime });
    });

    return element;
  }
};
3.9.4 插件生命周期管理
问题场景:插件可能需要在特定时机执行初始化或清理操作。
例如,一个"资源管理器"插件需要在应用启动时预加载资源,在应用关闭时释放资源。
当前实现的局限:
- 缺少插件生命周期钩子
- 无法在插件加载时执行初始化逻辑
- 无法在插件卸载时执行清理逻辑
3.9.5 插件安全性
问题场景:第三方插件可能存在恶意代码,需要限制其访问权限。
例如,一个恶意插件可能尝试访问用户敏感信息、修改核心系统配置或执行危险操作。
当前实现的局限:
- 沙箱机制不够完善
- 缺少权限控制
- 无法隔离恶意插件
4. 渲染与动画系统
4.1 渲染循环原理
PixiJS 使用 Ticker 实现渲染循环,每帧调用一次回调函数:
typescript
private async init() {
  // ... 初始化 PixiJS Application ...

  // 注册渲染循环
  this.app.ticker.add(() => {
    const deltaMs = this.app.ticker.deltaMS;

    // 如果正在播放,更新当前时间
    if (this.playing) {
      this.currentTime += deltaMs;

      // 循环播放
      if (this.currentTime > this.opts.duration) {
        this.currentTime = 0;
      }
    }

    // 更新画面
    this.updateFrame();
  });
}
4.2 每帧发生了什么?
updateFrame 函数负责更新所有元素的状态:
typescript
export function updateFrame(context: RenderContext) {
  const { clips, transitions, currentTime, duration, applyClipProps } = context;

  // 1. 计算当前活动的过渡效果
  const activeTransitions = computeActiveTransitions(
    transitions,
    clips,
    currentTime
  );

  // 2. 遍历所有元素
  for (const [id, instance] of clips) {
    const clip = instance.data;

    // 3. 计算元素是否可见
    const visible = isClipVisible(clip, currentTime, duration);

    if (!visible) {
      instance.sprite.visible = false;
      continue;
    }

    instance.sprite.visible = true;

    // 4. 应用动画插值
    const { props } = interpolateAnimation(clip, currentTime, clip, duration);

    // 5. 应用过渡效果
    const transition = activeTransitions.get(id);
    if (transition) {
      updateTransitionProgress(instance, transition);
    } else {
      clearTransition(instance);
    }

    // 6. 更新元素属性
    applyClipProps(instance);
  }
}
4.3 动画插值算法
动画的本质是在两个状态之间进行平滑过渡:
typescript
export function interpolateAnimation(
  clip: CanvasClip,
  currentTime: number,
  base: CanvasClipBase,
  duration: number
): AnimationState {
  const display = clip.display ?? { from: 0, to: duration };
  const animation = clip.animation;

  // 没有动画配置,直接返回基础属性
  if (!animation) {
    return { props: base, isActive: false };
  }

  const animationDuration = animation.duration;
  const start = display.from;
  let local = currentTime - start;

  // 处理循环动画
  if (animation.loop && animationDuration > 0) {
    local = local % animationDuration;
  }

  // 判断动画是否在活动区间
  const isActive = local >= 0 && local <= animationDuration;

  if (!isActive) {
    return { props: base, isActive: false };
  }

  // 计算插值进度 (0-1)
  const t = animationDuration === 0 ? 1 : local / animationDuration;

  // 执行属性插值
  const props = interpolateProps(base, animation, t);

  return { props, isActive: true };
}
4.4 线性插值(Lerp)
线性插值是最基础的动画算法:
typescript
// 从 from 到 to,按进度 t 计算中间值
export function lerp(from: number, to: number, t: number) {
  return from + (to - from) * t;
}

// 示例:从 x=100 移动到 x=200,进度 0.5
lerp(100, 200, 0.5); // 结果:150
属性插值的完整实现:
typescript
function interpolateProps(
  base: CanvasClipBase,
  animation: CanvasClipAnimation,
  t: number
): CanvasClipBase {
  // 合并基础属性和动画起始状态
  const from = { ...base, ...(animation.from ?? {}) };
  // 合并基础属性和动画结束状态
  const to = { ...base, ...(animation.to ?? {}) };

  return {
    ...base,
    x: lerp(from.x, to.x, t),
    y: lerp(from.y, to.y, t),
    width: lerp(from.width, to.width, t),
    height: lerp(from.height, to.height, t),
    opacity: lerp(from.opacity ?? 1, to.opacity ?? 1, t),
    rotation: lerp(from.rotation ?? 0, to.rotation ?? 0, t)
  };
}
4.5 可见性计算
typescript
function isClipVisible(
  clip: CanvasClip,
  currentTime: number,
  duration: number
): boolean {
  const display = clip.display;

  // 没有设置显示时间,默认始终可见
  if (!display) return true;

  // 检查当前时间是否在显示区间内
  return currentTime >= display.from && currentTime <= display.to;
}
5. 效果与过渡
效果和过渡是画布系统里两个很重要的视觉增强功能。效果是给单个元素加特效,比如波浪扭曲、色差分离这些;过渡则是让两个元素之间平滑切换,比如淡入淡出、方向擦除。它们都是用 PixiJS 的 Filter 系统和 WebGL Shader 实现的。
5.1 先聊聊 PixiJS 的 Filter
Filter 本质上就是在 GPU 上跑的小程序,它会把显示对象先渲染成一张纹理,然后用 Shader 处理这张纹理,最后输出处理后的图像。这样做的好处是所有像素计算都在 GPU 上完成,性能特别好。
5.1.1 Filter 由什么组成?
一个自定义 Filter 主要有三块:
- 顶点着色器:决定顶点在哪、纹理坐标怎么算
- 片段着色器:决定每个像素输出什么颜色
- Uniform 变量:从 JS 传给 Shader 的参数
来看个最简单的例子:
typescript
import { Filter, GlProgram, UniformGroup } from 'pixi.js';

const filter = new Filter({
  // 创建 WebGL 程序,把顶点着色器和片段着色器编译成 GPU 可执行的代码
  glProgram: GlProgram.from({
    vertex: vertexShaderSource, // 顶点着色器代码字符串
    fragment: fragmentShaderSource // 片段着色器代码字符串
  }),
  resources: {
    // 定义 uniform 变量,这些变量可以从 JavaScript 动态更新
    uniforms: new UniformGroup({
      uTime: { value: 0, type: 'f32' }, // 时间变量,用于实现动态效果
      amplitude: { value: 0.02, type: 'f32' } // 振幅变量,控制效果的强度
    })
  }
});

// 把滤镜挂到 sprite 上,PixiJS 会自动在渲染时应用这个滤镜
sprite.filters = [filter];
就这么几行代码,一个滤镜就挂到 sprite 上了。
5.1.2 顶点着色器是怎么回事?
项目里用了一个自定义的顶点着色器,主要是处理坐标变换:
glsl
attribute vec2 aPosition;
varying vec2 vTextureCoord;
uniform vec4 uInputSize;
uniform vec4 uOutputFrame;
uniform vec4 uOutputTexture;

vec4 filterVertexPosition(void) {
  vec2 position = aPosition * uOutputFrame.zw + uOutputFrame.xy;
  position.x = position.x * (2.0 / uOutputTexture.x) - 1.0;
  position.y = position.y * (2.0 * uOutputTexture.z / uOutputTexture.y) - uOutputTexture.z;
  return vec4(position, 0.0, 1.0);
}

vec2 filterTextureCoord(void) {
  return aPosition * (uOutputFrame.zw * uInputSize.zw);
}

void main(void) {
  gl_Position = filterVertexPosition();
  vTextureCoord = filterTextureCoord();
}
看着有点复杂?其实就两件事:
filterVertexPosition把顶点从纹理空间转到裁剪空间filterTextureCoord算出正确的纹理采样坐标
那些 uInputSize、uOutputFrame 之类的都是 PixiJS 自动传进来的,你不用管它,知道有这些东西就行。
5.1.3 片段着色器才是主角
片段着色器才是真正干活的地方,它决定了每个像素最终长什么样。最简单的片段着色器就是原样输出:
glsl
precision mediump float;
varying vec2 vTextureCoord;
uniform sampler2D uTexture;

void main(void) {
  gl_FragColor = texture2D(uTexture, vTextureCoord);
}
几个要注意的点:
precision mediump float是设置浮点精度,mediump在移动端够用了vTextureCoord是从顶点着色器传过来的纹理坐标uTexture是输入纹理,PixiJS 会自动绑定gl_FragColor就是最终输出的颜色
5.2 类型定义
效果和过渡的定义结构差不多,都是一段 Shader 代码加上一些参数:
typescript
export type CanvasEffectDefinition = {
  fragment: string;
  uniforms?: Record<string, { value: number; type: 'f32' }>;
};

export type CanvasTransitionDefinition = {
  fragment: string;
  uniforms?: Record<string, { value: number; type: 'f32' }>;
};

export type CanvasTransitionType = 'fade' | 'directionalWipe';

export interface CanvasClipEffect {
  name: string;
  params?: Record<string, number>;
}

export interface CanvasClipTransition {
  type: CanvasTransitionType;
  duration: number;
  toId?: string;
}
5.3 效果注册表
我们用 Map 来存所有注册的效果,想加新效果就调用注册函数:
typescript
const effectRegistry = new Map<string, CanvasEffectDefinition>();
const transitionRegistry = new Map<
  CanvasTransitionType,
  CanvasTransitionDefinition
>();

export function registerCanvasEffect(
  name: string,
  definition: CanvasEffectDefinition
): void {
  effectRegistry.set(name, definition);
}

export function getCanvasEffect(
  name: string
): CanvasEffectDefinition | undefined {
  return effectRegistry.get(name);
}

export function registerCanvasTransition(
  type: CanvasTransitionType,
  definition: CanvasTransitionDefinition
): void {
  transitionRegistry.set(type, definition);
}

export function getCanvasTransition(
  type: CanvasTransitionType
): CanvasTransitionDefinition | undefined {
  return transitionRegistry.get(type);
}
系统启动的时候会把内置效果都注册上:
typescript
export function registerBuiltinEffects() {
  registerCanvasEffect('wave', waveEffect);
  registerCanvasEffect('chromatic', chromaticEffect);
  registerCanvasTransition('fade', fadeTransition);
  registerCanvasTransition('directionalWipe', directionalWipeTransition);
}
5.4 来看看具体的效果实现
5.4.1 波浪效果
波浪效果就是让纹理坐标按正弦规律偏移,产生波浪状的扭曲:
typescript
export const waveEffect: CanvasEffectDefinition = {
  fragment: `
precision mediump float;
varying vec2 vTextureCoord;
uniform sampler2D uTexture;
uniform float uTime;
uniform float amplitude;
uniform float frequency;

void main(void) {
  vec2 uv = vTextureCoord;
  uv.y += sin(uv.x * frequency + uTime) * amplitude;
  gl_FragColor = texture2D(uTexture, uv);
}
`,
  uniforms: {
    amplitude: { value: 0.02, type: 'f32' },
    frequency: { value: 12.0, type: 'f32' }
  }
};核心就这一行:uv.y += sin(uv.x * frequency + uTime) * amplitude
意思是根据 x 坐标和时间算出 y 方向的偏移量。frequency 控制波浪有多密,amplitude 控制波浪有多大,uTime 让波浪动起来。
uTime 是从哪里来的?
uTime 是一个 uniform 变量,它的值是在运行时从 JavaScript 传入的。具体来说:
- 初始化时 :在
createEffectFilter函数中,uTime被初始化为 0 - 每帧更新时 :在
updateFrame函数中,系统会把当前播放时间(毫秒)转换成秒,然后赋值给uTime
typescript
// 在 createEffectFilter 中初始化
const uniforms = new UniformGroup({
  uTime: { value: 0, type: 'f32' },  // 初始值为 0
  ...
});

// 在 updateFrame 中每帧更新
if (instance.effect) {
  instance.effect.uniforms.uniforms.uTime = currentTime / 1000;  // 转换成秒
}
所以 uTime 实际上就是当前播放时间(秒),随着时间推移不断增大,让波浪效果产生动态变化。
5.4.2 色差效果
色差效果模拟镜头的色散现象,把 RGB 三个通道往不同方向偏:
typescript
export const chromaticEffect: CanvasEffectDefinition = {
  fragment: `
precision mediump float;
varying vec2 vTextureCoord;
uniform sampler2D uTexture;
uniform float uTime;
uniform float offset;

void main(void) {
  vec2 uv = vTextureCoord;
  float shift = sin(uTime * 2.0) * offset;
  float r = texture2D(uTexture, uv + vec2(shift, 0.0)).r;
  float g = texture2D(uTexture, uv).g;
  float b = texture2D(uTexture, uv - vec2(shift, 0.0)).b;
  gl_FragColor = vec4(r, g, b, 1.0);
}
`,
  uniforms: {
    offset: { value: 0.01, type: 'f32' }
  }
};
这里做了三件事:
- 算一个随时间变化的偏移量
shift - 分别采样 RGB 三个通道:R 往右偏、G 不偏、B 往左偏
- 把三个通道拼成最终颜色
效果就是画面边缘会出现红蓝分离的色边,很有赛博朋克的感觉。
5.5 过渡效果怎么实现
过渡就是两个元素之间的切换效果。过渡期间两个元素会同时显示,但各自用不同的滤镜参数。
5.5.1 淡入淡出
最简单的过渡,就是调透明度:
typescript
export const fadeTransition: CanvasTransitionDefinition = {
  fragment: `
precision mediump float;
varying vec2 vTextureCoord;
uniform sampler2D uTexture;
uniform float progress;
uniform float role;

void main(void) {
  vec4 color = texture2D(uTexture, vTextureCoord);
  float alpha = role < 0.5 ? (1.0 - progress) : progress;
  float mixAlpha = clamp(alpha, 0.0, 1.0);
  gl_FragColor = vec4(color.rgb * mixAlpha, color.a * mixAlpha);
}
`,
  uniforms: {}
};
两个参数:
progress:过渡进度,从 0 到 1role:元素角色,0 是淡出(from),1 是淡入(to)
逻辑很简单:from 元素的透明度从 1 变到 0,to 元素的透明度从 0 变到 1。
5.5.2 方向擦除
这个效果更有意思,像是一块布从左往右被掀开:
typescript
export const directionalWipeTransition: CanvasTransitionDefinition = {
  fragment: `
precision mediump float;
varying vec2 vTextureCoord;
uniform sampler2D uTexture;
uniform float progress;
uniform float role;
uniform float feather;

void main(void) {
  vec4 color = texture2D(uTexture, vTextureCoord);
  float edge = clamp(progress, 0.0, 1.0);
  float leaveMask = smoothstep(edge - feather, edge + feather, vTextureCoord.x);
  float enterMask = 1.0 - leaveMask;
  float alpha = role < 0.5 ? leaveMask : enterMask;
  float mixAlpha = clamp(alpha, 0.0, 1.0);
  gl_FragColor = vec4(color.rgb * mixAlpha, color.a * mixAlpha);
}
`,
  uniforms: {
    feather: { value: 0.02, type: 'f32' }
  }
};
关键是 smoothstep 这个函数,它能在边缘处产生平滑过渡。feather 参数控制边缘有多柔和。
5.6 滤镜的创建和管理
5.6.1 创建效果滤镜
typescript
export interface EffectState {
  filter: Filter;
  uniforms: UniformGroup;
}

export function createEffectFilter(
  effectName: string,
  params?: Record<string, number>
): EffectState | null {
  const definition = getCanvasEffect(effectName);
  if (!definition) {
    console.warn(`找不到效果: ${effectName}`);
    return null;
  }

  try {
    const glProgram = GlProgram.from({
      vertex: FILTER_VERTEX,
      fragment: definition.fragment
    });

    const uniforms = new UniformGroup({
      uTime: { value: 0, type: 'f32' },
      ...(definition.uniforms ?? {})
    });

    const filter = new Filter({
      glProgram,
      resources: { effectUniforms: uniforms }
    });

    if (params) {
      const uniformValues = uniforms.uniforms as Record<string, number>;
      Object.entries(params).forEach(([key, value]) => {
        if (typeof value === 'number' && key in uniformValues) {
          uniformValues[key] = value;
        }
      });
    }

    return { filter, uniforms };
  } catch (error) {
    console.error(`创建滤镜失败: ${effectName}`, error);
    return null;
  }
}
流程大概是:
- 从注册表拿到效果定义
- 创建 WebGL 程序
- 创建 Uniform 组,初始化参数
- 创建 Filter 实例
- 如果有自定义参数就覆盖默认值
5.6.2 创建过渡滤镜
typescript
export interface TransitionState {
  type: CanvasTransitionType;
  filter: Filter;
  uniforms: UniformGroup;
}

export function createTransitionFilter(
  type: CanvasTransitionType, // 过渡类型,如 'fade' 或 'directionalWipe'
  progress: number, // 过渡进度,范围 [0, 1]
  role: 'from' | 'to' // 元素角色,'from' 表示淡出的元素,'to' 表示淡入的元素
): TransitionState | null {
  // 从注册表获取过渡效果的 Shader 定义
  const definition = getCanvasTransition(type);
  if (!definition) {
    console.warn(`找不到过渡: ${type}`);
    return null;
  }

  // 确保进度在 [0, 1] 范围内,防止 Shader 计算出错
  const clampedProgress = Math.max(0, Math.min(1, progress));

  // 将角色字符串转换为数值,Shader 中用 0 表示 from,1 表示 to
  const roleValue = role === 'from' ? 0 : 1;

  try {
    // 创建 WebGL 程序,编译顶点着色器和片段着色器
    const glProgram = GlProgram.from({
      vertex: FILTER_VERTEX, // 使用项目统一的顶点着色器
      fragment: definition.fragment // 使用过渡效果特定的片段着色器
    });

    // 创建 uniform 变量组,这些变量会传给 Shader
    const uniforms = new UniformGroup({
      progress: { value: clampedProgress, type: 'f32' }, // 过渡进度
      role: { value: roleValue, type: 'f32' }, // 元素角色
      ...(definition.uniforms ?? {}) // 合并过渡效果自定义的 uniform
    });

    // 创建滤镜实例,关联 WebGL 程序和 uniform 变量
    const filter = new Filter({
      glProgram,
      resources: { transitionUniforms: uniforms } // 将 uniform 组命名为 'transitionUniforms'
    });

    // 返回过渡状态,包含类型、滤镜实例和 uniform 组
    return { type, filter, uniforms };
  } catch (error) {
    console.error(`创建过渡滤镜失败: ${type}`, error);
    return null;
  }
}
5.6.3 更新过渡进度
过渡过程中要实时更新进度:
typescript
export function updateTransitionProgress(
  state: TransitionState,
  progress: number,
  role: 'from' | 'to'
): void {
  state.uniforms.uniforms.progress = Math.max(0, Math.min(1, progress));
  state.uniforms.uniforms.role = role === 'from' ? 0 : 1;
}
5.6.4 滤镜同步
一个元素可能同时有效果滤镜和过渡滤镜,得把它们同步到显示对象上:
typescript
export interface FilterableInstance {
  sprite: { filters: Filter[] | null };
  effect?: EffectState;
  transition?: TransitionState;
}

export function syncFilters(instance: FilterableInstance): void {
  const filters: Filter[] = [];
  if (instance.effect) filters.push(instance.effect.filter);
  if (instance.transition) filters.push(instance.transition.filter);
  instance.sprite.filters = filters.length > 0 ? filters : null;
}

export function clearEffect(instance: FilterableInstance): void {
  instance.effect = undefined;
  syncFilters(instance);
}

export function clearTransition(instance: FilterableInstance): void {
  instance.transition = undefined;
  syncFilters(instance);
}
5.7 运行时怎么跑起来的
5.7.1 过渡计算
核心问题是:当前时间点,哪些元素正在参与过渡?各自的进度是多少?
typescript
interface ActiveTransition {
  type: CanvasTransitionType;
  progress: number;
  role: 'from' | 'to';
}

function computeActiveTransitions(
  transitions: CanvasTransition[],
  clips: Map<string, ClipInstance>,
  currentTime: number
): Map<string, ActiveTransition> {
  const activeTransitions = new Map<string, ActiveTransition>();

  for (const transition of transitions) {
    const to = clips.get(transition.toId);
    if (!to) continue;

    const toStart = to.data.display?.from ?? 0;
    const duration = transition.duration;
    if (duration <= 0) continue;

    const start = Math.max(0, toStart - duration);
    const end = toStart;

    if (currentTime >= start && currentTime <= end) {
      const progress = (currentTime - start) / duration;
      const from = clips.get(transition.fromId);
      if (from) {
        activeTransitions.set(from.data.id, {
          type: transition.type,
          progress,
          role: 'from'
        });
      }
      activeTransitions.set(to.data.id, {
        type: transition.type,
        progress,
        role: 'to'
      });
    }
  }

  return activeTransitions;
}
时间关系大概是这样:
sql
时间轴:
|--------|--------|--------|--------|
0       start     end     toStart
         |--------|
       过渡区间

过渡开始 = toStart - duration
过渡结束 = toStart
进度 = (当前时间 - 开始时间) / duration
5.7.2 每帧更新
每帧渲染要做的事情:
typescript
export function updateFrame(context: RenderContext): void {
  const {
    clips, // 所有元素实例的映射表
    transitions, // 过渡配置数组
    currentTime, // 当前播放时间(毫秒)
    duration, // 画布总时长
    draggingClipIds, // 正在被拖拽的元素 ID 集合
    applyClipProps, // 应用元素属性的回调函数
    refreshTransformControls // 刷新变换控制器的回调函数
  } = context;

  // 步骤1:计算当前时间点活动的过渡效果
  // 返回一个映射表,key 为元素 ID,value 为该元素的过渡状态
  const activeTransitions = computeActiveTransitions(
    transitions,
    clips,
    currentTime
  );

  // 步骤2:构建过渡截止时间映射表
  // 用于确定 "from" 元素何时应该被过渡效果隐藏
  // key 为 from 元素 ID,value 为该元素应该被隐藏的时间点
  const transitionCutoffByFromId = new Map<string, number>();
  for (const transition of transitions) {
    const to = clips.get(transition.toId); // 获取目标元素
    if (!to) continue; // 如果目标元素不存在就跳过

    const toStart = to.data.display?.from ?? 0; // 获取目标元素的开始时间

    // 如果存在多个过渡使用同一个 from 元素,取最早的截止时间
    const currentCutoff = transitionCutoffByFromId.get(transition.fromId);
    if (currentCutoff === undefined || toStart < currentCutoff) {
      transitionCutoffByFromId.set(transition.fromId, toStart);
    }
  }

  // 步骤3:更新每个元素的状态
  for (const instance of clips.values()) {
    const clip = instance.data; // 获取元素数据

    // 获取元素的显示时间范围,如果没有配置则默认为整个画布时长
    const display = clip.display ?? { from: 0, to: duration };

    // 获取该元素作为 "from" 角色时的过渡截止时间
    const transitionCutoff = transitionCutoffByFromId.get(clip.id);

    // 判断元素是否被过渡效果抑制
    // 当当前时间超过了过渡截止时间,元素应该被隐藏
    const isSuppressedByTransition =
      transitionCutoff !== undefined && currentTime > transitionCutoff;

    // 计算元素的可见性:
    // 1. 当前时间在显示范围内,且未被过渡效果抑制
    // 2. 或者该元素正在参与过渡效果
    const visible =
      (currentTime >= display.from &&
        currentTime <= display.to &&
        !isSuppressedByTransition) ||
      activeTransitions.has(clip.id);

    instance.sprite.visible = visible;

    // 如果不可见,跳过后续处理
    if (!visible) continue;

    // 步骤4:插值动画属性
    // 如果元素有动画配置且未被拖拽,则进行动画插值并合并到 instance.data
    if (clip.animation && !draggingClipIds.has(clip.id)) {
      const animState = interpolateAnimation(clip, currentTime, clip, duration);
      if (animState.isActive) {
        Object.assign(instance.data, animState.props); // 将动画计算出的属性合并到元素数据
      }
    }

    // 步骤5:应用过渡效果滤镜
    const transitionConfig = activeTransitions.get(clip.id);
    if (transitionConfig) {
      // 如果已存在相同类型的过渡状态,只更新进度
      if (
        instance.transition &&
        instance.transition.type === transitionConfig.type
      ) {
        updateTransitionProgress(
          instance.transition,
          transitionConfig.progress,
          transitionConfig.role
        );
      } else {
        // 否则创建新的过渡滤镜
        const transitionState = createTransitionFilter(
          transitionConfig.type,
          transitionConfig.progress,
          transitionConfig.role
        );
        if (transitionState) {
          instance.transition = transitionState;
          syncFilters(instance); // 同步滤镜到显示对象
        }
      }
    }

    // 步骤6:应用计算后的属性到元素实例
    applyClipProps(instance);

    // 步骤7:同步特效时间
    // 如果元素有效果滤镜,更新其时间 uniform
    if (instance.effect) {
      instance.effect.uniforms.uniforms.uTime = currentTime / 1000; // 转换成秒
    }
  }

  // 步骤8:清理已结束的过渡效果
  // 遍历所有元素,清除不再参与活动过渡的过渡状态
  for (const instance of clips.values()) {
    if (!activeTransitions.has(instance.data.id)) {
      clearTransition(instance);
    }
  }

  // 步骤9:刷新变换控制器
  // 确保变换控制器的显示与当前元素状态同步
  refreshTransformControls();
}
简单说就是:
- 算出当前有哪些过渡在进行
- 遍历所有元素,决定谁可见谁不可见
- 给参与过渡的元素应用滤镜
- 更新效果的时间参数
- 清理已经结束的过渡
5.8 一些小技巧
5.8.1 Shader 性能
别在循环里做纹理采样,GPU 不喜欢这样:
glsl
// 别这样写
for (int i = 0; i < 10; i++) {
  color += texture2D(uTexture, uv + offset * float(i));
}

// 这样写更好
color += texture2D(uTexture, uv + offset * 1.0);
color += texture2D(uTexture, uv + offset * 2.0);
color += texture2D(uTexture, uv + offset * 3.0);
5.8.2 别每帧都创建 Filter
typescript
// 别这样
function updateFrame() {
  sprite.filters = [new Filter({ ... })];
}

// 这样才对
function updateFrame() {
  if (effectState) {
    effectState.uniforms.uniforms.uTime = currentTime / 1000;
  }
}
Filter 创建一次,之后只更新参数就行。
5.8.3 滤镜顺序有讲究
typescript
sprite.filters = [
  effectFilter, // 先应用效果
  transitionFilter // 再应用过渡
];
顺序不同,效果可能完全不一样,要注意。
6. 交互系统
6.1 变换控制器设计
变换控制器负责处理用户的交互操作:
typescript
export class TransformController {
  // 当前选中的元素
  private selectedClipId: string | null = null;

  // 正在拖拽的元素集合
  readonly draggingClipIds = new Set<string>();

  // 拖拽起始状态
  readonly dragStartState = new Map<string, { x: number; y: number }>();

  // 变换控制层(显示选中框和手柄)
  private transformLayer = new Container();
  private transformFrame = new Graphics();
  private transformHandles = new Map<TransformHandleKind, Graphics>();

  // 当前变换会话
  private transformSession: TransformSession | null = null;

  constructor(
    private readonly stage: Container,
    private readonly clips: Map<string, ClipInstance>,
    private readonly opts: TransformControllerOptions,
    private readonly deps: TransformControllerDeps
  ) {}

  init(width: number, height: number): void {
    // 设置舞台事件
    this.stage.eventMode = 'static';
    this.stage.hitArea = new Rectangle(0, 0, width, height);

    // 绑定事件处理
    this.stage.on('pointerdown', this.onStagePointerDown);
    this.stage.on('globalpointermove', this.onGlobalPointerMove);
    this.stage.on('pointerup', this.onGlobalPointerUp);

    this.setupTransformControls();
  }
}
6.2 拖拽交互实现
typescript
bindClipInteractivity(instance: ClipInstance): void {
  if (!this.opts.interactivity) return;

  const sprite = instance.sprite;
  sprite.eventMode = 'static';
  sprite.cursor = 'move';

  let dragging = false;
  let offsetX = 0;
  let offsetY = 0;

  sprite.on('pointerdown', (event: FederatedPointerEvent) => {
    event.stopPropagation();
    dragging = true;

    // 记录拖拽状态
    this.draggingClipIds.add(instance.data.id);
    this.selectedClipId = instance.data.id;

    // 记录起始位置
    this.dragStartState.set(instance.data.id, {
      x: sprite.x,
      y: sprite.y
    });

    // 计算鼠标偏移量
    const localPos = event.data.getLocalPosition(sprite.parent);
    offsetX = localPos.x - sprite.x;
    offsetY = localPos.y - sprite.y;
  });

  sprite.on('globalpointermove', (event: FederatedPointerEvent) => {
    if (!dragging) return;

    // 计算新位置
    const localPos = event.data.getLocalPosition(sprite.parent);
    const newX = localPos.x - offsetX;
    const newY = localPos.y - offsetY;

    // 更新元素位置
    instance.data.x = newX;
    instance.data.y = newY;
    sprite.x = newX;
    sprite.y = newY;

    this.refreshTransformControls();
  });

  sprite.on('pointerup', () => {
    if (!dragging) return;
    dragging = false;
    this.draggingClipIds.delete(instance.data.id);

    // 同步动画关键帧
    this.syncAnimationKeyframes(instance);

    this.dragStartState.delete(instance.data.id);
    this.refreshTransformControls();
  });
}
6.3 变换手柄
变换手柄用于缩放和旋转操作:
typescript
// 手柄类型
type TransformHandleKind =
  | 'nw'
  | 'n'
  | 'ne' // 上方三个手柄
  | 'w'
  | 'e' // 左右两个手柄
  | 'sw'
  | 's'
  | 'se' // 下方三个手柄
  | 'rot'; // 旋转手柄

// 绘制手柄
function drawTransformHandle(
  graphics: Graphics,
  kind: TransformHandleKind,
  x: number,
  y: number,
  rotation: number
): void {
  graphics.clear();

  if (kind === 'rot') {
    // 旋转手柄:圆形
    graphics.circle(x, y, HANDLE_SIZE);
    graphics.fill({ color: COLORS.ROTATE_HANDLE });
  } else {
    // 缩放手柄:方形
    graphics.rect(
      x - HANDLE_SIZE / 2,
      y - HANDLE_SIZE / 2,
      HANDLE_SIZE,
      HANDLE_SIZE
    );
    graphics.fill({ color: COLORS.HANDLE });
  }
}

// 根据手柄类型设置光标
function getTransformHandleCursor(kind: TransformHandleKind): string {
  const cursors: Record<TransformHandleKind, string> = {
    nw: 'nwse-resize',
    n: 'ns-resize',
    ne: 'nesw-resize',
    w: 'ew-resize',
    e: 'ew-resize',
    sw: 'nesw-resize',
    s: 'ns-resize',
    se: 'nwse-resize',
    rot: 'crosshair'
  };
  return cursors[kind];
}
6.4 缩放和旋转的几何计算
typescript
// 角度转换
export function degToRad(degrees: number): number {
  return degrees * (Math.PI / 180);
}

export function radToDeg(radians: number): number {
  return radians * (180 / Math.PI);
}

// 绕中心点旋转
export function rotatePoint(point: Point, center: Point, angle: number): Point {
  const cos = Math.cos(angle);
  const sin = Math.sin(angle);
  const dx = point.x - center.x;
  const dy = point.y - center.y;

  return new Point(
    center.x + dx * cos - dy * sin,
    center.y + dx * sin + dy * cos
  );
}

// 计算缩放后的矩形
export function proposeResizeRect(
  original: Rectangle,
  handle: TransformHandleKind,
  delta: Point,
  minSize: number
): Rectangle {
  let { x, y, width, height } = original;

  switch (handle) {
    case 'nw':
      x += delta.x;
      y += delta.y;
      width -= delta.x;
      height -= delta.y;
      break;
    case 'ne':
      y += delta.y;
      width += delta.x;
      height -= delta.y;
      break;
    case 'sw':
      x += delta.x;
      width -= delta.x;
      height += delta.y;
      break;
    case 'se':
      width += delta.x;
      height += delta.y;
      break;
    case 'n':
      y += delta.y;
      height -= delta.y;
      break;
    case 's':
      height += delta.y;
      break;
    case 'w':
      x += delta.x;
      width -= delta.x;
      break;
    case 'e':
      width += delta.x;
      break;
  }

  // 确保最小尺寸
  if (width < minSize) {
    width = minSize;
    if (handle.includes('w')) x = original.right - minSize;
  }
  if (height < minSize) {
    height = minSize;
    if (handle.includes('n')) y = original.bottom - minSize;
  }

  return new Rectangle(x, y, width, height);
}
7. 事件与状态管理
7.1 事件发射器模式
typescript
type EventCallback<T = unknown> = (data: T) => void;

export class CanvasEmitter {
  private listeners = new Map<string, Set<EventCallback>>();

  // 订阅事件
  on<T>(event: string, callback: EventCallback<T>): void {
    if (!this.listeners.has(event)) {
      this.listeners.set(event, new Set());
    }
    this.listeners.get(event)!.add(callback as EventCallback);
  }

  // 取消订阅
  off<T>(event: string, callback: EventCallback<T>): void {
    this.listeners.get(event)?.delete(callback as EventCallback);
  }

  // 触发事件
  protected emit<T>(event: string, data: T): void {
    const callbacks = this.listeners.get(event);
    if (callbacks) {
      callbacks.forEach(callback => callback(data));
    }
  }
}
7.2 内置事件
typescript
export type CanvasEvents = {
  'selection:changed': CanvasClip | null; // 选中状态变化
};
7.3 使用示例
typescript
// 在 React 中使用
useEffect(() => {
  if (!studio) return;

  // 监听选中变化
  studio.on('selection:changed', clip => {
    setActiveClip(clip);
    console.log('当前选中:', clip?.id);
  });

  return () => {
    studio.off('selection:changed', () => {});
  };
}, [studio]);
7.4 状态管理原则
- 单一数据源 :所有状态都存储在
CanvasStudio实例中 - 数据驱动视图:通过修改数据来更新画面
- 事件通知变化:状态变化通过事件通知外部
typescript
// 更新元素
updateClip(id: string, clip: CanvasClip): void {
  const instance = this.clips.get(id);
  if (!instance) return;

  // 更新数据
  instance.data = clip;

  // 触发重新渲染
  this.updateFrame();
}
8. 实战案例
8.1 从 JSON 加载项目
typescript
async loadFromJSON(json: CanvasProjectJSON): Promise<void> {
  await this.ready;
  this.clear();

  // 1. 应用设置
  if (json.settings?.width && json.settings?.height) {
    this.setSize(json.settings.width, json.settings.height);
  }
  if (json.settings?.bgColor) {
    this.setBgColor(json.settings.bgColor);
  }
  if (json.settings?.duration) {
    this.opts.duration = json.settings.duration;
  }

  // 2. 加载过渡配置
  this.transitions = json.transitions ? [...json.transitions] : [];

  // 3. 加载所有元素
  for (const clip of json.clips) {
    try {
      await this.addClip(clip);
    } catch (error) {
      console.error(`Failed to load clip "${clip.id}"`, error);
    }
  }

  // 4. 如果没有过渡配置,自动计算
  if (this.transitions.length === 0) {
    this.transitions = computeTransitions(json.clips);
  }

  // 5. 重置播放位置
  this.currentTime = 0;
  this.updateFrame();
}
8.2 添加元素
typescript
async addClip(clip: CanvasClip): Promise<void> {
  // 1. 获取对应插件
  const plugin = this.pluginRegistry.get(clip.type);
  if (!plugin) {
    throw CanvasError.pluginNotFound(clip.type);
  }

  // 2. 创建显示对象
  const sprite = await plugin.createElement(clip, {
    getSDKConfig,
    getCurrentTime: () => this.currentTime,
    getDuration: () => this.opts.duration
  });

  // 3. 创建元素实例
  const instance: ClipInstance = {
    data: clip,
    sprite,
    effect: undefined,
    transition: undefined
  };

  // 4. 绑定交互
  if (this.opts.interactivity) {
    this.transformController?.bindClipInteractivity(instance);
  }

  // 5. 添加到舞台
  this.stage.addChild(sprite);
  this.clips.set(clip.id, instance);

  // 6. 应用效果
  applyEffect(instance);
}
8.3 React 集成示例
typescript
export function useCanvasStudio(initialProject: CanvasProjectJSON) {
  const canvasRef = useRef<HTMLCanvasElement>(null);
  const studioRef = useRef<CanvasStudio | null>(null);
  const [currentTime, setCurrentTime] = useState(0);
  const [isPlaying, setIsPlaying] = useState(true);

  useEffect(() => {
    const initStudio = async () => {
      if (!canvasRef.current) return;

      const studio = new CanvasStudio({
        width: initialProject.settings?.width ?? 720,
        height: initialProject.settings?.height ?? 420,
        bgColor: initialProject.settings?.bgColor ?? '#0b0b0b',
        duration: initialProject.settings?.duration ?? 9000,
        interactivity: true,
        canvas: canvasRef.current
      });

      await studio.ready;
      studioRef.current = studio;

      // 监听选中变化
      studio.on('selection:changed', clip => {
        console.log('Selected:', clip?.id);
      });

      await studio.loadFromJSON(initialProject);
    };

    initStudio();

    return () => {
      studioRef.current?.destroy();
    };
  }, [initialProject]);

  useEffect(() => {
    const interval = setInterval(() => {
      if (studioRef.current) {
        setCurrentTime(studioRef.current.currentTime);
      }
    }, 50);
    return () => clearInterval(interval);
  }, []);

  const togglePlayPause = useCallback(() => {
    if (!studioRef.current) return;
    if (isPlaying) {
      studioRef.current.pause();
    } else {
      studioRef.current.play();
    }
    setIsPlaying(prev => !prev);
  }, [isPlaying]);

  return {
    canvasRef,
    currentTime,
    isPlaying,
    togglePlayPause
  };
}