目录:
-
- 一、环境准备
-
- [1、Anaconda 环境配置](#1、Anaconda 环境配置)
- [2、准备 caffe 模型及配置文件](#2、准备 caffe 模型及配置文件)
- 3、准备ImageNet类别标签文件
- [二、 caffe 模型代码案例](#二、 caffe 模型代码案例)
- [三、 caffe 模型运行结果](#三、 caffe 模型运行结果)
- [四、 yolo-v3 模型及配置文件](#四、 yolo-v3 模型及配置文件)
- [五、yolo-v3 模型代码案例](#五、yolo-v3 模型代码案例)
- [六、 yolo-v3模型运行结果](#六、 yolo-v3模型运行结果)
一、环境准备
1、Anaconda 环境配置
环境配置参考前面章节:
2、准备 caffe 模型及配置文件
本节用到的是 caffe 模型:
Caffe(Convolutional Architecture for Fast Feature
Embedding)是一个由伯克利视觉与学习中心(BVLC)开发的开源深度学习框架,以其高效、模块化和适合计算机视觉任务而闻名。Caffe模型是该框架训练和保存的神经网络模型,广泛应用于图像分类、目标检测、语义分割等领域。
主要构成:
- .prototxt文件:定义网络结构(即模型的"骨架"),包括层的类型、连接方式、输入输出尺寸等。
- caffemodle文件:包含训练好的模型权重(即模型的"大脑"),是二进制文件。
powershell
https://github.com/BVLC/caffe/blob/master/models/bvlc_googlenet/deploy.prototxt
http://dl.caffe.berkeleyvision.org/bvlc_googlenet.caffemodel
3、准备ImageNet类别标签文件
powershell
https://gist.githubusercontent.com/yrevar/942d3a0ac09ec9e5eb3a/raw/238f720ff059c1f82f368259d1ca4ffa5dd8f9f5/imagenet1000_clsidx_to_labels.txt要么复制粘贴到一个txt文件,要么就写个python下载下来吧:
python
import requests

url = "https://gist.githubusercontent.com/yrevar/942d3a0ac09ec9e5eb3a/raw/238f720ff059c1f82f368259d1ca4ffa5dd8f9f5/imagenet1000_clsidx_to_labels.txt"
response = requests.get(url)
with open("imagenet1000_clsidx_to_labels.txt", "w") as f:
    f.write(response.text)
二、 caffe 模型代码案例
流程:
导入模型->添加参数->回溯->推理->输出
python
import cv2
import numpy as np
model_prototxt = 'deploy.prototxt' # Caffe模型结构文件
model_weights = 'bvlc_googlenet.caffemodel' # Caffe模型权重文件
image_path = 'xxxx\dog_2.jpg'
# 加载Caffe模型
net = cv2.dnn.readNetFromCaffe(model_prototxt, model_weights)
# 加载ImageNet类别标签
try:
with open('imagenet1000_clsidx_to_labels.txt', 'r', encoding='utf-8') as f:
classes = [line.strip() for line in f.readlines()]
except Exception as e:
exit()
#输入图像
image = cv2.imread(image_path)
if image isNone:
print(f"无法读取图片")
exit()
(h, w) = image.shape[:2]
# 图像预处理,构建 Blob
blob = cv2.dnn.blobFromImage(image, 1.0, (224, 224), (104, 117, 123), swapRB=True, crop=False)
#模型推理
net.setInput(blob)
# 输出1000个类别的概率
preds = net.forward()
#找出概率最高的类别
# 找到最大概率的索引
idx = np.argmax(preds[0])
# 最大概率的值
confidence = preds[0][idx]
# 对应的类别名称
label = classes[idx]
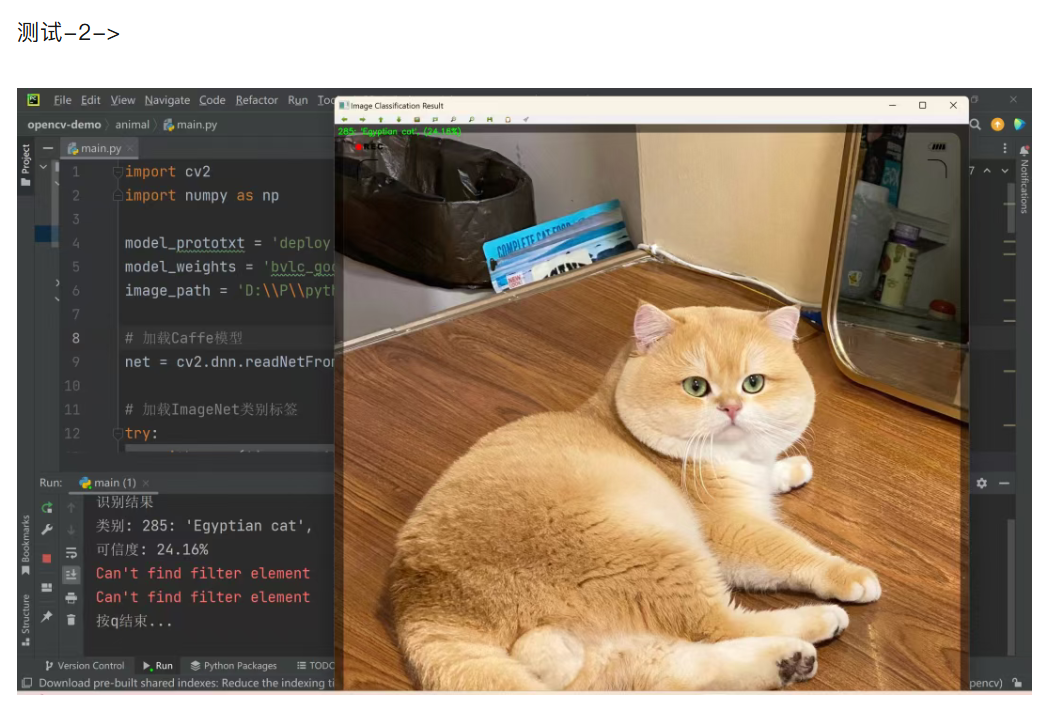
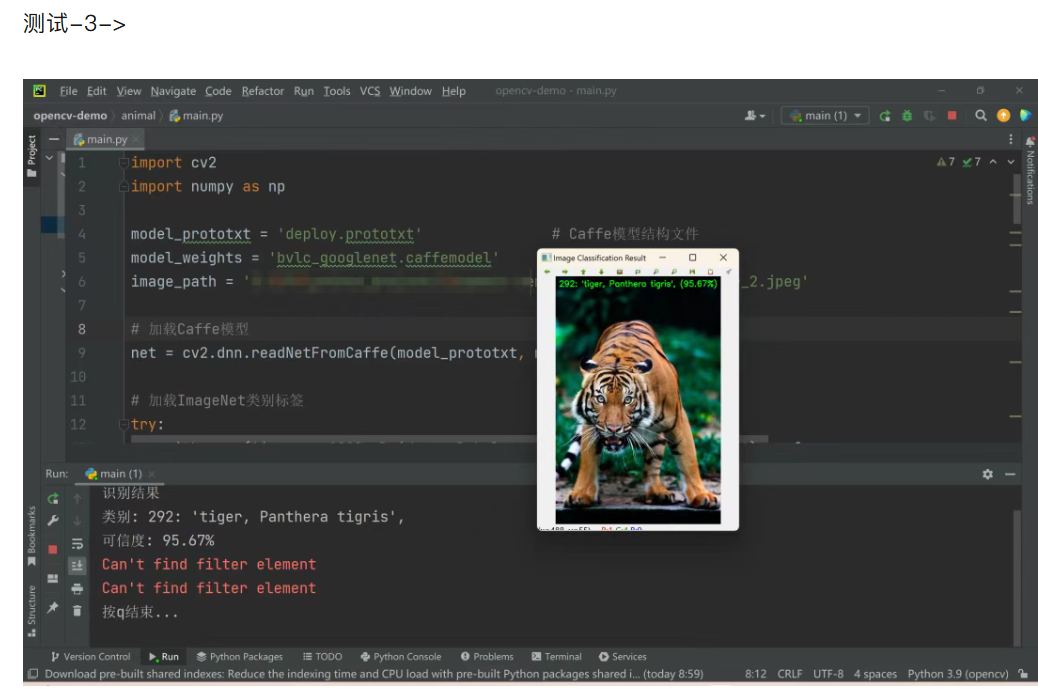
print(f"识别结果")
print(f"类别: {label}")
print(f"可信度: {confidence * 100:.2f}%")
#显示预测结果
text = f"{label} ({confidence * 100:.2f}%)"
cv2.putText(image, text, (10, 30), cv2.FONT_HERSHEY_SIMPLEX, 0.8, (0, 255, 0), 2)
# 显示图像
cv2.imshow("Image Classification Result", image)
print(f"按q结束...")
whileTrue:
key = cv2.waitKey(1) & 0xFF
if key == ord('q'):
break
cv2.destroyAllWindows()1、问题解析
Q:为啥只需要加载两个配置文件,而不需要运行Caffe模型就能直接使用?
A:这个不需要你额外部署完整的Caffe框架!OpenCV已经帮你把Caffe模型的加载能力内置好了,只要你有deploy.prototxt(模型结构)和bvlc_googlenet.caffemodel(模型权重)这两个文件,直接就能用cv2.dnn.readNetFromCaffe加载运行,不需要装Caffe环境。
三、 caffe 模型运行结果
四、 yolo-v3 模型及配置文件
YOLO(You Only Look Once)是一系列在计算机视觉领域,特别是目标检测任务中非常流行和高效的深度学习模型。它由 Joseph Redmon 等人于 2016 年首次提出,以其速度快、精度高、端到端训练的特点,成为实时目标检测的标杆。
看下主要用到什么配置文件:
- .cfg :模型结构配置文件
- .weights:预训练权重文件
- .coco 的类别标签文件
powershell
下载的路径如下:
https://github.com/AlexeyAB/darknet/releases/download/darknet_yolo_v3_optimal/yolov3.weights
https://raw.githubusercontent.com/pjreddie/darknet/master/cfg/yolov3.cfg
https://raw.githubusercontent.com/pjreddie/darknet/master/data/coco.names
五、yolo-v3 模型代码案例
python
import cv2
import numpy as np
#加载文件
CONFIG_PATH = 'yolov3.cfg'
WEIGHTS_PATH = 'yolov3.weights'
LABELS_PATH = 'coco.names'
# 加载类别名称
with open(LABELS_PATH, 'r') as f:
labels = f.read().strip().split('\n')
# 加载 YOLO 模型
net = cv2.dnn.readNetFromDarknet(CONFIG_PATH, WEIGHTS_PATH)
ln = net.getLayerNames()
try:
ln = [ln[i - 1] for i in net.getUnconnectedOutLayers().flatten()]
except:
ln = [ln[i[0] - 1] for i in net.getUnconnectedOutLayers()]
#2,读取输入图片
image_path = 'plane_1.jpg'
image = cv2.imread(image_path)
(H, W) = image.shape[:2]
#3,构建blob并前向传播检测
blob = cv2.dnn.blobFromImage(image, 1 / 255.0, (416, 416), swapRB=True, crop=False)
net.setInput(blob)
layer_outputs = net.forward(ln)
boxes = []
confidences = []
class_ids = []
conf_threshold = 0.5
nms_threshold = 0.3
class_stats = {}
print("开始检测...")
for output in layer_outputs:
for detection in output:
scores = detection[5:]
class_id = np.argmax(scores)
confidence = scores[class_id]
if confidence > conf_threshold:
# 计算边界框坐标
box = detection[0:4] * np.array([W, H, W, H])
(centerX, centerY, width, height) = box.astype("int")
x = int(centerX - (width / 2))
y = int(centerY - (height / 2))
boxes.append([x, y, int(width), int(height)])
confidences.append(float(confidence))
class_ids.append(class_id)
if class_id notin class_stats:
class_stats[class_id] = {
'label': labels[class_id],
'count': 0,
'conf_sum': 0.0,
'confidences': []
}
class_stats[class_id]['count'] += 1
class_stats[class_id]['conf_sum'] += confidence
class_stats[class_id]['confidences'].append(confidence)
print(f"检查汇总:")
for class_id, stats in class_stats.items():
avg_conf = stats['conf_sum'] / stats['count']
print(f"检测到:{stats['label']} | 总数:{stats['count']} | 平均置信度:{avg_conf:.2f}")
#5,应用NMS去重
idxs = cv2.dnn.NMSBoxes(boxes, confidences, conf_threshold, nms_threshold)
#6,在原图上绘制检测框和标签
if len(idxs) > 0:
for i in idxs.flatten():
(x, y) = (boxes[i][0], boxes[i][1])
(w, h) = (boxes[i][2], boxes[i][3])
label = f"{labels[class_ids[i]]}: {confidences[i]:.2f}"
color = (0, 255, 0)
cv2.rectangle(image, (x, y), (x + w, y + h), color, 3)
cv2.putText(image, label, (x, y - 5), cv2.FONT_HERSHEY_SIMPLEX, 3, color, 2)
else:
print("没有检测到物品")
# 保存结果图片
output_image_path = 'detected_' + image_path
cv2.imwrite(output_image_path, image)
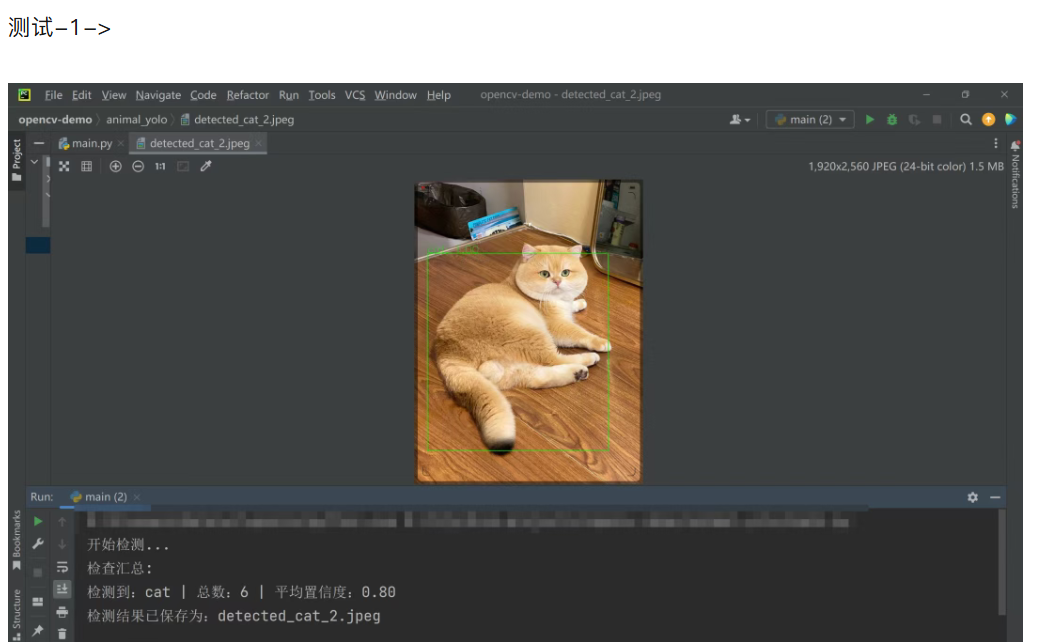
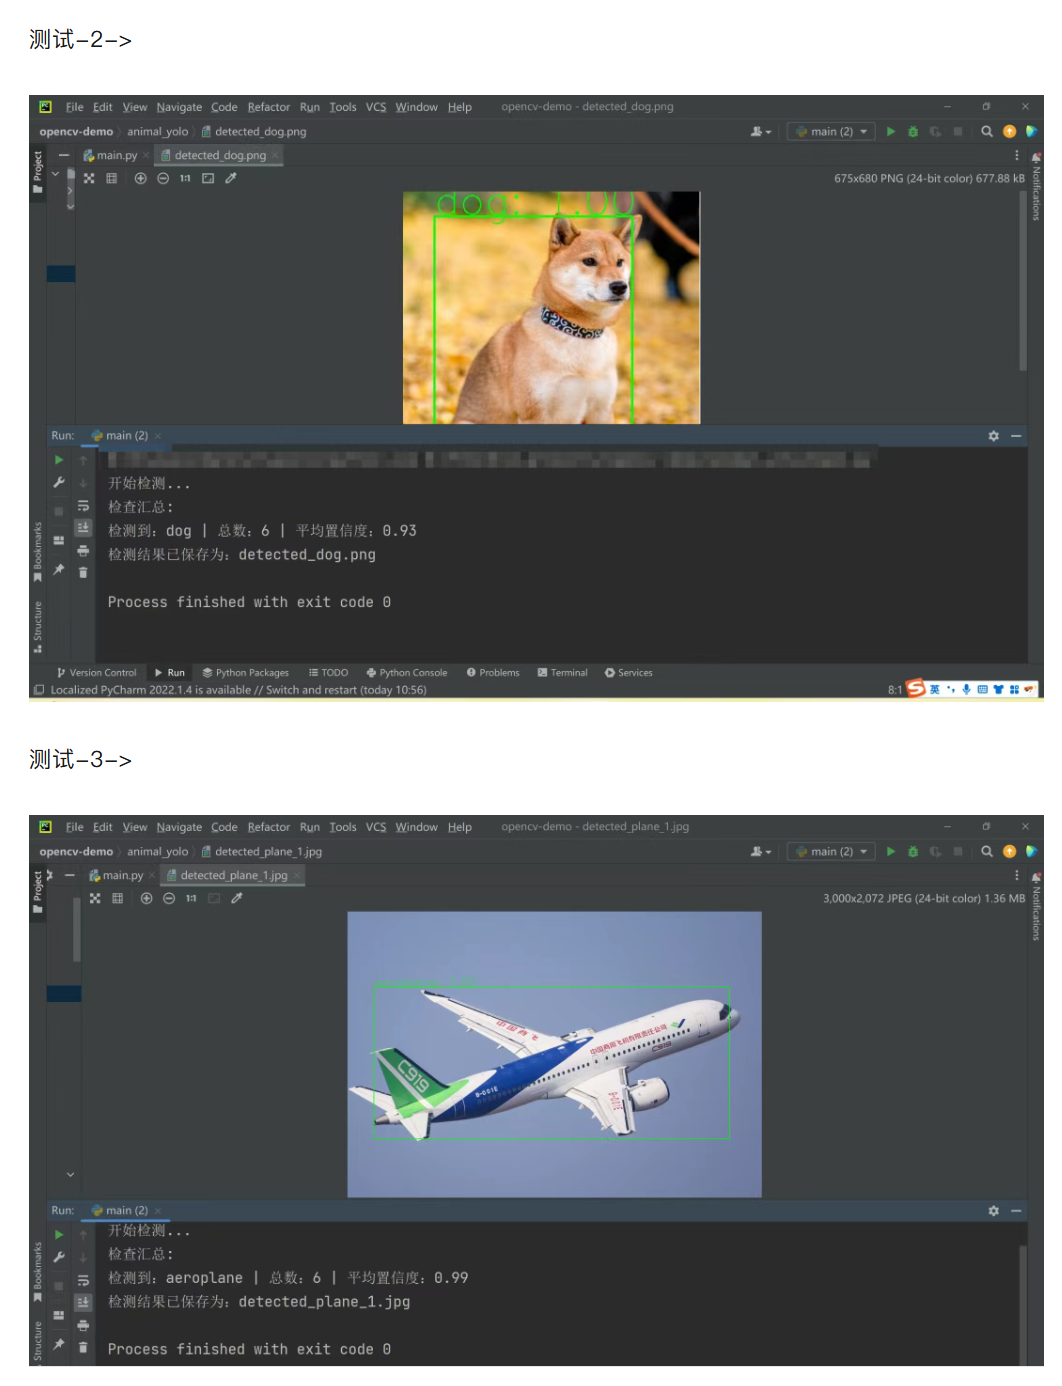
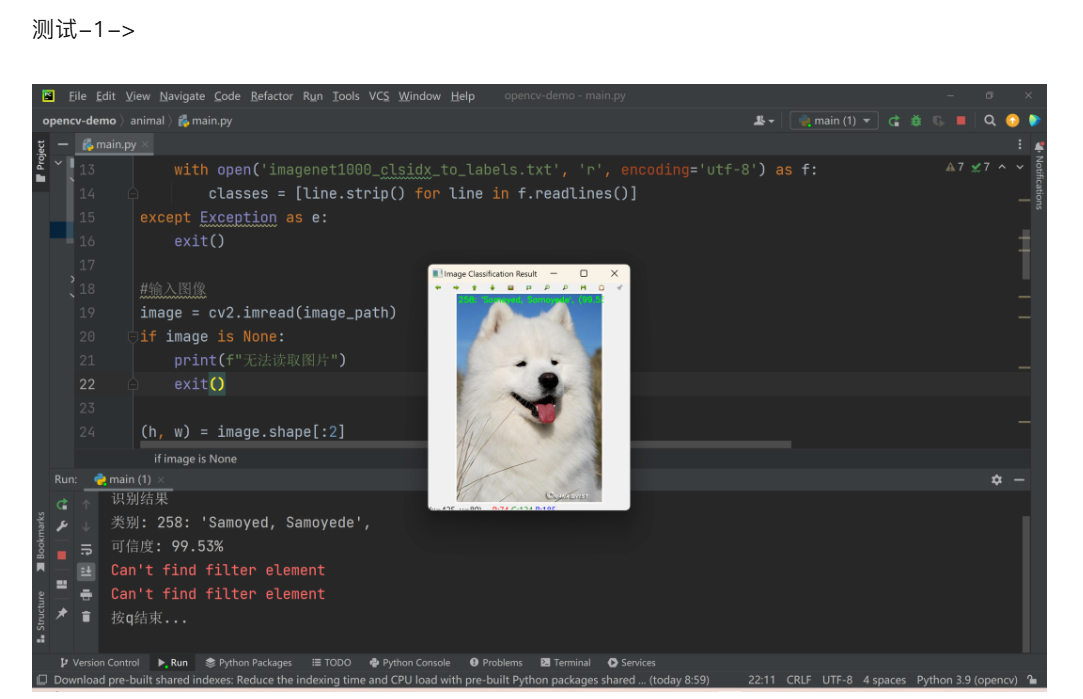
print(f"检测结果已保存为:{output_image_path}")六、 yolo-v3模型运行结果